


In this post, we will be going through the process of recovering and rebuilding an Exchange Server setup after a failed migration from Exchange Server 2010 to Exchange Server 2019. We will be using Stellar Repair for Exchange as the recovery tool.
The Scenario
A client had a setup on a physical server with Windows Server 2008 R2 and Exchange Server 2010 (Standard) with three mailbox databases. The client purchased a new server with Windows Server 2022, and Hyper-V with the Active Directory already moved onto a Windows Server 2022 virtual machine. The plan was to also move to Exchange Server 2019 and decommission the old server as the Exchange Server 2010 and Windows Server 2008 R2 are out of support and end of life. Though they had some legacy applications, they were not compatible with the new systems. However, after the re-development of some APIs, this was rectified.
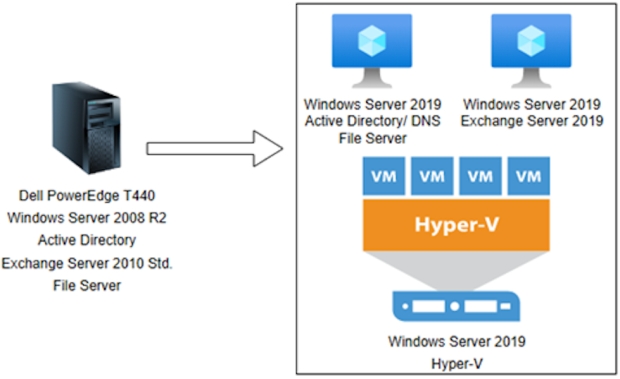
This is a big leap from an all-in-one box with one point of failure to splitting the services and virtualizing the system. This is ideal for the mobility and operability of the system. To do this, they cannot just install the Exchange Server 2019 as it cannot co-exist with Exchange Server 2010. They must first install the Exchange Server 2013 or 2016, move all the data to it, and decommission the Exchange Server 2010. After that, install the Exchange Server 2019, move all the data to it, and then decommission the Exchange Server 2013 or 2016. As they have around 1000 mailboxes, this isn't an easy task. It needs to be planned correctly.
The Issue
The client didn't have enough capacity to store about 500 GB of mailbox databases and a virtual machine with enough capacity and resources to have a temporary third virtual machine on the Hyper-V. The client purchased an additional hard drive and installed it on the server. They installed a Windows Server 2016 with Exchange Server 2016 with minimum specifications (below the recommendation).
The migration from Exchange Server 2010 was successful, and then the Exchange Server 2010 was decommissioned. The Exchange Server 2016 was already suffering, and the ISO was not the latest. There was a patch run until the migration to Exchange Server 2019, and without noticing, an Exchange Server Cumulative Update was pushed automatically.
This was a disaster as the installation crashed due to a lack of resources. Due to this, the server was turned off abruptly to try to add more resources. After this, some of the services were not turning on. After the intervention of a professional, these were fixed. But the databases were not mounting, and the users were unable to access their mailboxes.
When the ESEUtil /mh command was run against the databases, it showed the databases in the Dirty Shutdown state. Running a smooth recovery proved unsuccessful, as the databases were unable to mount. Restoring from backup would result in loss of data of a full day, which was not an option. So the only option left is to repair the EDB file & recover all mailboxes on New Exchange Server using Stellar Repair for Exchange.
How Stellar Repair for Exchange helped in this Situation?
Since the Exchange Server 2019 was already set up, the option was to uninstall Exchange Server 2016 and turn off the server. Then, attach the drive, where the databases are stored, to the Exchange Server 2019. On the Exchange Server 2019, new mailbox databases were installed to host the databases.
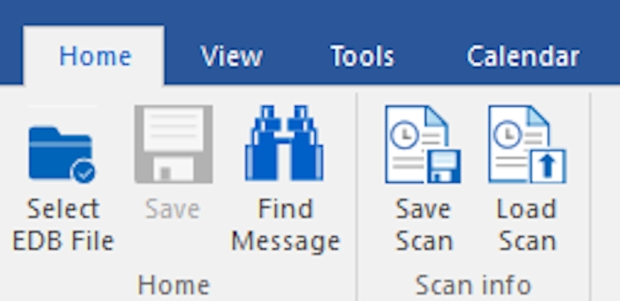
Stellar Repair for Exchange was successfully installed with minimal effort and configuration. The installation process took about 5 minutes.
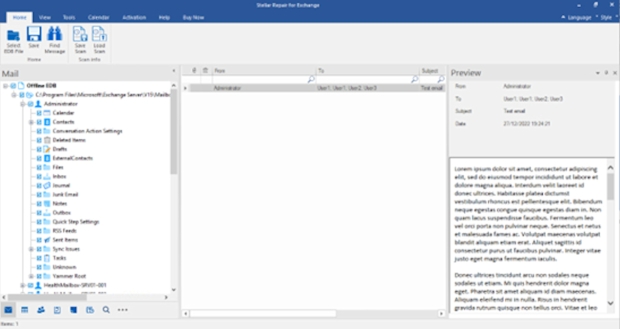
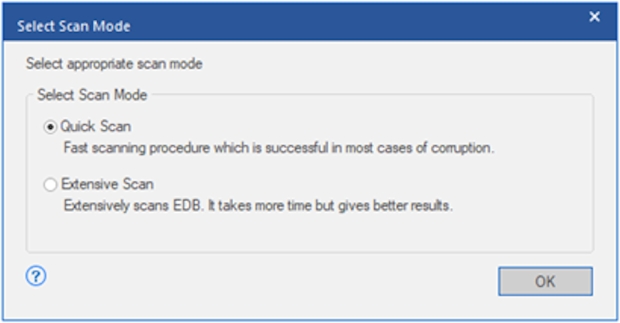
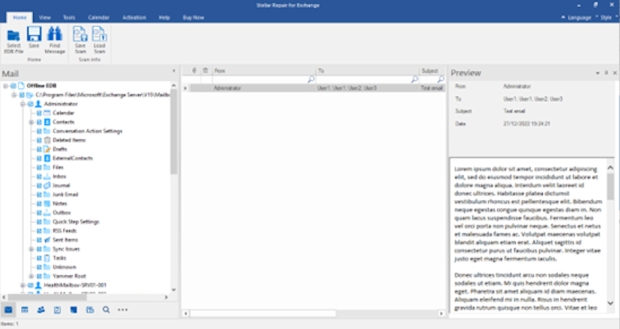
- After launching the software, we selected the main mailbox database (EDB) file, and a Quick Scan was performed on the database.
- The other two databases were opened. After scanning, the scan information was saved.
- All the data from the three databases was visible and accessible within the application's interface.
- Granularly, the mailboxes were selected, and the save button was clicked. The option to Export to Live Exchange was selected.

- The mailboxes were confirmed from the source to the destination with the automatic mailbox mapping.
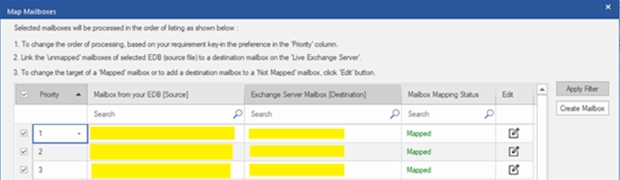
- After this, the mailboxes started showing in the new Exchange Server 2019 database.
At this point, the network team routed the incoming port 25 to the Exchange 2019, and the emails started coming in while the mailboxes were being populated.
Conclusion
As you can see, Stellar Repair for Exchange saved the day for us. It helped in Exchange Server recovery and migration of mailbox databases. This application can also be used to export recovered data from EDB file directly to Office 365. It can process user mailboxes, user archives, shared mailboxes, disabled mailboxes, and even public folders. It offers features like continuation in case of interruption and priority and parallel mailbox recovery.
 RAM crisis is getting worse, Valve engineer warns
 Xbox's return to exclusives was decided 'very early on' by CEO Asha Sharma
 Xbox console exclusives can include multiplayer games too
 Assassin's Creed Black Flag Resynced sells over 3 million copies, New Game+ is coming
 Modder plays GTA Vice City and GTA III on a TV inside GTA San Andreas
 Enthusiast puts 11 fans and an AiO on an RTX 3080, gains only 4 FPS
 Spotify removed 75 million AI-generated tracks in 2025 as it cracks down on royalty abuse
 YouTuber claims Sony is using social media bots to push back against backlash over its physical disc announcement
 Apple's first OLED iPad mini could launch as early as October
 Ryzen 7 7700X3D outperforms Ryzen 7 5800X3D with just one stick of DDR5, making AM4 a terrible option for your next build
 SteelSeries Arctis Nova 7 Wireless Gen 2 Headset Review - New and Improved, But Is It Enough?
 AMD Ryzen 7 7700X3D Review - Days of Future Past
 Samsung 990 2TB SSD Review - Ninth Gen QLC at PCIe Gen4 Speeds
 ASUS ExpertBook Ultra (Panther Lake) 14" Business Laptop Review
 ASUS ROG Raikiri II Xbox Wireless Controller Review - Ready to Take Control
 MOZA FMP18 Panel Bundle Review: authentic F/A-18 Hornet cockpit controls for flight sims
 Micron 6600 ION 245.76TB Enterprise SSD Review - Best in Class Programming Speeds
 MOZA MA3F EFCM Flight Control Module Review: authentic Airbus A320 autopilot panel for simulators
 Turtle Beach Stealth Pro II Wireless Gaming Headset Review - Premium Sound, Fantastic Features
 MOZA MGX1000 Instrument Panel Review: a realistic Garmin G1000 replica for immersive flight sims
 I use this decade-old free tool that finds files faster than Windows Search does
 I install and update most of my apps with this Windows command now, and I stopped downloading sketchy installers
 Hisense U6SF 65-inch MiniLED TV: High Performance Meets Leisurely Convenience
 I stopped digging through Windows menus after I set up this one folder
 Don't sell your Windows laptop until you do these things
 6 PC cleaning mistakes to avoid for safer hardware maintenance
 Phison and Intel Take Aim at Local AI's Memory Wall with aiDAPTIV
 How to Remap Keyboard Keys in Windows using Microsoft PowerToys
 7 tips to organize your Windows files for faster, easier access
 Intel Arc G3 Extreme first impressions with MSI's Claw 8 EX AI+ - Incredible power for an extreme price