













Did you try recording content or joining a video meeting, only to find that your camera isn't working? In many cases, the problem is caused by a simple permission issue, a disabled camera, or outdated drivers - but sometimes it can be something more serious. If your camera or webcam isn't working properly, here's how you can get it working again.
Ensure the Camera Isn't Physically Disabled or Blocked

Before jumping into serious troubleshooting, first make sure the webcam isn't physically blocked, turned off, or disabled. Check if your laptop has a built-in privacy shutter. Even if the camera is technically on, a small sliding cover might be blocking the lens, resulting in a black screen - so ensure it's fully open.
Some laptops also include a dedicated camera toggle key, usually marked with a camera icon. Press it once to confirm the camera isn't disabled. If you're using an external webcam, make sure it's securely connected to a working USB port. Once you've confirmed the camera isn't unplugged, physically blocked, or switched off, proceed to the next step.
Review Camera Access Permissions
Even if your webcam isn't physically turned off, certain apps may still be unable to access it if camera permissions are disabled in the system settings. It's important to rule out this possibility. To check camera permissions, right-click the Start button and open "Settings." Then go to Privacy & Security > Camera and ensure the toggle next to "Camera Access" is turned on.
If that's enabled, also ensure that apps can use your camera. The toggle next to "Let Apps Access Your Camera" should be switched on. After that, expand the list and confirm that the specific app you're trying to use has permission enabled-the toggle next to that app must be turned on.
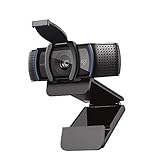
Best Deals: Logitech C920S Webcam
Price Trend:
Prices last scanned 9 hours and 4 minutes ago

7 days ago: $54.74 USD30 days ago: $58.83 USD
7 days ago: $112.02 CAD30 days ago: $103.54 CAD


Ensure the Right Camera Device Is Selected
Do you have multiple cameras connected to your computer, like a built-in one and an external one? If so, Windows - or the app where the camera isn't working - might be using the wrong device. This can result in a black screen or an error message. Open the app you're trying to use, go to its settings, and manually choose the correct camera.
You can also manage your cameras through Windows Settings. Right-click the Start button and open "Settings," then navigate to Bluetooth & Devices > Cameras. Make sure your preferred camera is enabled there. After that, confirm the same camera is selected within the app you're using. You can also disable other cameras to prevent conflicts.
Our Latest TweakTown Guides
- Don't sell your Windows laptop until you do these things
- 6 PC cleaning mistakes to avoid for safer hardware maintenance
- How to Remap Keyboard Keys in Windows using Microsoft PowerToys
- 7 tips to organize your Windows files for faster, easier access
- How to fix Wi-Fi Adapter Not Working on Windows laptops: troubleshooting tips

Ensure Your Camera Isn't Being Used By Another App
In Windows, only one application can actively use a camera at a time. If another program is already accessing the camera in the background, your current app, set to use the same camera, might show a black screen or display an error. To check if this is happening, look for the camera activity indicator light or a small camera icon in the taskbar near the system tray.
You can hover over this icon to see which app is using the camera. Simply close that application. If you can't identify any app using the camera but your other app still reports it's in use, your device might be compromised. In that case, expand the "Recent Activity" menu to see if any suspicious apps have accessed the camera, and remove them.

Update or Reinstall the Camera Drivers
If none of the previous fixes work, the issue could be caused by outdated, corrupted, or missing webcam drivers. To fix this, update your camera driver. Right-click the Start button and open "Device Manager." Expand "Cameras" (or "Imaging Devices"), double-click on your webcam driver, go to the "Driver" tab, and select "Update Driver."

Next, choose "Search Automatically for Drivers" and follow the on-screen instructions. If updating the drivers doesn't resolve the problem, try reinstalling the driver. Right-click the webcam driver and select "Uninstall Device," then restart your computer - Windows will automatically reinstall the driver.
For external webcams, download and install the latest drivers directly from the manufacturer's website.
Check Camera Settings in BIOS/UEFI
Some laptops - particularly Microsoft Surface models - allow you to disable the webcam at the hardware level through the BIOS/UEFI. When this is done, Windows won't detect the camera, and no software fix will work until it's re-enabled. To check this, restart your computer and press the appropriate key (which varies by manufacturer) to enter the BIOS/UEFI.
Once inside, look for options under Devices, Integrated Webcam, or a similar menu. Here, you can enable or disable the camera. On Windows tablets, you may see separate options for the front and rear cameras. After making the changes, save and exit BIOS/UEFI, then test the camera in your app-if it was previously disabled, it should now work properly.

If any of the issues mentioned above were affecting your webcam, these solutions should get it working again. However, if it still doesn't work, the problem may be hardware-related. To check, connect an external webcam to another device to see if it works, ensuring the webcam itself isn't faulty.
For built-in cameras, try using an external webcam on the same device to determine if the issue lies with your device's hardware.


 Don't sell your Windows laptop until you do these things
 6 PC cleaning mistakes to avoid for safer hardware maintenance
 How to Remap Keyboard Keys in Windows using Microsoft PowerToys
 7 tips to organize your Windows files for faster, easier access
 How to fix Wi-Fi Adapter Not Working on Windows laptops: troubleshooting tips
 id founder John Carmack comments on sad fate of studio
 Report: Minecraft profits used to fund Xbox games portfolio
 Assassin's Creed Black Flag Resynced has $80 worth of cosmetics and time-saving DLC
 Need For Speed seemingly on ice as Criterion becomes a Battlefield studio
 51 Ubisoft employees who worked on the successful Assassin's Creed Black Flag Resynced have just been laid off
 AMD expands Ryzen 200 and 100 'Hawk Point' APU lineup with 11 new SKUs
 Open-Source Windows alternative ReactOS runs Half-Life 2 on a GTX 960
 NVIDIA and Sega to celebrate 30 years of partnership at a 'Guerrilla event' in Japan
 Mysterious AMD Ryzen 7 4700LE 'Zen 2' desktop CPU appears in a new prebuilt PC paired with an RTX 3050
 Apple bucks the PC market downtrend with 10.1% growth amid global supply constraints
 MOZA MA3F EFCM Flight Control Module Review: authentic Airbus A320 autopilot panel for simulators
 Turtle Beach Stealth Pro II Wireless Gaming Headset Review - Premium Sound, Fantastic Features
 MOZA MGX1000 Instrument Panel Review: a realistic Garmin G1000 replica for immersive flight sims
 Simagic Zeus Formula Steering Wheel Review: premium build and advanced inputs for F1 racing
 GIGABYTE X870E Aero X3D Dark Wood Review - A woody goody
 The Super Mario Galaxy Movie (2026) 4K Ultra HD Blu-ray Review
 KTC H49S66 5K2K (5120x1440) 49-inch 180Hz Gaming Monitor Review
 HighPoint Rocket 1604L Gen5 x16 NVMe Software RAID AIC Review: half the price with full 59 GB/s speed
 Next Level Racing ERS3 Haptic Seat Review: immersive sim racing comfort with integrated haptics
 ASUS TUF Gaming X870-Pro WiFi7 W NEO Review - Tuffed up
 Phison and Intel Take Aim at Local AI's Memory Wall with aiDAPTIV
 Intel Arc G3 Extreme first impressions with MSI's Claw 8 EX AI+ - Incredible power for an extreme price
 Hisense U7SG 4K TV: Modern Entertainment for the New Age
 6 underrated Microsoft Word features worth using to boost your productivity
 Level Up Your PC Gaming with these Fantastic ASUS Prime Day Deals on GPUs, Motherboards, and More