Introduction and Packaging
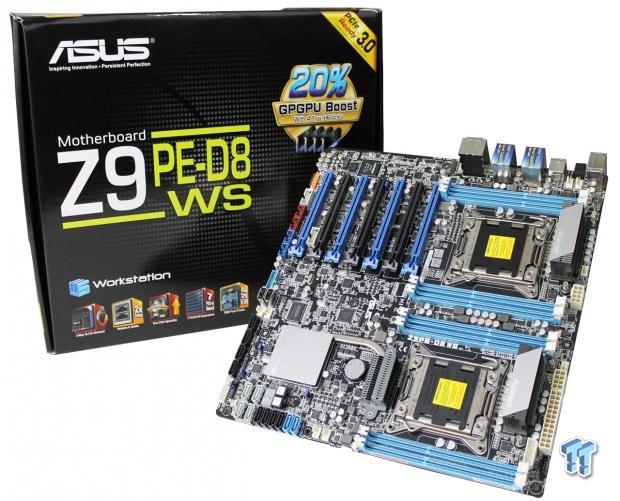
Workstations come in all sizes and form factors, from mid-range single-socket systems to powerful dual-socket systems. For a high-end workstation, a user looks at dual-socket 2011 systems to crunch though massive datasets used in video encoding, AutoCAD, SolidWorks, or other types of applications that need heavy duty power.
The Z9PE-D8 WS workstation motherboard has been out for a while now, and it is the go-to motherboard for many when building high-end workstations or even servers.
This motherboard has a huge set of features, so let us look at what this motherboard has to offer.
- Enhanced parallel GPU computing power with seven PCIe-x16 3.0 slots.
- The motherboard is able to use many different types of memory.
- The Z9PE-D8 WS provides Server-level compatibility with RAID and LAN cards.
- One click SSD Caching boosts system performance.
- Extra SATA 6 Gb/s ports.
- DTS Connect to improve your PC audio experience.
- The Z9PE-D8 WS also supports 4-way SLI and Quad-GPU CrossFireX.
- Support for Intel Xeon Phi 3100 Coprocessor series (active fan SKU only) and NVIDIA Tesla K20C GPU accelerators.
Let us look at what you get in the retail package.
Packaging
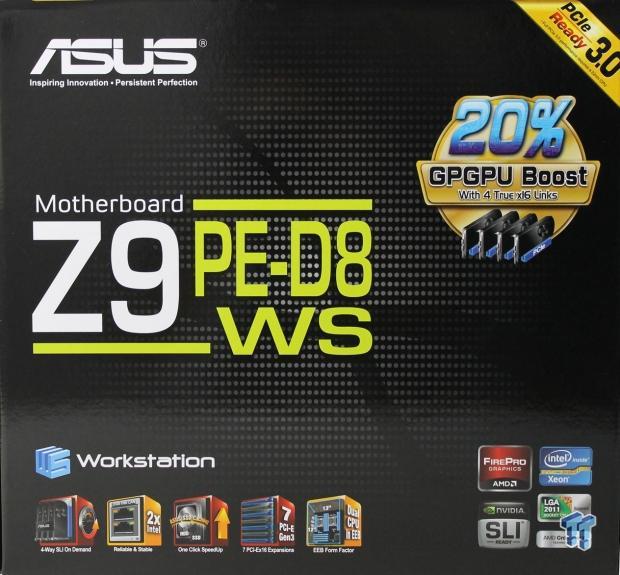
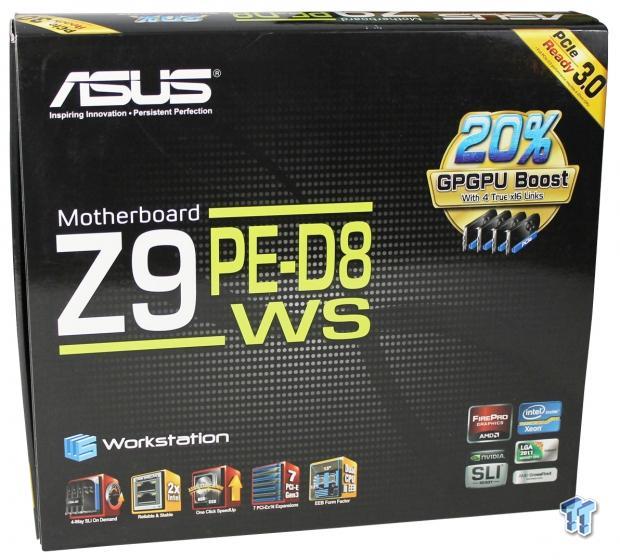
Looking at the front of the retail box, it shows many of the features that this motherboard has to offer. The retail box actually has an outer sleeve that fits over the whole box that opens up to show the feature list.
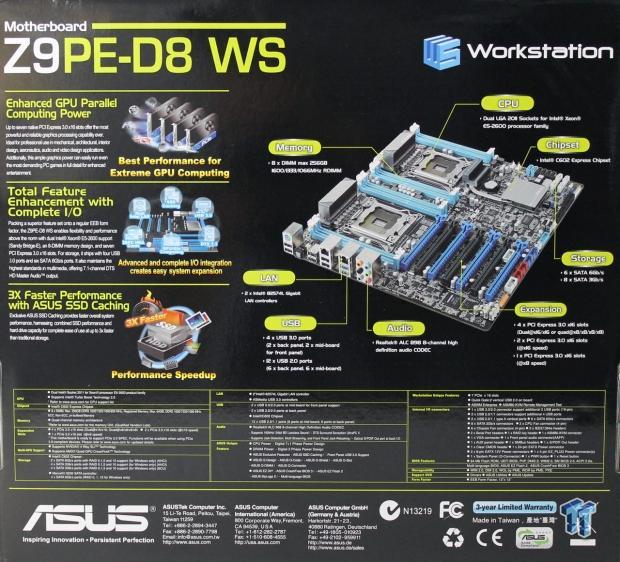
Looking at the back of the retail box, we again see a breakdown of additional features of the motherboard.
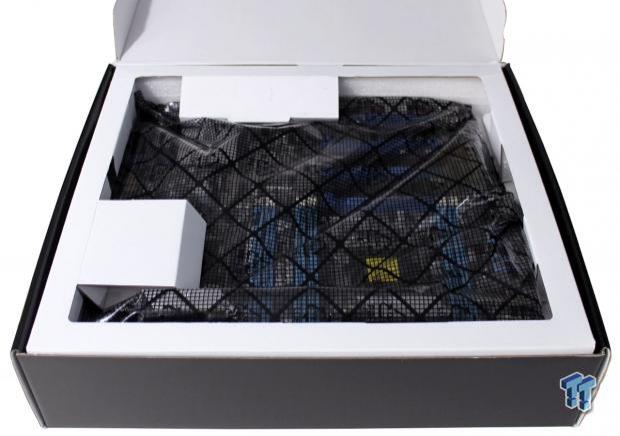
Taking the other sleeve off and opening up the retail box, we can see the motherboard packed in its anti-static bag.
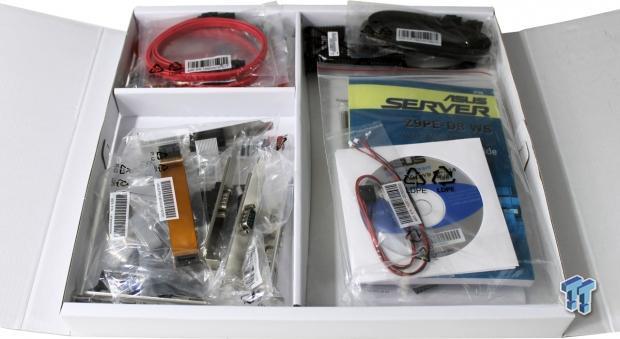
After we remove the motherboard, we find two accessory boxes in the bottom of the retail box. You can see by the list this motherboard comes with just about anything you might ever need.
The total list of accessories is:
- Two Driver DVDs
- User's manual
- ASUS Q-Shield
- Two COM port cables
- Eight SATA 3Gb/s cables
- Six SATA 6Gb/s cables
- One 3-Way SLI bridge
- One 4-Way SLI bridge
- One SLI bridge
- One 2-port USB 2.0 + 1394 bracket
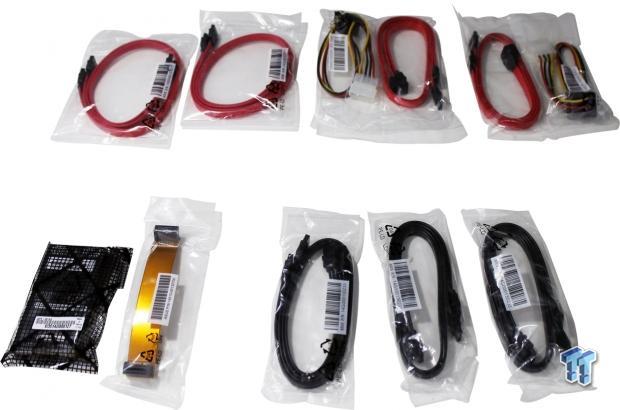
In one of the boxes, we find a mix of SATA cables and SLI bridges.
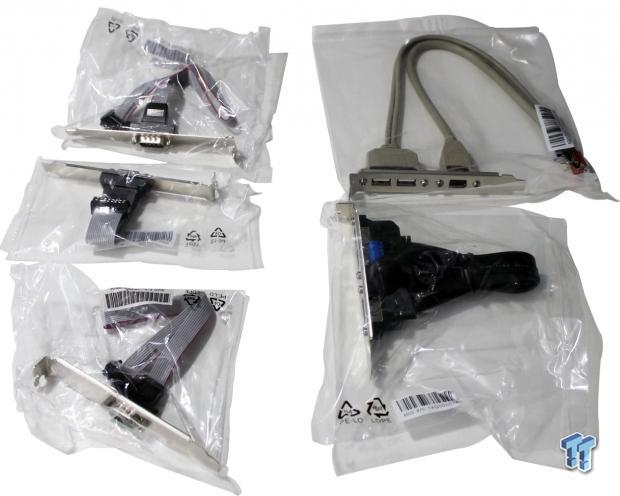
Accessories include plenty of extra ports that connect to headers on the motherboard.
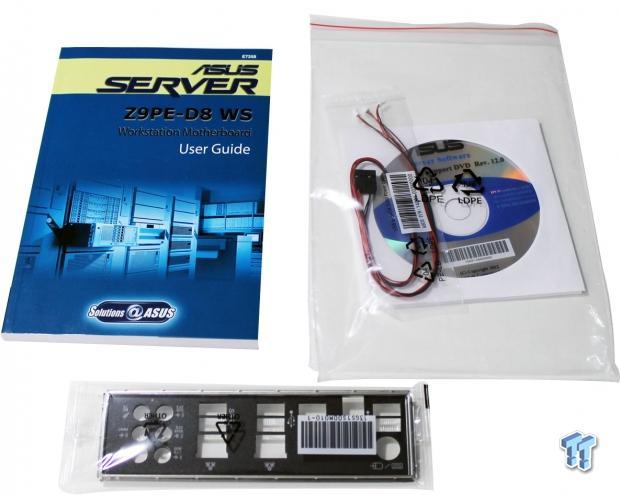
Here we see the user manual, driver disks, and I/O plate.
Yes, we prefer printed user manuals over a PDF.
Specifications and Layout
Specifications
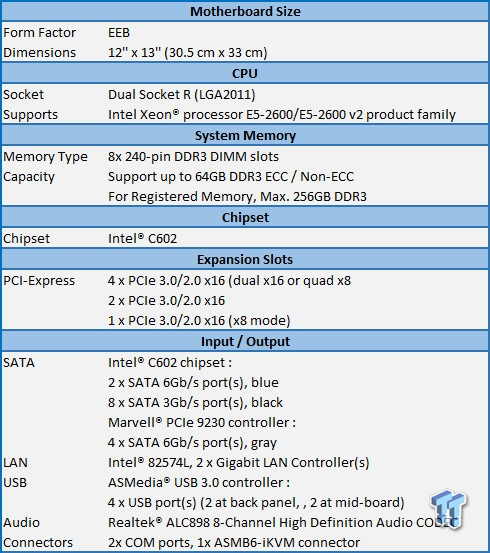
What stands out in the specification list is the number of PCIe slots and Input/Output options. You can install up to four GPUs and connect a large number of storage devices. If you need remote access, you can add an ASMB6 iKVM connector, which is very nice.
Layout
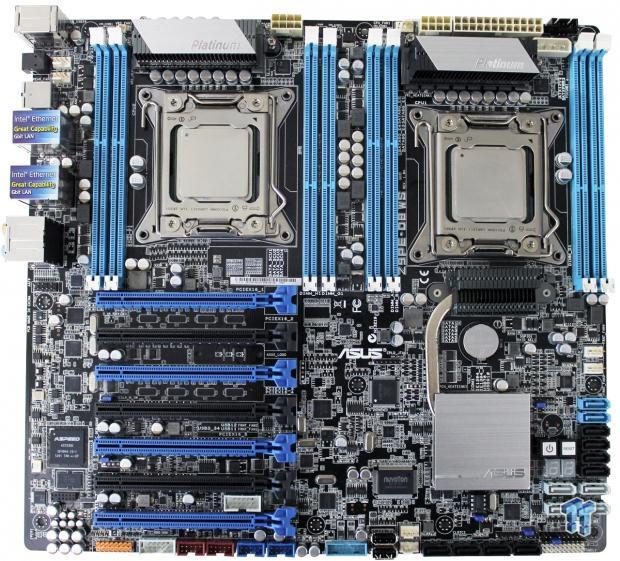
Over all, the layout of the Z9PE-D8 WS is straightforward. What we are not crazy about is how the RAM slots are located. Using large heat sinks here might cause issues with keeping the RAM sticks cool; there is a possibility they will not get good airflow to keep them cool.
With the Noctua heat sinks we used, we would not have clearance for tall RAM sticks, so we suggest using low profile RAM to help with airflow.
The CPU sockets are staggered just a little, but not enough for higher air flow rates. Keep these factors in mind when considering a case and coolers to use on this motherboard.
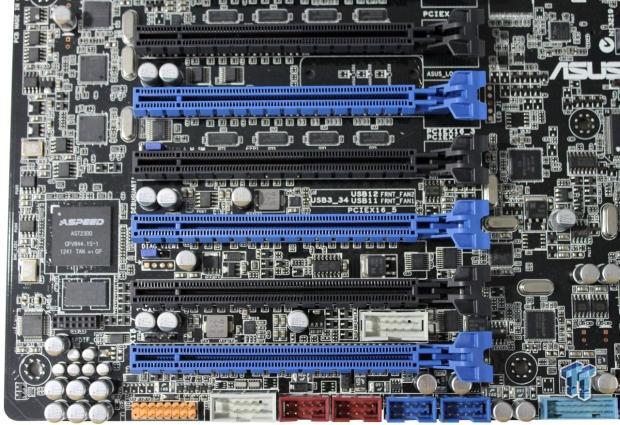
This is the left side of the motherboard. Right above the mounting hole, we find the ASMB6-iKVM header if you wish to install this extra option.
The orange header is the VGA Header. You can use the included VGA Bracket and output video through this.
The white header is COM port 1. In between the blue and black PCIe slots is the second white COM port 2. The two red headers are IE-1394 one and two ports. The two blue headers are for USB 2.0. The light blue header is for USB 3.0.
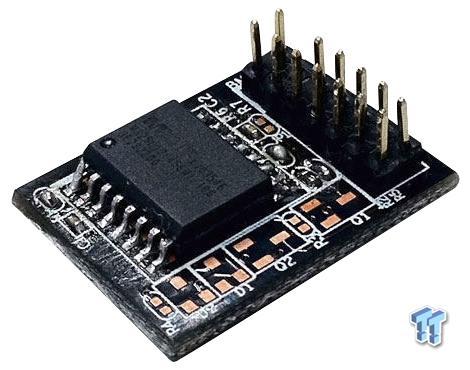
If you need iKVM, you can order the ASMB6-iKVM module. It is not included in the retail package.
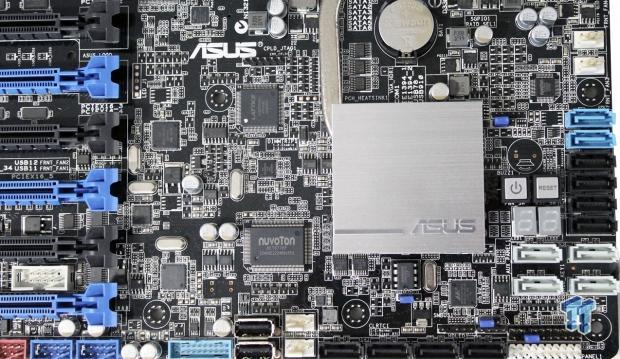
Starting from where we left off, the next two connectors are two USB 2.0.
The two white connectors are for front fan headers. The next four black connectors are SATA 3.0. The white header is the front panel connector. The black header just above the white header is the auxiliary panel connector.
Next, we see four white SATA 6.0 Gb/s connectors controlled by the Marvell controller. Above that are four black SATA 3.0 Gb/s connectors. The top two blue connectors are SATA 6.0 Gb/s.
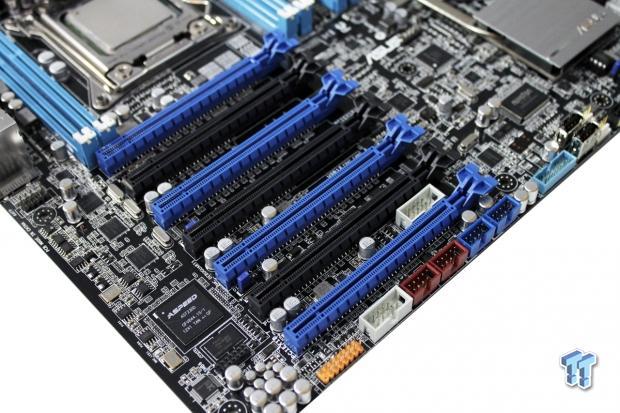
Seven PCIe slots are on the board, which break down like this.
- PCIe 1 (blue) x16 (Gen3 x16/x8 link)
- PCIe 2 (black) x16 (Gen3 x8 link)
- PCIe 3 (blue) x16 (Gen3 x16/x8 link)
- PCIe 4 (black) x16 (Gen3 x8 link)
- PCIe 5 (blue) x16 (Gen3 x16 link)
- PCIe 6 (black) x16 (Gen3 x8 link)
- PCIe 7 (blue) x16 (Gen3 x16 link)
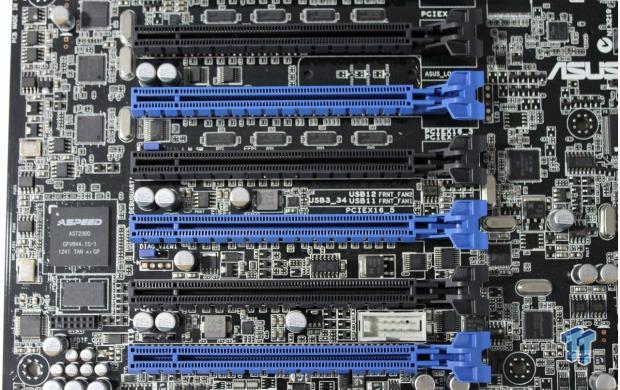
We really like it when Power/Reset buttons and Q-Code LED display features are included on motherboards.
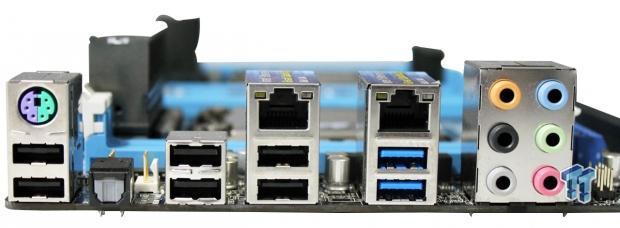
The back I/O section starts with a PS/2 and 2 USB 2.0 connectors. Next is an optical S/PDIF Out port followed by 2x USB 2.0 ports. The next stack has a Gigabit LAN port with two USB 2.0 ports below. Next is a Gigabit LAN port with two USB 3.0 ports below. The last stack is the audio outputs.
BIOS
The BIOS for this motherboard is typical for these motherboards, so we will only show key BIOS screens.
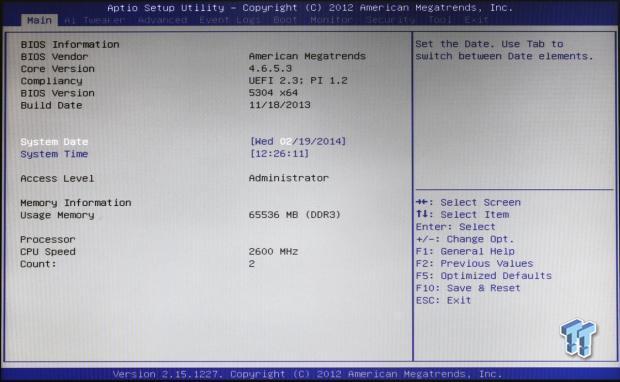
This is the main BIOS screen you see when you first enter the BIOS.
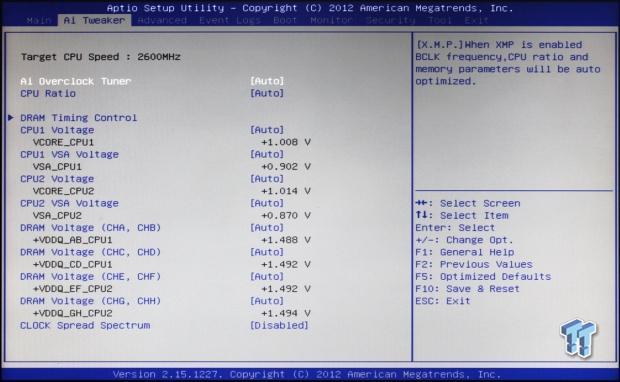
Here we see the AI Tweaker tab. Now, this has some very interesting settings compared to other dual-CPU systems we usually use here in the lab.
If you set the AI Overclock Tuner function to Manual, you can then change the BCLK Frequency, and the same is true for the CPU Ratio function, which can be set to manual allowing you to change the CPU Multiplier. However, with Xeon CPUs, you will not be able to change the CPU Multiplier.
This leaves only the BCLK Frequency that the Z9PE-D8 WS allows you to change. We will have more on this later.
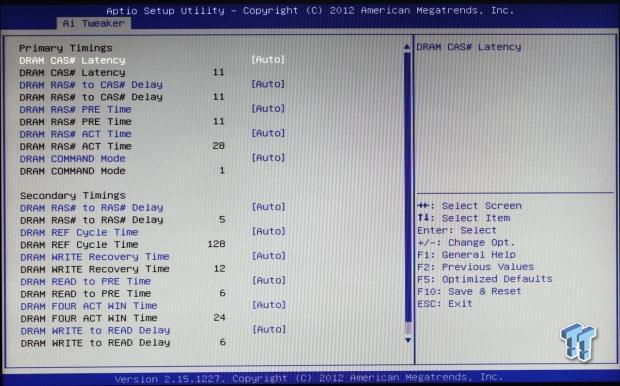
Under the AI Tweaker menu, we can see the memory timing settings.
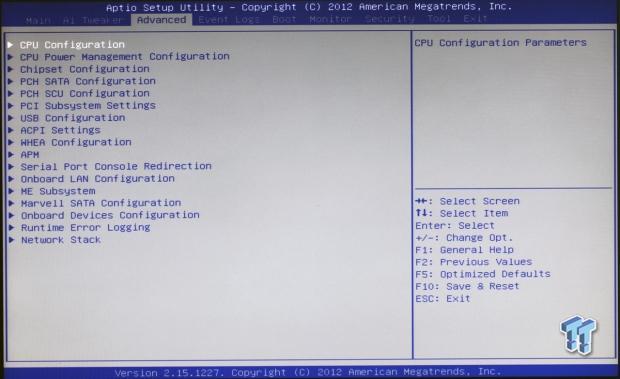
Next is the advanced menu.
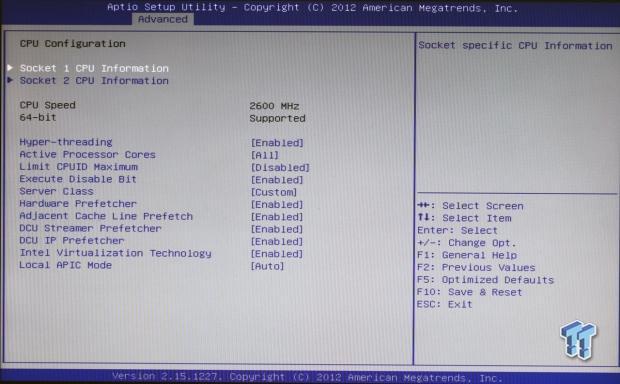
Here we see adjustments that are in the CPU configuration.
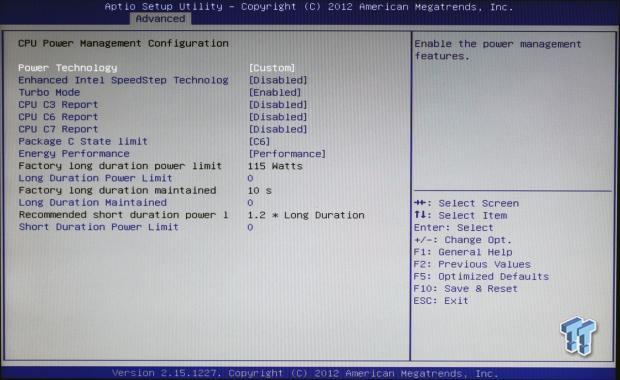
The controls that you can change under the CPU power menu.
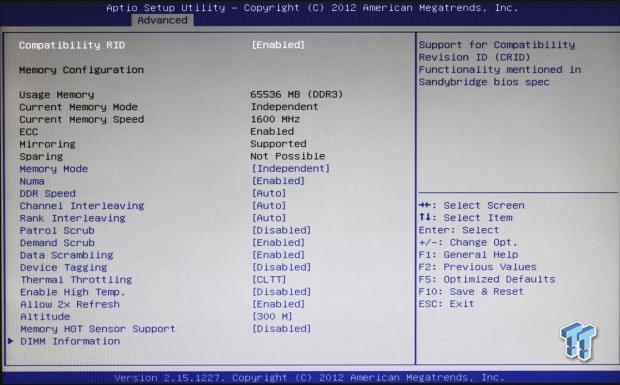
Here we see additional memory settings that you can adjust.
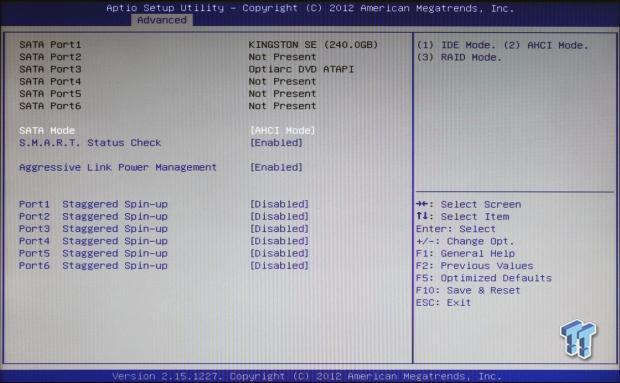
Here are all the SATA port settings.
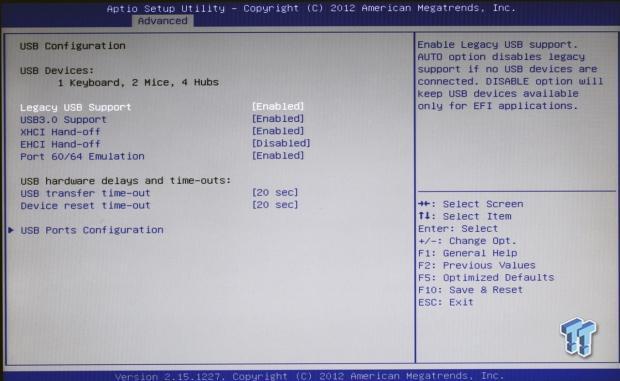
This is the main USB port setting menu.
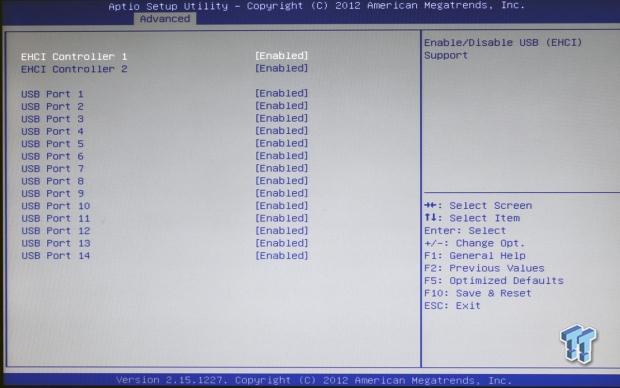
Here you can disable USB ports and the controllers.
Software
The ASUS Z9PE-D8 WS comes with two driver disks: one is the standard driver disk and the second is the enterprise driver disk.
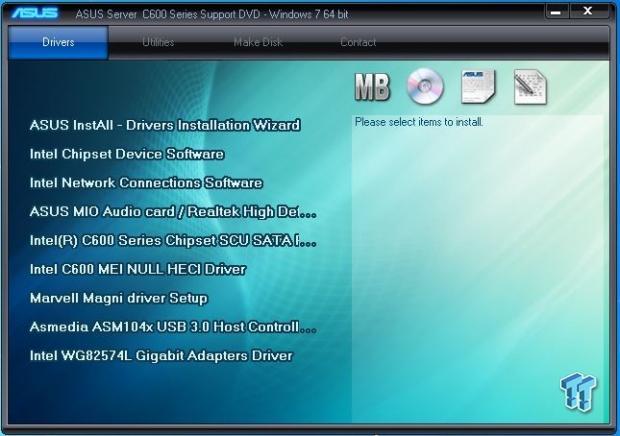
The first disk labeled C60X Series Support DVD Rev. 12.0 includes all of the drivers you will need for a workstation setup.
For a fresh install, the only option you really need to do is click the first one. It installs all of the drivers for the system. You can also click each one of the separate drivers listed below.
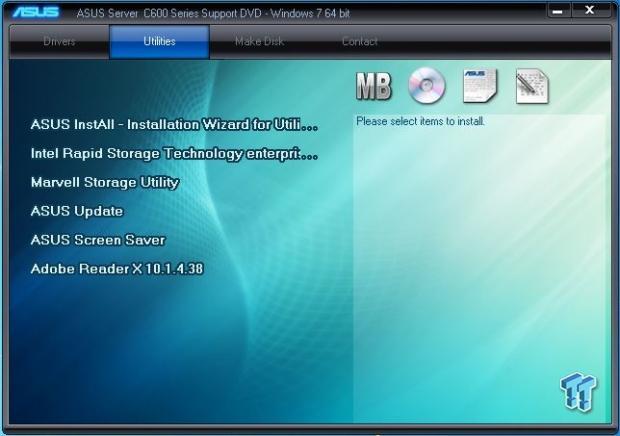
Here are the utilities listed for this disk.
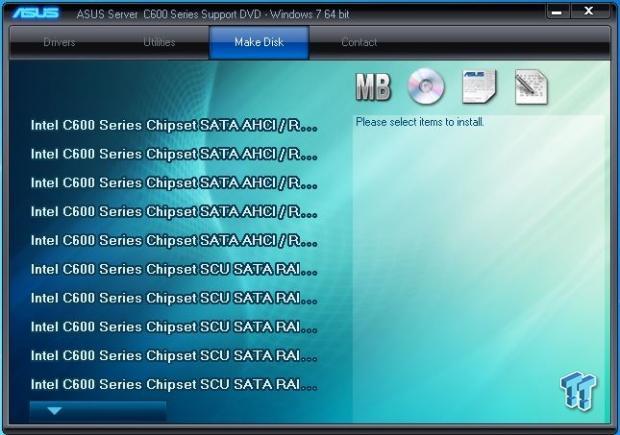
The make disk menu will create an Intel RAID Storage disk for you.
The last menu item is contact information.
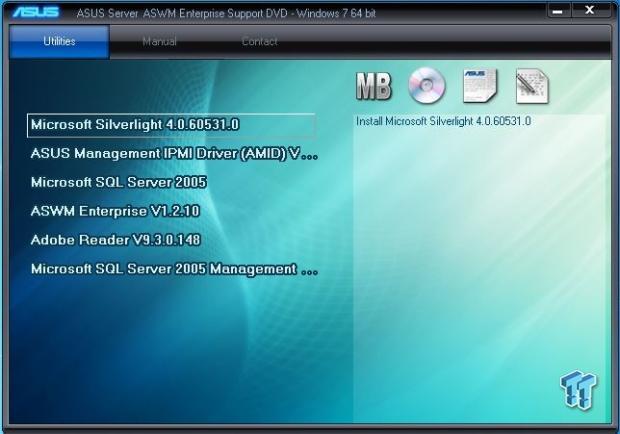
The second disk labeled S476 ASWM Enterprise SDVD Rev V9.0 has drivers for enterprise setups.
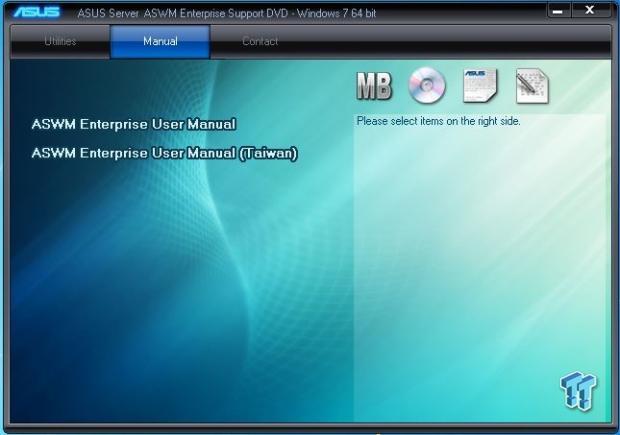
Under manuals, we find the ASWM Enterprise user manual.
The contact menu has the same information that is on the first disk.
Test System Setup
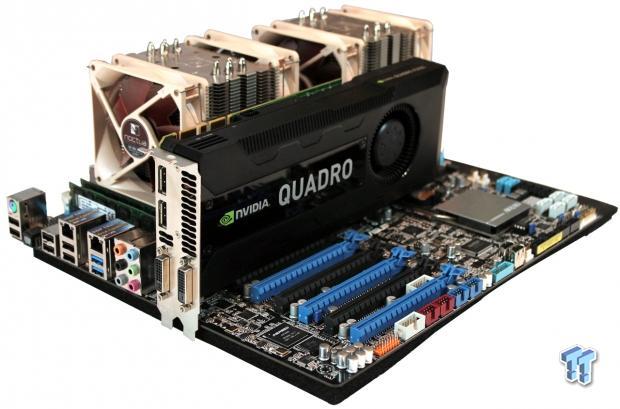
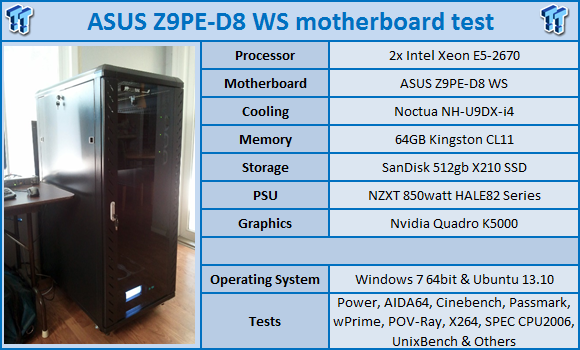
Special thanks to ASUS, NVIDIA, NZXT, SanDisk, Kingston, and Noctua for their support!
The test setup is typical for a workstation setup. The CPUs used in these tests are a pair of Intel Xeon E5-2670 CPUs. The memory installed is 64GB of Kingston CL11 RAM.
We also used an NVIDIA Quadro K5000 for our graphics tests. This motherboard can handle four GPUs, but we only have one here, so that will have to do.
For all tests that we ran, we used optimized BIOS settings for max performance.
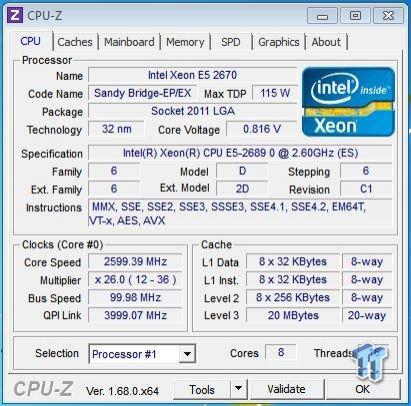
This is the CPUz screen showing the various stats of the Xeon E5-2670 CPUs. As you can see, this CPU has a max TDP of 115 watts and core voltage of 0.816V, which means this CPU runs nice and cool under low voltage.
System and CPU Benchmarks
PassMark8
PassMark performance test runs 32 tests, including CPU, 2D and 3D graphics, disk, and memory tests, to come up with an overall system ranking that allows you to determine how fast your computer is in comparison with other systems.
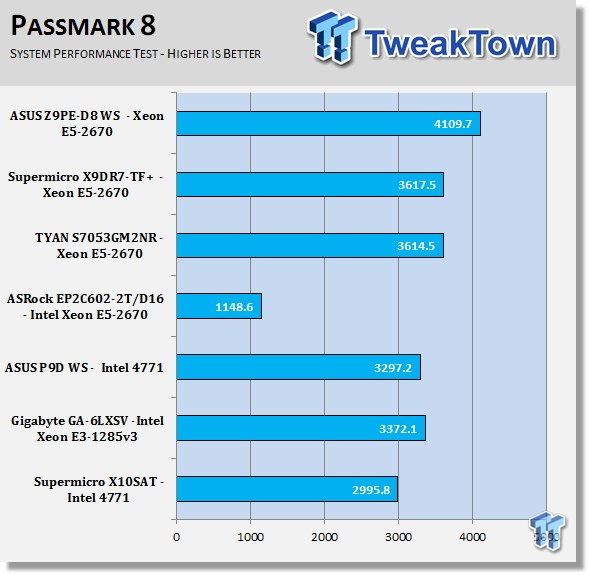
In the PassMark tests, we find that higher stock speeds and better graphics score better. The ASUS Z9PE-D8 WS scored very well in this test; in fact, it holds our new number one spot.
Cinebench 11.5
Cinebench is a real-world cross platform test suite that evaluates your computer's performance capabilities. The test scenario uses all of your system's processing power to render a photorealistic 3D scene. This scene makes use of various different algorithms to stress all available processor cores. You can also run this test with a single-core mode to give a single-core rating.
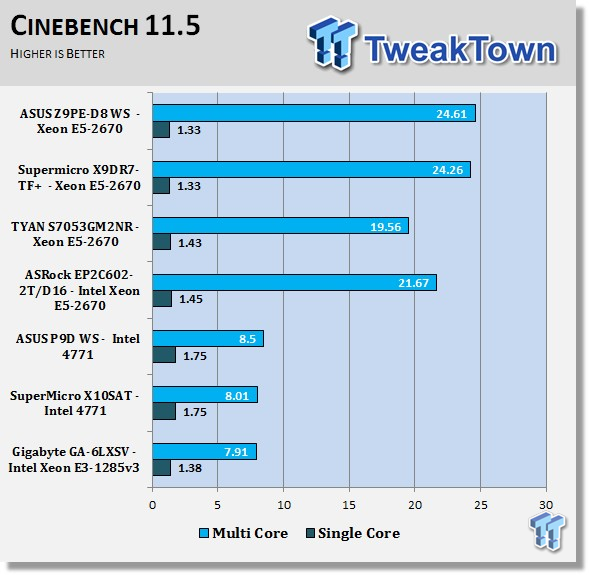
Again, we find the lower stock speed of the E5-2670s hold this board back in these benchmarks, but it really takes off in the multi-threaded scores as we can see here. Having 32 threads is a real advantage here.
The ASUS Z9PE-D8 WS claimed the number one spot in this test also but only by a small amount.
Cinebench R15
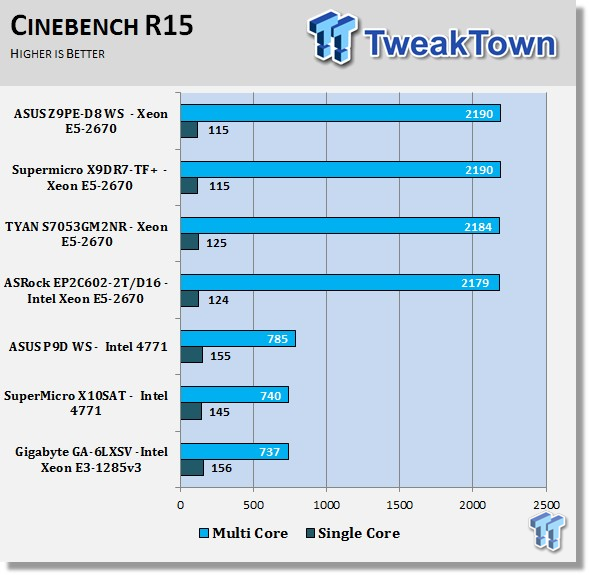
Just like in the Cinebench 11.5 results, we see a lower single-threaded score and a much higher multi-threaded score.
In this test, we have a tie for first place. This is a strong showing for the ASUS Z9PE-D8 WS in that it is equal to powerful server boards.
wPrime
wPrime is a leading multithreaded benchmark for x86 processors that tests your processor performance. This is a great test to use to rate the system speed; it also works as a stress test to see how well the system cooling is performing.
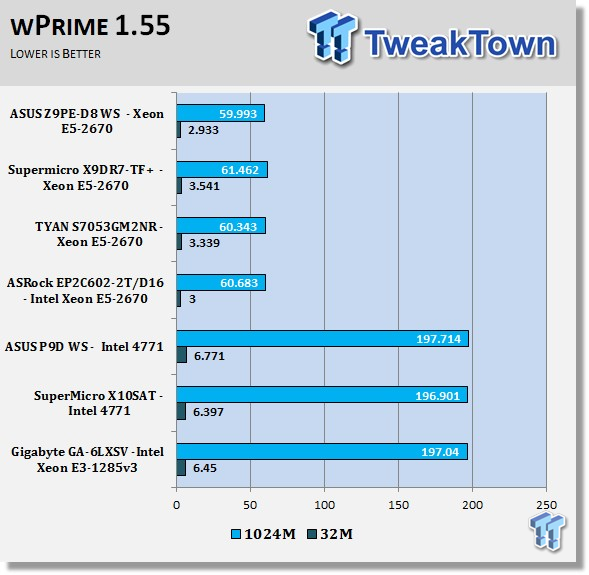
In this test, we see the ASUS Z9PE-D8 WS is again faster and takes the lead.
POV-Ray
POV-Ray (Persistence of Vision Ray-Tracer) creates three-dimensional, photo-realistic images using a rendering technique called ray tracing. Ray tracing is not a fast process by any means, but it produces very high quality images with realistic reflections, shading, perspective, and other effects.
This is a very good test to stress CPU threads and check memory stability and overclocks to see if the system is stable. The latest version (3.6) is a free download and has a benchmark utility that we have run for these tests. Results displayed show the average PPS (pixels per second) that the render took.
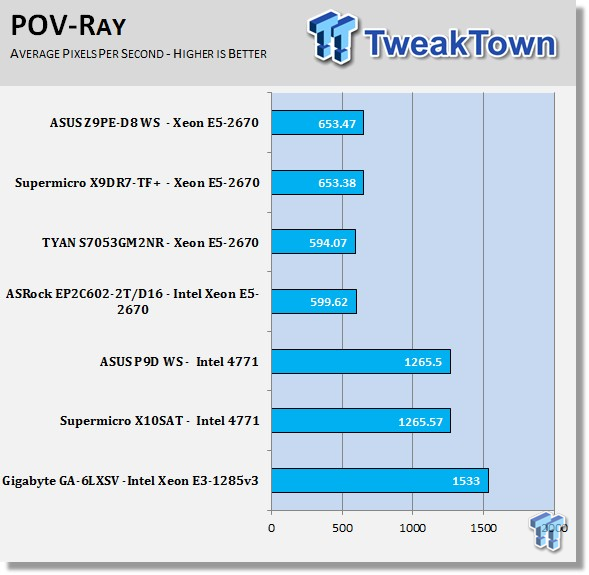
Single-threaded higher clock speeds will generate higher scores with this benchmark, so a dual CPU system does not help this benchmark much.
Here again, we see a slightly faster score.
x264 HD
x264 HD Benchmark measures how fast your computer can encode a 1080p video clip into a high quality x264 video file. This benchmark uses multi-core/threaded systems very efficiently and is a good memory stability test.
Results in this test are the average of each pass performed four times.
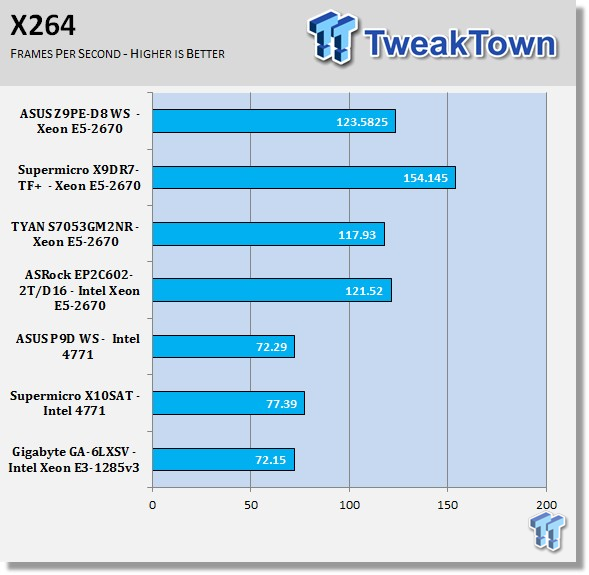
The X9DR7-TF+ scored much better in this test, producing 32.6 FPS more in the x264 test.
SPECwpc_v1.0.2
SPECwpc_v1.0.2 is a workstation benchmark that measures key aspects of workstation applications.
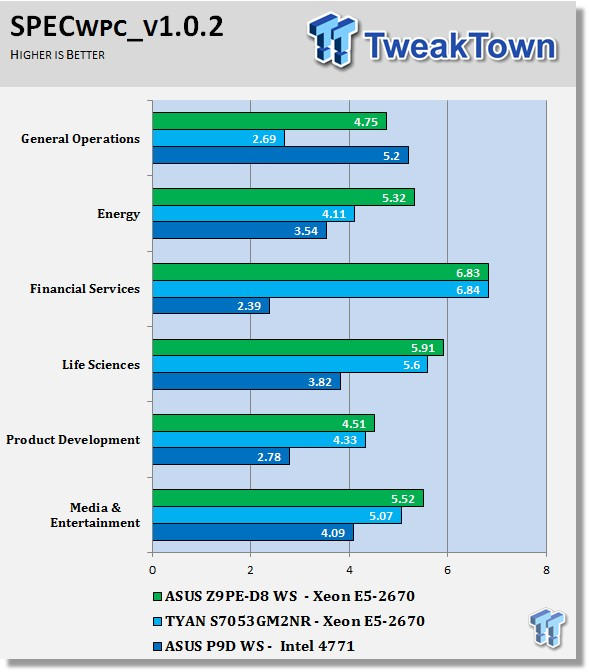
These tests do put a huge load on the system and take around 8 hours to run on this system. SPECwpc puts a heavy load on the GPU.
In everything but general operations, the ASUS Z9PE-D8 WS has taken the lead, except for a slightly lower score for financial services.
Memory Benchmarks
AIDA64
AIDA64 memory bandwidth benchmarks (Memory Read, Memory Write, and Memory Copy) measure the maximum achievable memory data transfer bandwidth.
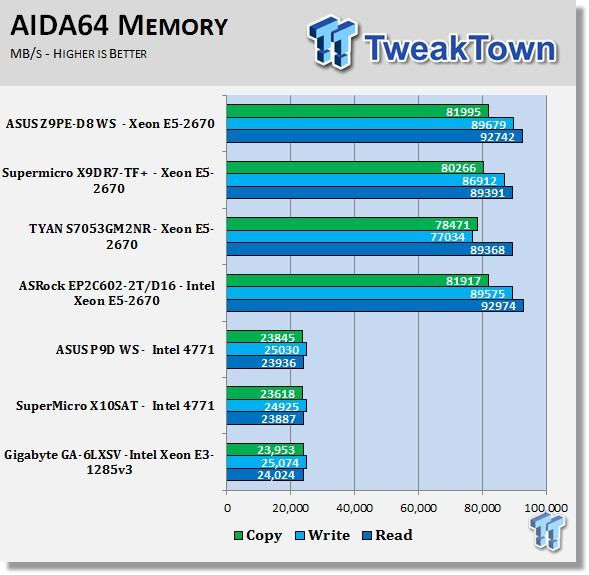
AIDA64 memory tests show the ASUS Z9PE-D8 WS has a very good memory design and show about the best speeds we have seen yet.
LinX
LinX 0.6.4 is a CPU benchmark that measures floating-point operations per second and is used to compare CPU performance; it is also a very good stress test to run.
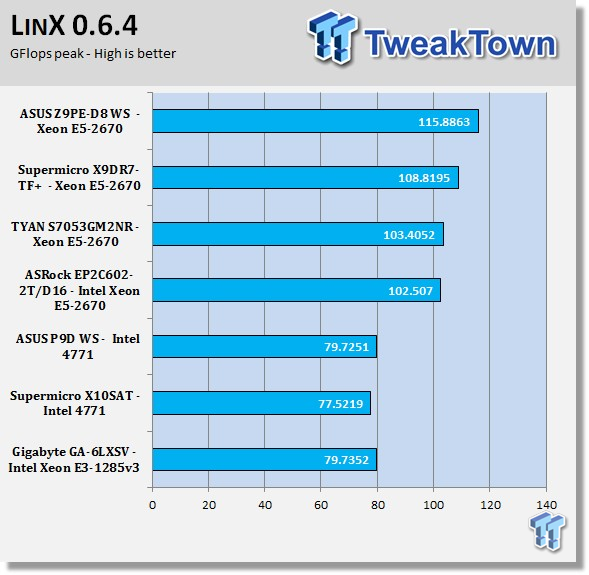
Just like the AIDA memory tests, this board really is pushing memory fast.
UnixBench 5.1.3 and SPEC CPU2006v1.2
UnixBench
UnixBench has been around for a long time now and is a good general-purpose benchmark to test on Linux systems.
This is a system benchmark that shows the performance of single-threaded and multi-threaded tasks.
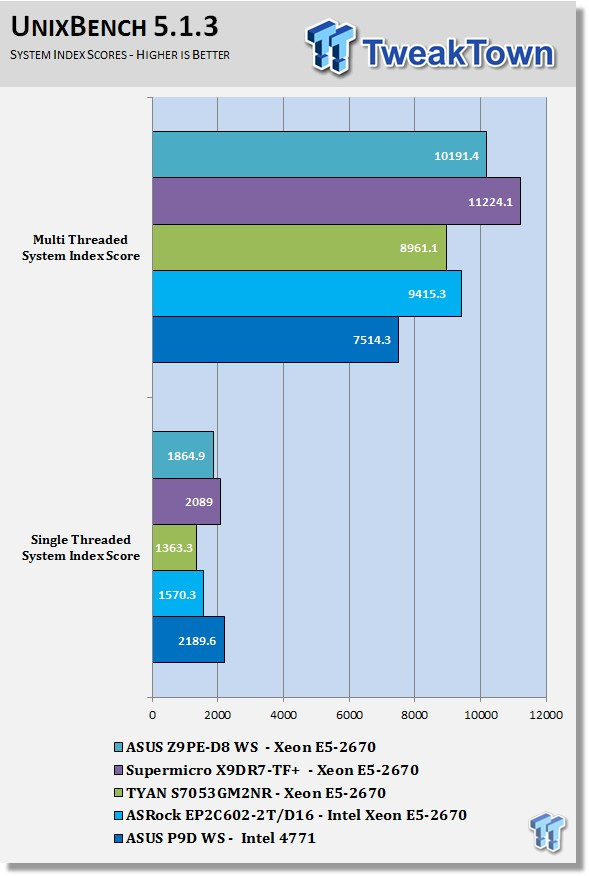
This shows the system indexes after a complete UnixBench run. We can get an idea of how much performance gain we get using multi-threaded applications. However, many applications use single threads, so this number is really the base, and a higher clock speed will increase both indexes.
In UnixBench, we get lower scores that show this benchmark is not a strong one for the ASUS Z9PE-D8 WS.
SPEC CPU2006v1.2
SPEC CPU2006v1.2 measures compute intensive performance across the system using realistic benchmarks to rate real performance.
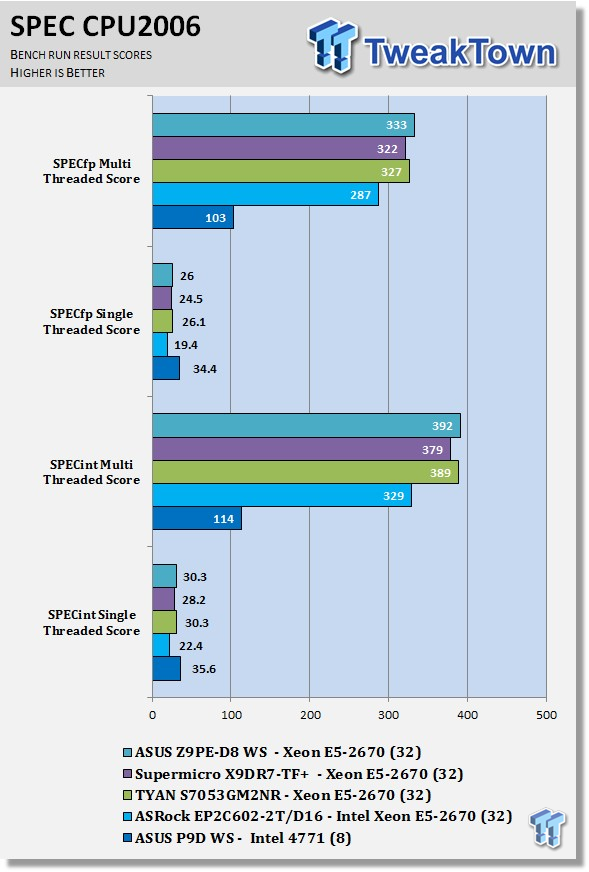
This benchmark has many different commands to use depending on what the user is looking for. For our tests, we used basic commands that run a full test.
You can see the SPEC scores after full runs for Integer (int) and Floating Point (fp) tests.
Single-core runs show how fast (speed) a CPU can perform a given task. In the multi-core runs, we set SPEC CPU2006v1.2 to use all threads, and this is a measure of the throughput of the system.
The additional cores/threads of this system have a huge impact on performance in these tests and really show the amount of horsepower that a dual-socket system has over a single-socket board.
Single-threaded results are still very important, but when you need lots of those to run, moving to a dual-socket setup is the way to go.
The CPU2006 test is a long test taking up to two full days to run. We can see that the ASUS Z9PE-D8 WS is able to go toe-to-toe with the server boards listed.
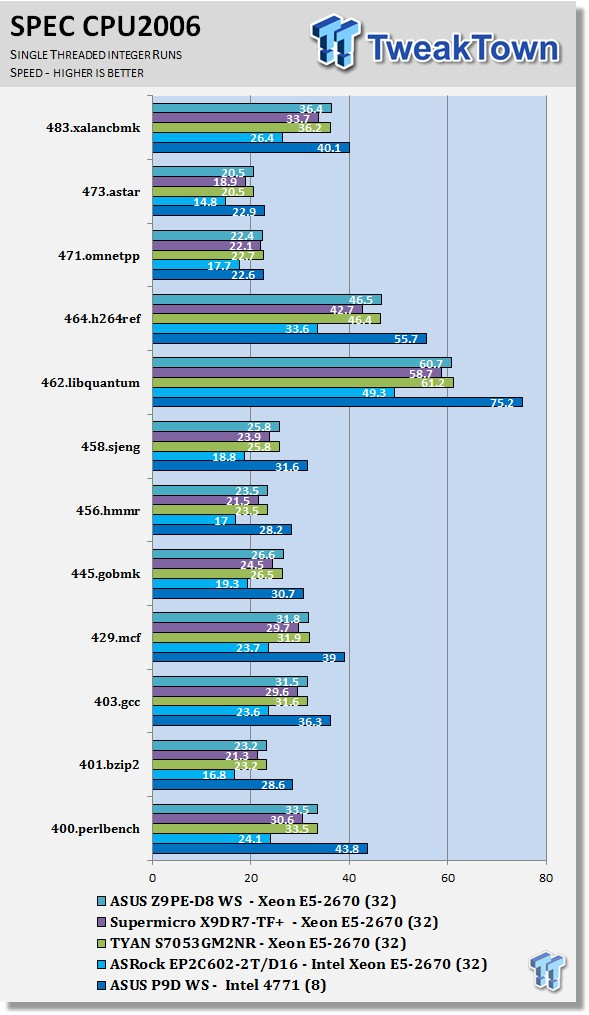
Looking at the results of single-threaded integer runs, we can get an idea of the speed at which the Intel Xeon E5-2670s can crunch through the different integer tests. Not all CPUs are equal here, and ones that have a higher speed will generally perform these tests faster. In this case, this is the stock speed of the Intel Xeon E5-2670s. Naturally, using an overclocked system or CPUs with a higher stock speed will generate higher results.
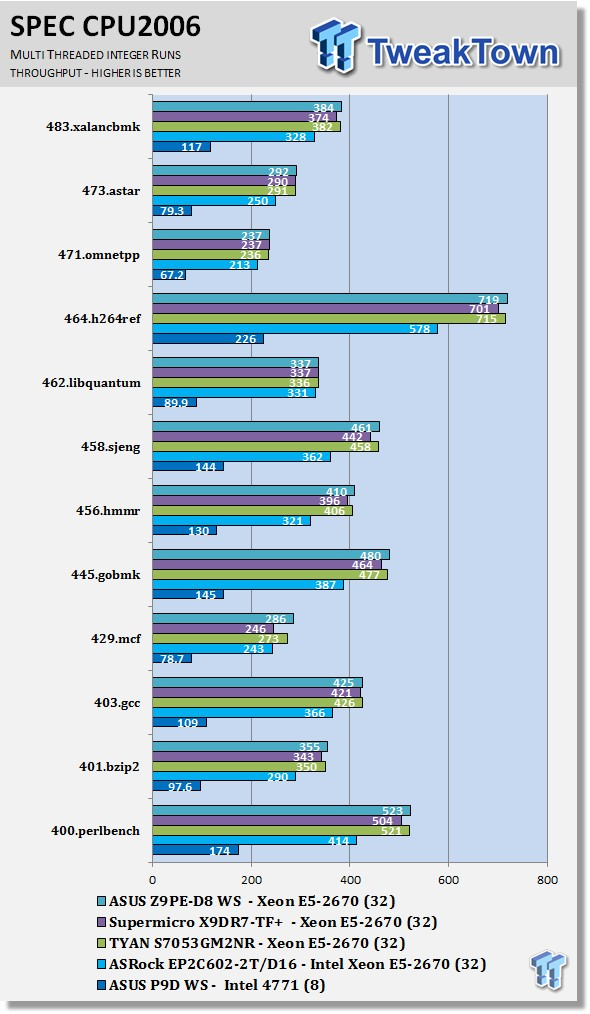
Now we run the test using all 32 threads of the dual Intel Xeon E5-2670s to measure the throughput of the system. In this test, more cores/threads will have a greater effect on the outcome.
We can see a big difference here using the dual-socket setup with a three to four times performance boost being present in many cases.
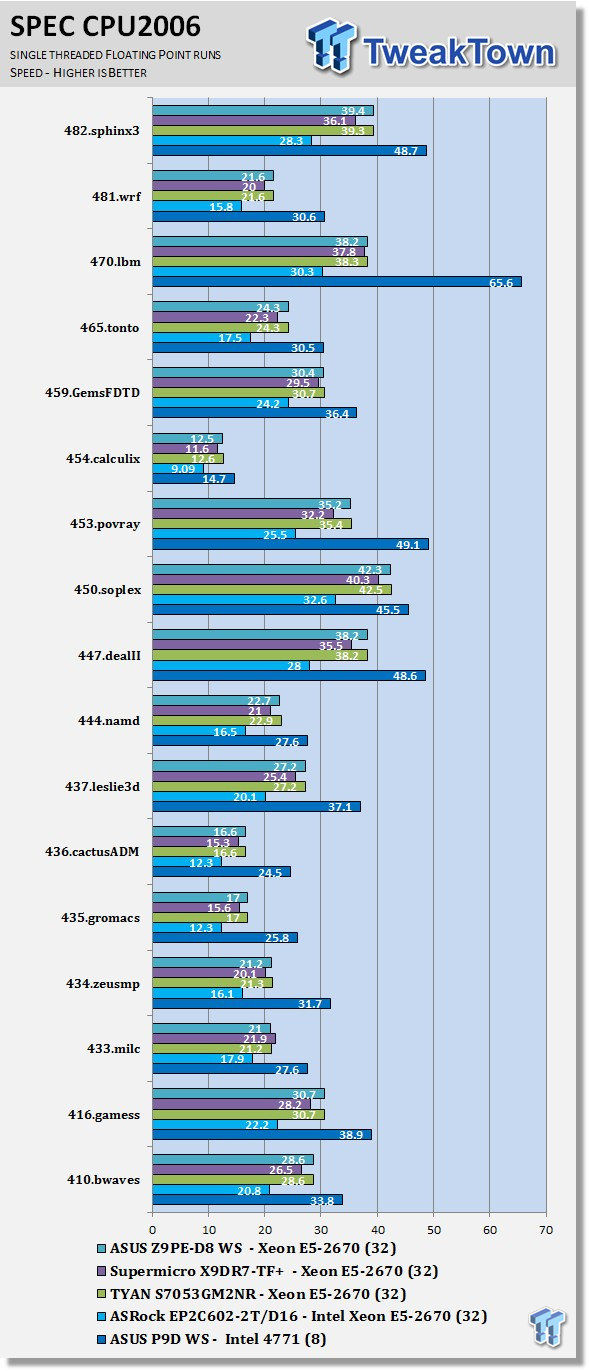
Just like the integer tests, we now run the floating-point tests in single (speed) mode. The lower clock speed of the Intel Xeon E5-2670s hold this benchmark back also.
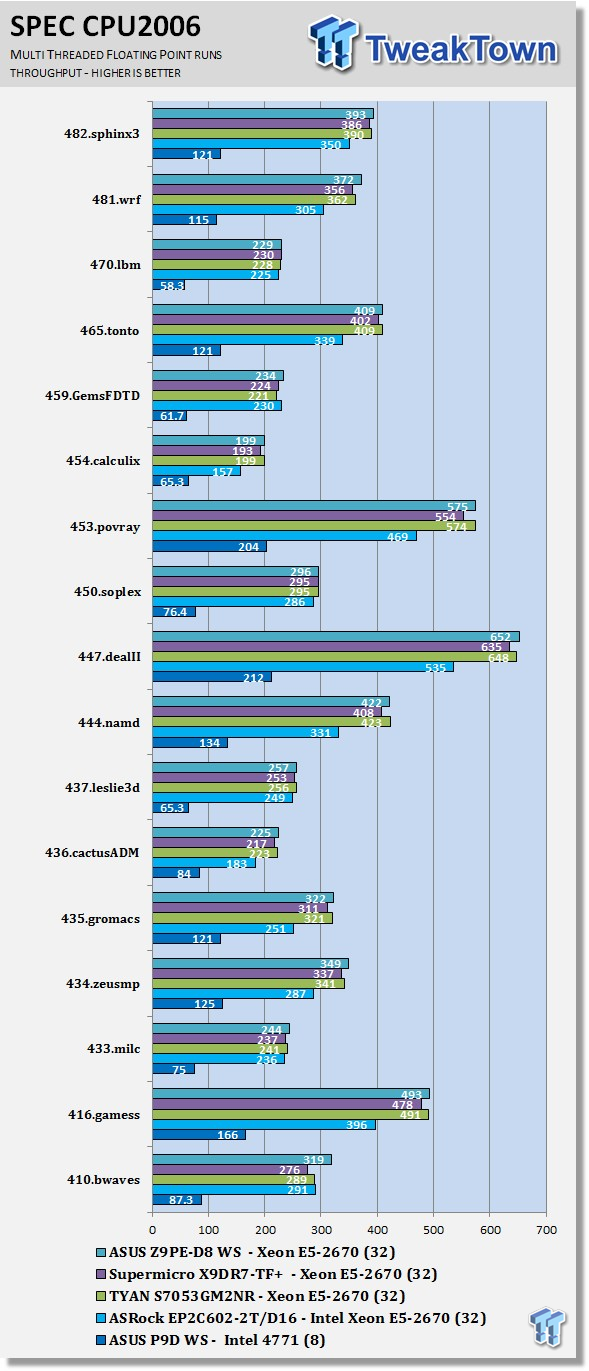
Above, we see the results of the multi-threaded floating-point run that uses all 32 threads of the dual Intel Xeon E5-2670s. Like the multi-threaded integer test, more cores/threads will have a greater impact on the test.
Power Consumption
We used the WattsUp? Pro meter in these tests. This allowed us to measure power use directly from the wall. This meter also uses a USB cable to connect to a computer and Logger Pro software to graph the readings while we run our tests.
To test total system power use, we used AIDA64 Stability test to load the CPU and then recorded the results.
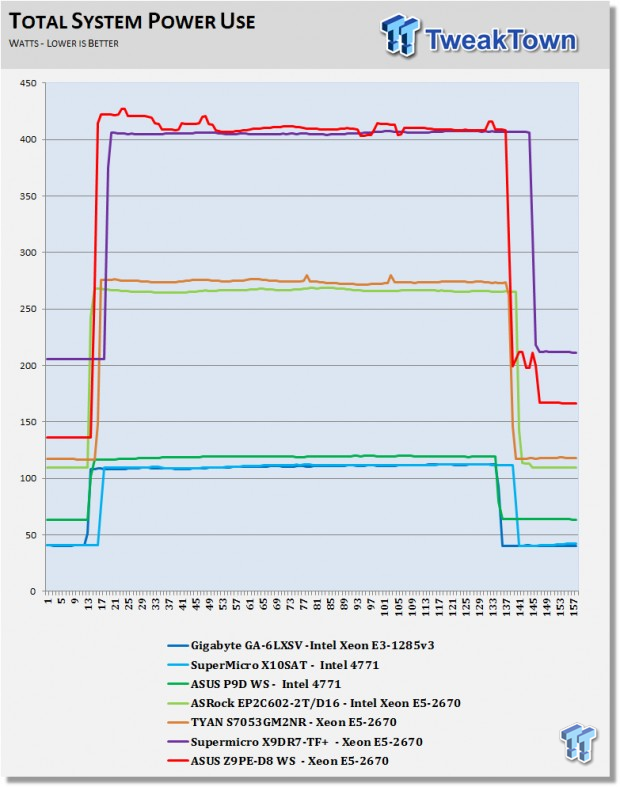
With dual-socket systems, power use can be rather high when fully loaded. The Z9PE-D8 WS did peak out at 422 watts, but keep in mind we had the system set to max performance.
Final Thoughts
We had a lot of fun with this board in the lab while doing this review. It comes so loaded with features that you can do just about anything with it. Make a decked out workstation? No problem. Use it as a high-end gaming system? No problem.
One of the things that we wanted to touch about this board was the fact that you can overclock with it. The number of dual-socket systems that can overclock is very small; there are perhaps three that we can think of off the top of our heads.
We did test this in the lab and were able reach a BCLK of 105, which is not bad for these boards. However, with that comes several side effects.
One of the big issues is power draw. When we tested this under full load, our power use jumped to a massive 625 watts. With that kind of power, heat becomes a real issue and we did see temperatures rise quite a bit. With that in mind, we decided not to run our benchmarks with an overclock.
We did find that the Z9PE-D8 WS is not only fully loaded with features but also performs extremely well. There was only one benchmark that it did not take the number one spot.
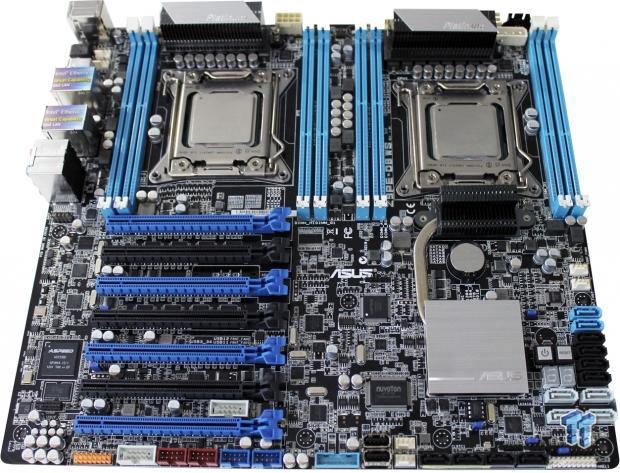
Let us take one final look at the Z9PE-D8 WS workstation motherboard before we finish this review.
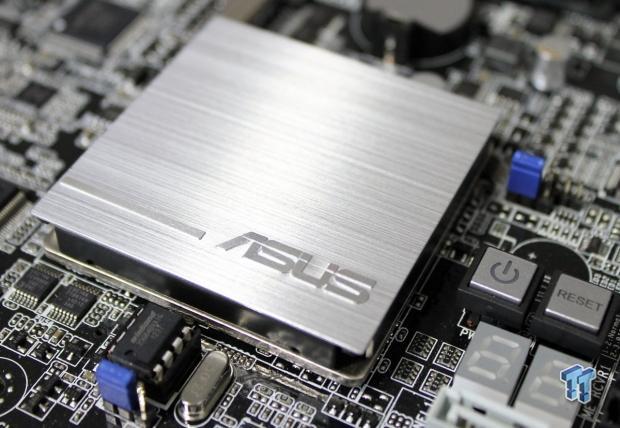
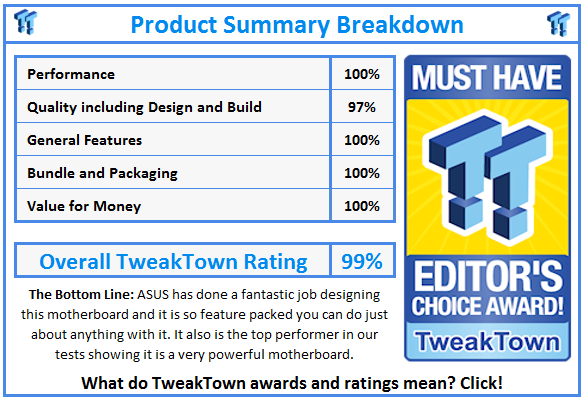
The Z9PE-D8 WS workstation motherboard showed to be the top performer in our tests. ASUS has done a wonderful job designing this motherboard.
About the only complaint we could find is how the memory slots are located. It is not always possible to position these so they can get the maximum airflow for better cooling, so keep that in mind when setting up a system using this motherboard.
PRICING: You can find the ASUS Z9PE-D8 WS Motherboard for sale below. The prices listed are valid at the time of writing, but can change at any time. Click the link to see the very latest pricing for the best deal.
United States: The ASUS Z9PE-D8 WS Motherboard retails for $534.99 at Amazon.
Canada: The ASUS Z9PE-D8 WS Motherboard retails for CDN$648.12 at Amazon Canada.

