Introduction
On multiple occasions we have told you that motherboard manufacturers are having a harder time making products that are clearly different from each other. After all, they share common cores (chipsets) and support the same CPU ranges (well, usually). To combat this issue board manufacturers are building up feature sets for each product as well as common features to their internal line ups and even common features for their whole product range.
Many of these fall into the category of value added software or BIOS tweaks. However, one that often gets overlooked is component choices. Things like using a series of capacitors with a higher voltage tolerance or stronger voltage regulators. These type of "features" are not as sexy as an OC button or wireless overclocking, but they are often more important. ASUS seems to have learned this and often uses components that are rated much higher than needed.
Today we are taking a look at their Sabertooth X58 motherboard. This product boasts that it is built all with long life components that have been certified to U.S. military standards by a third party agency. Of course, in being an ASUS product that is not all you are getting; you are also getting a unique board level cooling system which has been coated by ceramics to improve cooling, and the usual laundry list of ASUS common features.
With a price tag of $189.99 at NewEgg,com and a 5 year warranty, it certainly raises the eyebrows. So, let's take a look at the Sabertooth and see if it can keep in step or if it will fall out on the march through our lab.
The Box and What's Inside
Package and Contents
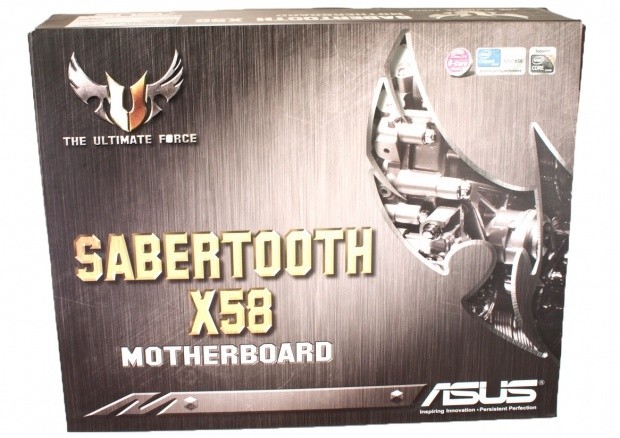
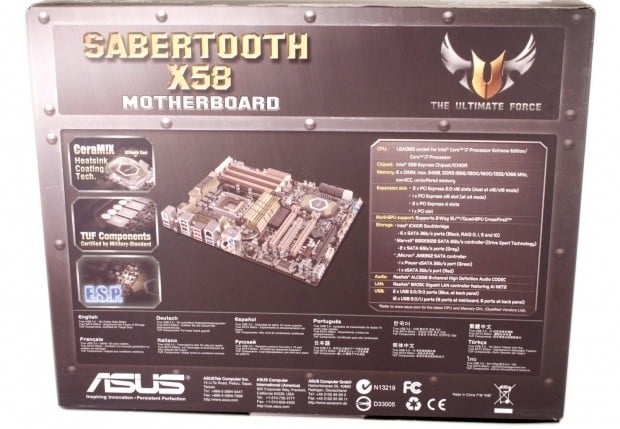
The Sabertooth X58 comes in a box that suggests an industrial design. The box has been given a look of brushed steel and a new logo (Ultimate Force). The look is clean, if somewhat cheesy.
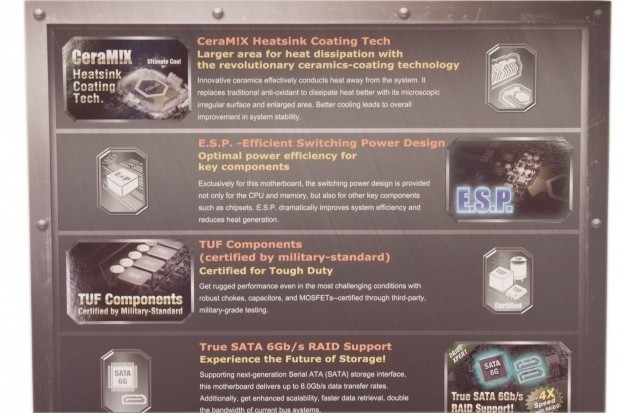
Under the metallic front there is the obligatory front flap (after all, any box that has an artistic front is wasting valuable marketing space). This has information on what the Sabertooth brings to the table.
Although many of these items are a given (MemOK!, SATA 3.0 USB 3.0), some pique our curiosity like the CeraM!X (nothing like a little leetspeak) coating and the TUF Components. We will be taking a look at these a little better later in the review.
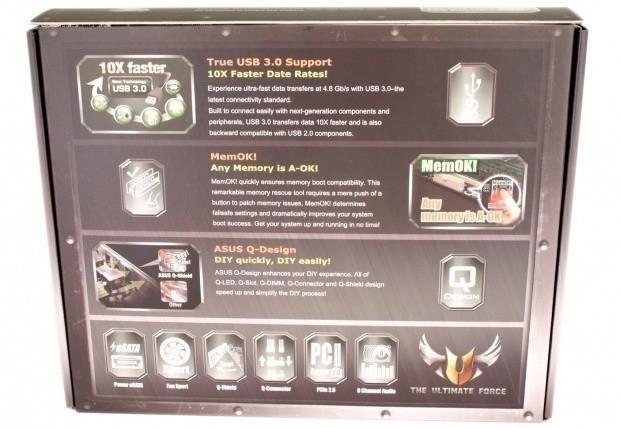
The back of the box is a continuation of the inside flap. Here you find a nice shot of the board with a basic specs sheet to the right of the image.
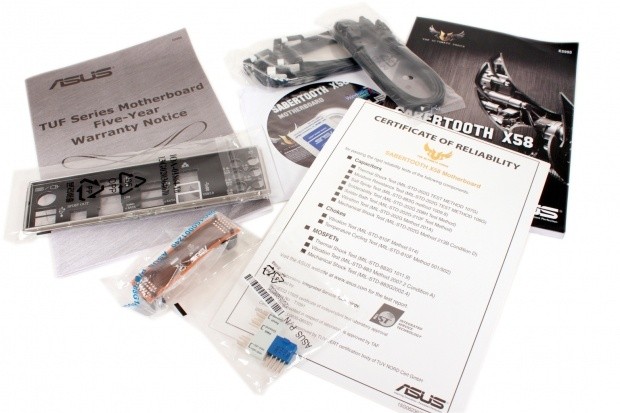
Inside the box is a rather limited amount of loot, but then again, this is much more of a value based industrial product, so the fancy trappings are probably not needed.
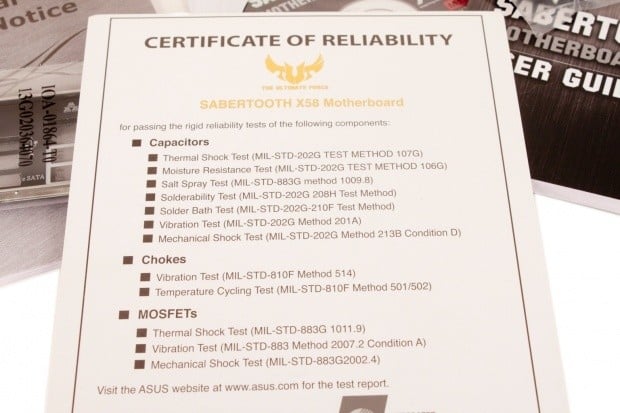
One item in particular caught our attention, though; this is a card listing the testing done on three of the main components of the board; the capacitors, chokes and MOSFETs (Metal Oxide Semiconductor Field Effect Transistor). This card contains the actual MIL-STD (military standard) test used for each simulated load. At the bottom of the card is also the certification number for the testing lab used. In this case, Integrated Service Technology.
This is not a press only card like we have seen on other products, but a card that anyone buying this board will get. It is a nice touch even if the numbers and test types will mean little to most people.
The Motherboard
The Board
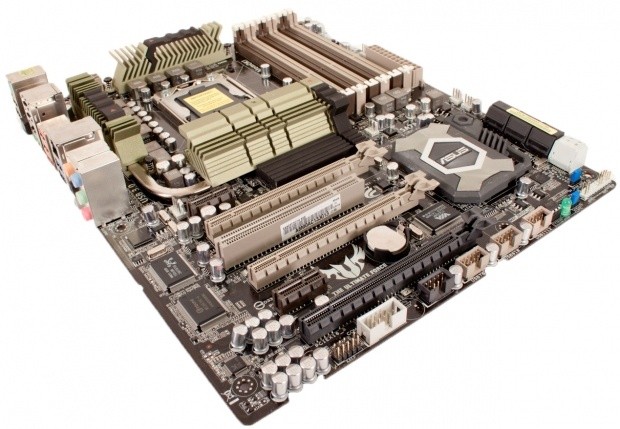
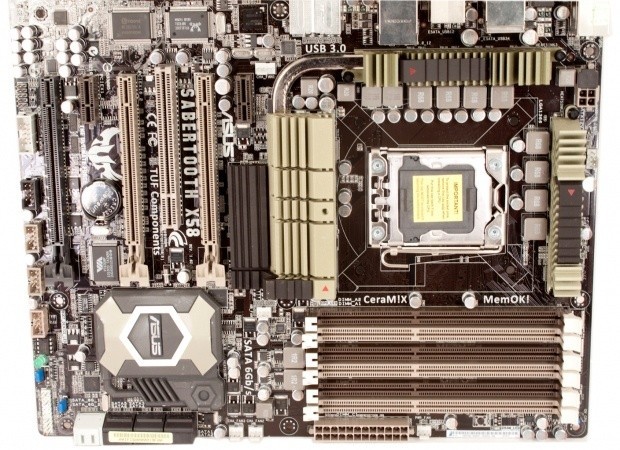
The Sabertooth is a nice looking board. The combination of colors gives it the intended military look, but does not make it an unattractive product. The ATX layout has been used fairly efficiently and ASUS has also thrown in an aesthetically designed cooling solution (which for some reason reminds me of the Contemporary Resort at Disney World in Orlando).
Looking at our top down view, you can see that the board differs slightly from many of ASUS' typical designs. The voltage regulation looks much more evenly spaced around the CPU socket (unlike other boards where everything is stuffed on one side). The tracing layout also looks more conservative than we are used to with ASUS.
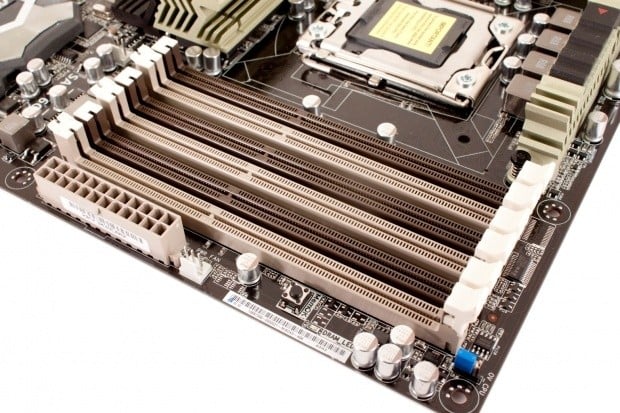
Moving back to our normal starting point, we find a set of six RAM slots. These use the one-armed style so as to make installation and removal easier when the board is installed in a case and has a GPU in the primary slot. Despite the lack of a second lock down arm, these slots are very sturdy. You may also notice an OV_CPU jumper. This allows you to increase the voltage range available to the CPU in the BIOS. It is set to off by default.
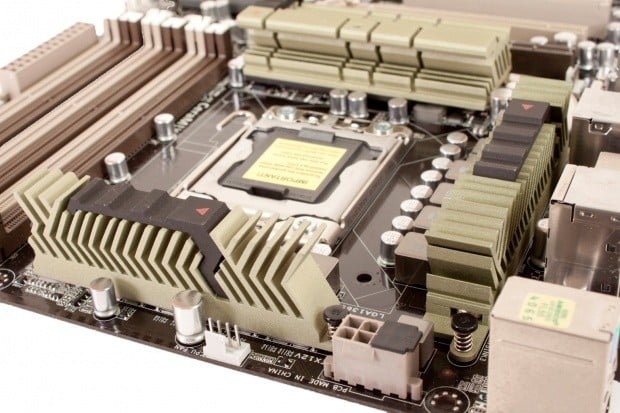
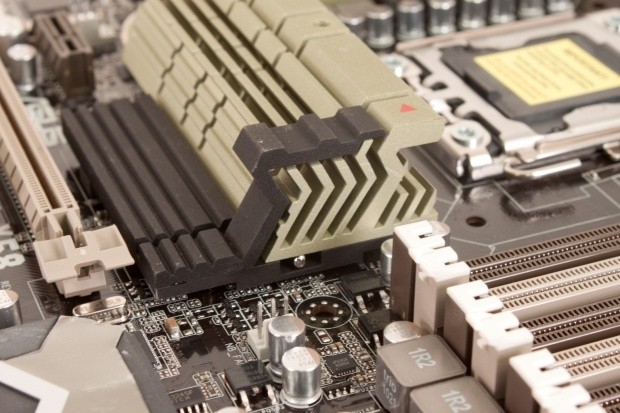
Moving around the corner, we get a little closer look at the CPU socket and the upper heatsink. In this shot you can see the texture of the heatsink. It reminds me of the paint used on some military vehicles, which I am sure was the intention. The 8-pin aux power connector is placed fairly well on the Sabertooth, although it can still be a little bit of a pain to disconnect.
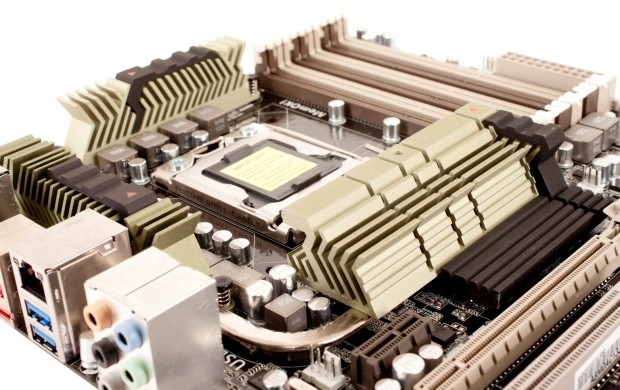
Here we have a better look at the cooling around the CPU socket. We also get a glimpse of the top PCIe x1 slot which is placed well and can be used effectively for audio or networking cards (or many other x1 PCIe add-in boards). You can also see the coating on the metal heatsink more clearly. Again, it offers a textured and worn look; certainly an industrial feel to it.
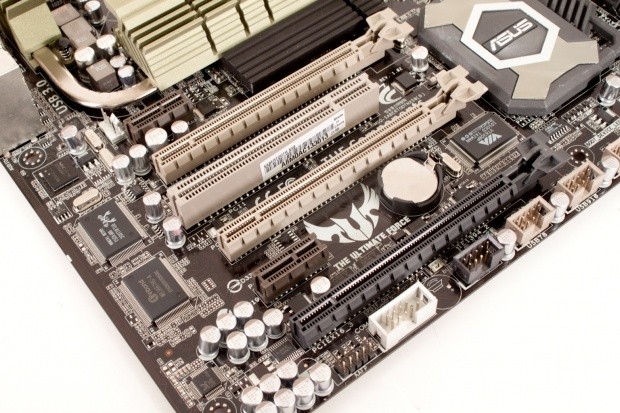
The lower half of the board looks very clean and is not cluttered at all. Again, this design choice allows for a much more conservative tracing layout which in turn helps to prolong the life of the board. There are three x16 mechanical slots on the board, but only two work in full x16 mode. The full x16 slots are the two tan ones; the black slot only has a x4 link despite its x16 size.
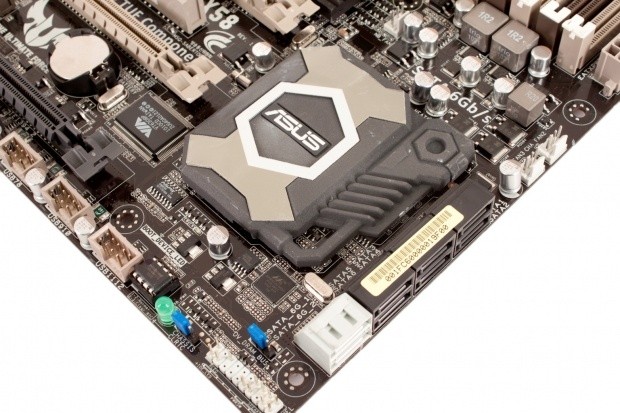
Moving over to the other side of the board, we find the "southbridge" components hidden under a fairly large heatsink; the work and military look is continued in this part. I am not sure of what shape ASUS was going for, but it certainly is interesting to look at. We see the standard six SATA II ports right next to the dual SATA 3.0 ports (the white ones). Not much to see here other than the heat sink really.
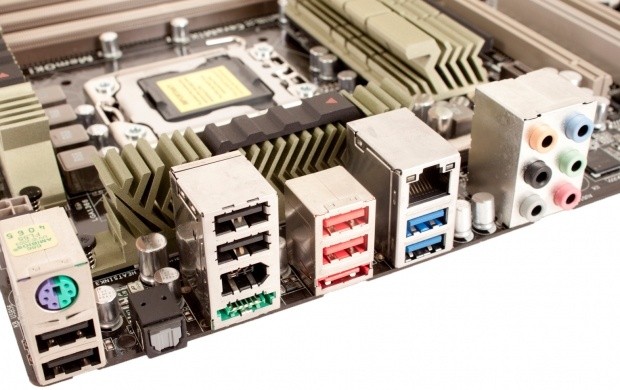
On the I/O port side of things we find the typical options here. In general the Sabertooth looks clean and simple, but a lot of work and thought went into making it so. The conservative tracing layout offers stable performance without overloading anything. The solid caps and better MOSFETs and Chokes should provide longer life as well as a more stable performance. ASUS has done a good job he with the layout; now let's see if it can perform.
BIOS and Overclocking
BIOS
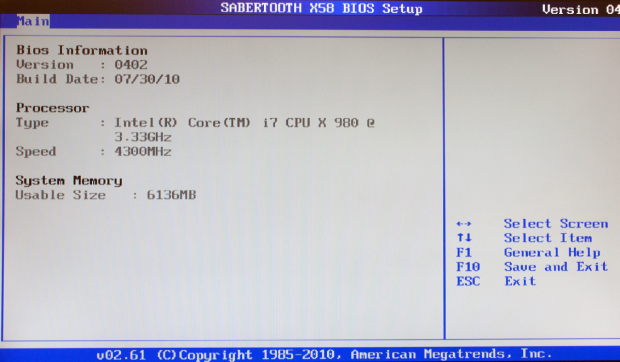
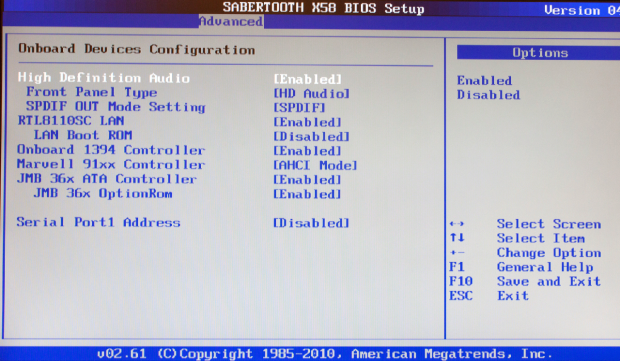
As with every other ASUS board, the Sabertooth X58 uses a modified AMI (American Megatrends Inc) BIOS layout. For our testing we worked with the 0402 version of the BIOS.
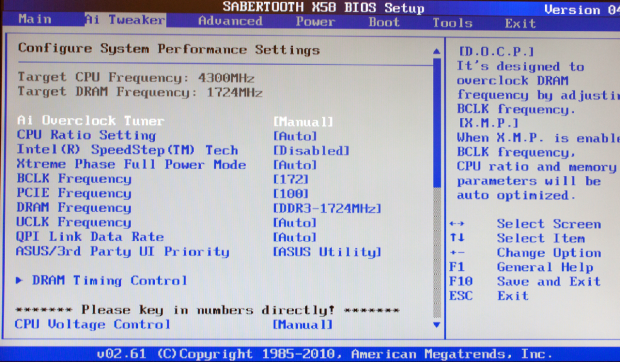
Of course, as with all ASUS products, the place to be is the AI Tweaker page. Here is where almost all of your system tweaks reside. We have CPU ratio, BCLK, DRAM speed and quite a bit more.
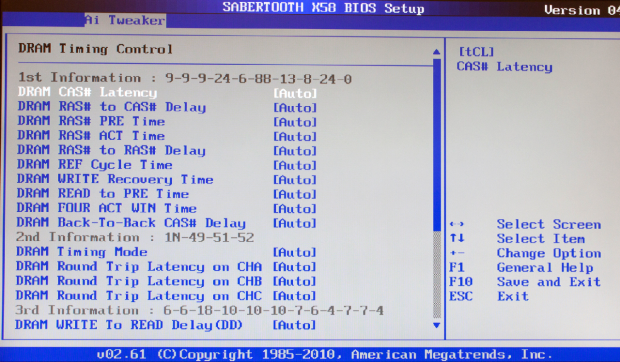
One of the important Submenus here (inside the AI Tweaker page) is the DRAM timing control. Here is where you can adjust timings, sub-timings, and sub-sub-timings to squeeze the most out of the memory you are using.
The Voltage controls on the Sabertooth are also very detailed with reference DRAM voltages broken down into channels. The extra voltage controls are handy to help ensure stability throughout the board subsystems.
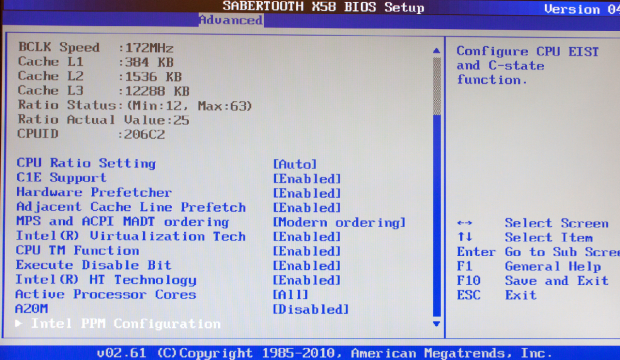
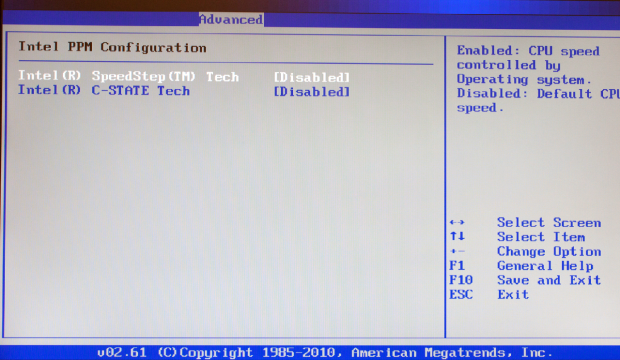
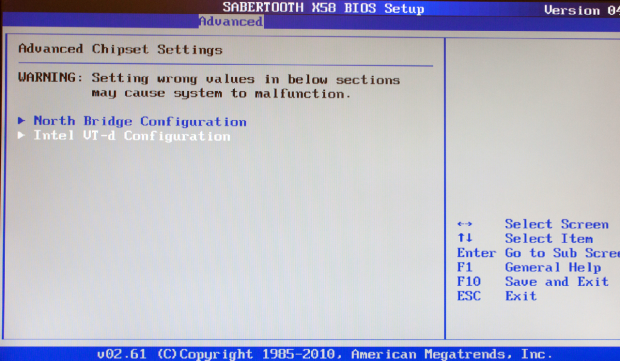
Of course, as with all BIOSes, there are places other than the overclocking settings (I know, I know, they are not as interesting). The Advanced CPU Settings page lets you enable or disable prefetch, virtualization, Hyper Threading, and C-States. That last item can improve performance in single threaded applications when it is disabled.
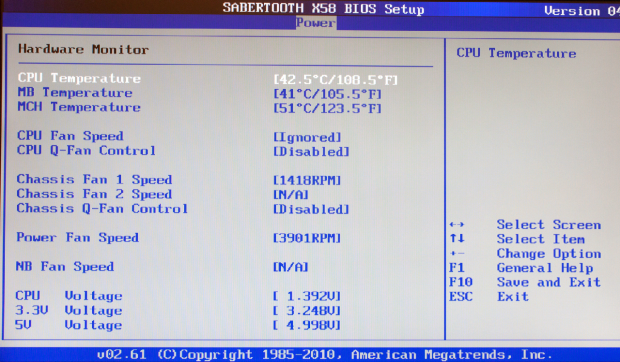
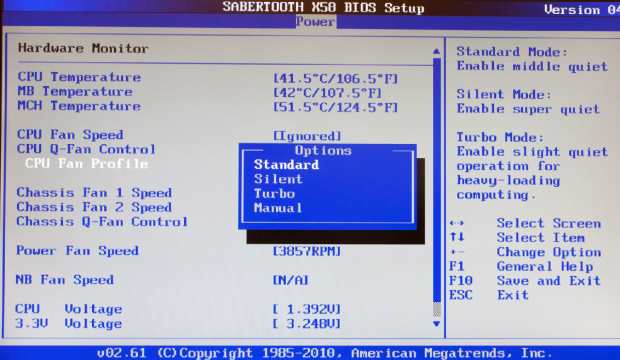
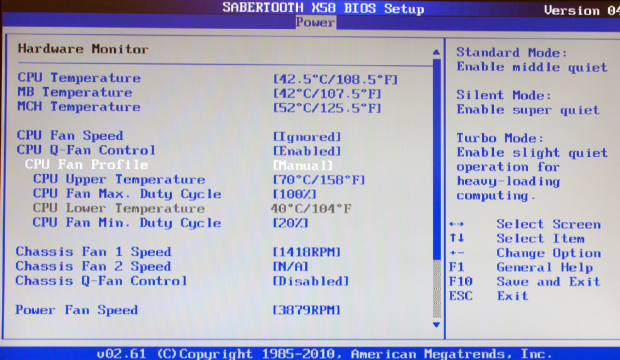
The power management pages are always interesting on ASUS boards; if for no other reason than the fan profiles and settings.
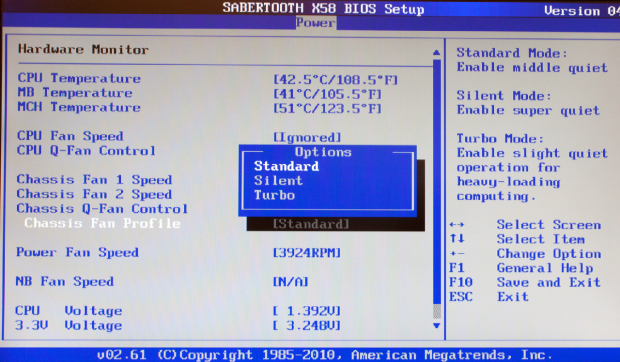
The Case fan header has the choice of Standard, Silent and Turbo while the CPU has an extra option of manually setting the temperature thresholds and the fan speeds used when those levels are reached. It is an impressive setup and one that so far has always worked for me (although we do not use them during testing).
Overclocking
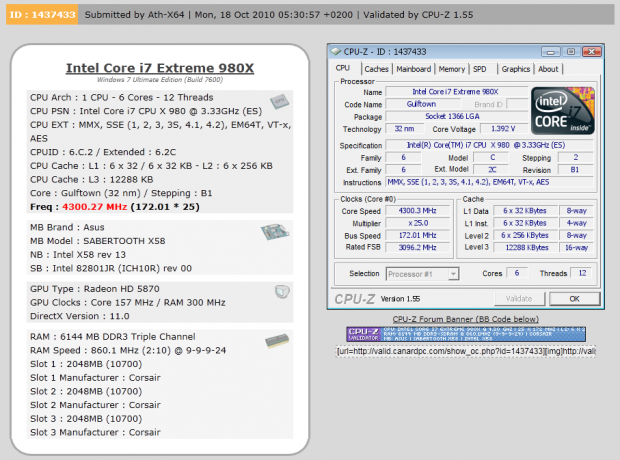
I am not sure if it is us, or that manufacturers are making their overclocking tools cleaner and easier to use, but overclocking most motherboards these days is very quick and simple. It took us no time to get the Sabertooth running at 4.3GHz. We had some issues running over that speed that we did not have the time to address before our time was up, but we feel confident that this board has a lot more headroom in it. Oddly enough, the Sabertooh did not come with the TurboV EVO software we have come to enjoy, but an Intel performance utility was available that we will be covering below.
You can see the validation for the Sabertooth X58 here.
Intel Extreme Tuning Utility
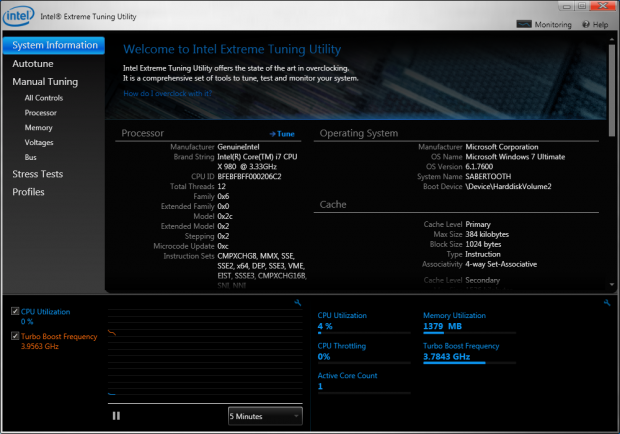
In place of the TurboV EVO software, the ASUS Sabertooth X58 has the Intel Extreme Tuning Utility. But that is not a bad thing as we found it to be quite complete. You have both manual and auto tuning options.
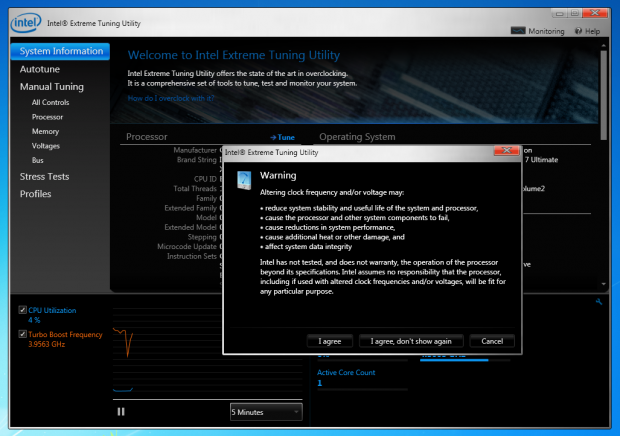
Like most overclocking software, you have to get the usual warning tell you that overclocking your CPU may cause things to break...But like most of us, you will simply ignore that and press on.
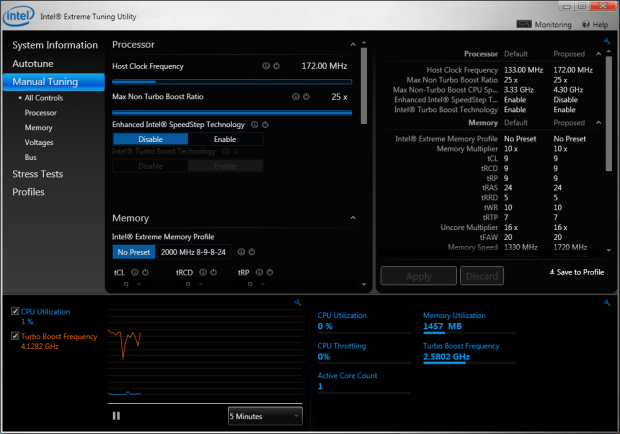
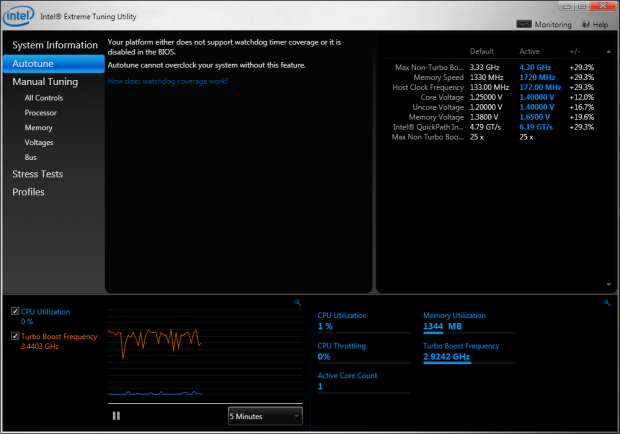
We did not bother with the Auto Tuning method but instead went right into the Manual controls to see what Intel put there for us to play with. As you can see, Intel has dropped in quite a bit even allowing you to enable and disable items like SpeedStep and Turbo Boost right from inside Windows.
Even memory settings were put inside. This is something that I have wanted to see from a Windows based overclocking software for some time. I cannot tell you how many times I have set a speed in Windows, but had to reboot to the BIOS to adjust RAM speed or timings to get things stable. Having this right here is a very nice touch.
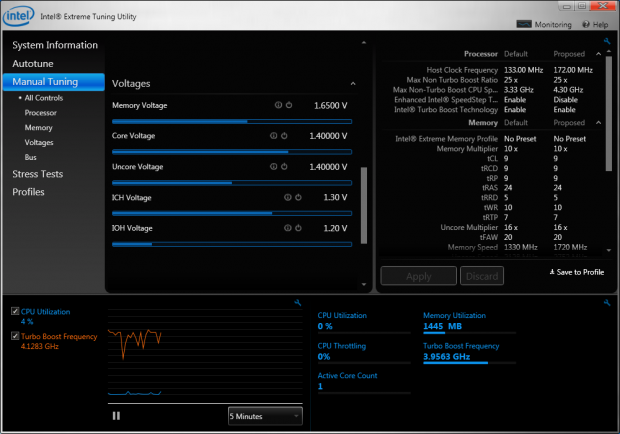
The voltages available are a little more limited than I would like, but still give you the major ones with the exception of the CPU PLL voltage.
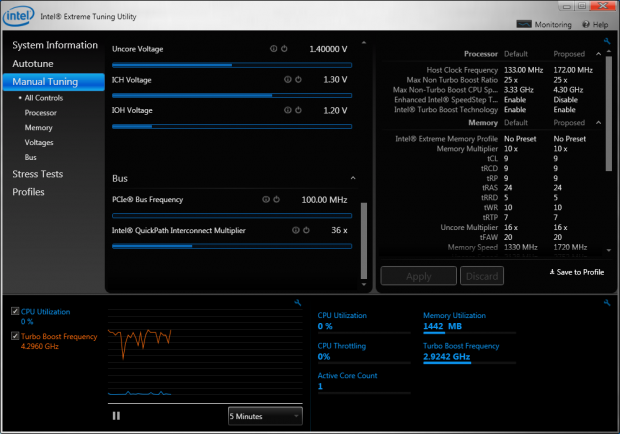
You can also tweak the PCIe frequency and the QPI multiplier.
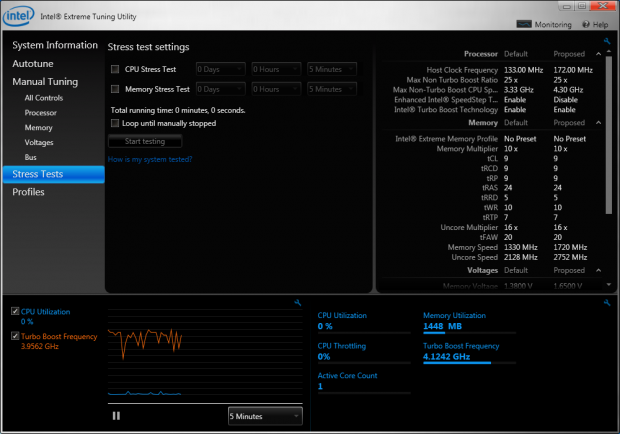
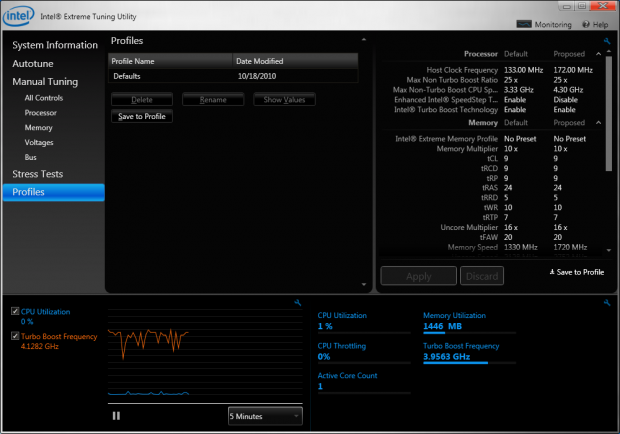
Of course, just as an added bonus, you get a stress testing utility and a place to store your overclocks.
As all overclocking results are dependent on the hardware you use, your results may vary. Results of our overclocking tests are included in the performance section with the stock scores.
Important Editor Note: Our maximum overclocking result is the best result we managed in our limited time of testing the motherboard. Due to time constraints we weren't able to tweak the motherboard to the absolute maximum and find the highest possible FSB, as this could take days to find properly. We do however spend at least a few hours overclocking every motherboard to try and find the highest possible overclock in that time frame. You may or may not be able to overclock higher if you spend more time tweaking or as new BIOS updates are released. "Burn-in" time might also come into play if you believe in that.
Test System Setup and Comments
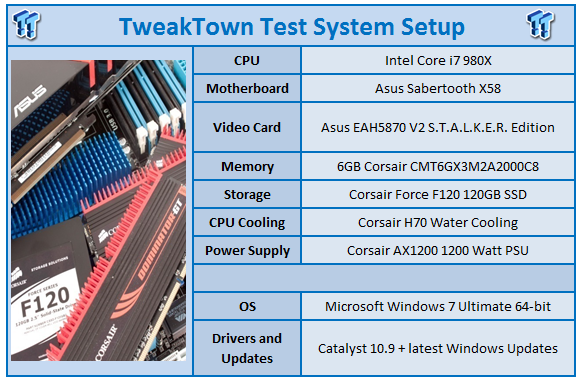
We would like to thank the following companies for supplying and supporting us with our test system hardware and equipment: Intel, ASUS, corsair and Sceptre.
The Sabertooth was about as easy as any motherboard to get setup and running. We had no issues installing Windows with our USB flash drive as we have on a few other boards (although most of them turned out to be an issue with our KVM). We do have a complaint that is not limited to ASUS, though. For some reason most system BIOSes will default to having the HDD become drive 0 over the SSD. This is even if the SSD is attached to SATA port 1 (or 0 in some cases). This means that when you install Windows, even if you tell it to install on the SSD it will put the boot partition (about 100MB) on the HDD as it is drive 0.
I wish that boards would not do that, as the SSD is becoming more common and should be allowed to take the Drive 0 position. Other than that one complaint (which again I will say is not limited to ASUS), we found the installation to be very simple.
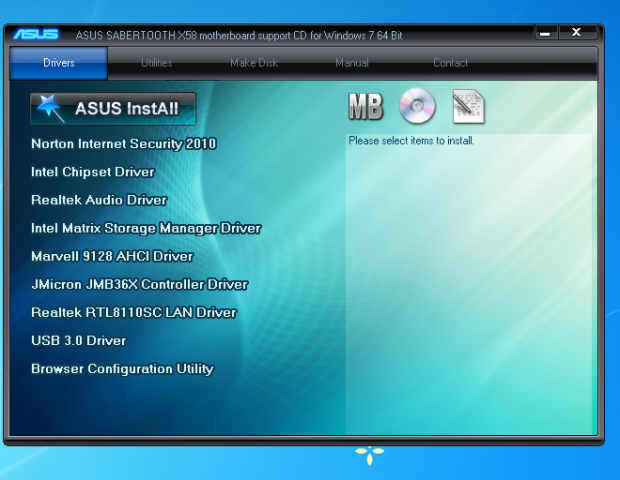
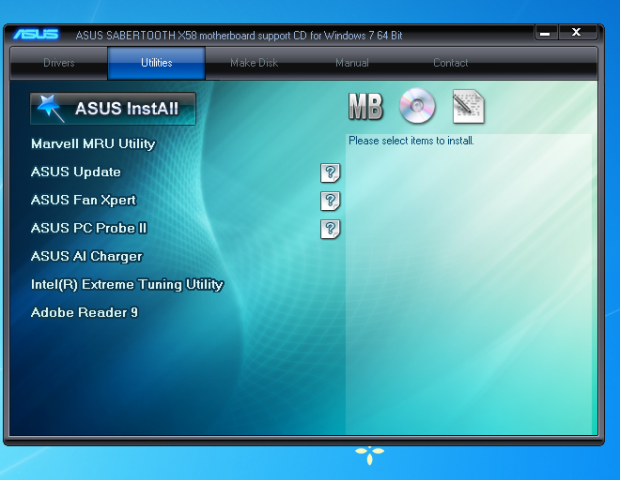
ASUS does have one of the better installers available, although I wish they would extend the InstallAll to allow you to include some of the utilities. This would get them all out of the way at once.
Synthetic Tests - Part I
With any system you will want to see a combination of synthetic testing and real-world. Synthetics give you a static, easily repeatable testing method that can be compared across multiple platforms. For our synthetic tests we use Everest Ultimate, Sisoft Sandra, Futuremark's 3DMark Vantage and PCMark Vantage, Cinebench as well as HyperPi. Each of these covers a different aspect of performance or a different angle of a certain type of performance.
Memory Bandwidth
Memory is a big part of current system performance. In most systems slow or flakey memory performance will impact almost every type of application you run. To test memory we use a combination of Sisoft Sandra, Everest and HyperPi 0.99.
Sisoft Sandra
Version and / or Patch Used: 2010c 1626
Developer Homepage: http://www.sisoftware.net
Product Homepage: http://www.sisoftware.net
Buy It Here
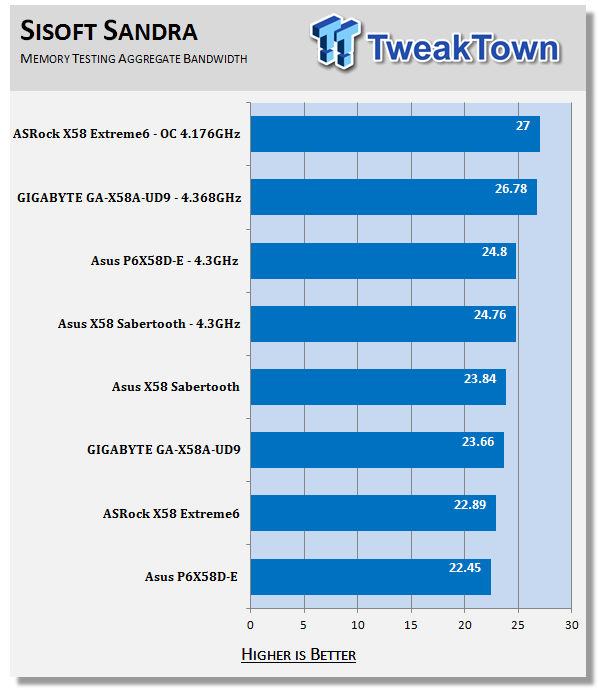
For stock memory performance the Sabertooth does an excellent job. It comes out on top even over boards that are much more expensive. However, when we overclock it, we cannot maintain the same level of performance.
AIDA64
Version and / or Patch Used: 1.00.1035BETA
Developer Homepage: http://www.aida64.com
Product Homepage: http://www.AIDA64.com
Download It Here
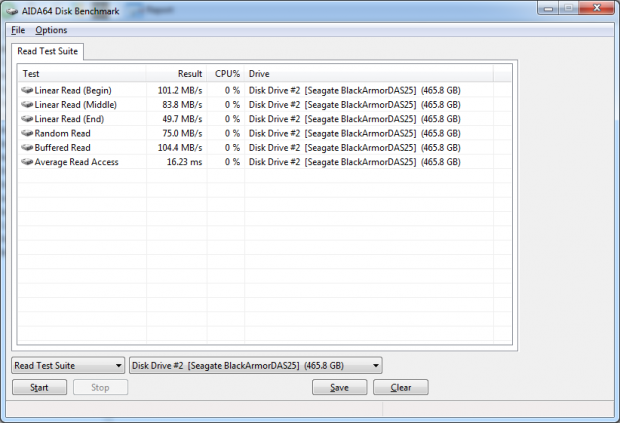
Replacing Everest in our labs is AIDA64. This new testing suite is from the core development team from Lavalys and continues that tradition. The guys have thrown in better support for multithreaded CPUs as well as full 64-bit support. We use this to test memory and HDDs for now, but may find ourselves opening this up to other areas of the motherboard.
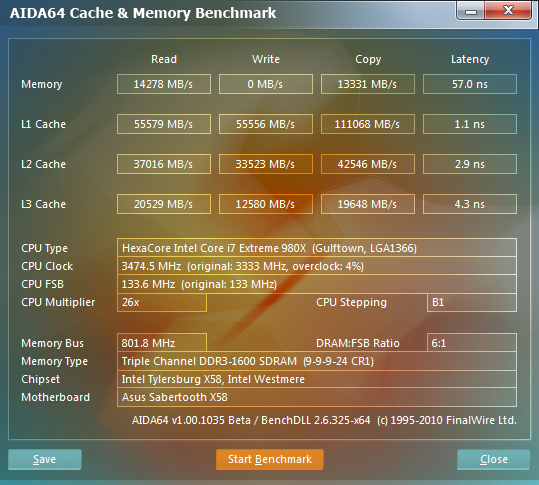
Stock Memory Performance
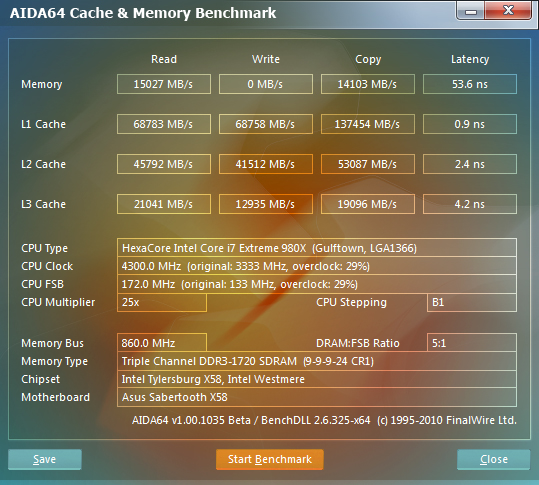
Overclocked Memory Performance
Something interesting in these results (although they still show good memory performance) is the absence of a write speed. This is probably due to the BETA version we used for this testing run. We will be moving forward with the final 1.00.1111 version in all future reviews, so this will not be an issue.
But getting back to memory performance, the Sabertooth can certainly hold its own here. We hope to see matching HDD speeds as that would indicate a solid performing product.
HyperPi 0.99
Version and / or Patch Used: 0.99
Developer Homepage: www.virgilioborges.com.br
Product Homepage: www.virgilioborges.com.br
Download It Here
HyperPi is a front end for SuperPi that allows for multiple concurrent instances of SuperPi to be run on each core recognized by the system. It is very dependent on CPU to memory to HDD speed. The faster these components, the faster it is able to figure out the number Pi to the selected length.
For our testing we use the 32M run. This means that each of the four physical and four logical cores for the i7 and the four physical cores of the i5 is trying to calculate the number Pi out to 32 million decimal places. Each "run" is a comparative to ensure accuracy and any stability or performance issues in the loop mentioned above will cause errors in calculation.
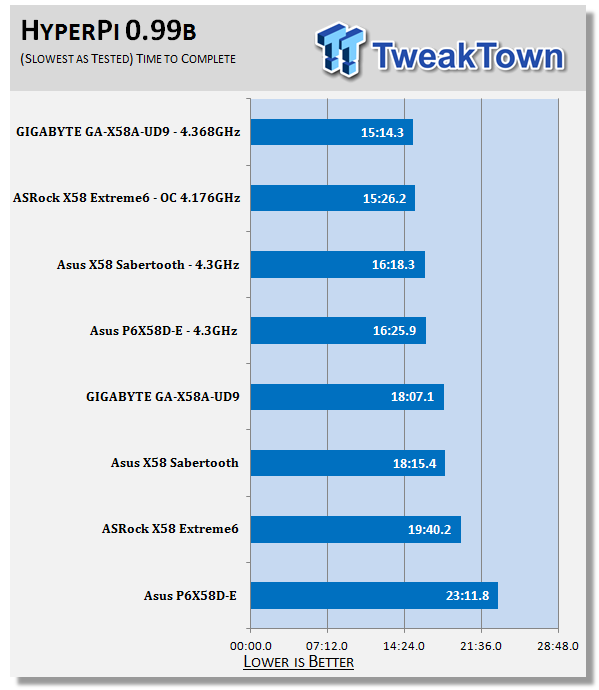
The ASUS Sabertooth X58 is second behind the X58A-UD9 for our HyperPi testing; at least at stock speeds. When we overclock it the slower memory performance kicks in and we drop back to third. However, it is very important to say that every overclock is going to be different, as timings, voltages and even the ratio of the UnCore and QPI will come into play.
Synthetic Tests - Part II
Disk Drive Controller
The system drive controller is an important part of system performance. In most modern boards your drive controller will run off of the PCI-e bus. The PCI-e bus performance can be affected by poor trace layout as well as many other design choices that show up on different boards.
For testing we use Sisoft's Sandra and Everest.
SiSoft Sandra
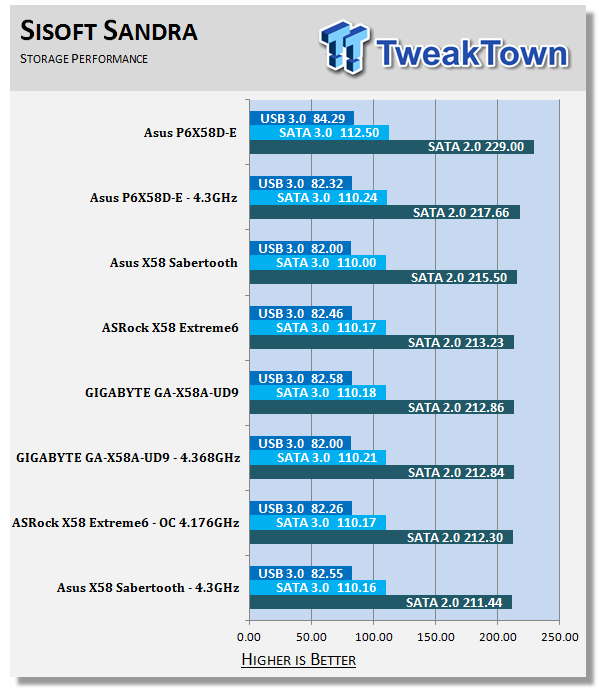
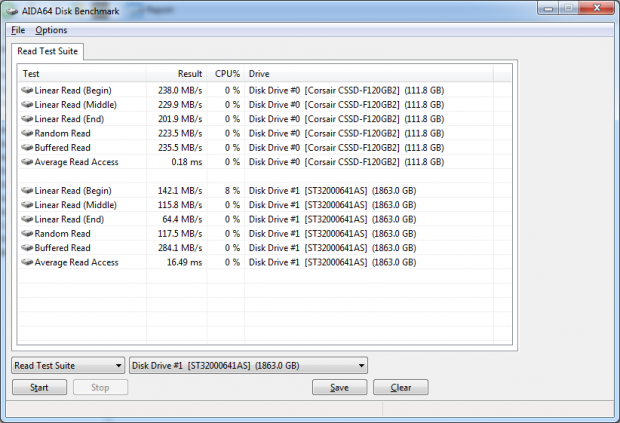
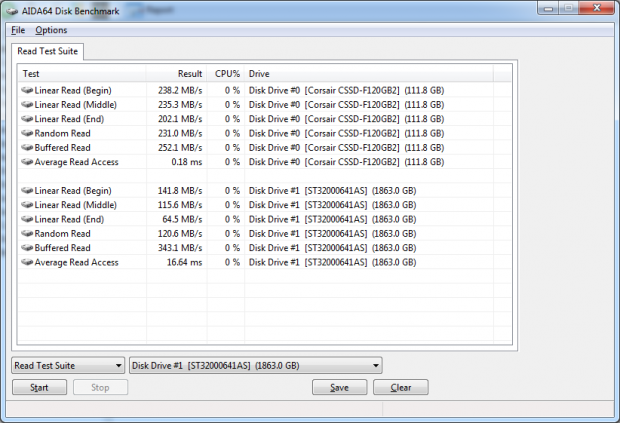
Once again at stock speeds the Sabertooth does very well. It is not the fastest board we have tested, but it is up there. Unfortunately when we push this board the HDD speeds drop. That is something to be concerned about.
AIDA64
Stock HDD Performance
Overclocked HDD Performance
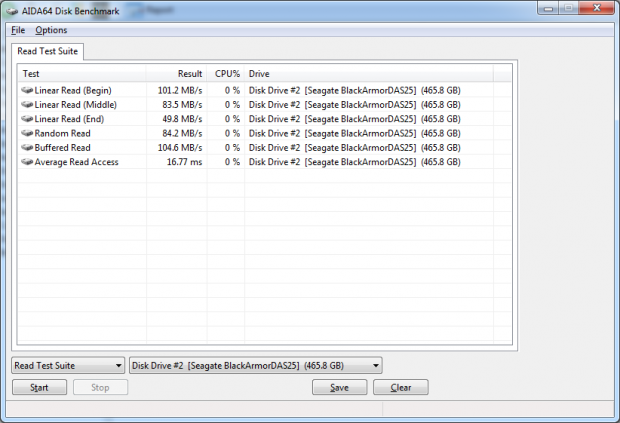
Stock USB 3.0 Performance
Overclocked USB 3.0 Performance
AIDA64 shows us something a little different. The HDD performance is a little more balanced than what we saw from Sandra. Of course, this could be due to the BETA nature of the application.
Synthetic Tests - Part III
Here is where we dig out the FutureMark tests.
PCMark Vantage
Version and / or Patch Used: 1.0.0.0
Developer Homepage: http://www.futuremark.com/
Product Homepage: www.futuremark.com
Buy It Here
For overall system performance we use PCMark Vantage. This is run in both x86 and x64 mode to give the best indication of performance.
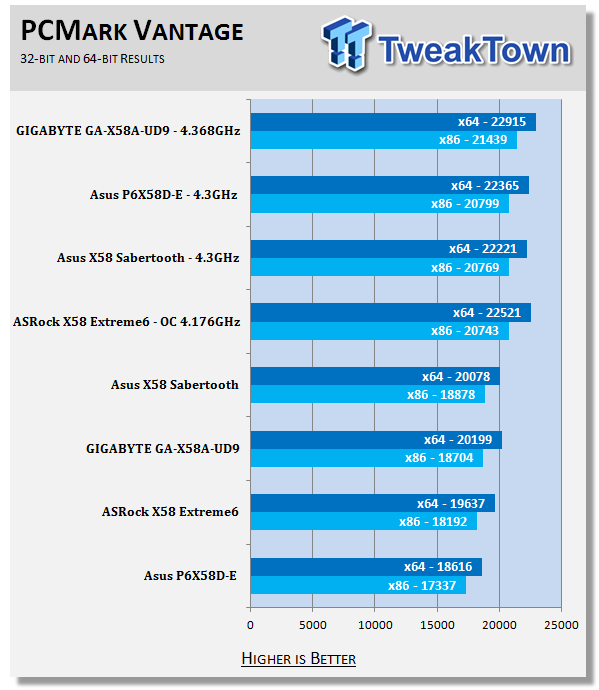
For PCMark there is no doubt that the Sabertooth can deal with demands put on it. This could be a good indication of balanced performance. Of course, this is only a synthetic test and cannot tell us the whole story.
3DMark Vantage
Version and / or Patch Used: 1.0.1
Developer Homepage: http://www.futuremark.com/
Product Homepage: www.futuremark.com
Buy It Here
For synthetic gaming tests we used the industry standard and overlockers bragging tool 3DMark Vantage. This is a test that strives to mimic the impact modern games have on a system. Futuremark went a long way to change from the early days of graphics driven tests to a broader approach including physics, AI and more advanced graphics simulations.
3DMark Vantage uses the DX10 API in addition to having support for PhysX. As we are no longer using an NVIDIA GPU for testing, you will only see the CPU based PhysX results in the scores. For testing we use the Performance test run.
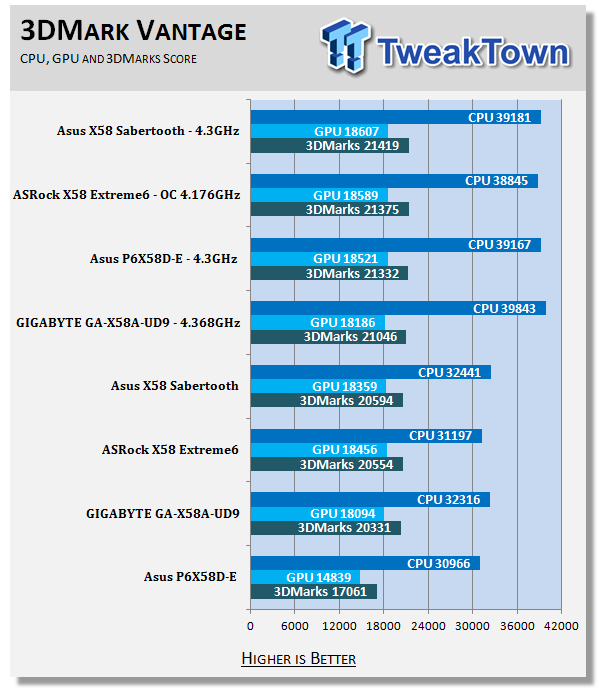
For our 3DMark Vantage testing the Sabertooth X58 is out on top for both Stock and Overclocked testing. This could be a good sign for gamers, but we will have to reserve our final judgment until after the real-world gaming tests.
Cinebench R11. x64
Version and / or Patch Used: R11.5 x64
Developer Homepage: http://www.maxon.net/
Product Homepage: www.maxon.net
Download It Here
Cinebench is a synthetic rendering tool developed by Maxon. Maxon is the same company that developed Cinema4D, another industry leading 3D Animation application. Cinebench R11.5 tests your systems ability to render across a single and multiple CPU cores. It also tests your systems ability to process OpenGL information.
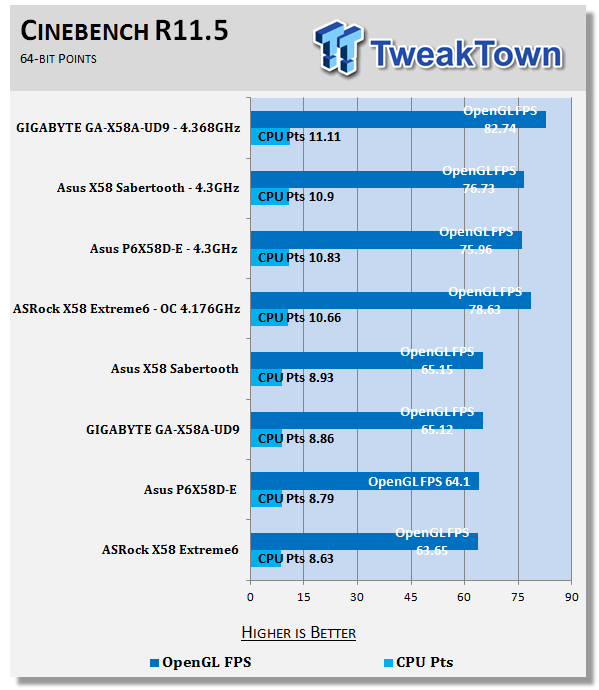
Once again, for our stock run the Sabertooth is up at the top of the pack. This is due to the combination of good memory and HDD performance (not to mention the 12 thread CPU onboard). With good scores here you can expect decent performance in image manipulation (Photoshop etc).
Real-World Tests - Part I
Real-world testing allows us to see how well a product will perform when used in the same manner as it would be in your house or office. It is an important side to performance testing as it can uncover hidden glitches in the way a product performs.
It is especially true when testing a mainboard; there are so many components of a board that have to interact that any problems between parts can cause a failure of the whole.
For real-world testing we use some common applications and functions. We test with LightWave 3D for rendering performance, AutoGK for transcoding from DVD to AVI and two games for gaming testing.
Rendering
Rendering of 3D Animation is a system intensive endeavor. You need a good CPU, memory and HDD speed to get good rendering times. For our testing we use LightWave 3D. This software from Newtek is an industry standard and has several pre-loaded scenes for us to use.
LightWave 3D
Version and / or Patch Used: 9.6
Developer Homepage: http://www.newtek.com
Product Homepage: http://www.newtek.com/lightwave/
Buy It Here
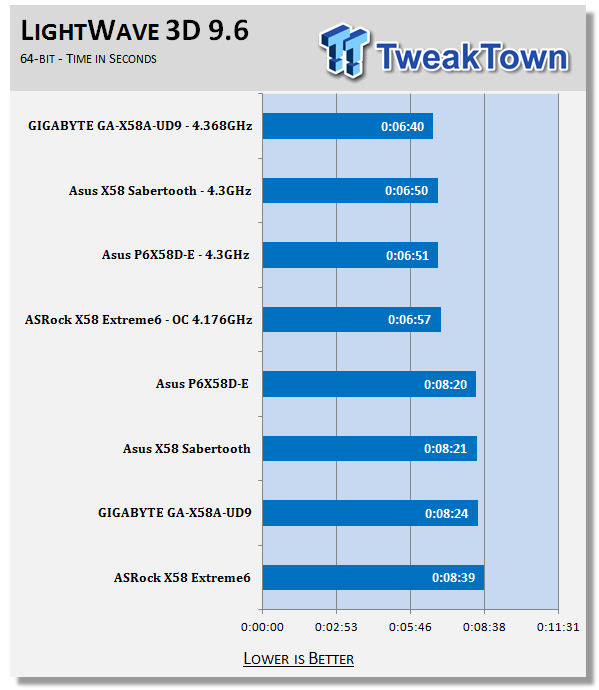
For LightWave 3D things fall into place about where we thought they would. If you remember, there was only one board that was ahead of the Sabertooth for stock HDD performance. This is the same board that is in the lead here by one second. Of course, once we overclock the CPU most of the usual rules go out the window. Here it is all about who has the better memory and CPU throughput which can overcome the HDD deficiencies in many cases.
AutoGK
Version and / or Patch Used: 2.55
Developer Homepage: http://www.autogk.me.uk/
Product Homepage: http://www.autogk.me.uk/
Download It Here
AutoGK stands for Auto Gordian Knot; it is a suite of transcoding tools that are compiled into an easy to install and use utility. It allows you to transcode non-protected DVDs and other media to Xvid or Divx format. For our testing purposes we use a non-DRM restricted movie that is roughly 2 hours in length. This is transcoded to a single Xvid AVI at 100% quality.
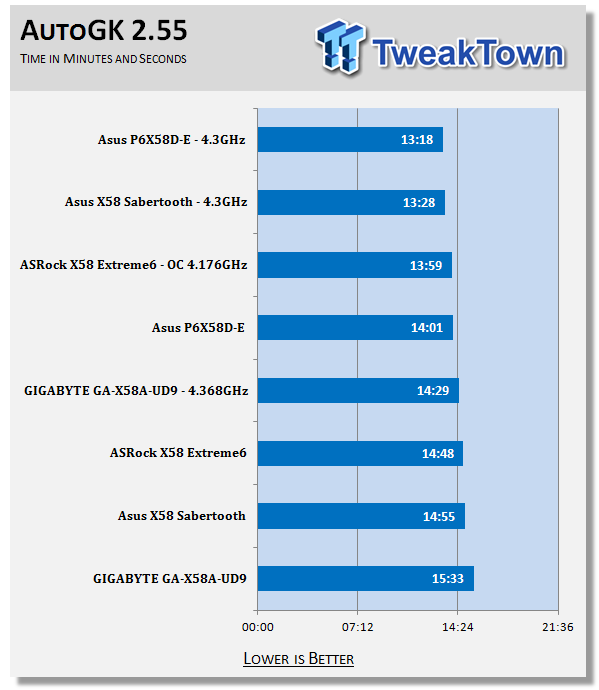
As AutoGK has a demand for good HDD performance (to write and read the data written during the transcode), it is not surprising to find the Sabertooth in third place for the stock run. As both the HDD and the DVD-ROM that handled the video file are using the same controller, it becomes an aggregate issue. Still, less than 15 minutes to transcode a 2 hour movie is nothing to be ashamed of.
Real-World Tests Part II
Here we have our real gaming tests. Each of the games we chose use multiple cores and GPUs. They are able to stress the system through use of good AI. Both have decent positional audio that adds impact to the sound subsystem of the board. We ran each game through the level or parts listed and recorded frame per second using FRAPS. This brings the whole game into play.
*** A word on gaming as a motherboard test; ***
Despite the fact that most games are very GPU limited, we are still noticing HDD and even audio creating issues in gaming performance. Because of this you may see differences in the number of frames rendered per second between different boards. Usually the difference is very small, but occasionally, because of bad tracing, poor memory or HDD performance, this difference is significant. The issues are often more prevalent in older versions of DirectX but can still pop up in DX10 and 11.
Call of Duty Modern Warfare 2 (DX9)
Version and / or Patch Used: 1.0
Timedemo or Level Used: First combat until the school is cleared
Developer Homepage: http://www.infinityward.com
Product Homepage: http://modernwarfare2.infinityward.com
Most of you know about the game Modern Warfare 2, it caused quite a bit of controversy in the latter half of 2009. The game is a first person shooter with a heavy combat emphasis. It follows the events in the first Modern Warfare very closely and brings back several characters from the original.
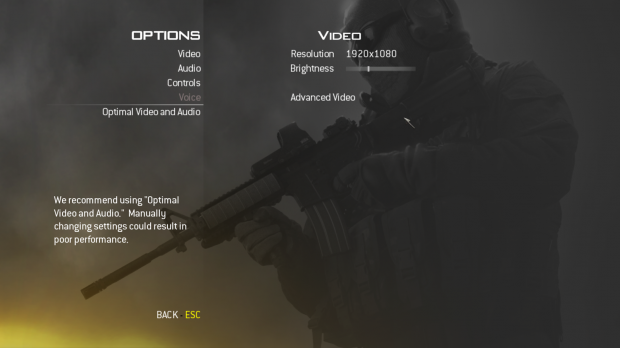
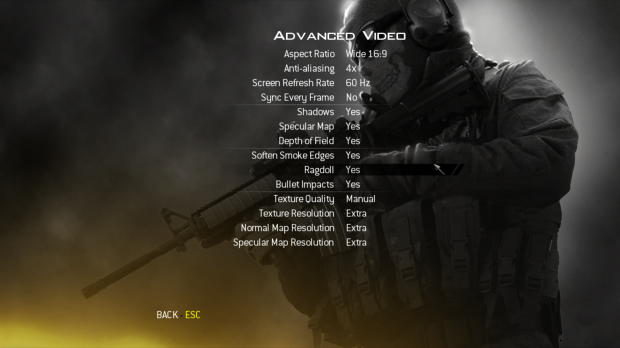
As with most games in the Call of Duty franchise, it features a heavy AI load. This is not because of a complex AI routine, but more due to the sheer number of enemies in any given combat situation. It is also our single DX9 based game in our testing suite. Settings are shown below.
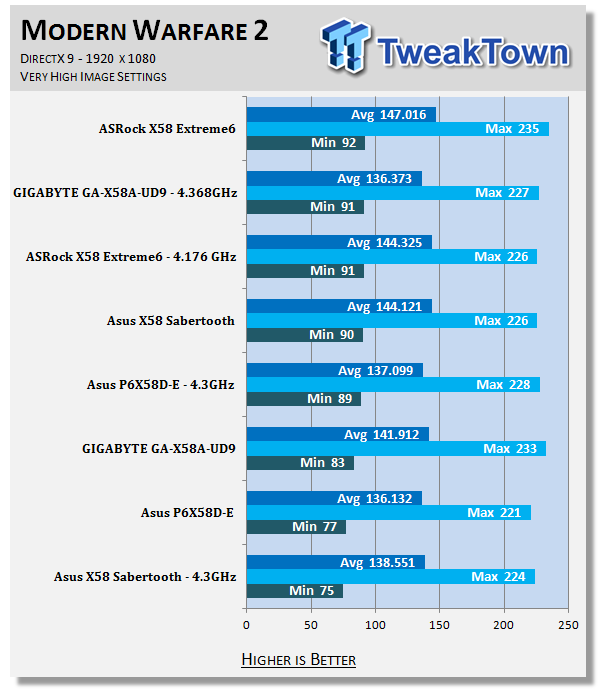
Ok, here we have opposing results; for stock performance the Sabertooth does quite well with minimum frame rates over the capabilities of LCDs (60Hz). From there you have nothing but that extra feeling of smoothness that comes from never starving the display for frames. However, when we pushed the system something happened and our testing dropped a whopping 15 FPS. We still come out over the 60 mark, but it is still quite odd to see this level of drop.
Far Cry 2 (DX10)
Version and / or Patch Used: V1.00
Timedemo or Level Used: Clearing the Safe house through to the Rescue
Developer Homepage: http://www.ubi.com
Product Homepage: http://farcry.us.ubi.com
Far Cry 2 is a large sandbox style game. There are no levels here so as you move about the island you are on you do not have to wait for the "loading" sign to go away. It is mission driven so each mission is what you would normally think of as the next "Level".
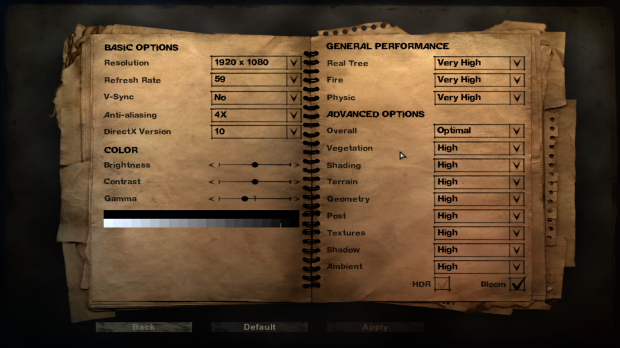
In the game you take the role of a mercenary who has been sent to kill the Jackal; unfortunately your malaria kicks in and you end up being found by him. Long story short, you become the errand boy for a local militia leader and run all over the island doing his bidding. Settings we used for testing are shown below.
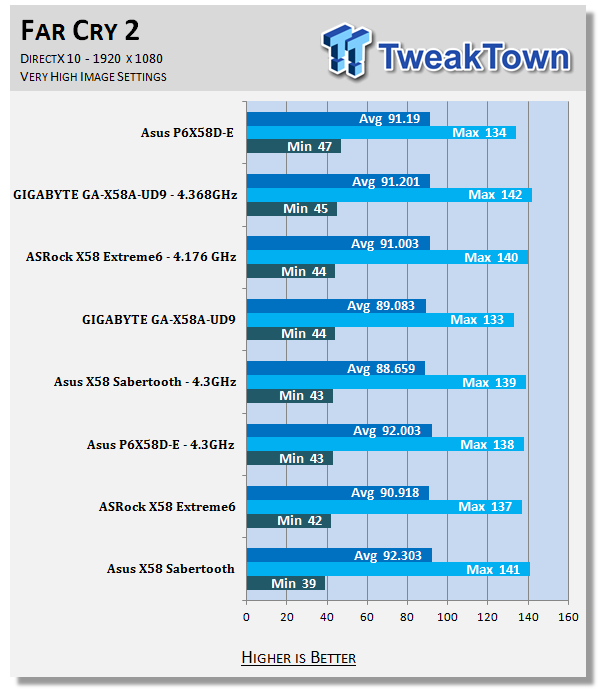
Far Cry 2 was not as nice to the stock speed run as Modern Warfare 2 was. Here we find the Sabertooth at the bottom of the pile with a minimum of 39. Still, we have to stress that at 39FPS you are over the level in which the human eye can register individual frame changes (normally between 32-36 FPS). So while it might be technically slower than the others, you would never be able to see it.
Battlefield Bad Company 2 (DX11)
Version and / or Patch Used: V1.00
Timedemo or Level Used: From washing up on the beach to the mine fields.
Developer Homepage: http://www.ea.com/
Product Homepage: http://badcompany2.ea.com/
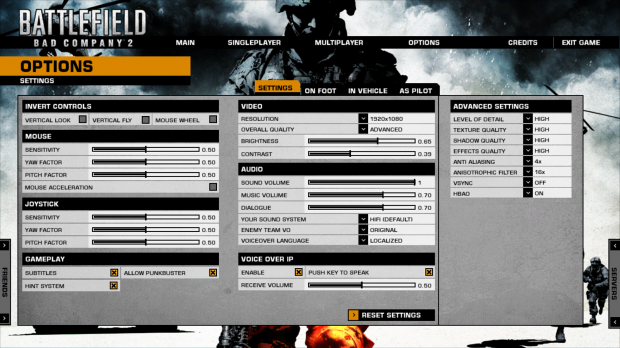
Battlefield Bad Company is another sequel and also another game "franchise". Bad Company 2 is also our DX11 Shooter game. The game follows a fictitious B company team on a mission to recover a Japanese defector. This puts you back in World War II (at least for the beginning of the game) while the multi-player game is centered on much more modern combat. For our testing we used the single player mode. Settings are shown below.
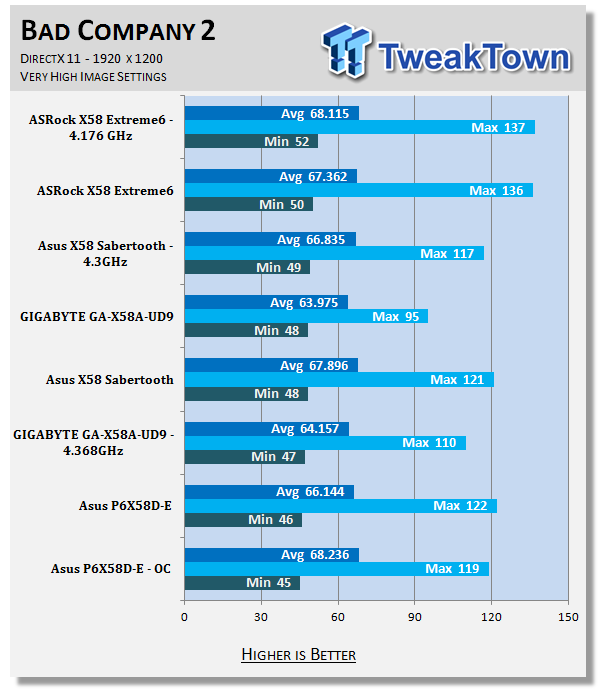
With Bad Company 2 the results are even closer with only a 7 FPS difference from top to bottom. Still, all of the boards are above the magical 32 FPS, so while the Sabertooth was up in the thick of the group, you would never know. But you can be certain that you would not have any issues with running Bad Company 2 on it.
Gaming Conclusion
In gaming the usual mark is the frame rate. This is the measure that people use to determine what GPU or system is better. However, understanding that once you reach the refresh rate of the monitor you are only adding to the feel of the game means that you often need to look at the rest of the gaming experience.
If you have a board that can deliver good frame rates, but has terrible load times or bad audio, you will still have a poor gaming experience. The Sabertooth manages to cover all of these bases. The HDD performance is enough that it should impede your gaming with overly long level load times.
The audio, while it will not win any awards, is more than good enough to give you a good gaming experience, even with headphones (although the volume drops off due to the lack of amplification).
Power Usage and Heat Tests
Power Consumption
We are now able to find out what kind of power is being used by our test system and the associated graphics cards installed. Keep in mind; it tests the complete system (minus LCD monitor, which is plugged directly into an AC wall socket).
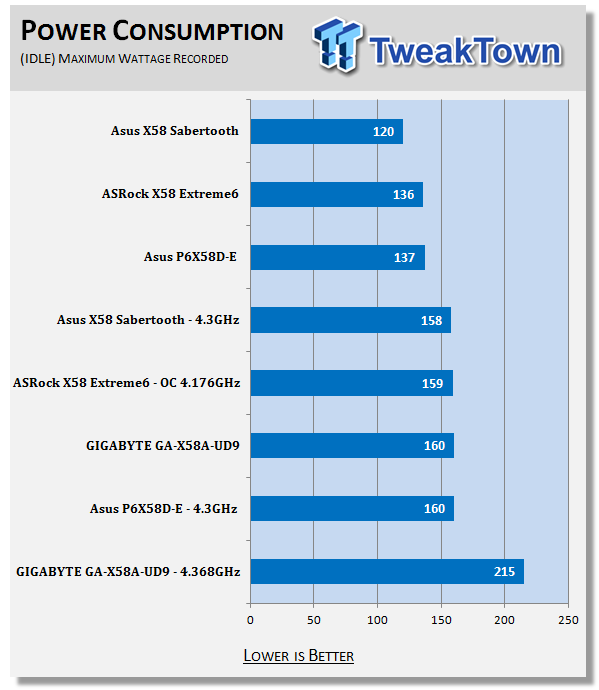
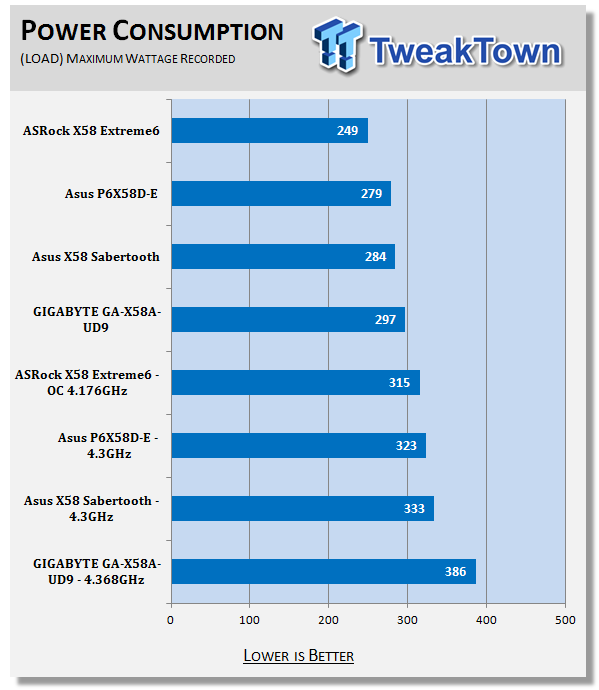
At idle the Sabertooth X58 has some excellent power usage numbers. Under load things do change considerably as everything kicks in and starts demanding its share of power from the wall.
Heat Generation
As a new measure, we are now monitoring the heat generation from the key components on the motherboard; this being the Northbridge, Southbridge (if it contains one) as well as the Mosfets around the CPU. The results are recorded at idle and load during the power consumption tests.
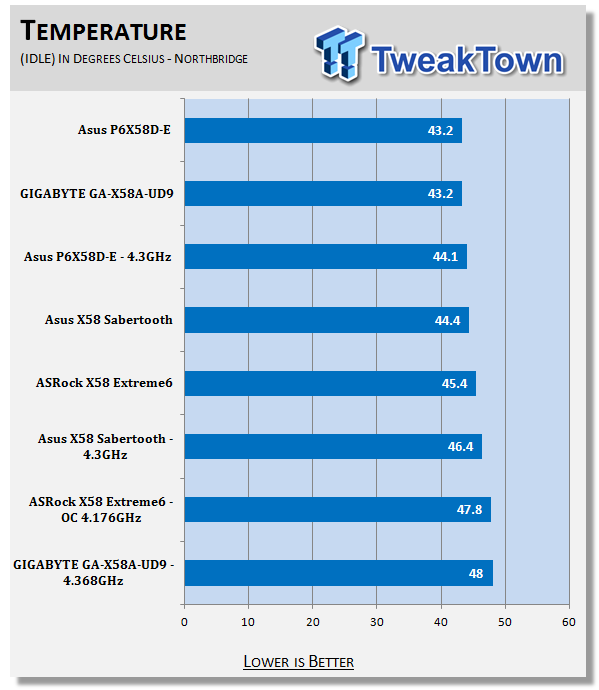
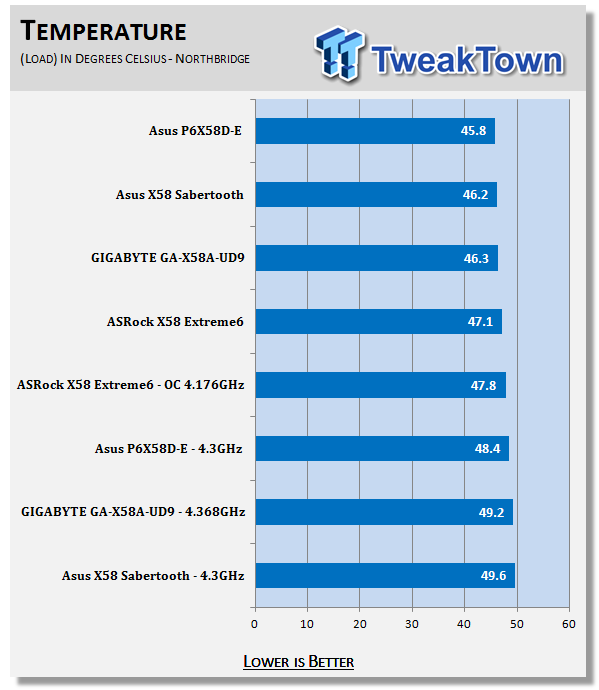
One of the advertised features of the Sabertooth is the CeraM!X heatsink coating. According to the PR write up this should "dissipate heat better with its microscopic irregular surface". As you can see from our readings, this was not necessarily that case; we can say that it had a low delta between idle and load at stock speeds, but again things broke down when we overclocked the system.
Final Thoughts
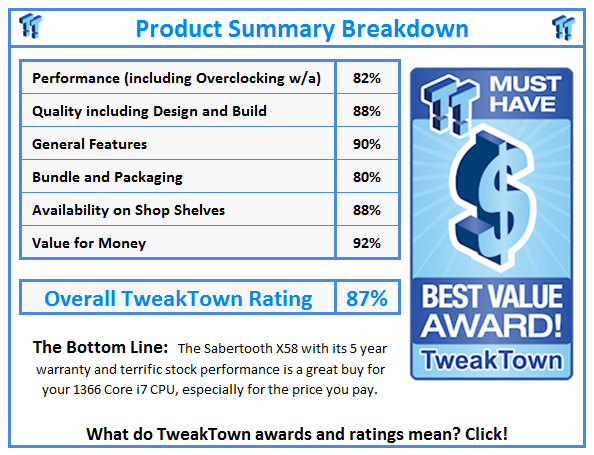
After my time with the Sabertooth X58 I am left with a very distinct impression. This is a board that is designed to last. Although we had good overclocking results in terms of the actual clock speed we saw, many of the performance numbers drop. This would seem to indicate that the Sabertooth is designed with stock speeds in mind.
However, do not let that fool you. At stock speeds it performs very well. It is also built with efficiency and component life in mind. This is a board that will just run and not give out on you. But the Sabertooth offers more than just longevity; with the better components you get better efficiency. This efficiency also has no effect on the stock performance of the Sabertooth where we saw it out perform boards that cost much more.
In the end, if you are looking for a hardworking, good performing motherboard for your next system, the ASUS Sabertooth X58 would be an excellent choice. This is even more so with its $189.99 price tag at NewEgg.com and the 5-year warranty that ASUS gives you.

