


Our Verdict
Introduction, Specifications, and Pricing
With huge success from their Core Series cases, Thermaltake does not seem to have any intentions of slowing their roll anytime soon. This series has brought the mainstream market cases with above average structural integrity, excellent liquid cooling capability, all wrapped up in a sleek and tidy package. No matter which from this series we are discussing, these three things ring true in every one of them. This review marks the ninth chassis from the Core Series, and not once have we been disappointed with what Thermaltake has sent.
Thermaltake sent us one of their latest designs in the land of well-appointed mid-tower chassis designs, but there are two versions of it. Both cases offer the same bits, down to one exception, the cooling. In the version we have today, it comes with two black Turbo fans, one low in the front, and another in the back. However, there is an RGB variant that sports three 120mm Riing fans. Outside of the cooling, the main idea with this design is to deliver full modularity for storage and cooling. This chassis still provides plenty of room for huge, dual-tower CPU air coolers, and the longest of video cards and power supplies. A lot is going on inside of this mid-tower chassis; we are just scratching the surface so far.
As many Core Series cases as we have seen, and the fact that we know what to expect to some extent, but it is always interesting to see what Thermaltake is doing with the inside of cases these days. To be blunt, Thermaltake is one of maybe three companies that we find are trying to maximize potential in every design. Many companies will waste extra space, or give half-hearted attempts to hide storage drives; only a select few take it to the extent Thermaltake delivers. This all holds true in their latest chassis we were sent, the Core X31, and we are sure you will want to have a look at this affordable, highly modular and water cooling capable, mid-tower chassis has to offer.

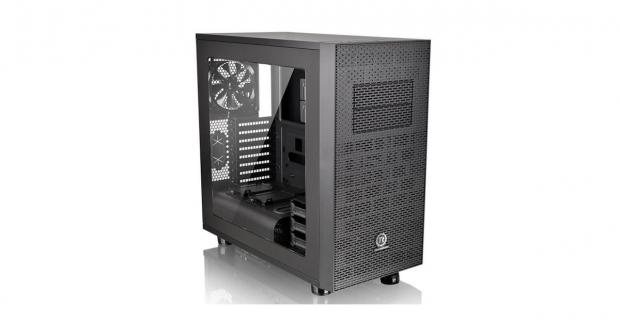
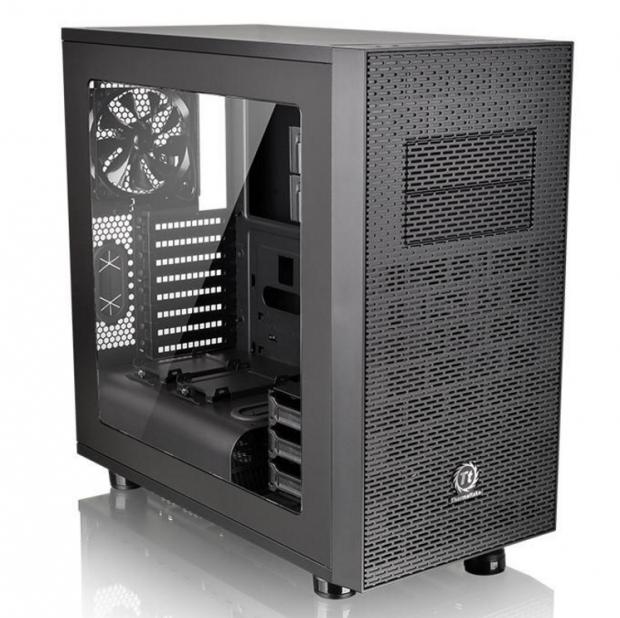
The Core X31 mid-tower chassis is an SPCC steel based design with trim made of ABS plastic. It measures in at 490mm tall, 250mm in width, it is 511mm deep, weighs in just less than nineteen pounds, and comes in any color you want, as long as that choice is black. There is a large transparent window on the left side of the chassis in this design, and it affords a view of the whole inside of the chassis. The Core X31 delivers a pair of 5.25" bays that are removable, a cage of three plastic trays for 3.5" or 2.5" drives, and another pair of metal trays for 2.5" drives only. As a bonus, if you should want to remove the HDD rack, the plastic trays inside it can be hung behind the motherboard tray. ATX, Micro-ATX, and Mini-ITX motherboards can be used inside of it, with eight expansion slots to fill, and the front I/O panel offers USB 2.0, USB 3.0, and HD Audio.
The cooling provided in this chassis consists of a pair of 120mm, black, Turbo fans, which provides no CFM rating, but we are told they are 16 dBA and can spin at 1000 RPM. Most will likely discard these in a chassis such as this, though, and the options here are wide open. The front of the chassis offers room for a pair of 120mm fans, a pair of 140mm fans, or you can opt for a 200mm fan to push air into this tower. The top of the chassis raises what the front offered by one, giving you room for three 120mm fans, three 140mm fans, or the option for a pair of 200mm fans. The back of the chassis has slots that will house either a 120mm fan or a 140mm fan, and at the bottom of the Core X31, dependent on the PSU choice, you can install either a pair of 120mm fans or 140mm fans there as well. As for water cooling, the X31 still has it covered. The front can house a 240mm or 280mm radiator, the top can house a 360mm or 280mm radiator, and the rear and bottom both have room for a single 120mm or 140mm radiator.
Thermaltake also offers a clearance section with their chart, and this is all great information to have before buying this chassis. First, we see that if you opt to cool the CPU with an air cooler, you are given 180mm of room for one. Video cards can be blocked by the HDD rack, as it can be moved up the inside of the chassis, and it can restrict cards to 278mm in length. With it removed, you then are offered 420mm of length for them. PSU length is of some concern, only if you want fans on the floor, that is. With one fan in, they show a limit of 180mm and a 220mm limit without fans.
We mentioned earlier that the Core X31 was an affordable design, and looking around for availability and pricing information, we are happy to see this chassis priced where it is. No matter where we looked at the time of writing this, the pricing is the same across the board. No matter if you go to Amazon or Newegg, both locations are offering the same deal currently. We found the Core X31 you are looking at today was priced at just $99.99. Pricing does change a bit if you are looking for the RGB version, though. While Amazon lists the Core X31 RGB at $129.99, you can save $10 if you shop at Newegg. Either variant you do decide to go with, the Core X31 is so feature-rich and aesthetically appealing that you will find it hard to resist the temptation to purchase one.
Our Latest Mid-Tower Cases Review Coverage
Chad's Chassis Test System Specifications
- Motherboard: GIGABYTE GA-Z68X-UD4-B3
- CPU: Intel Core i7 2600K (buy from Amazon)
- Cooler: Corsair H80i GT (buy from Amazon)
- Memory: G.Skill Ripjaws F3-12800CL6D-4GBXH
- Video Card: ZOTAC GeForce GTX 970 AMP. Extreme Edition (buy from Amazon)
- Storage: SuperSpeed 128GB SSD
- Power Supply: SilverStone SST-ST85F-G (buy from Amazon)
- OS: Microsoft Windows 7 Ultimate 64-bit (buy from Amazon)
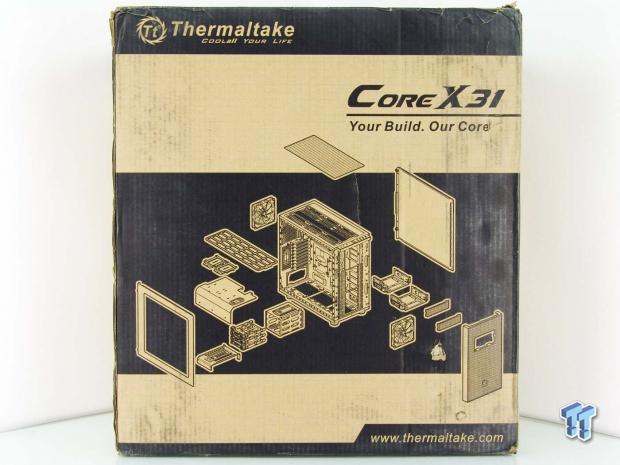
Packaging

The Thermaltake name, logo, and slogan are all found at the top in the thin black band. There is a thicker band below broken up by the rendering and LCS certification icon of the Core X31. Then, along the bottom, Thermaltake offers their site address to look for this chassis before buying it off the shelf.

On this side of the box, we are again given all of the naming up top, with a much smaller rendering in the middle of this panel. Nearer to the bottom, we are offered a list of features which is repeated many times in various languages.
As Thermaltake likes to do on a lot of their boxes, they provide an exploded diagram of the Core X31. The diagram shows all of the panels, removable bits, supplied cooling, and answered any questions you may have had about the design.

The last side of the packaging starts off just like its opposing panel, but this time at the bottom, there is a slightly condensed specifications chart to the one we covered earlier.

With plastic wrapped around each foot, found clinging to the inside and outside of the window, and then a bag encompassing the entire chassis, rubbing and abrading is kept from causing any damages. To be able to deliver a chassis in pristine condition like ours is, they also use thick Styrofoam end caps to take the big hits from transit. As rough as our box looked, the Core X31 inside arrived unharmed.
Thermaltake Core X31 Mid-Tower Chassis

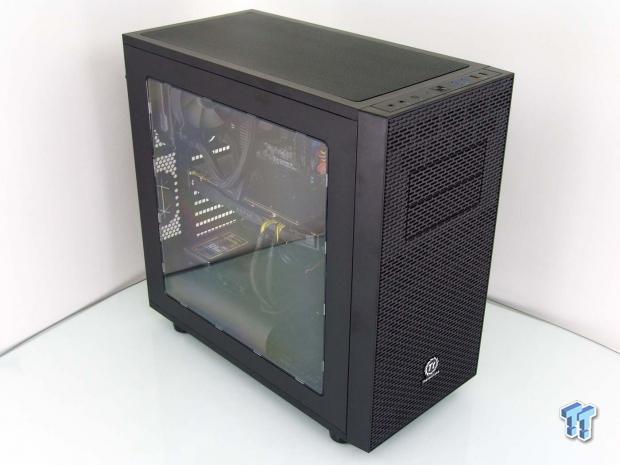
The face of the Core X31 comes with an entire panel of mesh, which looks like stacked bricks. At the top, there is a pair of removable panels to utilize the 5.25" bays, and towards the bottom of the chassis is a Thermaltake logo, boldly contrasting the black around it.

At the top, but not connected to the front bezel, we find the front I/O panel. Starting at the left of the I/O panel, there are HD Audio jacks, a tiny reset button, an HDD LED, and the LED-ringed power button is in the middle. Beyond those, we then find the pairs of USB 3.0 and USB 2.0 ports.

The top of the chassis is made of steel, and for now is covered with a large magnetic dust filter. The dust filter is made of fine mesh to keep dust out and removes easily to access fan or water cooling mounts under it.

The left side of the Core X31 shows the gaps in the panels are almost non-existent, and that the vast majority of the side panel is a window. In most instances we do not like to see the bays, but since these can be removed and replaced with other goods you may want to see, we can appreciate its width.

We first noticed that the side panels have both thumbscrews and hex-head screws holding them onto the frame, most likely for shipping reasons only. Down the back we see the rear I/O area and the slots and mesh to the right for the rear exhaust fan. Beneath the cable lock loop, we see eight expansion slots, a large rubber grommet next to them, and the PSU is installed at the bottom.

The right side of the Core X31 is plain, but again, the panel fitment is on point, keeping the lines tight and tidy. There is a finger-grab at the back to help with removal, but both side panels come off with little effort or struggle.

Four shiny plastic legs with rubber rings at the bottom of them are used to support the chassis off whatever surface it sits on top of. This way the majority of the lower portion of this chassis, what is under the fan filter, can be used as an air intake, passive or otherwise.
Inside the Core X31

Removing the front bezel is easy using the cutout at the bottom to grip and pull the panel from the frame. Inside of the bezel we see dust filters in the removable bays, and a larger one in the lower intake section. The front of the chassis has slots for fan installation so they can adjust as needed, and we also see screws in the front of the optical bay trays, which allows for their removal.

Inside of the Core X31, we see that the wiring is run behind the motherboard tray, in through a grommet, and then gets tucked below the PSU cover, so there is no way for it to damage the window. It is hard to see from this angle, but inside of the top HDD tray, we did find a bag of hardware to use for installation.

The pair of 5.25" bays are offered with tool-free clips on this side of the bays. Both sides can be secured with screws if desired, and of course, as we addressed, they can be fully removed if desired.

Tucked in the bottom of the chassis, just behind the 120mm intake fan, we find an HDD rack sitting on a pedestal. They three trays inside will house either a 3.5" or a 2.5" storage drive, and these trays can also be relocated outside of this rack. That is because this HDD rack is removable as well.

We had to remove twelve Phillips head screws to get the bays out of the Core X31. Once these are out of the way, it opens the top for longer water cooling options, and opens the front third of the main chassis section, allowing for more water cooling gear.

The top of the chassis offers grooves to keep 120mm and 140mm cooling offset to the left side of the chassis. This helps keep things away from the memory when using radiators. Keep in mind, there is also a band of slots on the right side too, to allow two 200mm fans in here.
Inside the Core X31 Continued

The motherboard tray is dropped quite a bit from the top panel, and on it, we found eighteen wire tie points, five rubber grommets to pass wiring through, and a pair of large openings at the top for more wiring. There is also a large opening for back plate access, and the tray is labeled for ATX and Micro-ATX boards.

At the bottom of the motherboard tray, we then ran into the PSU cover. On top of it, we see a pair of metal trays for 2.5" drives, a large hole with a grommet for GPU wiring, and a cutout at the back for the front I/O wiring and the SATA drives connections.

You need to remove four screws, shift the PSU cover to the right slightly, and then lift up on it to remove it from the chassis. Once it is out, you have all of that room for the PSU at the back and options for fans or water cooling as well.

At the back of the Core X31, we find the black 120mm fan hanging there, and the sleeved cable and 3-pin connection match that of the intake fan. As for the expansion slots, the covers are held in with thumbscrews.

Behind the tray the depth for wiring is great. Thermaltake does tie up the wiring for you, but it is currently blocking one of the three optional locations to hang the plastic drive trays. Two sites fall behind the left support rail section, and the third is found under the CPU cooler access hole. With all of the tie points and well-placed holes for the wiring, it should be easy to keep the wiring tidy.

The front I/O wiring is long and gives you room to wire it cleanly without much trouble at all. In the mass of black wires, we see the HD Audio Connection, the wires for the lights and switches, the native USB 3.0 connector, the USB 2.0 connection, and the 3-pin fan connection of the Intake fan.
Hardware & Documentation

The hardware ships in two bags, a smaller one inside of another. In the smaller of the two bags, this is what is included. There are PSU screws, standoffs and a socket, fan screws, motherboard and SSD screws, and optical drive screws.
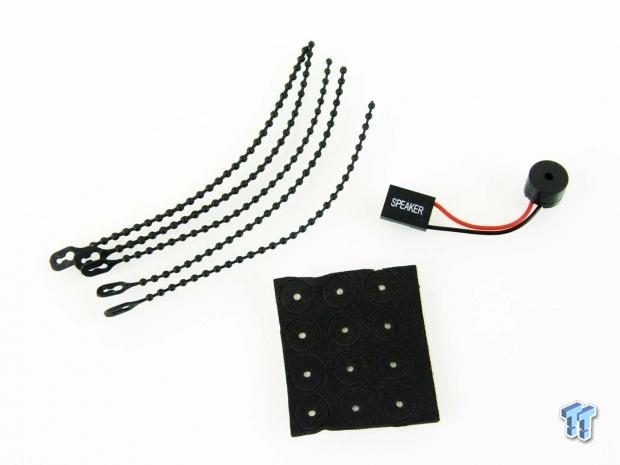
In the larger bag, we found a set of five adjustable straps to help maintain the wiring. There is a motherboard POST speaker included, as well as foam rubber washers to isolate mechanical drives in the metal 2.5" drive trays.

The manual is done well. Things start off with a list of all the hardware and what it is used for, and then the manual jumps right into how all of the bits are installed. It also shows how to remove the modular components, where they can be moved to, and completely covers the cooling options.

Thermaltake covers both sides of the coin when it comes to cooling. They are sure not only to show which fans can go in each panel, but they were sure also to do the same for radiator options, showing us that without a doubt, you are safe to install anything they are showing here.
Case Build & Finished Product

With the components we use for our chassis builds, we dropped the optical device long ago. So as we finished the build and snapped the front bezel back onto the frame, we did not change the aesthetics here one iota.
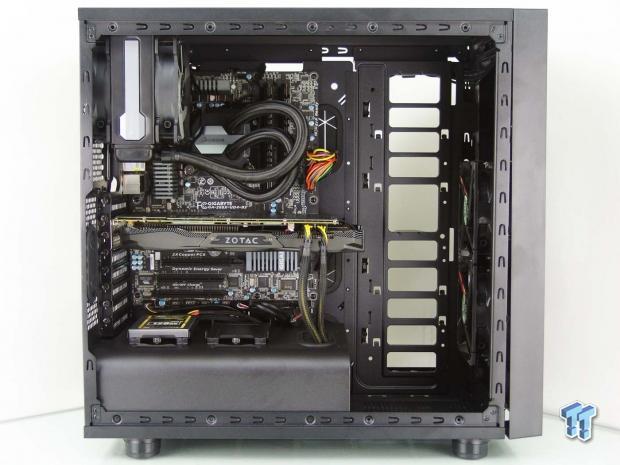
We did leave the bays removed when we did our build, as we simply used the tray on the PSU cover for our SSD. We did move the exhaust fan to the front of the chassis so we could install the AIO, but nothing inside of the Core X31 is out of line or caused us any issues during installation.

The dust shield was a tight fit, but we got it snapped in. We like being able to raise or lower the AIO via the screw slots, and we found no issues aligning the video card. Even when it came to the PSU, we set it on the pads inside, and the holes were all in line, ready for the screws.

We made sure to rewire the Core X31, so that if we needed to, we could use both of the HDD trays optional locations, like how we have it at the bottom. So many tie points you can have four trunks of wiring running across the tray, and large openings to hide everything under the PSU cover.
There were no issue with the doors, as you just need to hook them along the front edges, lay the door flat, and slide it forward and screw in the captured thumbscrews. All we need now, it a power cord.
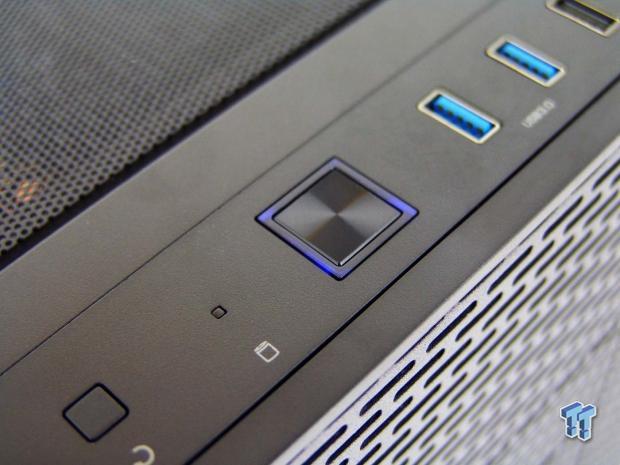
We did miss the tiny blue LED flicker as the SSD booted up and the OS loaded, but the LED ring around the power button is fully lit. Neither of the lights is brilliant, just enough to see them, but not bright enough to fill the whole room with light when it's dark.

The transparent window on the side afford a brilliant view of the gear inside of it, and once we removed the bays, our issue with seeing them was removed. If this was the RGB version, the look would be even more impressive, inside and out, then what we see here, and we are happy with this as it is.
Final Thoughts
Thermaltake does it again. It would seem that with so many cases in the same series, one might get bored looking at them, or reviewing them after a while, and that simply is not the case here. While the Core Series has a defined look that you either love or hate, every version we have been sent, we have thoroughly enjoyed looking at, installing gear into, and tinkering around with.
The Core X31 is yet another chassis that came from a great pedigree and proves it is superior to many cases on the market in its class. If you decide to use the chassis as it is shipped, if you gut it by removing the components, even when loaded with all of your gear, the X31 is solid as a rock, spacious in all areas. It is a design that is just waiting for you to add your individual flavor to it.
For a mid-tower chassis, there is a whole list of reasons that we feel there is a lot of bang for the buck. Dust filters where they are needed most, a PSU cover with optional storage and great wire management options in it, great wire management throughout the entire chassis, modular drive bays, hidden optional drive locations, the list just seems to go on forever. From every angle, Thermaltake has thought things through and proven that they have a design that will fit any possible configuration. As we sit here thinking everything over again, we should bring up that we found the stock fans to be a bit lackluster. Using the AIO, temperatures were not bad, but mainly because the chassis breathes so freely, not that the pair of 120mm Turbo fans were offering up much air flow. However, with less air flow, there is less noise, and the Core X31 never went above 28 dB in our testing around the outside of the chassis.
If you happen to be in the market for a mid-tower chassis, there is only one question left to cover. Since Thermaltake offers up so much in this design, and it is a chassis that can be used and reused many times with various configurations of parts, are you getting the vanilla or the RGB version of the Core X31? While we found no faults with the aesthetics of our X31, we do admit that we would also have enjoyed it more with RGB fans installed. Not only do you get the lighting to see inside and out, but they come with better specifications as well, so you get more cooling performance out of the box too. Considering the difference is only $20 from the $99.99 version we looked at today, versus the X31 RGB listed at $119.99, we feel it is easily worth the upgrade. Either way you decide to go into the realm of mid-tower cases, it is designs like the Core X31 from Thermaltake which keeps all the others on their toes.
Chad's Chassis Test System Specifications
- Motherboard: GIGABYTE GA-Z68X-UD4-B3
- CPU: Intel Core i7 2600K (buy from Amazon)
- Cooler: Corsair H80i GT (buy from Amazon)
- Memory: G.Skill Ripjaws F3-12800CL6D-4GBXH
- Video Card: ZOTAC GeForce GTX 970 AMP. Extreme Edition (buy from Amazon)
- Storage: SuperSpeed 128GB SSD
- Power Supply: SilverStone SST-ST85F-G (buy from Amazon)
- OS: Microsoft Windows 7 Ultimate 64-bit (buy from Amazon)
 Montech TG3 Mid-Tower Chassis Review
 Noctua NL-LC1-36 Liquid CPU Cooler Review
 Lian Li B4-mATX Review: a compact mATX SFF case with excellent airflow and premium features
 Ocypus Sigma F36 BK ARGB Cooling Fan Review: high airflow and unified design in one frame
 PCCooler CPS RZ820 Display Review: a flagship-level CPU air cooler with an LCD screen
 NVIDIA GPU rumors swirl claiming major price hikes of 20 to 30% - or more - are coming, as VRAM costs climb
 AMD's RX 9050 GPU comes up short in first review, but there's a good reason why it lags behind NVIDIA's RTX 5050 here
 Sony confirms it won't reverse disc phase out: 'We're going to cautiously move forward'
 GeForce RTX 50 Series GPU prices are rumored to increase by 30% in the coming weeks, months
 TSMC's 1.4nm process timeline accelerates, with mass production happening sooner than expected
 Diablo 4's next season is bringing back iconic items from Diablo 2 and 3
 Razer Huntsman V3 HE Magnetic 8K keyboards include a Mini 65% model
 Four C's of Xbox's future outlined in new CEO memo
 Linux kernel patch boosts Steam Deck 1% lows by 31.8% by fixing AMD CPU clock handling
 Nexus Mods new owner wants to make installing mods as easy as using Spotify
 ASUS ROG Strix X870E-A Gaming WiFI7 Neo Review - A New Enticing Option
 Logitech G316 X 98 Wired Gaming Keyboard Review - Retro-Inspired Board that Falls a Little Short
 Biwin M560 2TB SSD Review - Best Overall Retail-Ready DRAMless SSD
 Logitech G512 X 98 Analog Mechanical Gaming Keyboard Review - An Innovative Two-in-One
 Thrustmaster T.Flight HOTAS 5 MSFS Edition Review
 SteelSeries Arctis Nova Pro Omni Wireless Headset Review - One Headset to Rule Them All
 SteelSeries Arctis Nova 7 Wireless Gen 2 Headset Review - New and Improved, But Is It Enough?
 AMD Ryzen 7 7700X3D Review - Days of Future Past
 I switched my PC to encrypted DNS in Windows 11, and browsing felt more private
 Printer Not Working in Windows? How to fix detection, print queues and drivers
 The Ultimate Guide to Personalizing Your Windows 11 Taskbar
 How to Turn Your Windows Laptop Into a Second Monitor with Miracast and Wireless Display in Minutes
 6 Mistakes to Avoid When Buying a Windows Laptop
 I capped Windows Update's bandwidth with Delivery Optimization, and my downloads stopped choking
 I use this decade-old free tool that finds files faster than Windows Search does
 I install and update most of my apps with this Windows command now, and I stopped downloading sketchy installers
 Hisense U6SF 65-inch MiniLED TV: High Performance Meets Leisurely Convenience
 I stopped digging through Windows menus after I set up this one folder