


Our Verdict
Introduction, Specifications, and Pricing
At the beginning of this year, Thermaltake sent us their largest chassis to date, when they released the Core W100, and that was without even considering the even larger WP100 option of that same design. However, the W100 has been dwarfed. What you are about to see here today will hold "all the things", and in that statement, we are not over exaggerating in the slightest. This latest chassis can house tons of gear, multiple systems, and keeps asking for more.
This steel chassis that requires complete assembly is not only huge, but is also one of the most feature-rich, and most customizable designs on the market today. Tons of room for optical bay drives and devices, tons of storage locations all around the case, and a sophisticated look that comes along with the new Tt Premium product line. Honestly, as long as you can use a screwdriver, and know how to follow a book of instructions, this chassis is not out of your reach. With all of the customizable options found in this design, it nearly guarantees that your PC will be unique, and easy to make it that way.
The Tt Premium Core W200 is what we have been sent to show you today. In this review, we are covering all of the options, installing a massive amount of gear into it, and hopefully showing off the potential of what the W200 is capable of doing. If for some reason, you find that this massive Core W200 chassis is not enough space, just like the W100 offered, the W200 also has a pedestal option as well. That being said, sit back and get comfortable, as we have a lot to show you in what has taken top honors of largest chassis ever to be reviewed by us.
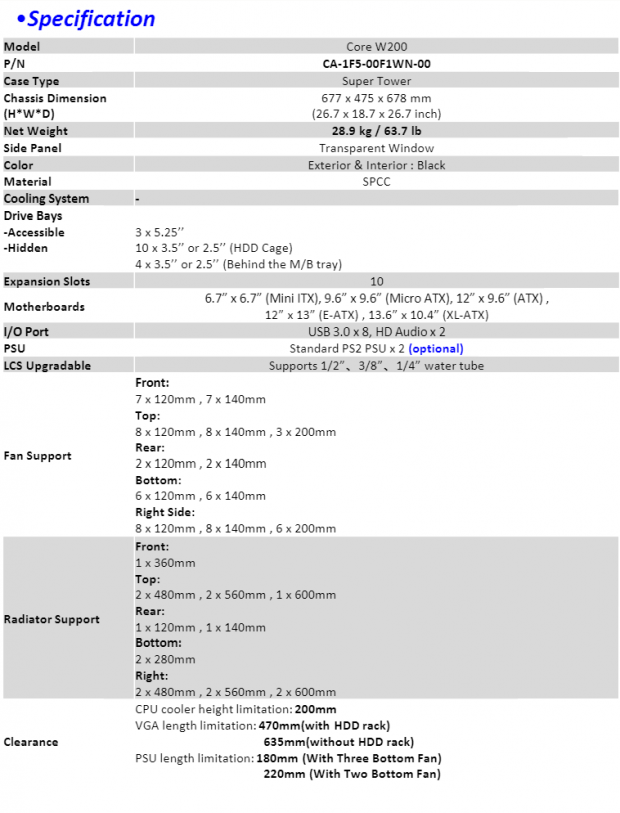
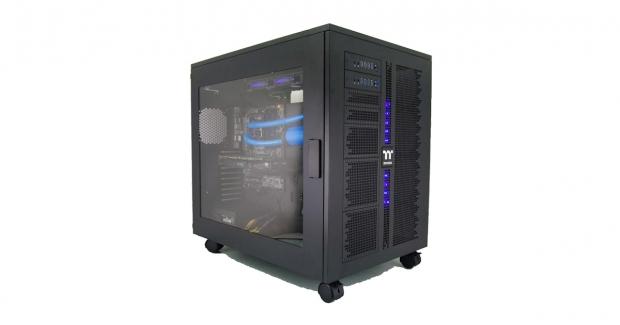
The Core W200 Super Tower chassis measures in at an astounding 26.7" tall, 18.7 inches of width, and is 26.7" from front to back, weighing in at a hefty 63.7 pounds without a drop of hardware inside. The chassis is built from panels and components made of SPCC steel, and all panels have been painted inside and out in a textured black. There are a few bits made of ABS plastic as well but are also black to match the chassis. There is also a gigantic window offered with this design, and it takes up almost all of the left side panel, offering a terrific view of the gear inside of this larger than life chassis.
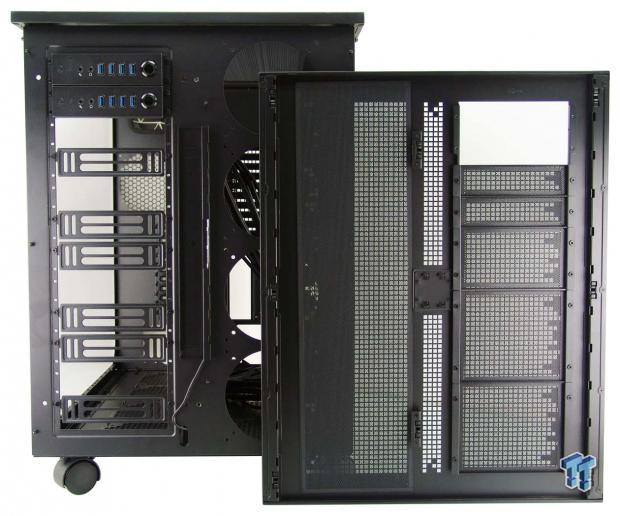
Inside of the chassis, we see that this design offers the option to install three optical devices to fill the bays under the front I/O panel. The I/O panels, as there are two, offer USB 3.0 connectivity, HD Audio, Power buttons, and activity LEDs. There is also an option to install a drive rack that will house up to ten 3.5" or 2.5" drives, but these can also be mounted to the front of the chassis without the rail support system. To take storage even further, you can also opt to install a few bits from the hardware box, allowing another four trays to hang behind the main motherboard tray. On top of the optical bay support, and the plethora of storage drive space and optional locations, this chassis will also house a pair of motherboards. In either side, you can have a Mini-ITX, Micro-ATX, ATX, E-ATX, or XL-ATX motherboard screwed down to one of two trays.
Cooling in the chassis is all up to the consumer, as not a single fan is shipped with this chassis. However, there are too many locations to even keep track of. The front of the chassis allows for up to seven 120mm or 140mm fans, three on the left, and four to the right. The top of the chassis does one better. Since it is completely open, using some of the radiator supports, you can house eight 120mm or 140mm fans in the top, but it can also take on three 200mm fans as well. The rear of the W200 allows for two 120mm or 140mm fans, one to either side. The bottom of the chassis needs room for power supplies and is why the specifications show there is room for only six 120mm or 140mm fans.
Using another pair of the radiator supports, the right side of the chassis offers the same space at the top of the chassis does, and room for all three fan sizes there too. So, if our math is right, that is thirty-one 120mm or 140mm fans. Water cooling support is robust as well. The front will house a 360mm radiator on the left, and the top can take on a pair of 480mm radiators, a pair of 560mm radiators, or three 200mm radiators. The rear can house only single 120mm or 140mm radiators, but the right side supports all the same space as the top offers again. If that is not enough space for your needs, you may want to look into the P200 pedestal as it adds even more space to this oversized colossus of a case.
Our Latest Super-Tower Cases Review Coverage
Pricing does take this chassis and its pedestal option out of the hands of economic chassis buyers, but the cost is in no way out of line. We were told that the Core W200 on its own, as you will see it here, will set you back $459.99 when it hits the shelves. If you want to opt in for the pedestal, the P200, that will cost you another $149.99 on top of the initial purchase price. While we were not told of a combo deal, we will assume at this point, that Thermaltake will also be offering a WP200, which combines both products, at a slightly discounted cost.
We have had the pleasure or reviewing quite a few high-end cases in the past, and some more expensive than this W200, but not one of them has offered us what this chassis does. Thermaltake may seem like they are demanding a huge chunk of your money, but the reality is, you will be hard-pressed to find something this large, this well-equipped, and with the sheer amount of options that the W200 brings forth, right out of the box. The fact that you have to put it all together has no bearing to us, as the assembly is half the fun.
Chad's Chassis Test System Specifications
- Motherboard: GIGABYTE GA-Z68X-UD4-B3
- CPU: Intel Core i7 2600K (buy from Amazon)
- Cooler: Corsair H80i GT (buy from Amazon)
- Memory: G.Skill Ripjaws F3-12800CL6D-4GBXH
- Video Card: ZOTAC GeForce GTX 970 AMP. Extreme Edition (buy from Amazon)
- Storage: SuperSpeed 128GB SSD
- Power Supply: SilverStone SST-ST85F-G (buy from Amazon)
- OS: Microsoft Windows 7 Ultimate 64-bit (buy from Amazon)
Packaging

The portly, five-foot tall delivery woman wanted to roll this chassis to my door, and the icon at the top of the box alludes to why. With the box, packaging, and the W200, this box is over thirty kilograms in weight and does require a lot of effort to move it. So, either get help or lift with your knees, as this chassis will test your muscles.
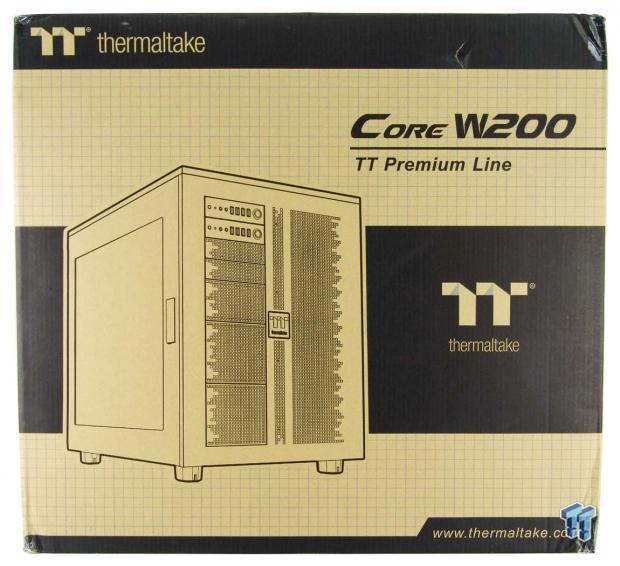
Keeping most of the investment of this chassis to things inside of the box, Thermaltake opts for plain cardboard and black printing on the packaging. Here on the front panel, we see the new logo at the top, a large rendering of the chassis and its Core W200 naming in the middle, and their site address at the bottom.
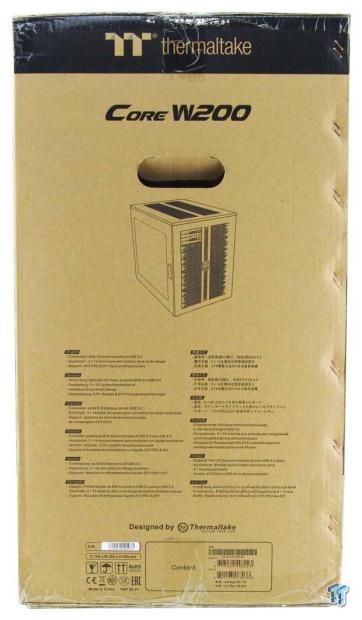
The Core W200 name goes above the handle, and there is a smaller rendering of the chassis below it. But this side panel offers three features in many languages. It covers the front I/O panels and connectivity, the storage bay options, and that it uses ATX PSUs and is a DIY chassis design.
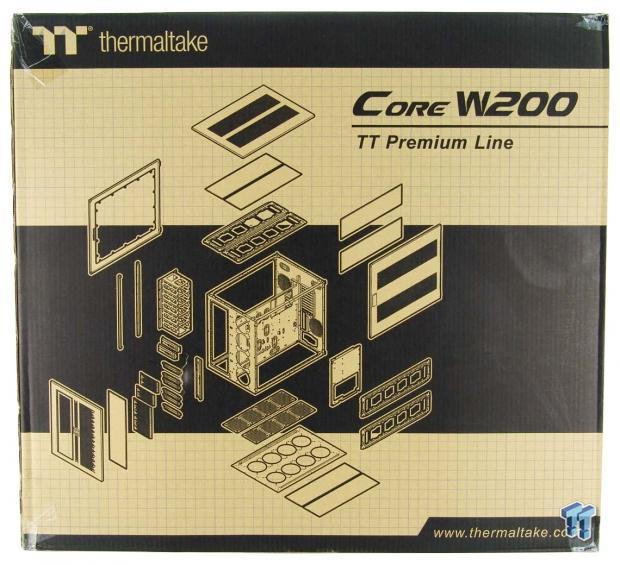
The back of the box tells the box store customer a lot about this chassis. In the exploded diagram of the W200 that adorns this die of the box, you can see how everything is laid out, where the dust filters are, where the radiator supports go, even that right side has a second motherboard tray.
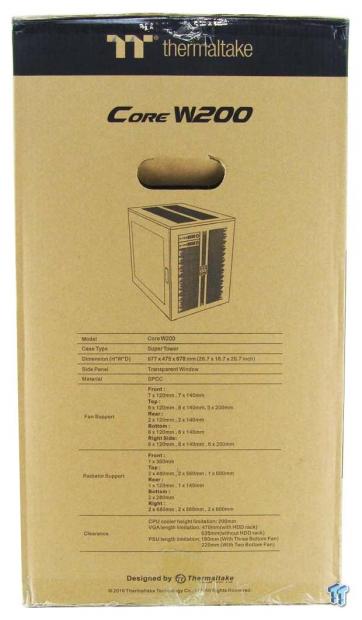
The last panel offers us a condensed specifications chart near the bottom. It still covers all of the major components, cooling and water cooling support, and even the clearances for the video cards, CPU coolers, and PSU lengths.
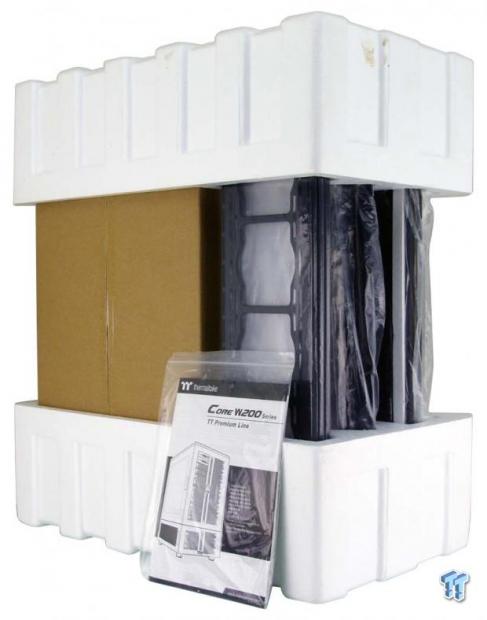
With the box now out of the way, we find the literature is shipped so that it is easily found first. As for the components that make up this chassis, each component is wrapped in plastic, has cardboard between each part, and is then fitted into thick Styrofoam end caps to keep it all protected. There is also a large box full of all the hardware and goodies you can use inside, seen off to the left.
Thermaltake Core W200 Super-Tower Chassis
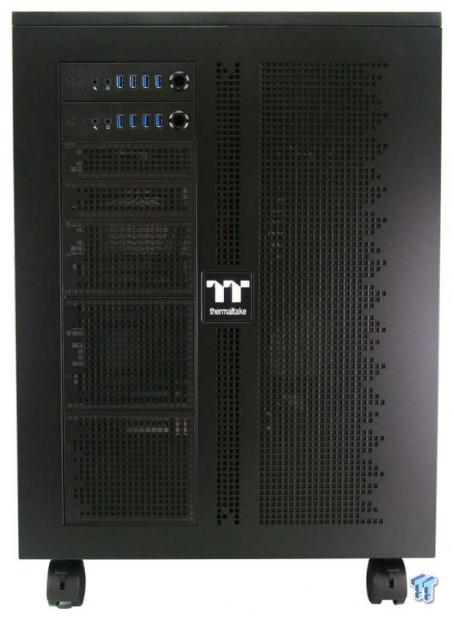
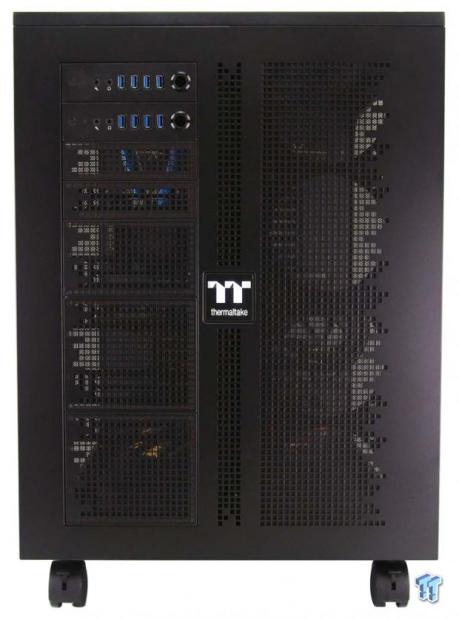
After roughly an hour of assembly, this is what we see of the W200. The front panel is split into two halves with the new logo right in the middle. Square blocks are used for ventilation, and while the right side is solid, the left is broken up into groups to allow for optical devices and ways to customize the layout of things on that side.
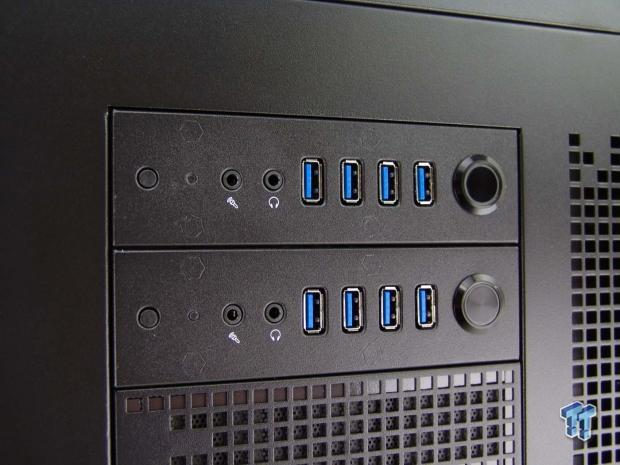
With the capabilities of housing two different systems inside, it only makes sense that there are two front I/O ports offered as well. Each of the panels provides a tiny HDD activity LED to the left, followed by HD Audio jacks, four USB 3.0 ports, and a large power button with LED ring around it.

The top of the chassis offers ventilation nearer to the middle of the panel. This is done to accommodate the fact that there are trays that can clip on the top, allowing for all of the cooling support we discussed in the specifications.

The left side panel is mostly a clear window, with enough steel around the edge to keep the panel rigid and strong. There is a handle to get a grip to open the door via hinges at the back, and it is magnetically held shut.
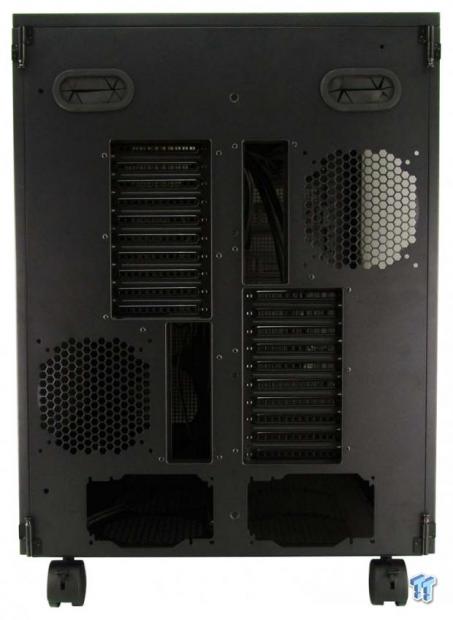
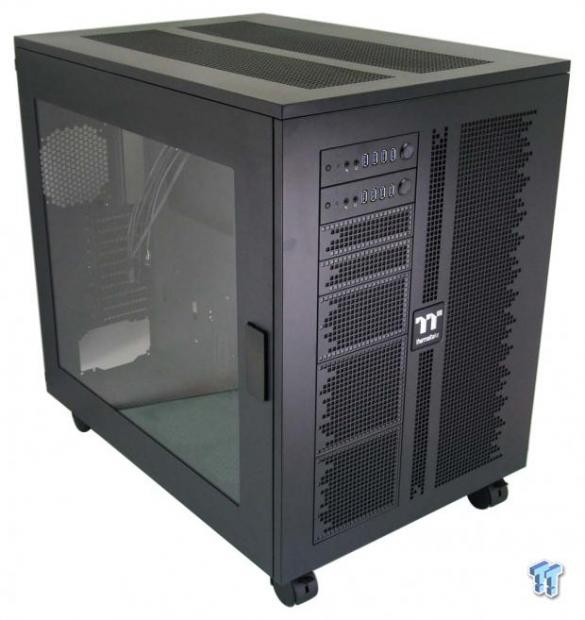
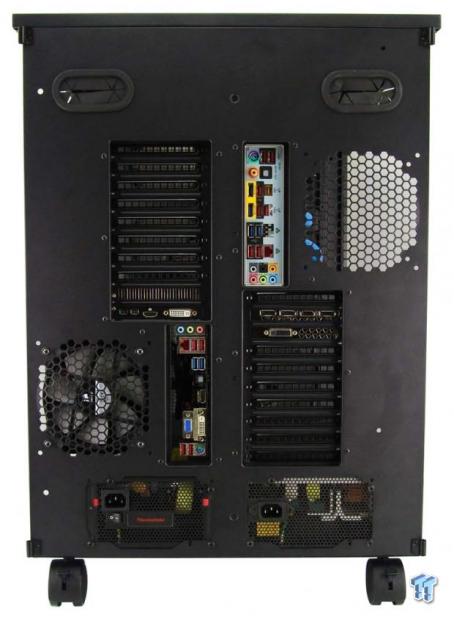
The back of the W200 offers an inverted layout of the expansion slots, rear I/O, and exhaust location to the left, and a typical layout to the right. Both sides offer a grommet for wiring or external cooling, and both sides offer a bottom mounted PSU.
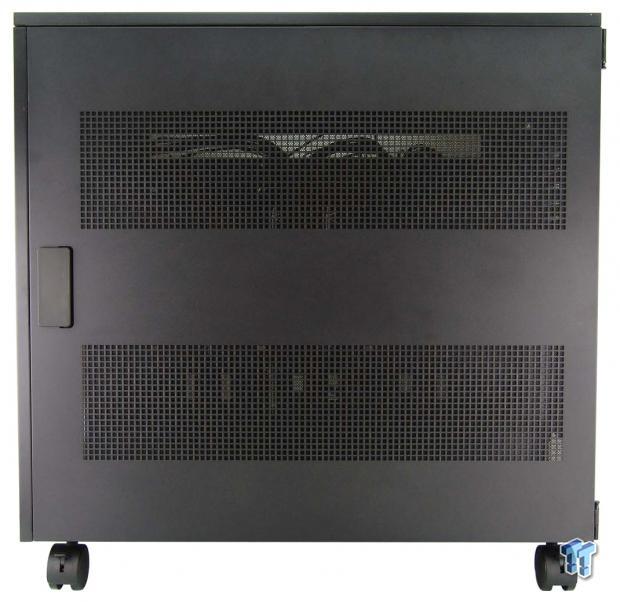
The right side of the chassis is not just a vast expanse of solid steel. Here we have squares punched out of the panel, offering two locations for the W200 to ventilate. This is because of the other pair of cooling racks that can be installed here, so that they have a way to intake or exhaust air, depending on your cooling arrangement needs. It too offers a handle and is magnetically held like the left side is.
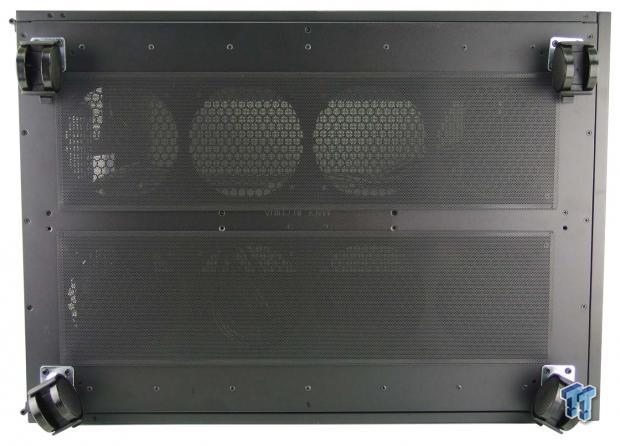
Under the chassis, we opted for lockable casters versus the large plastic feet, to make moving this enormous chassis much easier. There are also two long dust filters offers for the PSUs and any optional fans you may want to install here. On that subject, you will find magnetic dust filters covering every bit of ventilation this W200 offers.
Inside the Core W200
With the front bezel unsnapped from the front of the chassis, we find bay support panels to allow fans or radiators to be mounted on the left, and to the right, the spacing of the fans is a bit too much for most radiators. Inside of the bezel, as we mentioned, we see that every section has a magnetic dust filter in place. These make keeping the inside clean, and the filters are simple to remove and clean.
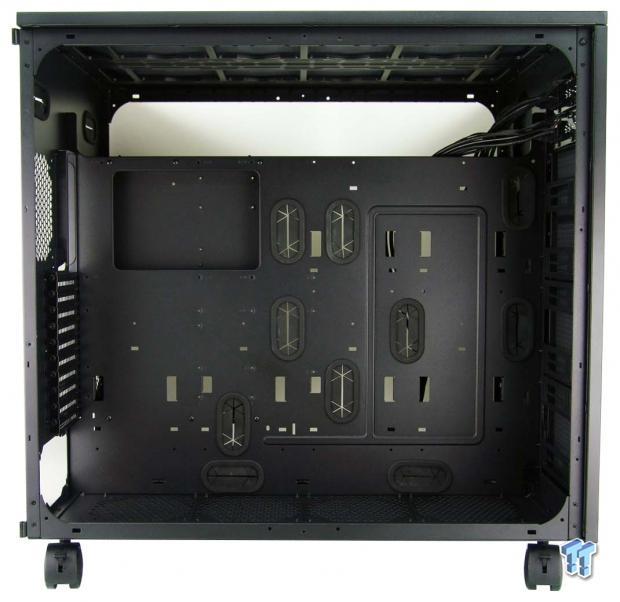
With just the basic assembly finished, before anything optional, this is what the W200 looks like inside. A vast cavity ready for anything you can throw at it.

The wiring from the I/O panels quickly disappears behind the motherboard tray, via the gap at the top of it. As of this moment, there are no bays in the front of the chassis, but there are large holes with grommets to aid with hiding wiring from fans or devices straight away.
A couple of the options are what we went for in this image. We installed the ODD brackets below the I/O panels, so you do have options built-in for fan controllers, bay reservoirs, and optical media drives. We also learned, by reading the manual, which you can also screw in the HDD cages to the front of the chassis like we have it here.
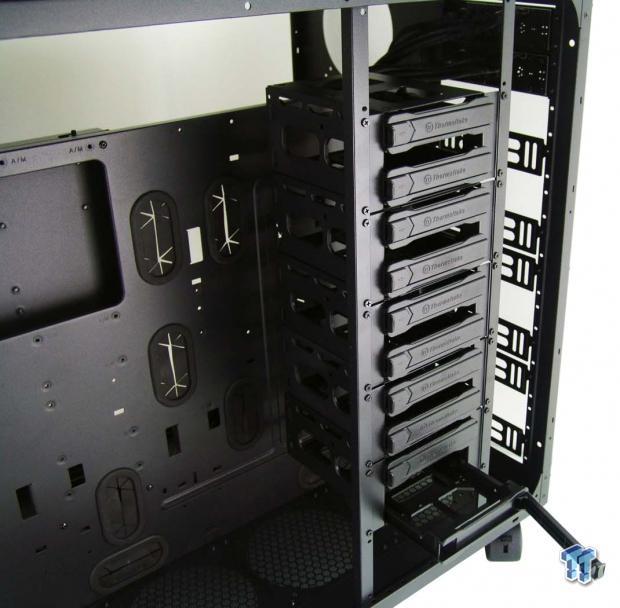
Another way to go about storage is to opt for this method, by using a pair of support rails included in the box. Each bay holds two drives, for a total of ten, and can be set anywhere on these rails. Also, keep in mind that this support system also works for the right half of the chassis as well. So, you can still use all of this space, but hide it all, out of view of the side window.
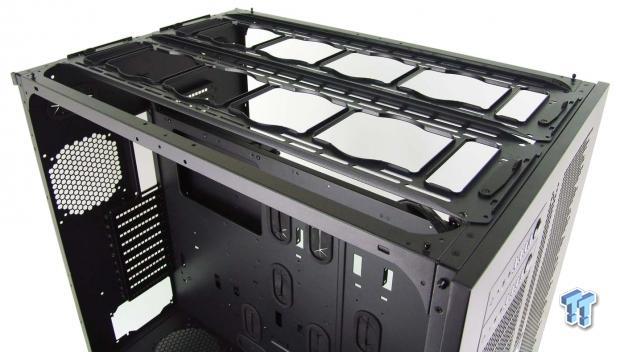
The top of the chassis, the panel itself, is mostly open, but it takes the addition of the two trays before you can mount anything. These have tabs that sit in grooves at either end or lock into the front and back with thumb locks at either end. These are what gives the W200 astounding cooling support here.
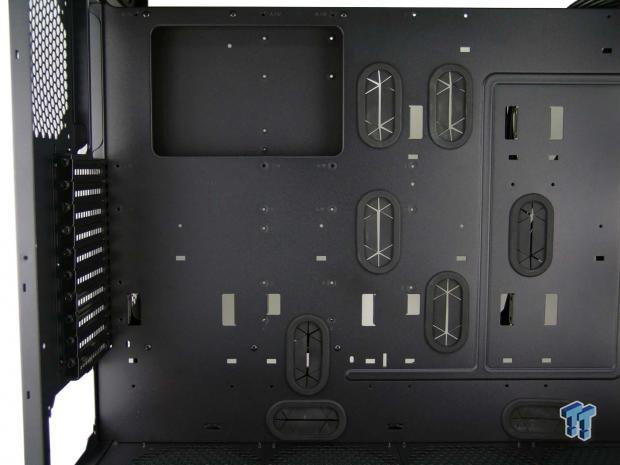
The motherboard tray is clearly marked to place standoffs on the various form factors of motherboards. There is an inner and outer set of holes, all of them with grommets, so that wiring is clean on smaller boards, but offers another set, for larger motherboard offerings.
Inside the Core W200 Continued
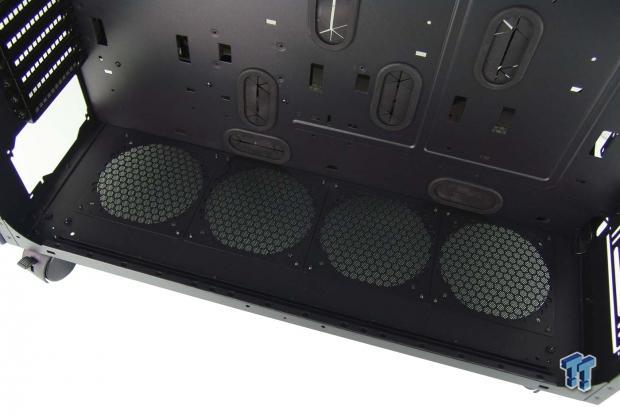
The floor of the chassis allows for three fans to go there, but the fourth hole, and possibly the third hole, will be used by the PSU. We also find a pair of holes along the floor, again to keep the wiring as clean as possible, no matter what the plans are.
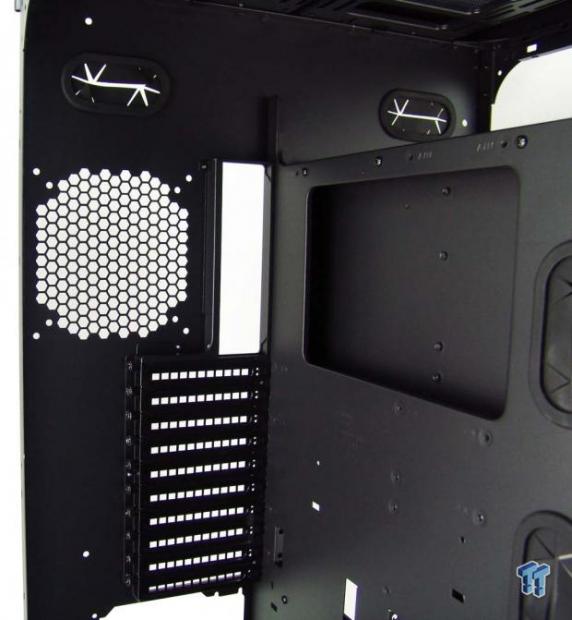
On this side, we see no exhaust fan which most cases would come with, but we do see that the ten expansion slots offered, have ventilated covers, and use thumbscrews to secure them.
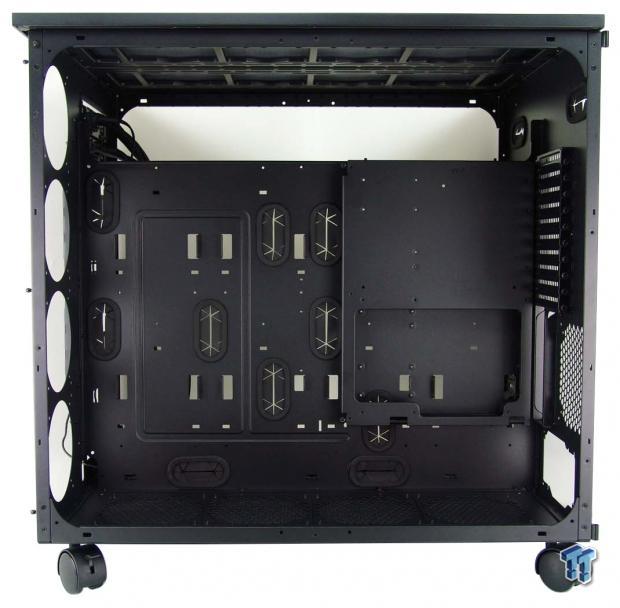
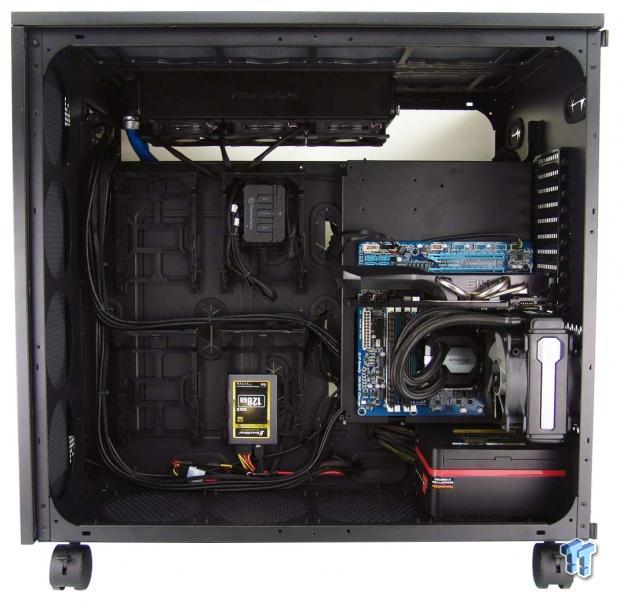
Again, this is the basic build photo. We start again with a vast cavity to fill, and to the right, we find an inverted motherboard tray mounted to the back of the large motherboard tray from the other side.
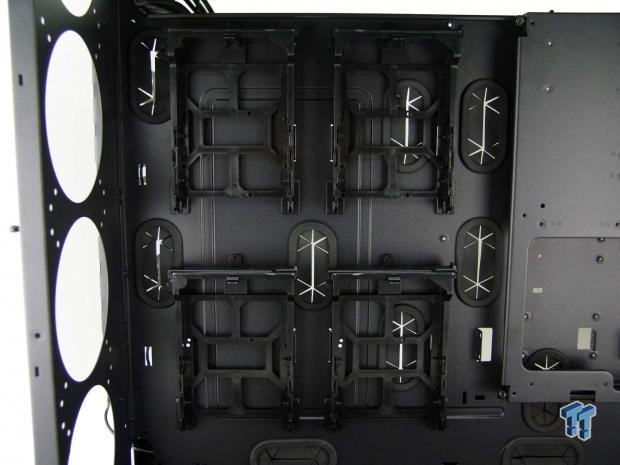
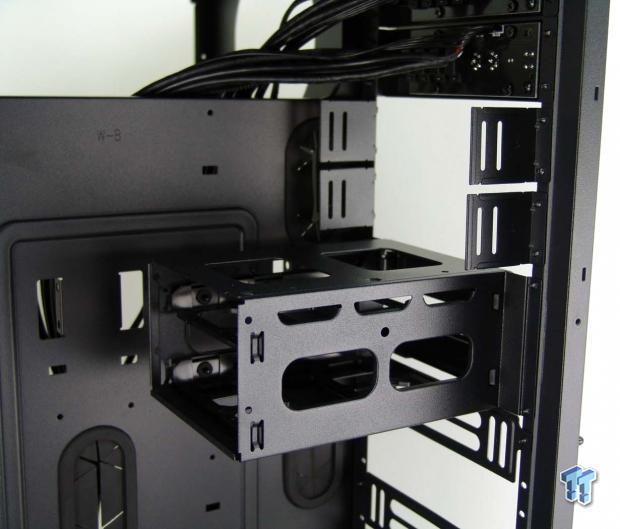
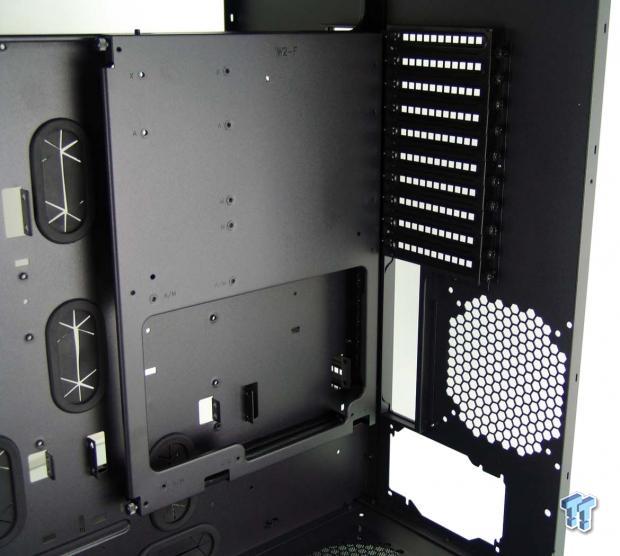
One more of the options is to install these four drive bays. You do have to mount the clips for each tray tot the larger motherboard tray, and when done, the tray set in the tabs at the bottom, and click into a locked position with the clip at the top.
Unlike with the main motherboard tray, this smaller one is removable. This makes accessing the CPU cooler hole in the main section possible, and also allows you to run wiring behind the smaller one. We also see that this tray is plainly marked, and we see XL-ATX compatibility here too.

Of course, you do have the option to take that ten-stack of bays and install it on this side, but that would block the cooling options a bit. As you can see, the way the W200 is designed, the second pair of cooling trays can be locked into place here, and shows why the right side panels are ventilated the way it is.
Hardware & Documentation

Rather than to give you a big bag of screws and make you figure it out, each group of screws is clearly marked, allowing you to follow the manual, and associate letters on the bags that correspond to the directions, by name and quantity needed for that step. Everything you need is here.
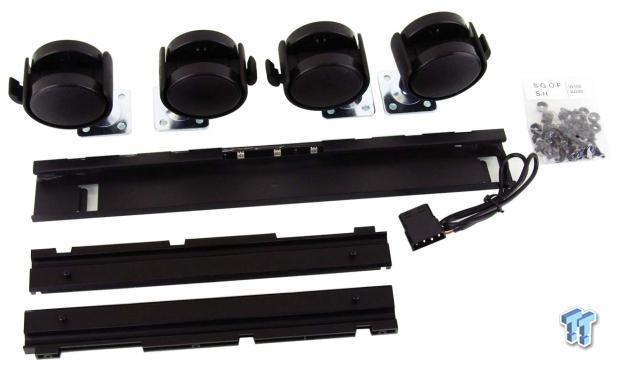
There are four large casters that lock, there is a bar with an LED strip in it to light the front of the chassis powered via a 4-pin Molex connection too, and just in front of it are the plastic motherboard tray rails for the secondary tray. The bag to the right contains the screws for the feet and the nuts and bolts for the casters.

We also found the five cages for storage drives in that box. Digging deeper, we found the clips for the hidden drive bays behind the main motherboard tray, the feet, and also a sorter box for all the bits you may have left after the build.
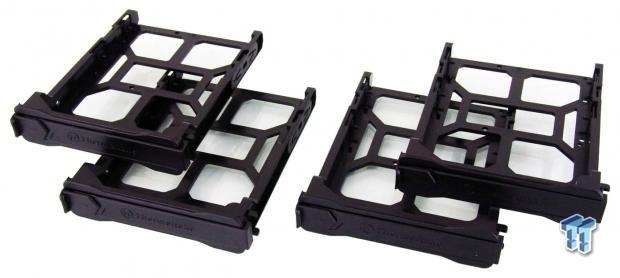
We also found the four hidden drive trays. Just like the ones that are found in the HDD racks, each tray is drilled for both 3.5" and 2.5" drives. Although opting for 2.5" drives, requires the pins to be removed from the side of the tray.
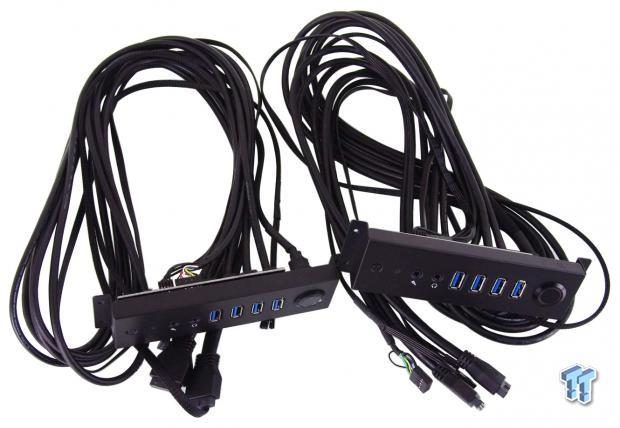
While we did already see the I/O panels, we did not cover the wiring. Everything is black to hide away in the chassis, but the best part is that these wires are near four-foot-long, to ensure they get around cleanly in this massive chassis.
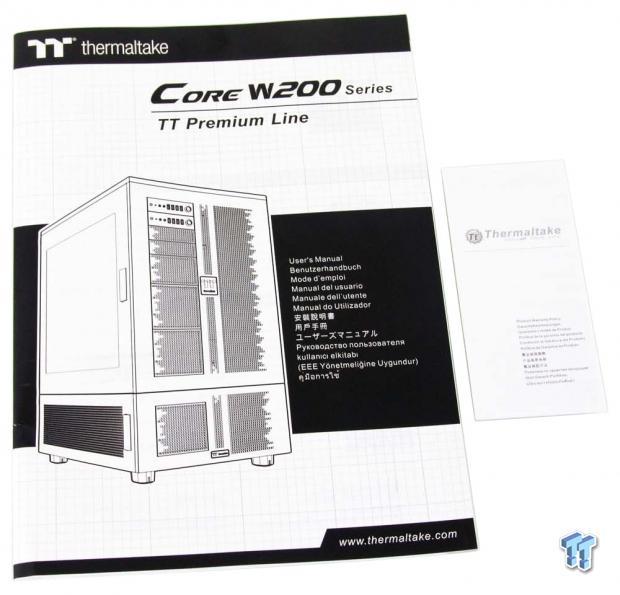
Then, of course, we have the manual and the warranty insert for the W200. The manual is crucial to the success of this chassis and its DIY theme. It starts out with a hardware and parts checklist, to ensure you are good to continue, and then takes off into the chassis assembly, step-by-step, with images that help out tremendously. It then covers parts installations and optional setups, and even covers the cooling options as well to remind you where things will fit.
Case Build & Finished Product
In our build, we again find the front of the chassis has not changed. It may be boxy, but the W200 does have some style and attitude. Just wait till you get to see it with the center area lit up.
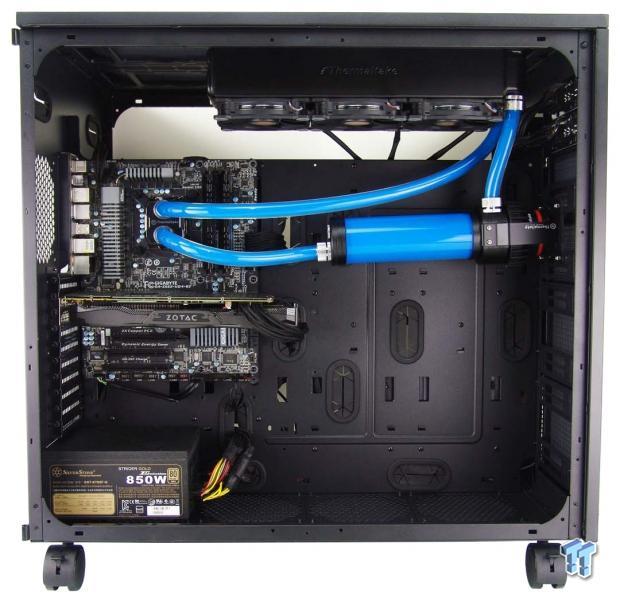
Even with a Pacific 360 loop in this chassis, along with an ATX motherboard, it still looks tiny in the W200. This may not be the conventional way of installing a loop, but it gives an aspect of size, where we have the large reservoir still clear of the major components, and how far away the thick radiator is away from the motherboard in the top.
Out back, we found not a single issue. The I/O shield snapped in on both sides, and the video cards align well and are securely fastened with the thumbscrews. As for the PSUs, once the feet are placed on the floor of the W200, they rest on top of them and align right up to be screwed in at the bottom.
This system is just for display purposes. You can see we were able to hide a lot of the wiring from view on both sides, and that there are easy to use channels to run the massive lengths of wiring. This is just enough to get the wheels turning on your W200 layout, but you can easily see just how enormous the W200 is, and just what you can stuff inside of it.

This is our favorite view of the W200 by far. With the main system powered up, we see the LED strip in the front panel now showing through the steel. Along with that, our Riing fans on the radiator are glowing blue, and that coolant color is great too.
Final Thoughts
The Core W200 has widened our eyes and minds as to what is possible in a chassis when size is of no concern. We know there are quite a few users out there running multiple rigs, so we see the definite gap in the market in which this chassis will thrive. We also see that this chassis is a blank slate, and a PC modders dream. You can not only add a personal touch with additional bits, but there is also a ton of room to fit anything you could want to inside of this chassis. If you only want one system inside of it, you can hide all of the storage drives in the back, and still water cool till your heart is content. If you want to use two inside, things aren't complicated in the slightest by doing so. The wiring is easy to run and hide from view, plenty of places to tie it down and pass it through the motherboard tray via the grommets. There is not one bad thing we can say about its layout, features, or options.
There is also no noise level, and cooling is completely based on what you install, so you cannot fault Thermaltake in either of these categories. With plenty of space for fans, there should be no reason this chassis cannot keep your gear icy cold, and if you choose the right fans, or use controllers, noise levels can be kept low as well. Everything we installed went right into place; we have all the hardware needed to do all of this, including optional gear, and once assembled correctly, the W200 is a tank. If there were one thing we do wish this chassis would have come with, that it did not, it would have to be a pump mounting plate. As not everyone will want to water cool, or may have a pump built into the radiator, it won't always be needed. We found that with our build, the front bay supports were the only way we could go, without drilling holes, or adding in a plate, then devising a way to mount it. This does, however, keep with the DIY spirit of the design too, as Thermaltake hands you the easel, paint, brush, and the canvas; it is up to you to complete the masterpiece.
The pricing is high and that we cannot deny; the Core W200 is pricey. However, in our mind, it makes very little sense that one would spend $3000 on PC components and water cooling gear, and then just try to throw it all into a $100 full-tower chassis. That is a fine way to go for some, but we feel that the chassis should suit the hardware when it comes to going crazy with things. Just the sheer size of the Core W200 inspires you to want to keep filling it with bits and parts, just to see how much you can get into it. In our build, we did just scratch the surface, but we can see two systems, dual loops on each system, dozen storage drives, and still a fair amount of room to fill.
While there are other options like the Core W200 already out there asking for your money, with what Thermaltake was able to pack into this design for $459.99, look no further. Thermaltake hit the nail on the head and keeps on driving it deeper with this design. The Core W200 may be enormous, but it's a chassis that will stay by your side, no matter what sort of crazy ideas you may have with PC builds. This chassis will stand there, take it, and say to you, "please sir, can I have some more?"
Chad's Chassis Test System Specifications
- Motherboard: GIGABYTE GA-Z68X-UD4-B3
- CPU: Intel Core i7 2600K (buy from Amazon)
- Cooler: Corsair H80i GT (buy from Amazon)
- Memory: G.Skill Ripjaws F3-12800CL6D-4GBXH
- Video Card: ZOTAC GeForce GTX 970 AMP. Extreme Edition (buy from Amazon)
- Storage: SuperSpeed 128GB SSD
- Power Supply: SilverStone SST-ST85F-G (buy from Amazon)
- OS: Microsoft Windows 7 Ultimate 64-bit (buy from Amazon)
 Noctua NL-LC1-36 Liquid CPU Cooler Review
 Lian Li B4-mATX Review: a compact mATX SFF case with excellent airflow and premium features
 Ocypus Sigma F36 BK ARGB Cooling Fan Review: high airflow and unified design in one frame
 PCCooler CPS RZ820 Display Review: a flagship-level CPU air cooler with an LCD screen
 MOAIPLAY ORA PRO G1 850W ATX 3.1 PSU Review: high efficiency and 10-year warranty for $119.99
 GeForce RTX 50 Series GPU prices are rumored to increase by 30% in the coming weeks, months
 TSMC's 1.4nm process timeline accelerates, with mass production happening sooner than expected
 Diablo 4's next season is bringing back iconic items from Diablo 2 and 3
 Razer Huntsman V3 HE Magnetic 8K keyboards include a Mini 65% model
 Four C's of Xbox's future outlined in new CEO memo
 Linux kernel patch boosts Steam Deck 1% lows by 31.8% by fixing AMD CPU clock handling
 Nexus Mods new owner wants to make installing mods as easy as using Spotify
 Dragon Age remasters are technically possible but won't be easy, BioWare co-founder says
 The EU is preparing to hit ChatGPT and Roblox with its strictest content moderation rules
 Man outsmarts GPU scammers by filming his RTX 5070 Ti unboxing, and finds two-liter water bottle inside
 ASUS ROG Strix X870E-A Gaming WiFI7 Neo Review - A New Enticing Option
 Logitech G316 X 98 Wired Gaming Keyboard Review - Retro-Inspired Board that Falls a Little Short
 Biwin M560 2TB SSD Review - Best Overall Retail-Ready DRAMless SSD
 Logitech G512 X 98 Analog Mechanical Gaming Keyboard Review - An Innovative Two-in-One
 Thrustmaster T.Flight HOTAS 5 MSFS Edition Review
 SteelSeries Arctis Nova Pro Omni Wireless Headset Review - One Headset to Rule Them All
 SteelSeries Arctis Nova 7 Wireless Gen 2 Headset Review - New and Improved, But Is It Enough?
 AMD Ryzen 7 7700X3D Review - Days of Future Past
 Samsung 990 2TB SSD Review - Ninth Gen QLC at PCIe Gen4 Speeds
 I switched my PC to encrypted DNS in Windows 11, and browsing felt more private
 Printer Not Working in Windows? How to fix detection, print queues and drivers
 The Ultimate Guide to Personalizing Your Windows 11 Taskbar
 How to Turn Your Windows Laptop Into a Second Monitor with Miracast and Wireless Display in Minutes
 6 Mistakes to Avoid When Buying a Windows Laptop
 I capped Windows Update's bandwidth with Delivery Optimization, and my downloads stopped choking
 I use this decade-old free tool that finds files faster than Windows Search does
 I install and update most of my apps with this Windows command now, and I stopped downloading sketchy installers
 Hisense U6SF 65-inch MiniLED TV: High Performance Meets Leisurely Convenience
 I stopped digging through Windows menus after I set up this one folder