


Our Verdict
Introduction, Specifications, and Pricing
Just when you think air cooling has hit a plateau, and there is not much more that manufacturers can do, Cooler Master steps in and turns the market upside down. While there is some familiarity with the naming of this most recent submission that may make you think back to the V8 cooler they introduced a while back, rest assured this is nothing like that cooler aside from the fact that it also uses a shroud and offers LED lighting to dress up this design. Outside of those similarities, the cooler we are about to see is an entirely new beast.
In the spirit of the Maker Movement that Cooler Master seems to be very much involved with, they decided this time to make a cooler that is customizable so that each owner can make it unique to suit their particular needs. Of course, the primary structure is not mod-able, but that has not kept Cooler Master down in what they have brought forth. Firstly this is a single tower design, using a pair of fans to cool it, and is shipped in one of four creative options. To allow this sort of changeability, Cooler Master offers a pair of top cover plates that are interchangeable, and there is also the option to run without a cover to the shroud. Going just a bit deeper, there is also a dressed up insert that resides on the cooler out of the box, but it too can be removed as well for the fourth option in aesthetic appeal. They have also designed optional fan brackets that allow users to switch from the pair of 140mm fans that cool this tower and have the option to use 120mm fans instead.
This is a first in CPU air cooling for us. Of course, some coolers have come with shrouds and multiple fans but never have we seen such a modular design. The thing is, though; this is not the only thing that Cooler Master has offered here. While vapor chambers are nothing new to Cooler Master, they have redesigned how it plays into this design and are introducing their first cooler to use a 3D Vapor Chamber design. This leaves us with a ton to cover on this product and is an entirely new way of looking at what a CPU air cooler can be.
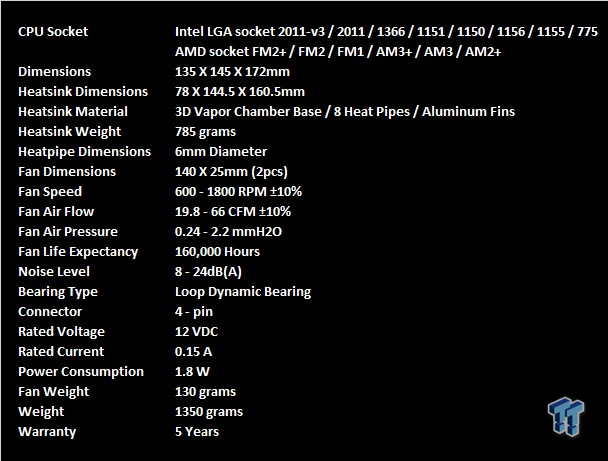
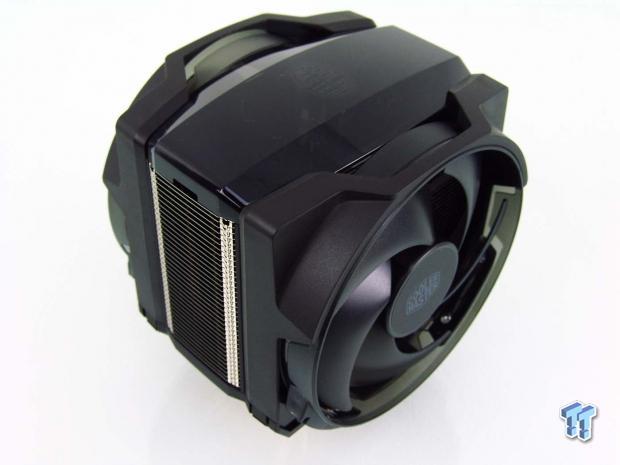
With this product being very hush-hush at the moment, Cooler Master was not offering a specifications chart, so we copied what we found on the packaging. Right out of the gate we see that the MasterAir Maker 8 will fit all of the relevant Intel and AMD sockets, going back as far as LGA775 and Socket AM2 plus. In this design, we find a copper 3D vapor chamber that works along with four 6mm diameter copper heat pipes. This is all then sent through a tall stack of aluminum fins to allow the fans to take away the heat produced from the CPU. Overall dimensions are 135mm by 145mm across the top, and we see that this 1350 gram monster stands 172mm in height. The actual heat sink is smaller than the overall dimensions, and without the shroud and fans, the cooler body weighs in at 785 grams.
To remove the heat from the fin stack, Cooler Master offers a pair of 140mm fans in a push-pull setup. These 25mm thick fans will spin in a range of 800 to 1600 RPM delivering up to 66CFM each. These are rated to last 160,000 hours delivering up to 2.2 mmH2O of static pressure and are rated to deliver only 24 dB(A) of noise at peak power. We also see the power draw of each fan along with their 130-gram weight. The last thing that we are offered in this chart is that Cooler Master backs the MasterAir Maker 8 with a five-year warranty.
Of course, with us bringing this cooler to you on its release date, we are unable to locate this cooler at the time of writing this up. We were told that availability should be ready for release, so many of the major haunts for PC gear should have this cooler listed very soon after reading this. There is a bit of a sticker shock associated with this design as well, but there is also more going on with this design that in anything we have seen previously, and all of that adds up. We were informed that Cooler Master has set the MSRP of the MasterAir Maker 8 at $129.99. Along with the cooler, they are also introducing Master Gel thermal paste at $19.99, but that portion will be tested at a later date to show what it is capable of. For now, we will deal solely with the MasterAir Maker 8 and everything you are getting for this high-end investment.
Packaging

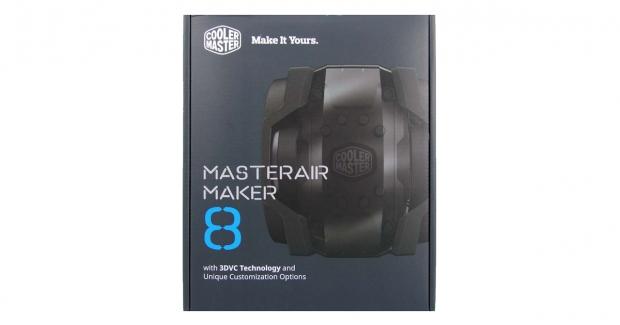
On the front of the packaging, we find the Cooler Master logo at the top with the tagline of "make it yours." The majority of the panel is taken up with an image of the top of the cooler with the MasterAir Maker 8 naming off to its left. Near the bottom we see a mention of the 3DVC and that this cooler has unique customization options.
Our Latest CPU Air Coolers Review Coverage

As we spin the box, we run into this panel. The larger image shows the cooler so that you can see the 3DVC and the pipes, along with the 140mm fan and shroud that it uses. Along the bottom, we see the top of the cooler as shipped to the left, and to the right we see it with the optional steel cover plate replacing the tinted plastic one.

On the back is where we find an exploded diagram that shows all of the components that go into this design. At the top of this image you can see the cover plate is removable allowing users to expose the metal cap inserted around the pipes, and even then this plate is removable to reveal the top fin and heat pipes in a more typical aesthetic.
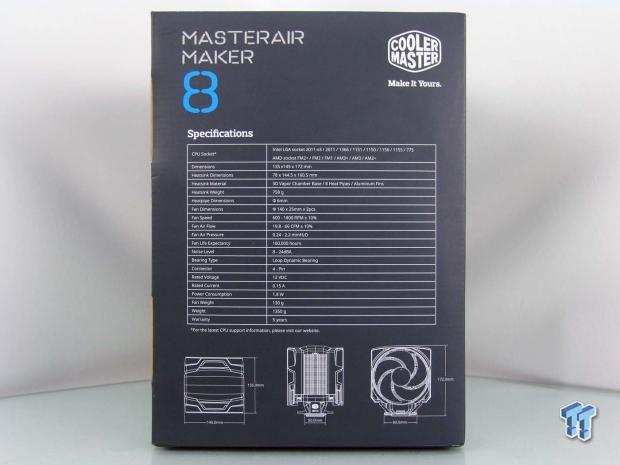
The last panel offers the specifications chart we copied for the last page and also provides three-dimensional renderings of the cooler to gauge its size before purchasing it. We do wish that they had provided the space from the base of the cooler to the bottom of the shroud, though, as this will likely be the bane of most users.

Inside of this very large box, we find the cooler standing in the back with a plastic cover to protect the top of the cooler. In the front, we can see three boxes, one for the manual and accessories, another for the optional 120mm fan brackets, and the last one containing the steel top plate.
Cooler Master MasterAir Maker 8 CPU Cooler
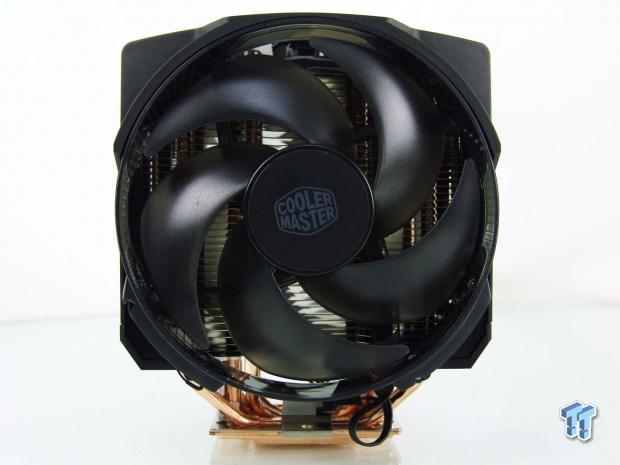
The view from the front of the MasterAir Maker 8 is mostly a view of the five sickle style blades of the 140mm fan, with the shroud covering all hints of aluminum behind it. We also see that the fans sit very low in this design and will require very short memory to be used beneath it.
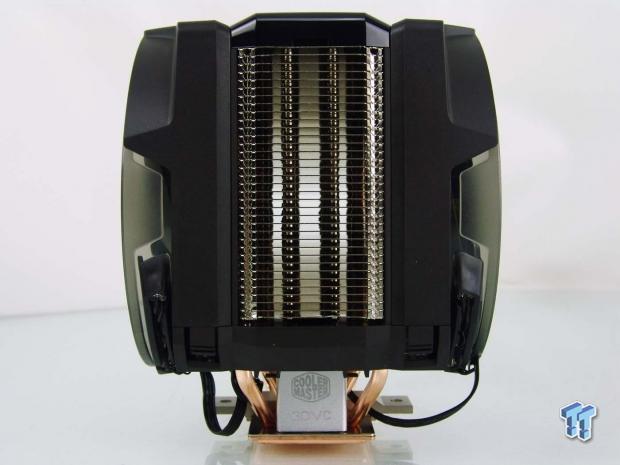
On this side, we can see that Cooler Master leaves the sides of this design open, exposing the aluminum fin stack. Looking below the fins, we see the wide extension of the 3DVC between the copper heat pipes.

In this design, there is a vapor chamber across the entire base, and the wide bit runs up into the fins to help deliver more heat to the fins faster and more efficiently than with just pipes alone. There are four pipes used in this design that are soldered to the top of the vapor chamber to help to make this design as efficient as possible.
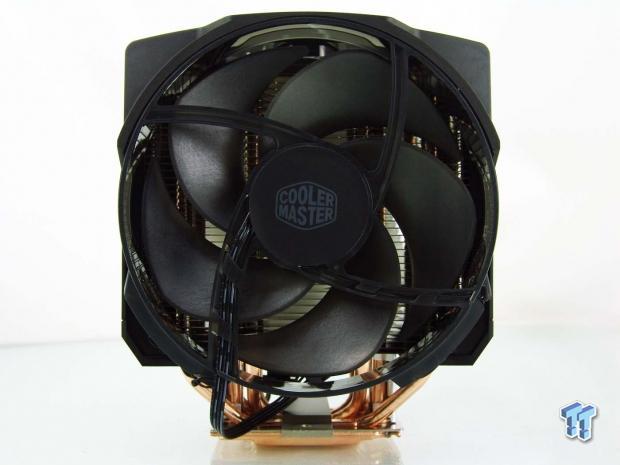
From the back, we find the second of the pair of 140mm fans, and both sides of the fans offer a Cooler Master logo on the hub, so identifying the exact fan used is nearly impossible. Both fans are powered via 4-pin PWM connections, although these fans are nearly silent at full speed, so they do not need PWM signals to keep them quiet.

As we wrap around to the last side of the tower, we find it to be identical to the other side, and without a view of the fans frames, both sides of this design look just as good as the other.

A view of the top of the MasterAir Maker 8 shows us the shrouds for the fans on either side of the cooler, leaving the center covered with a tinted plastic that hides the pipe tips. While almost impossible to make out in this image, there is a Cooler Master logo that is visible through it, but it is much easier to see once the cooler is powered and LED backlit.

At the other end of the cooler, we find an aluminum cross bar has been mounted to the top of the 3DVC, and the 3DVC itself is made with two levels. The lowest level, of course, is where it attaches to the CPU and is currently covered with a protective sticker to fight oxidation of the exposed copper base.

The mating surface has been left with the machining marks plainly visible, rather than taking the base and polishing it smooth. The majority of this surface is flat where it makes contact, and only deviates nearer the edges.
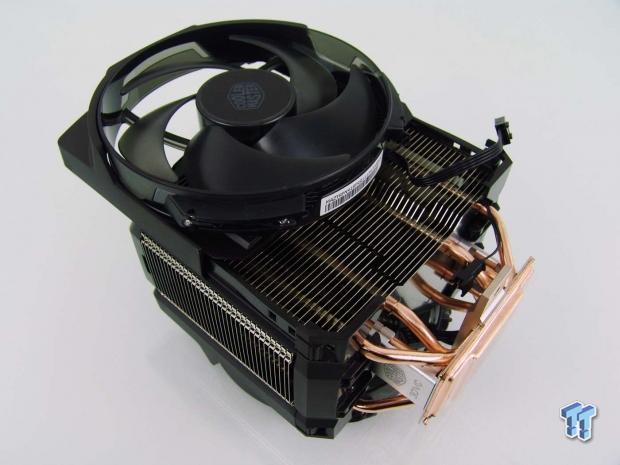
To mount the cooler, the fans must come off, and to do so, you will find a pair of buttons at the bottom that when pressed allows the fan to slide up the cooler and off of it. We can also see in the fin stack that the sides are higher than the midsection, and this is found to be identical on both sides of the fin stack.
Accessories and Documentation

Rather than using multiple bags to contain the hardware, Cooler Master offers them all in this plastic container. Everything from a sample size tube of thermal paste, various mounting screws, and nuts, even washers in two forms come in the kit. Also, if you look closely, the left side offers letters for each row to make following the instructions much easier as to which hardware is being used in each step.
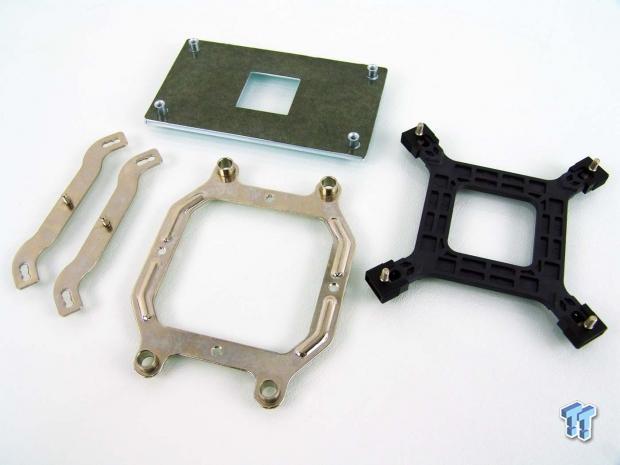
Mounting hardware is pretty typical for an air cooler too. To the left side, we find the Intel mounting brackets that go along with the adjustable Intel backplate seen on the right. For AMD users, you have a steel top plate and no need for the plastic stock backplate, as Cooler Master offers a steel replacement.
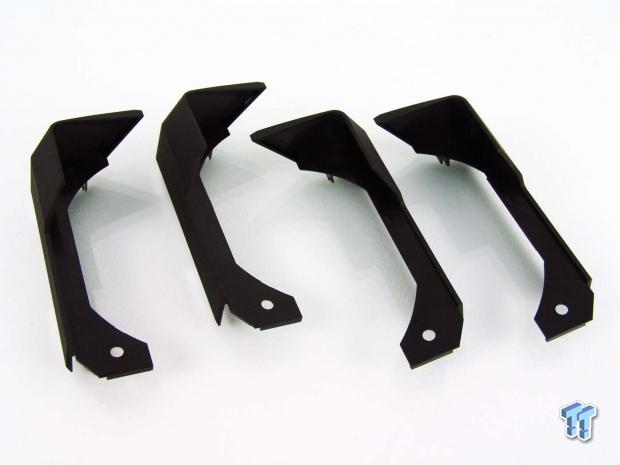
If memory is an issue, or you have a favorite pair of 120mm fans you wish to use, Cooler Master includes four 120mm fan brackets that also slide in and out of the side shroud components.

If you are not a fan of the way you will see this cooler here in a bit, illuminated from underneath through the tinted plastic top, the MasterAir Maker 8 offers a steel cover. This cover snaps onto the shroud and has the center of it opened to allow the Cooler Master logo at the top of the cooler to be exposed.

Along with all of the other goodies, we find that there is a user manual that is very well written and explains all of the options for this design. We also see there is an insert covering the terms of the warranty coverage, and Cooler Master also sends a y-splitter fan cable that also has a smaller connection built-in to power the LEDs in the tower. The fan LEDs will be powered via the fan power leads.
Installation and Finished Product

For our test build, we first adjusted the ends of the backplate to the LGA115X setting and then placed it in through the back of the motherboard. There is also no specific way that this needs to be installed as all sides of the plate are identical.
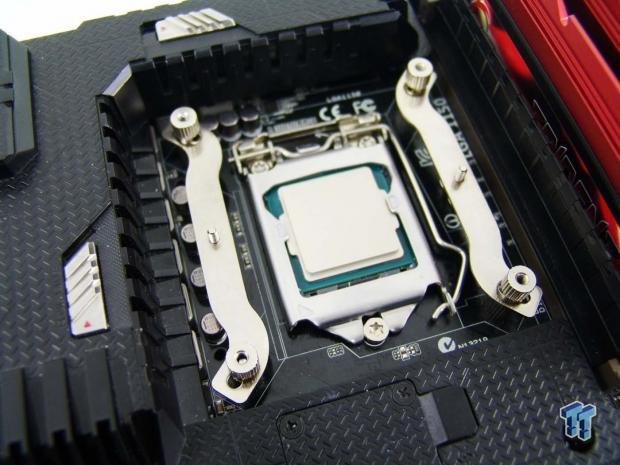
You then install standoffs, the Intel top brackets, and then screw it all down securely with the knurled nuts on the top. Be sure to install these top brackets to either side of the socket and not the top and bottom, as the cross bar on the cooler does not change direction.

One optional way to go is to remove all of the covers and have this shiny metal insert showing on the top of the cooler. This can also be deleted to show the exposed pipes and aluminum top fin, but this is the more attractive offering of the two.

We also tried out the textured steel top cover. This is a sleek look, but in our opinion, not nearly as nice looking as the tinted plastic cover once the cooler is powered and LEDs lit.

As we mentioned, the fans must be removed from the cooler to allow access to the screws that secure the cooler to the rest of the hardware. This is where you will appreciate the fact that the fans slide on and off the cooler so easily - no mucking about trying to clip them to the cooler.
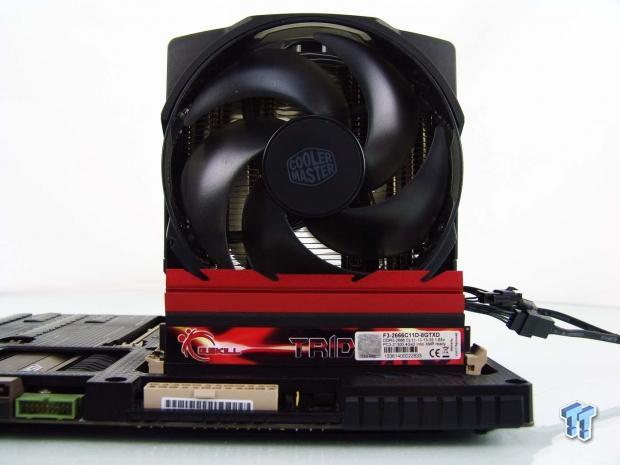
With the MasterAir Maker 8 tucked in behind the memory, we see this cooler is just as wide as the RAM is. To be honest, clearance did not seem like much of a concern when Cooler Master developed this design, so be aware of that.
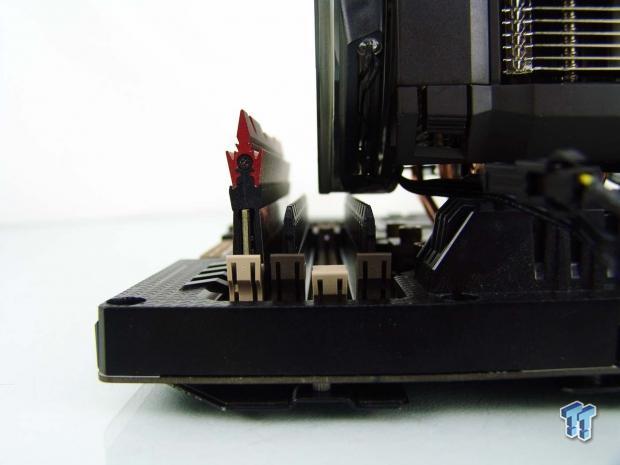
If we allowed the 140mm fans to clip into the bottom of the shroud, it infringes a lot of the memory area. Not only does it cover two slots, but the fan is also so low that unless you have some super low-profile sticks in the motherboard, you will end up having to use it like we did in the next photo.

Even after removing the top of the memory, we were only able to get the front fan to sit so low, not able to clip it fully into place. There is some good news, however, at least, the 140mm fan locked into the 120mm fan position so that the fan will not slide off the cooler.

This does make the cooler look a bit goofy from this angle, however. This should not affect its performance, though, as, in its bottom-most position, a lot of the fan was below the coolers fins, so being raised should take slightly more advantage of the fans air flow.
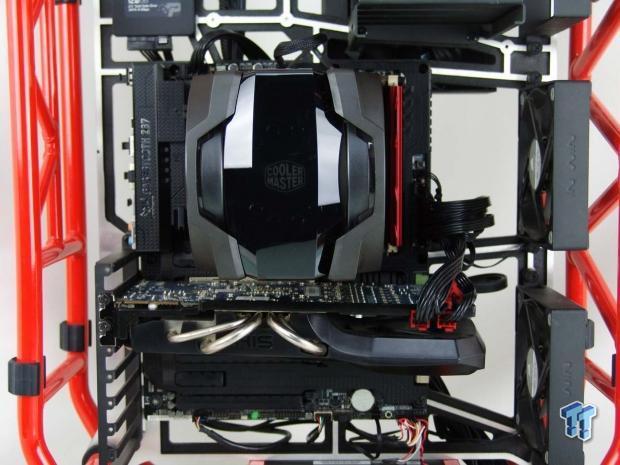
Once everything is installed and it is time to mount the motherboard into the chassis, we found that the first PCI-e slot is usable, and with all the plastic on the shroud, if contact is made, at least, it cannot short against the card. We did find that accessing the motherboard screws in the middle row of the board is complicated by this design, but we were still able to get them installed.

Once powered up as we began the testing, we found that as it is shipped out of the box is a sleek looking design. Not only do both fans offer eight LEDs to illuminate both sides of the cooler, but there are also LEDs at the top of the cooler that highlight the pipe tips and the Cooler Master logo under the tinted cover. If left exposed you still get the LED effect, but using the steel cover option does eliminate the view of the LEDs at the top of the cooler.
Test System Setup, Thermal Tests, and Noise Results
Chad's CPU Cooler Test System Specifications
- Motherboard: ASUS Sabertooth Z87 - Buy from Amazon
- CPU: Intel Core i7 4770K - Buy from Amazon / Read our review
- Memory: G.Skill F3-2666C11D-8GTXD - Buy from Amazon
- Video Card: HIS Radeon HD 7950 IceQ - Buy from Amazon / Read our review
- Storage: Patriot Torch 120GB - Buy from Amazon / Read our review
- Case: IN WIN D-Frame - Buy from Amazon / Read our review
- Power Supply: SilverStone ST85F-G - Buy from Amazon / Read our review
- OS: Microsoft Windows 8 Professional 64-bit - Buy from Amazon
- Software: RealTemp 3.70, AIDA64 Engineer 5.20.3400 and CPU-z 1.72.1 x64
I would like to thank ASUS, InWin, Patriot, and Fractal Design for supplying products for me to test with.
To see our testing methodology and to find out what goes into making our charts, please refer to our CPU Cooler Testing and Methodology article for more information.
Thermal Results
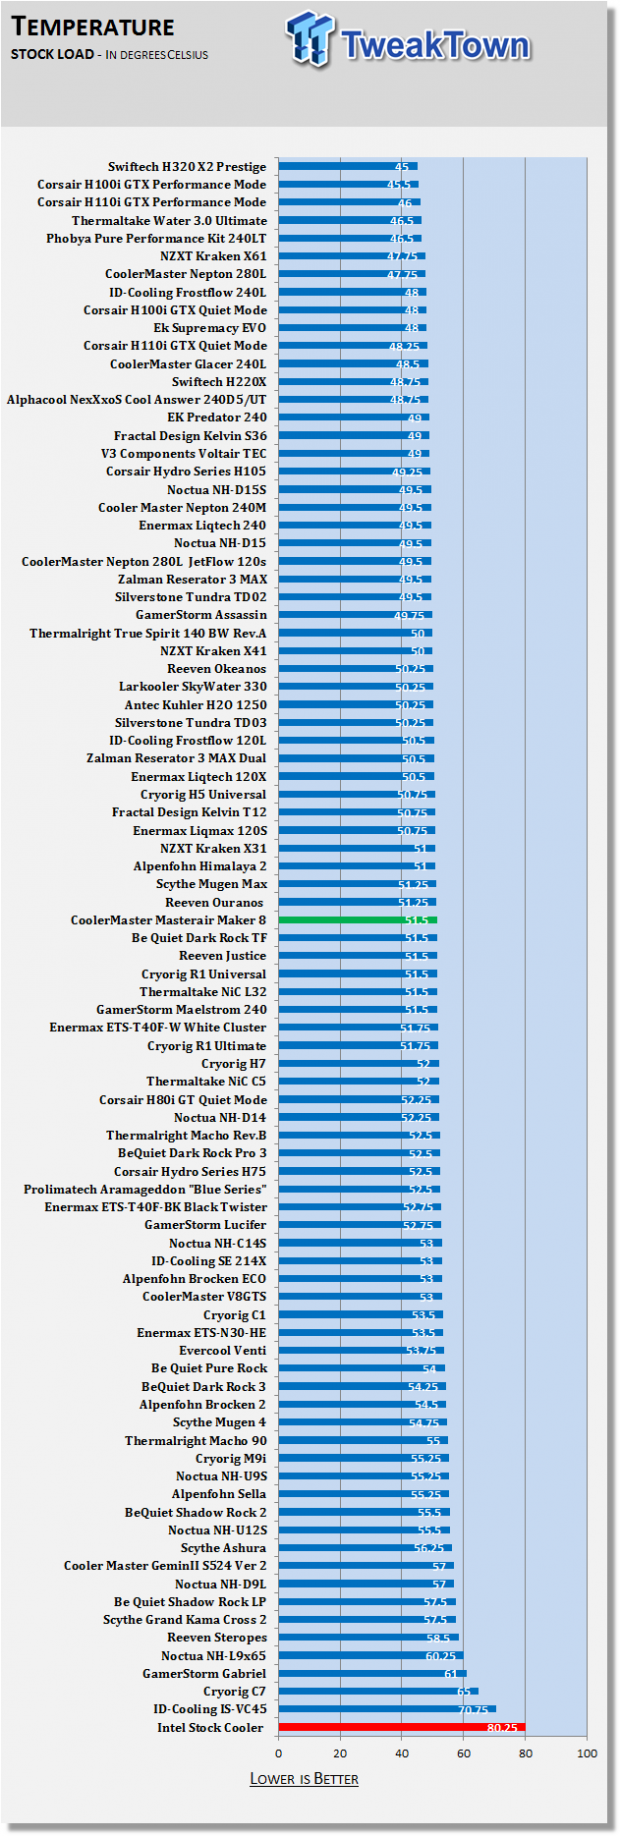
With the CPU running stock speeds and the fan voltage controlled, we find the MasterAir Maker 8 comes in with a respectable result of 51.5 degrees. This is 6.5 degrees out of the top of the charts, but considering its company, we feel this is a good result for a single-tower design.

Once the overclock is applied and testing was done, we found that with the fans sent with this cooler, the results were less than expected. Coming in at 72.33 degrees is still decent for a single-tower design, but many more affordable offerings did better in this test.
Noise Level Results
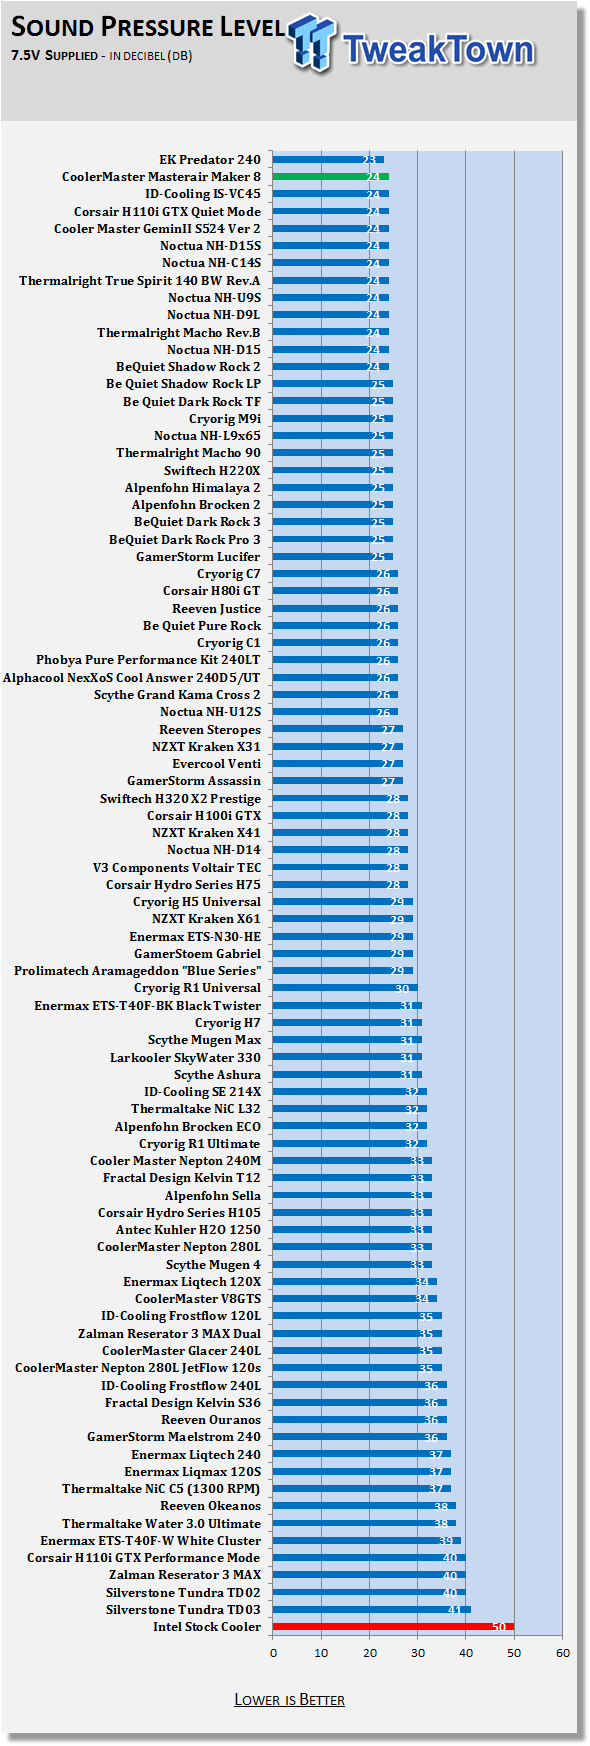
Silence is one of the major factors in this design, and with only 7.5V supplied to the fans, we seen them spinning at 1075 RPM, delivering 24db of noise at this time.
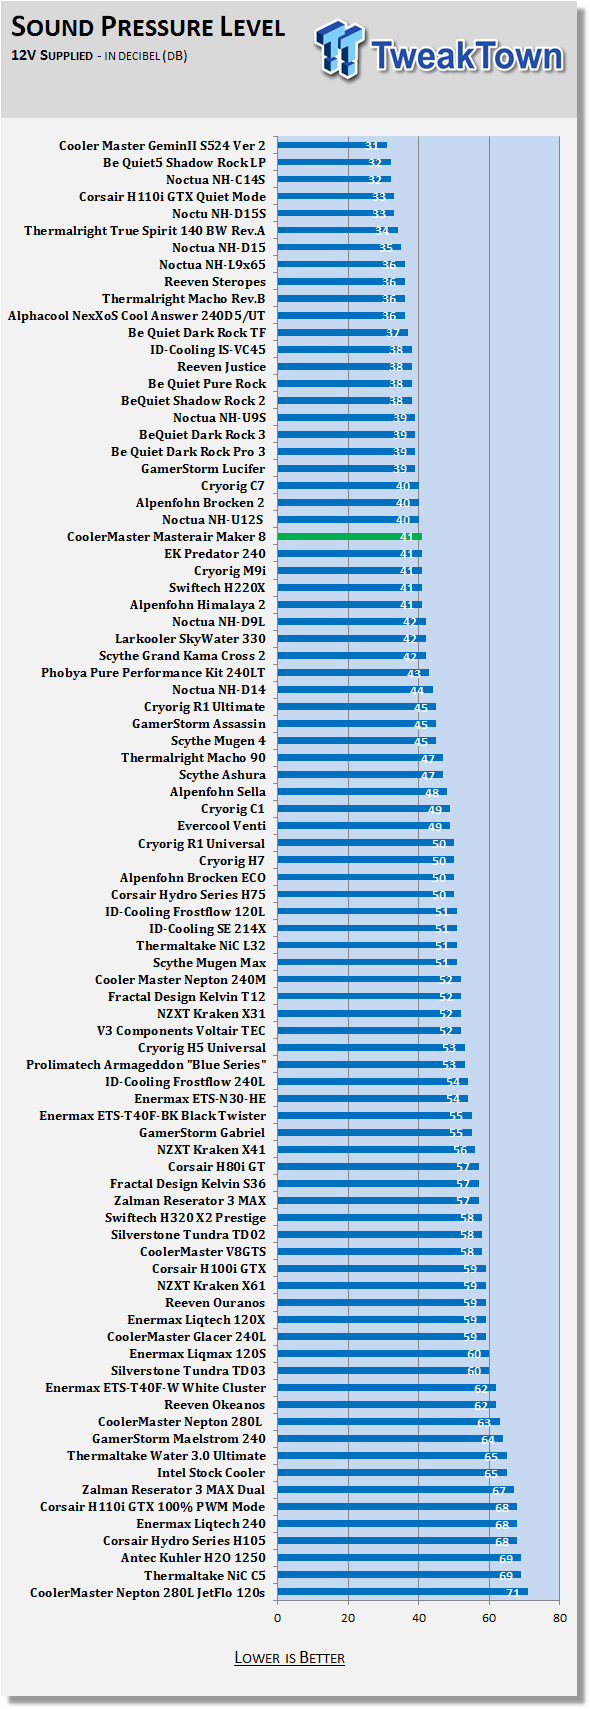
Allowing the fans to use the full 12V, we saw them turning at 1750 RPM, well within specifications. At this time, the noise delivered to the meter at a foot away is 41dB. Not exactly dead silent, but much more tolerable than many other coolers that did better in thermal performance. Of course, all of this can be changed swapping out the 140mm fans, or even opting for 120mm fan instead, but that is for you to decide if it is needed.
Final Thoughts
We have yet to see anyone else try something like this when it comes to CPU coolers. Cooler Master and their whole Maker Movement is present in this design. It is hard not to like a cooler with aesthetic options. Even if you do not want to change things out of the box, it allows you to change things later and feel that you have a whole new cooler in the rig, all without spending any more money to do so. We feel that the way it is sent to you is the best looking of the four options, but we also understand that not everyone has the same taste in aesthetics. When it comes to the MasterAir Maker 8, it is the looks that are going to sell this design.
That being said, there are some minimal issues with the design. In an era of no interference coolers, it is strange that Cooler Master paid little or no attention to this when designing this cooler. Of course, you can swap fans and eliminate the memory clearance issues we had, but with the 140mm fans cooling this tower, expect to run into issues like we did. For LGA2011 or 2011-v3 users, this issue is compounded, as you have the issue on both sides of the cooler.
The bulkiness of the design also makes you have to angle the screwdriver to mount the top center and middle row center screws of the motherboard, but we were able to get those screws in and secured. As for the PCI-E clearance to the top slot, it is usable, and again with all the plastic, solder points on the card will not come in contact with metal, they will rub against plastic instead.
Of course, when it comes to new technologies and a plethora of design options, this all comes with a premium price. However, at $129.99 for a single tower air cooler, we expected more from this design. It is by no means a failure; it is more than capable of taming our test system. At the same time, users who spend this sort of money can opt into something like the H110i GTX, get better results, and have all the clearance in the world. Granted there isn't much but lighting and fans that you can easily change on the AIO, but we do feel that pricing is going to be a major stumbling block for this design.
While we do like what we saw and all of the options this cooler offers, spending $130, then needing to pay more for different fans to compete against more affordable air cooling solutions pretty much speaks for itself. Of course, there is the niche market of users who will fully appreciate this cooler for what it is, but we feel the masses will simply see the results and the price needed to obtain this cooler, and opt for a more affordable solution, as creative as it may be.
 Lian Li B4-mATX Review: a compact mATX SFF case with excellent airflow and premium features
 Ocypus Sigma F36 BK ARGB Cooling Fan Review: high airflow and unified design in one frame
 PCCooler CPS RZ820 Display Review: a flagship-level CPU air cooler with an LCD screen
 MOAIPLAY ORA PRO G1 850W ATX 3.1 PSU Review: high efficiency and 10-year warranty for $119.99
 NZXT H6 RGB+ Compact Dual-Chamber Chassis Review
 Xbox Game Pass subscribers reportedly at 30 million, down from a high of 34-35 million
 Microsoft's job cuts go beyond Xbox, with 2.1% of its global workforce affected
 Intel's next-gen Nova Lake-S CPUs to feature Xe3 graphics, similar to recent Panther Lake mobile SoCs
 Ghost in the Shell and Cyberpunk fans will definitely want to check out this new keyboard from IQUNIX
 Rare GeForce RTX 4080M tested, a Frankenstein 100W mobile GPU in desktop form
 Xbox wants to reach 'more than a billion people each day,' which is ridiculous
 Indie developer asks Valve to change its 2-hour refund policy as 55,000 players refunded his game after finishing it
 Samsung's 2026 profit to surpass its entire 40-year cumulative earnings
 First 'agentic ransomware' run entirely by a large language model discovered
 PlayStation disc phaseout petition hits 120,000 signatures in just four days
 Simagic Zeus Formula Steering Wheel Review: premium build and advanced inputs for F1 racing
 GIGABYTE X870E Aero X3D Dark Wood Review - A woody goody
 The Super Mario Galaxy Movie (2026) 4K Ultra HD Blu-ray Review
 KTC H49S66 5K2K (5120x1440) 49-inch 180Hz Gaming Monitor Review
 HighPoint Rocket 1604L Gen5 x16 NVMe Software RAID AIC Review: half the price with full 59 GB/s speed
 Next Level Racing ERS3 Haptic Seat Review: immersive sim racing comfort with integrated haptics
 ASUS TUF Gaming X870-Pro WiFi7 W NEO Review - Tuffed up
 GIGABYTE GO27Q24G Gaming Monitor Review: Glossy OLED Gaming at 240Hz
 MSI MPG 322UR QD-OLED X24 Review: A Brighter, Tougher 4K 240Hz QD-OLED for $1099
 Phison and Intel Take Aim at Local AI's Memory Wall with aiDAPTIV
 How to Remap Keyboard Keys in Windows using Microsoft PowerToys
 7 tips to organize your Windows files for faster, easier access
 Intel Arc G3 Extreme first impressions with MSI's Claw 8 EX AI+ - Incredible power for an extreme price
 How to fix Wi-Fi Adapter Not Working on Windows laptops: troubleshooting tips
 Hisense U7SG 4K TV: Modern Entertainment for the New Age
 6 underrated Microsoft Word features worth using to boost your productivity
 Level Up Your PC Gaming with these Fantastic ASUS Prime Day Deals on GPUs, Motherboards, and More
 GIGABYTE Wants to Kickstart Your New Gaming PC or Upgrade with These Limited-Time Deals
 7 Windows settings to change right after installation for better privacy, security, and performance