
The Bottom Line
Introduction
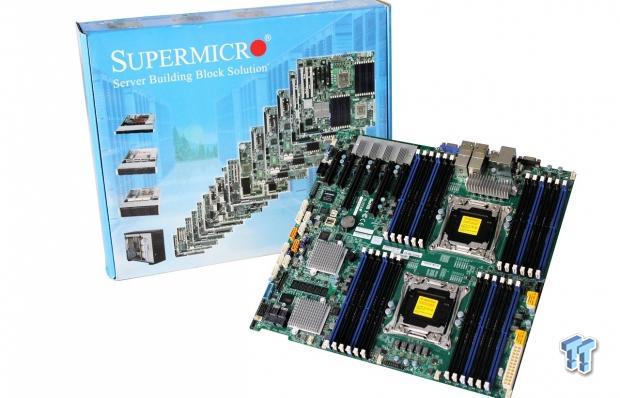
We reviewed the Supermicro X9DR7-TF+ (Intel C602J) not long ago, and absolutely loved it.
The X9DR7-TF+ is a fully loaded motherboard that is packed with features, and has top performance to boot. We really enjoyed everything the X9DR7-TF+ had to offer, so when we had a chance to review the Supermicro X10DRC-T4+, we were very excited to fire this board up and see what it could do.
Supermicro took the already powerful X9DR7-TF+ motherboard, and fully updated it to handle the new Haswell-EP E5-2600 v3 series processors and C612 chipset, plus they threw in a whole host of new features, to make the new X10DRC-T4+. The X10DRC-T4+ is a top-of-the-line Supermicro motherboard, able to take on many data center needs with ease.
The X10DRC-T4+ also fits into Supermicro's New Generation X10 Green Computing Solutions, with optimized performance and power efficiency. The key features of the X10DRC-T4+ are:
- Dual socket R3 (LGA 2011) supports Intel Xeon processor E5-2600 v3 family; QPI up to 9.6GT/s
- Intel C612 chipset
- Up to 1.5TB reg. ECC DDR4 2133MHz; 24x DIMM sockets
- Two PCI-E 3.0 x16, three PCI-E 3.0 x8, and one PCI-E 2.0 x4 (in x8) slot
- Quad LAN w/ Intel X540 10GBase-T
- Ten SATA3 (6Gbps) ports w/ Intel C612 controller; RAID 0, 1, 5, 10
- Eight SAS3 (12Gbps) ports w/ LSI 3108 controller; RAID 0, 1, 5, 6, 10, 50, 60
- SuperCap option support. Integrated IPMI 2.0 and KVM with Dedicated LAN
- Three USB 3.0 (two rear, one Type A)
PRICING: You can find the Supermicro X10DRC-T4+ for sale below. The prices listed are valid at the time of writing, but can change at any time. Click the link to see the very latest pricing for the best deal.
United States: The Supermicro X10DRC-T4+ retails for $1,039.95 at Amazon.
Specifications and Layout
Specifications
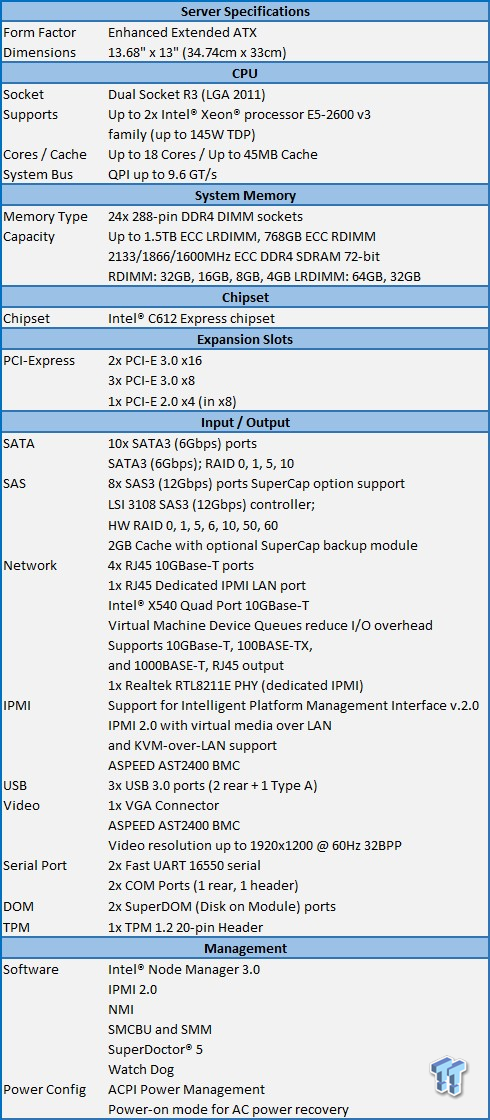
Made to handle the heaviest VM workloads, the X10DRC-T4+ is fully loaded with the ability to handle high-speed storage options with the SAS3 (12Gbps) LSI 3108 controller, and an additional ten SATA ports. Without any add-in cards for network, this board comes with Quad Intel® X540 10GBase-T network ports as standard features. For memory hungry applications, 24 DIMM slots can provide up to 1.5TB of fast DDR4.
We only received the X10DRC-T4+ motherboard for our tests. The retail package should contain:
- Two (2) SATA Cables (CBL-0044L x2) (X10DRC-LN4+/T4+ Only)
- Two (2) SAS Cables (CBL-SAST-0532 x2) (X10DRC-LN4+/T4+ Only)
- Six (6) SATA Cables (CBL-0044L x6) (X10DRi-LN4+/T4+ Only)
- One (1) I/O Shield (MCP-260-00042-0N)
- One (1) Quick Reference Guide (MNL#1560-QRG)
Optional accessories are:
- Heat sinks
- TPM security module - TPM module with Infineon 9655, RoHS/REACH, PBF; Vertical or Horizontal
- (depending on the server layout and expansion cards used)
- SuperDOM - Supermicro SATA DOM Solutions
- SuperCap TFM module
- I/O Cables - Internal Mini-SAS HD to Mini-SAS HD 50cm, 30AWG,12Gb/s
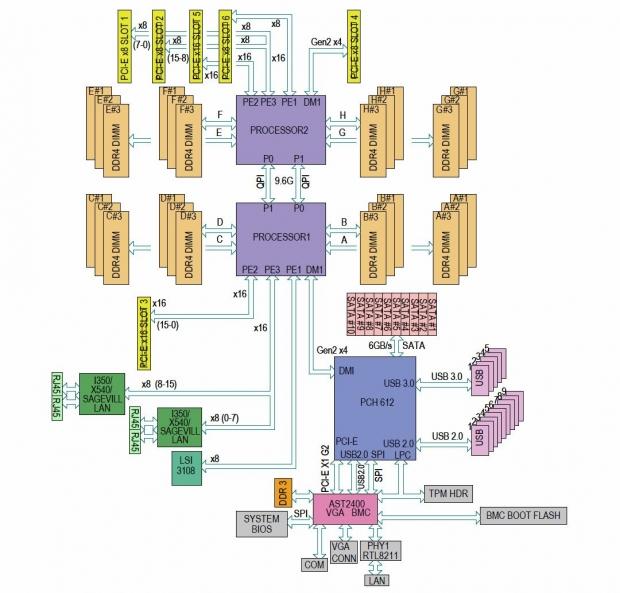
Here we get a look at the block diagram, which shows how all of the input and output devices connect to the C612 Chipset.
Layout
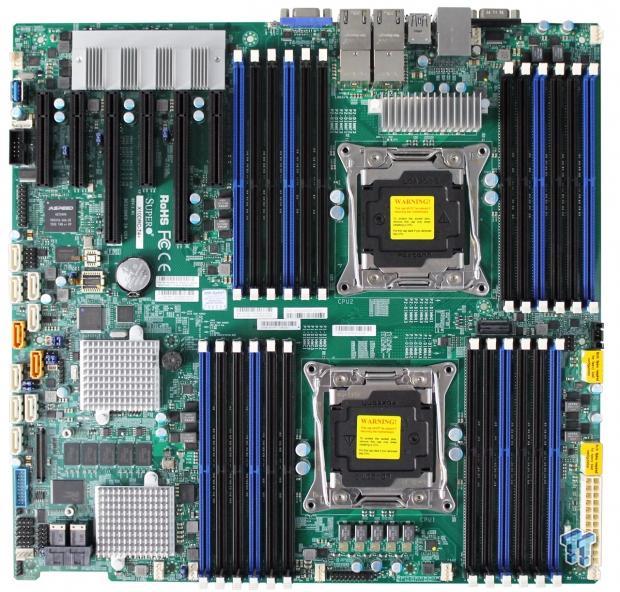
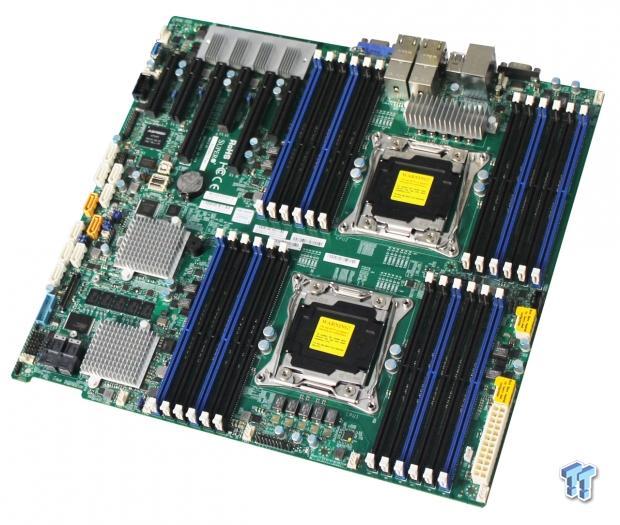
Here we get our first look at the X10DRC-T4+.
With a size of 13.68" x 13" (34.74cm x 33cm), this is a large motherboard that is packed with features. If you plan to use this motherboard in a Supermicro case, please note that a Revision M chassis is recommended for this motherboard.
Everything is laid out very well on this motherboard. Remember to provide good airflow across the motherboard when running. We found that the LSI 3108 controller does get very warm, so be sure to have a fan blowing on it during operation.
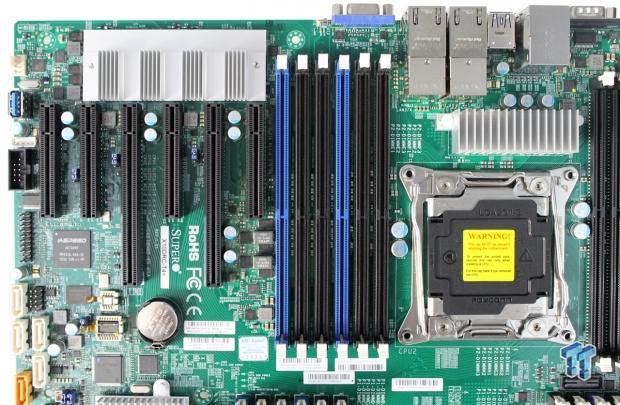
To provide adequate cooling, the two Dual Intel X540 Ethernet controllers are located under the heat sink, just above the PCIe slots. Just below the X540 heat sink, we find the PCIe slots, which are:
- Two PCI-E 3.0 x16
- Three PCI-E 3.0 x8
- One PCI-E 2.0 x4 (in x8)
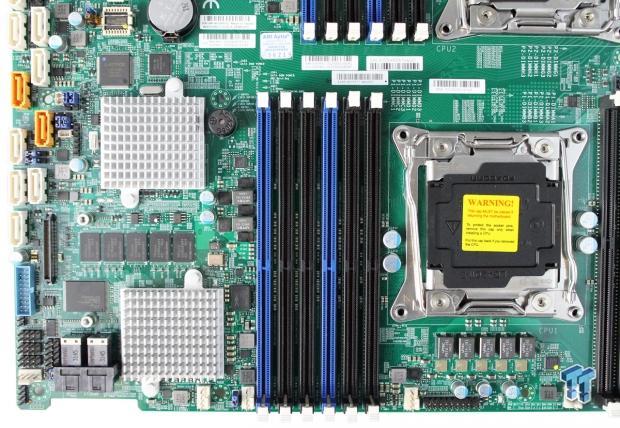
Now we are looking at the lower left side of the motherboard. There are ten SATA ports here; one is actually at the top, and not shown in this picture. The top four S-SATA ports are controlled by the Intel SCU. The remaining six I-SATA ports are controlled by Intel PCH C612 chipset. There are eight SAS 3.0 ports just to the left of the aluminum LSI 3108 SAS controller heat sink at the bottom.
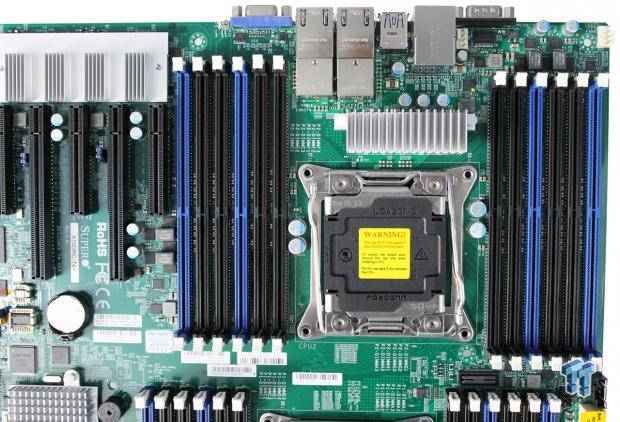
Here we are looking at the upper right section of the motherboard. There are only two fan headers located here. Just above the eight-pin power connector seen at the bottom right of this picture, there is a IPMB system management bus header for IPMI 2.0.
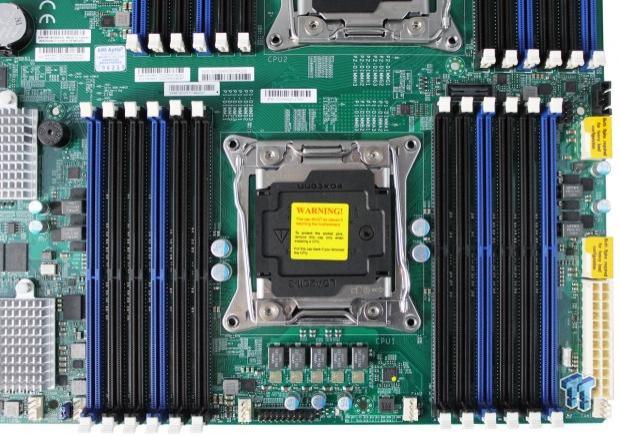
This is a close up of the new Socket 2011 R3. As you can see, it looks very much like the normal Socket 2011 that we have seen on past boards. However, last gen processors will not fit this new socket because it has a different pin configuration, and the notches inside the socket will only work on the new Haswell-EP E5-2600 v3 processors.
The mounting holes for heat sinks are the same as those used on Socket 2011 systems, so you should have no problems using those heat sinks.

Here we get a look at the eight SAS 3.0 ports. The LSI 3108 SAS controller supports these SAS 3.0 ports. These SAS ports provide serial-link signal connections, which are faster than the connections of Serial ATA (SATA).

Now we are looking at the back I/O ports. At the left side, we find COM Port One, then two USB 2.0 ports with the IPMI dedicated LAN port. The next stack consists of two USB 3.0 ports, followed by two stacks with four 10G LAN ports. The last port is for VGA output. Off to the far right, not shown in this picture, is a UID Button.
BIOS & Remote Management
BIOS
The BIOS for this motherboard is standard for server motherboards, so we will only show a few BIOS screens.
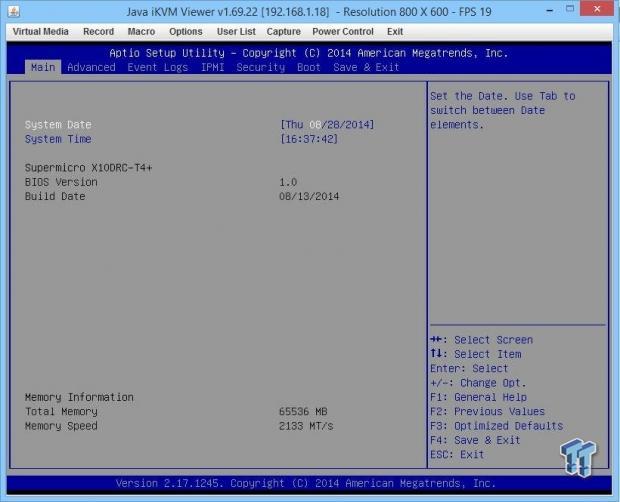
This is the main BIOS screen, which shows basic system information.
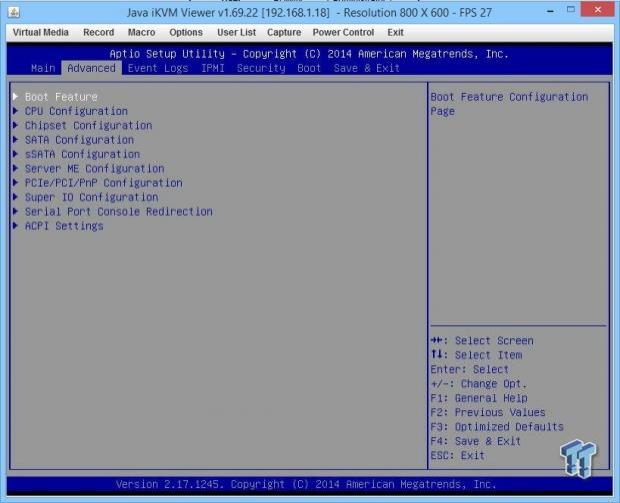
The Advanced tab brings you to the main advanced screen.
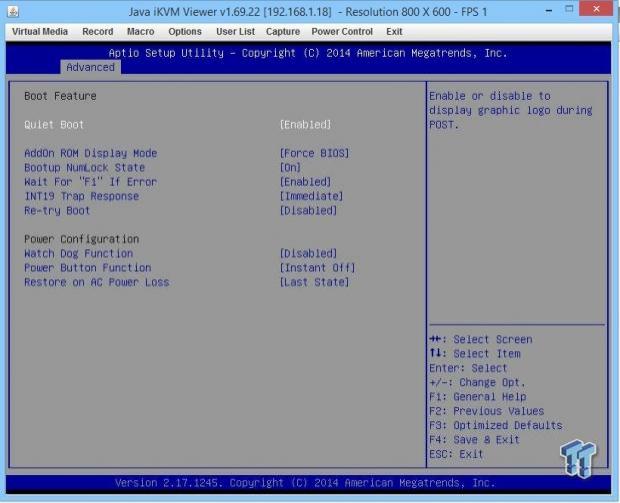
This is the Advanced Boot Feature menu.
Quiet Boot:
Use this feature to select the screen display between POST messages, or the OEM logo at bootup. Select Disabled to display the POST messages. Select Enabled to display the OEM logo instead of the normal POST messages.
Add-On ROM Display Mode:
Use this item to set the display mode for the Option ROM.
INT19 (Interrupt 19) Trap Response:
Interrupt 19 is the software interrupt that handles the boot disk function.
Power Configuration:
Watch Dog Function:
Select Enabled to allow the Watch Dog timer to reboot the system when it is inactive for more than five minutes.
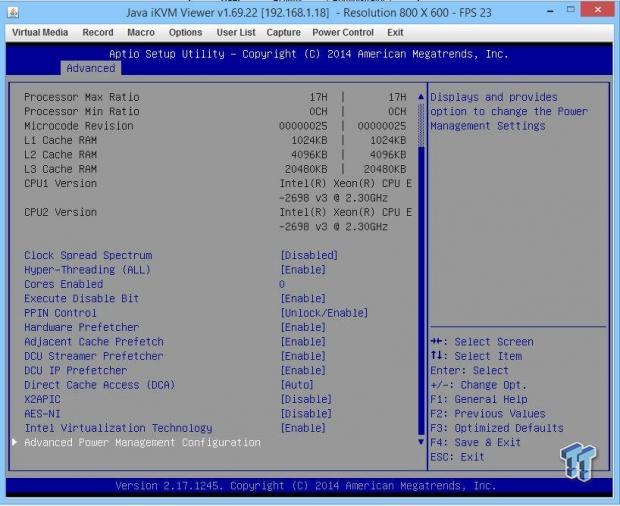
This is the CPU Configuration screen.
Clock Spread Spectrum:
Select Enabled to allow the BIOS to monitor and attempt to reduce the level of electromagnetic interference caused by the components.
Cores Enabled:
This feature allows you to determine the number of CPU cores to enable. Enter "0" to enable all cores.
PPIN Control:
Select Unlock/Enable to use the Protected-Processor Inventory Number (PPIN) control in the system.
Hardware Prefetcher:
The Hardware Prefetcher will prefetch streams of data and instructions from the main memory to the L2 cache to improve CPU performance.
Adjacent Cache Line Prefetch:
Select Enable for the CPU to prefetch both cache lines for 128 bytes as comprised.
Select Disable for the CPU to prefetch both cache lines for 64 bytes.
DCU (Data Cache Unit) Streamer Prefetcher:
The DCU Streamer Prefetcher will prefetch data streams from the cache memory to the DCU (Data Cache Unit) to speed up data accessing and processing to enhance CPU performance.
DCU IP Prefetcher:
The IP Prefetcher in the DCU (Data Cache Unit) will prefetch IP addresses to improve network connectivity and system performance.
DCU Mode:
Set the data-prefecting mode for the DCU (Data Cache Unit).
The options are 32KB eight-way without ECC and 16KB four-way with ECC.
Direct Cache Access (DCA):
Intel DCA (Direct Cache Access) technology will improve the efficiency of data transferring and accessing.
DCA Prefetch Delay:
The DCA prefetcher is used with a TOE (TCP/IP Offload Engine) adapter to prefetch data in order to shorten execution cycles and maximize data processing efficiency.
X2 APIC (Advanced Programmable Interrupt Controller):
Based on Intel's Hyper-Threading architecture, each logical processor (thread) is assigned 256 APIC IDs (APIDs) in 8-bit bandwidth. When this feature is set to Enable, the APIC ID will expand(X2) from 8-bits to 16-bits to provide 512 APIDs to each thread for CPU performance enhancement.
AES-NI:
Intel Advanced Encryption Standard (AES) uses a New Instructions (NI) to ensure data security.
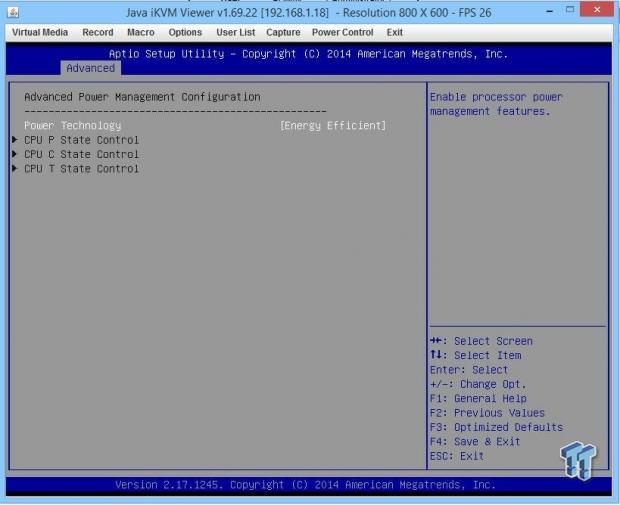
Now we are looking at the Advanced Power Management Configuration screen.
CPU P State Control:
EIST (Enhanced Intel SpeedStep Technology) allows the system to automatically adjust the processor voltage and core frequency to reduce power consumption and heat dissipation.
P-State Coordination:
This feature is used to change the P-state (Power-Performance State) coordination type. P-state is also known as "SpeedStep" for Intel processors.
CPU C State Control:
Use this to set the limit on the C-State package register.
CPU C3 Report:
Select Enable to allow the BIOS to report the CPU C3 State (ACPI C2) to the operating system. During the CPU C3 State, the CPU clock generator is turned off.
Enhanced Halt State (C1E):
Select Enabled to use Enhanced Halt-State technology, which will significantly reduce CPU power consumption by reducing CPU clock cycles and voltages during a halt-state.
CPU T State Control:
ACPI (Advanced Configuration Power Interface) T-States supports CPU throttling by the operating system to reduce power consumption.
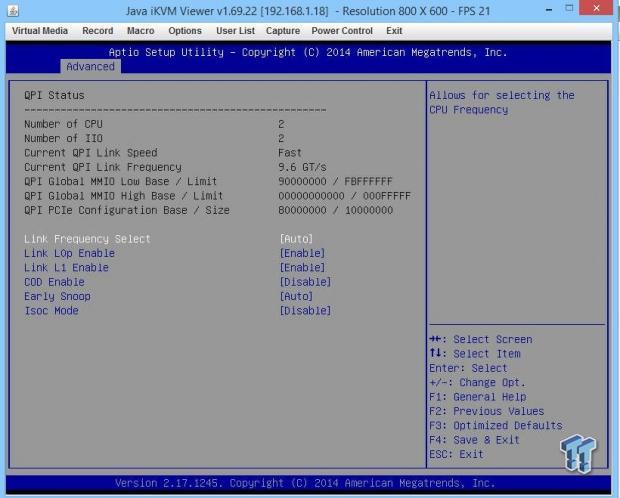
This is the QPI Configuration screen.
The main feature to look at here is CoD (Cluster-on-Die), which enhances system performance in cloud computing.
CoD reduces coherence traffic and cache-to-cache transfer latencies, and targets NUMA (non-uniform memory access) optimized workloads where latency is more important than sharing caching agents. CoD is best used for highly NUMA (non-uniform memory access) optimized workloads.
Each Home agent has ~14KB of cache, which is eight-way, 256 sets, and two-sector wide. It stores 8-bit presence vector tracking caching agent, potentially owning a copy a cache line; allocation on a cache-to-cache transfer, and tracks hit-M, hit-E, and hit-S lines, which are hotly contested cache lines.
The result is lower cache-to-cache transfer latencies, and reduced directory updates and reads of hotly contested lines. Snoop traffic is also reduced by sending directed snoops, rather than broadcasting them.
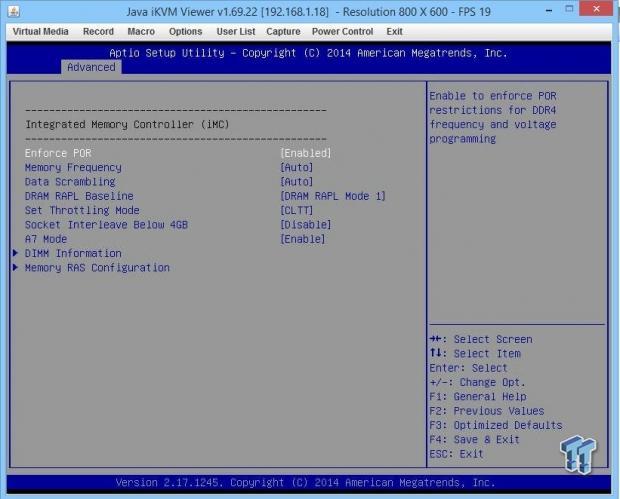
Now we are looking at the Integrated Memory Controller (IMC) screen:
Enforce POR:
Enforce POR restrictions on DDR4 frequency and voltage programming.
Data Scrambling:
Enable data scrambling to enhance system performance and data integrity.
Enable ADR:
ADR (Automatic Diagnostic Repository) support enhances memory performance.
DRAM RAPL (Running Average Power Limit) Baseline:
Set the runtime power-limit baseline for DRAM modules.
Set Throttling Mode (Closed Loop Thermal Throttling):
Throttling improves CPU reliability, and reduces power consumption via automatic-voltage control during CPU idle states.
A7 Mode:
Set the A7 (Addressing) mode to improve memory performance.
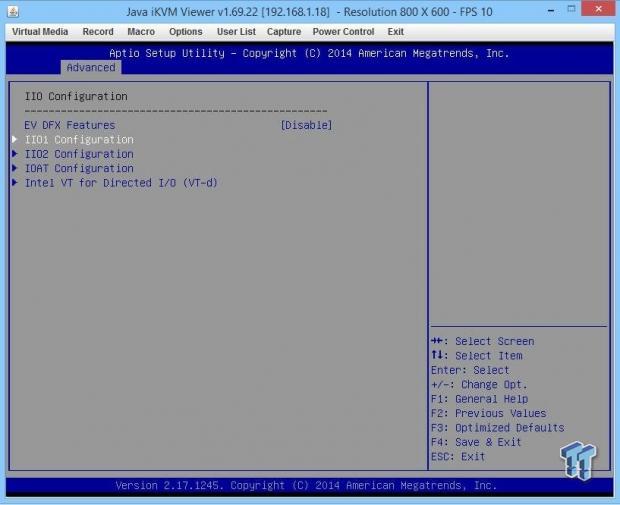
Next up is the IIO Configuration settings.
EV DFX (Device Function On-Hide) Features:
The EV_DFX Lock Bits that are located on a processor will always remain clear during electric tuning.
IOU2 (II0 PCIe Port 1):
This configures the PCI-E port Bifurcation setting for a PCI-E port.
II01 PORT 1A Link Speed:
This feature configures the link speed of a PCI-E port specified by the user, Gen 1, Gen 2, Gen 3.
IOAT (Intel IO Acceleration) Configuration:
Intel I/OAT (I/O Acceleration Technology) support significantly reduces CPU overhead by leveraging CPU architectural improvements, and freeing the system resource for other tasks.
Intel VT for Directed I/O (VT-d):
The Intel Virtualization Technology provides support for Direct I/O VT-d, by reporting the I/O device assignments to the VMM (Virtual Machine Monitor) through the DMAR ACPI tables. This feature offers fully protected I/O resource sharing across Intel platforms, providing greater reliability, security, and availability in networking and data sharing.
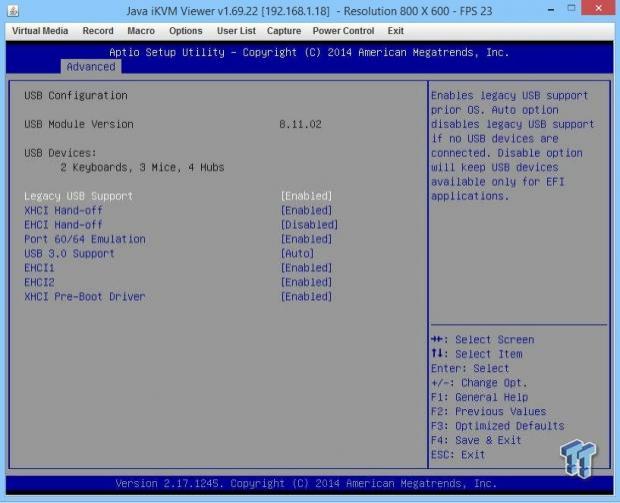
Now we are looking at the USB Configuration screen.
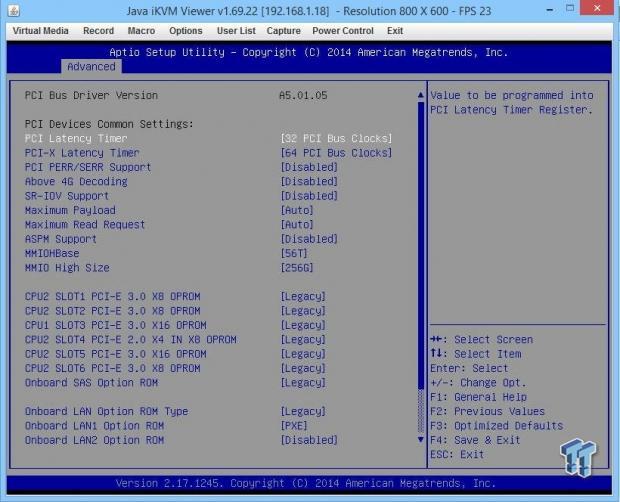
This is the PCIe/PCI/PnP Configuration screen.
SR-IOV is available if the system supports Single-Root Virtualization.
ASPM Support:
With this option, the Active State Power Management (ASPM) level for PCI-E devices with auto set in the system BIOS will automatically set the ASPM level based on the system configuration.
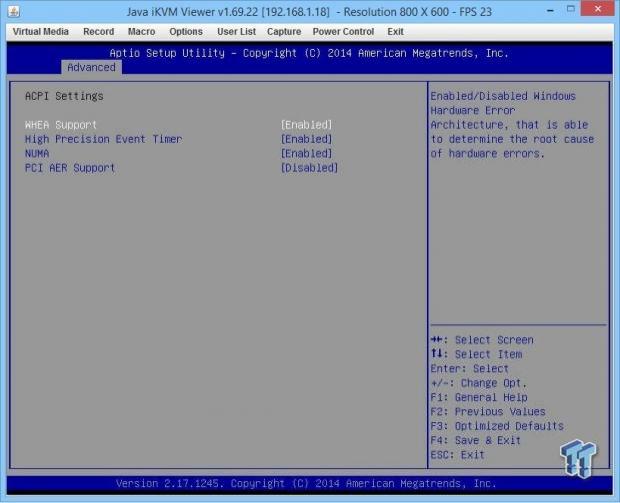
This is the ACPI Settings screen.
WHEA Support:
Select Enabled to support the Windows Hardware Error Architecture (WHEA) platform, and provide a common infrastructure for the system to handle hardware errors within the Windows OS environment to reduce system crashes, and to enhance system recovery and health monitoring.
NUMA (Available when the OS supports this feature):
Non-Uniform Memory Access support enhances system performance.
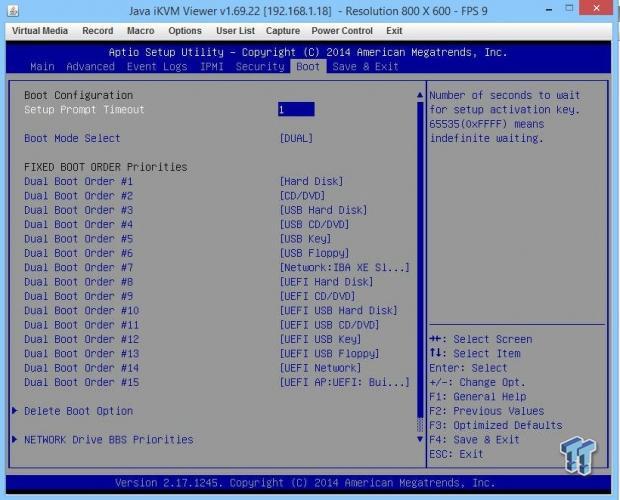
The last screen we will look at is the Boot Configuration screen. Here you can see all of the boot options available for the system.
Remote Management
The IPMI 2.0 with virtual media supplies remote access over LAN and KVM, over LAN support. Be sure to have a LAN cable plugged into the Dedicated IPMI LAN port.

We find our remote access IP address located in the BIOS under the IPMI Tab. In our case, this was 192.182.1.36. Enter yours into your browser, and you will see the login screen.
To login use:
Username: ADMIN
Password: ADMIN
As a best practice, administrative users should change factory default login information before connecting any new server to their network.
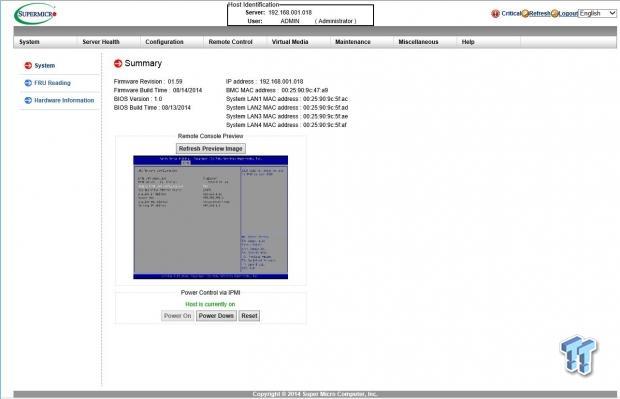
After logging in, we come to the home screen and see system information displayed.
There is also a remote control option for iKVM.
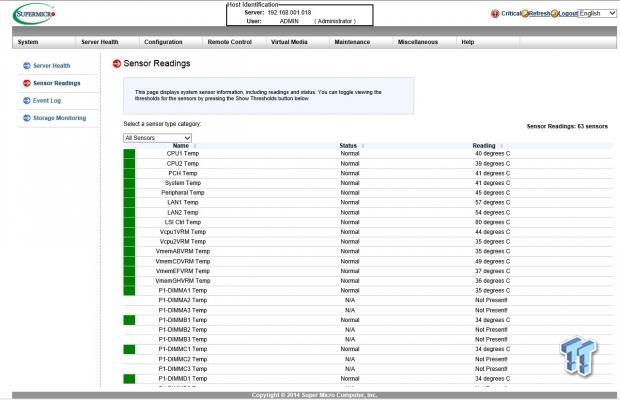
The next tab is the Sensor Readings menu.
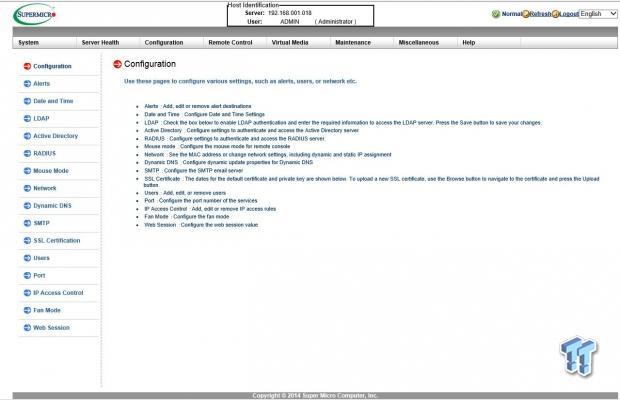
The Configuration menu allows you to change many features on the server, Active Directory settings, DNS, LDAP, and many more.
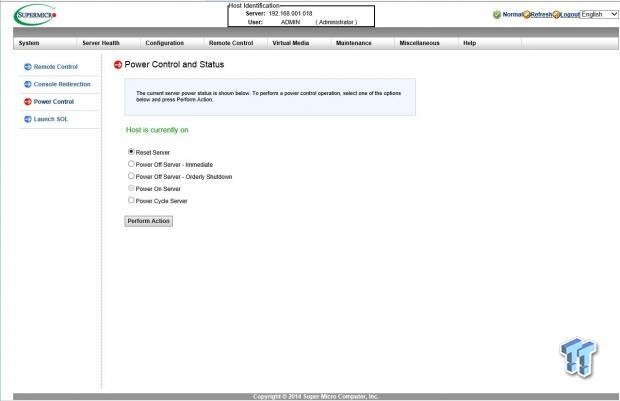
The power control and status menu allows you to power on, shut down, restart, and cycle the server.
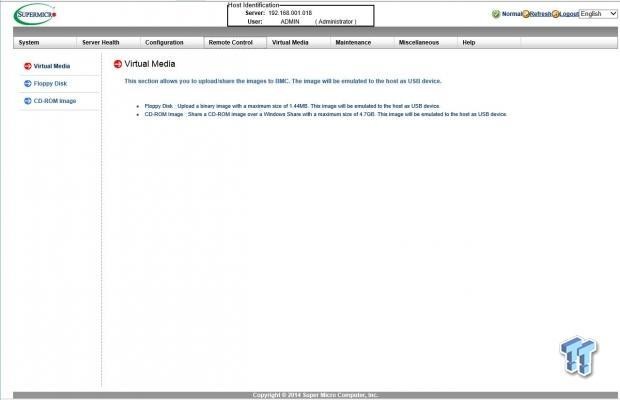
The Virtual Media menu allows you to mount or share virtual media like Floppy Disks and CD-ROM images.
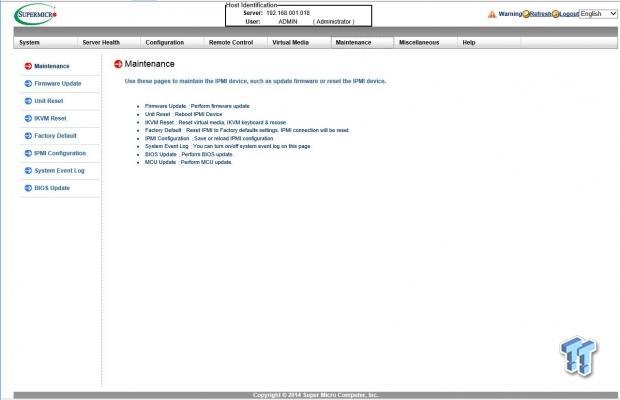
The Maintenance menu allows you to update the firmware, and restore factory defaults.
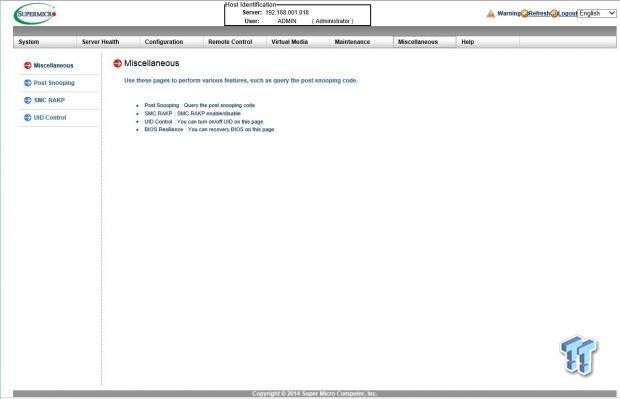
The Miscellaneous menu allows post snooping, SMC RAKP enable/disable, UID control, and BIOS recovery.
Test System Setup
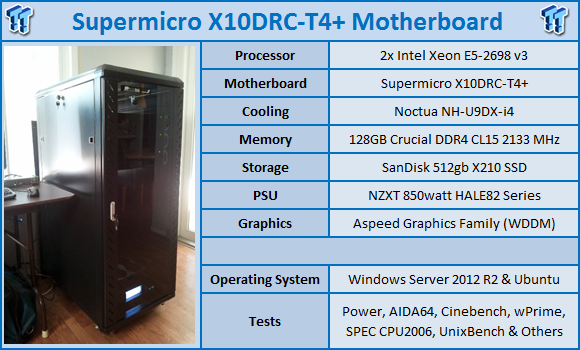
We would like to thank Supermicro,Crucial,SPEC, Yokogawa,NZXT,SanDisk, and Noctua for their support in providing parts for our test system.
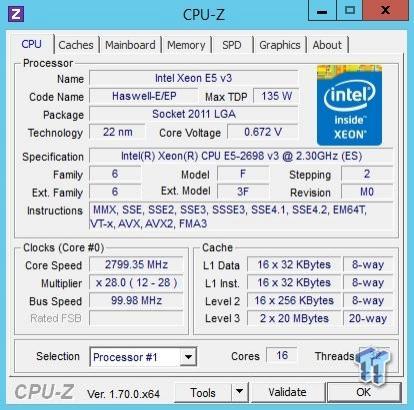
The platform that the X10DRC-T4+ uses is the Wellsburg (Intel C612), and new Haswell-EP processors. The processor we will be using is the Intel Xeon E5-2698 v3, which features 16 cores with hyper-threading used on these tests, and will supply the processing power.
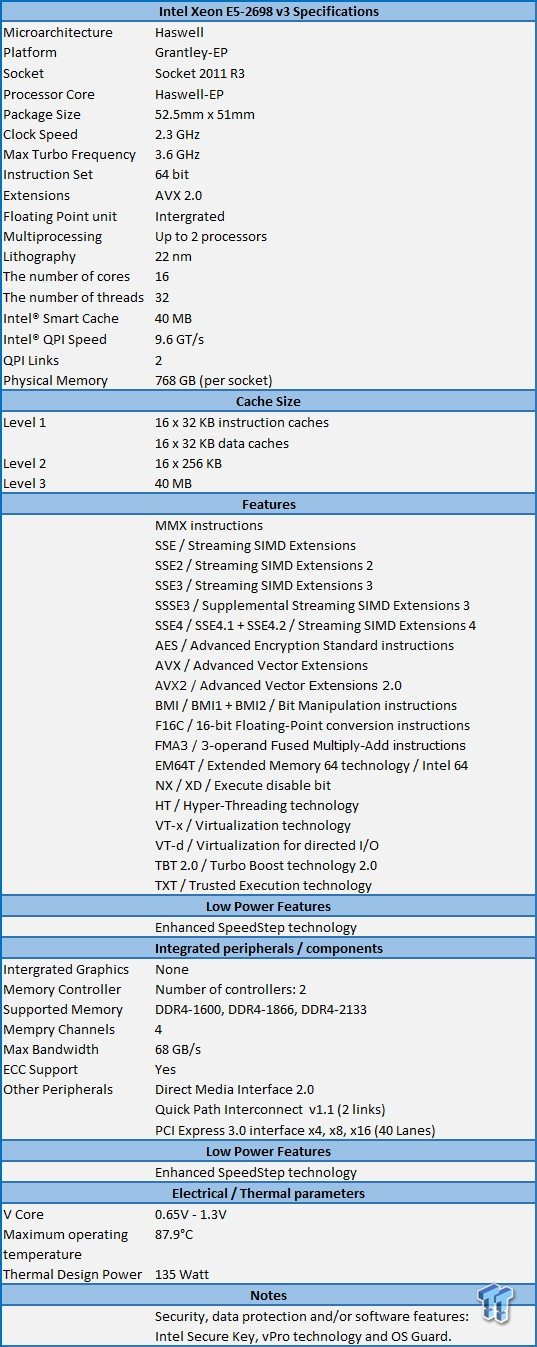
The Wellsburg Platform (Intel C612) will have support provided for four to 18 cores with dual socket capability. TDP ranges from 55W up to 160W for workstations. Memory is now DDR4, and can gave a frequency of up to 2133 MHz. The E5-2600 v3 processors use two QPI 1.1 channels with up to 9.6 GT/s. These processors support PCIe 3.0 with up to 8 GT/s and 40 lanes.
The chipset will be Wellsburg PCH. This gives support for a huge number of SATA ports at ten. A large number of USB devices can be used with six USB 3.0, and eight USB2 ports. Wellsburg (C612) also supports DMI2 with four lanes.

In our tests, we will be using the new Crucial DDR4 memory, which has a speed of 2133 MHz, and is rated at CL15. We have already taken a look at these memory kits, you can find our overview here.
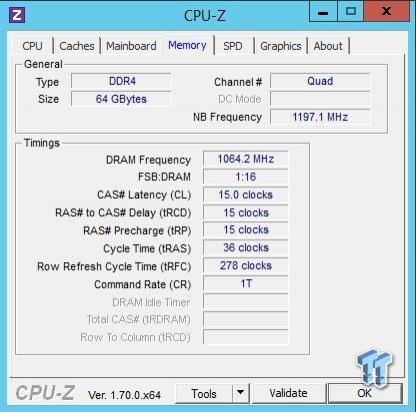
Here we can see the timings of the Crucial DDR4 memory that we will be using in our tests.
System and CPU Benchmarks
Cinebench 11.5
CINEBENCH is a real-world, cross platform test suite that evaluates your computer's performance capabilities. The test scenario uses all of your system's processing power to render a photorealistic 3D scene. This scene makes use of various different algorithms to stress all available processor cores. You can also run this test with a single-core mode to give a single-core rating.
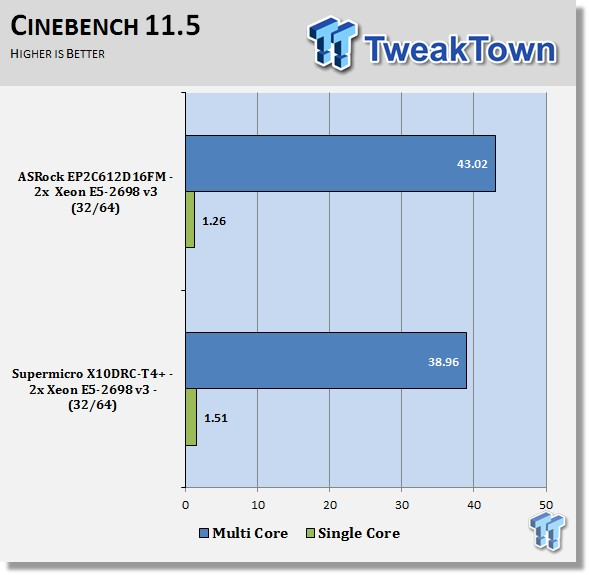
Here we are looking at our CINEBENCH 11.5 tests; the X10DRC-T4+ shows a slight lower score here. What we will find with the X10DRC-T4+ is the BIOS tuning is for VM workloads. These BIOS tunings will have an impact on some benchmarks. Do notice that the single-threaded score is very good here.
Cinebench R15
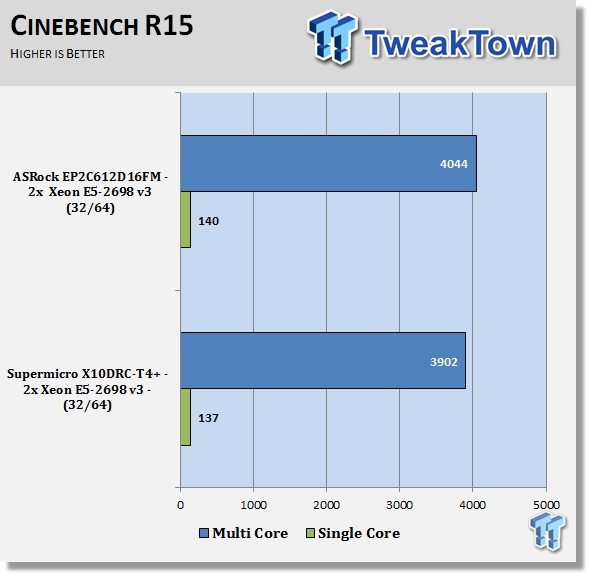
Just like in the CINEBENCH 11.5 results, the X10DRC-T4+ has a slightly lower score. Overall, this is not that important, as we will see later on where the strengths of the BIOS tuning comes into play.
wPrime
wPrime is a leading multi-threaded benchmark for x86 processors that tests your processor performance. This is a great test to use to rate the system speed; it also works as a stress test to see how well the system's cooling is performing.
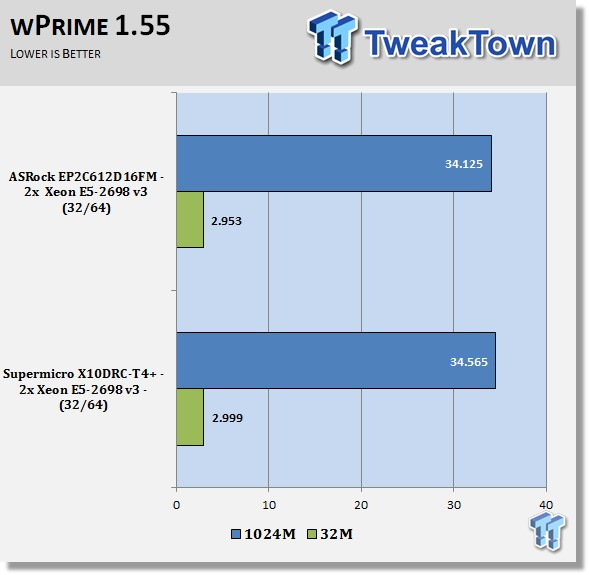
Just like in the CINEBENCH results, the X10DRC-T4+ has a slightly lower score. As we said before, these small score adjustments are not much to be concerned about with these tests.
Memory & UnixBench Benchmarks
AIDA64
AIDA64 memory bandwidth benchmarks (Memory Read, Memory Write, and Memory Copy) measure the maximum achievable memory data transfer bandwidth.
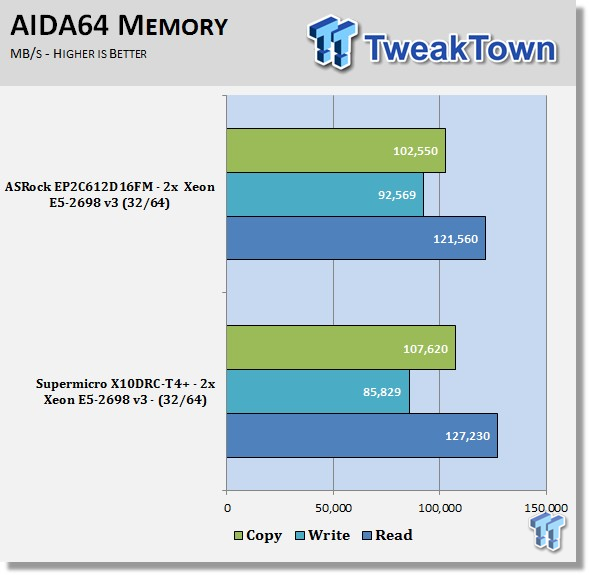
Memory bandwidth for the X10DRC-T4+ is looking very good. Although there are no huge increases of bandwidth, the X10DRC-T4+ is showing good strong bandwidth numbers.
Linpack
LinX 0.6.4 is a CPU benchmark that measures floating-point operations per second, and is used to compare CPU performance; it is also a very good stress test to run.
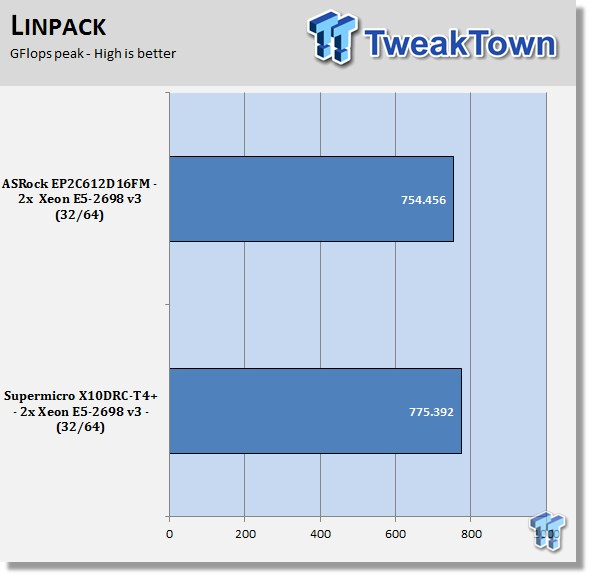
Linpack shows strong bandwidth numbers and is comparable to other motherboards we have tested. These results are almost two times faster than our Ivy Bridge-EP tests, and show just how well the new Haswell-EP platforms perform. These speeds, coupled with fast DDR4, should give a real boost to application performance.
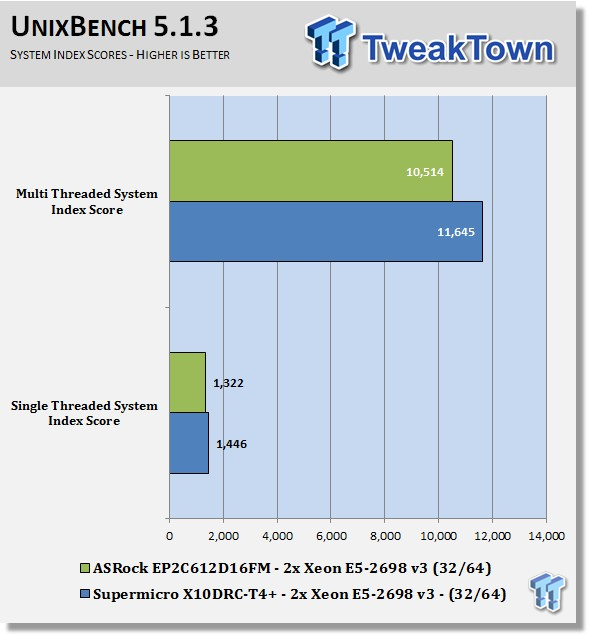
Synthetic benchmarks only show part of the performance of a motherboard. When using tests that are more complex, we will start to see a different trend in the scores. UnixBench starts to show what the X10DRC-T4+ can really do well, and that is multi-threaded workloads.
SPEC CPU2006v1.2 Benchmark
SPEC CPU2006 v1.2
SPEC CPU2006v1.2 measures compute intensive performance across the system using realistic benchmarks to rate real performance.
In our testing with SPEC CPU2006, we use the following basic commands to run these tests:
Runspec --tune=base --config=tweaktown.cfg, then int, or fp
To do multi-threaded, we add in --rate=64.
When SPEC CPU first came out, these tests could take up to a week to run, but as computers become faster, our tests now take up to four days for a full run, and even less on some systems.
The user can do many thing to effect the results of CPU2006 runs, such as compiler optimizations, add-ons like SmartHeap, and different commands used to start the tests.
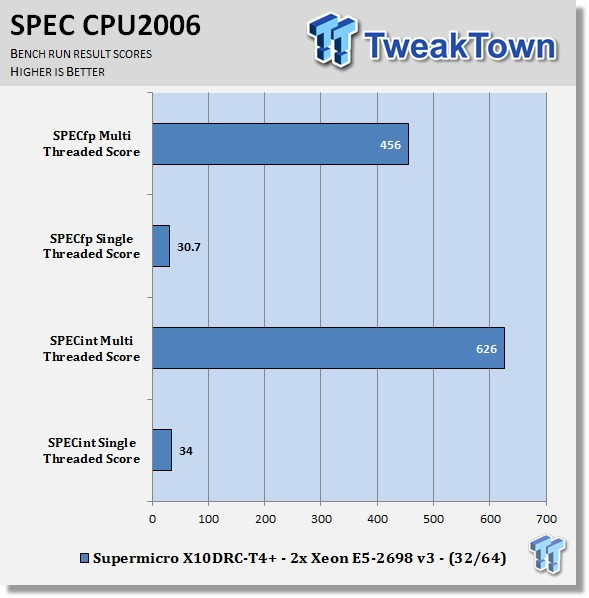
This benchmark has many different commands to use depending on what the user is looking for. For our tests, we used basic commands that run a full test with a base tune.
You can see here the SPEC scores after full runs for Integer (int) and Floating Point (fp) tests.
Single-core runs show how fast (speed) a CPU can perform a given task. In the multi-core runs, we set SPEC CPU2006v1.2 to use all threads to measure the throughput of the system.
The additional cores/threads of this system have a huge impact on performance in these tests, and really show the amount of horsepower that a dual-socket system has over a single-socket board
Single-threaded results are still very important, but when you need many single-threaded apps to run, moving to a CPU with more cores is the way to go.
The X10DRC-T4+ really starts to shine in multi-threaded interger workloads.
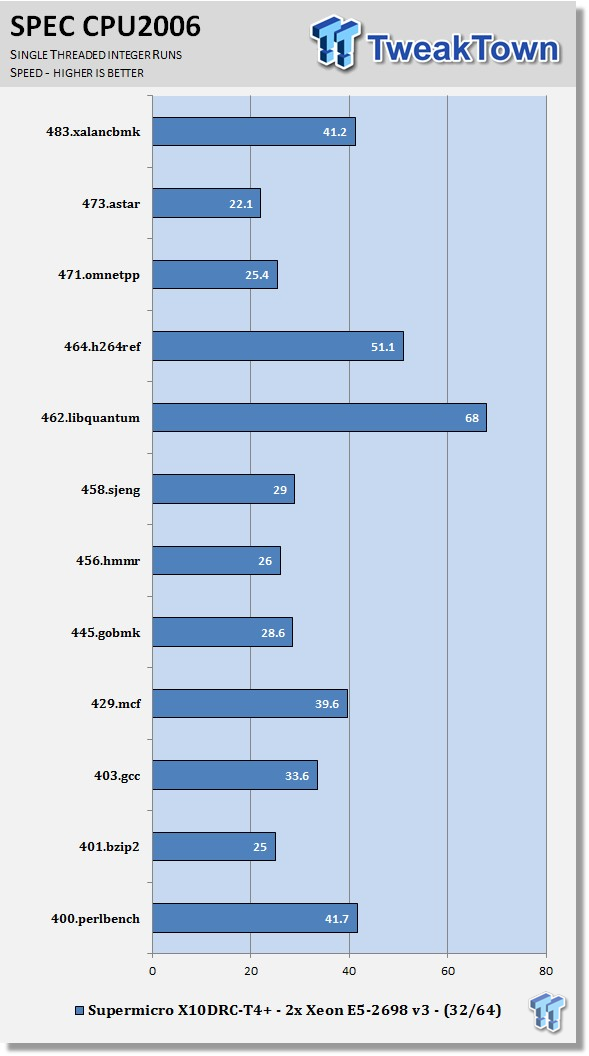
Looking at the results of single-threaded integer runs, we can get an idea of speed at which the E5-2698 v3s can crunch through the different integer tests. Not all CPUs are equal here, and ones that have a higher speed will perform these tests faster. Naturally, using an overclocked system, or CPUs with a higher stock speed, will generate higher results.
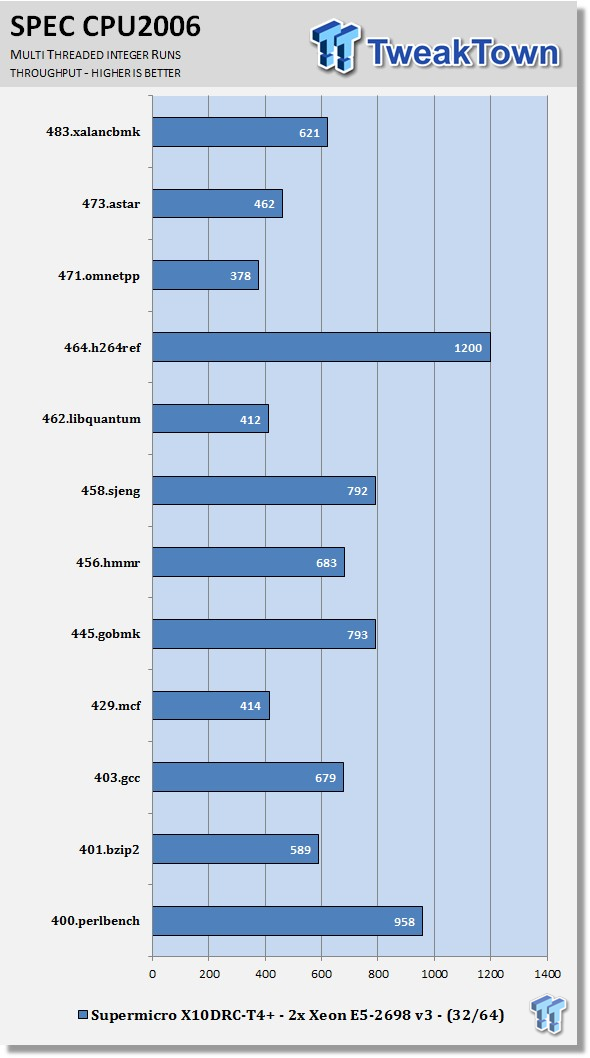
Now we run the test using all 32 cores/64 threads cores on the E5-2698 v3 processors to measure the throughput of the system. In this test, more cores/threads will have a greater effect on the outcome.
The X10DRC-T4+ really takes off in this test. BIOS optimization for VM workloads clearly helps this out on multi-threaded tests.
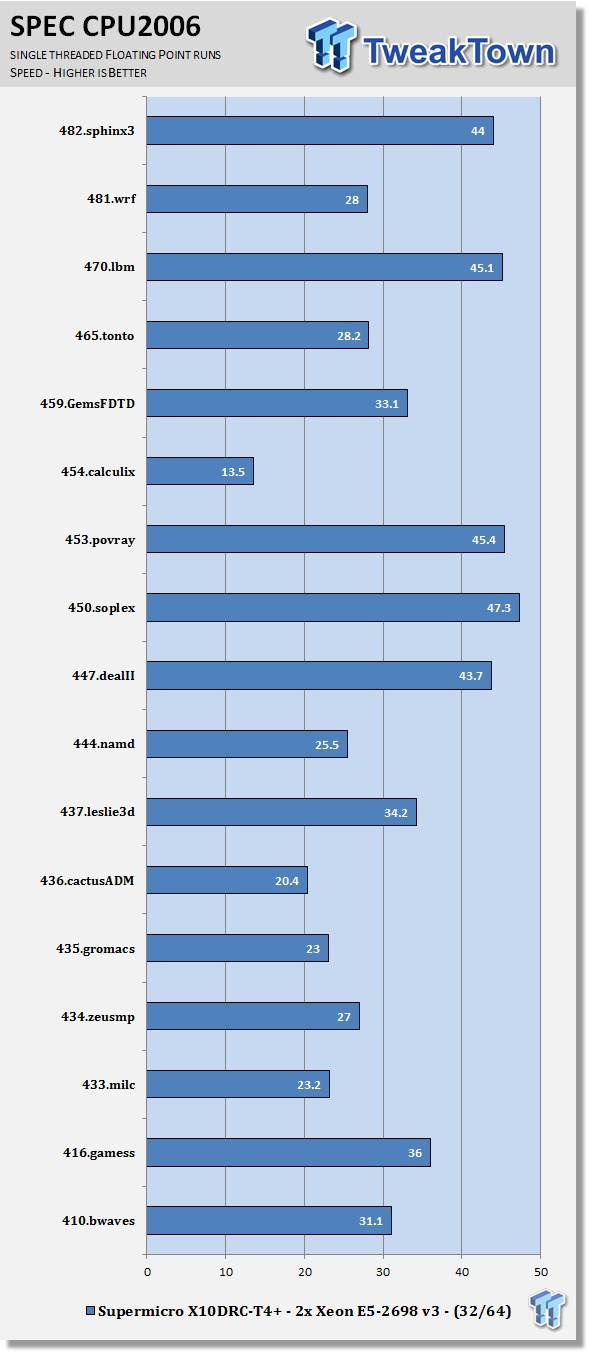
Just like the integer tests, we now run the floating-point tests in single-threaded (speed) mode.
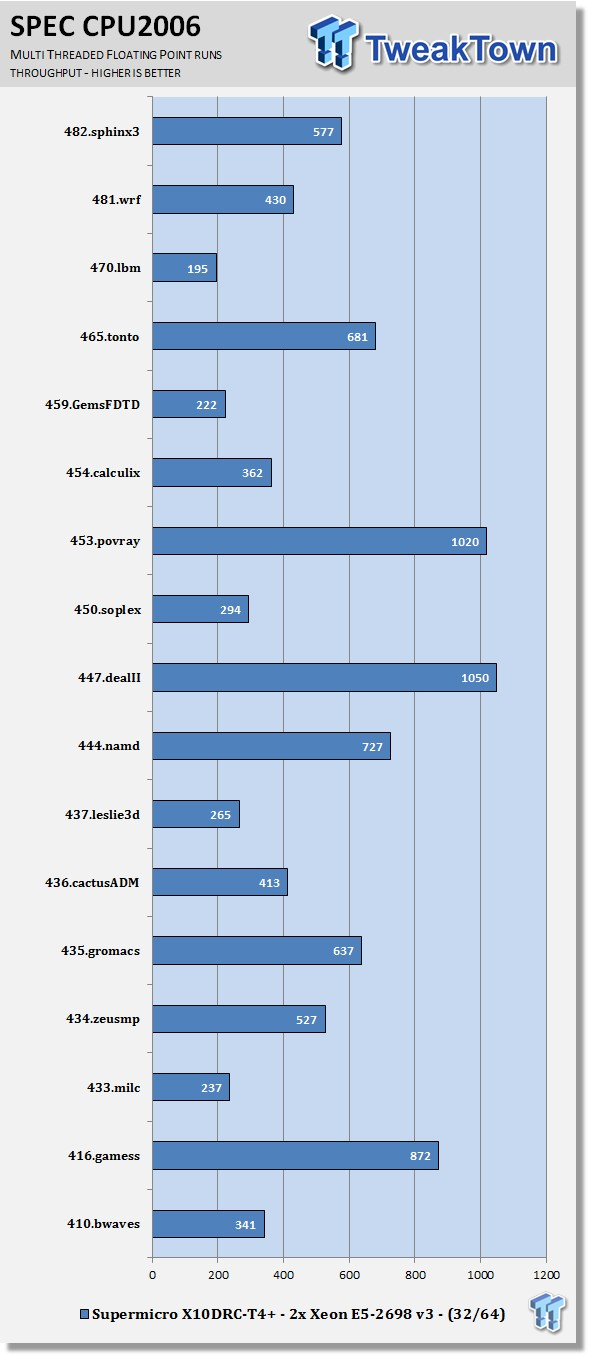
Here we see the results of the multi-core floating-point run that uses all 32 cores/64 threads cores on the E5-2698 v3 processors. Like the multi-threaded integer test, more cores/threads will have a greater impact on the test.
Similar to what we saw in the integer multi-threaded tests, the X10DRC-T4+ really takes off here.
Power Consumption & Final Thoughts
Power Consumption
We have upgraded our power testing equipment, and now use a Yokogawa WT310 power meter for testing. The Yokogawa WT310 feeds data through a USB cable to another machine, where we can capture the test results.
To test total system power use, we used AIDA64 Stability test to load the CPU, and then recorded the results. We also now add the power use for a server from off state, to hitting the power button to turn it on, and taking it all the way to the desktop. This gives us data on power consumption during the boot up process.
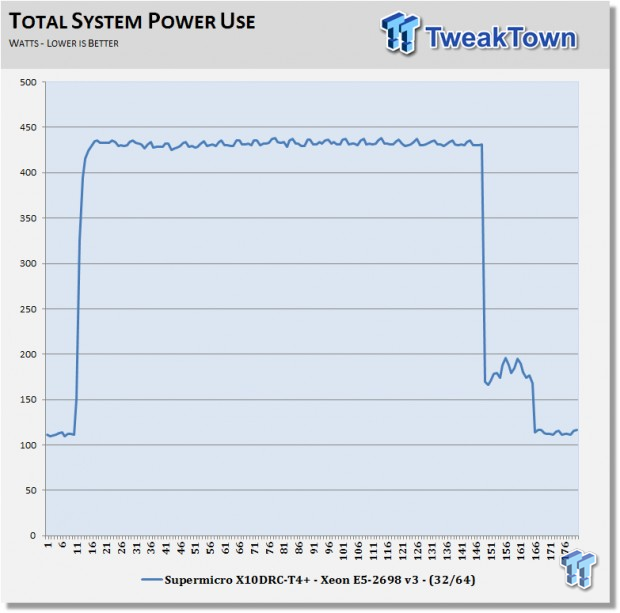
The X10DCR-T4+ uses ~110watts at idle on the desktop, which is about 40watts less than Ivy Bridge-EP setups we have run. The max power use is also very good. We find this system to be energy efficient, which will save on power bills.
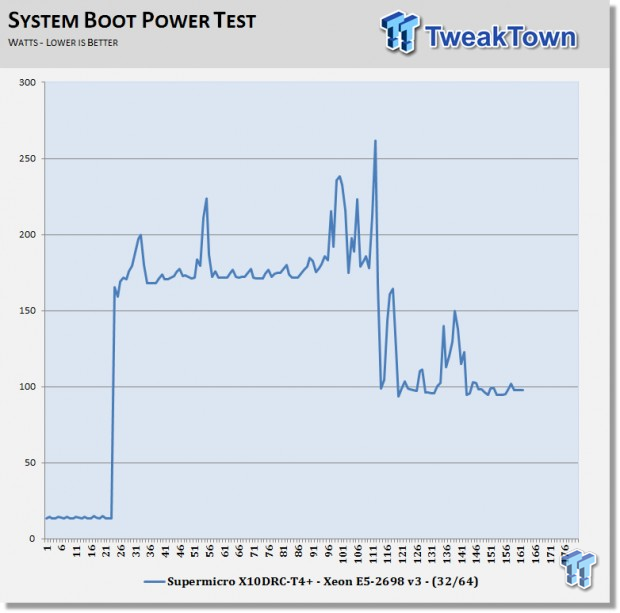
With the X10DCR-T4+ turned off, we see only ~5watts of power use to keep IPMI active, and a peak power use of ~260watts during the boot up process. The system settles down to ~100watts after the boot up is completed.
When powering up a rack of these servers, it is useful to know what the boot up power demands would be like.
Final Thoughts
Like we said in the beginning, we have several Supermicro motherboards to test, but this one just had to go first on the benching table. The X10DRC-T4+ has so many features, which made it hard to do this write up. We think Supermicro went all out when designing this board, and left nothing off the table.
With a system like this, multi-threaded performance is really what you need to have, and this is where the X10DRC-T4+ really shines. With 24 DIMM slots, RAM load out should not be an issue with this board. We ran 16x sticks of 8GB Crucial 2133 MHz DDR4, and this only scratched the surface of what this board could handle.
Per Core P-States (PCPS) also helped to reduce power usage on these new systems, which in turn helps reduce running costs and keep heat down. CoD (Cluster-on-Die) also helps give multi-threaded performance and VM workloads a huge boost, which we saw in our UnixBench and CPU2006 multi-threaded runs.
The storage options on the X10DRC-T4+ seem unlimited; eight SAS3 (12Gbps) ports with the LSI 3108 controller give storage performance a big boost, and ten SATA ports give this board plenty of storage capabilities.
Dual x540 10 GBASE-T (four ports) gives ample network connections right out of the box, unless you require faster connections like 40GbE, or Infiniband. If you need more storage or network options, then you have six more PCIe slots to allow for plenty of expansion.
When it comes to cases for the X10DRC-T4+, Supermicro has several to choose from. Cases recommended for this board are typical Supermicro cases, which come in 2U, 3U, and 4U sizes. 2U Chassis: SC826BAC4-R920WB, and SC826BE1C-R920LPB.
3U / Mid-Tower Chassis: For rack mount GPU/MIC Servers SC835BTQ-R1K28B, and high performance storage servers SC836BE16-R920B.
4U / Tower and Rack Mount Chassis: SC745TQ-R920B, and SC847BE1C-R1K28LPB.
The X10DRC-T4+ was truly a wonderful motherboard to review, it has so much potential built right into it. We are also happy to see that Supermicro has DVD ISOs for drivers to download now. All in all, this is a very powerful motherboard that can handle just about anything you can throw at it. If manage to use all of the networking and storage options with motherboard, you will find expansion capabilities are almost unlimited.
PRICING: You can find the Supermicro X10DRC-T4+ for sale below. The prices listed are valid at the time of writing, but can change at any time. Click the link to see the very latest pricing for the best deal.
United States: The Supermicro X10DRC-T4+ retails for $1,039.95 at Amazon.
