Introduction
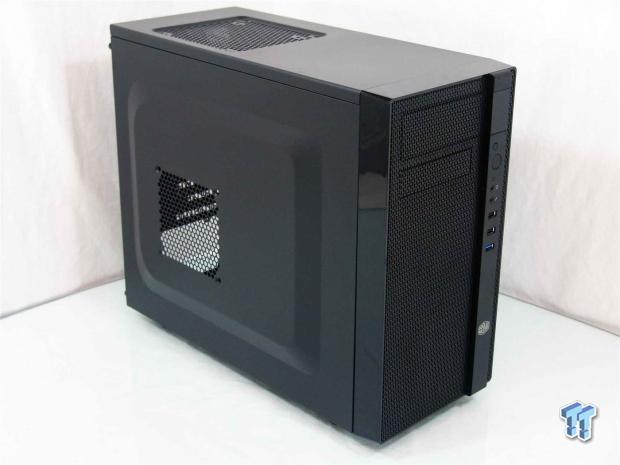
I will give one thing to Cooler Master; they aren't afraid to try new things. The way the chassis market is going, there are a few things that have become "must-have" options when it comes to what a customer expects to see. Water cooling support is big these days, and so are fan filters built into the chassis. Native USB 3.0 is something that should be included, and there should be no need these days for a rainbow colored assortment of cabling. There should be room for an average sized tower cooler for the CPU, and there needs to be room for some serious graphics power to be bolted in as well. Another thing that is being offered I find very handy are hidden 2.5" drive mounting locations as well as possibly a removable hard drive cage for more room and better ventilation inside the chassis.
On the outside you can do just about anything, but as many companies will tell you, once you get too far outside the box, less and less people are interested in your designs. What I look for externally is a unique looking bezel that is well ventilated, but looks will supersede airflow for some. As for the door panels, well I prefer flat panels with a window, but my second choice is panels with bumps for extra room, and without a window, I do like the option to have a fan in the left side to blow directly on the video cards to help keep them cool when in SLI or X-fire. As for the back of the chassis, I don't expect much, maybe some removable expansion slot covers that I can replace later. No cheap tool-free mechanisms in the back, maybe some holes for water cooling, but most definitely it needs an exhaust fan. As far as the PSU is concerned, it can be at the top or the bottom as long as the cables reach, but if it is on the bottom a dust filter is a must.
The newest chassis to hit the desk for testing is the Cooler Master N200. What many will be surprised to see is that most of the things I listed above are in some way included in this new chassis. While this is a much smaller chassis than most are used to dealing with, Cooler Master did not let that stop them from helping to redefine what buyers want to see in any chassis, even if released in the sub-$50 category as this one is.
What you are about to see may be compact, but it is attractively stylish, offers all sorts of things we don't see in some towers much larger and more expensively priced, and is a chassis that I can see many buyers warming up to once they see everything the N200 has to offer.
Specifications, Availability and Pricing

The N200 or NSE-200-KNK1 comes in only one color, Midnight Black. This covers the textured paint applied both inside and out as well as the plastic front bezel. This mostly steel chassis measures in at just less than eight inches wide, just shy of 15 inches tall, and is 17.5 inches from front to back. The front plastic bezel of the chassis has a shiny finish on the sides, top and bottom, but the front is mostly mesh where the thick bar containing the front I/O isn't running the length of the front. Both side panels are bumped out to allow for more interior space. At the top the steel covers most of it except for the ventilation hole above the CPU cooler. The bottom of the chassis does contain a slide out dust filter that goes under the power supply, and the back of the chassis offers an exhaust, break-out water cooling holes, and four expansion slots.
Inside the chassis you are given one each of the 5.25" and 3.5" bays at the top for an ODD and possibly a card reader to go through the front bezel. Under that there is a large space where the front intake 120mm fan is found. You can add another 120mm fan here if you remove the HDD cage at the bottom that supports a pair of 3.5" HDDs. The motherboard tray has wire management options, it offers tie points, it can hold either a Micro-ATX or Mini-ITX motherboard, and it also offers a large access hole for the coolers back plate. You do have the option for a 120mm fan at the top of the chassis, but things are very close to the cooler there, and you will also find the second fan in the chassis hanging in the back as an exhaust. All told, you can install a total of five 120mm fans in the N200.
There are some measurements we need to cover as far as compatibility goes inside the chassis, too. The power supply should be no longer than 180mm, unless you plan to leave the bottom HDD cage removed from the chassis. Otherwise a longer PSU will not allow enough room for the wiring and the cage. There is a full 160mm of room for a tower CPU cooler, and that does not include the bumped out door panels. As long as the alignment is good, this can add a few more millimeters of space there, too. As far as video cards are concerned, even with the lower HDD rack installed, you have room for 355mm of video card.
As I shopped around for this chassis, in the American market, I only see three places to obtain one. At the time of writing Newegg and eBay are both showing listings of the N200 for $49.99 prior to any shipping charges, although Newegg does have a special free shipping offer currently. The third location is CostCaptain.com, and it is a dollar cheaper in initial pricing. With a name I am unfamiliar with; I think I would just go ahead and pay that extra dollar to get a product from a company I know much better.
I really think many of you will be impressed once you get the full scope of what the N200 from Cooler Master offers at this really great price point.
Packaging

Using plain brown cardboard and black screened information on top of it, the front of the box shows the chassis on the left and five key features on the right side. At the bottom you will find that this is a mini-tower chassis and it is called the N200.

Here the company and chassis name start things off above the handle. Under it is an image of the chassis with more of the left side showing this time. At the bottom you will find the bar codes and the "model box" where a sticker designates what is inside the box.

The back of the packaging offers an idea of what you find inside the N200. There are ten features pointed out and described with text to let you know what you are looking at or where to find each feature. At the bottom in many languages it says that this is a mini-tower chassis, the N200.

This last panel offers the Cooler Master logo and chassis name at the top under the shipping labels. Under the handle you find the same specifications chart we covered a page back.

Inside of the cardboard, Cooler Master uses thick Styrofoam at the top and bottom to protect the chassis from drops and possible crushing. Inside of that you have the clear plastic liner, but also the shiny part of the front bezel has an additional layer so that it is perfect for their customers. It all worked very well, as the N200 arrived in great shape.
Cooler Master N200 Mini-Tower Chassis

The front bezel on the N200 is nearly all black steel mesh. The only thing to break it up is the long thick bar on the right side of the chassis with the Cooler Master logo at the bottom.
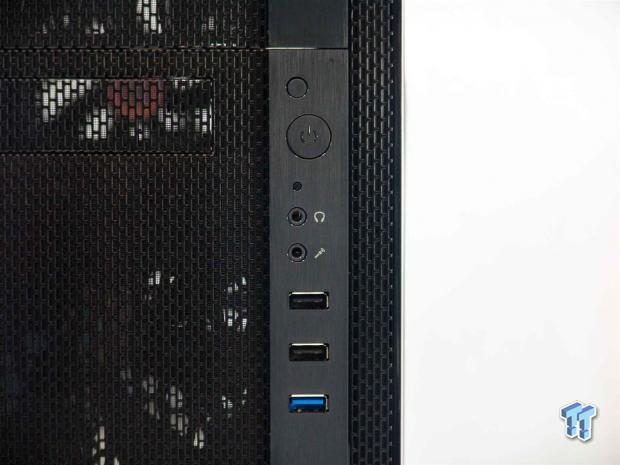
Under the removable 5.25" bay cover and next to the 3.5" cover, you will find the front I/O panel. It starts with the reset button and the power button just above the HDD activity light. You then get a pair of 3.5mm audio and microphone jacks as well as a pair of USB 2.0 ports and a single USB 3.0 port.

Most of the top surface of the chassis is just the texture painted steel. As you move back on the chassis you have a 120mm fan opening that currently has a dust filter held in with push-clips, but no fan is shipped in this location.

You can see at the front of the chassis that the sides of the bezel are all very shiny, and you bluntly hit the textured paint of the left door panel. The door is raised to allow for a fan to have room next to the video card/s if you choose to fill this second optional mounting position.

In the back you find the rear I/O area next to the exhaust fan at the top. The lower half offers four expansion slots that have removable ventilated covers, offers a pair of optional holes for water cooling, and has the power supply sitting on the bottom of the chassis.

The right side of the chassis offers that same shaped bump-out that the left side had. This time it is for wiring since the motherboard tray is so close to the door.
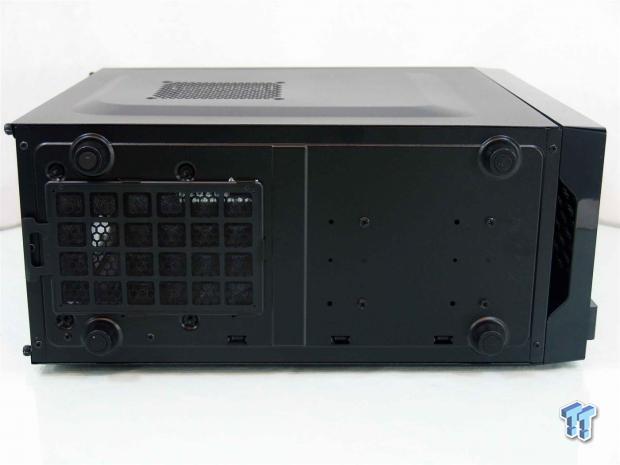
Under the chassis you can see the dust filter under the PSU and the four large plastic feet with rubber pads right away. If you look a little closer at the right side, you can see those are screws and not rivets holding in the HDD rack.
Inside the N200

After removing the thumb screws, the side panels almost fall off with just a slight nudge to the back of the case. Inside you can get the lay of the land along with seeing that a hardware bag along with the wiring is tied up to the HDD rack to keep it from flopping around in transit.
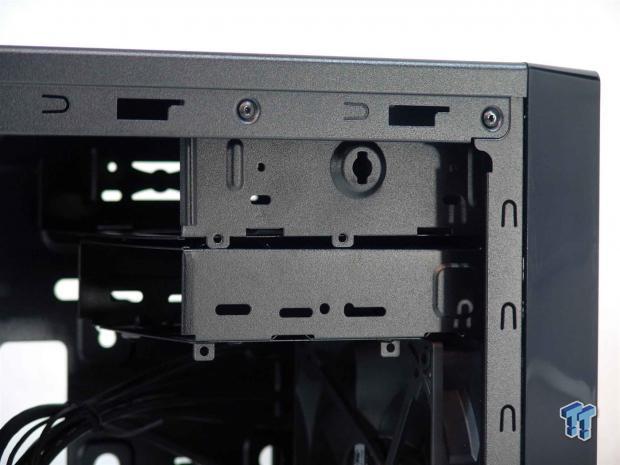
At the top you have a 5.25" bay for an ODD or a reservoir, and just below is a 3.5" drive bay for card readers. Both bays use screws to mount devices on both sides. Even though there is the tool-free hole in the bay, there is no lock provided to go with it.

Under the bays that pass through the bezel, you have the area that doesn't. At the front of the chassis there is a single 120mm fan provided, although you can install two, and even a radiator in here. The way to get the radiator in would be to remove the drive cage that hols two 3.5" HDDs comfortably.

In the roof of the chassis you can see the screen a little better that acts as a dust filter. If you look close you can see the fan screw holes are cut in the filter so you can install the fan with this still in place.

The motherboard tray has just enough room for a Micro-ATX motherboard, or plenty of room for a Mini-ITX motherboard. The tray offers eleven places to tie wires, four places to run wires through and a large CPU back plate access hole.
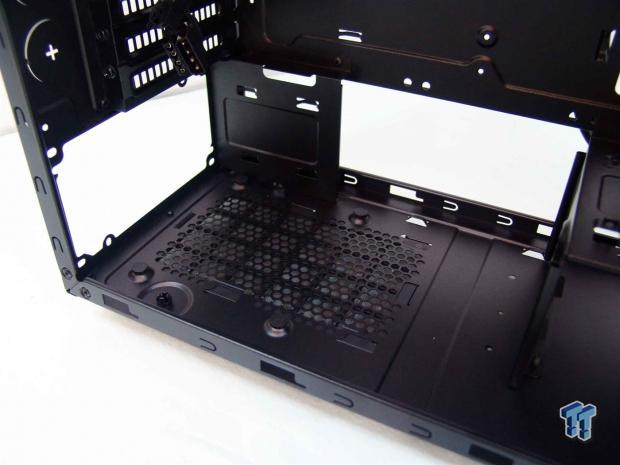
At floor level you would install the power supply on top of the four rubber pads there. The bottom of the motherboard tray is wide open so passing and routing wires is made very easy in this chassis.
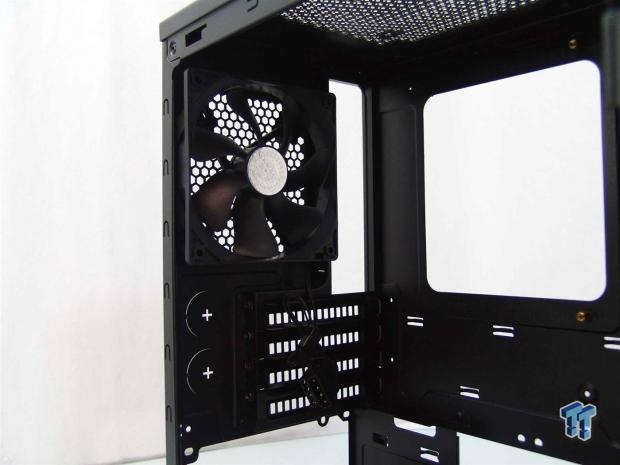
At the back of the chassis you will find the match to the fan in the front of the N200. Both fans are 3-pin powered, but do come with Molex power adapters on them, too. It is a bit tough to see in an all black image, but if you look closely you can make out the hex head screws used to secure the slot covers.

The motherboard tray sits almost flush with the edge of the chassis and makes that bump in the panel much more valuable. On the left of the tray you can also stack up 2.5" drives in the key-ways with use of grommets and screws that are provided.

All of the cabling is black, and it includes the HDD LED, reset, power and power LED on the left, Native USB 3.0 and USB 2.0 connectors in the middle, and the option for HD or AC'97 audio on the right.
Accessories and Documentation

Inside of the bag tied to the HDD rack you will find seven brass standoffs along with a socket to tighten them, ten wire managing ties, and a motherboard speaker to listen for post codes.

You are also given eight grommets for the 2.5" drives, and their screws in the middle of this image. The thumbscrews are used for hard drives, the hex heads are for the PSU and motherboard, leaving the small screws at the bottom right for the ODD and card reader installation.

Shipped outside of the case and sitting there right on top as you open the box, you will find the installation guide provided for the N200 chassis.

Completely unfolded, this side starts with a parts list and moves right into things like the component installation as well as pointing out where every part goes and what screws to use in the explanations in the text under each image.

On the back side of that same paper you can see there are three more sections of how-to at the top and that row ends with a wiring guide. The bottom discusses the terms of the two year warranty in many languages.
The Build and Finished Product
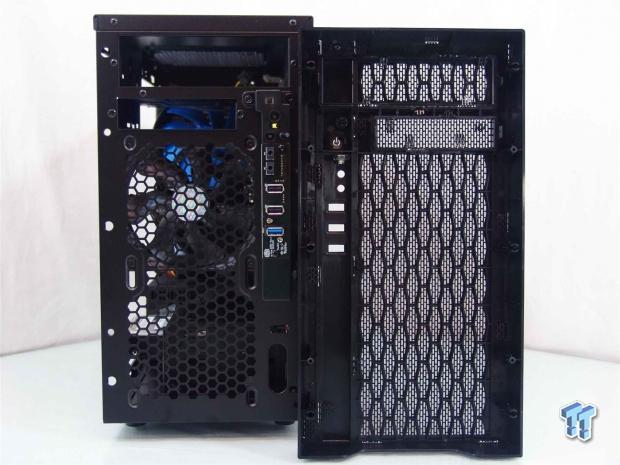
As I was about to install the DVD drive, I had to remove the bezel to do this. The latches for the cover are on the inside of the bezel, and you don't have to worry about the wiring, the front I/O stays with the case as you remove the front bezel.
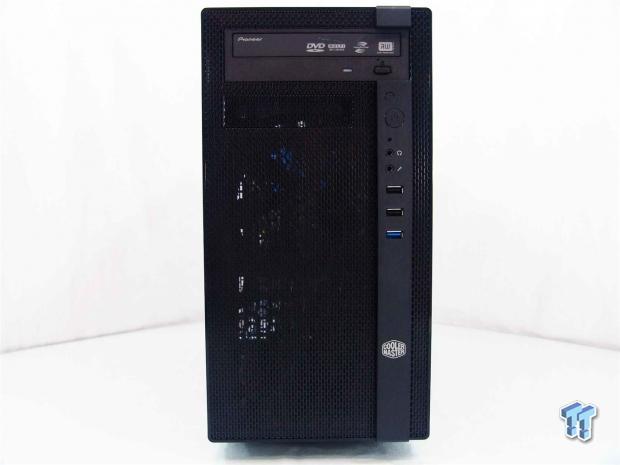
With the bezel back in place you can align the optical drive with it fairly easy. The thing is, if you do plan to use the 5.25" bay, it definitely breaks up the stock look where that bar went all the way down and wasn't so obviously broken up. It still looks good like this though in my opinion, just not as good.
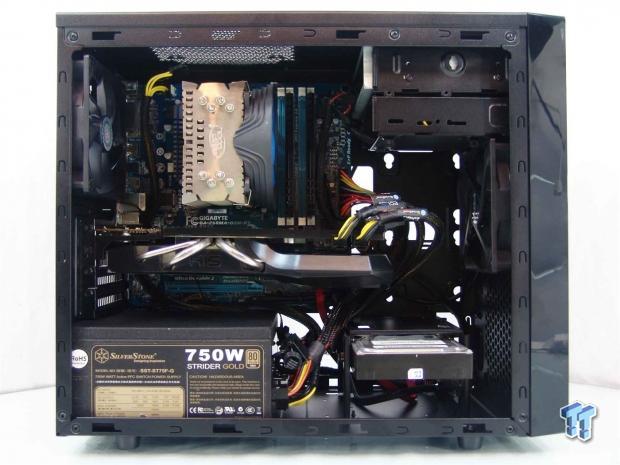
Inside things are cramped, but I was able to install all of the typical gear. With a small CPU cooler like this you could put a fan at the top, but larger cooler will conflict with this area. The Radeon HD 7950 has plenty of room left on the right of it, and the PSU went in fine, but wiring the clips to it is tight quarters.

At the back, I found the dust shield snapped right into place. The expansion slots line up well, and the screws are easy enough to use. Even with the PSU, everything lined right up and it was easy to send the screws home.

Since there isn't a window in this chassis I was less worried about putting the PSU wiring back here. I was able to run all of the front I/O wiring and the SATA cables with ease. It really wouldn't be too hard to get the 24-pin back here or the video card power leads, but the case does lack an 8-pin hole at the top.
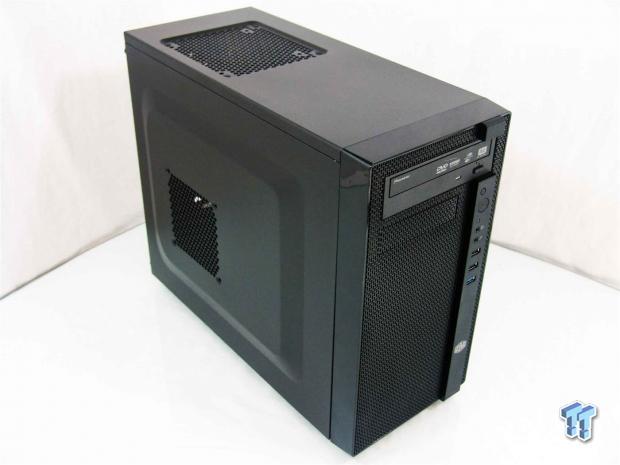
Now the N200 is all closed back up and ready for testing. If it weren't for the DVD drive sticking through the bezel, there really isn't anything that changes about the looks. If you liked it empty, you are going to like it when the system is built too.

When I powered on the system, I ran into a question. Why did I have a power LED and an HDD LED when the front of the chassis only offers the flicker of a white LED under the power button to denote the HDD access? Either way, with just a tiny white LED, there is very little lighting to deal with in any environment.
Final Thoughts
Seeing everything we just did, all I can say is I am impressed. Cooler Master hit all of the major points that customers are looking for when they are buying a chassis. The front is aesthetically pleasing while staying simple and subdued, and they still offer great ventilation through the front of the N200. The chassis is compact, but still plenty of room for me to stuff in a Micro-ATX motherboard, a larger video card, and a full sized power supply in with little to no issue with any of it. Then of course we move to the options. You can remove the hard drive rack and just use the 2.5" slots behind the motherboard tray for storage in this chassis. That gives you a cleaner look along with offering up room for a radiator and a pump, maybe even a tube reservoir. Even if you want to go to an outside mounted radiator, with the pair of optional holes in the back of the chassis, you could hook up a car radiator to this if you want to. Then of course there are the bumps on the door panels which may not be for everyone, but with such a thin (overall width) chassis, it is the only way to offer real wire management options or leave room for the optional fan.
The construction is good, and with the panels off, there wasn't any worry of the chassis flexing or sagging making things not line up well - everything stays right where it is supposed to. During testing, the pair of fans leaves you with average thermal results, but the passive opening in the top definitely helps in this design. You do have the option to add another fan to the front, the door and CPU cooler allowing you can get a third optional 120mm fan in the top of the chassis. This will definitely boost the thermal performance of this chassis, but it may also increase the stock noise level. Booting the system and allowing the fans on the board to stabilize I took an audio reading. With the Molex adapters in place, the fans were emitting 43dB of noise level. If you have them on a fan controller or your BIOS will allow for 3-pin voltage control, you can lower the noise levels, but you will also raise the temperature as you get quieter.
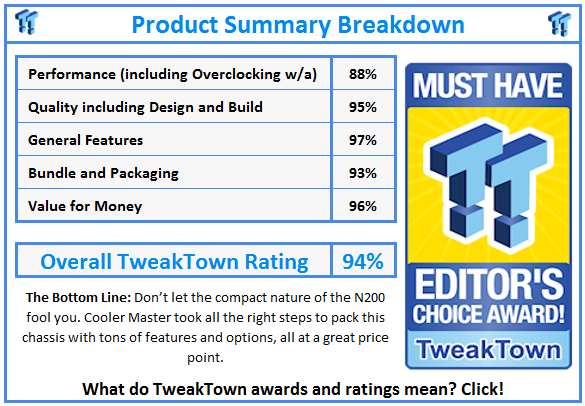
I'm sure by now you will have to agree that Cooler Master is giving you a lot of features in such a compact design, especially at this price point. At this point it is just a matter on you deciding whether or not to build with Micro-ATX or a Mini-ITX motherboard. Since the chassis is so clean and appealing, I don't think looks will keep you from building in the N200. Being able to stuff in huge video cards, room for internal water cooling, all in a mini-tower is great on its own, but once you add in the fact that this chassis can be had for $49.99 right now, the total package is well worth it.
Personally I would leave the ODD drive out, and with the limited LED light, if you change all the fans this would even be great for an HTPC. Any way you look at it, I know it is going to be real hard to pass on the N200 when looking for your next mini-tower chassis.


 United
States: Find other tech and computer products like this
over at
  United
Kingdom: Find other tech and computer products like this
over at
  Australia:
Find other tech and computer products like this over at
  Canada:
Find other tech and computer products like this over at
  Deutschland:
Finde andere Technik- und Computerprodukte wie dieses auf