


Introduction

Things are a bit different today as I bring you this latest review. Maingear had gotten in contact with Cameron and asked if they could show off their latest and greatest CPU cooling solution that they are now offering their buyers to cool the CPU in their pre-configured PCs, specifically The Shift and The Quantum Shift offerings. Maingear used to deliver its systems with large weighty air coolers and have found over the last decade of business that transportation can wreak havoc on a system, more specifically the CPU socket and anything under it as the coolers may break loose. This lead Maingear to keep searching for a better solution to both the issue of possible damage incurred from the coolers weight, and more importantly to deliver better performance than what even the best air coolers can offer.
Maingear prides themselves on delivering premium quality products along with thorough and personal support for the systems and is why they went to CoolIT to partner up to design a custom solution to fit inside of the SilverStone RV01 chassis. We all know that SilverStone long ago jumped ahead of the curve and started cooling their cases with 180mm fans. This gave Maingear a unique opportunity that they took full advantage of. Maingear could have followed suit with Corsair, Antec, CoolIT, or Asetek and just deliver the standard 120mm solution that we have seen in many, many forms, even one with a dual 120mm radiator! For Maingear that wasn't enough, they want to deliver their customers something even better.
Since there isn't much weight in any of the AIO head units, they are the perfect solution to remove the stress from the motherboard in any form of transit, limiting company returns and customer disappointment. Even with the fact of moving to a single 180mm radiator, Maingear took it a step further and offers a shroud/offset component to these units. This allows the EPIC 180 we are about to take a look at to not only perform better than if the fan was connected directly to the radiator, the main reason was to allow for longer PSUs with the offset. From what I have seen looking at the pages in the links I provided earlier, the way this unit is incorporated into the chassis delivers the best looking results I have seen with any AIO cooler before. It leaves the chassis of the Shift and Quantum shift very clean and empty looking as it hides the bulk of this superior AIO cooling solution for CPUs.
Specifications, Availability and Pricing

The EPIC 180 specifically made for Maingear uses all the same components as you would expect to see in an AIO cooler. There is the mostly plastic head unit, this time topped with the red Maingear logo and houses the 1.2W pump for the cooling system. The pump sits right on top of the copper transfer plate that uses thin fins on the back of it to move the heat from the plate into the water of the unit. From the head unit the heated water travels through black non-permeable rubber tubing that is covered in a layer of corrugated covering that protects the tubing and keeps it from kinking. The coolant then travels into the 180mm radiator that is actually 184mm wide and 230mm tall. The cooled coolant then travels back to the head unit and the cycle repeats over and over.
To mount the EPIC 180 into the RV01 there have been steel adapters added to the radiator. This steel offset allows for an additional 38mm of room for longer power supplies. It is also set away from the fins 15mm to allow the SST-181 white fan to build a head of steam before the air moves into the fins of the radiator. The steel shroud/offset allows Maingear to mount the EPIC 180 into the frame in the lower third of the chassis. Since the chassis already has a 180mm fan in this position, it makes a lot of sense that I got a SST-181 white fan to test the EPIC 180 with. The fan I received comes with a few accessories. There is an expansion slot fan controller that will allow me to control the fan speeds. This allows you to keep noise levels and performance where you like it if the use of the jumper wire included putting the fan at 12V is too loud.
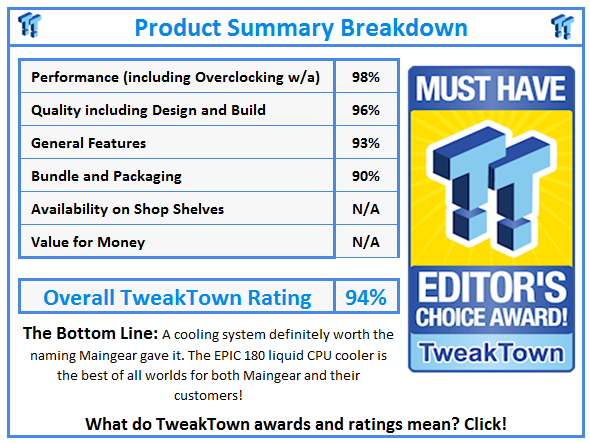
At this point in the review, things take a turn from the norm. I would usually mention how easy it is to get this cooler from one of your favorite retailers, but with the EPIC 180 it isn't that easy. As it stands today, there is no other retail solution being offered currently that matches what the Maingear and CoolIT collaboration brings to the table. Even with the pricing, while I know what it cost Maingear to obtain these coolers, you cannot buy them directly from them without the systems surrounding them. As far as the scoring goes in the end of this review, there will be an "N/A" applied as there is not really a fair way to score it. The last way in which we are deviating from the usual is in the packaging of the EPIC 180. While I received it in a box, I believe it to be the box that CoolIT delivers them to Maingear in. As for retail packaging, click the links and drool over the builds, as that is the packaging that the EPIC 180 arrives in! Either way, I believe the EPIC 180 is well worth the time to read this, it may even spark a rash of emails to CoolIT to maybe deliver a retail version of this 180mm AIO cooling solution.
The Maingear EPIC 180 Liquid CPU Cooler
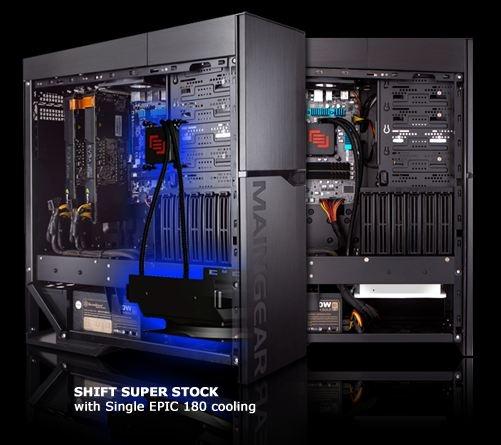
Just so that you can put it in your mind what I have been and will continue to describe is just how the EPIC 180 gets installed into these Maingear systems. Here is one version in the Shift chassis.
Our Latest CPU Liquid Coolers Review Coverage
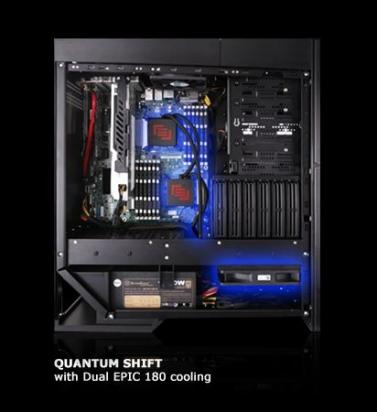
Again they use the same radiator, but in the Quantum Shift there is a dual CPU cooler configuration used. There are also GPU cooling solutions for both single and dual GPU setups, again based on CoolIT designs.
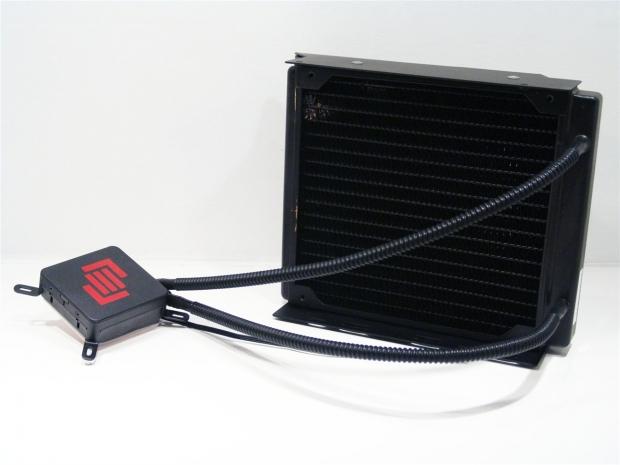
The Maingear EPIC 180 is constructed like many other CoolIT built solutions. This time the head unit is emblazoned with the Maingear logo and making the head unit look tiny, there is the 180mm by 180mm radiator.

The radiator being a single 180mm radiator offers more surface area than what the Corsair H100 offers with its dual radiator offering, so I will expect some pretty good results with this unit. There are mounts on both sides of the radiator for a fan to be added.

On both sides you have extended mounts applied to the radiator to allow for the specific installation in the RV01 chassis. These sides are connected across the back and have a 180mm opening to which the fan gets mounted creating a offset for both the power supply and acting as a spacing shroud to allow the fan the best chance to build CFM and static pressure before it hits the fins.

This angle was to show the 33mm thickness of the actual radiator inside of the steel covering. You can also see that these have CoolIT's sticker on them calling this the ECOII-180.
The Maingear EPIC 180 Liquid CPU Cooler Continued
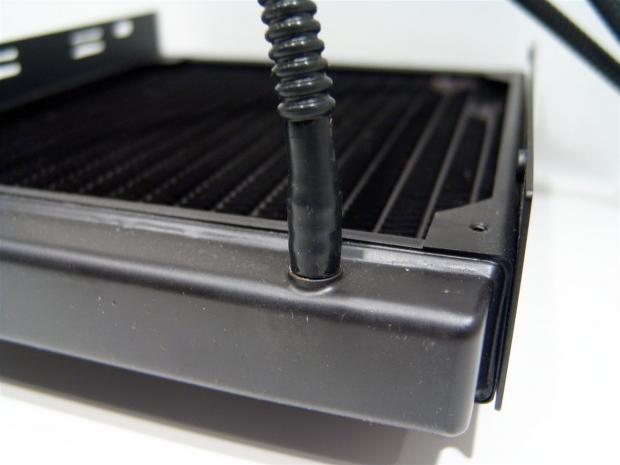
As with all of these AIO coolers, there is the rubber tubing getting stretched over the brass fittings on this radiator. Just above the fittings, the black non-permeable rubber tubing gets a covering of the ribbed black plastic.

During the trip to my house something made contact with the radiator and bent up some of the fins pretty good. Not a big deal to me personally, I will just straighten them out and move on.

The head unit is made of a textured black plastic like all the other CoolIT offerings. To single out this brand, a red Maingear logo is applied to the top. The 1.2W pump inside is powered with a 3-pin header and will run up to around 4200 RPM.
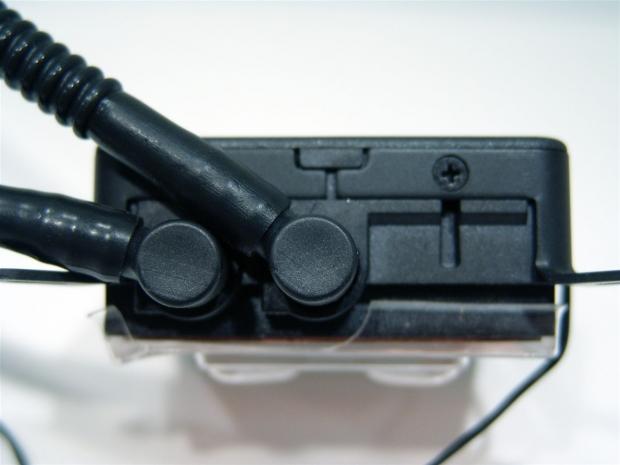
On the side it uses plastic ninety degree fittings that allow the hoses to be positioned in a manner that won't cause odd pressure or kinks in the tubing. This unit did not ship with any AMD mounting legs, so we can leave the screws that mount the Intel legs in place as there isn't the hardware to swap out to.

This unit also comes with thermal paste pre-applied. I have to assume that Maingear is assembling this system into their builds using this application of thermal paste.
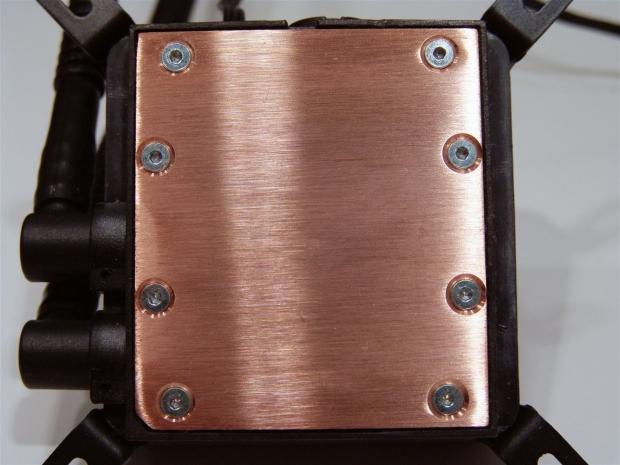
For our testing we will be using MX-2, so I went ahead and removed the thermal paste. This exposes the brushed finish of the copper transfer plate. The majority of the base is flat and level, but just like all the rest, once near the screws, the base starts to deviate from square and level. Either way, the area that will make contact to the CPU is dead level and will do just fine installed on any CPU.
Accessories and Documentation

The hardware I received is most of the same kit I always get with CoolIT OEM AIO coolers. There are the four thumbscrews to secure the head unit at the left. In the middle are the four Intel screw in spaces that go from the back plate under it in this image and is what the thumbscrews mount to. Under the Intel back plate is part of the AMD mounting hardware with the stock socket latch clips and springs, but no AMD legs for the sides of the head unit. No matter for Maingear or our testing as we are both using Intel processors. On the far right in its own little bag you will also find the spacing screws for the LGA2011 socket.

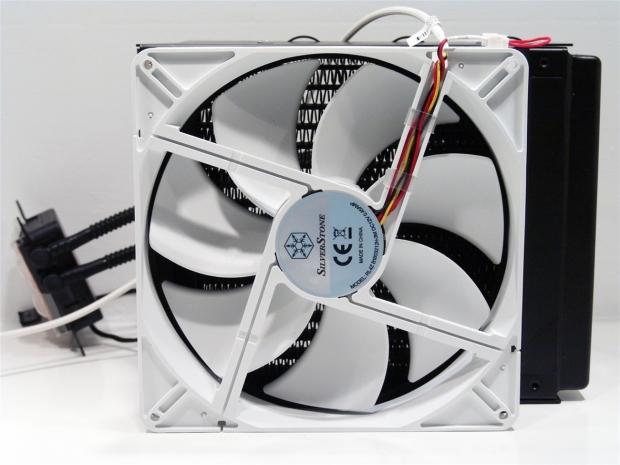
Included in the box from Maingear is this SST-FM181 you see here. The fan is indeed white and comes with an included fan controller you can place in your expansion slots to adjust the fan speed by adding up to 50 Ohms of resistance.

The back of the fan packaging shows a similar image of the fan and controller, but this time a specifications chart is placed next to it. In nine languages at the bottom of the back of the packaging there are four key features of the fan.

This seven blade white fan uses a 3-pin connection to draw its power to accomplish the 1300 RPM delivering 150 CFM of airflow into the radiator of the EPIC 180 cooler.

The rest of the fans hardware contains the fan controller and wiring to reach the fan, four fan screws, and a 4-pin Molex to 3-pin adapter for another way to power the fan if you chose not to use a motherboard fan header.
Installation and Fit

This is the same area of the radiator I showed the damage on earlier. As you can see, I didn't get it perfect, but the damage was light enough that three to four minutes with a jewelers screwdriver will allow for much better flow than with them bent over and blocking this section off entirely.
For the images I installed the fan onto the offset plate in the pull configuration. After some discussion with Maingear I reversed the fan for testing to have it push through the radiator to mimic the results you would get inside of the RV01 as Maingear would install it. We just need to set up the motherboard and get this thing mounted so we can begin the testing.
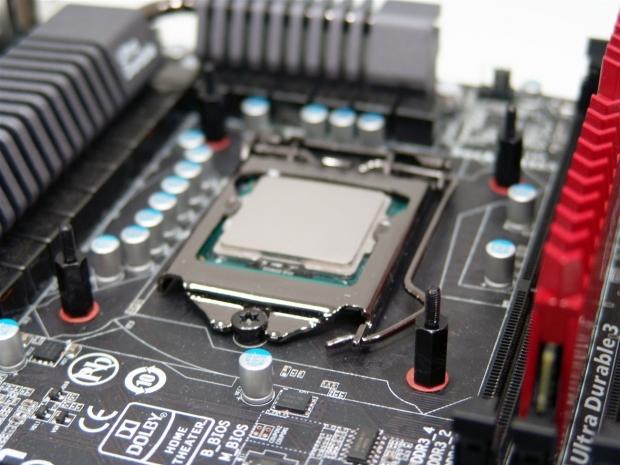
Speaking of which, I have the back plate on the reverse of the board and I installed the Intel risers for the appropriate socket. I added the washers just to be sure I don't ground out to the board accidentally, they do not come in the kit.
I was so excited to test the cooler that at first I hadn't even looked at the back plate, I just stuck it on so I could get the images. This is not the correct way to mount the plate. The notch on the left side will allow the plate to clear the pair of screws at the top that I am currently setting on top of.

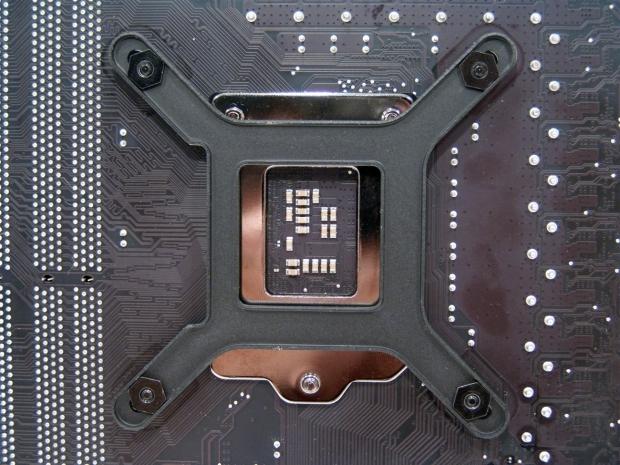
Just for show and orientation of the logo, I installed the block on the board as you see it. Keep in mind that when this is installed in the RV01, this block will be turned ninety degrees to accept the motherboard orientation inside the chassis, keeping the logo in the proper orientation. In other words, as you would receive it, the fittings on the head unit should run next to the memory slots.
Test System & Testing Results

With the system listed above, I apply Arctic Cooling MX-2 to all the coolers I have tested on the GIGABYTE motherboard to even things out with all the cooler manufacturers. To gauge the idle temperatures I allow the PC to run for a few minutes from the fresh reboot. I then open RealTemp and let things again settle as the reading spikes until the processor is again fully idle. At this point I get the reading and report it to the charts.
For the load testing, both stock and overclocked, we use Intel Burn Test to supply the system load. In this application I set it to work eight threads for 50 passes and maximize the memory tested to over 3000MB to generate as much load as possible to the coolers. With RealTemp open for the entire run, I report the highest temperature seen during the test run. All cooler testing is done open air on a test bench with an ambient temperature of 25°C.

The idle results are right where I would expect them to be. Within one degree of the lead is a great result, but the idle testing isn't where water cooling shows its efficiency.

Here we have the proof of the stock 2600K results with IBT still running.
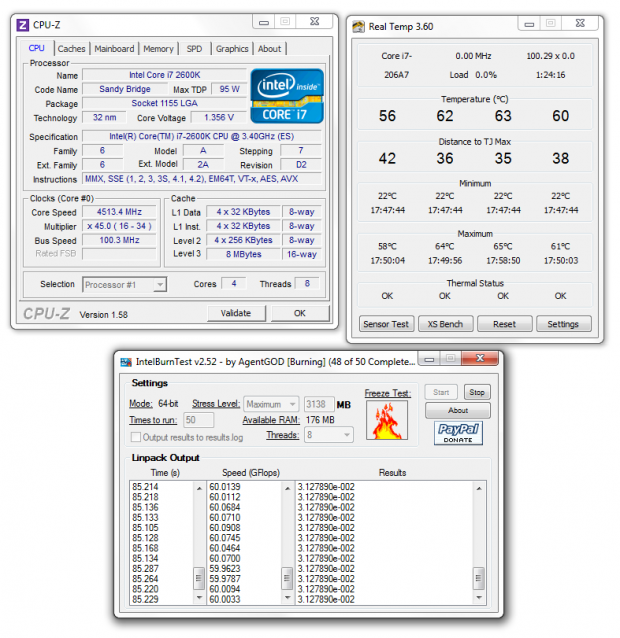
Again, proof of the results, but this time with the overclock applied. Now let's see how this testing stacks up against the rest.
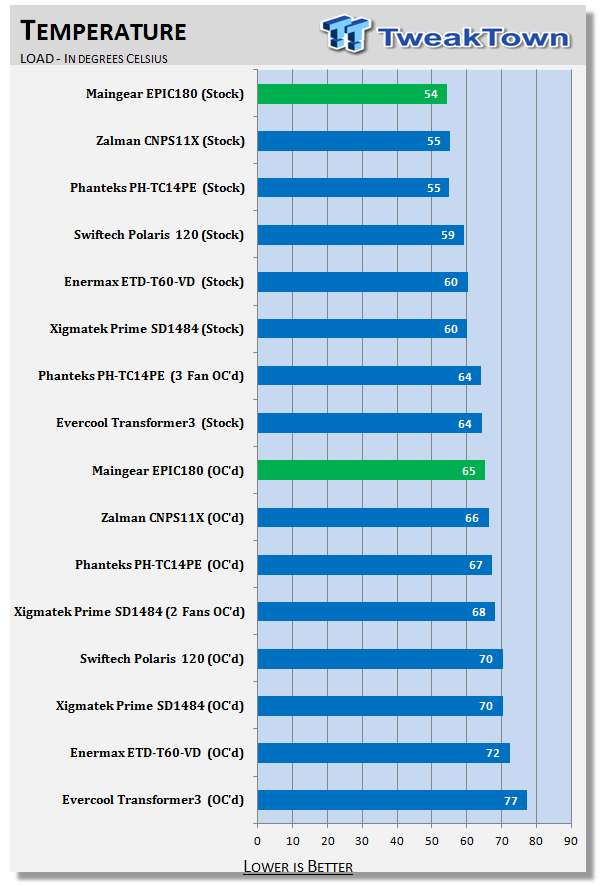
The EPIC 180 gave us our best stock results to date with a fifty-four degree reading during testing. As for the overclocked results, the EPIC 180 placed second, but only by one degree to a behemoth that Maingear doesn't want on their boards in the first place. Moving to this type of system for them is a real no brainer as the results speak for themselves.
Noise Level Results

While these results show the EPIC 180 in the middle of the pack, there have been a literal ton of new "silent" coolers that have hit the market. The 44 dB rating we got at idle is expected considering radiators do add to the overall noise of the fans attached to them. While I could hear the unit if I was within a couple of feet of it on the open air system, it wasn't the loudest fans that I have running in my office.
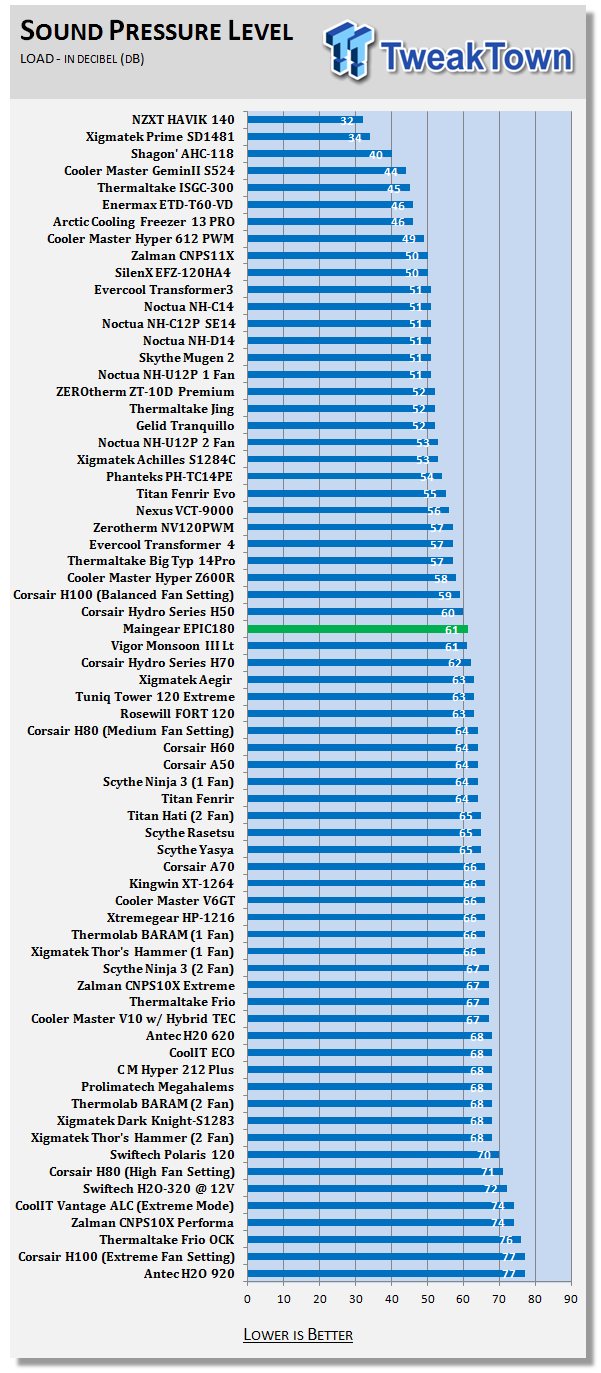
Once I gave the EPIC 180 twelve volts to the fan, noise levels did pick up a bit to the 60 dB level. One thing going for this unit is that it gets built into an internal section of the chassis, so these sound levels will be more muffled once in the RV01 chassis and the door is shut. The way it draws in from the bottom and blows into the hard drive bay area, you don't even get the exhaust noise associated with other AIO coolers coming directly out of the chassis.
Final Thoughts
In the end it comes down to whether or not I feel that Maingear is doing right by themselves and their customers with the addition of the EPIC 180 to cool CPUs in their builds. I really have to say, yes, in every way. Not only is the head unit attractive to look at with the large red Maingear logo, aside from the two thin tubes running down the right side of the chassis, the rest of the EPIC 180 is hidden from sight. On their end, doing right by them, I feel they chose the right OEM in CoolIT to develop these units specifically for the Shift and Quantum Shift builds. For both their benefit and your piece of mind, the use of an AIO water cooling system takes away most issues associated with water cooling without the leaks and issues that come with it. On the customers end, they not only get a cooling system custom made for these cases, but one that can take everything an air cooler can without hogging up all the interior space or causing the stresses to the motherboard that most 1000 gram coolers deliver. Not only does it look good, put our mind at ease and offer terrific efficiency with the massive amount of surface area in the 180mm radiator, I definitely think this is the best choice with all considerations taken into account.
Keeping with the tradition Maingear has set, they want to deliver you the best of the best. The EPIC 180 not only is a hassle free solution for everyone involved, it delivers some really impressive results. I have tested a bunch of the AIO solutions, and with the EPIC 180 I am trying to find a way to incorporate it into my next case, as I don't want to let this go. That in itself is saying quite a bit. I get a lot of coolers, I mean a lot, and it has to be something special for me to want to keep it on hand or to even incorporate it into my daily grind PCs. The only thing I can say that might detract from the efficiency and performance of this solution is that in my open air testing, the fan was loud at full load. Keep in mind that these are not stand alone units as I was testing it; once in the chassis there will be much less noise audible to users of the Shift or Quantum Shift.
I hate to end the review of such a terrific product on a sour note, but reality is reality and I can't do much about that. The reality is that the only way you will get your hands on the EPIC 180 CPU cooler is to go through Maingear and purchase either the Shift or Quantum Shift with pricing from $2,048 and $2,620, respectively. While I will urge you to shoot as many emails over to Maingear and CoolIT support to get them to deliver this somewhere in the retail world so we can all enjoy the benefits of this for yourself. As it sits for the terms of the review, it's almost free, as long as you are in the market for a pre-built chassis. It really comes down to the fact that I do feel that Maingear took the right direction in offering their buyers a much better solution to cooling the CPUs on their custom built creations that deliver in every way possible!
 MOAIPLAY ORA PRO G1 850W ATX 3.1 PSU Review: high efficiency and 10-year warranty for $119.99
 NZXT H6 RGB+ Compact Dual-Chamber Chassis Review
 Lian Li HYDROSHIFT II 360P OLED Curved Liquid CPU Cooler Review
 ID-Cooling FROZN A620 SLK CPU Cooler Review
 GAMDIAS Atlas P6 CG Dual Chamber Mid-Tower Chassis Review
 Destiny 2 situation not result of Sony revenge plot, decisions are entirely financial
 AMD Zen 6 will target a 7 GHz boost clock for Ryzen CPUs, according to insider
 New Halo CE remake won't get new DLC, story missions, maps, or any extra content
 $90 GTA 6 price not real, says renowned games leaker billbil-kun
 AMD's RDNA 5 Radeon GPUs will launch in mid-2027, per new leak
 GTA 6 price seems to have leaked, base version to cost €89.99
 Assassin's Creed Hexe is reportedly going to launch earlier than expected
 NVIDIA's open-source NVK Vulkan driver gets experimental DLSS support in Mesa 26.2 for Linux gamers
 ASUS ROG Astral RTX 5090 reportedly causes discoloration on ASUS motherboard after six months
 Nothing has cancelled the CMF Phone 2 Pro's successor, blaming memory prices for making it unaffordable
 Speed Racer (2008) 4K Ultra HD Blu-ray Review: a stunning remaster of the cult classic
 Navman MiVue Smart True 4K Surround Dashcam Review - Seeing In All Directions At Once
 IQUNIX Magi96 Pro Aluminum Low Profile Mechanical Keyboard Review - Premium Build, Satisfying Sound
 Asetek Forte S-Series Racing Simulator Bundle Review
 Razer Pro Type Ergo Wireless Split Ergonomic Keyboard Review - Built for Comfort and Support
 ASUS ROG Strix Morph 96 Wireless Gaming Keyboard Review - Great Performance, More Affordable
 SAPPHIRE Radeon RX 9070 GRE PULSE OC Review - A New 1440p Challenger Has Arrived
 I stopped Windows 11 notifications from interrupting me with Do Not Disturb, Focus, and a priority list
 I read the Windows Backup app screen carefully, and it does not back up what most people think
 Low Sound Volume on Windows 11? How to fix audio issues and restore normal volume
 8 Critical Warning Signs You Should Never Ignore in Windows 11
 This Windows security feature protects Documents from ransomware, but it is off by default
 Windows 11 already has a voice typing tool, and it is the one most people are not using
 Quick Assist is the only remote-support tool I open when a relative calls about their PC
 The PowerToys utilities I keep enabled on every Windows 11 PC, and the ones I turned off within a week
 TweakTown's Best of Computex 2026 Awards - The Best Hardware, Gaming Gear, and AI