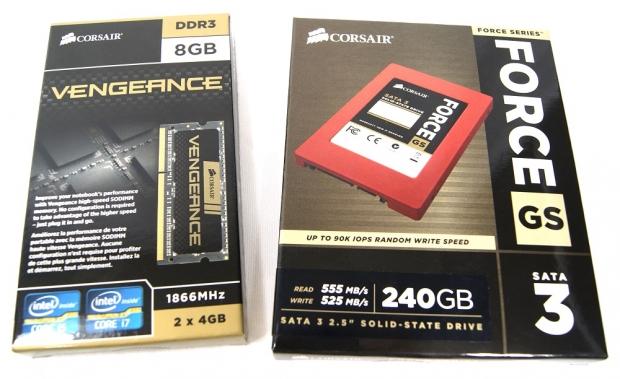
If you're running an older laptop that's starting to feel a bit long in the tooth, it may be time to consider doing some upgrades to extend the longevity of the system. Our own Chris Ramseyer, along with most tech gurus, will tell you that upgrading to an SSD is one of the best ways increase the performance of an aging system and breathe new life into it. Previously the process of upgrading a disk could be complicated, but there are now many tools and different ways of upgrading a system to take advantage of a fast new SSD. In today's guide, we'll show you how to upgrade your aging laptop-or even a new one, as is the one we're using today-to a solid-state drive. We'll also cover upgrading RAM to get the most performance we can from easily upgraded components.
The first thing that needs to be done is all of your data that you don't want to possibly lose should be backed up. Backing up your files is beyond the scope of this article, so I'll leave you to your own devices, though I will take the time to suggest a few methods. The first is to use backup software such as Acronis to take an image of the disk. This is handy as we will be using Acronis later to copy the disk to the new SSD. Another option is to load important files onto a USB, CD, or external drive for safe keeping. Backups are extremely important, but I won't lecture you if you don't have a current backup plan in place. A third option is to use a cloud storage service, such as Google Drive, Apple iCloud, Dropbox, Carbonite or CrashPlan, though this will likely be the most expensive option and will require lots of bandwidth for the initial backup.
It's also important to remember that changing parts in your laptop may void your warranty. Please keep this in mind before proceeding.
RAM Installation
Once you've got your backup all squared away, it's time to break out the new components and get to installing. The first component we're going to install is the new RAM. It's a fairly simple process, especially if you've ever upgraded or built your own desktop. The slots are smaller, and oriented parallel to the motherboard due to space constraints, but the process remains similar.
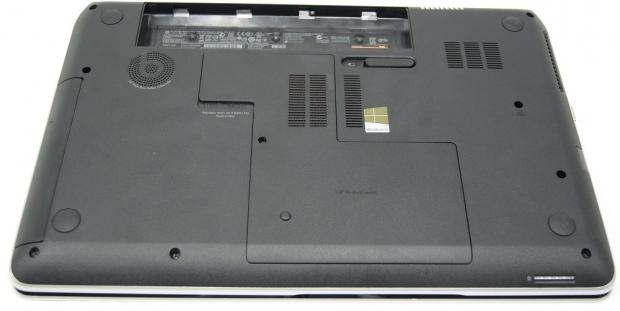
First, remove the battery and AC adapter. It's always a good idea to disconnect all power and discharge the system before working on it. Once you've removed the power, find the panel that conceals the RAM (and likely the hard drive). Sometimes manufacturers will mark the cover with a little picture of RAM. If in doubt, search the web for a copy of the service guide that is usually produced by the manufacturer. It will list out the steps for removing the service panel. Note that this guide covers installing DDR3 SO-DIMM memory. Check your laptop specifications first before buying to see what type of RAM (and speed) it supports.
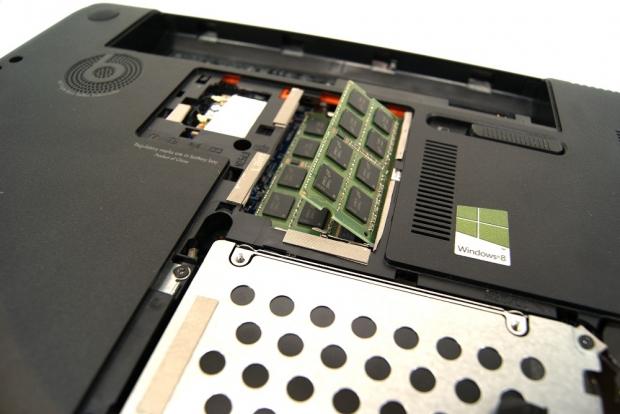
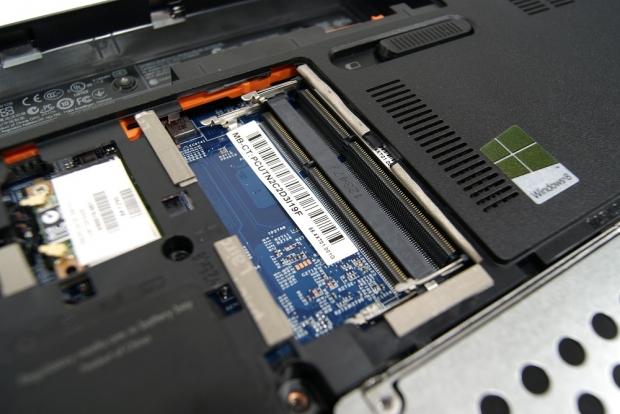
Once you've got the panel off, set it aside. Be sure not to lose any screws if it was secured with any! Locate the RAM and take note of the silver clips on both ends of the DIMM. These function similar to desktop RAM slot clips, except for the fact you have to hold them for them to remain open. They don't click into an unlocked position like desktops.
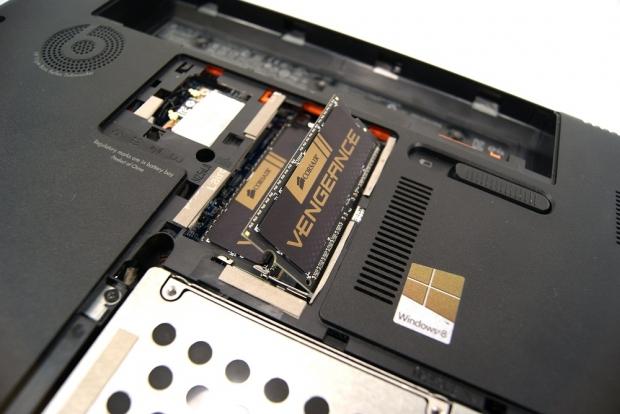
With your fingers, gently articulate the silver clips to the sides and the stick of RAM should pop up to a 45 degree angle as seen in the picture below.
Then pull the DIMM out of the slot in the direction it is pointing. Be sure not to force the DIMM if it will not come out easily. Recheck the clips and look for anything that may be keeping it from being easily removed. Once the DIMM is removed, repeat the process for the second DIMM, if applicable.
To install the new RAM, simply reverse the above process. Insert the bottom DIMM first at a roughly 45 degree angle. Make sure the DIMM is fully inserted and then push down to lock it in place. The silver clips will automatically lock the DIMM in place. Now insert the second DIMM in the same manner. Do not use excessive force, the RAM should slot in without much force.
SSD Installation - Moving Data
Congratulations, you've successfully installed a new set of RAM! Now we're going to move onto upgrading to an SSD. There are several different methods for installing a new SSD. Some are destructive, meaning you'll lose your files, and some are safe, meaning they should keep your files intact. Of course, you should be sure to have a backup of anything you don't want to lose, just to be safe.
For the purposes of this guide, I'll be demonstrating using Acronis True Image 2013 to clone my existing 750GB hybrid drive to a smaller 250GB Corsair solid state drive. This process of cloning will keep my existing file system and file structure intact. The target drive must be larger than the amount of data on the existing drive for this to work, but both drives are not required to be the same size. Acronis handles that task of resizing partitions for you.
First you'll need to obtain a copy of True Image 2013 from Acronis. They were kind enough to provide me with a copy to show you how to use it. Let me just say that this was by far the easiest hard drive upgrade I've ever done, and is popular among editors here at TweakTown.
You'll also need to be able to connect your new SSD to your laptop. In some systems this isn't a problem as they have multiple hard drive bays. For my system, I needed a USB enclosure. Some solid-state drives come with a transfer kit. I made use of my external enclosure that is used for our laptop reviews.
Once you have your copy of True Image 2013 (TI13), install it on the existing system. The setup process is simple, so I'll leave you to figure that out on your own. Once installed, open the software and select the "Tools and utilities" tab.
On the screen seen above, select the "Clone disk" ption.
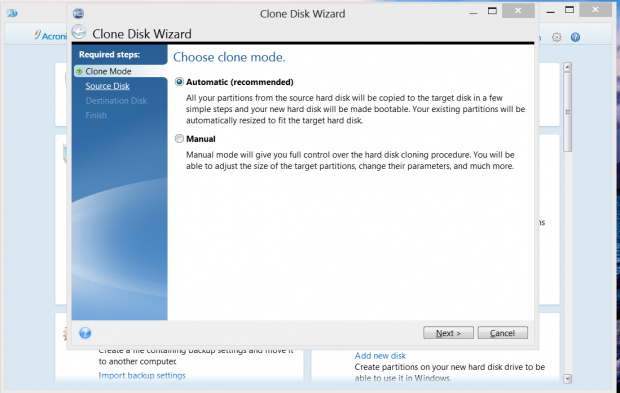
If you know what you're doing, you can select "Manual", though for the purpose of this guide, we'll be selecting the recommended "Automatic." Click "Next" to proceed to the next step.
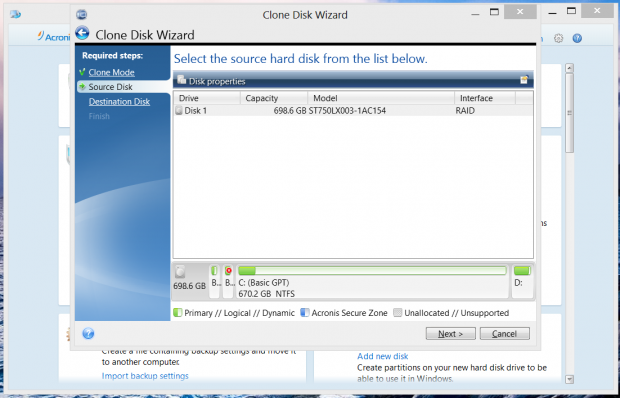
If you're doing this on a laptop, you'll likely only have one source drive to choose from. In this case, I've selected "Disk 1." The partition structure is shown below the selection screen and confirms that I have selected my system drive. Again, select the "Next" button to proceed to the next step.
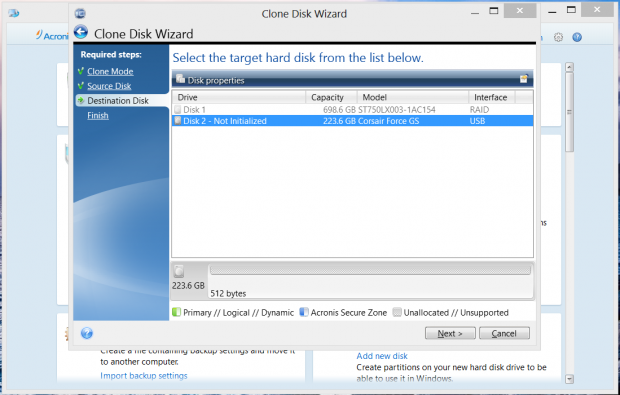
On this screen, you'll select the drive to clone your system disk to. I've selected "Disk 2," which is the Corsair Force GS connected via USB. Click "Next" to proceed to the next step.
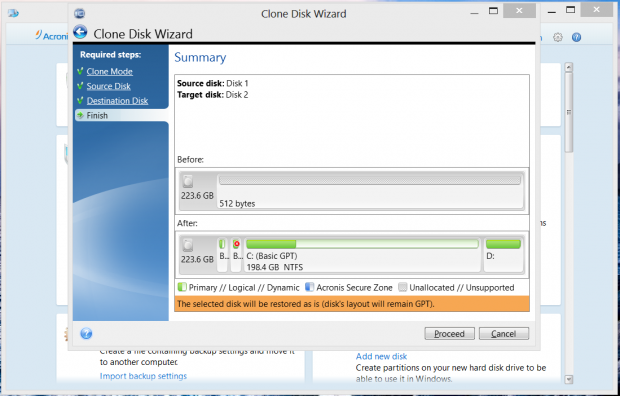
This final screen just verifies that you have made the correct selections. Verify that the disks are correct and click "Proceed" to finish the wizard.
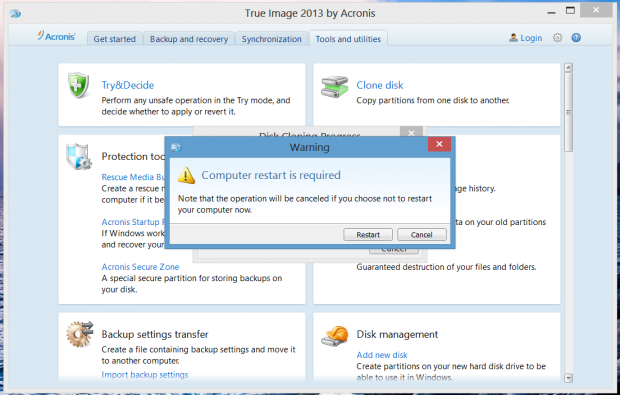
Acronis TI13 will then warn you that you need to restart your computer for the process to continue. Choose "Restart" or the process will be canceled. After clicking Restart, the system will boot into an Acronis operating system that will complete the process. Depending on the speed of the source drive and target drive, this process could take some significant time.
Due to the small amount of data on my source drive and my USB 3.0 enclosure, the process completed fairly quickly on my system. Your mileage may vary and you'll likely want to find something else to do while the process runs. Don't interrupt it and keep your system turned on.
SSD Installation - Drive Install
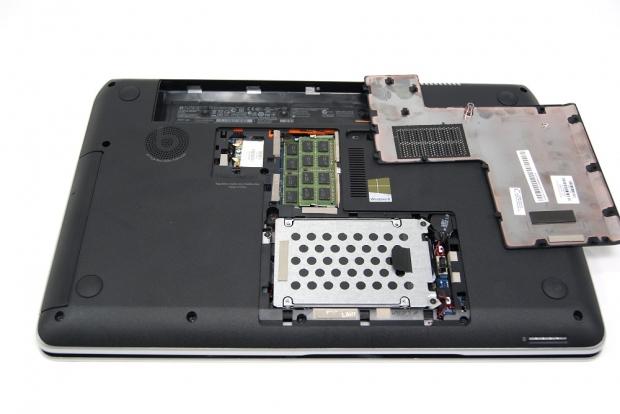
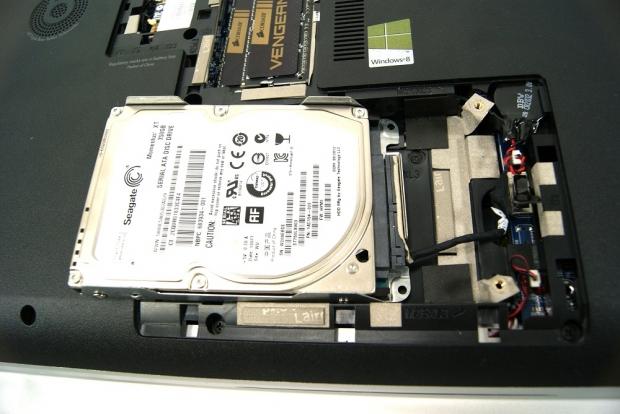
Once Acronis alerts you that the process is complete, shut the system down and prepare to swap out the drives. Again, pull out the AC adapter and battery and flip the machine over to locate the hard drive panel. In my case, it's the same as the service panel that covers access to the RAM.
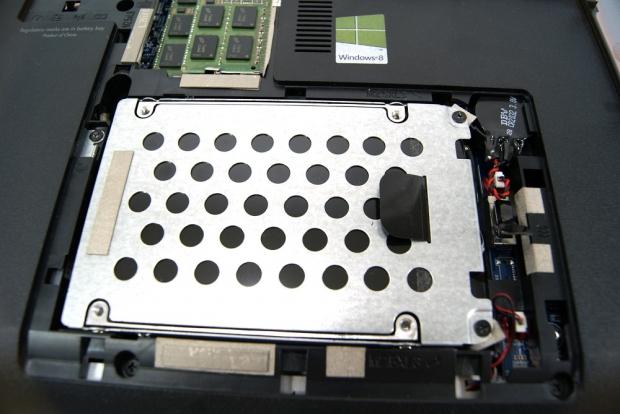
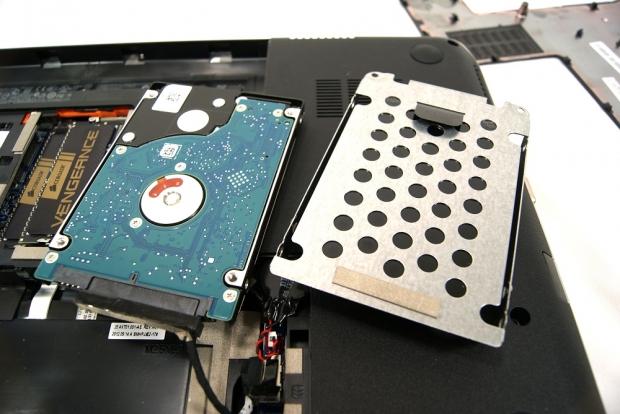
As you'll see in the picture above, the hard drive is located in a caddy. The caddy allows the hard drive to be more easily mounted in the system. We need to remove the two small black screws at the right side of the drive, as seen in the picture above.
The drive can then be removed by removing the screws that attach it to the caddy. Each laptop will feature a slightly different caddy, so make sure to look at yours. Consult the service manual if you have any questions about which screws to remove.
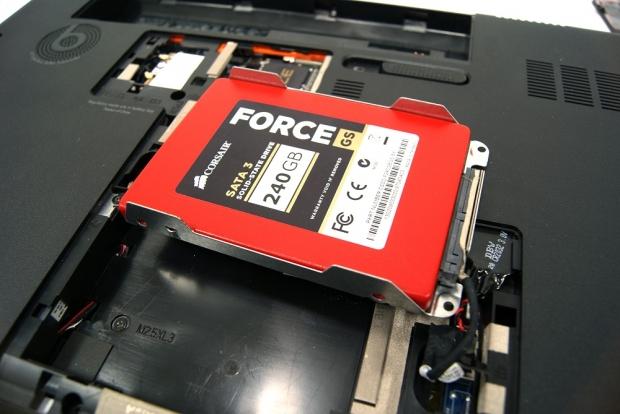
Once the drive is removed from the caddy, it can be placed away somewhere safe. Take the solid-state drive that now has all of your files and reverse the process.
Boot the system and make sure it runs before doing anything else with the now removed hard drive. Verify that TRIM is enabled by running an elevated command prompt. (Start->CMD-> CRTL+Shift+Enter) Run the command: fsutil behavior query DisableDeleteNotify. If the result is '0', TRIM is enabled.
Performance Numbers
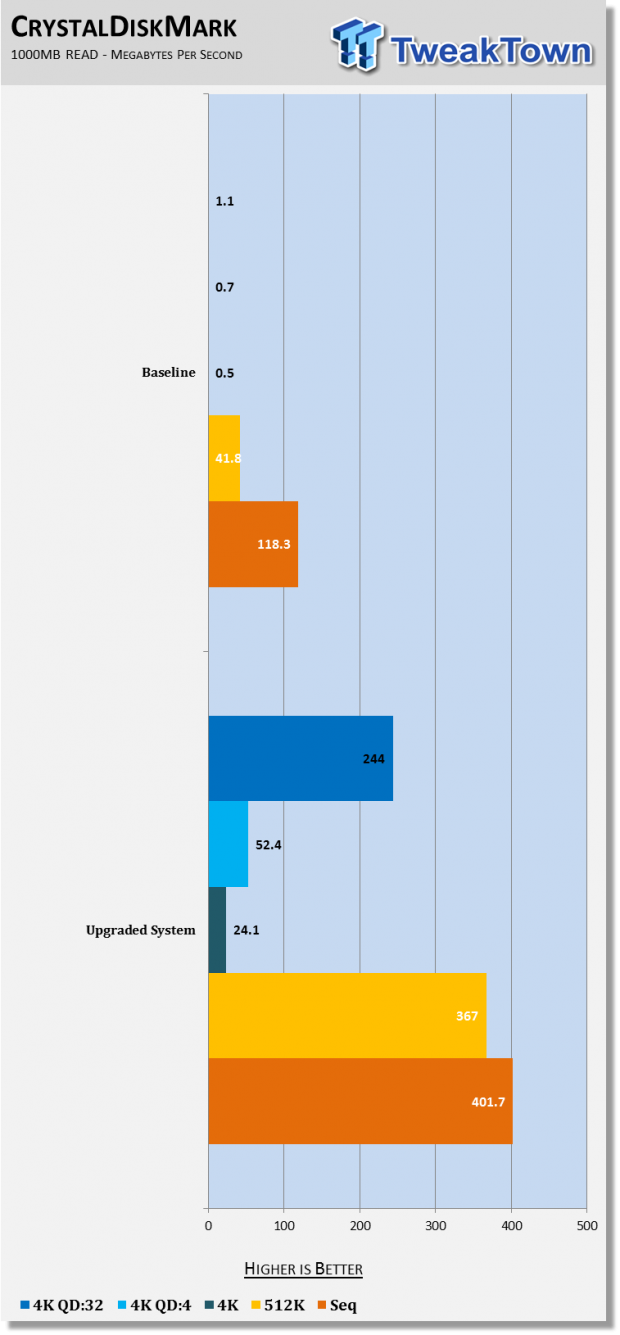
Congratulations! You have successfully upgraded your laptop! Now we're going to take a look at a few benchmarks that show the benefits of doing an upgrade like this. Of course, your results will vary. My system uses an Intel Core i7-3630 and NVIDIA 650M. The baseline hard drive is a 750GB Hybrid drive. First up, let's take a look at CrystalDiskMark. If you'd like to know more about the benchmark itself, you can take a look at one of our latest laptop reviews.
As you can see in the chart above, the read speeds are much better on the newly upgraded solid-state drive. As you can see, the middle bar that represents 4K is much longer for the upgraded system. Most operating system files fit in the 4K category, so the higher this number, the better.
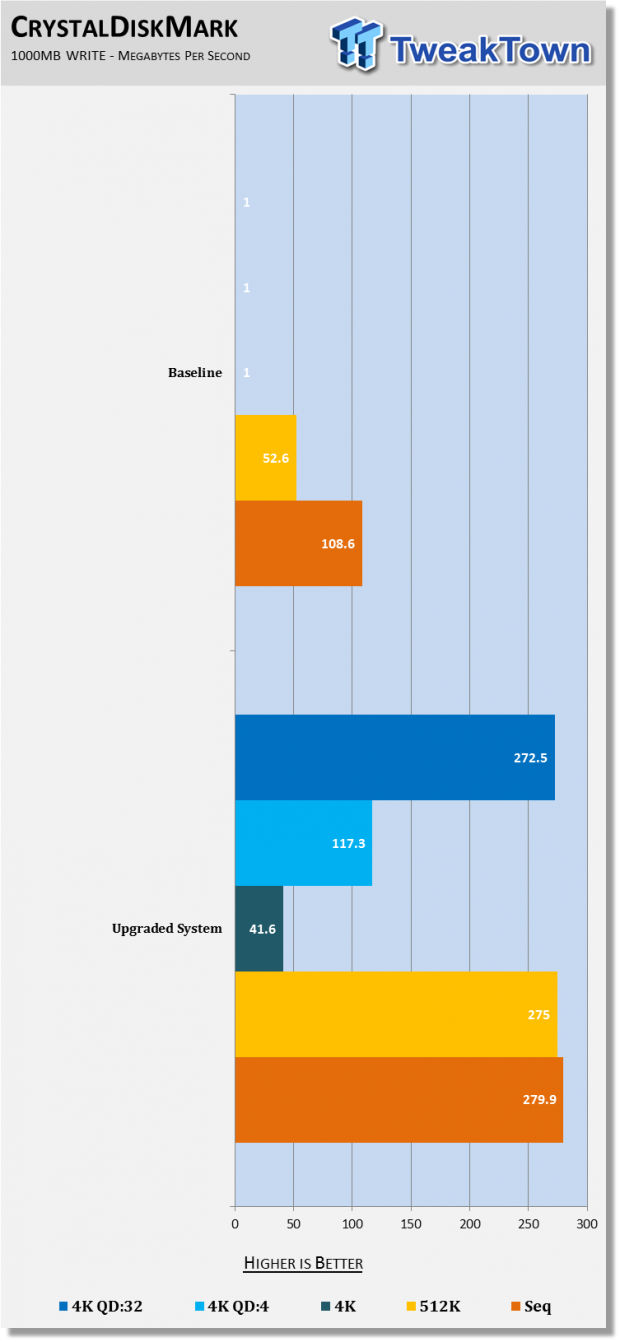
Again, the chart above shows that the newly upgraded system's write speeds are much improved, thanks to the solid-state drive.
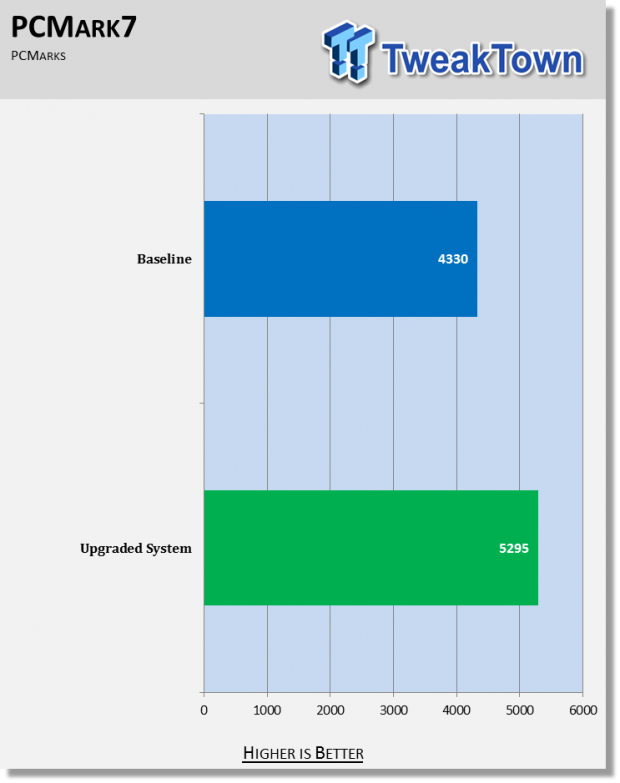
The chart above represents our PCMark 7 test. As you can see, the upgraded RAM and solid-state drive contributed to an increase of just under 1000 points. This equates to a 22 percent performance increase.
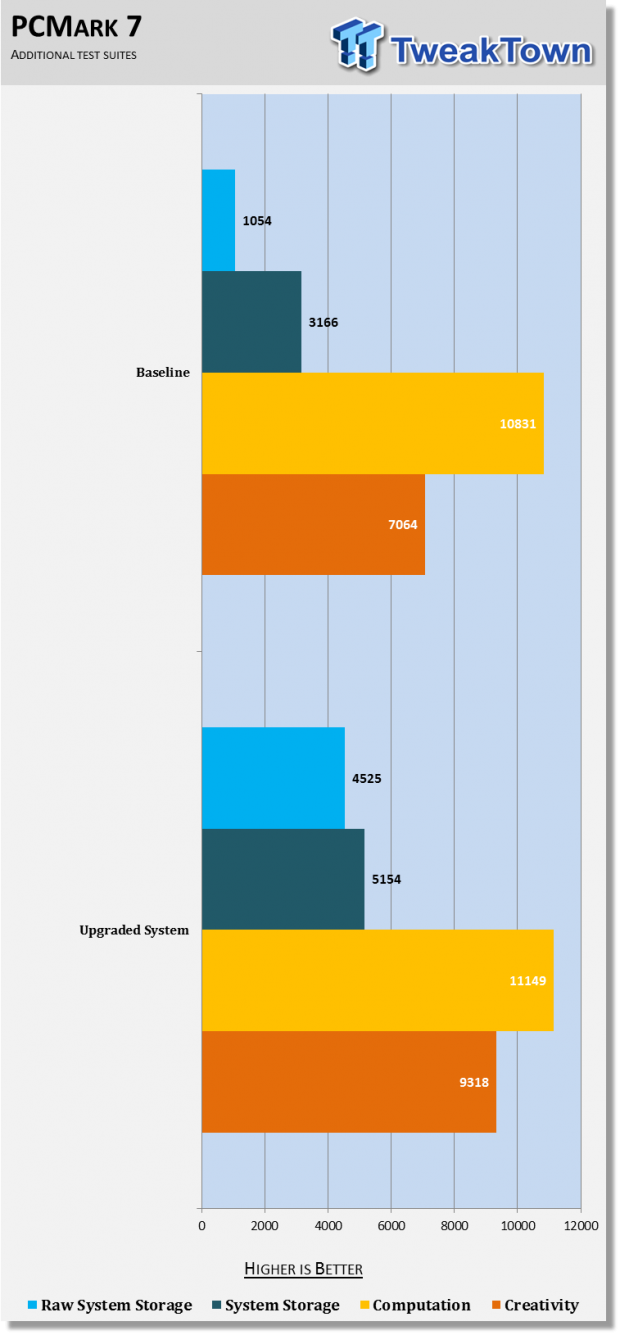
We also ran a few additional test suites in PCMark 7. In the chart above, you can see that all of the numbers were higher after the upgrade, some more than others. One of the main beneficiaries from the upgrade was the raw storage system score.
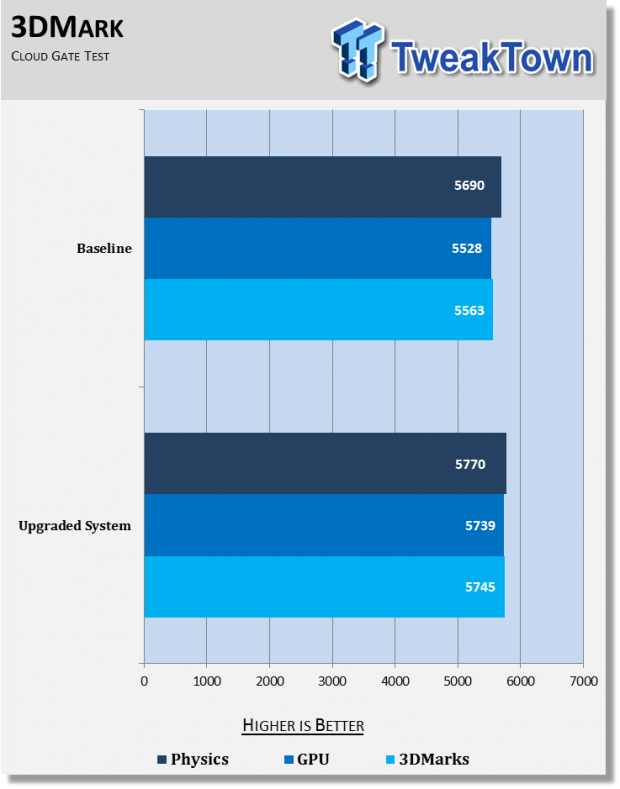
Finally, we tested the baseline system and the upgraded system in the new 3DMark's CloudGate test. As you can see in the chart above, the system performs marginally better after the upgrades, though these are fairly statistically insignificant.
We hope you enjoyed this guide!
Last updated: Nov 3, 2020 at 07:12 pm CST

