


Introduction, Specifications, and Pricing
When the Core Series is spoken of, we immediately think back to the Thermaltake Core V71, where Thermaltake offered a chassis like no other they had before. Of course, it did take some interior components that we had seen in other designs, but the versatility of the interior design, along with the slick rounded exterior, the full mesh front panel, and huge side window, all lent to its high ratings. Not only did we at TweakTown give the Core V71 an outstanding rating, but no one elsewhere could point out a failure with that design either.
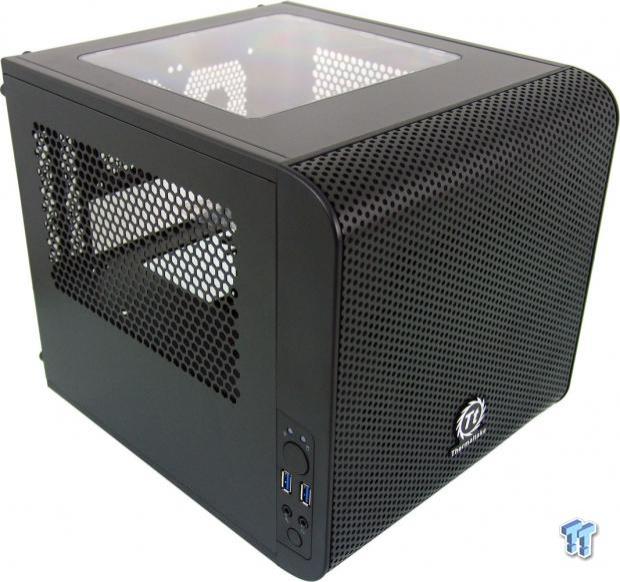
So, how do we connect this oversized full-tower into the realm of Small Form Factor cases? Well, both of these are from the same Core Series from Thermaltake. Of course, we are dealing with something much smaller this time around, but there is a definite styling that is easily recognizable as a chassis from this same series. This is due to the full mesh front bezel, the rounded off design, an interior layout with plenty of room for an AIO, and all of the typical Mini-ITX system goodies. They even figured out a way to put in an extra-large window in perspective to the chassis and panel size. So, even though we are now in SFF territory, you will easily see why this chassis is named Core V1.
We have you here today to join us as we take a tour around, inside of, and have our hand at a build inside of the Core V1 Mini-ITX chassis from Thermaltake. We know it shares aesthetics and design elements that make it easily recognizable as a Core chassis, but following the V71, we also expect some modularity, and an easy time with the process as a whole. Stick around as we go through all of the finer points of what this Core V1 has to offer, and see if it is a SFF chassis worthy of carrying the Core Series moniker.
The Core V1 has an all steel assembly for the frame and panels, but this Mini-ITX chassis has a plastic bezel frame with steel mesh that covers the entire front. The Core V1 is restricted to 276mm in height, 260mm in width, and 316mm in depth. We can also see that there is a windowed panel, and a mention of interchangeable panels. This means that either of the well ventilated side panels will swap with the top panel, so the window can be on the left, the right, or you can leave it at the top as shipped.
Inside of the chassis there are two storage drive trays that will allow for either a pair of 2.5" drives, or a pair of 3.5" drives that hang off the right side of the motherboard tray. Speaking of which, the tray offers raised steel section drilled to accept the motherboard screws, and even offers a large access hole for the CPU cooler backplate. At the front of the plate, near the 200mm installed fan, the tray is open to allow for all wiring from the PSU to get to the upper shelf easily. In the back there are two expansion slots, and cards that fill them can be 255mm and still fit inside the chassis. The front is also cut away to allow you to fiddle with fitting 285mm worth of card, if the 200mm fan is not used. The other specification that will lead to many wanting to use an AIO is that the CPU height restriction is 120mm from the motherboard to the top panel.
Cooling options are pretty limited inside of this chassis as far as locations are concerned, but this is a very small chassis to fit many fans into. The front allows for the stock 200mm fan to be installed, but also offers mounting for a single 140mm or 120mm fan. With the room between the front of the chassis and the motherboard tray, AIOs with standard 27mm thick radiators will pose little issue installing here. The other option for air flow is to fill the pair of fan locations in the rear of the chassis, but sadly those are 80mm, so adding fans here will likely raise the noise level of this chassis as well.
Finding a Core V1 for your very own is pretty easy at this point, as stock showed up everywhere we looked during our search for its current pricing. This is where things get even better for the Core V1 in our opinion. While some locations are asking the moon for one of these cases with near $90 pricing plus shipping, currently, this chassis can be had for much less of an investment. At first, we thought the deal at Newegg was pretty good at $49 with $5.99 more needed for shipping.
Our Latest Small Form Factor Cases Review Coverage
However, when we looked over at Amazon, we found the current pricing to be set at only $40.99 with $8.99 for shipping, saving a couple more dollars yet. For this sort of an investment, the Core V1 would have to be a serious failure to not attract tons of customers, and we already know that isn't the case with the Core V1. For this price, it certainly is impressive.
PRICING: You can find the Thermaltake Core V1 for sale below. The prices listed are valid at the time of writing, but can change at any time. Click the link to see the very latest pricing for the best deal.
United States: The Thermaltake Core V1 retails for $40.99 at Amazon.
Canada: The Thermaltake Core V1 retails for CDN$60.18 at Amazon Canada.
Packaging

Thermaltake may be using a plain cardboard box to house this chassis, but boy do they know how to fill up empty space. There are thick bands cross the top, middle, and the bottom of the front, with a grid pattern filling the rest of it. Along with the Core V1 naming, there is also a large rendering of the chassis to see.

This side of the box offers all of the naming at the top, followed by a smaller rendering of the Core V1. The bulk of this panel is taken up with explanations of the ventilation, expansion, and the support this chassis offers, all of which is covered in twelve different languages.

The back of the packaging is nearly identical to what was offered on the other side of the box, but this time, a large exploded rendering of the chassis is given, so you can visualize how this design goes together and functions.

This last panel also mimics its opposing panel, but rather than covering features under the naming and tiny rendering, this time the space is filled with the same specifications we just went over.

To protect this Core V1, on the inner most layer of protection, both sides of the clear window have plastic applied to it to prevent abrasions, and then the entire chassis is wrapped in a plastic liner to protect the paint finishes. The last line of defense is the thick Styrofoam caps used above and below the chassis to keep prevent major dents in the product. As for our sample, this packaging proved once again that it is more than capable of delivering a chassis in terrific shape.
Thermaltake Core V1 Mini-ITX Chassis

Right out of the gate, we can see the Core Series in the front bezel design. There is only an expanse of steel mesh with small round holes to ventilate the entire front of the chassis, with only the logo at the bottom to impede on the air flow.

With the front of the chassis now to the right, as it curves up to the top, we are greeted with a view of the windowed panel that Thermaltake installs on the top of the chassis for transit. Remember, this panel can be swapped with either of the side panels as well.

As for the left side of the chassis, we can see that same curve the bezel made to the top of the chassis is also mimicked at the floor as it wraps around the front I/O panel. The stock side panel offered here is a well-ventilated panel that will allow a video card to breathe rather well later in the build.

The front I/O panel is topped with a blue power LED to the left, and to the right of that there is a red HDD activity LED. Then we see a large power button followed by two USB 3.0 ports, 3.5mm HD audio jacks, and a much smaller reset button at the bottom.

The back of the chassis has thumbscrews to hold in the top and sides, as well as the bottom of this chassis, to make the build process as easy as possible. We also find the pair of optional fan locations for 80mm fans, with two expansion card slots off to the right. The rear I/O is horizontal, just above where the PSU is to be installed. You can also pick up on the tab hanging there to remove the dust filter.

The right side of the chassis is a mirror image of the left side, sans the I/O panel. Again, if you want, the windowed panel could be placed here, and this panel could be moved to the top. Or, if for some reason you want to do so, you can even flip the side panels, and put the ventilation near the bottom.

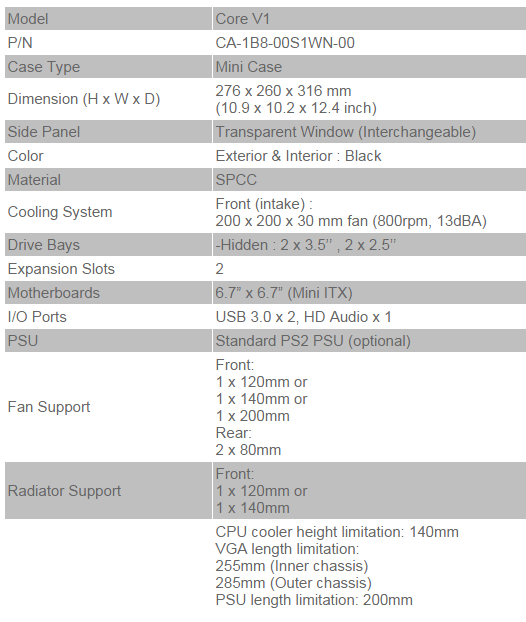
Looking at the bottom of the chassis, we find thick, hard rubber feet near the corners, a dust filter under the PSU, and in the raised sections, there are some rubber PSU supports that can be installed depending on PSU length.
Inside the Core V1

The front bezel has a thin ridge at the bottom that offers enough grip to pop it off, free of the front I/O that stays with the chassis. This is done to make cleaning the bezel easier. As for the front of the chassis, we find that the I/O panel is held in with a screw for easy removal during the build, and of course, how can you miss the 200mm fan covering the rest of it.

Looking in at the left side of the chassis again, after stripping it pretty clean, we see the motherboard tray that sections off the motherboard from the PSU at the bottom. Yes, the bottom is too thin to slide in a PSU, but there is a trick for that, which we will show in a bit.

At the back of the chassis there are no fans installed, but the ventilated expansion slot covers are held firmly in place with external screws that are hidden under the removable plastic cap.

As we look into the right side of the chassis, we see two steel frames blocking off the view of the lower half. There are the storage trays that are removable to make installation of either a 3.5" drive or a 2.5" drive very easy to do with screws.

Flipping the chassis around to stand on its face, we can see the motherboard tray pretty well. There is a huge access hole to cover almost any socket location on your Mini-ITX motherboard. We also see a lot of holes around the cutout at the front to offer plenty of places to tie wiring that needs to pass through that hole.

As for the wiring coming from the front I/O panel, there is plenty to get where it is needed, and still have some left to hide. This wiring includes the native USB 3.0 connection, the ribbon cable of LED and button connections, and a black sleeved HD audio connection.
What makes installing the PSU super simple is the fact that the bottom of the chassis is fully removable. This gives you a chance to figure out where to install the rubber isolators near the front before you slide the PSU in through the bottom of the frame.
Accessories and Documentation

The hardware that comes with the kit is somewhat limited, but does offer all of the essentials. There are four zip ties offered to help with wire management at the top. Under those are the 3.5" drive screws, with the rubber grommets used with them just to the right, and at the end are the two rubber PSU supports. The bottom offers the PSU screws, 2.5" drive screws, and motherboard or 3.5" drive screws.

We also get a user manual for the chassis. Inside of this manual there is a parts checklist with descriptions of use for all of the parts listed. This manual also carries on to explain how to disassemble the chassis for the build, the actual build process, and ends with many pages of wiring diagrams. Everything is covered in all of the languages Thermaltake sells to regionally.

In case you still haven't caught onto the cooling options in this chassis, this page makes it crystal clear for us. The back only houses 80mm fans, but you can see the three fan options, and below, the pair of radiator options for the front.

While we went ahead and mounted the 2.5" drive as seen. However, after placing this tray back in, we realized that there is room to have this drive on the other side of the rack, and still be able to install a 3.5" drive via the keyed holes on the sides where the 2.5" drive currently is. This isn't really explained all that clearly, but in total, that increases the capacity to four total drives, not the two we reported earlier.
Case Build and Finished Product

While this may be an unusual way to view the bottom of the chassis, this shows the point we made earlier about the ease of the PSU installation. Since the bottom panel of the chassis is removable, it makes sliding in and screwing down the PSU a cinch.

After we installed the PSU, we noticed that with the fan removed, there is plenty of access to plug things in and route them away from the fan. We can see the large cutout at the left for extended video card support, and options for fans with the various mounting holes.
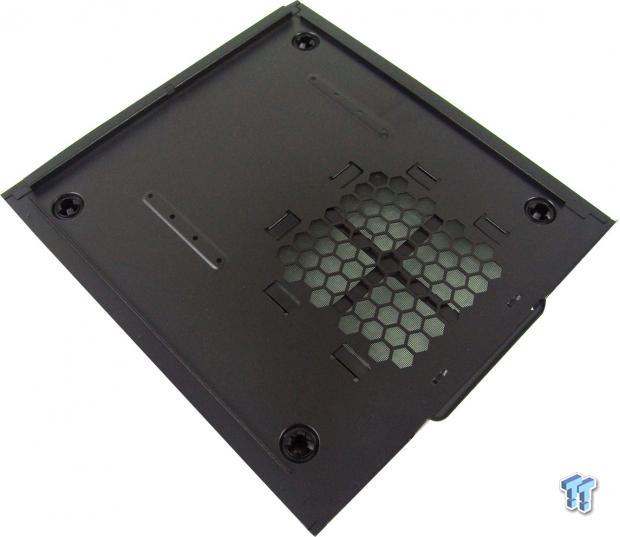
We could have gone with a longer video card, but this MSI is installed to the Mini-ITX OS. The nice thing is there is plenty of room for wiring below, next to the PSU and at the top. There is also plenty of room to power cards at the side, or even via the opening at the front for cards powered at the end.

We did not fill the fan locations in the back, as it has been years since we used 80mm fans. We did test fit an I/O shield, and all went well there. The video card is very secure, and we already went over the PSU installation.
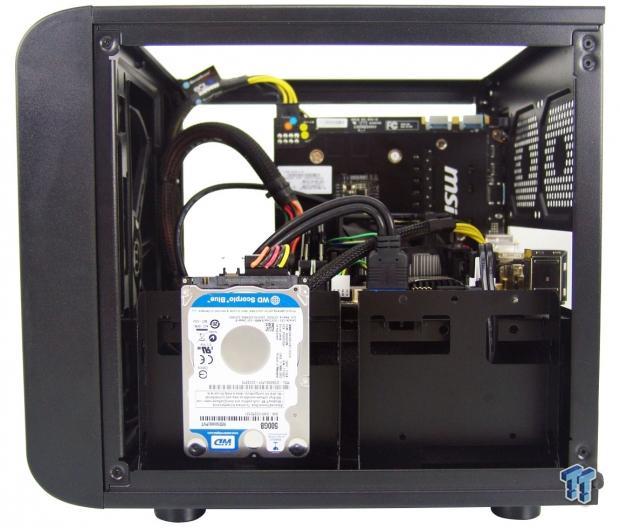
Looking into the right side of the chassis, we can see that all of the wiring stays low, and will not obstruct the venting in the side panels or even the view if you opt for the windowed panel here. Honestly, the toughest part to do was to connect the button and LED connection, as it got quite cramped when we put the I/O panel back on.

With the chassis all back in one piece, from this angle, the only visible change is that we can see the flashes of red from the video card through the ventilation. If you can see the card that plainly, you can be assured air can flow right through and keep it cool.
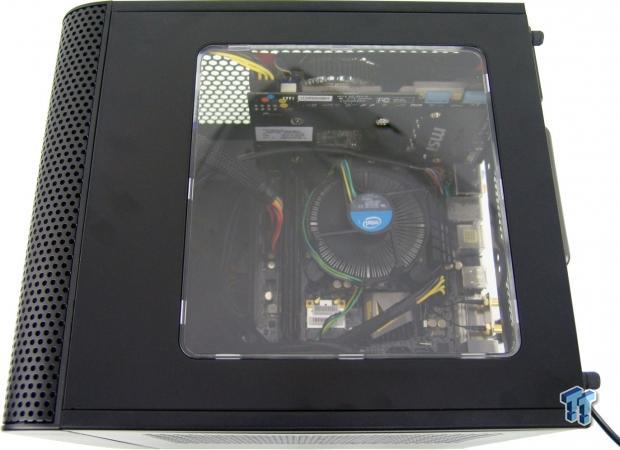
We decided to keep the windowed panel in the top of the chassis to afford the best view of the most hardware. On the side there is a nice view of the video card and PSU, but on the right, the view is less spectacular. We found this to be the best option for our tastes.

Of course, once the PC is powered, the 200mm fan comes to life, and with a three-pin connection, any header on the motherboard is fair game. With any PWM IC in control of the speed, it will vary from almost no noise, up to 35 dB at its loudest level.
Even with a stock CPU cooler, and no real changes to the positive air pressure design of this Core V1, we found air draws in the front well; this keeps the interior components cooler than expected. We missed the red flicker of the HDD activity LED, but with both the HDD activity LED and the blue power LED placed so low on the side, it doesn't fill the room with a massive glow of light.
Final Thoughts
Being blunt and honest has always worked for us in the past, so there is no need to change anything now. When we first looked at the Core V1 online, we thought that it looked aesthetically pleasing on the outside with the cool option to change the panels around to suit each user's specific needs. This option is cool enough for most, but without having much of a look prior to un-boxing this chassis, our hopes for the interior were not all that high. However, our tune quickly changed after about ten minutes with the Core V1.
After removing some thumbscrews, the panels started to shed off like leaves from a tree in fall, and it became clear that there would be no struggle to build inside of the Core V1. Failure to pay attention to detail is the one thing that will seriously break a good chassis and bring it to its knees in sales. However, we found the Core V1 is like a gift that keeps on giving with its drive bays and removable floor, as it hides features here and there like an Easter egg hunt.
As we said before, the toughest part of the build was after we had everything installed and then added the front I/O panel back into the chassis. There was plenty of wiring length to accommodate all of the runs to the USB 3.0 and HD Audio. Since we installed the video card prior to adding the tiny connections, we did have to fiddle around there, but that was due to the way we went at easing the build and eliminating the extra wiring. We did this until the PSU was wired to all of the components and tucked neatly away from the fans blades with the many wire tie points situated around where they pass from the bottom to the top.
We also love that the access hole for the wiring is deep enough to fully support a 120mm or 140mm AIO with a 27mm thick radiator and a 25mm thick fan. It also has just enough room left for the major wiring to pass. The Thermaltake Core V1 may not have large plastic handles on the top and bottom like the Prodigy, but if ever there was an economically friendly Prodigy killer, this Core V1 has to be it.
Keeping with notion that honestly is best policy, we do feel the MSRP for this chassis is set a bit high. By that we mean that the intended cost is nowhere near as awesome as some of the current pricing we have seen around the internet. This is still a pretty cool chassis at nearly $90, but if you shop smart, this chassis can be delivered to your door for less than $50. This takes this from an average bang-for-your-buck design into the realm of excellence, and it is hard to deny such a sleek and roomy design in such tight confines at this price.
Just as the Prodigy did years ago, I can see the Core V1 becoming the basis for many mods to come. It is also one of those cases that will make you ponder buying all the rest of the Mini-ITX gear just so you can complete a build in, and have one of these Core V1 Mini-ITX cases gracing your desk. That alone says volumes about a design. Thermaltake has won us over once again by showing they can offer unique, and stunning designs, even when it comes to a Small Form Factor chassis.
PRICING: You can find the Thermaltake Core V1 for sale below. The prices listed are valid at the time of writing, but can change at any time. Click the link to see the very latest pricing for the best deal.
United States: The Thermaltake Core V1 retails for $40.99 at Amazon.
Canada: The Thermaltake Core V1 retails for CDN$60.18 at Amazon Canada.

 Ocypus Sigma F36 BK ARGB Cooling Fan Review: high airflow and unified design in one frame
 PCCooler CPS RZ820 Display Review: a flagship-level CPU air cooler with an LCD screen
 MOAIPLAY ORA PRO G1 850W ATX 3.1 PSU Review: high efficiency and 10-year warranty for $119.99
 NZXT H6 RGB+ Compact Dual-Chamber Chassis Review
 Lian Li HYDROSHIFT II 360P OLED Curved Liquid CPU Cooler Review
 Ausom discounts three electric scooters by up to $100 in new soccer promotion
 GEEKOM GeekBook X16 Pro Prime Day Deal, save big on this thin and ultralight laptop
 GEEKOM's Prime Day deals deliver Massive Savings and up to 30% off Mini PCs
 Club386 is the latest victim of melted 12V-2x6 cable connectors, RTX 5090 and PSU both damaged
 Valve is working with NVIDIA to make GeForce GPUs compatible with SteamOS
 Meta Quest gets full-body VR movement system with Omni One for Quest
 Steam Deck code is bleeding into Steam Machine game functionality
 GIGABYTE launching stylish new RTX 5080 AORUS Infinity Wood graphics card
 Steam Machine buyers will receive different RAM configurations, Valve confirms
 For that 1993 PC look, check out SilverStone's new FLP03 Micro-ATX case
 Speed Racer (2008) 4K Ultra HD Blu-ray Review: a stunning remaster of the cult classic
 Navman MiVue Smart True 4K Surround Dashcam Review - Seeing In All Directions At Once
 IQUNIX Magi96 Pro Aluminum Low Profile Mechanical Keyboard Review - Premium Build, Satisfying Sound
 Asetek Forte S-Series Racing Simulator Bundle Review
 Razer Pro Type Ergo Wireless Split Ergonomic Keyboard Review - Built for Comfort and Support
 ASUS ROG Strix Morph 96 Wireless Gaming Keyboard Review - Great Performance, More Affordable
 GIGABYTE Wants to Kickstart Your New Gaming PC or Upgrade with These Limited-Time Deals
 7 Windows settings to change right after installation for better privacy, security, and performance
 I stopped Windows 11 notifications from interrupting me with Do Not Disturb, Focus, and a priority list
 I read the Windows Backup app screen carefully, and it does not back up what most people think
 Low Sound Volume on Windows 11? How to fix audio issues and restore normal volume
 8 Critical Warning Signs You Should Never Ignore in Windows 11
 This Windows security feature protects Documents from ransomware, but it is off by default
 Windows 11 already has a voice typing tool, and it is the one most people are not using
 Quick Assist is the only remote-support tool I open when a relative calls about their PC