Introduction, Specifications and Pricing

Not that long ago, we took a look at the first chassis from a predominant video card company with the Hadron Air from EVGA. In that design, they figured the smaller the better, and delivered a very compact chassis that, while very cool, limits what can be used inside of it. This time, the tables are completely turned, and we are now looking at a mid-tower chassis that has plenty of room for most typical components, and is something any user can appreciate. The company to bring you this latest chassis is XFX, and this is the first time I have ever reviewed any product from their vast lineup, but it is in no way my first XFX product as we go way back to the 7600GT days.
Since XFX is taking the larger mid-tower approach to the chassis market, this chassis offers all the formalities in a chassis. Things like normal optical bays, a modular storage drive rack, wire management, dust filters, and all of that good stuff can be found inside of this design. What is the biggest seller of this concept has to be the exterior, though. XFX has designed a chassis that is mostly plastic on the outside, and not only does it match their product line beautifully, but it allows them to bend the rules of what we consider "normal" in chassis design. Although we do prefer a chassis to be more than just looks, XFX is making a huge impression with this new design.
This brings us to why we are here today, and that is to have a look at their one and only chassis, the Type 01. So, sit back and relax as we do a lot of the legwork for you and offer our take on this chassis from XFX.
Visiting the XFX site to view the specifications, we are given everything worth writing about to describe this chassis. In the general section, the material choices as well as their thicknesses are offered, and we see the main part of the chassis is steel; it is then covered in ABS panels and has aluminum nameplates on the front and both sides. We also see that the chassis is black in color, and while they denote a window, that is only partly true. The chart below will describe all of the connections and controls available in the front I/O on top of this chassis.

The technical specifications show this chassis to have eight expansion slots and three 5.25-inch bays, one of which is convertible to a 3.5-inch bay for card readers and such. The chassis comes with three stealth covers for the trio of bays. It also offers room for eight 3.5-inch or 2.5-inch drives with removable trays, and the top section of the drive rack assembly is also removable to improve airflow or add longer cards. Speaking of airflow, the front of the chassis is equipped with a single 200mm fan, and the top has room for a single 120mm or 140mm fan. The back does also, but the second and last fan offered is the 140mm fan here. The floor can also hold a 120mm or 140mm fan. Any real plans for water cooling may need to be thought of externally as the options are very limited.
We are also given the contents list that covers what all comes in the kit, offers weight and dimensions of this chassis, and the last bit covers the five-year warranty that the Type 01 offers.
Finding the XFX Bravo Type 01 is not an issue at all; it is readily available at most of the places we hunt for pricing information. Speaking of the pricing, it is high for a mid-tower chassis. As we look around, really no matter the vendor, once shipping is included in the cost, this chassis will set you back just over the $200 US dollar mark. A lot has to really go right for a chassis with limited water cooling options and based from steel and ABS to have the need to cost this much, but we have yet to see the insides and take the time to build a PC inside of it, so we may be jumping the gun a bit here, but the bar is high, and we aren't sure XFX is up to that standard.
PRICING: You can find the XFX Bravo Type 01 for sale below. The prices listed are valid at the time of writing but can change at any time. Click the link to see the very latest pricing for the best deal.
United States: The XFX Bravo Type 01 retails for $129.99 at Amazon.
Canada: The XFX Bravo Type 01 retails for CDN$235.96 at Amazon Canada.
Packaging

The packaging is kept cost efficient and simple with the use of plain cardboard with black printing applied. To the left is a striped pattern that mimics the chassis design, and we see a large band that presents the Type 01 chassis naming.

Along with a lot of black cardboard, the right side offers only the rest of the band from the front containing the XFX name here.

The back also carries the stripping from the front panel, but it is broken up with an exploded diagram of the chassis that is contained inside. There is also a rendering of sorts of the chassis to the left, but much of the fine detail is left out of that rendering.

The remaining panel offers a good place for shipping labels above the XFX logo. Just below, we have the Bravo box checked, some bar codes, and the web address at the bottom.

Inside of the box, we find the chassis protected with dense foam inserts inside of cardboard frames to be extra protective of the chassis under the plastic liner. The box looked good, and as we removed this inner packaging, we found our Bravo Type 01 had arrived in excellent condition.
XFX Bravo Type 01 Mid-Tower Chassis

The chassis is built to appear to float, and with the rounded top and bottom and skinny outstretched legs, this chassis does appear to do that. Down the bezel, amidst all of the horizontal strips of plastic, are three hidden bay covers and a very large intake toward the bottom half. This is, however, a large XFX made of aluminium added to the bottom so people are sure who designed this chassis.

Most of the top is rounded as you move back across the top of the chassis, but is broken up with the ventilation that runs down both sides as well. The forward section also holds the front I/O as it runs dead center down the top of the chassis.

The left side of the chassis has a plastic panel added to a steel inner panel. This allows them to make the standard looking section fore and aft, and also allows them to run the horizontal ventilation strips up the sides as well as adding in the bold red nameplate that carries XFX TYPE 01 on it.

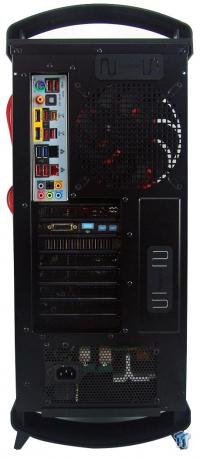
The back of the chassis offers all the standards with the PSU being mounted at the bottom, which also offers a slide out dust filter. What we haven't seen is the S-shaped cuts in grommets to allow for external water cooling or a wire pass-through.

The cool thing about this design is that the Bravo Type 01 can set to the left of you or to the right of you. Since both side panels are identical, it makes that choice easy to what you have the room for, instead of having to rearrange the office for this chassis.

Under the chassis, the rounded lower section is broken up for ventilation of the PSU, and you can get a glimpse of the filter there too. To keep the chassis upright, the legs have been angled out to the sides and have thin rubber strips to give it a good footing on most surfaces.
Inside the Bravo Type 01

Both doors will allow for 120mm fans to be mounted to them, but behind the tray, it will severely limit room, and on the motherboard side, they will close down the CPU cooler clearance as well. The doors will need to be pulled apart as well so that the screw heads are not visible from the outside.

Inside of the chassis, we find the wiring bundled, but left to flop around the interior. We also spot the large hardware box at the bottom, but that has been tied to the motherboard tray to keep it secure while in transit.

There are tool-free clips on either side of the three 5.25-inch bays, and they can be backed with screws. Good thing, too, because these locks do not hold a drive very tightly, and we advise that you use screws on top of these, or just don't bother with these clips at all.

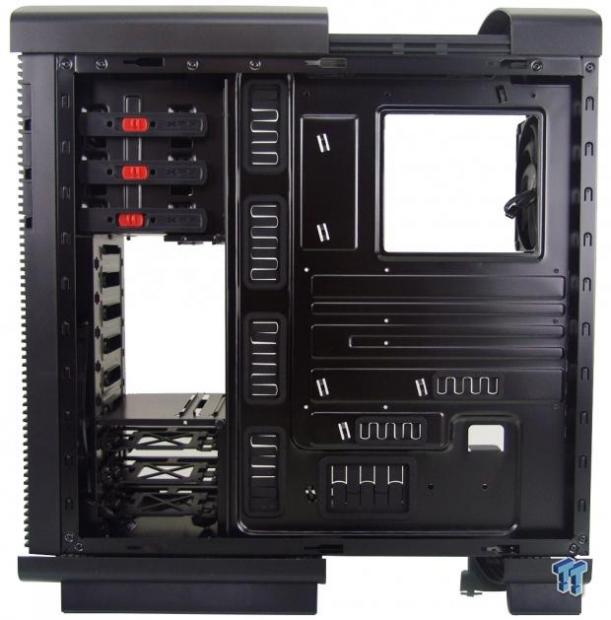
The storage drive rack comes in two sections. There is a top section that is removable and modular to be realigned for 2.5-inch drives, while the lower section is riveted into the chassis and houses three trays.

Once the top section is removed, we get a bit of a peek at the 200mm fan in the front, but one wall of the rack still remains hindering air flow, but the rail to go to 2.5-inch from 3.5-inch is plainly visible on top of the lower section.

The roof of this design offers room for either a 120mm or a 140mm fan, but none have been supplied to fill this void. That is left for you to do.

The motherboard tray is almost completely open at the top for wiring, has an average sized opening for back plate access, has six grommets with the S-shaped cuts in them, has only six tie points, and also offers room for an ATX motherboard.

The floor of the chassis has an optional fan location near the HDD rack, but that depends on how long of a PSU you install against the gasket on top of the little rubber feet stuck to the bottom of the chassis.

Keeping with the black theme inside, the 140mm fan in the back is black on black and can be powered via 3-pin connection or a Molex plug. As for the eight expansion slots and future cards, they are locked into place with thumbscrews.

Behind the tray, there is 20mm of room in most areas intended for wiring. Outside of that, there is not really much here to discuss.

We also noticed that XFX did not even take the time to route the front I/O wiring through the management hole. They leave it up to you to have to work in the tight confines as you run the black HD Audio, USB 2.0, native USB 3.0, and switch and LED wiring behind the tray.
Accessories and Documentation

All of the hardware needed to complete the build was included in that large box, and here we have the basics. There are wire ties at the top and seven bags that are clearly labeled as to their intended use during the build process.

Since all three bays have flip down stealth covers, if there is a need for a fan controller, you can use the smaller clips at the bottom to dress the sides of it to match the front of the chassis. If you plan to use a 3.5-inch device, the large top panel is to be used for those to keep the styling looking clean.

The manual is very thorough and does a great job starting with the basics like parts and how to get into the chassis. It continues with illustrations and text to guide one through the major components being installed and offers a handier exploded diagram than the box to see how it all works.

Also in the box, you will find five plastic drive trays specifically engineered to work with 2.5-inch drives only. You will need to slide out the one side rail of the drive cage and move it into the inner tracks, but that is what these are for.

Strange enough, though, if you slide out any of the 3.5-inch drive trays, they all have holes in them to install 2.5-inch drives anyways, and maybe that inch is important to some, but we don't see the point in this design to have specific 2.5-inch trays.
Case Build and Finished Product

The bezel... what a PITA this is. To remove it, find a flat head screwdriver to put on the clips inside of the chassis. Then, find your favorite hammer and give them a solid whack or three, and the bezel should pop free. We also found that all the switch and LED wiring is attached to the bezel, so keep that in mind.

Once we were done, we snapped the bezel back onto the chassis, and we do like that this chassis has the stealth covers. This way no matter what drives are installed, they don't have to be seen, and if they do, XFX took steps to keep the sides of those devices in line with the rest of the front bezel design.

Inside, we couldn't help but to continue the red and black theme with what parts we had on hand. This also shows that the wiring hides well, and even with the bright color of the wires, it looks damn good inside of this chassis with those unique grommets in play as well.

Not much fuss to snapping in the dust shield or with the PSU mounting. We did, however, need to flex the back of the chassis quite a bit to get the thumbscrews back into the chassis to support our video card.

With sleeved cable adapters comes big connections, and even with the limited amount of room provided compared to some others, we were able to sneak by with what we have here, and we were still able to get the panel back on with very little issue.

Something to consider, and something we had never even thought of, since the back panel is also ventilated like the left side is, you may have a slight view of the wiring to look at; otherwise, be sure to move it out of the way for a cleaner view or the addition of 15mm thick 120mm fans.

With the panels back on, all we are waiting for is the power to be added and to get to the thermal and audio testing. What we are left with at this point is just like what we saw out of the box, and for a chassis without a true window, it does have an appeal that is tough to deny this design.

Once the chassis receives power and the button is pressed, the LED in the center of that button becomes illuminated with a white LED. In the plastic strip just below is an HDD activity light, and one band below that is the reset button for this chassis. When tested, the Bravo Type 01 only hit 29 dB on our meter.
Final Thoughts
The good things about this design are pretty obvious. The aesthetics are new and something we have not seen done like this. The fact that this chassis would go great with their video cards and power supplies is also a huge plus, and there aren't many companies out there offering the full line like these for a name brand build throughout. We liked the limited noise it produced, and we also liked the average thermal results we were given considering there are only two fans. We also liked that the wiring is black inside of the chassis to blend in, and we liked the XFX grommets and the way they work around cables. We also liked the modularity of the hard drive rack, but that isn't to say we didn't find any issues.
First of all, it seems like the steel chassis under the flash and glittery exterior was of little concern to XFX. The front bezel is not what I would call "removable," and even if you can get it off, you find that the front of this chassis only offers 200mm fan mounting, so no love at all for potential water cooling mods there. On top of that, there are only two fans shipped in this chassis, and for this kind of money, we should get something loaded, not something needing us to spend more just to fill out the chassis.
Then there is the fact that with the panels off the chassis, it tends to flex in general quite a bit, and when it came time to install the video card, we almost needed a third hand to hold the back of the chassis inward as we tried to get the thumbscrews in. Even when it comes down to the simpler things like wiring, XFX failed to even try to help with the wiring, where in $100 cases, it is almost done for you with nothing to do but connect the ends to the board.
This all may be a bit harsh for us to be this hard on XFX, being this is their first venture into chassis development, but I think if they want to compete with something substantial, this design is not the way to go about it. Realizing the over $200 price point, it seems XFX has no issues charging double most other capable chassis in the mid-tower segment.
While the outside of the XFX Bravo Type 01 is stellar to see in person, and does definitely inspire a complete XFX build, the lack of water cooling options, lack of impressiveness inside, and the lack of foresight to even see that their product is just not up to what users today expect are all solid reasons in our eyes to pass this chassis by. Sorry, XFX, but if the interior was half as impressive as the exterior, I would support and even prompt people to buy this, but for what has been delivered, I just can't add my seal of approval.
PRICING: You can find the XFX Bravo Type 01 for sale below. The prices listed are valid at the time of writing but can change at any time. Click the link to see the very latest pricing for the best deal.
United States: The XFX Bravo Type 01 retails for $129.99 at Amazon.
Canada: The XFX Bravo Type 01 retails for CDN$235.96 at Amazon Canada.


