


Introduction
Usually when we get a chassis to test at TweakTown, they are standalone units, but today we are going at things a bit different for the release of Cooler Master's new HAF Stacker chassis. We of course will be bringing you the much larger components to this completed stack of cases, but at this moment we are having a look at the smaller add-on component to this design. Truly allowing cases to stack on top of each other brings forth a few ideas that I know a lot of high-end users in cramped spaces could appreciate. Even for those with a ton of room, the new HAF Stacker when fully assembled is large enough to hold its own in any room, and demand attention from anyone who sees it.
Here the chassis is designed to be added on to either the top or bottom of the rest of the HAF Stacker kit, or you can simply use the chassis as-is with any Mini-ITX motherboard. The chassis offers all the things we would find in any other chassis like drive bays, blacked out chassis wiring, wire management, and plenty of room for full sized cards and power supplies. What may throw you off your game a bit with this design, is that it is also designed to be able to be stripped of all of the things that makes a chassis, and will then allow users to also strap in a couple of triple radiators and use this chassis as a water cooling pedestal.
Those who actively look for these sort of a components either mod something to suit their needs or go with one of the few offerings on the market that allow specifically the ability to use them as a pedestal, but when you leave water cooling, the pedestals are usually worthless, but with the chassis we are about to see, you can just add back in the components and un-stack this section and use it as a standalone SFF chassis.
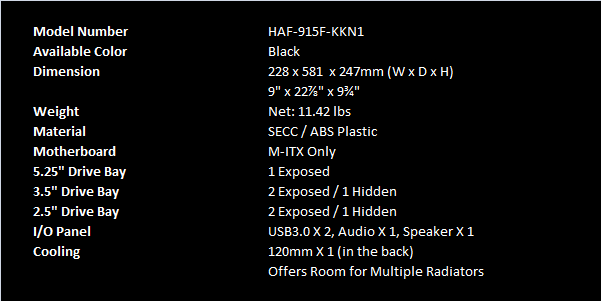
The HAF Stacker 915F we are about to look at has one key letter in the title to help customers get the right components they are looking for. The 915F offers a front mounted power supply. There is also a brother to this chassis the HAF Stacker 915R, which obviously has a rear mounted power supply, but comes as part of the much larger HAF Stacker 935 that we will also be showing off soon enough.
From what I gather, both of the smaller chassis will be available for use as a normal SFF chassis, but for sure the 915R comes with the other larger kit, and to get the 915F we are about to get into, you will need to make a separate purchase to complete the trio of sections that the HAF Stacker as a whole is designed to allow for.
Specifications, Availability and Pricing
Aesthetically, the exterior of the chassis offers steel and plastic to make up the components, but the design stays true to the HAF series of cases, with chunky aggressive styling on the front of the 915F. The front of the chassis offers a large mesh area for the PSU to exhaust through, with both the ODD bay and front I/O panel placed above it. The top of the chassis is removable for better access inside of the chassis, and while it is almost entirely mesh, there are no options to place fans here; it is just for passive cooling. Both side panels of the chassis are ventilated and even offer dust filters, but the nice thing about them is that you can bolt a 360mm radiator inside of each panel, turning this chassis into a pedestal. Of course, just like the rest of the HAF series of Cooler Master case designs, you can have this in any color you want, as long as that choice is black.
Inside of the chassis there is the ODD bay that is exposed through the bezel, but there is also room for either a 3.5" or 2.5" drive, as they have slots in the floor of it to accept anti-vibration grommets to slide in and lock a drive into place. There is also a spot on the floor of the chassis as well as a removable section at the back of the chassis that both offer the same options as the ODD bay does. This will allow for a total of three storage drives, if you choose not to install an optical drive. There is room near the back for the M-ITX motherboard to lie on the floor, and at the rear of the chassis there is a 120mm fan installed and two expansion slots to fill.
Our Latest Mid-Tower Cases Review Coverage
On top of that, Cooler Master has also designed more holes in the floor of this chassis. This allows you the ability to run wiring and water cooling tubing through either the four oval holes cut into the floor near the middle, or you can use an area with a grommet in it that is located under where the motherboard will set. For a design with its convertible nature, Cooler Master covered all aspects for both, and leaves customers with everything they will need, without overlooking the simpler things.
The best part about the HAF Stacker 915F outside of its modularity and dual purpose design has to be the pricing. As a SFF chassis, the MSRP of $69.99, prior to shipping, is a tasty price for a Mini-ITX chassis that offers room for full length components. On top of that, the 915F has the ability to be a simple pedestal, and looking around at options from other manufacturers, even here the pricing is too good to pass up on.
I know a lot of you have waited through the early videos and news posts, but now that the HAF Stacker and its components are no longer under NDA, I say we get right down to it and see just what Cooler Master offers with the new HAF Stacker 915F as an individual components, and soon we will even add it to the rest of the HAF Stacker chassis to address its benefits there too.
Packaging
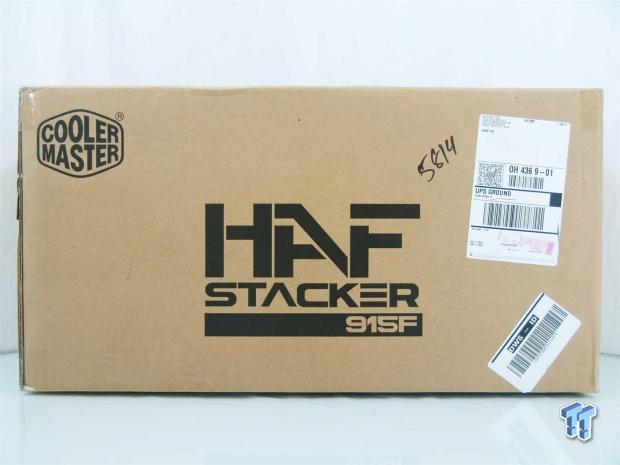
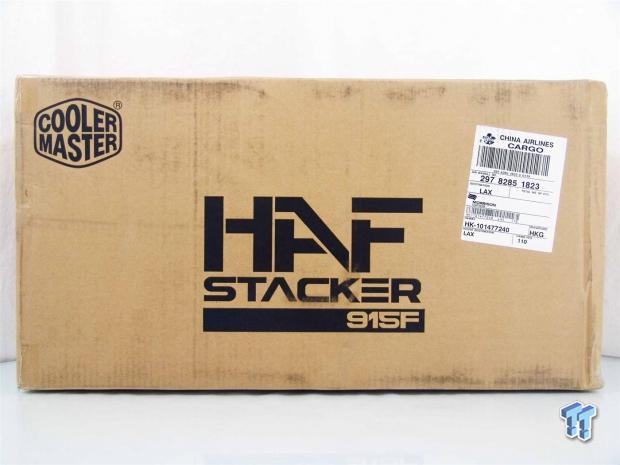
The Cooler Master HAF Stacker 915F comes in plain brown cardboard with black screening used to display information. Outside of the UPS sticker on this side, just the company name and chassis name are offered.
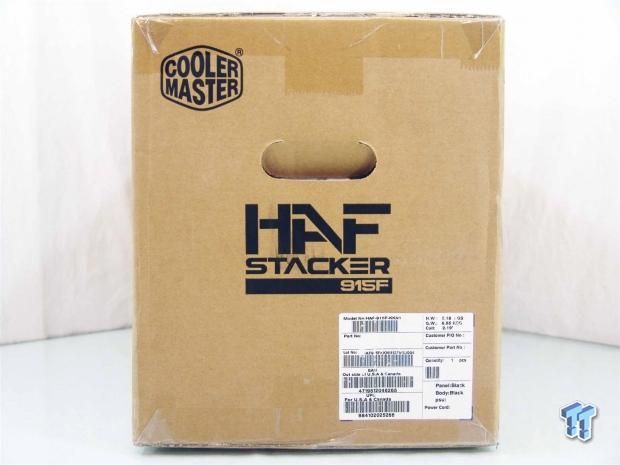
The smaller side of the packaging mimics the front panel, but there is a sticker with the model number, weight, quantity, and color of the chassis inside the box.
I guess Cooler Master wanted to keep the surprise sealed till the very last moment. Instead of offering some images of the chassis, and maybe pointing out some key features, we get a duplicate of what was shown on the front of the packaging.

Since Cooler Master doesn't use the panels very effectively for marketing at all, why would the last panel of the packaging be any different? As you see, we again are just given the logo and chassis name to look at, and even the same sticker at the bottom.
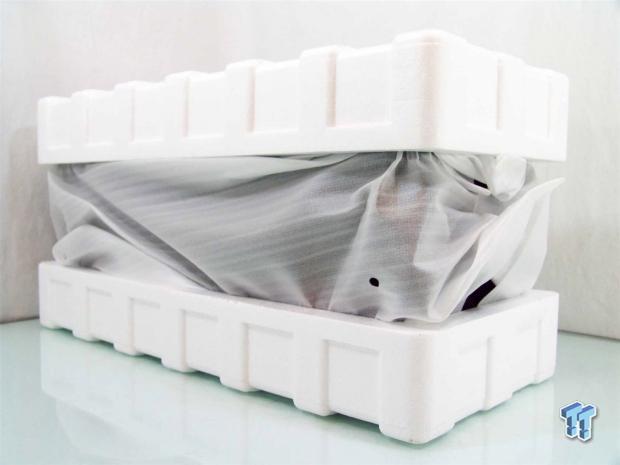
While they do use thick Styrofoam end caps that surround a large percentage of the 915F, instead of using a thin plastic liner, a thin foam bag has been used to make certain that this chassis arrives in great shape. Even with the slight damages to the cardboard, the inner packaging did its job and this HAF Stacker 915F arrived for testing in perfect condition.
Cooler Master HAF Stacker 915F
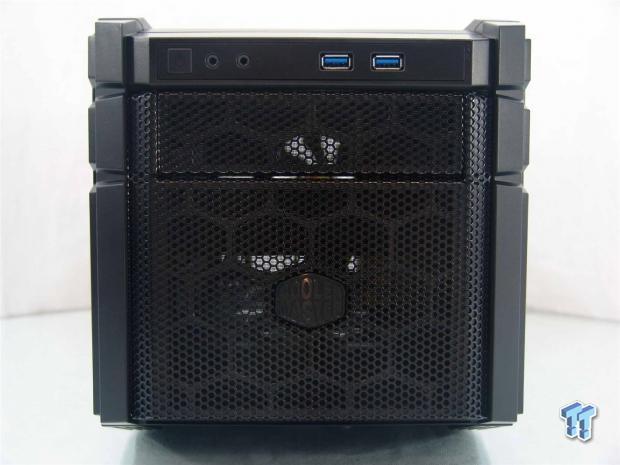
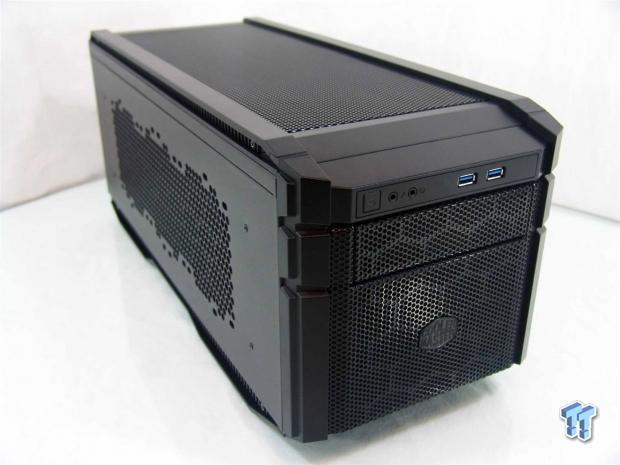
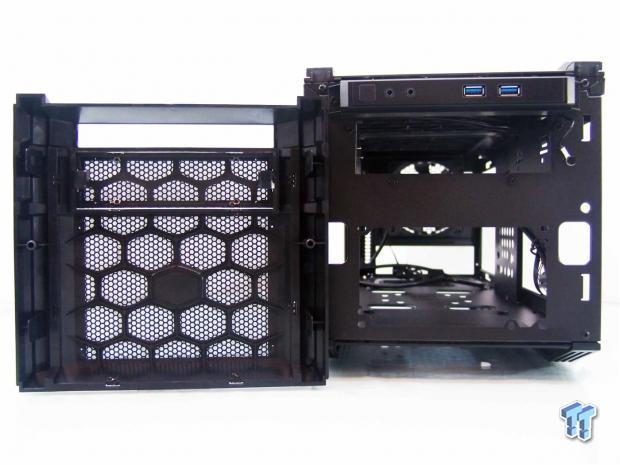
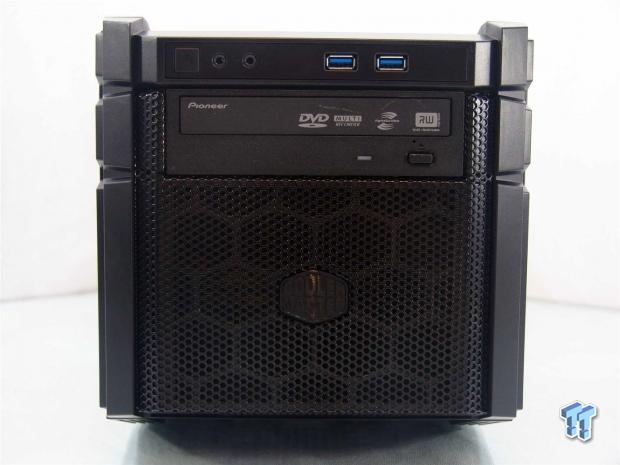
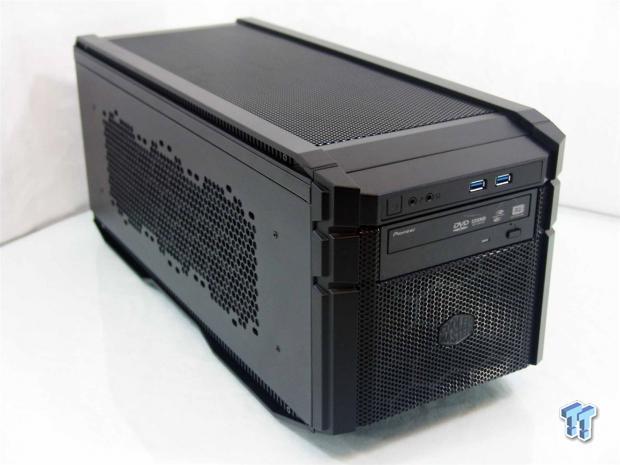
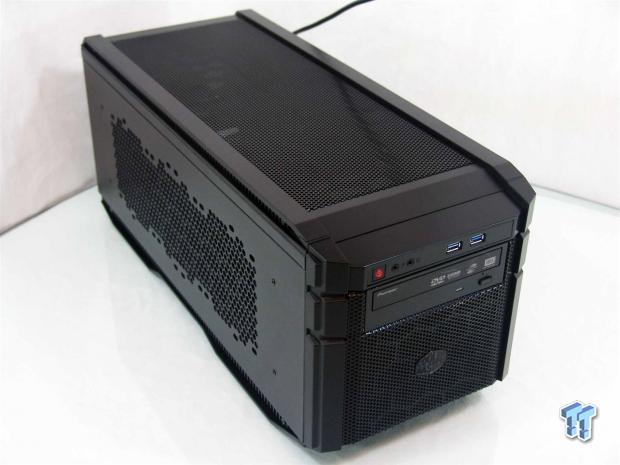
At first glance, you can see the HAF heritage in this design with the thick sides and chunky protruding sections and use of the steel mesh to cover the majority of the front panel. There is only one removable cover to install an optical drive, and Cooler Master places a logo in the center of the lower section of mesh.
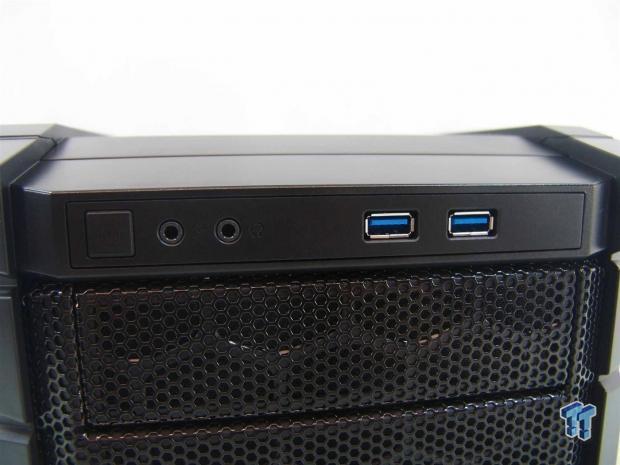
The front I/O panel is simplified as it offers a power button that is backlit to denote chassis power, there are a pair of 3.5mm jacks for AC'97 or HD Audio, and finishes with the pair of USB 3.0 ports.

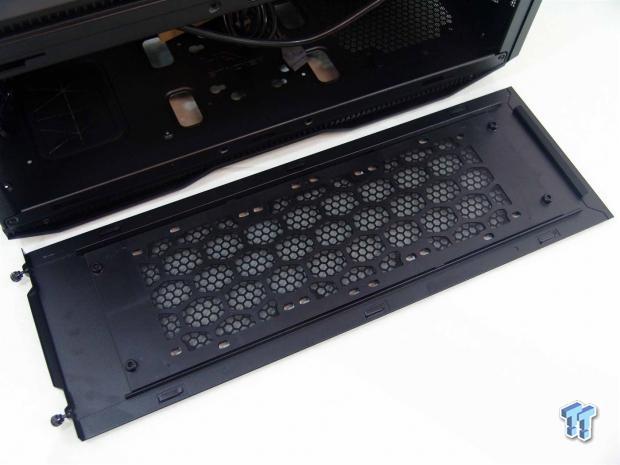
The top of the chassis has thick plastic edges to give this panel the support it needs to allow that vast expanse of steel mesh. This panel is for passive flow, and is also removable to gain access inside of the chassis.
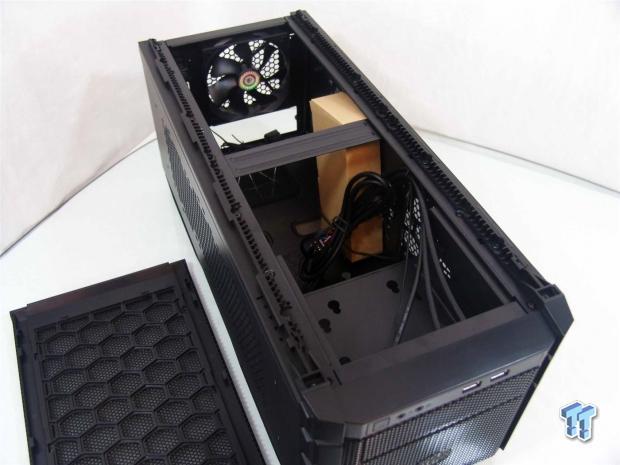
There are two screws in both sides of the top panel that need to be removed, and then the panel slides back just a bit and will lift right off the chassis. Under that there are plastic rails to hold the top on and there is also a center support bar installed to keep the chassis from flexing.
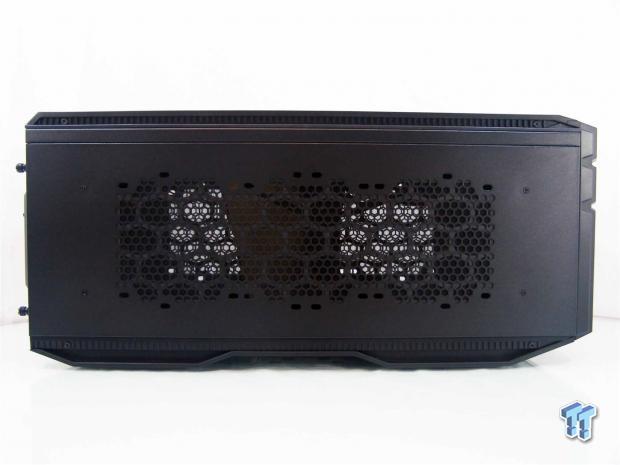
The left side of the chassis is well ventilated, and there is a dust filer on the inside of the door. This design cut into the door panel will allow for fans, but its main purpose is to allow a triple 120mm or a dual 140mm radiator to be attached here.

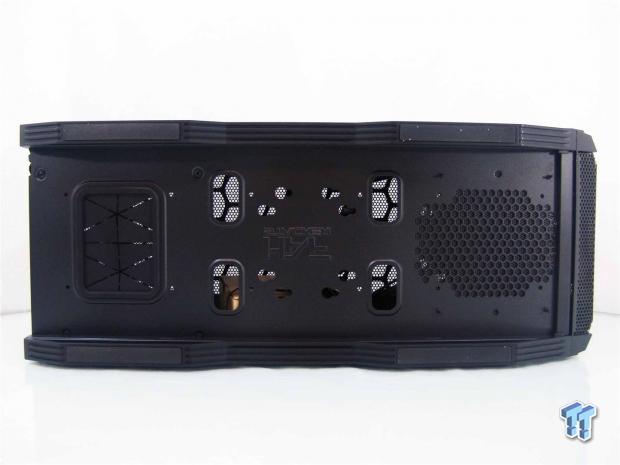
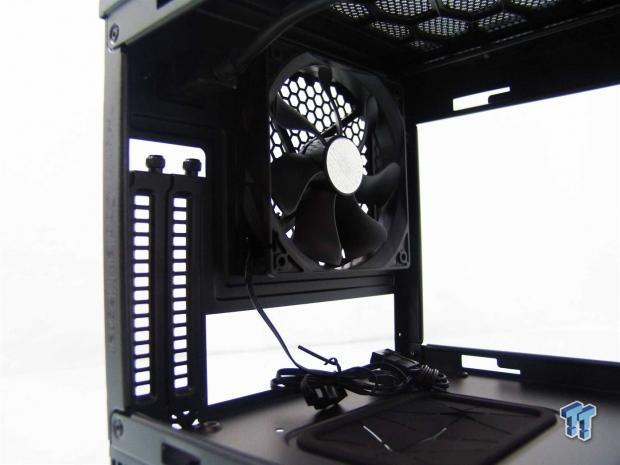
The back of the 915F offers a 120mm fan and a rear I/O area on the left. To the right you have a power plug for the PSU power extension cable with the pair of expansion slots just below it.
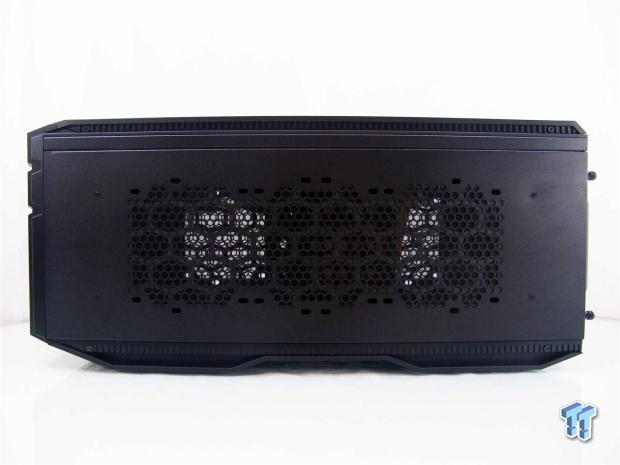
The right side of the HAF Stacker 915F is just like the left, and again will allow users to install a radiator here for the pedestal half of the design. For M-ITX builders, depending on the components used inside, you can also populate these with fans, if desired.
There is a lot going on under the 915F as well. There is a very large grommet to run anything you want through it when using it for water cooling, and there are also four other smaller holes to use. Around the embossed logo, there are slots for storage drives, and even at the front there is a filter under the PSU.
Inside the HAF Stacker 915F
There are two things to note with the side panels. The plastic dust filer inside of the door is screwed into place, but is cut to allow radiators to mount with it still in place, and at the back, the thumbscrews stay in the door panel, so you don't loose them.
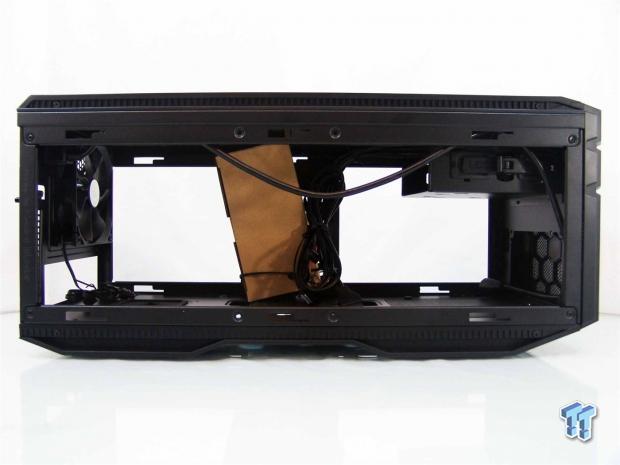
Inside of the chassis the hardware and the chassis wiring are tied to the center support structure, and it has all remained where it was intended as not to damage the connections of the paint finish inside of the chassis.
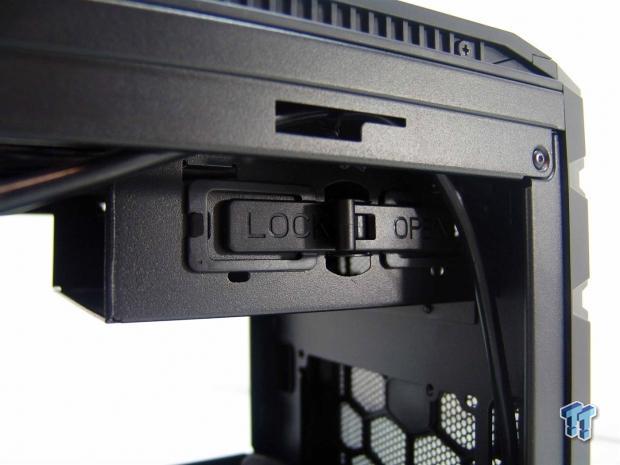
At the front of the 915F, there is a single 5.25" bay with a tool-free locking mechanism on this side. If you go back to the image, where we removed the top, you can also see the slots on the floor of this bay as an optional storage drive location.

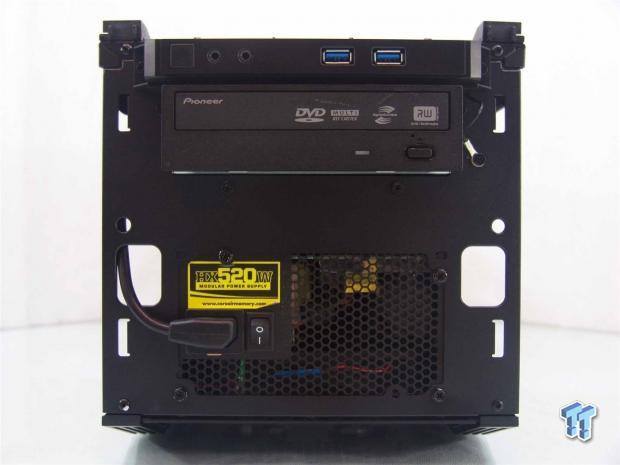
Under the ODD bay, in the 915F only, we have the front mounted PSU location. You need to remove the bezel to mount and plug in the PSU. The dust filter is only removable if the PSU is out of the chassis, and make things really tough to routinely clean.
Just behind where the power supply sits, there is the name of the chassis pressed into the steel with four holes and another location for the storage drives. Don't worry about the plate behind it, we will get to that soon.
At the back, you see the power supply extension cable running to the front, but you also see the fan wiring that starts off with a 3-pin connection for power, but also includes the Molex adapter to power this directly from the PSU.

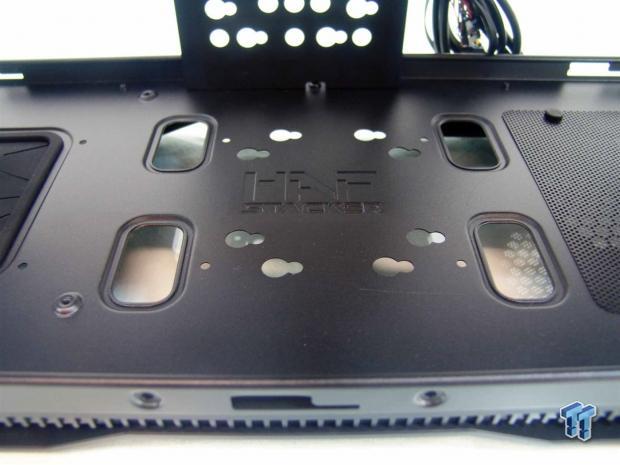
The motherboard tray consists of a very large grommet in a whole under where the motherboard will set. Around it are four raised holes that you can install standoffs into for a motherboard, or if water cooling, you leave it as-is, and have the option to route quite a lot just in this one opening.
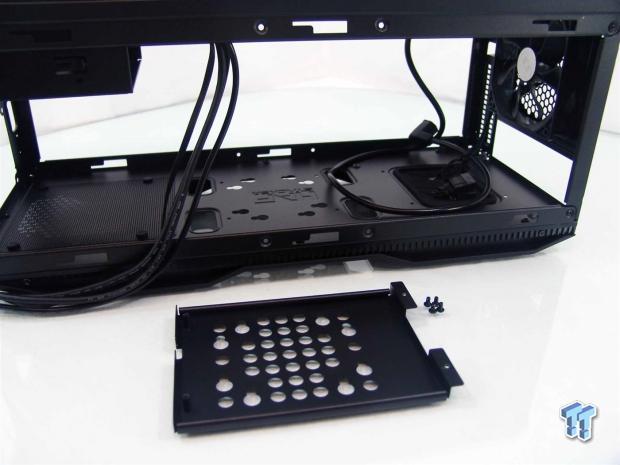
The plate on the table sets inside the rails of this side of the chassis, but it is removable for radiator clearance as well as to make drive mounting on it a bit easier.
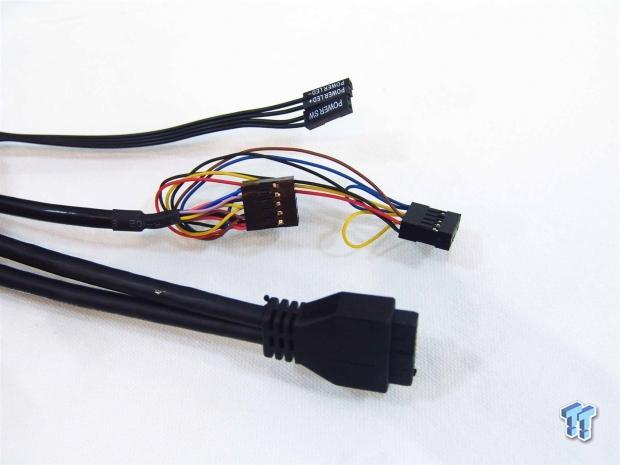
On the end of some very long wiring, you have the native USB 3.0 connection, the AC'97 and HD Audio connections in the middle, and the two things that the front I/O will control on the motherboard, the power switch and power LED wiring.
Accessories and Documentation
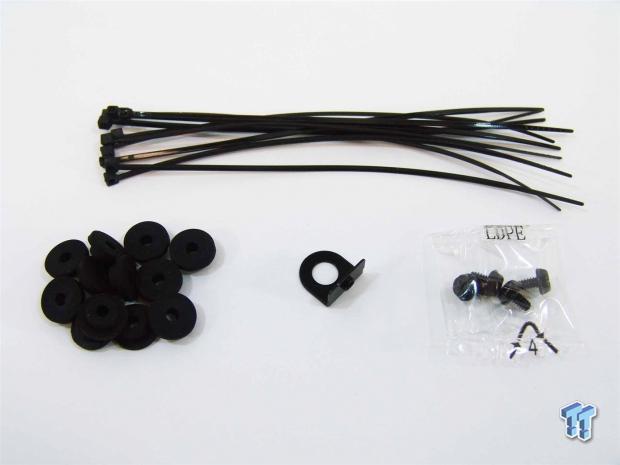
Part of the hardware you are given is shown here. There are ten zip ties to keep wiring tidy inside, 12 rubber isolation pads for storage drive installation, a Kensington lock, and a bag with PSU screws in it.
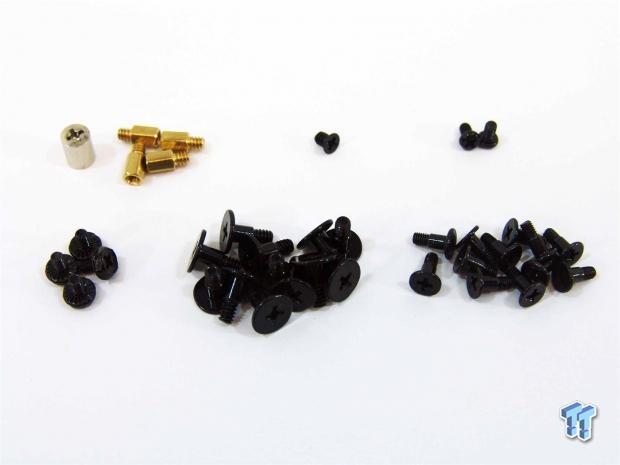
In this image, we are given a socket for the installation of the four brass standoffs, the screw for the Kensington lock, and a pair of screws to mount the optical bay device on the right side of the chassis. The bottom row offers the motherboard screws, 3.5" drive installation screws, and 2.5" drive installation screws, both of which work with the rubber pads.
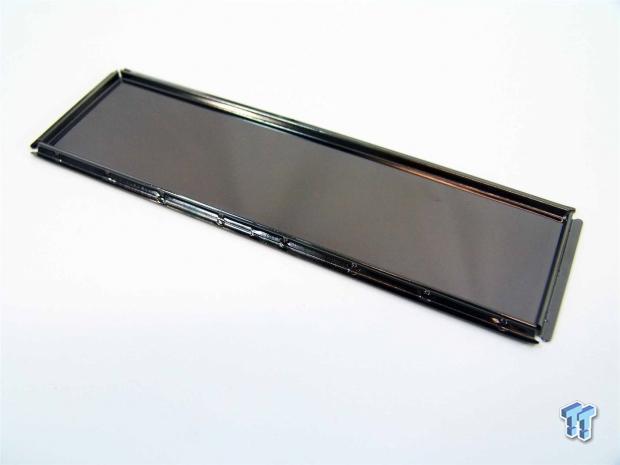
For instances where you are intending to use the 915F for a water cooling pedestal rather than a chassis for a full system, Cooler Master also sends along a blank rear I/O dust shield to block that hole.

The paperwork that came with our HAF Stacker 915F shows on this side how to stack this chassis. You see that it can be stacked in triplicate, as a double, or run as-is, but it can also go on the HAF Stacker 935. All you need to do is remove the top or bottom plastic components, slide it onto the other sections, and use four screws to bolt the chassis together.
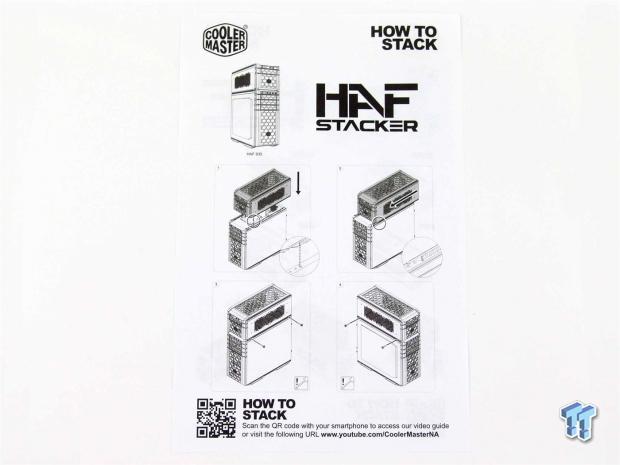
The reverse of that sheet then goes into the mounting of the 915F onto the 935 main chassis. In this instance, it shows the removal of the feet and then the 915F going on to the top of the 935. This will make great use of all of the holes offered in the bottom of the HAF Stacker 915F.
The Build and Finished Product
The front bezel will easily remove from the front of the chassis with just a gentle tug. This allows you to be able to remove the bay cover if needed, but will also offer you access to the PSU mounting and plugging in the power extension cable. It is also nice that the front I/O and wiring stay with the chassis and not the bezel.
The power supply at the bottom of the chassis offers nothing out of the ordinary for the installation, and the PSU fits and mounts well into the 915F. Even though we are showing the optical drive in place, it needs to be removed to fit the bezel, and then the drive can slide in once the bezel is back on.
The front of the chassis does not change much, and even with the DVD drive in place, it doesn't detract from the looks of the design.
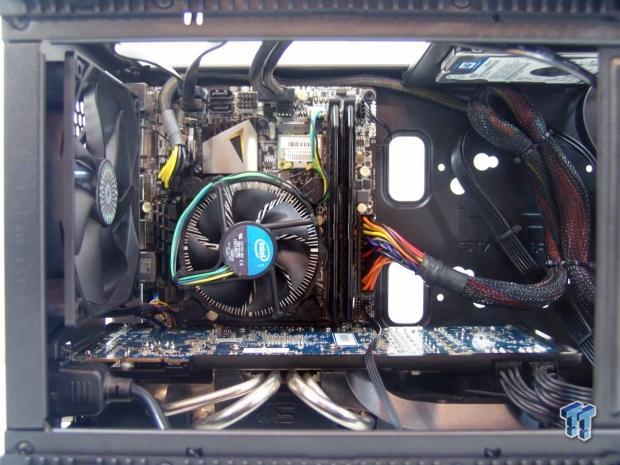
This is a look inside of the chassis from the top of the 915F because with a video card installed, you can see very little through the conventional view through the left side of the chassis. There is plenty of room for wiring to be tended to, and there are locations at the top rails to tie wiring to as well.
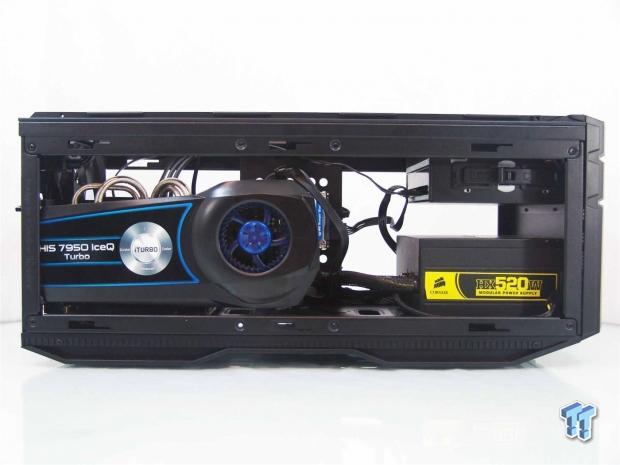
The HD 7950 we use is larger than the usual dual slot cards, and we had no issues with it fitting inside of this chassis. The other nice thing is that you can easily tell there is plenty of room for even the larger PSUs to go in the front of the chassis, even with long video cards installed.

The one issue we found with this design is that the holes in the expansion slots do not line up with a card well at all. Compounding this issue is the fact that the power plug offsets the screwdriver, so even if you can get the screw in the hole by force, it is still tough screwing in at all.

The right side of the 915F is where you can have easy access to the hardware inside of the chassis. Wire management is slightly tougher with this completely open design, but we were still able to have good results with our build.
If not for the DVD drive poking out of the front of the chassis, at this point where we have the build completed, there is nothing else aesthetically that changes. If you are planning to use this as a pedestal, the only changes you will notice then would be the screw heads in the right and left door panels.
When the HAF Stacker is powered on, there is very little noise from the chassis fan in the rear of the case. We did test the fan prior to the build due to the noise that the stock Intel cooler and this PSU puts off, at that time there was a reading of 27 dB. With my build in play, we were dealing with something near 50 dB.
The red LED light denoting the system is powered is handy, but if used as a water cooling box, there will be no LED or use of most of the front I/O for that matter.
Final Thoughts
In the aspect of just being a chassis capable of running Mini-ITX based systems, it is one of the longest we have seen, but there is more than enough room for all of your components to make a tiny motherboard based power house. With just one fan pumping air out of the back of the chassis, the PSU pumping out the front of the chassis, and the sides allowing for passive airflow to creep in and get pulled by the rear exhaust fan, thermals inside of the chassis are very reasonable for the way the chassis is delivered. We could have also added some fans to the right side of the chassis to elevate the cooling efficiency and still used the same components. We just would have moved the drive to the floor of the chassis and removed the support to allow room for them there. There is the one sticking point about the expansion slots, but with some force and a bit of struggling, I was able to eventually get my card secured into the 915F, but it was much more work than it should have been to mount my video card.
Then there is the whole other aspect of what this chassis will do. Even with the front bay still in place, and with room for a smaller PSU like the one we used for this build, there is room for a pair of radiators, one on either side. You can use the PSU to power pumps and lighting, have plenty of room in the middle of the chassis for a tube reservoir, pumps, fan headers, and excess wiring all to go in and stay tidy when it's built. While it is entirely possible to house thick radiators with fans on both sides, you do limit the space in the middle for other components, but the large grommet at the back and the smaller ones in the middle allow you to set up any sort of configuration of 140mm and 120mm based radiators. While the HAF Stacker 915F is intended to be used with the rest of the HAF Stacker components, I see no reason why you can't be a bit creative and use this with any chassis that is nine inches wide and near 23 inches deep.
As a standalone SFF chassis that can also be used to support additional water cooling to almost any other chassis where external water cooling is your only option left, the fact that this chassis is going to sell at $69.99 is great value to be had in my opinion. Having the ability to stack two or three of these high could make an office setup like mine much cleaner than my two main rigs and a laptop all spread across the room. With a design like this, you have one central location for many systems, and at a glance, you can see if the entire array is running and doing what they should be doing. Then of course you can add this to the HAF Stacker 935 for even more space for whatever you desire, is a handy feature as well.
I really think that Cooler Master did a great job on the HAF Stacker 915F as a standalone M-ITX based chassis, and in the review of the HAF Stacker 935 that will go online soon, you will see how it plays into that design as well. As long as you are aware of the expansion slot struggle and are willing to try your hand with it, I don't see why you would pass up on this design, where you can get bored with it one way, and completely readdress the design and still have a pedestal on hand. With just a tiny bit of modding, I want to turn this into a portable water cooling kit that I can just have a pair of quick disconnects and use this for benching purposes next to my open air test rig - the options are truly only limited to your imagination with the HAF Stacker 915F.

 MOAIPLAY ORA PRO G1 850W ATX 3.1 PSU Review: high efficiency and 10-year warranty for $119.99
 NZXT H6 RGB+ Compact Dual-Chamber Chassis Review
 Lian Li HYDROSHIFT II 360P OLED Curved Liquid CPU Cooler Review
 ID-Cooling FROZN A620 SLK CPU Cooler Review
 GAMDIAS Atlas P6 CG Dual Chamber Mid-Tower Chassis Review
 Xbox employees offered Microsoft's first-ever retirement program amid studio closures
 Valve rolls out update for Steam Machine release following Steam Deck price hike
 PowerA puts Flight Simulator controls on its new Xbox controller, and it looks wild
 God of War Laufey release target leaks ahead of Sony's official announcement
 MSI Claw 8 EX AI+ with Intel's Arc G3 Extreme processor costs a lot more than expected
 Logitech's new G3 Series mouse and keyboard deliver its most affordable pro-level gear to date
 Xbox sets world record for shortest time between a AAA game reveal and its studio's closure
 Intel x86 processors with GeForce RTX graphics are reportedly coming in 2028
 AMD says FSR 4.1 on RDNA 3 will feature no quality loss
 US AI startup Tensordyne claims 3nm Napier chip outperforms NVIDIA Blackwell by 13x in tokens per second
 Speed Racer (2008) 4K Ultra HD Blu-ray Review: a stunning remaster of the cult classic
 Navman MiVue Smart True 4K Surround Dashcam Review - Seeing In All Directions At Once
 IQUNIX Magi96 Pro Aluminum Low Profile Mechanical Keyboard Review - Premium Build, Satisfying Sound
 Asetek Forte S-Series Racing Simulator Bundle Review
 Razer Pro Type Ergo Wireless Split Ergonomic Keyboard Review - Built for Comfort and Support
 ASUS ROG Strix Morph 96 Wireless Gaming Keyboard Review - Great Performance, More Affordable
 SAPPHIRE Radeon RX 9070 GRE PULSE OC Review - A New 1440p Challenger Has Arrived
 ASRock Radeon RX 9070 GRE Steel Legend Review - The RDNA 4 Mid-Range Reshuffle
 8 Critical Warning Signs You Should Never Ignore in Windows 11
 This Windows security feature protects Documents from ransomware, but it is off by default
 Windows 11 already has a voice typing tool, and it is the one most people are not using
 Quick Assist is the only remote-support tool I open when a relative calls about their PC
 The PowerToys utilities I keep enabled on every Windows 11 PC, and the ones I turned off within a week
 TweakTown's Best of Computex 2026 Awards - The Best Hardware, Gaming Gear, and AI
 Phison E37T SSD Controller Exclusive Preview - The Fastest DRAMless SSD Platform Yet
 USB Ports Not Working in Windows 11? Try These Fixes
 ASUS WiFi Routers and Networking Solutions Deliver Long-term Security and Reliability with No Additional Cost
 Second Monitor Not Detected in Windows 11? Try These Fixes