Introduction and Package
Introduction
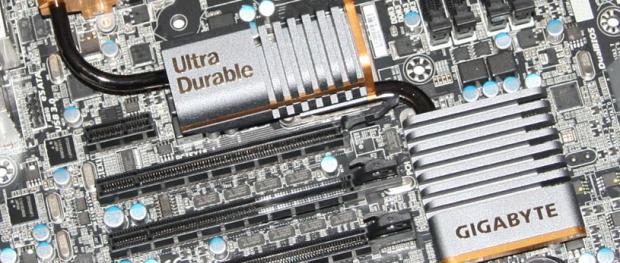
Earlier this month GIGABYTE invited us over to check out both the Z68X-UD7-B3 and Z68X-UD3H-B3 Motherboards in Taiwan. Because the preview on the GIGABYTE boards wasn't done in house and didn't include the contents of the package nor our standard photo line-up, we'll be covering the board as we would normally cover one that we hadn't previewed.
That means that we'll start by looking at the box itself before looking at the actual contents of the package. Once that's done we'll have a good look around the motherboard to cover the location of all those important connectors while also covering some of the main features. Once that's done, we'll check out the BIOS and we'll also do something a little different today and cover the new Touch BIOS that GIGABYTE has been heavily promoting.
Once we've done that, we'll cover the overclocking potential we managed to achieve with the board and also talk a little about GIGABYTEs "QuickBoost" feature before getting into the performance side of things.
So with that all said and done, let's not delay any longer and get stuck into the package of the GIGABYTE Z68X-UD7-B3 to see exactly what's going on.
The Package
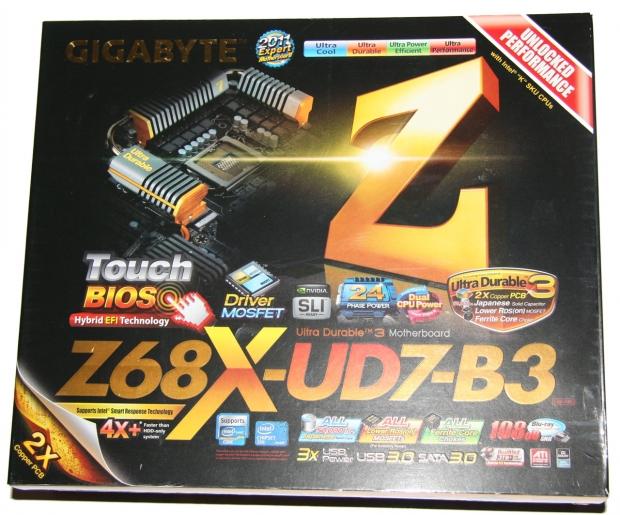
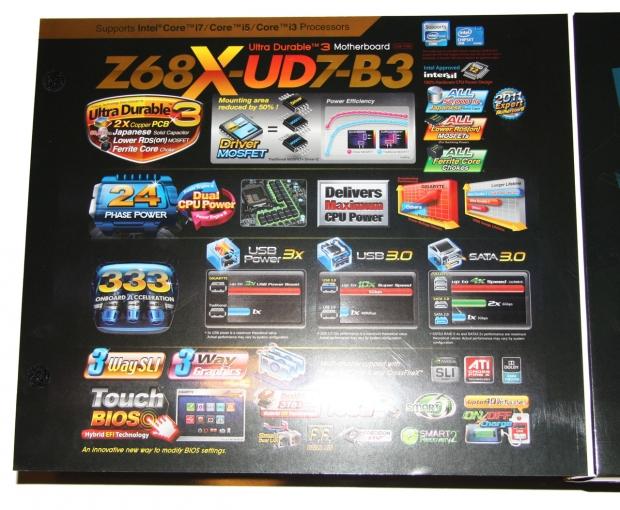
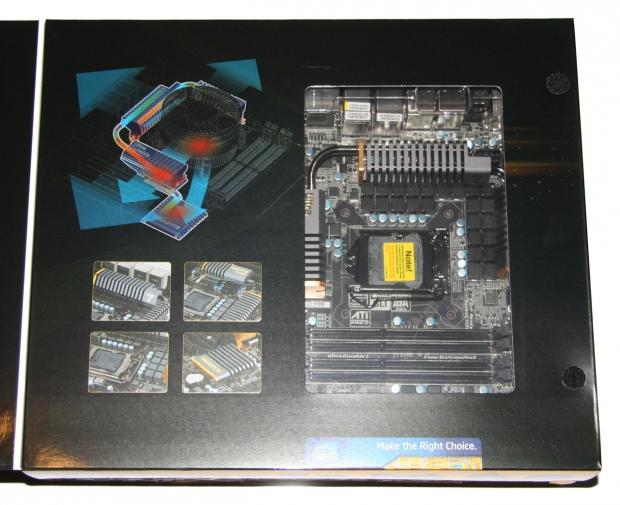
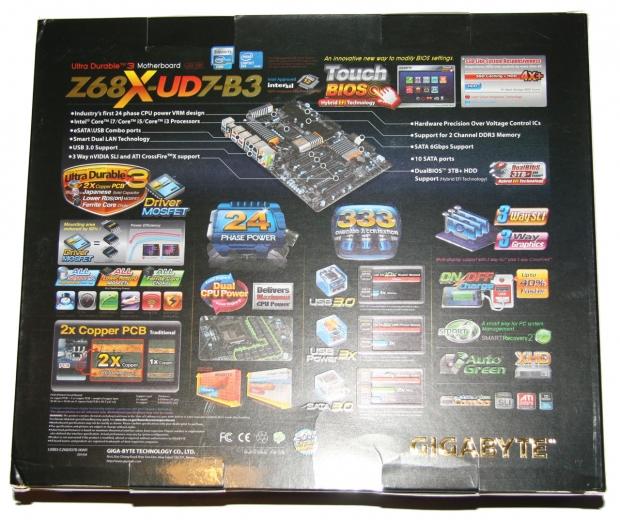
In typical GIGABYTE fashion, the Z68X-UD7-B3 box is big and has an absolute wealth of information. Like a book, you can flip open the front and see not only part of the board, but also a diagram as to how the cooling system works and just a bunch more information in relation to the features that are offered on the board.
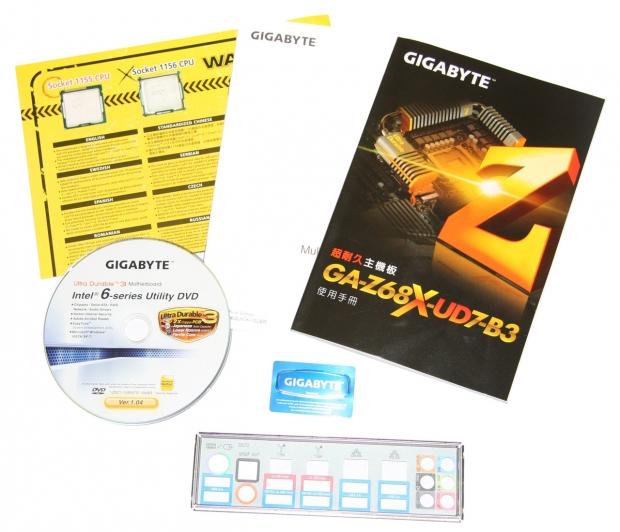
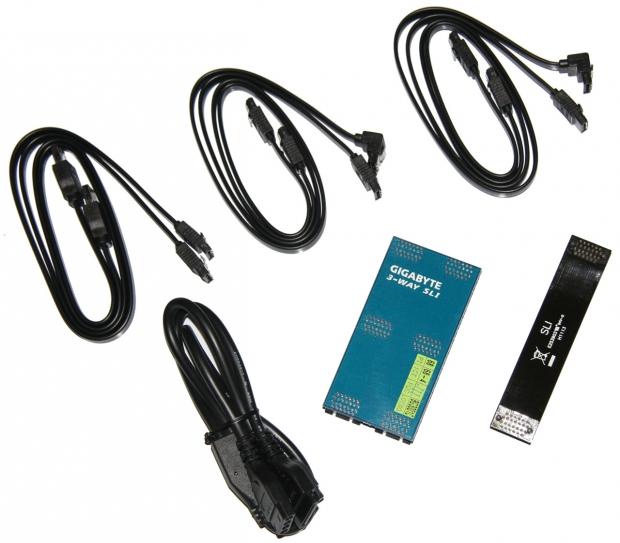
Inside the box we're pretty stacked when it comes to the bundle. We've got the normal stuff like manuals, driver CD and I/O shield. On the SATA cable front we've got four along with two SATA to eSATA cables. Along with that, we've also got an eSATA power connector and two SLI bridges; one a 3-Way SLI one, the other just an extended bridge.
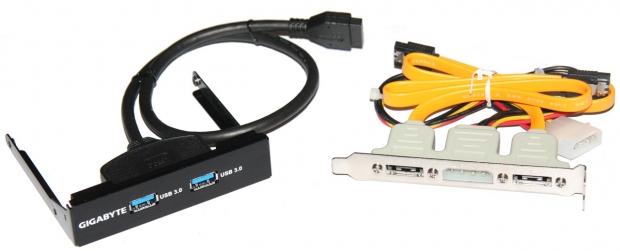
On top of all that, we've got an eSATA bracket on the right and a dual port, 3.5" USB 3.0 plate that can be installed in the front of your case. Clearly this is one of the larger bundles we've seen to date on the Z68 platform.
The Motherboard
The GIGABYTE Z68X-UD7-B3 is a great looking board; the all black PCB and black connector setup looks fantastic with that gunmetal grey heatsink setup running down the middle with little bits of gold seen throughout. From top to bottom this is just a good looking board.
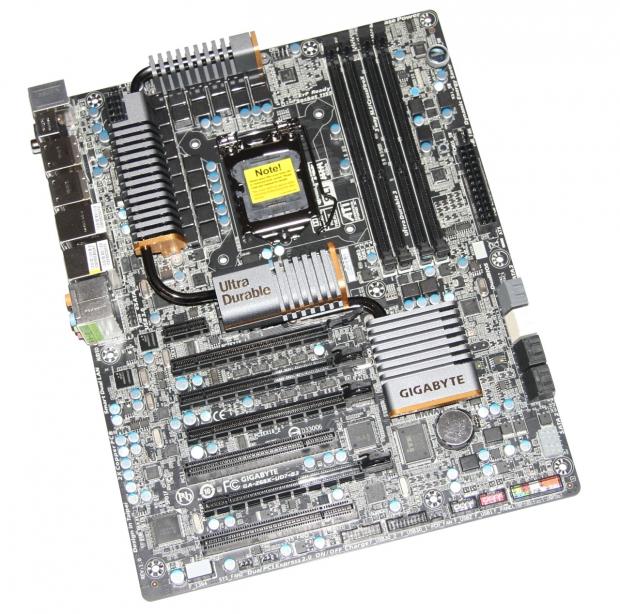
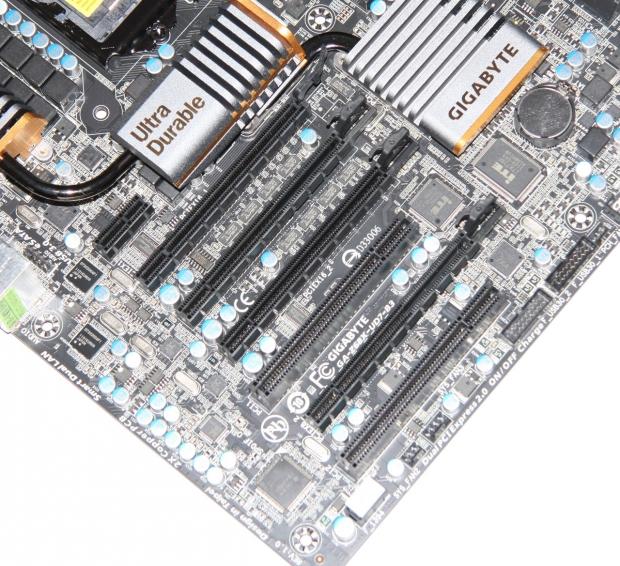
Looking at the expansion setup, you've got a really strong setup for people who are interested in going down the multi GPU path. Alongside two legacy PCI slots and a single PCI-E 1x slot, we have four PCI-E 16x ones. Like all our other Z68 boards, though, these don't all run at 16x.
Unlike other Z68 boards, though, GIGABYTE has chosen to include the NF200 chip which gives us some great options for people who want to go down the multi card route. If you use the top slot and the third slot, both cards will run at 16x. This differs to all other Z68 boards we've looked at that will run only at 8x when two cards are installed.
If you install a third card in the final 16x slot, you will have a 16x / 8x / 8x setup. Again, comparing to other Z68 boards which if supporting three VGA cards would run at 8x / 8x / 4x. If you want to go down the Z68 path with multi GPUs, this board is looking like the one to buy. Let's continue looking around, though.
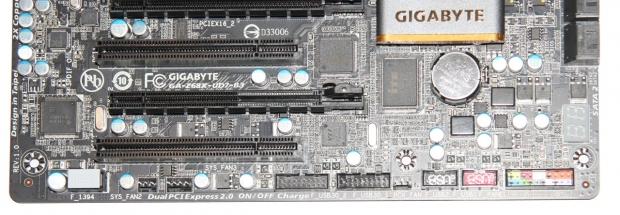
Moving away from the expansion side of things, we can move to the bottom of the board. Here we've got an absolute bucket load of headers. Starting from the left, we've got 1394 FireWire, two fans, two USB 3.0, another fan, two USB 2.0 and our main system header. Just above that final header, we can also see our debug display which will help troubleshoot any problems you're having.
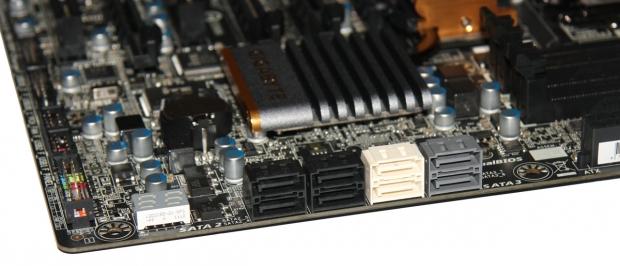
Just around the corner, we can see the header again and next to that we've got eight SATA ports. We've got four SATA2 and four SATA3. The black ports are SATA2 running off the Z68, while the white also run off the Z68, but are SATA3. As for the grey, they're also SATA3, but use the Marvell 88SE9128 chip. You'd only move away from the Intel chip if you needed to make use of a third or fourth SATA3 drive.
The Motherboard Continued
As we continue to move around the board, we come to the top corner where we found our four RAM slots. The GIGABYTE Z68X-UD7-B3 supports up to 32GB of DDR3 at speeds of 2133 / 1866 / 1600 / 1333 / 1066MHz DDR.
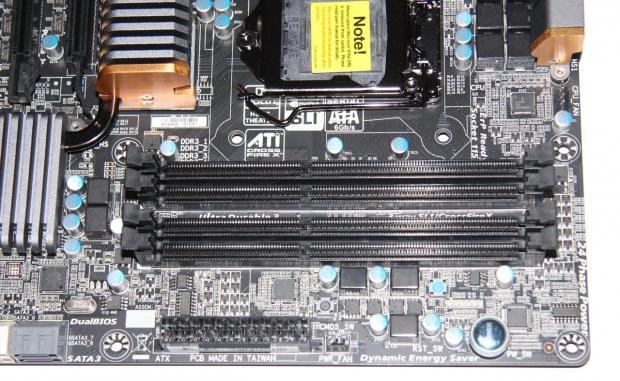
Just below our RAM slots we can see our main 24-Pin ATX power connector and next to that we have a fan header. Above the fan header you can also see a little black button; this is if you need to reset the CMOS. Just to the right of the corner you can see a blue button; this is a power button which lets you turn the system on and off without the need to plug in the main front panel header.
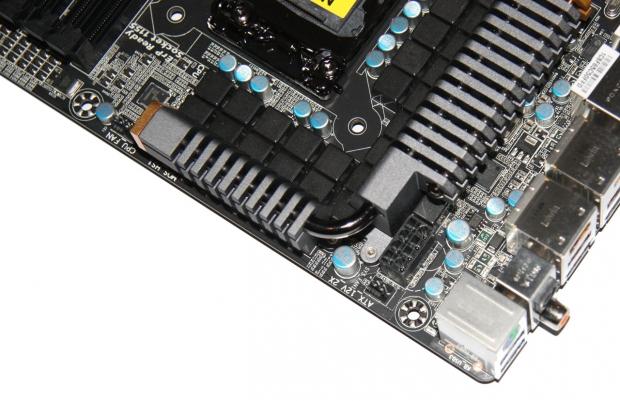
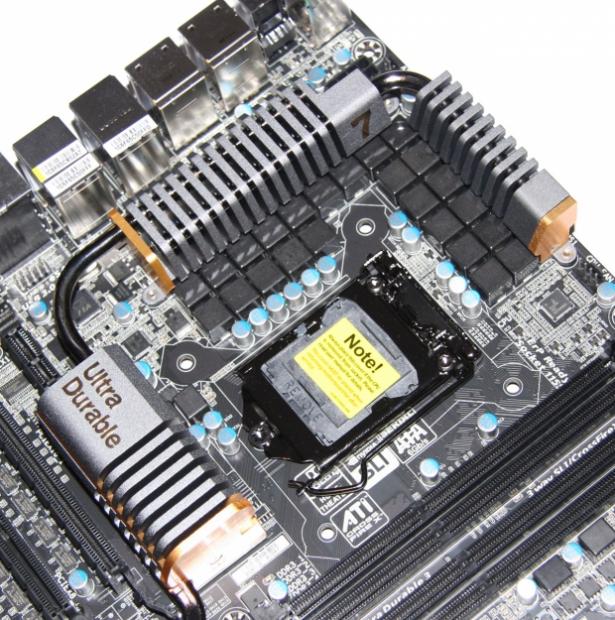
As we move around to the main CPU area, we can see our 8-Pin CPU power connector tucked in the back corner with another fan header below it. Around the CPU area itself we can see the great looking heatsink GIGABYTE has got going on. As you would expect with any high end GIGABYTE board, there's plenty of room around here for installing your large heatsinks.

The I/O side of things is pretty busy. Starting from the left, we've got a combo PS/2 port and two USB 3.0 ports. Moving over, we've got both Optical and Coaxial audio outputs, we've then got a 1394a FireWire port, USB 2.0 and eSATA / USB 2.0 combo port powered by the Marvell 88SE9128 chip. Next to that we've got another FireWire port, USB 2.0 and eSATA / USB 2.0 combo port. Jumping across to the next bit, we've got two Gigabit networking ports and four more USB 3.0 ports. At the very end we've got our standard audio jack layout powered by the Realtek ALC889 codec.
USB 3.0 is offered via two Renesas D720200 chips and two VIA CL810 hubs. FireWire comes thanks to the T.I. TSB46AB23 chip while our two Gigabit ports are powered by two Realtek TRL8111E chips.
BIOS and Touch BIOS
BIOS
If you've been reading a lot of P67 or Z68 reviews over the past few months and seen all those flashy BIOS pictures, you may find yourself a little let down by the "traditional" BIOS setup. Using the Award layout we've grown to know, you're not going to find anything too out of the ordinary when it comes to the whole BIOS.
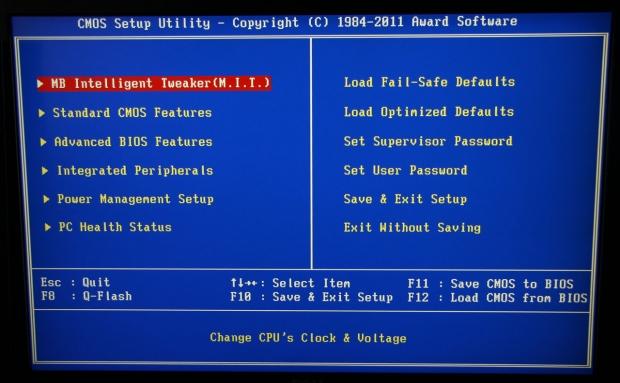
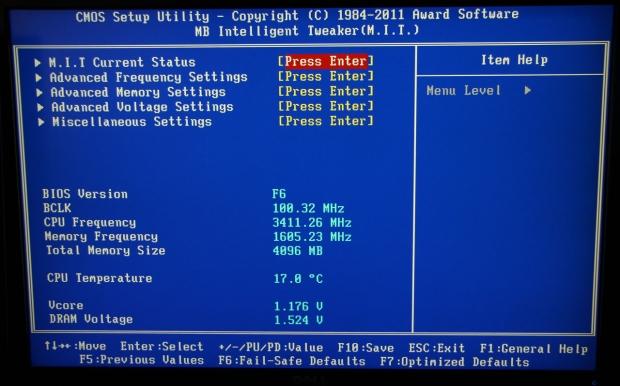
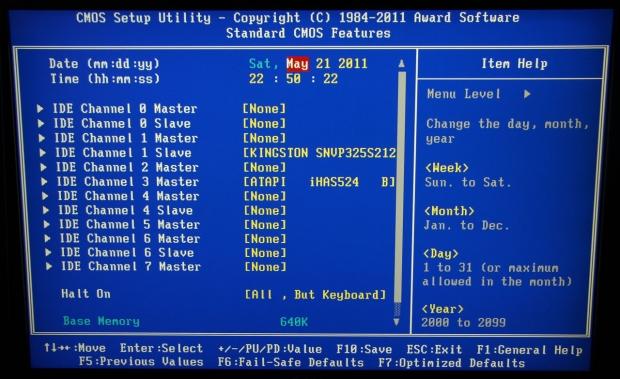
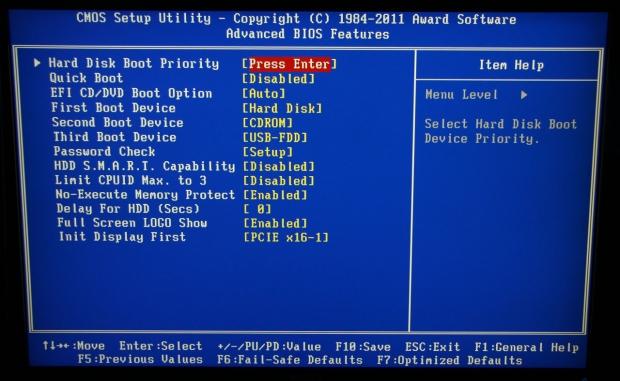
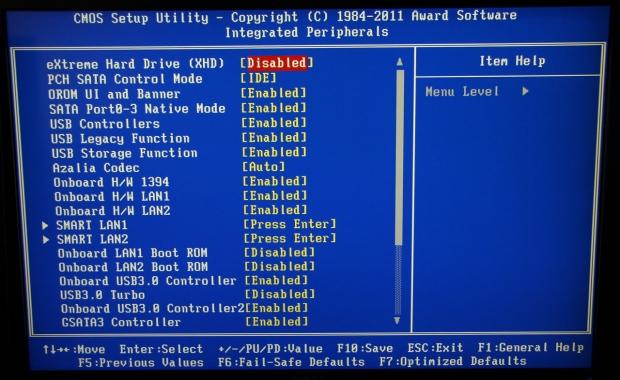
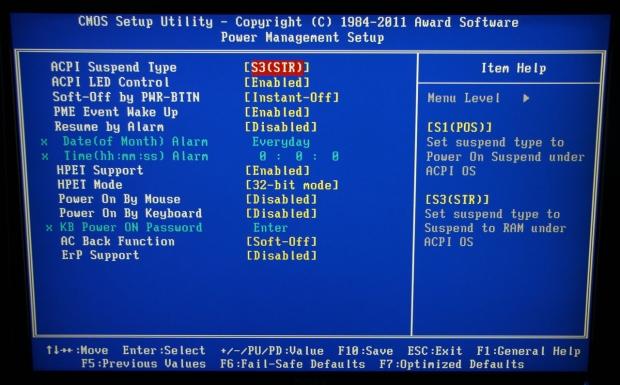
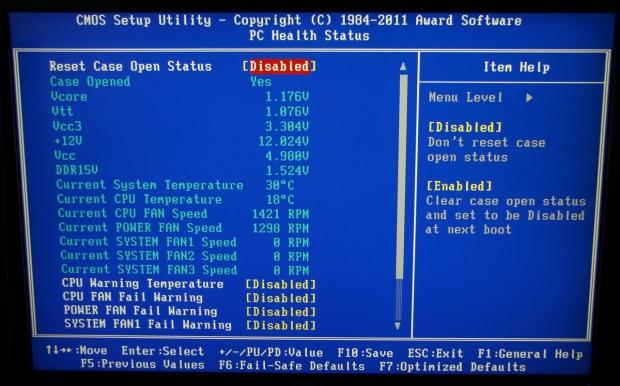
Really, there's absolutely nothing wrong with the BIOS, but over the last few months it's been nice to see a bit of color in what has traditionally been a pretty boring part of a motherboard.
The thing is, GIGABYTE has taken a bit of a different approach to the whole colorful BIOS thing, introducing "Touch BIOS" not that long ago.
Touch BIOS
To be completely honest, I found myself a little skeptical about Touch BIOS. Initially I didn't do a lot of research on it and thought that I'd just wait 'till I had my hands on a board that could make use of it. I wasn't sure where the "Touch BIOS" was going to be instituted; in Windows or at the actual BIOS level. Also, the "Touch" bit makes you think it's really only designed for "Touch" Screens.
When I finally setup the Z68X-UD7-B3 and installed all the usual stuff along with the latest version of "Touch BIOS", I discovered it's done in Windows. Instantly I thought to myself it was just another halfhearted piece of software that would let you adjust some things that can be done in the BIOS.....how wrong I was, though!
"Touch BIOS" is essentially your BIOS in Windows, and not just your BCLK / Multiplier / Core Voltage, but everything that's in the BIOS. The integration into Windows also means that the mouse is extremely easy to use. The mouse in your standard EFI BIOS just never feels as smooth. Of course, in Windows you've got drivers installed, mouse sensitivity set correctly and all that jazz.
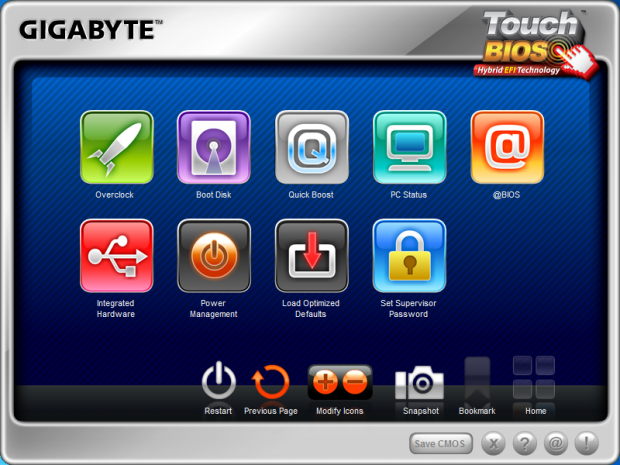
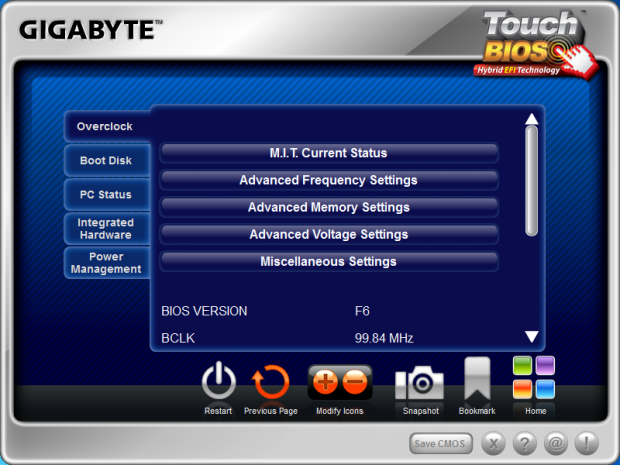
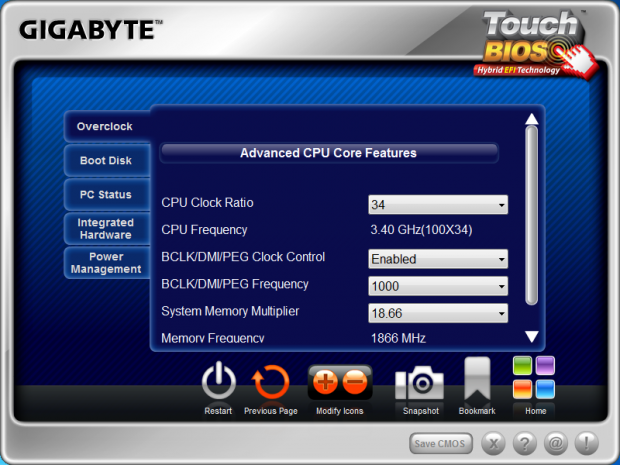
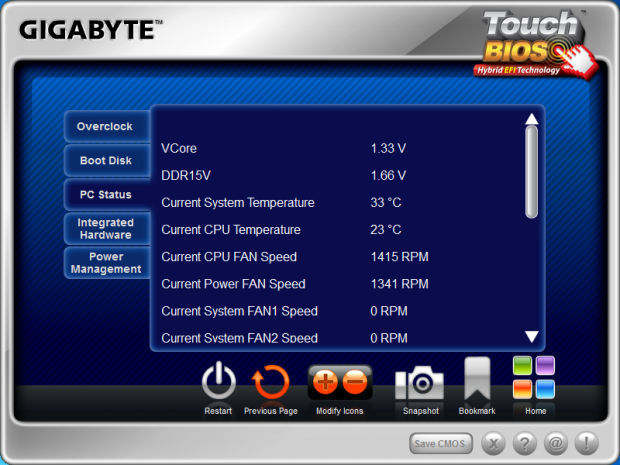
We've seen a lot of companies integrate the EFI BIOS system in many ways. The "Touch BIOS" system is kind of the best of both worlds as you can opt for that traditional BIOS that you've become so accustomed to if you want, or you can opt for this full on graphical interface within Windows.
Something else I like is that GIGABYTE are listening to feedback. My understanding is that initially there was just text at the main screen; a few people said it would be nice to have words corresponding to what each section is - "Overclock", "Boot Disk" etc. So what did GIGABYTE do? They added it to the latest version.
For me, the only thing I can really think that I'd like to see is to have the ability to make the window longer and not have the need to scroll if you're on a monitor with a higher resolution. Apart from that, though, "Touch BIOS" does a good job at offering us a new way to edit our BIOS options.
Test System Setup and Overclocking
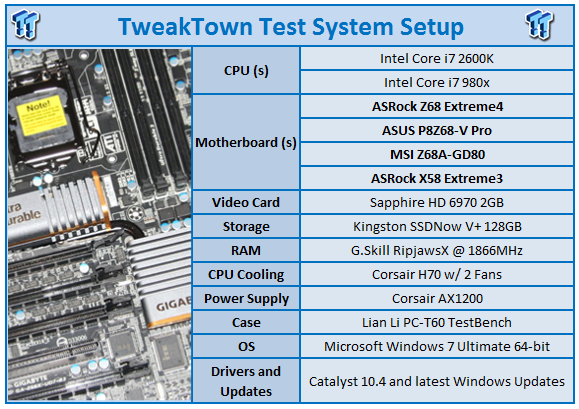
We would like to thank the following companies for supplying and supporting us with our test system hardware and equipment: Intel, ASRock, Kingston, Mittoni, Noctua and Corsair.
Compared to recent Z68 motherboard reviews, there's nothing too different going on here today. When it comes to boards we'll comparing the GIGABYTE against, we'll be seeing how it goes against Z68 boards from ASUS, MSI and ASRock while also including our ASRock X58 board in for good measure.
When it comes to overclocking the GIGABYTE Z68X-UD7-B3, there's a few options. You can of course go down the more traditional path in the BIOS and adjust all your voltages etc. or you can use EasyTune6 and use the "QuickBoost" feature which does as the name suggests, gives you a quick boost.
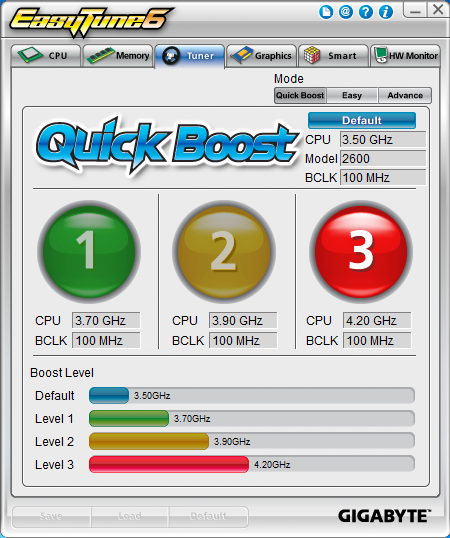
Under "QuickBoost" we have three options; 1, 2 or 3. And below each you can see the CPU speed you'll be at while also seeing the BCLK. Since the BCLK doesn't change, the CPU speed is increased via the multiplier. We opted to go straight to 3 and do some testing.
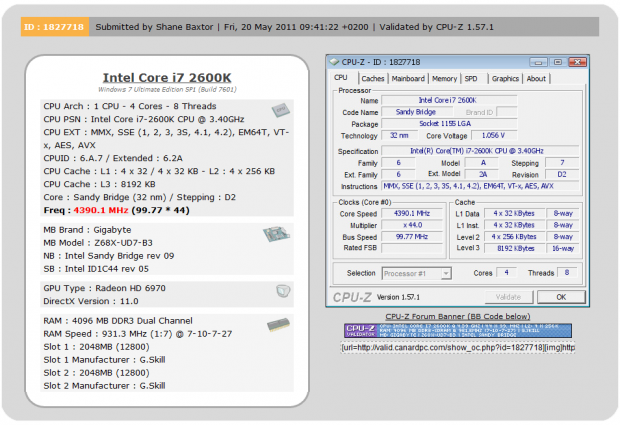
With Intel SpeedStep you'll get up to 4.39GHz when your CPU is under load and running the GIGABYTE Z68X-UD7-B3 as you would expect didn't have any problems running at this speed. "QuickBoost" does exactly what it's supposed to, it gives you a quick boost. It's easy to use and you can find yourself staring down the barrel of an extra GHz with no effort.
Getting into the BIOS, we started to mess around with our multiplier, BCLK and voltage to see what we could do with our trusty 2600k.
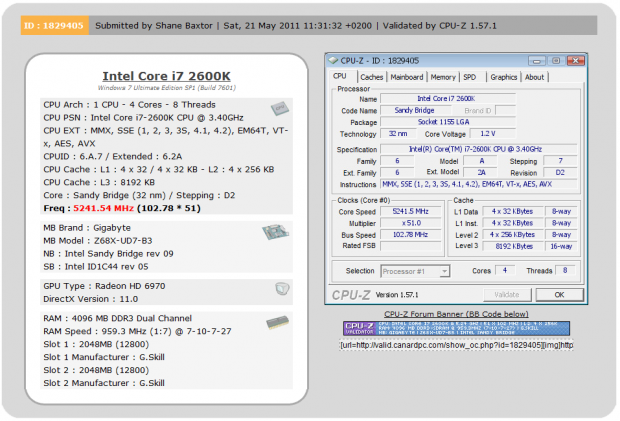
What we ended up at as you can see above is 5241MHz or 5.24GHz. This was achieved with a 51x multiplier and our BCLK set to 103. This isn't the highest overclock we've achieved, but it's only just behind the highest which sits at around 5.36GHz. As long as we're above the 5GHz mark, though, we consider ourselves happy. The Z68X-UD7-B3 also manages to offer a couple of extra features that we haven't seen in other Z68 boards we've looked at.
Before we get onto the testing side of things, it's worth noting that if you wanted to play around a bit in the BIOS to overclock, GIGABYTE has done a video on doing a quick OC. You can check out the P67A-UD3R Quick OC and Vdroop test video on YouTube. While it's based on the chipset beforehand, the BIOS itself is very similar and it will help point you in the right direction if you want to mess around in the BIOS yourself.
Let's get started!
CPU Benchmarks
AIDA64
Version and / or Patch Used: 1.00.1035BETA
Developer Homepage: http://www.aida64.com
Product Homepage: http://www.AIDA64.com
Buy It Here
Replacing Everest in our labs is AIDA64. This new testing suite is from the core development team from Lavalys and continues that tradition. The guys have thrown in better support for multithreaded CPUs as well as full 64 bit support. We use this to test memory and HDDs for now, but may find ourselves opening this up to other areas of the motherboard.
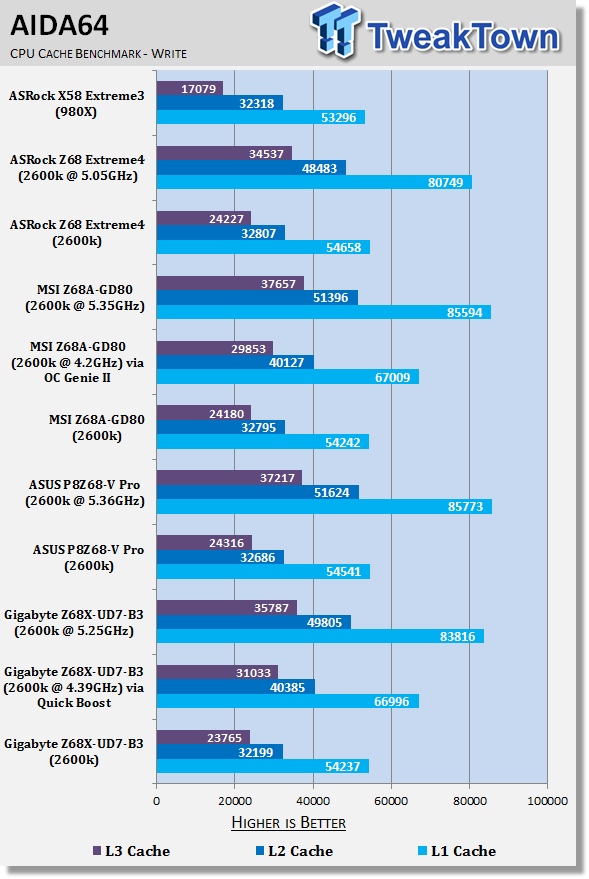
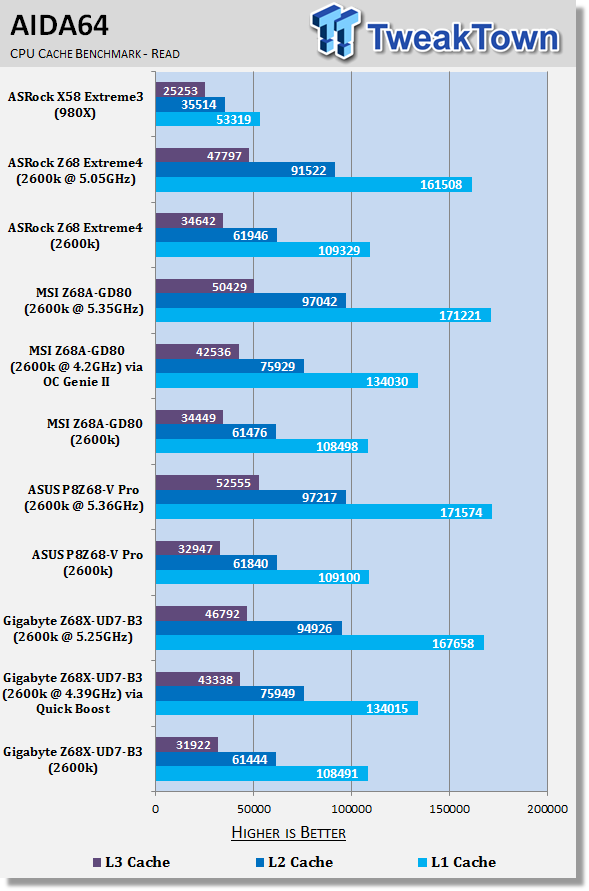
At stock the GIGABYTE offering performs in line with other Z68 boards. As we up the clock via QuickBoost and manually, you can see the strong gains we get.
CPU Benchmarks Continued
HyperPi 0.99
Version and / or Patch Used: 0.99
Developer Homepage: www.virgilioborges.com.br
Product Homepage: www.virgilioborges.com.br
Download It Here
HyperPi is a front end for SuperPi that allows for multiple concurrent instances of SuperPi to be run on each core recognized by the system. It is very dependent on CPU to memory to HDD speed. The faster these components, the faster it is able to figure out the number Pi to the selected length.
For our testing we use the 32M run. This means that each of the four physical and four logical cores for the i7 and the four physical cores of the i5 is trying to calculate the number Pi out to 32 million decimal places. Each "run" is a comparative to ensure accuracy and any stability or performance issues in the loop mentioned above will cause errors in calculation.
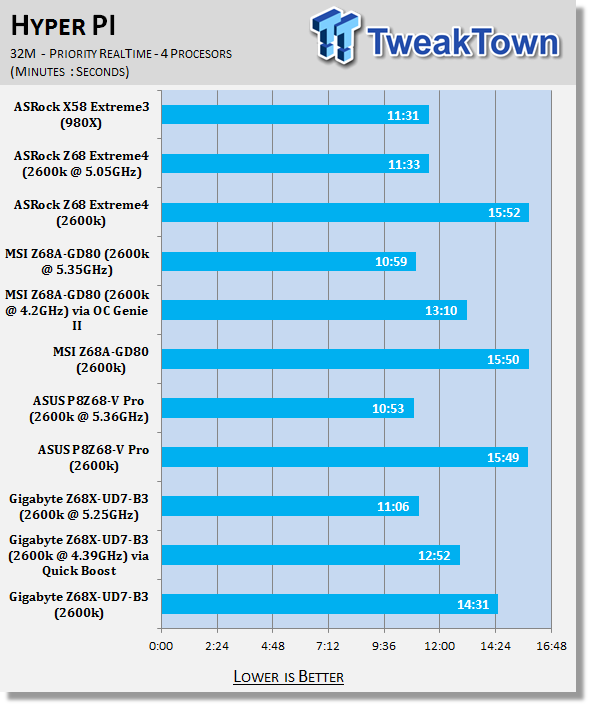
Under HyperPi the GIGABYTE offering performed very strong at stock; better than other boards we've tested at stock actually.
AutoGK
Version and / or Patch Used: 2.55
Developer Homepage: http://www.autogk.me.uk/
Product Homepage: http://www.autogk.me.uk/
Download It Here
AutoGK stands for Auto Gordian Knot; it is a suite of transcoding tools that are compiled into an easy to install and use utility. It allows you to transcode non-protected DVDs and other media to Xvid or Divx format. For our testing purposes we use a non-DRM restricted movie that is roughly 2 hours in length. This is transcoded to a single Xvid AVI at 100% quality.
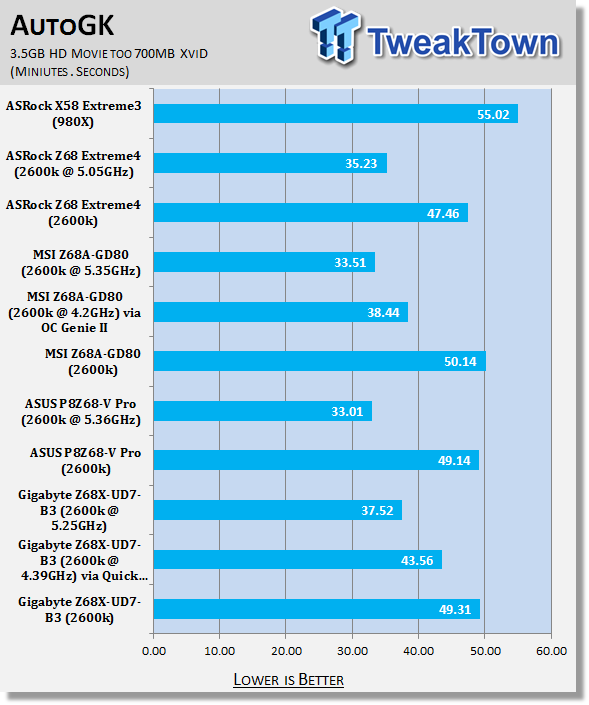
AutoGK is great at showing us the difference an overclock makes in a real world situation, in this case encoding.
Storage Benchmarks
AIDA64
Version and / or Patch Used: 1.00.1035BETA
Developer Homepage: http://www.aida64.com
Product Homepage: http://www.AIDA64.com
Buy It Here
Replacing Everest in our labs is AIDA64. This new testing suite is from the core development team from Lavalys and continues that tradition. The guys have thrown in better support for multithreaded CPUs as well as full 64 bit support. We use this to test memory and HDDs for now, but may find ourselves opening this up to other areas of the motherboard.
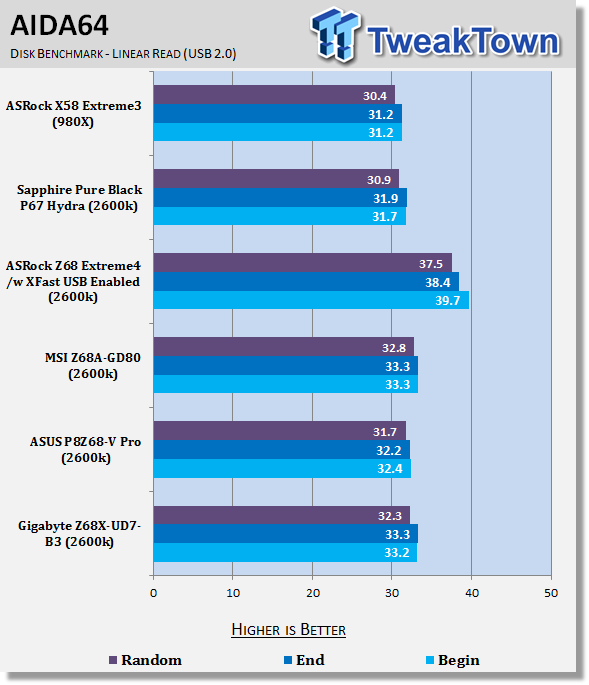
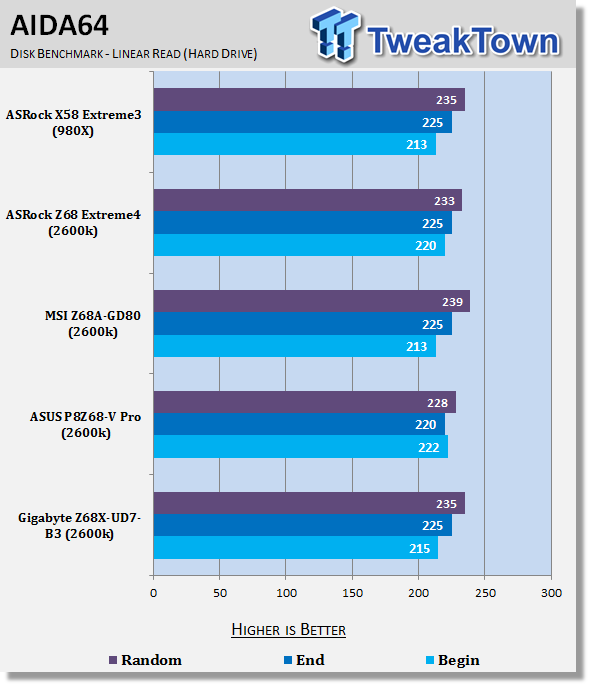
Under Storage we see that USB 2.0 and SSD performance falls in line with our other setups which is exactly what we would expect.
Memory Benchmarks
Sisoft Sandra
Version and / or Patch Used: 2011
Developer Homepage: http://www.sisoftware.net
Product Homepage: http://www.sisoftware.net
Buy It Here
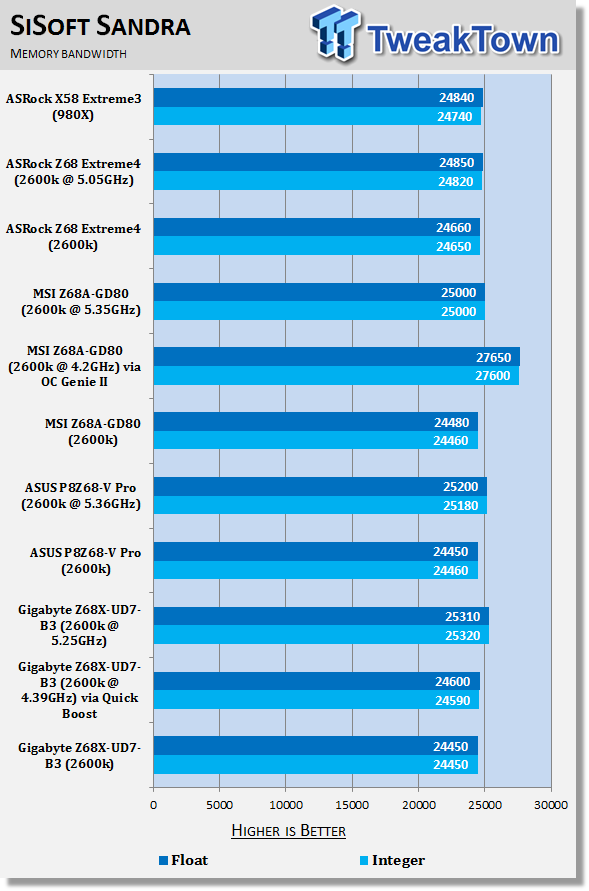
You can see for the most part that SiSoft Sandra puts all our platforms at a similar level of performance. It really isn't 'till we look at them under AIDA64 that we see them begin to separate.
AIDA64
Version and / or Patch Used: 1.00.1035BETA
Developer Homepage: http://www.aida64.com
Product Homepage: http://www.AIDA64.com
Buy It Here
Replacing Everest in our labs is AIDA64. This new testing suite is from the core development team from Lavalys and continues that tradition. The guys have thrown in better support for multithreaded CPUs as well as full 64 bit support. We use this to test memory and HDDs for now, but may find ourselves opening this up to other areas of the motherboard.
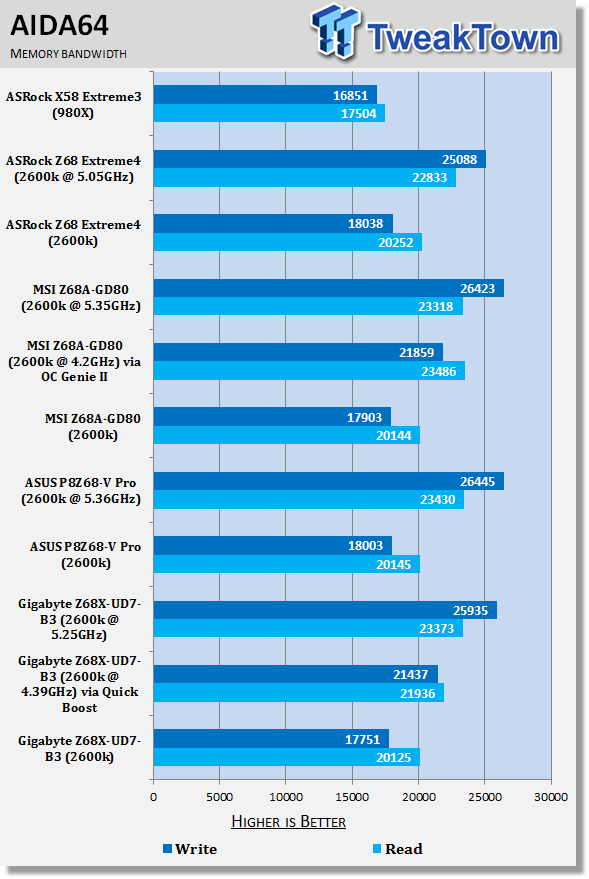
Like we've seen all along, at stock the GIGABYTE Z68X-UD7-B3 performs in line with the other platforms we've tested. As we start to overclock, though, you can see the strong increase in memory performance, especially in write speeds.
Gaming Benchmarks
3DMark 11
Version and / or Patch Used: 1.0
Developer Homepage: http://www.futuremark.com
Product Homepage: http://www.3dmark.com/3dmark11/
Buy It Here
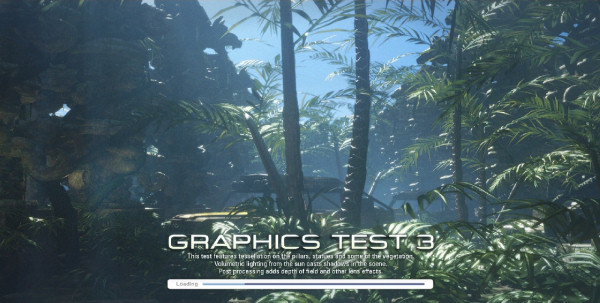
3DMark 11 is the latest version of the world's most popular benchmark. Designed to measure your PC's gaming performance 3DMark 11 makes extensive use of all the new features in DirectX 11 including tessellation, compute shaders and multi-threading. Trusted by gamers worldwide to give accurate and unbiased results, 3DMark 11 is the best way to consistently and reliably test DirectX 11 under game-like loads.
Aliens vs. Predator
Version and / or Patch Used: Standalone Benchmark
Timedemo or Level Used: Built in Benchmark
Developer Homepage: http://www.rebellion.co.uk/
Product Homepage: http://www.sega.com/games/aliens-vs-predator/

Aliens vs. Predator is a science fiction first-person shooter video game, developed by Rebellion Developments, the team behind the 1999 original PC game, and published by Sega for Microsoft Windows, the PlayStation 3 and the Xbox 360. The game is based on the Alien vs. Predator franchise, a combination of the characters and creatures of the Alien franchise and the Predator franchise. There are three campaigns in the game, one for each race/faction (the Predators, the Aliens and the Colonial Marines), that, while separate in terms of individual plot and gameplay, form one overarching storyline.
Following the storyline of the campaign modes comes the multiplayer aspect of the game. In this Multiplayer section of the game, players face off in various different gametypes in various different ways.
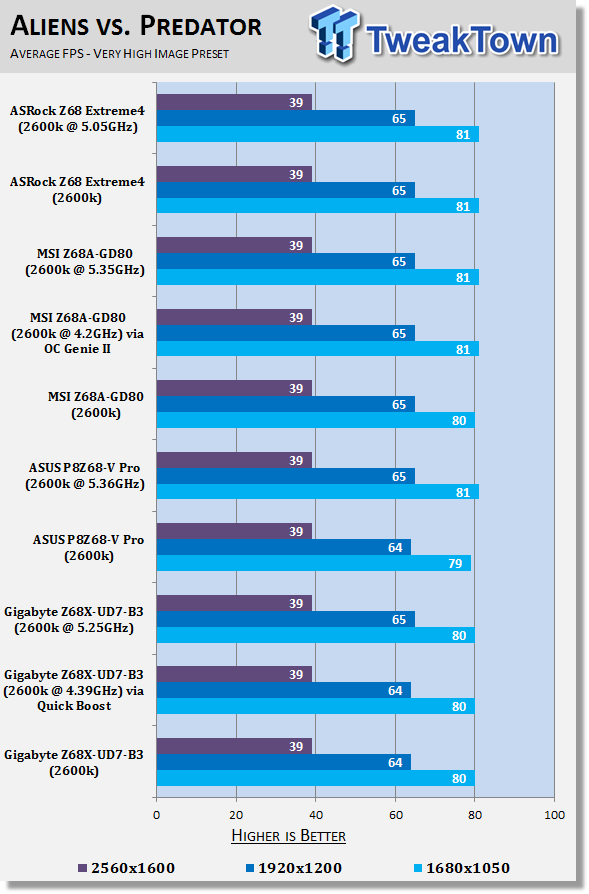
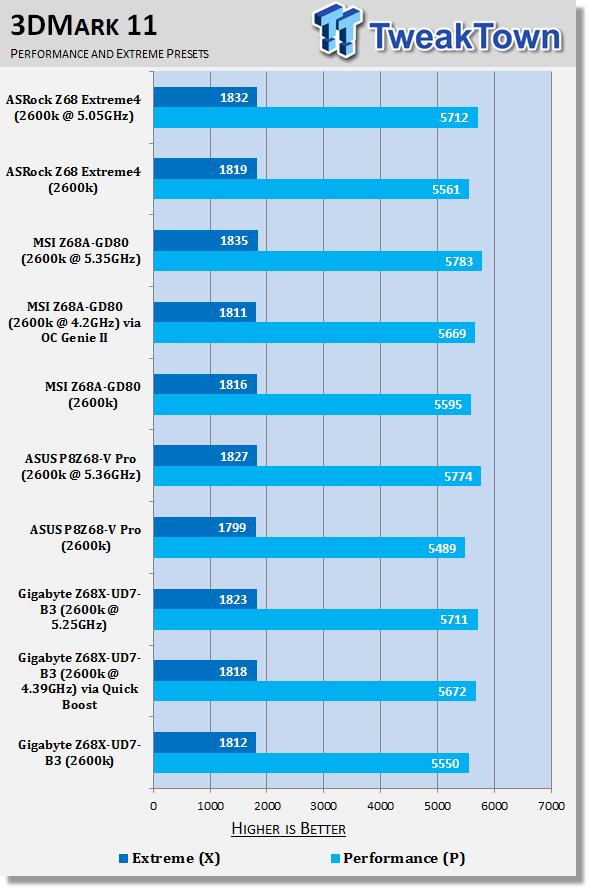
When we look at Aliens vs. Predator performance we can see that there's barely anything between all the platforms. Looking at 3DMark 11, you can see as we increase the CPU speed, our P preset increases, but not a lot of change at the higher resolution X one.
Temperature and Power
Core Temperature
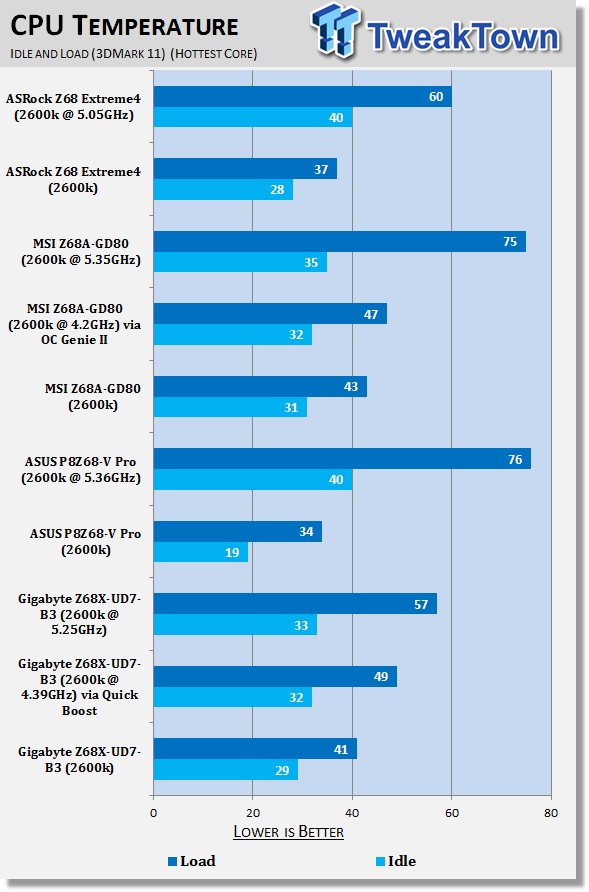
At our highest overclock our CPU ran very cool, much cooler than our other options at maximum overclock. There's no doubt that around the CPU area there would be less heat because of the extremely good heatsink setup GIGABYTE is using.
Power Draw Tests
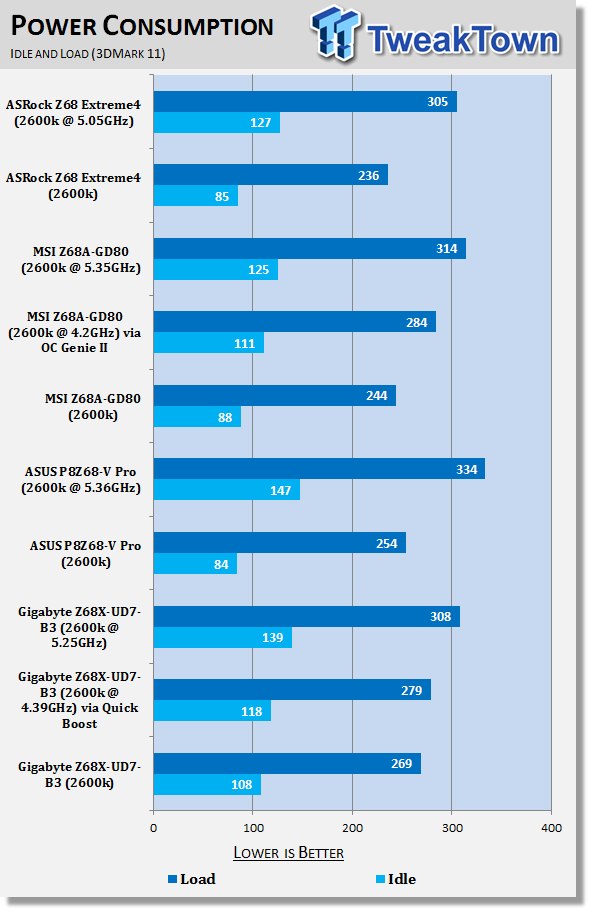
At idle the Z68X-UD7-B3 does draw a little bit more power, but not a huge amount. It's not a huge surprise, though, as it's a very feature rich board and there's just more going on with it.
Final Thoughts
At $349.99 US the GIGABYTE board is the most expensive Z68 based board being sold on Newegg at the moment. The next cheapest below that is $269.99 which is also a GIGABYTE motherboard. It isn't 'till $239.99 that we see another brand motherboard come in to the picture and that's the MSI Z68A-GD80 we looked at.
So, is the Z68X-UD7-B3 worth the extra coin? Absolutely! Over the last few months we've seen companies implement the Lucid Hydra chip which gives people the ability to do stuff like run an AMD and NVIDIA card together, or different series. To me, it feels like a bunch of marketing mumbo jumbo and a feature that most people won't use. What it does, though, is add a chunk of extra money to the board.
GIGABYTE has skipped using something like that and instead opted for the NF200 chip which is just a great addition to any performance motherboard based on a native 8x / 8x PCI-E setup when SLI or CrossFire is used. Instead, when we make use of SLI or CrossFire on the Z68X-UD7-B3 we get 16x / 16x. If you want to throw a third card into the mix, we get 16x / 8x / 8x; much more attractive than the 8x / 8x / 4x setup other Z68 boards offer if supporting a triple VGA setup.
If you're not going down the multi VGA path, though, is the Z68X-UD7-B3 still worth it? The value of the board isn't as strong, but it's still there. It's still an extremely feature rich board and an extremely good looking one at that. The thing is, though, the Z68X-UD5-B3 at $269.99 is a great option as well.
With nine boards at Newegg for GIGABYTE, two more than ASRock, ASUS and MSI are offering combined, there's a huge price range. Before we wrap everything up, though, GIGABYTE has removed a feature that we've seen on all our other Z68 boards. If you remember the I/O side of things, you may've seen no display connections. GIGABYTE doesn't offer the onboard video feature we're seeing with other Z68 boards on the UD7; there's actually a few boards it isn't included on in the GIGABYTE flock. Saying that, there's also a number of boards GIGABYTE offer that do have it, so keep an eye out if it's something you're after.
I find the onboard video a little wasted, though, on these $180+ US boards. Surely if you're going to pay that much for a higher end board, you're going to get a video card with it. Sure, you lose the Lucid Virtu feature, but both AMD and NVIDIA offer hardware encoding via Stream and CUDA. The technology behind Lucid Virtu while something new to the Intel platform, isn't something new.
While people continue to carry on about the Sandy Bridge platform not being hardcore enough because in SLI / CrossFire your PCI-E slots run at 8x / 8x, you can now go "Well mine runs at 16x / 16x, and I get 5GHz on my i7!"
The X58 is still a great platform, but it's been around for so long now that it's nice to play with something newer. You can have that ability with the Z68X-UD7-B3 without having to deal with the 8x / 8x VGA setup that is associated generally with the Sandy Bridge platform.
If you're going down or thinking about going down the multi GPU path, the Z68X-UD7-B3 is a stand out board. If you're not, though, the massive feature list, strong package and great looks make it a dream option for single GPU users as well.
While pricier than other Z68 boards, the value for money is present in a big way because it does offer more than cheaper boards. For people who want an extremely strong all round Z68 board, the GIGABYTE Z68X-UD7-B3 is a fantastic option.

