


Introduction
First of all, I would like to sincerely apologize for the delay in getting this review to airing to everyone in the Lian-Li and LanCool teams. These guys are all top notch people and very patient.
With that out of the way, let's get back to the task at hand and explain a bit about who LanCool is. Lian Li, as we all know is a major competitor in the chassis market and is renowned for the build quality and ease of use from many tool-less designs incorporated in their chassis. Lian Li saw a need to supply buyers with more mid range chassis' and LanCool was born with the intension of diversifying what they would offer end users.
LanCool offers a few mid tower chassis' and within those is a series named Dragon Lord, of which the case we are looking at today is part of. At LanCool's site there are seven cases that carry the Dragon Lord series name. All of these have the same basic chassis design, just each individual case has an option or two the others don't, making each chassis in the series unique.
Today we are looking at the PC-K62 which LanCool had sent me as a pre-release version. While the packaging may have changed a bit and an instruction booklet may be included in yours, the chassis is as complete as it is going to get and you will see this same chassis with all the same options as I am about to show. Let's get a look at the LanCool PC-K62 and see just what sort of features and options this budget minded chassis has to offer.
Specifications, Availability and Pricing

Starting with the basics, the PC-K62 is a full steel chassis with a plastic front bezel that is well ventilated with mesh removable panels. Unlike some of the others in the Dragon Lord series, the PC-K62 does in fact come with a side panel window for those who love to see inside their case during operation. The LanCool is painted inside and out a nice flat black and has holes in the motherboard tray for both wiring and access to the CPU backplates. From what I have seen so far, LanCool packs most of today's case buyers "must haves" into this chassis.
Cooling in the PC-K62 is accomplished with three 140mm blue LED fans that flood the inside of the chassis in a bright blue glow. One of the 140mm fans is placed in the bottom of the front to induce colder air into the chassis, while two 140mm fans and a 120mm fan pull the air out the top (140mm) and the rear (120mm). They not only allow for great air movement inside the chassis, but the 1000RPM speed of these fans keeps them at a very low hum. LanCool made a good compromise between "bling" and fan efficiency with the supplied fans.
There are only thirteen e-tailers that pop up in Google shopping currently, but as I said before this chassis is for the budget minded buyers. The highest price I saw this chassis listed for was just under $130 plus shipping. This places it right smack in the middle of most of the mid tower choices today based on price alone. Looking over at Newegg, I found the PC-K62 for 119.99 U.S. Dollars plus shipping to get one delivered to your door. Let's move on and see what the LanCool PC-K62 offers for its budget pricing.
Packaging
The Package

LanCool shipped my PC-K62 in a box for another chassis with tape and black marker designating the "62". LanCool makes good use of the room by placing the Dragon Lord logo, an image of the chassis and windows of the key features incorporated into the design.

Both sides of the package carry the red and black background, as did the front. Both display all the same information, even down to the bilingual specifications chart.

Even though the rear of the packaging is the same, I want to show just how bad USPS handled this package, that way we get a good idea of the inner packaging's ability to allow the PC-K62 to arrive intact and undamaged.

Opening the end of the box and sliding out the chassis shows that LanCool opted for Styrofoam end caps to protect the PC-K62 along with the typical plastic bag for preventing scratches.
The LanCool Dragon Lord PC-K62 Advanced Mid Tower Case

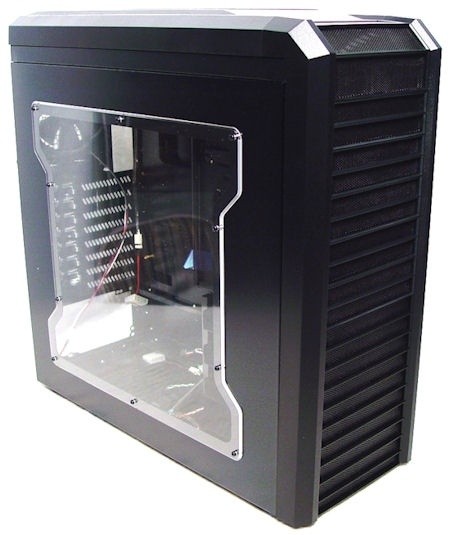
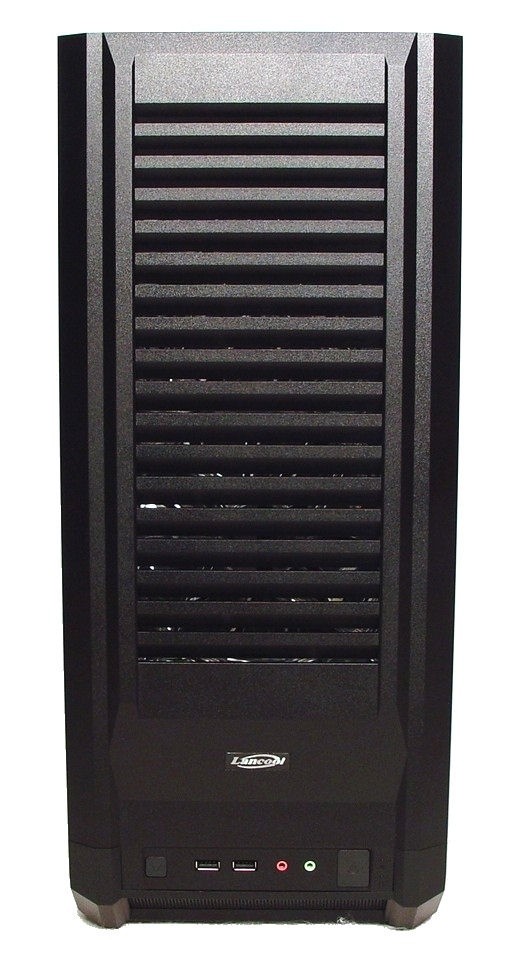
The front of the PC-K62 is well ventilated with all mesh clip in panels. This panel is all plastic and with the large edge rails, it is slightly reminiscent of the Antec 900's front, although LanCool angled the top to match the top panel better and use bold horizontal cross bars to break up the mesh.

Spinning the chassis to the left, you can see this chassis differs from the box image. My sample, the PC-K62 has a window in the side to allow almost a complete view of the internals. Speaking of the internals, we get our first peek here of the all-black painted guts. There is a small issue here. Looking closely, there is a tiny stress crack in the bottom of the window. Not sure if it's due to the screw stressing the hole, or if it was from one of the numerous whacks it took in shipping.

The rear of the LanCool chassis stays in the all-black theme. You can see the top panel stands about 1.5" taller than the chassis. This is to house the 140mm fans and not encroach on interior space. Moving down, we run into the rear I/O hole next to the 120mm rear exhaust fan. LanCool even adds grommets that allow for ½" tubing to pass into and out of the rear of the chassis. Continuing down, there are the eight vented expansion slots, next to which is the screw-less VGA clamping systems mounting plate. That leaves us with the rather large hole at the very bottom for power supply installation.

Underneath the LanCool chassis you will find four rubber round stick on feet to keep the chassis off the table top to allow better airflow to get through the removable fan filter. This hole is to allow a PSU to be installed in the fan down position.
The top of the PC-K62 is louvered to allow the air to have an easy path to exit the chassis once the dual 140mm fans push it up. At the very front of the top (pictured at the bottom) are the front I/O connections.

Getting a little closer to the front I/O shows the LanCool name plate that is placed just behind the I/O. The front I/O consists of the reset switch, two USB 2.0 connections, microphone and audio out 3.5mm jacks and the power switch. To the far right are two LEDs that denote both power and HDD activity.
Inside The LanCool Dragon Lord PC-K62 Advance Mid Tower Case
Inside The LanCool Dragon Lord PC-K62 Advanced Mid tower Case

Since all the rear panel goodies should be fresh in your mind from the outside image, here's a look from the inside. Most notable is the same VGA locking system I had in my PC-B70, which I really like both its looks and functionality. Just above this mechanism you can see the padlock loop hanging off the back of the chassis for those who need to lock up their hardware. The last thing I want to cover here is the padded rails at the bottom that keep your PSU off the floor of the chassis. In case you put the chassis on the carpet, air can still be drawn into the PSU from inside the PC-K62.

The motherboard tray is set up from the factory ready to accept a full ATX motherboard. The stand offs are already there. Looking around the tray, you will find four wire management holes; two at the bottom, and two on the right side. Something found in a lot of the newer chassis' is the CPU cooler back plate access hole. A nice tray in my opinion for a budget builder's case!

Another look at the floor of the chassis shows a few things. One, there is a plastic rail placed to aide in containing all the PSU wires as they leave the PSU on their destinations to the appropriate component. The right side, or front of the chassis, allows for four 3.5" hard drives to be mounted in a screw-less fashion and slide into the rack. Lastly, we get a glimpse of the front intake 140mm fan.

Stepping back a bit allows the 5.25" drive bays to be seen. The top two have a more simplified screw-less mechanism than did my PC-B70, but the two included devices work just as well as the ones I had seen before and are just as simple to use. Just remove the front bezel and the correct front clip in vented panel, squeeze the screw-less mounts clip to unlock it, swing it left, slide in the drive and snap the lock back into place. The bottom three bays need the use of screws to mount drives in those.

Removing the rear panel gives a good look at the inside of the rear of the motherboard tray and just how you need to route the wires to get them where they need to go. From the outer edge of the support under the tray to the panel is just under ½" of room to route wiring.

Prepping for the installation, I removed the vented plastic front bezel. This allowed me to also gain access to the intakes fan filter that snaps in and out for easy cleaning. As far as removing the vented front sections, there is a tab on either side to release and they slide right out to allow optical drives to show through.
Accessories and Documentation

Starting with the largest piece, we have the lock down bar for the PSU. You can, and I advise you do, use the four screws normally used to install a PSU. LanCool makes sure it isn't going to go anywhere during transit. Next is a sheet of padded stickers, which I am unsure of their use, a motherboard speaker, additional wire management and a bag of assorted mounting screws. Just like my PC-B70, the PC-K62 uses thumb-screw style screws for mounting the motherboard, found at the bottom left of the image. And that leaves us with one of the few 3-pin fan adapters that allow the fans to run off of a 4-pin Molex connection.

These aren't really included hardware, but I thought I should show them off anyways. The HDD trays are tool-less. As you can see on the left one, I had lifted the locks over the tabs found under the tray, to allow them to swing up. The inside of these locks has two pins that lock into the screw holes to secure the drive and are locked back into place once it is aligned correctly.
The Build and Finished Product

Everything pretty much falls into place when building inside the PC-K62. With a full ATX motherboard, there is still plenty of room to work inside this chassis. I was able to install my 9800GTX with room to spare, which means it will accept most of the larger graphics cards.
I did set the PSU in with the fan down to try out the locking bar, which is easy to use and does a nice job locking down the PSU. I had to flip it though for the build as this PSU has shorter wires and having them come out of the PSU closer to the motherboard makes it possible to use, versus missing them by mere inches.
Lastly, I want to note that this PSU has a ton of extra leads and not being modular can sometimes lead to issues. I found plenty of room to stash the extra leads inside the chassis. Even though they can be seen, it allows for a much cleaner overall look.

Other than the fact that my PSU isn't black, even the rear of the chassis looks good and is easy to access. Nothing out of the ordinary to note here!

Just before I closed up shop and powered this PC-K62 up for the pretty images about to come, I figured I'd show what I meant about hiding excessive wiring. What could have looked like a rats nest laying on the floor of this chassis, is easily bundled and slid under and into unused drive bay space. It may look a bit messy from here, but put the panel back on and no one is the wiser.

Virtually an unimpeded view of the components is what I mentioned earlier. With all the pieces in place and the windowed panel back on, you can see you get just that. Personally I like that this window isn't square, but I'm not a fan of this "dog bone" design. But hey, at least it has a window!

With the lights dimmed down and the power switch pushed, you can see not only the blue glow of the intake fans LED's, but there is even a flood from the top fans that comes through above the optical drive.
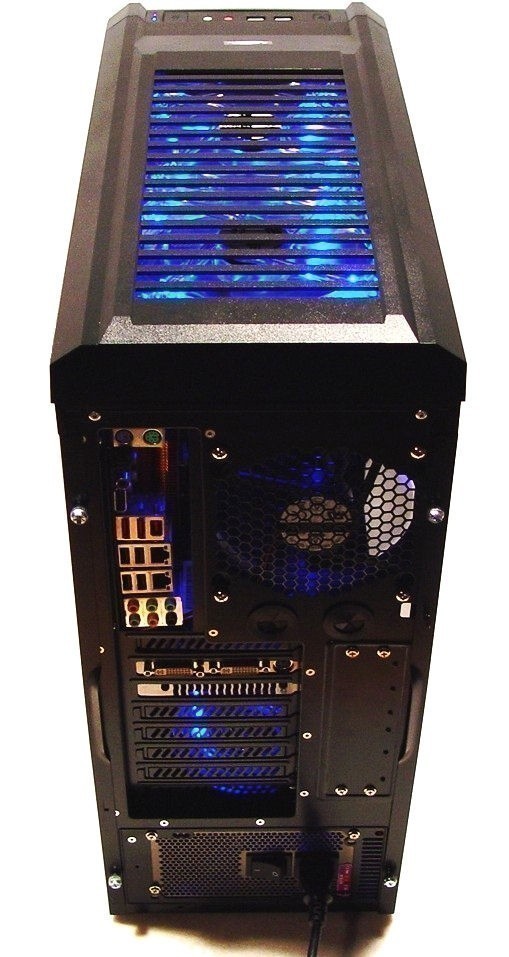
Spinning the PC-K62 around so I could look into the louvers, there I found the glow of the dual 140mm top exhaust fans. The rear exhaust fan, as you can see, has no LED's, but the fan up installation of my PSU adds more of the same blue flood of light.

See what I mean? Turning the chassis around one more time shows that flood I was talking about. Quite a soothing look with all the components in place! It's even enough blue LED to hide the ugliness of the red Foxconn motherboard.
Final Thoughts
I wish I hadn't been so slow in getting this chassis reviewed. It was a pleasure to work with and for the price I have not seen better offerings yet. LanCool did one hell of a job cramming a ton of modder smart features into this attractive outer package. A well ventilated front allowing a ton of air into the chassis is a great start, All out black paint on all surfaces is a plus. A flood of blue LEDs and fan filters on all the intake fans is another plus. LanCool took extra steps all the way around this chassis to provide a great chassis to those who can't afford the $300 designer enthusiast chassis'.
As I mentioned in the build section, all the components basically fall into place. Lift a lever here, slide whatever in, lock it down and wire it up. How much easier does it get? I liked the fact that the PC-K carries so many of the features of its Lian Li brethren, such as a screw-less GPU locking system, the optical drive screw-less latches, slide in hard drive rack and filters - all a plus in a budget builder's pros and cons list!
The only real mark against the LanCool Dragon Lord PC-K62 was based only on its availability on shelves. With only thirteen e-tailers showing stock, it isn't that hard to get one, but it may be outside of the United States. Other than that, this chassis is a superb example of what I love to see in a wallet conscious design. LanCool offers one of the most "bang for the buck" chassis' that I have reviewed to date and its $119.99 asking price at Newegg exemplifies that fact. I know when it was new I paid quite a bit more for my Antec 900 and it doesn't hold a candle to what this LanCool PC-K62 offers at a lower price point. I highly suggest you put this chassis in your must look at column when cruising for your next mid tower purchase.

 Lian Li B4-mATX Review: a compact mATX SFF case with excellent airflow and premium features
 Ocypus Sigma F36 BK ARGB Cooling Fan Review: high airflow and unified design in one frame
 PCCooler CPS RZ820 Display Review: a flagship-level CPU air cooler with an LCD screen
 MOAIPLAY ORA PRO G1 850W ATX 3.1 PSU Review: high efficiency and 10-year warranty for $119.99
 NZXT H6 RGB+ Compact Dual-Chamber Chassis Review
 PlayStation 6 will reportedly ditch the PS5's liquid metal cooling in favor of something else
 GeForce RTX 50 Series hotspot temperature readings won't be added to MSI Afterburner
 Samsung is using titanium to finally tackle the foldable crease problem with the Galaxy Z Fold 8
 PALIT introduces GeForce RTX 3060 Infinity 2 OC GPU, a 'brand new' design
 A hacked Xbox player beat Microsoft in court after it suspended his account and told him to buy his games again
 Dead Space creator Glen Schofield announces retirement after 35 years in the video game industry
 Steve Buscemi to star in new Far Cry anthology TV show
 Assassin's Creed Hexe DLC leaked before the game is even revealed
 100% of Japanese online game developers are using generative AI, reveals new poll
 Windows 11 tested on Steam Machine, provides nearly identical gaming performance to SteamOS
 Samsung 990 2TB SSD Review - Ninth Gen QLC at PCIe Gen4 Speeds
 ASUS ExpertBook Ultra (Panther Lake) 14" Business Laptop Review
 ASUS ROG Raikiri II Xbox Wireless Controller Review - Ready to Take Control
 MOZA FMP18 Panel Bundle Review: authentic F/A-18 Hornet cockpit controls for flight sims
 Micron 6600 ION 245.76TB Enterprise SSD Review - Best in Class Programming Speeds
 MOZA MA3F EFCM Flight Control Module Review: authentic Airbus A320 autopilot panel for simulators
 Turtle Beach Stealth Pro II Wireless Gaming Headset Review - Premium Sound, Fantastic Features
 MOZA MGX1000 Instrument Panel Review: a realistic Garmin G1000 replica for immersive flight sims
 Simagic Zeus Formula Steering Wheel Review: premium build and advanced inputs for F1 racing
 GIGABYTE X870E Aero X3D Dark Wood Review - A woody goody
 I stopped digging through Windows menus after I set up this one folder
 Don't sell your Windows laptop until you do these things
 6 PC cleaning mistakes to avoid for safer hardware maintenance
 Phison and Intel Take Aim at Local AI's Memory Wall with aiDAPTIV
 How to Remap Keyboard Keys in Windows using Microsoft PowerToys
 7 tips to organize your Windows files for faster, easier access
 Intel Arc G3 Extreme first impressions with MSI's Claw 8 EX AI+ - Incredible power for an extreme price
 How to fix Wi-Fi Adapter Not Working on Windows laptops: troubleshooting tips
 Hisense U7SG 4K TV: Modern Entertainment for the New Age
 6 underrated Microsoft Word features worth using to boost your productivity