


Our Verdict
Introduction, Specifications, and Pricing

While up until this chassis hit the lab for testing, we will admit that Streacom was not even on our radar. So like we always do, we look at Streacom's site to find out what we can about the company and just what it is they do. In this instance, it did not take long to see our heads were in the sand because Streacom has a full line up of thick aluminum cases to fit anything from an NUC to an ATX HTPC chassis with plenty of air cooling and water cooling support. What they all have in common, though, is that they all appear to be refined designs with simplicity in mind. Offering designs that anyone would be proud to have to sit in their office, next to the TV as an HTPC in the living room, or with their smaller designs, the possibilities of where you can sleekly house a PC are truly endless.
To get more specific about the model that we have at the lab, this is the largest solution to case design that Streacom currently offers, yet this is not a large chassis by any means. This chassis, built with thick extruded sections of aluminum, and unlike most makers out there, this chassis is completely screwed together. This design does indeed remind of us cases from other makers, where thick aluminum is used for a solid design, yet still looking great. Streacom still has one ace in the hole that we never have in our long tenure of looking at cases, ever run across before, and to be blunt, it is pure genius.
What you are about to see from Streacom is the F12C black edition, but for those that like the more natural appearance of aluminum, they also offer a silver edition with all the same goodies you will see with our black version. It is made and intended to go into an HTPC role in the house as it is wide, low to the ground, and has the motherboard lying flat on the bottom of the chassis. However, while we have seen many forms of this design before, we have never seen one so well thought out and easy to use with anything from Mini-ITX to full ATX motherboards. There is just so much going on in this design that are somewhat revolutionary to the chassis scene; you too will find it hard to keep your chin off the desk while reading and seeing what this Streacom F12C is all about.

You can find this same chart on the Streacom site, covering everything the F12C design has to offer. We have first explained the high quality of the Premium Grade 6063 aluminum, which is the last grade before you lose the ability to form it without cracking or snapping the aluminum panels in the process. In either the silver or the black versions, you are offered 4mm thick extruded panels, and everything is either attached or gets mounted to these panels making the entire design rock solid.
Inside, you can use a Mini-ITX, Micro-ATX, or an ATX motherboard, but that choice also affects the storage ability. If you use a Mini-ITX motherboard in the F12C, you can pack in up to twenty-four 2.5" drives, twelve 3.5" hard drives, or a combination of both. If you decided to go the ATX route, you are then limited to two 2.5" drives and possibly five 3.5" drives. There are seven expansion slots in this design to hold just about any video card on the market. There are no fans included in this design, there are many locations to add them to the chassis, but the fans also use the same revolutionary drive mounting plates, and is something to keep in mind. There is also a limitation to the CPU cooler height of 135mm, but with a pair of supports that run across the top of this chassis, you can also support dual radiator water cooling, as long as it uses a thin radiator. There are no limitations on the length of the PSU or the video card, and we also see that this is FLirc or IRRC capable of remote control, but you do need to purchase the panel to make it work separately.
What is left are the size and weight of the F12C to cover. Looking at the F12C from the front, you will find a chassis that is 440mm from left to right. It is 320mm from front to back and stands only 184mm tall. While that may seem like a lot of chassis, if opting to use an ATX motherboard, there is enough room for the motherboard and a PSU on its side, from side to side. From front to back, there is only a small amount of room at the front to attach wiring, and you are out of space. This is also why Streacom mention that the choice of system plays hugely on what sort of storage arrangement is possible. The last thing to know about this chassis is that it weighs in at 4.4KG, which for those on this side of the pond, that is roughly ten pounds of aluminum sexiness. One thing we cannot find online, on the box, or in the manual, is what sort of warranty terms Streacom cases offer with the purchase.
One thing we found is that if you are on the west side of the Atlantic, obtaining this chassis is down to just one option unless you happen to run across these on eBay or similar resale sites. As of writing this, we see that Only Newegg has them in stock. Amazon has other cases from Streacom but does not show the F12C in any listings. What we did find out, is that if you do want this chassis, prepare to dig a little deeper into your bank account. This chassis is listed at $275 and comes with free shipping. Up front compared to what we normally see, this is near twice the cost of other options, but we feel the cost is justified, and once you see what all goes into this design and how good it would look in any environment, you can see the value in a chassis of this magnitude. Keep in mind too that Streacom makes these cases and when purchasing the F12C, it will ship directly from them.
Our Latest HTPC Cases Review Coverage
Chad's Chassis Test System Specifications
- Motherboard: GIGABYTE GA-Z68X-UD4-B3 (buy from Amazon)
- CPU: Intel Core i7 2600K (buy from Amazon)
- Cooler: Corsair H80i GT (buy from Amazon)
- Memory: G.Skill Ripjaws F3-12800CL6D-4GBXH (buy from Amazon)
- Video Card: HIS HD7950 IceQ (buy from Amazon)
- Storage: SuperSpeed 128GB (buy from Amazon)
- Power Supply: SilverStone SST-ST85F-G (buy from Amazon)
- OS: Microsoft Windows 7 Ultimate 64-bit (buy from Amazon)
Packaging

Our Streacom F12C had a little bit of a rough ride it appears, but keep in mind this black panel you are seeing is just a sleeve over a plain brown box inside it. We find the packaging is also kept simple like their aesthetics with just the company name at the top, their logo in the middle, and the F12C Aluminum PC Case shown at the bottom.

Rather than showing the entire panel in this image, we moved in very close to the only bit of information found there in this little sticker. It displays the SKU, its color, the EAN number, and shows the 15JT-F12C-002-1/200 full part number.

For all we know, this could technically be the front of the packaging, but with all the labels and envelopes for shipping materials, we decided to show this panel second, since it is an identical match to what we saw on the other side.

We find the same comparing side panels. You can see the sleeve around the inner box, and they also placed the same sticker found previously in the top left corner again.

The top and bottom panel of that sleeve also sports the Streacom logo and the F12C chassis naming. The difference between the two is that up top, there is a plastic handle protruding from the box, to make carrying it much easier.

Inside of the inner plain brown box, we find out that the F12C well attended to inside the box. Dense foam on the top and bottom that also surrounds a bit of the side, also with the cloth bag that the chassis is slipped into, allows this chassis to arrive in great shape despite the packaging appearances. They also offer the manual and the hardware right on the top so that you can read how to open this chassis.
Streacom F12C HTPC Chassis

The front of the Streacom F12C is a vast expanse of thick black aluminum with a sandblasted texture across the entire panel. There is not a name or a logo at all on the chassis, and the only things to break up the flat panel are the power button and LED at the bottom left, and the IR window at the bottom right.

We are now looking at the top of the F12C. This is well ventilated with three large vented areas that have dust filtration in place and offers magnetic rings around the filter to allow them to be easily removed and cleaned.

The left side of this chassis offers up two locations for ventilation and again have the same filter setup, just smaller this time. As of now, all of these are passive, as the chassis does not include any fans.
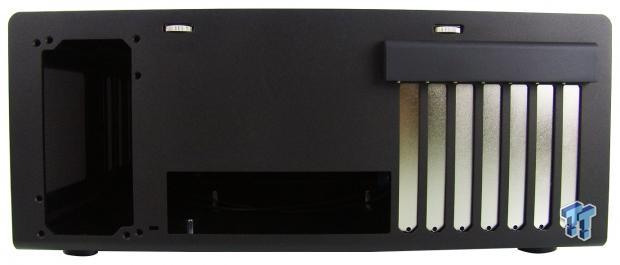
Around to the back of the F12C and we find openings only where they are needed. To the left sits the PSU with the motherboard's rear I/O panel in the middle. To the right are the seven expansion slots, but to access the screws, you need to remove the cover that is mounted from inside.

The right side of this chassis is a direct copy of the left side of the chassis. While the front and back panels are mostly solid, with the top and these sides open, there are plenty of ways to provide good cooling without much noise involved.

The floor of the chassis is as thick as all other panels that come together with screws to assemble this F12C. Here we find the panel has been drilled for ventilation, but due to the thickness, we do not see standoffs or other non-essential holes.

We passed right by these thumb screws when we first looked at the back panel. When reading the manual before trying to open the chassis, it shows that by spinning these, the top will start to lift as the threads back out of the top panel and allow it to be removed.
Inside the F12C

After spinning both screws, you carefully get a fingernail under the panel and remove it to expose this. Upon first glance, we find a completely open interior design, but for now we will address the bars across the top. These are added in to allow users to install fans at the top of the chassis, and they can even support dual radiator AIO units without too much fuss.

Looking in at the right side of the F12C, we see the room at the far end for a PSU of any length. We see that the motherboard area is set up for Mini-ITX out of the box, and we also get our first look at the brackets covering the opening to the right that can be used to mount many things.

Deep down inside the F12C, behind the IR panel that can be seen from the front, we find a pair of standoffs and screws. You will need to purchase a device for this option of an HTPC if you desire to control it remotely.

At the other end of the chassis, we find a tiny PCB behind the power button and LED. Since this chassis offers no front I/O support, the wiring is just down to the switch and LED to connect to the motherboard.

The length of these cables is of no concern as they loop around two sides of the chassis and are plenty long enough in any situation. We also like that they sleeved them black so that they blend right into the chassis interior.

Looking into the next corner in the rotation, we run into four more of the universal mounts blocking this opening as well. Notice the steel clips at the top, though. These curve with the top corner of the chassis and are what locks the mounts to the sides of the chassis.

Our last of the tour along the inside of the panels brings us full circle to the seven solid expansion slot covers. They are held in place with Phillips screws, and you can also see the pair above the slots that allows the removal of the external cover to access the expansion slot screws.
Hardware & Documentation

The bag of hardware contains many smaller bags of goodies. There are isolation washers, a silver and black set of countersunk 6/32 screws, and a bag of standoffs for Micro-ATX and ATX installations. The bottom row offers 4mm long M3 screws for SSDs and the motherboard, fan screws, and flat head 6/32 screws for hard drives.

This is one set of the two sets provided shown in this image. At the top left are the metal clips. It is much easier to see the curve in them that follows the extruded side panels, and with bends at either end. The shorter one locks over the four brackets, and the larger end is on top to lock it all into the chassis. As for the four brackets, these are used, usually in pairs, but not always, to mount 3.5" and 2.5" drives, but with the grooves cut in the middle, they also work for fans.

There is a very solid user manual supplied with the chassis as well. Very well illustrated and well written. Even if you have never touched a PC before, this book will get the task complete. It does include everything about the F12C and how each component works and covers all aspects of cooling and installation possibilities as well.

We thought that an image of how the mounting brackets are designed would be much easier for readers to digest, so here it is. As you can see, you can stack 3.5" drives, use them for fan supports, or use them individually to stack drives in this chassis vertically as well. They even go as far as to show which of the hardware is intended to be used for each. This is the level of detail found throughout the manual.

We also wanted to make special mention of the dust filtration. It is said that this is designed for maximum flow while still trapping the majority of the dust. To accomplish this, they use a plastic dust filter that is cut to fit each opening in the F12C. There are magnets set into the aluminum panels that hold onto the black painted steel rings. While it is super simple to remove and clean these, we did find them popping out all the time during installation, but once running and left alone they do just fine.
Case Build & Finished Product

We did have to stop part way through the build to show things a bit more clearly. At this point, we have installed the PSU and have also installed our full ATX motherboard. In this instance, the PSU blocks most of the top, so if we wanted to install a few drives, we would need to have them below the video card.

We used the Corsair H80i GT for demo purposes only as the radiator is too thick to use a fan, but it does show one way the top brackets can be used. We were also able to sneak the SSD in at the top by the power supply. We did not add fans for testing, but we did leave the top off and add a fan to the AIO on top of the brackets to offer some flow into this design. The card was within average temperatures as well, as it has plenty of passive access to fresh air through the left side of the case.

Aligning the tabs at the front of the panel, and carefully dropping it onto the chassis and screwing the top panel down offers us the same sleek simplicity that we liked in the beginning.

In the back, we found the PSU to align well, and it can be installed drawing fresh air from the side, or working double duty drawing air from within the system. The rear I/O cover snapped right in, and removing the cover and installing the video card is pretty simple as well.

At this point, the only indication of this machine now having power is that there is a white glow from the LED on the chassis, and we could just hear the video card fan. The chassis, as shipped, offers nothing as far as noise goes, so the amount of cooling and noise in this build is all up to the individual user.
Final Thoughts
We have been privy to quite a few HTPC cases in the past, and we are reminded for sure of the bigger names in cases like Silverstone, Lian Li, and many others. The point is that when you think of more refined case designs, those are the first names to pop into most people's minds. Realistically, we can see no real reason you should not be adding Streacom to that list. To us, coming completely out of left field, and delivering this beast of a chassis, that takes chassis interiors to a whole new level, yet still offer an exterior with a sandblasted finish that anyone would love to add to their living room or home office. Made of 4mm extruded aluminum panels, and of the highest sensible grade to be working with, while changing the way we think of mounting things, they left no stone unturned in this design and are offering some nice high-end cases from what we have seen.
Considering this is made to be an HTPC chassis, and is made to be dead silent out of the box, that is a really good start for a build that needs to be seen yet not heard. The fact that you can install one of three motherboard form factors still leaving room for serious power delivery, and even offers plenty of space for the beastliest video cards to be able to drive those new 4K displays. We also loved the way that addressed mounting things into this chassis. At first the locks seem a bit odd and funky to get to work properly, but once you understand how it all works, popping them in and out of the chassis just gets easier. We also like that we are not stuck in the confines of a modular cage system, or a section of the chassis that covers the motherboard to afford the space. With this design, you can put things anywhere you have room to fit them. The choices are all left to the user to maximize this chassis and its space to best suit your individual needs.
The only thing we could complain about would have to be the force of the magnets on the dust filter design. As long as they are left alone and not bumped or rubbed against, there isn't much of an issue. However, we do recommend they are all removed in the build process, as it will save time and effort constantly reaffixing them. We are thinking ahead, though, and if a cat can rub against it, you will be fixing them, as we seemingly adjusted them slightly for nearly every photo, as moving the chassis caused us to rub one or two as we handled it.
We know that most of you when it comes right down to it, are looking at this and appreciating everything you just took in, but you are still looking at that price tag and pondering if it is worth it. We are here to say it is worth every penny of that $275 price. The sheer thickness of this build means the chassis is always cool, and it also means you get a superbly structurally sound chassis. There is no bold naming on the chassis to distract your eye, the LED isn't blindingly bright, and you have to option to buy an IR control system to remotely use this PC as well. What sold us on this design, however, is that while using the largest components we had on hand, we could fit it all without an issue. On top of that, the modular brackets to mount fans or drives to allow you to pick where stuff goes rather than having a huge drive tray taking up valuable space. The fact that you can even use a dual radiator AIO in this chassis as well just makes it that much more user-friendly. No matter where you look at this F12C chassis, no matter the angle, no matter the lighting conditions, you will find no defects in workmanship. Just solid panels screwed together with even body lines and a look that we are sure will have many of you wanting this chassis sitting across the room from you driving your home theater.
Chad's Chassis Test System Specifications
- Motherboard: GIGABYTE GA-Z68X-UD4-B3 (buy from Amazon)
- CPU: Intel Core i7 2600K (buy from Amazon)
- Cooler: Corsair H80i GT (buy from Amazon)
- Memory: G.Skill Ripjaws F3-12800CL6D-4GBXH (buy from Amazon)
- Video Card: HIS HD7950 IceQ (buy from Amazon)
- Storage: SuperSpeed 128GB (buy from Amazon)
- Power Supply: SilverStone SST-ST85F-G (buy from Amazon)
- OS: Microsoft Windows 7 Ultimate 64-bit (buy from Amazon)
 Noctua NL-LC1-36 Liquid CPU Cooler Review
 Lian Li B4-mATX Review: a compact mATX SFF case with excellent airflow and premium features
 Ocypus Sigma F36 BK ARGB Cooling Fan Review: high airflow and unified design in one frame
 PCCooler CPS RZ820 Display Review: a flagship-level CPU air cooler with an LCD screen
 MOAIPLAY ORA PRO G1 850W ATX 3.1 PSU Review: high efficiency and 10-year warranty for $119.99
 Elder Scrolls Online 'here to stay,' ZOS committed to MMORPG amid layoffs, delays new Thieves Guild features
 Valve officially announces FSR 4.1 support for the Steam Machine through Proton Experimental
 Microsoft now identifies exclusives as a way to grow Xbox
 Xbox expected to vaguely 'return to growth' this year in FY27
 KIOXIA introduces the first PCIe 6.0 CM10 enterprise SSDs, up to 92% faster than PCIe 5.0
 GTA 6 trailer 3 expected to drop soon after Rockstar updates website three times in four hours
 Xbox console sales drop to lowest point in a decade as division loses $1.7 billion in FY26
 Hackers breach UK government and police systems, steal passwords and personal data
 COLORFUL launches thin and lightweight Rimbook L1 Plus laptop
 Tech enthusiast finds RTX Spark-powered Microsoft Surface Laptop Ultra, delivers first 'review'
 ASUS ROG Strix X870E-A Gaming WiFI7 Neo Review - A New Enticing Option
 Logitech G316 X 98 Wired Gaming Keyboard Review - Retro-Inspired Board that Falls a Little Short
 Biwin M560 2TB SSD Review - Best Overall Retail-Ready DRAMless SSD
 Logitech G512 X 98 Analog Mechanical Gaming Keyboard Review - An Innovative Two-in-One
 Thrustmaster T.Flight HOTAS 5 MSFS Edition Review
 SteelSeries Arctis Nova Pro Omni Wireless Headset Review - One Headset to Rule Them All
 SteelSeries Arctis Nova 7 Wireless Gen 2 Headset Review - New and Improved, But Is It Enough?
 AMD Ryzen 7 7700X3D Review - Days of Future Past
 Samsung 990 2TB SSD Review - Ninth Gen QLC at PCIe Gen4 Speeds
 Printer Not Working in Windows? How to fix detection, print queues and drivers
 The Ultimate Guide to Personalizing Your Windows 11 Taskbar
 How to Turn Your Windows Laptop Into a Second Monitor with Miracast and Wireless Display in Minutes
 6 Mistakes to Avoid When Buying a Windows Laptop
 I capped Windows Update's bandwidth with Delivery Optimization, and my downloads stopped choking
 I use this decade-old free tool that finds files faster than Windows Search does
 I install and update most of my apps with this Windows command now, and I stopped downloading sketchy installers
 Hisense U6SF 65-inch MiniLED TV: High Performance Meets Leisurely Convenience
 I stopped digging through Windows menus after I set up this one folder
 Don't sell your Windows laptop until you do these things