


Overview and History
In one of our recent articles we have explored the benefits of Light Virtualization (LV). This is a unique software technology that sandboxes whole disks/partitions, protecting their contents against unwanted changes.
Shadow Defender (or SD for short as it is known among its dedicated fans) has been enjoying a great reputation among Light Virtualization fans during the last few years. There has been a barren period of two and a half years where development was interrupted, leaving v1.1.0.325 (which was released back in February 2010) as the last known good version.
Amazingly this version is still doing its job perfectly three years later, keeping pretty much everything at bay. It is basically a three year old piece of code that is still able to fully isolate and contain malicious code which is much newer than itself. This unique feature is what has cemented the Shadow Defender reputation among its dedicated fans.
The SD project was put back on track a few months ago with the developer coming back and picking it up once again. Tony (as he is known among SD fans) is the author and owner of Shadow Defender. We don't know what real life issues may have forced Tony to abandon the project for two and a half years. What is important is that the break is now over. In the last five months the program has evolved and important new features have been added. The latest version of SD includes full SSD/TRIM compatibility, introduces Windows 8 support, and also includes write cache encryption plus a configurable RAM Cache option.
If you are interested in trying or buying Shadow Defender, you can visit this website.
Program Functionality Analysis
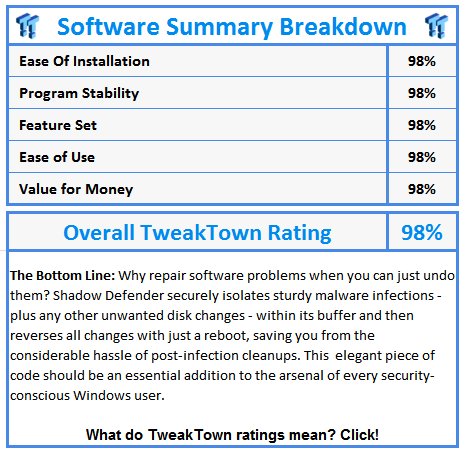
Shadow Defender is capable of fully isolating some of the sturdiest malware infections within its buffer. It can then completely reverse infections with just a simple reboot, and without leaving behind any junk, as is often the case with conventional anti-malware clean-ups. Essentially all system changes (including infections and their effects) are strictly contained within the program's virtual environment and nothing actually touches the real system. Upon rebooting all changes that have happened in the meantime are discarded by default, returning the system to its clean, pre-infected state. Even better: SD is able to do this all on its own, without the help of additional anti-malware and anti-execution components.
SD has been enjoying this rootkit resistance reputation for quite some time now. I for one am amazed that the SD code hasn't already been bought out by one of the mainstream security software players out there. There are other LV programs that are also very resistant against sophisticated zero-day threats. The difference between those and Shadow Defender is that the others can only achieve this with the additional help of conventional anti-malware and anti-execution components. Shadow Defender on the other hand can do it all on its own.
Our Latest Security & Backup Review Coverage
- Norton Mobile Security (reviewed on an Android device)
- Instant Recovery / Snapshot Software Review and Guide: Rollback RX
- Light Virtualization and Instant Recovery Software: A great overall safety net for your computer
- Ethereum Mining Guide - Part 1: The Basics & Set Up
- Unigine Superposition Benchmark: The New GPU Crusher
In my view this is what separates the men from the boys when it comes to Light Virtualization software. That is, the ability of an LV program to fully contain and undo sturdy infections when everything else has already failed, and without additional help. This quality alone makes Shadow Defender invaluable as an overall safety net for Windows systems.
So why not use a Light Virtualization alternative plus a well-known anti-malware/anti-execution suite? Or why not use an LV alternative that includes its own dedicated antivirus/anti-execution modules? The answer is simple. What happens in cases where some obscure zero-day malware somehow manages to bypass existing traditional protections? What happens when anti-execution itself is bypassed by the users themselves? What can we possibly do when a child wants to run a game which may contain malicious code, and when an antivirus or anti-execution warning pops-up the kid allows it to execute anyway?
For such eventualities we need a virtualizer that is potent enough to fully contain and thoroughly undo malicious installs, all on its own. We need something that can protect all disks attached to the system against unwanted changes. Above all, we need something that works reliably even when all additional layers of protection have failed, and with an absolute beginner at the wheel. To my experience Shadow Defender most certainly delivers on this front.
If you are interested in trying or buying Shadow Defender, you can visit this website.
The Importance of Multi-Layered System Protection
Shadow Defender should not be used as the sole protection for your system. Multi-layered protection is the best approach in all cases. SD works best as the final layer of protection, the ultimate undo tool for cases where sturdy malware have somehow managed to breach existing anti-malware and anti-execution solutions.
It is important to understand that SD is not an anti-malware program and as such it does not differentiate between malicious and non-malicious system changes. SD essentially serves as the final damage control tool. It does not stop malware from infecting your computer in the first place; it simply isolates all system changes strictly within its virtualization buffer including infections and their effects. The virtualization buffer is emptied by default at the next reboot, and the system is instantly reverted back to the exact state it was when SD protection was activated. Malware infections never actually get the chance to spread to the real system. In my view this is the cleanest possible way to deal with malware damage plus all other unwanted system changes for that matter.
For best overall protection you should always use Shadow Defender alongside a decent Firewall/Antivirus suite with HIPS/anti-execution features. Top it all up with anti-keylogging software in order to cover yourself against most eventualities. Such programs should be your first line of defence against malware. In cases where these defences have somehow been compromised, you can take a great degree of comfort in the fact that SD will thoroughly discard all changes on the next reboot.
Of course no single program can ever be 100% infallible. New malware strains appear online all the time. SD is currently the best against sophisticated threats, but it would be foolish to take this ability for granted and think that it will always be able to contain everything in the future. That's why it is crucial to always have a clean backup of your Windows disk/partition at the ready, along with a tested start-up disc or USB stick that contains a bootable version of your favourite backup program. This will cover you in cases of hardware failure, or when Windows has been damaged beyond repair and the computer cannot boot normally.
If you are interested in trying or buying Shadow Defender, you can visit this website.
System Requirements, Installation and Registration
First things first: If you haven't already performed a full backup of your Windows partition recently, then I would strongly recommend for you to do so before installing Shadow Defender (or any other software for that matter). There is always the possibility that a new program may be incompatible with your individual configuration. Backing up now could save you from having to troubleshoot problems later on. Basic backup tips have been provided within our LV/IRS technology introduction.
Minimum System Requirements:
Operating System: Windows 2000 / XP / 2003 / Vista / Windows 7 / Windows 8
Memory by OS: 2000: 128MB, XP: 256MB, 2003: 256MB, Vista: 512MB, Windows 7: 1GB, Windows 8: 1GB (NOTE: these are the minimum RAM requirements. It is best to have at least 4GB of installed RAM before using the Shadow Defender RAM Cache option).
Disks: 3 MB for program files, 10MB or more free space for each partition in Shadow Mode.
Installation and Registration:
Installation takes mere seconds, depending of course on the speed of your system. When it completes you will be asked to restart your computer. The program doesn't add any boot sector drivers, which is a good thing in my view. After rebooting there will be a yellow Shadow Defender icon added to your system tray. Double-click on it and the registration prompt will come up.
Registration is very straight-forward. The program is fully functional as a 30 day trial with all of its features fully unlocked. If you have already purchased a license you can enter the serial number at this point. There is no hardware fingerprinting involved and the program won't ask you to access the Internet in order to register. In fact, I have been using SD for a long time now and it has never tried to go online, a huge plus in my book.
Once you have entered the serial (or chosen the trial option), the main SD window will come up, as below.
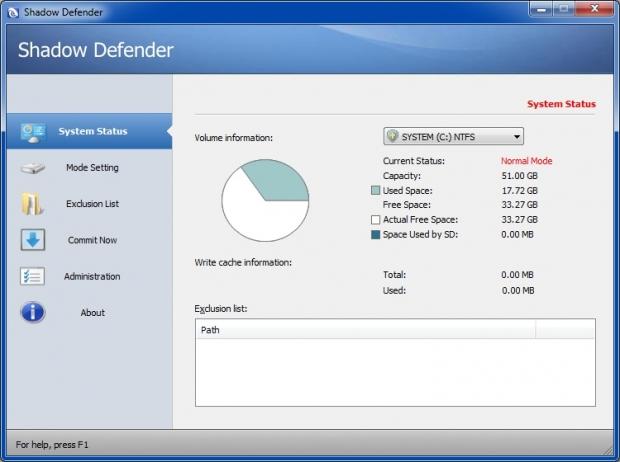
This is the System Status screen. You can select any of your volumes from the drop-down list on top, to see current information about them. If your disks are split into multiple partitions, then each one of those partitions will appear as an individual volume on this list. SD can protect all disks connected to the system, provided of course that its protection module (which is called Shadow Mode) is enabled for them. This includes all external disks that are currently plugged in; things like eSATA, firewire, and USB disks, as well as USB flash drives.
SD works at sector level, using RAM or each protected partition's free space for its virtualization cache. As a result you won't be able to see the buffer itself as an expanding file in Windows Explorer, as is the case with other LV applications which operate at file system level.
If you are interested in trying or buying Shadow Defender, you can visit this website.
Software Usage Part 1 - Mode Setting
Mode Setting is the second set of options on the left of the main SD window. This is one of the most important parts of the program, the place where users can define which volumes will be protected. Select it and this screen will be shown:
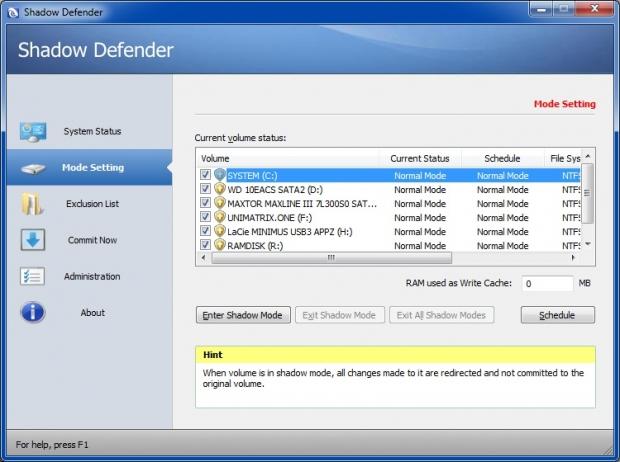
There is a RAM used as Write Cache feature here as well. If your system has an adequate helping of RAM, you can assign a part of it to be used for the SD write cache. The benefits of this are obvious. When the virtual system runs in RAM the whole process will be faster and your protected volumes won't take any write hits until you choose to manually commit data to them (more on that later). This is especially beneficial to devices like SSDs, memory cards, flash sticks etc.
No disk hits also means no disk traces of deleted data left behind. It all stays in RAM and gets flushed at the next reboot, which is perfect for the more paranoid among us. Where is my tinfoil hat...?
When adding a RAM value, remember to always leave enough RAM available for the system. For example: If your system has 4GB of RAM (which translates to 4096MB), you can assign 1024MB for the SD write cache and leave the rest for Windows. If you only have 2GB of RAM installed you should not use this option. In this case leave the RAM cache at zero (default).
When the assigned RAM cache fills-up the program will automatically switch back to disk buffering mode. Personally I keep a close eye on Shadow Defender's RAM cache usage (through the System Status screen), making sure to reboot the system before the RAM cache fills-up completely. This way the program never switches into disk buffering mode and my SSDs don't get any write hits while in Shadow Mode.
Let's return to the Current volume status list. All volumes are ticked by default, ready to be placed in Shadow Mode. It is up to the user to decide which volumes to put under Shadow Mode at any given time; just untick the ones you don't want to protect at this point.
As a rule I usually enable Shadow Mode only for C: in order to protect my Windows partition from any changes. This way I can still save my data on my other volumes and those changes will not be undone when I reboot. I have already moved my User folders to a non-protected volume; so any changes I make to those frequently modified folders will always stick regardless if C: is in Shadow Mode or not. Details on how to move the User folders to a different disk/partition have been provided within the LV/IRS technology introduction article. The introduction contains a comprehensive list of other useful Light Virtualization tips as well.
Once you untick the volumes that you want to exclude from SD protection, you can then click the Schedule button, which will affect all volumes that remain ticked. Two options will drop down. The first one is Enter Shadow Mode on Boot. This option will schedule Shadow Mode to auto-start for all ticked volumes every time the computer starts. Scheduled SD protection for ticked volumes won't kick-in until you restart the computer.
The second option on the Schedule drop-down list is Exit Shadow Mode on Shutdown. This essentially undoes the previous option: It disables the scheduling of Shadow Mode for any ticked volumes.
If you are interested in trying or buying Shadow Defender, you can visit this website.
Software Usage Part 2 - Mode Setting Continued
You can instantly put any volumes you want in Shadow Mode without rebooting first, simply by placing a tick next to them and clicking the Enter Shadow Mode button. Once you do this a new prompt will pop up:
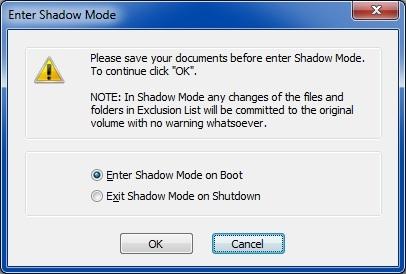
The first option (Enter Shadow Mode on Boot) will place all ticked volumes into Shadow Mode straight away. It will also schedule Shadow Mode for those volumes to auto-start with Windows. Scheduled volumes will automatically go into Shadow Mode every time the computer starts, until you manually disable the scheduling as mentioned earlier. When Shadow Mode is enabled for any of your volumes, there will be a small Shadow Mode indicator placed at the top middle of your screen.
The second option (Exit Shadow Mode on Shutdown) will place all ticked volumes into Shadow Mode straight away, but for this Windows session only. With this option there will be no scheduling; any previously scheduled Shadow Mode option for those volumes will be disabled and all ticked volumes will be back into Normal Mode upon rebooting.
Once a volume is in Shadow Mode you can also easily disable the protection and bring it back into Normal Mode. Just tick its box on the list, then click the Exit Shadow Mode button. Once again a prompt with two options will pop up:
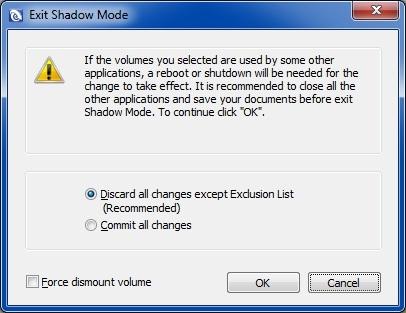
The first option is the default pre-selected one and will discard all changes that have occurred on the volume since Shadow Mode was activated. If you have already added any files or folders into the SD Exclusion List (more on that later), then only the changes to those files/folders will be saved; all other changes will be discarded. There is also an option there to forcibly dismount a volume; this normally doesn't have to be ticked.
If the system volume (C:) is the one you are taking out of Shadow Mode then you will need to reboot the computer in order for the changes to be dropped. A reboot will also be needed to disable Shadow Mode for any other volumes that contain files/folders which are currently open or in use by other programs.
The second option is to Commit all changes. In this case all changes that have happened since Shadow Mode was activated will be committed to the real volume for good. Once again the computer will have to be restarted if you choose this option for your system volume (C:) or for any volumes with files/folders currently in use. Please commit wisely: Only do it when you are 100% sure that all changes are safe to commit. Remember that once you commit changes in this manner there will be no turning back to a previous state - unless of course you restore a previously taken traditional backup of that volume, or unless you also use snapshot software on that volume.
The Exit All Shadow Modes button disables Shadow Mode for all ticked volumes and brings them back into Normal Mode. When you use this option you will not be given the chance to commit anything: All changes will be automatically discarded (apart from any files/folders in the SD Exclusion List of course), and all ticked volumes will be brought back into Normal Mode. When you select this option any previously set Shadow Mode scheduling will be cancelled as well for all ticked volumes.
The Exit All Shadow Modes button provides an easy one-click way to discard all changes on all currently protected volumes and then take everything out of Shadow Mode in one go. You may be prompted to reboot if any volumes contain any files/folders that are currently open or in use by programs.
If you are interested in trying or buying Shadow Defender, you can visit this website.
Software Usage Part 3
The next choice on the left of the main SD window is the Exclusion List:
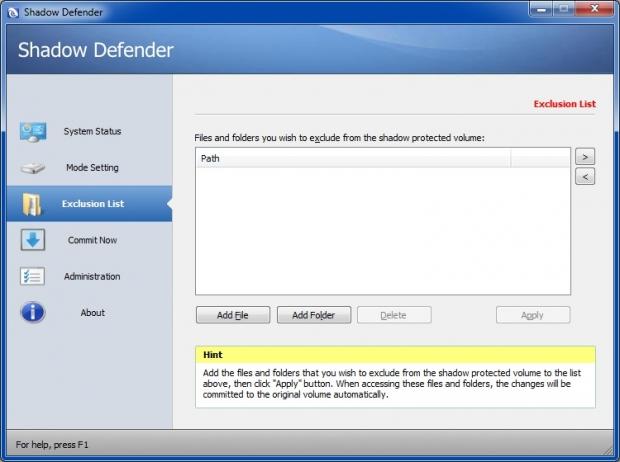
You can add to the exclusion list any files or folders that you want to exclude from Shadow Mode protection. All changes to those files/folders will always be preserved no matter what. Many users choose to add frequently modified folders to this list. This includes things like their User folders (e.g. their Documents, Music, Movies, Downloads, Contacts, Saved Games, Searches, Links, or Favourites/Bookmarks folders), or any custom folders where their antivirus program stores its definitions.
As I mentioned earlier, I have moved all my User folders to a different non-protected volume, so I don't have to define any such exclusions. Please note that this is not necessarily the safest option. The vast majority of malware will target your Windows volume only (C:). Some of those may target your Contacts folder, or even add their own Favourites/Bookmark entries which may point to malicious websites. If your Favourites/Bookmarks or Contacts folders have already been moved to a non-protected volume, this means that those malicious entries will still be there even after the malware infection itself has been undone on C:
It's up to you to decide whether you want your User folders fully protected or not. If you have moved your User folders to a volume other than C: and you want those folders to be protected, then make sure to also schedule Shadow Mode to auto-start for the volume that contains them. In this case you shouldn't add those folders to SD Exclusion List either, as this would exclude them from protection anyway.
Another very important point here: If you choose to protect the volume that contains your User folders and you don't define exclusions for them, then any changes within those folders (malicious or not) will be completely undone upon rebooting. Any new Favourites you save in there will be gone, and any new files you may have added while in Shadow Mode (e.g. any new contacts, new pictures, new videos, music, downloaded files etc.) will all disappear. Also, if you delete any unwanted files contained within (e.g. old Favourites) while in Shadow Mode, then those files will come back from the dead when you reboot.
An easy way to deal with all this is to always keep those folders on a protected volume, and only commit changes to them manually and on demand, via the context menu commit option (more on that later).
I haven't provided exclusions for any folders that contain my antivirus signatures either; I prefer to allow my antivirus definitions to update to their latest version every time I go online.
If you are interested in trying or buying Shadow Defender, you can visit this website.
Software Usage Part 4
The next SD option is the Commit Now box:
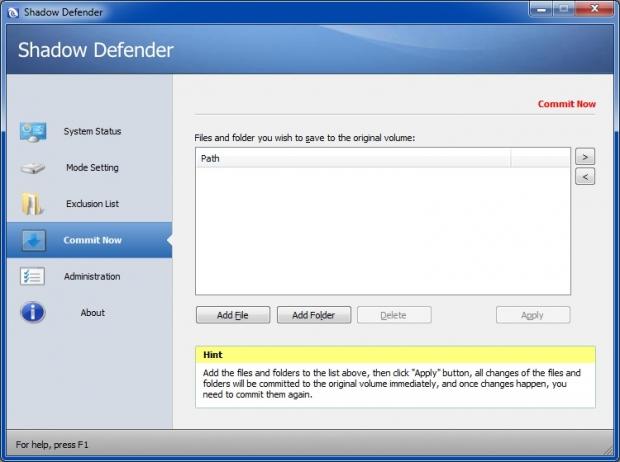
This is an easy way for users to commit any files/folders that reside on volumes which are currently in Shadow Mode. Committing of files/folders via this box is immediate.
There is also the very useful context menu commit option that I mentioned earlier: Users can right-click on any files or folders which are located on volumes that are currently in Shadow Mode, and then select the Commit by Shadow Defender context menu option. The following prompt will come up:
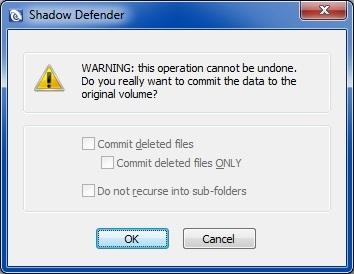
This context menu commit option is great for cases where you want to save your own changes on demand, for any files or folders which reside within a protected volume. You can make any changes to any file or folders, add or remove stuff, then right-click on them and commit your actions immediately. If you tick the Do not recurse into subfolders option, then your changes will be saved only for the contents of the topmost folder (the one you right-clicked in the first place). Any other subfolders contained within (along with all of their contents) will remain unchanged if that option is ticked.
Such manually committed changes won't be undone when you reboot. If you have also deleted stuff from those folders while in Shadow Mode and you want those items to stay deleted, then make sure you to also tick the Commit Deleted Files option. This ensures that any content you have already removed from those folders while in Shadow Mode won't come back upon rebooting.
The penultimate option on the left contains the Administration settings. The options here are self-explanatory:
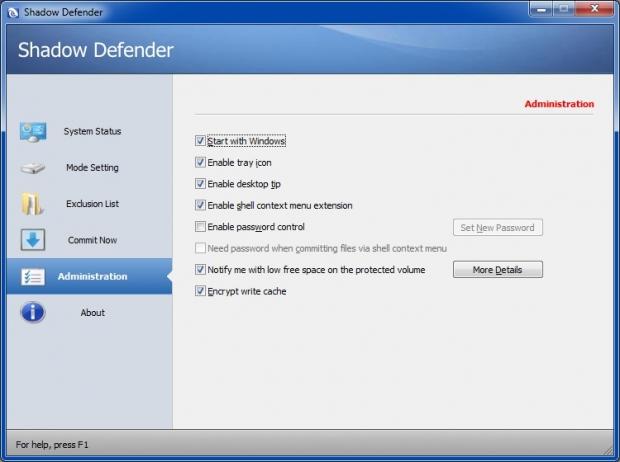
A VERY IMPORTANT NOTE FOR PARENTS HERE: If the computer is also used by youngsters, I would strongly recommend for you to use the Shadow Defender password option. Here's why:
A password will stop the kids from possibly disabling Shadow Mode or messing with the other SD settings. Make sure you select a strong password that your children won't be able to guess. Don't write the password down or save it as a text file; it has to be something that only you will know and remember. There is also a cache encryption option there which is disabled by default. If your system is very old/underpowered/low on resources, I would recommend for you to keep this option unticked.
If you are interested in trying or buying Shadow Defender, you can visit this website.
Important Shadow Defender Usage Tips - Part 1
Make sure you always put at the very least your system volume (C:) in Shadow Mode before you go online, before running an unknown program, or before allowing children to use the computer. Once again make sure that SD has been locked with a strong and secure password.
I have already mentioned this on the LV/IRS introduction, but it should be mentioned again: If you get infected and your system volume is on Shadow Mode, don't give the malware time to call back to its maker! As soon as you realize that something is wrong, disconnect from the internet immediately. Ignore any new screen pop-ups and messages alerting you to infections and prompting you to clean up: In many cases such messages belong to fake antivirus malware or ransomware that have possibly infected your system. Only trust such messages if they originate from your existing anti-malware programs.
If Shadow Mode was activated for C: prior to the infection you don't need to clean-up anything anyway; all you need to do is to switch off the computer. If your system is frozen you must hold the computer's power button for a few seconds until it switches off (hard reset). If this doesn't work just switch off mains power or unplug the power cord, and remove the battery if the system is a laptop/netbook. Wait 20 seconds or so and then power the system back on. All trouble should be undone and your Windows partition should be reverted back to its previous clean state.
Post-infection check: After Windows loads again and the infection has been undone, make sure to update your antivirus definitions and run a full system scan. I have tested SD on three different test systems and with a wide variety of sturdy malware; to my experience there have never been any leftovers whatsoever after a reboot: SD has always managed to completely contain and fully undo everything I ever threw at it.
My testing always took place on real test beds. Many users often perform such malware resistance tests within virtual machines. Personally I think that accurate conclusions can only be reached when such testing takes place on actual systems.
A small problem has been reported where certain programs may lose their configuration settings when C: is taken out of Shadow Mode. This is a very rare occurrence and it seems to depend on specific software configurations regardless of the OS used. Personally I have installed SD on many different systems during the last two years, without ever experiencing this. Nevertheless, the developer is currently gathering data from the few affected users in order to fix this minor issue.
If you are interested in trying or buying Shadow Defender, you can visit this website.
Important Shadow Defender Usage Tips - Part 2
You should always keep at least C: in Shadow Mode while trying out a new program or tweak that may mess things up. It is important to understand at this point that light virtualization protection works on per-Windows session basis only. With Shadow Mode activated you can safely test-drive programs, but only if such programs don't need a reboot in order to become functional. Shadow Defender will not automatically save changes for software installations that require a reboot.
For example, let's assume that you have installed a new program on C: under Shadow Mode and that this program needs a reboot in order for it to become functional. You have two choices:
I don't want it: If you want to get rid of the new install just reboot the computer as usual and the new installation will be completely undone along with any other changes.
I want to keep it: If you are certain you want to keep the new installation then you will have to take C: out of Shadow Mode. Tick its entry on the SD current volume status list and click the Exit Shadow Mode button. The aforementioned prompt will come up asking you to either discard or commit changes. If you choose to commit them then all changes will be written to the real volume (system) before rebooting back into Normal Mode. Please understand that this option will not just selectively commit the new installation only; it will also commit all other changes that may have happened since Shadow Mode was activated. A better way to deal with this is described below.
My committing methodology: When newer versions of your programs (or other things like new drivers or Windows updates) become available, remember to always keep C: in Shadow Mode while you download them. For Windows Updates you can use the excellent Windows Updates Downloader. This free program enables users to save all Windows updates as files, ready for later offline installation.
Once you have saved the updates, drivers, new programs etc. on a non-protected volume, you can then take C: out of Shadow Mode first, without committing anything. Also make sure to disable Shadow Mode scheduling for C: The system will then reboot back into Normal Mode. When back in Windows, make sure to keep your system disconnected from the Internet while you install/update the new stuff by either removing the LAN cable or disabling your LAN / Wi-Fi device in Control Panel.
When you install Windows updates as offline files, you may be asked to reboot after each one of them has been installed. If there are many updates to install, rebooting after every single one of them could take forever. It is OK to reboot just once, after all of them have been installed. Sometimes two sequential reboots may be needed in order for all updates to be applied.
When all updates, drivers and other programs have been installed and the computer has booted back into Windows, it's now time to run a portable version of CCleaner (or similar) to get rid of any leftover junk. At this point you should also configure any new software additions to your liking. Once it's all done you can now place C: back into Shadow Mode and also re-schedule for Shadow Mode to auto-start. In my opinion this is probably the cleanest and most controlled way to incorporate new software additions into your protected volumes.
If you are interested in trying or buying Shadow Defender, you can visit this website.
Final Thoughts
Shadow Defender is a great little piece of code and one of the best kept security-related secrets out there. Most people still rely solely on traditional anti-malware protection alone; they are completely unaware of the existence of programs like Shadow Defender which can contain and completely reverse all system changes with just a simple reboot.
Shadow Defender complements existing anti-malware and anti-execution solutions, providing superior damage control. It serves as the final safety net, the ultimate undo tool for cases where sophisticated threats have somehow managed to breach your other layers of protection. The latest version is fully compatible with SSDs and TRIM, and it also fully supports Windows 8.
When it comes to the security of your systems you should accept no half-measures or compromises. Being a long term Shadow Defender user myself I have to say that when it comes to the security of my own setups, this program has given me unrivalled peace of mind.
If you are interested in trying or buying Shadow Defender, you can visit this website.
 Ethereum Mining Guide - Part 1: The Basics & Set Up
 Unigine Superposition Benchmark: The New GPU Crusher
 3DMark Time Spy - DX12 Benchmarking for the Masses
 AMD Radeon Software Crimson Edition (RSCE) 16.4.2 Overview
 AMD makes game development easier with its new GPUOpen initiative
 'Radically different' business models coming to Xbox, CEO Asha Sharma says
 GEEKOM's new GeekBook M16 brings a Core Ultra 9 and a 99.9Wh battery to the business laptop market for $899
 AMD warns DDR5 prices won't recover until 2028 as AI demand continues pulling supply away from consumers
 SEGA under fire for using gen AI in new Crazy Taxi game
 Halo Studios quietly establishes innovative new business model for legacy game remakes
 Zelda Ocarina of Time remake confirmed for 2026 launch on Switch 2
 ID Cooling shows off wooden PC cases and matching AIO coolers at Computex 2026
 Formula V Line's Ice Nova Pro 3 air cooler could be perfect for brass-themed PC builds
 SAMA's Computex 2026 lineup includes a curved-glass case and AIO coolers with swappable screens
 Master Chief crashes the Covenant's vacation in new Halo remake prequel missions
 Navman MiVue Smart True 4K Surround Dashcam Review - Seeing In All Directions At Once
 IQUNIX Magi96 Pro Aluminum Low Profile Mechanical Keyboard Review - Premium Build, Satisfying Sound
 Asetek Forte S-Series Racing Simulator Bundle Review
 Razer Pro Type Ergo Wireless Split Ergonomic Keyboard Review - Built for Comfort and Support
 ASUS ROG Strix Morph 96 Wireless Gaming Keyboard Review - Great Performance, More Affordable
 SAPPHIRE Radeon RX 9070 GRE PULSE OC Review - A New 1440p Challenger Has Arrived
 NZXT H6 RGB+ Compact Dual-Chamber Chassis Review
 ASRock Radeon RX 9070 GRE Steel Legend Review - The RDNA 4 Mid-Range Reshuffle
 ASRock Z890 Taichi Aqua Motherboard Review - Flagship features without the flagship price
 GIGABYTE Z890I AORUS Ultra Motherboard Review - Mini-ITX with surprisingly good thermals
 The PowerToys utilities I keep enabled on every Windows 11 PC, and the ones I turned off within a week
 TweakTown's Best of Computex 2026 Awards - The Best Hardware, Gaming Gear, and AI
 Phison E37T SSD Controller Exclusive Preview - The Fastest DRAMless SSD Platform Yet
 USB Ports Not Working in Windows 11? Try These Fixes
 ASUS WiFi Routers and Networking Solutions Deliver Long-term Security and Reliability with No Additional Cost
 Second Monitor Not Detected in Windows 11? Try These Fixes
 Turn Your Old Smartphone Into a Dedicated Webcam for Your Windows PC
 The Send To menu is the right-click feature on Windows 11 that nobody bothers to customize
 Windows 11 will not let you pin a folder to the taskbar, but a 30-second workaround does
 ASUS ProArt Displays Unlock Creativity with Professional Monitors for Everyone