
Introduction

LAN parties are great events if done right; you get a bunch of people together that are bent on killing each other in a virtual sort of way. But the problem is, how do you go about getting the right equipment to get things going? You need some good, robust and most of all fast equipment to maintain the flow of those killer packets.
On the home front, as we have mentioned before people are turning their homes into small infrastructure environments. Many families have a computer per person living in the house and in some you may have more than one. This leads to an issue where you may over load your home router with connections. Most routers today only provide four ports. This is great if you only have a couple of hardwired systems, but what happens when you have five, six, or even more.
TRENDnet has graciously provided us with a potential answer to both of these issues. As the Pro-Sumer and the Enthusiast encroach on what was formerly a "members only" market, we have to look at more advanced equipment to meet the needs of these more demanding users. To find our answer we look at an enterprise class product and see if it can fit into the enthusiast space. So we present to you the TEG-240WS 24-Port Gigabit Web Smart Switch.
The Package

The box the TEG-240WS showed up in was understandably large. After all, it needs to contain a full sized 24-port switch and accessories. The packaging follows TRENDnet's habit of including a picture of the gear on the front of the box along with a few teasers on features.

The back of the box contains a little more information and the usual diagram to show how your new TEG-240WS fits into your network.

Inside the box we find all of the goodies; the TEG-240WS, a power cable, CD-ROM with manual and utilities, quick start guide and rack mounting kit. Everything you need to get the TEG-240WS connected and working is here.
The Switch
The TEG-240WS is a rather large piece of equipment, but this is nothing unusual; after all, it is designed primarily to sit in a tel-com rack but can find itself at home on a shelf as well.
The front is the business end with the full bank of 24 ports (in three groups of eight) and the two mini-GBIC ports visible to the right of the RJ-45 ports. These two ports allow for Fibre GBICs to be used for uplink between multiple TEG-240WSs or other switches that support spanning, or for simple uplink between network devices. If these two additional ports are used, RJ-45 ports 23 and 24 are unusable.
To the left of the RJ-45 ports are your indicator lights for the TEG-240WS; these provide system and power information as well as link state and speed for all of the ports on the TEG-240WS.

The back is very stark with only the reset button and the power port.

Even though the TEG-240WS might look unassuming, it is anything but. Under its sleek grey exterior is a switch capable of 48Gbps total switching capacity, multiple VLANs, multiple trunks (Link Aggregation), QoS profiles, IGMP relay and filtering, SNMP monitoring, port mirroring (for packet monitoring) and much more.
Setup and Installation
Installation of the TEG-240WS is quite simple. Configuring the device is a little more complex in terms of options, but is still made easier by the Web Smart interface.

One of the first things you will need to do is get the TEG-240WS on the proper network; you do this with a handy little utility that is found on the Utility CD-ROM.
This utility will scan your network for the TEG-240WS and allow you to perform basic configuration steps to get it ready for more advanced options as well as having a few advanced options of its own such as a monitoring function for traffic, password setting/changing, firmware updates and launching the Web Smart interface.

When you open the Web Smart Management Utility you will need to find the TEG-240WS. To do this, simply click on the discover button; this will tell the utility to search for connected web smart switches.
Once the TEG-240WS is found you highlight the listed unit and click the configure settings button.

In the window that opens you can set the IP address of the TEG-240WS as well as set up an SNMP trap if you are using one.

Once you have set the IP address to match your existing network range (or the desired range) you can log into the Web Smart Configuration utility built into the TEG-240WS.

Web Smart Configuration
Accessing the Web Smart Configuration is simple, you browse to the IP address that you chose for the TEG-240WS and it opens the login page.
One thing to note and I hope that TRENDnet considers fixing this in future firmware releases; the connection to the switch is not secure and I feel it would improve the product greatly to add an SSL connection to the Web Smart pages. This would protect the configuration better than the standard connection used currently.

Once you are in you come to the status screen. Here is all of the basic information about your TEG-240WS at-a-glance.

Keeping under the system heading we move down to System Settings. Here you can change the network information such as IP address, subnet, gateway, system and location name, as well as the login timeout.

Moving more steps down we come to the Trap Settings page. As we mentioned above there is a monitor in the Web Smart Management Utility. This page allows you to setup specific events for the TEG-240WS to send information to the monitor on.

Password setting is self explanatory as is the statistics page; the nice thing about the statistics page is that you can view individual ports in greater detail by clicking on the port number.


Factory reset, backup settings, firmware upgrade and system reboot round out the System heading.

Next up is the Advanced header. Here your only option is for setting up IGMP Snoop Settings. IGMP stands for Internet Group Management Protocol and it is intended to reduce the flood of multi-cast traffic on a network. Enabling this in a typical network can help to improve performance globally by cutting down on the amount of traffic set to all ports on the switch by only sending IGMP Multi-Cast traffic to systems with IGMP clients actively listing on the network.
Of course, multicast traffic is not entirely bandwidth intensive and enabling snooping puts a larger demand on the router, but it is an important function as we move into the world of media extenders and streaming HD TV and Movie servers in our home networks. For the LAN Party setup this is not completely needed as the server and clients will be actively connecting anyway. In an enterprise environment this is an important feature if you are running video or remote installation servers as it will over all improve performance across the network.

Moving up one more header, we come to the Setup header. Under Setup we find the most interesting options for the configuration of the TEG-240WS. At the top of the list is the Port Settings page. Here you can manually adjust the speed and flow control of each and every port to suit the needs of the LAN you are building. The Flow Control option is available for each port but should not be used while QoS is setup as it can prevent QoS from working properly. There will be times that you may need to run Flow Control though (for 802.3x compatible devices as you will see below).

The 802.1q VLAN settings are up next. Here you can create multiple symmetrical and asymmetrical Virtual LANs with tagged and untagged frames. You can also establish common ports to allow for access to a single server or point of connection (e.g. for Internet). This is a powerful function that has uses in enterprise networks but can also be handy for LAN Party setups and even more advanced home networks; segregating Console Game traffic from a home office network, segregating an internal LAN for game play without external access (for younger kids) or simply breaking the 24 ports into a regular network and a testing environment.

The TEG-240WS also supports trunking or link aggregation for increased bandwidth.
You are able to setup a maximum of four trunks with up to eight ports in each. When setup the trunks combine the ports for greater through put. I found this especially handy with my Thecus 5200 Pro NAS. Although I ran into problems using the 802.3ad setting; when 802.3ad was enabled on the 5200 Pro and trunking was setup on the TEG-240WS I was not able to connect to the 5200 Pro. However, by setting up load balancing on the 5200 Pro and trunking on the TEG-240WS I was able to significantly improve performance of the 5200 Pro.

Another excellent feature of the TEG-240WS, although one that has no translation into the home or LAN Party arena, is port mirroring. By setting up port mirrors you can forward all packets from a particular port to another port for study. You can set up mirroring for transmitted, received or all packets.

802.1p otherwise known as QoS (Quality of Service) is another feature of the TEG-240Ws that is worthy of mention. In this section you can individually adjust for the QoS level on a per port basis. By setting higher and lower QoS levels you can shape the way traffic moves through your network. This can be good in a home/home office environment where there might be servers or storage that need a higher priority than the kids browsing the internet or gaming. It works inside VLANs but will not work if you have Jumbo Frame enabled.

Broadcast Storm Control is excellent to prevent overloading the TEG-240WS with broadcast packets (like DHCP requests etc). Although this feature is disabled by default, turning it on can improve enterprise performance by setting a limit on the amount of broadcast packets allowed through the TEG-240WS.

Jumbo Frame control allows devices on your network that are capable of Jumbo Frames to combine packets (frames) of the same type, like video, into a single larger frame. By enabling this on the TEG-240WS and any Jumbo Frame aware devices you can improve performance by reducing the processing time of a larger number of smaller packets. One down side to using this feature is that you cannot individually adjust QoS per port when this is enabled.
Testing
We used PerformanceTest 6.1 by PassMark which you can find out more information about here. It has a handy Advanced Networking section which is perfect for our testing.
Doing our best to emulate a real-world performance scenario, I setup a server running Windows 2008 (x64) Server, (2x Xeon Quad Core 3.0 GHz 1333MHz FSB, 4GB DDR2 FB-DIMMS, 2x 146GB SAS drives in RAID 1) as well as setting up a NAS (Thecus 5200 Pro) that was capable of Link Aggregation and Jumbo Frames. Since the TEG-240WS covers a larger network than our usual networking devices, I wanted to add in a few more clients rather than our usual single client run.
These were:
1 - HTPC system Windows Vista Ultimate on an Intel E7200, 4GB RAM connected through a powerline connection.
1 - Wireless system an ASUS G2S-X1running Windows Vista Ultimate x64, using n-Spec wireless connected through a D-Link DIR-655 in AP mode with WAP-2 PSK AES.
1 - Hard wired system Core i7 965, 6GB Kingston RAM, Windows Vista Ultimate x64.
I ran Performance Test 6.1 on each as well as file transfers (3GB ISO file) and streamed HD (1080p) to each in Media Center.
The TEG-240WS was compared to a standard D-Link DGS-2208, granted the 2208 is not an enterprise class switch but it serves to demonstrate the advantages of a switch like the TEG-240WS over a less expensive model. The following advanced features were enabled on the TEG-240WS:
Jumbo Frame
Trunking (for the Thecus 5200 Pro)
IGMP Snoop
- Bandwidth

*signal travelling through wet wall and main house electrical panel
Overall, the TEG-240WS saw an impressive improvement in all traffic types. Even the limited powerline connection experienced a boost.
For my file transfers I found that over a wired system I was able to move my test file to the 5200 Pro in 1 minute and 39 seconds with the TEG-240WS and with trunking and jumbo frames this was in stark contrast to the 3 minutes and 20 seconds it took with the 2208. For transfers from the 5200 Pro my times were around 2 minutes and 13 seconds for hardwired systems versus over 4 minutes on the 2208.
For Wireless my times were -
TEG-240WS - 6:50 Up 9:50 Down
DGS-2208 - 10:12 Up 12:35 Down
For PowerLine -
TEG-240WS - 6:45 Up 9:40 Down
DGS-2208 - 10:15 Up 13:01 Down
HD Video streamed from the 5200 Pro was flawless on all media; there were no stutters, clicks or other anomalies. In addition, streaming the HD Video to the HTPC systems was not affected by other internet traffic.
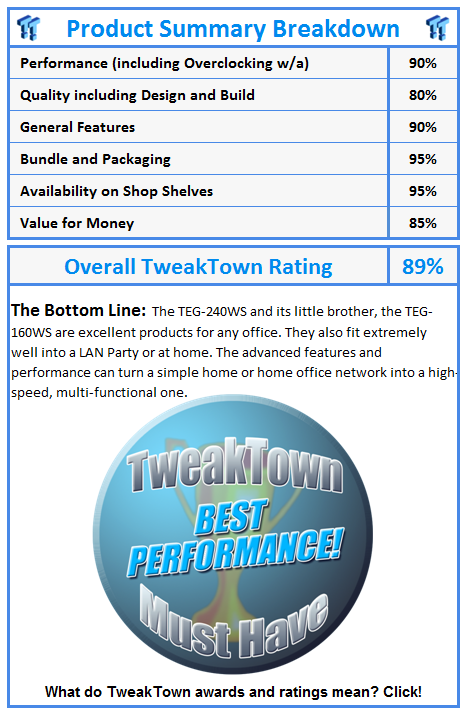
Final Thoughts
The TEG-240WS is intended as an enterprise class product, but it has some significant performance improvements that make it work in a LAN Party setup or in a mixed home network for the enthusiast or Pro-Sumer. Advanced features like Jumbo Frame, Trunking, IGMP and VLANs make it a very versatile product.
The VLAN feature makes it practical to use as a single solution for a home office, home network, console network setup while the TEG-240WS' processor has the power to keep all of those networks running at top speed.
As the lines blur between what was formerly an enterprise only configuration and what we see in the future for home networks, products like the TEG-240WS will find their way into more and more homes. The price tag of249.99 USD will be a small price to pay for the features and functions, while products like Windows Home Server, Sage Media Server and other home media servers will only serve to quicken the trip of the TEG-240WS and its smaller bother, the 16-port TEG-160WS into the home.
 United
States: Find other tech and computer products like this
over at
United
States: Find other tech and computer products like this
over at  United
Kingdom: Find other tech and computer products like this
over at
United
Kingdom: Find other tech and computer products like this
over at  Australia:
Find other tech and computer products like this over at
Australia:
Find other tech and computer products like this over at  Canada:
Find other tech and computer products like this over at
Canada:
Find other tech and computer products like this over at  Deutschland:
Finde andere Technik- und Computerprodukte wie dieses auf
Deutschland:
Finde andere Technik- und Computerprodukte wie dieses auf  Fallout 76 player drops a nuke on Microsoft Gaming CEO Phil Spencer's Camp
 This external GPU dock has OCulink and a built-in 550W power supply, supports huge GPUs
 ASUS unveils ROG Ally X: same Ryzen Z1 Extreme APU, over 16GB RAM, larger battery, and more
 More job cuts coming to Xbox shortly after Arkane Austin and Tango Gameworks closures
 Why Xbox closed Tango Gameworks and Arkane Austin
 Corsair MP700 Pro SE 4TB SSD Review - As Fast as They Come
 Corsair MP600 Mini 2024 Edition 1TB SSD Review - Fastest Tiny Drive on the Planet
 Lexar SL500 1TB Portable SSD Review - The best of native USB
 Corsair Platform:6 Elevate Modular Desk Review
 4K Blu-ray Review") True Lies (1997) 4K Blu-ray Review
True Lies (1997) 4K Blu-ray Review Fractal Design North XL Full-Tower Chassis Review
 Western Digital WD Gold 24TB HDD Review - High-Capacity Masterpiece
 AOC U27G3X 27-inch Gaming Monitor Review - 4K 160Hz for $500
 MSI Vector GP68HX Gaming Laptop Review
 Review") Dell UltraSharp 40 5K Curved Thunderbolt Hub Monitor (U4025QW) Review
Dell UltraSharp 40 5K Curved Thunderbolt Hub Monitor (U4025QW) Review Building the Ultimate Home Entertainment Server with an ASUSTOR NAS and Viper Gaming NVMe SSDs
 Everything you need to know about the latest ASUS NUC Mini PCs - NUC 14 Pro and ROG NUC
 How to Overclock Your GPU and Boost Your PC Gaming with ASUS GPU Tweak III
 ASUS's AMD Radeon RX 7000 Series GPU lineup has something for every gamer
 ASUS OLED Premium Care defends the ROG Swift OLED PG32UCDM gaming monitor from burn-in