


Introduction
Windows 7 and Vista (and XP) Simple Multi-Boot Guide
Microsoft had gotten a lot of people's knickers in a bit of a knot late last year during WinHEC when it first started providing copies of its next operating system, Windows 7, to developers and hand selected media.
Fast forward a few months and this week Microsoft finally introduced its public BETA of the Windows 7 operating system, in the Ultimate flavor, which MS claim is basically the equivalent of Vista Ultimate. Now everyone gets a shot at it. We got our hands on a 64-bit version product key (32-bit is also available - check here for tips!), downloaded the 3.15GB ISO install file from the Microsoft servers and got down to business, working with the almost final version of Windows 7.
As always, it pays to be cautious when working with BETA software, but so far Windows 7 is rather polished and we haven't experienced many major issues. Actually, we're quite impressed by the responsiveness of the OS, which is one of the major things Microsoft said they would work on.
In this quick and simple guide today, we are going to show you how to multi-boot Windows 7, Windows Vista AND Windows XP. Actually, the method we use will probably work for booting other operating systems as well, such as Linux Ubuntu and others. This guide will assume that you have Windows Vista SP1 (yes - the service pack must be installed, too!) already installed and you are prepared to upgrade that install to Windows 7 (W7) BETA, as per the requirement from Microsoft.
It's going to mean installing Vista again once W7 has been upgraded, but this is the safest, quickest and easiest method we have found. We do know there are many software applications out there that allow you to setup dual booting, but this method doesn't require any additional software at all and just works!
Go grab yourself a tea or coffee and then hit the next page as the guide begins!
Step 1 Preparation
Step 1 - Preparation
Alright then, the first step involves having Windows Vista (either 32-bit or 64-bit) with Service Pack 1 (SP1) already installed on a hard disk drive with at least 100GB free space for good measure. This is because Microsoft's Windows 7 BETA program requires you to upgrade from Vista SP1 to Windows 7.
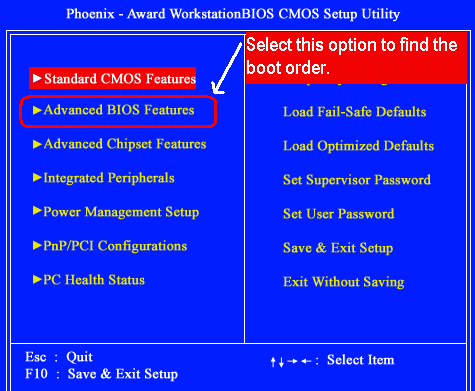
Once you've downloaded the Windows 7 BETA (and do note that this guide will more than likely also apply for the final shipping version of W7, too, whenever it is released), burn the ISO to a DVD and set your computer's BIOS to boot from CD/DVD as the first boot device - you'll find that open under 'Advanced BIOS Features' or something similar depending on your motherboard.
If you did that part correctly, your computer will see the DVD you burnt with W7 and begin booting from it into the setup. Follow through the Windows 7 install screen until it is all done - depending on the speed of your computer, it may take up to a few hours to upgrade Vista to Windows 7, but on our test system, which is relatively new and fast (Intel Q9450 CPU @ 3.2GHz, 4GB RAM and X48 chipset), it took about one hour to complete and boot into the shiny new Windows 7 desktop.
Now that Windows 7 has taken over your previous Vista install, what we need to do now is setup the new partitions for installing Vista again as well as Windows XP and other operating systems you want to multi-boot. This might seem a little scary for new users, but it's really quite easy if you follow the screens we prepared for you.
Read on over the next page!
Step 2 - Partitioning
Our method of setting up multiple boots requires setting up a separate and new partition for each boot operating system. Let's get started on this part by booting into Windows 7 and then clicking Start, Control Panel, "All Control Panel Items" at the bottom right and then click Administrative Tools, Computer Management, Storage and then finally Disk Management.

You will be greeted with a screen similar to the one above. N.B. we have already setup our partitions; you still need to do that now.
In Windows XP this wouldn't be possible and you'd need to buy a standalone application such as Partition Magic; but in Vista and Windows 7, Microsoft thankfully added in quite a few disk tools for messing with partitions, sizes and so on. What we are going to do now is shrink your Windows 7 partition (or volume) size, to create space for installing our other operating systems.

To do that, right click on your Windows 7 volume / partition ( as seen above), and click Shrink Volume.
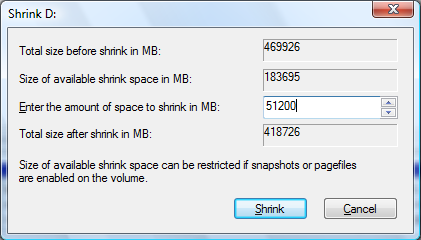
The next step is to determine the size of the new partition that you are creating. For Windows Vista SP1, we recommend at least 20GB as a safe number and for Windows XP, we recommend at least 5GB, which is also a little over what you actually need.
So, as you can see in the screen above, enter the amount of space to shrink your Windows 7 volume in megabytes - we setup a new 50GB volume for Windows Vista, which is 51200MB (50 x 1024). Once you've entered the amount of space, click 'Shrink'.

You will then be greeted with your new partition, unformatted and unallocated. You can have Windows Vista and XP installs do this for you, but we'll do it now, just to confirm everything is working and that you've followed the guide correctly thus far.

The next step is right clicking on the new partition and clicking 'New Simple Volume', as you can see above.
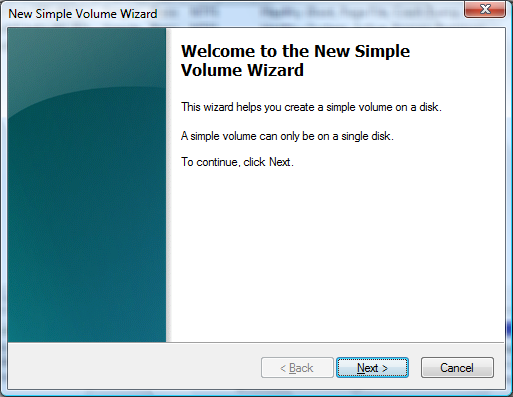
Click 'Next'.
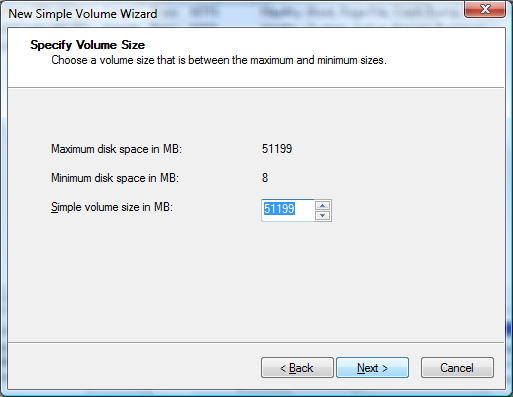
Leave the volume size as is and click 'Next'.
Here you can assign the drive letter for your new partition - we recommend you leave it at whatever Windows suggests and then click 'Next'.
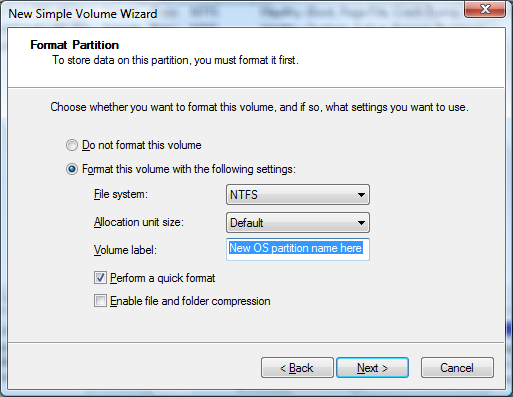
Now we are up to formatting the new partition and creating a volume label (or name) for it - you will also want to make sure you keep the file system set as NTFS, unless your operating system has specific requirements for another. For simplicity purposes, label it the same as whatever operating system you wish to install on it, so it is easy to recognize when installing your OS. Ensure you click 'Perform a quick format', otherwise it will take a long time to do a full format - then click 'Next'.
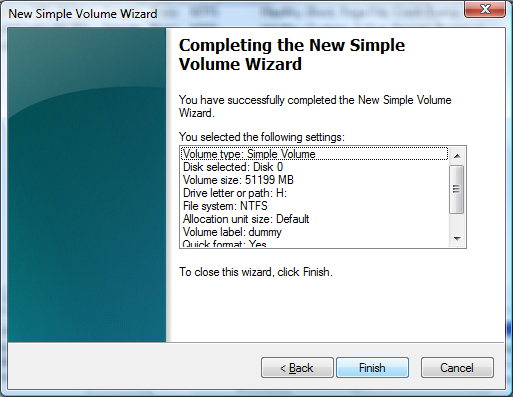
Your partition is almost ready, click 'Finish'.

Here you can see that your new partition is being formatted. Once the format has completed, a new window will pop up in Windows Explorer with your new drive. It will be empty and that also confirms for us that you've followed the guide correctly up to this point.
Depending on which operating systems you want to multi-boot, you will want to apply this above process again. Just do the same by shrinking your Windows 7 volume and you'll be just fine.

Here you can see our "dummy" partition is fully setup and ready to go for installing the OS.

Here you can see the partitions fully setup under My Computer. And now that our partitions are fully setup, we are ready to begin installing our operating systems!
Step 3 - Installing Windows Vista
The hardest part for including Vista on the multi-boot is already done, you did that in the previous step.
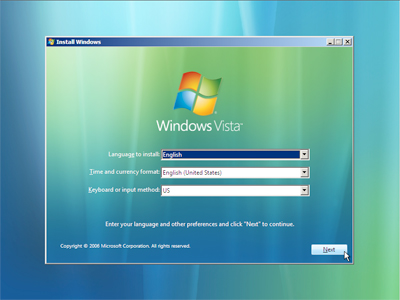
All you need to do now is find your copy of Windows Vista and boot from that DVD at boot and begin the Vista install process, as normal.
The only real difference is that when it comes to choosing where to install Vista, you need to make sure you pick the new partition you setup and labeled for Windows Vista - if you labeled the drive during formatting in Windows 7, it should be very easy to pick out.
DO NOT pick the wrong partition as it will break your Windows 7 install.
Once Vista has been fully installed, reboot and you'll have the option of booting either Windows 7 or Windows Vista from the boot menu. That was easy, huh?
Now we move onto Windows XP, which is more complicated, but easy enough if you follow the steps.
Step 4 - Installing Windows XP
Again, the hardest part for including XP on the multi-boot is already done, you did that in the previous step. But this time, unlike Vista, there are a few more steps involved.
Find your copy of Windows XP and boot from that CD at boot and begin the XP install process as normal. Again, the only real difference for installing is that when it comes to choosing where to install XP, you need to make sure you pick the new partition you setup and labeled for Windows XP (or whatever you called it) - if you labeled the drive during formatting in Windows 7, it should be very easy to pick out.
DO NOT pick the wrong partition as it will break or damage your Windows 7 or Vista installs.
Once XP has been fully installed, reboot and don't panic; it will have removed (well, more so hidden) your Windows 7 and Vista boot menu, since XP uses a different boot loader in the MBR (Master Boot Record) of your hard disk drive. Follow the next steps to restore the boot menu, and then we are back in business.
(We would like to credit William Wilson over at SysChat for doing the groundwork here.)
Step 4a - Find your Windows Vista setup DVD once more and boot from it as if you were installing Vista again.
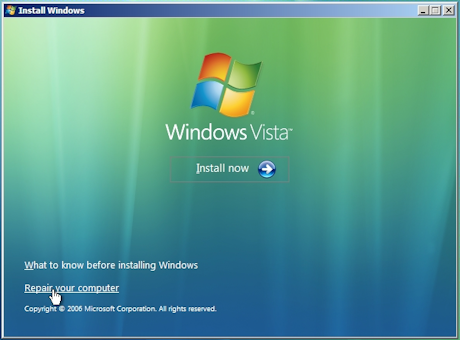
Step 4b - Click next on the first screen and then click 'Repair your computer' - do not click 'Install now'!
Step 4c - Setup will search for operating systems and will detect Windows 7 and Vista, but not XP - that's okay. Click 'Microsoft Windows Vista' and then click 'Next'.
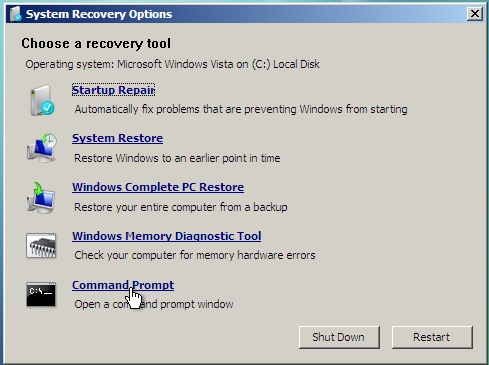
Step 4d - Next you will be greeted with System Recovery options and you need to click 'Command Prompt', as you can see above.
Step 4e - In the command prompt, type the two following commands one by one:
Bootrec.exe /fixMBR
Bootrec.exe /fixBoot
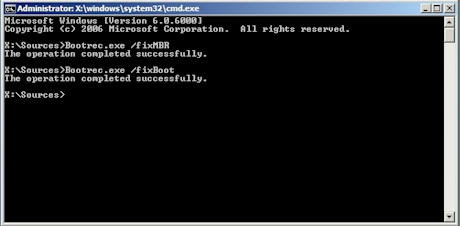
If the commands were successful, you will see something like the above. What we have done here is hand back control of the boot loader to Windows Vista from XP - you can reboot your system now and boot into Windows Vista.
Step 4f - Now we need to edit the Windows Boot Manager in Vista to tell the boot loader that Windows XP exists and that we want it on the boot menu. We need to open up a command prompt in Vista with administrator privileges - to do so, click start and then in run type 'cmd' - right click on it and click 'Run as administrator'.
Now you need to enter in these commands one by one (note: NTLDR means XP):
bcdedit -set {ntldr} device partition=C: (this either needs to be set to the drive letter of your Windows 7 or Vista partition - if you try and boot XP and it tells you that you are missing or have a corrupted file, just try a different letter!)
bcdedit -set {ntldr} path \ntldr
bcdedit -displayorder {ntldr} -addlast
bcdedit -set {ntldr} description "Microsoft Windows XP" (or whatever you want to call it in the boot menu - you can go crazy!)
Now you can close and reboot Windows Vista.
Step 5 - The End Result
See, now that wasn't too hard, was it?!
The end result here is that you can now multi-boot not only Windows 7 and Windows Vista, but also Windows XP and other operating systems that you want to use as well.
If you followed the guide correctly, after that final reboot of Windows Vista you will be greeted with your polished boot loader menu, as you can see below.
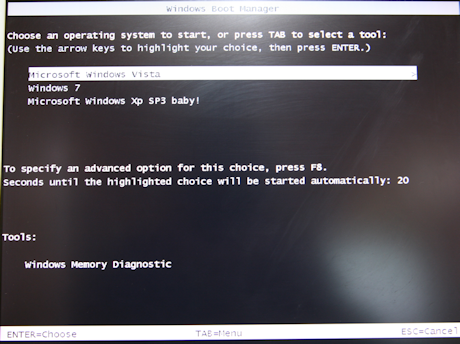
Sorry, I think I got a little carried away and excited about XP SP3 there, but it was nice to see it working.
We hope you enjoyed the guide and while we cannot answer technical questions over email, you can leave your questions and comments over in our forums!
Our Latest TweakTown Guides
- The PowerToys utilities I keep enabled on every Windows 11 PC, and the ones I turned off within a week
- USB Ports Not Working in Windows 11? Try These Fixes
- Second Monitor Not Detected in Windows 11? Try These Fixes
- Turn Your Old Smartphone Into a Dedicated Webcam for Your Windows PC
- The Send To menu is the right-click feature on Windows 11 that nobody bothers to customize
 The PowerToys utilities I keep enabled on every Windows 11 PC, and the ones I turned off within a week
 USB Ports Not Working in Windows 11? Try These Fixes
 Second Monitor Not Detected in Windows 11? Try These Fixes
 Turn Your Old Smartphone Into a Dedicated Webcam for Your Windows PC
 The Send To menu is the right-click feature on Windows 11 that nobody bothers to customize
 'Radically different' business models coming to Xbox, CEO Asha Sharma says
 GEEKOM's new GeekBook M16 brings a Core Ultra 9 and a 99.9Wh battery to the business laptop market for $899
 AMD warns DDR5 prices won't recover until 2028 as AI demand continues pulling supply away from consumers
 SEGA under fire for using gen AI in new Crazy Taxi game
 Halo Studios quietly establishes innovative new business model for legacy game remakes
 Zelda Ocarina of Time remake confirmed for 2026 launch on Switch 2
 ID Cooling shows off wooden PC cases and matching AIO coolers at Computex 2026
 Formula V Line's Ice Nova Pro 3 air cooler could be perfect for brass-themed PC builds
 SAMA's Computex 2026 lineup includes a curved-glass case and AIO coolers with swappable screens
 Master Chief crashes the Covenant's vacation in new Halo remake prequel missions
 Navman MiVue Smart True 4K Surround Dashcam Review - Seeing In All Directions At Once
 IQUNIX Magi96 Pro Aluminum Low Profile Mechanical Keyboard Review - Premium Build, Satisfying Sound
 Asetek Forte S-Series Racing Simulator Bundle Review
 Razer Pro Type Ergo Wireless Split Ergonomic Keyboard Review - Built for Comfort and Support
 ASUS ROG Strix Morph 96 Wireless Gaming Keyboard Review - Great Performance, More Affordable
 SAPPHIRE Radeon RX 9070 GRE PULSE OC Review - A New 1440p Challenger Has Arrived
 NZXT H6 RGB+ Compact Dual-Chamber Chassis Review
 ASRock Radeon RX 9070 GRE Steel Legend Review - The RDNA 4 Mid-Range Reshuffle
 ASRock Z890 Taichi Aqua Motherboard Review - Flagship features without the flagship price
 GIGABYTE Z890I AORUS Ultra Motherboard Review - Mini-ITX with surprisingly good thermals
 TweakTown's Best of Computex 2026 Awards - The Best Hardware, Gaming Gear, and AI
 Phison E37T SSD Controller Exclusive Preview - The Fastest DRAMless SSD Platform Yet
 ASUS WiFi Routers and Networking Solutions Deliver Long-term Security and Reliability with No Additional Cost
 Windows 11 will not let you pin a folder to the taskbar, but a 30-second workaround does
 ASUS ProArt Displays Unlock Creativity with Professional Monitors for Everyone