


Our Verdict
Introduction, Specifications, and Pricing
As of the last few years, the trends in sealed liquid cooling solutions have been to load these AIOs with as many features as possible and entertain the customer, rather than deliver a product worthy of the time it takes to test it. For quite some time, the amount, intensity, and control of lighting has been huge, and so has having the quietest system, or the one with the largest screen on its head unit. Whatever the new flavor of the month, we have seen it all come, and hopefully will eventually go, in favor of days of old, when AIO coolers were all the rage due to performance, not because of flash and bling.
It is rare, but every once in a while, we are starting to see manufacturers who are not fine with a $50 to $75 air cooler kicking its hind end, sitting on the fact that its lighting is awesome. We get it. RGB is huge, and we are one of them who will use it whenever it looks good. Hell, who are we kidding? We have systems puking rainbows just like the rest of you do. None the less, things like software control, fancy ARGB lighting abilities, and those types of aesthetic features should only be important after the performance is addressed to a satisfactory level for the cost being asked. While the market as a whole got stale in our minds, some manufacturers are finding their way through the masses of manufacturers already offering AIOs, and sneaking in with a surprise product that nobody saw coming.
Within the Castle 240R that we have in hand from DEEPCOOL, you will get a mix of a bit of old school design, some well thought out engineering added in, sprinkle in some RGB all over the cooler, and make it compete with the top of the charts. This is what DEEPCOOL has done, and in a very affordable package to boot. If, like us, you want to get back to the days when manufacturers battled it out for the top of our cooling charts, DEEPCOOL has a cooler you have to give some attention to. The Castle 240R might just be an ARCTIC LFII 280 killer!
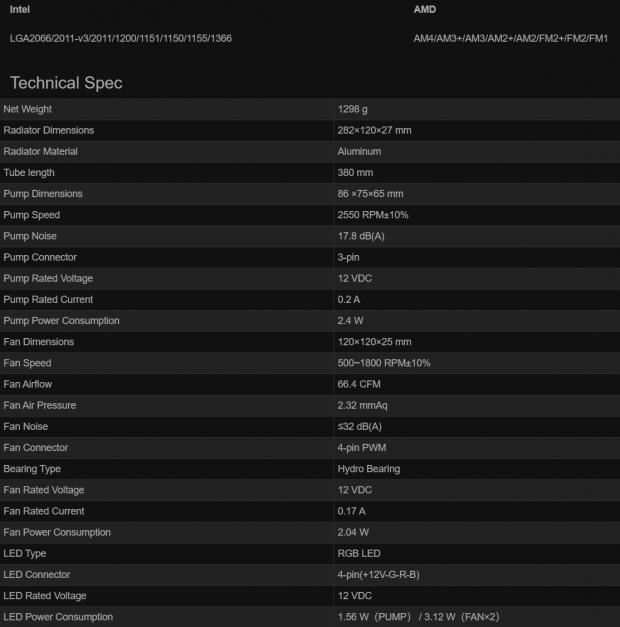
The chart we borrowed from DEEPCOOL's product page begins with compatibility. On the left, we find the Intel list, where we find LGA2011/2066, 1200, 115X, and even 1366. As for AMD users, anyone with an FM1/FM2, AM2, 3, and 4.
Best Deals: DEEPCOOL Castle 360EX AIO Liquid CPU Cooler
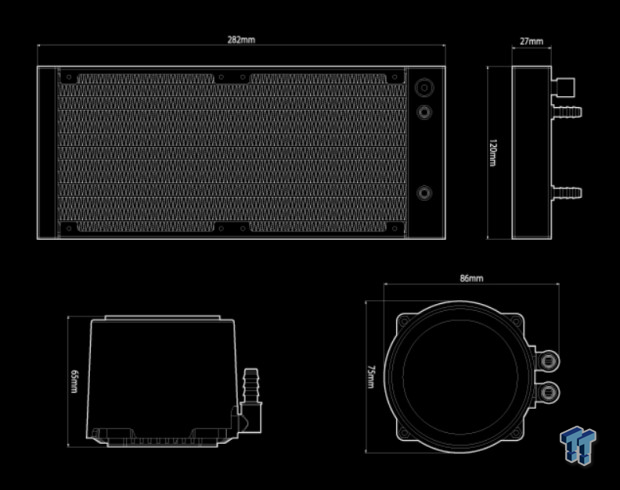
The bulk of the chart starts with 1298 grams of the total weight of the Castle 240R and then moves to the radiator. We see it is 282mm long, 120mm wide, 17mm thick, and we see it is made of aluminum. Between the radiator and the head unit, there is 380mm of tubing, but oddly, no mention that they come with a braided sleeve. The pump comes next, where we see three dimensions, and that is why we included the image below to help explain how that works. The pump is rated at 2550 RPM, producing just 17.8 dB(A) of noise, and is powered with a 3-pin header drawing 2.4W of power.
Cooling the radiator is the task of a pair of DF1202512CM DEEPCOOL fans. These are 120mm fans that can deliver 66.4CFM each. Static pressure at full speed is rated at 2.32 mmH2O, and noise is said to be at or below 32 dB(A). Each fan draws power through a 4-pin PWM connector, drawing 2.04W, and is also RGB backlit. We also see mention of the 4-pin RGB system used, which adds another 7.8W of a draw. The entire system draws less than 15W with full lighting and full speed of the pump and fans, so it matters little overall.
One thing that does not appear thus far is any mention of the anti-leak tech, which to us a k key feature to this system and well worth a heads up in all forms of information DEEPCOOL provides. However, it is right there, on the front of the box.
Our Latest CPU Liquid Coolers Review Coverage
From what we can gather from Amazon, DEEPCOOL is listed as the source of the products, and there are no signs of third-party listings at this time. What we do see is that DEEPCOOL is asking just $79.99 for our Castel 240R RGB AIO. Very similar to the release price of the LFII 240 we looked at, where manufacturers are getting back to the old days of AIO releases. Hopefully, DEEPCOOL can deliver performance at a low cost while still offering a fair bit of style and lighting.
Packaging

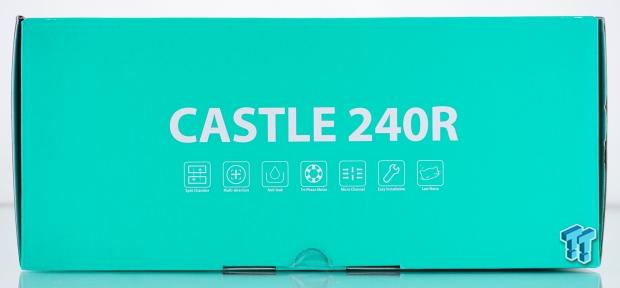
DEEPCOOL opts for a minty green and gray to highlight the Castle 240R image in the center of the panel. At the top is the DEEPCOOL logo at the left, but the right side is used to point out the Anti-Leak Tech that many AIOs do not possess! Across the bottom, we see the various RGB sync products that the 240R is compatible with, and we also see more of that industrial X design we found in the AS500.
On this larger side panel, we find a ton of mint green and white text and imagery. The product's name stands out the most, but below it are mentions of the split chamber design, multi-directional flow tri-phase motor having, micro-channel using, easy to install, low noise pump. There was also a mention of Anti-Leak, but that is found in the radiator.
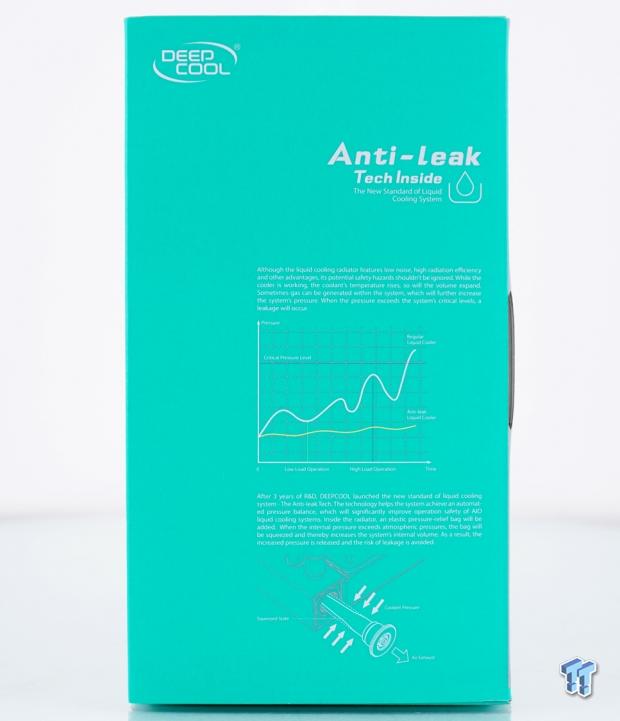
On this panel, DEEPCOOL takes the time to describe why the Anti-Leak Tech is needed. There have been many stories of AIOs leaking and taking systems with them, but DEEPCOOL solves the pressure build-up issue with a bladder system. Sliding an elastic pressure-relief bag into one of the radiator headers allows the bag to stretch and compress to equalize the pressure inside of the radiator with that outside of it. They are removing stress on weak points, like connections.

On the opposite end of the box, we see the DEEPCOOL name and logo, the Castel 240R name of the cooler, with a small mention of the +12V RGB LED feature. The lower half of the panel is used for legal and company information, providing stickers at the bottom for both the model number and serial number.
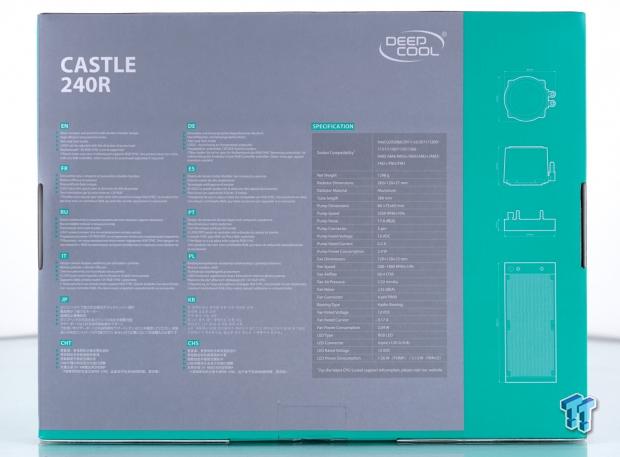
The back of the packaging is a reminder of what we discussed on this review's previous page. Five features are listed at the left, discussing the double chamber design, the high-power motor, Anti-Leak Tech, Logo that can be adjusted, and motherboard sync compatibility. Off to the right, we find the specifications chart and dimensional renderings of the components of the Castle 240R.
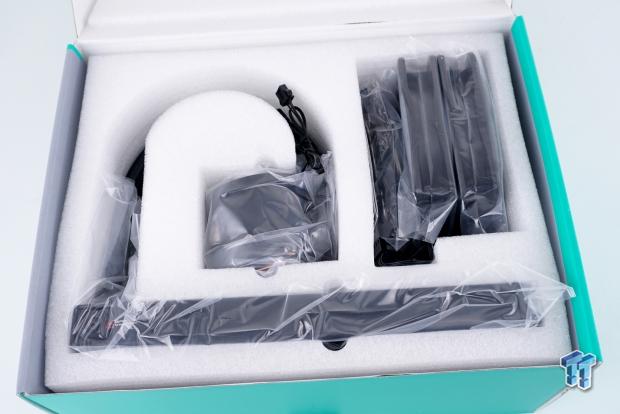
We love that DEEPCOOL, while offering the Castle 240R for a budget-friendly cost, still takes the effort to pack it better than many of the more expensive options! Open celled foam is great for two reasons. It takes impacts better than recycled cardboard, and more important to us, is foam does not leave dust all over the product that shows up in our images. Everything is in its place, with the radiator and the head unit kept separated, and the hardware and fans are tucked away from them to the right, allows this Castle 240R to arrive blemish-free.
DEEPCOOL CASTLE 240R Liquid CPU Cooler
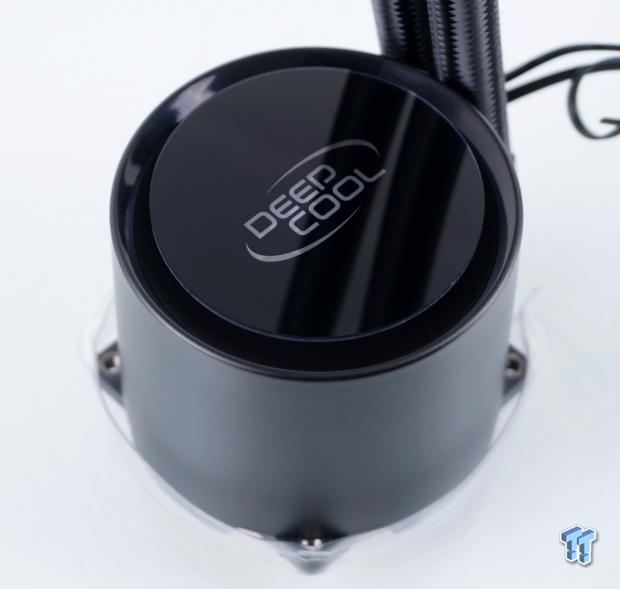
The head unit of the Castle 240R is round, ships without mounting hardware attached to it, and the black, slightly textured, plastic runs up the sides, and as it gets to the top, it immediately dives in on an angle, under the center portion. With a gap around the edge, where lighting emanates, as well as from the DEEPCOOL logo. While not an easy thing to do, you can grab onto the center of the top of the head unit, the part with the DEEPCOOL logo, and twist it in either direction, should it not be installed in a way that it is easily readable.
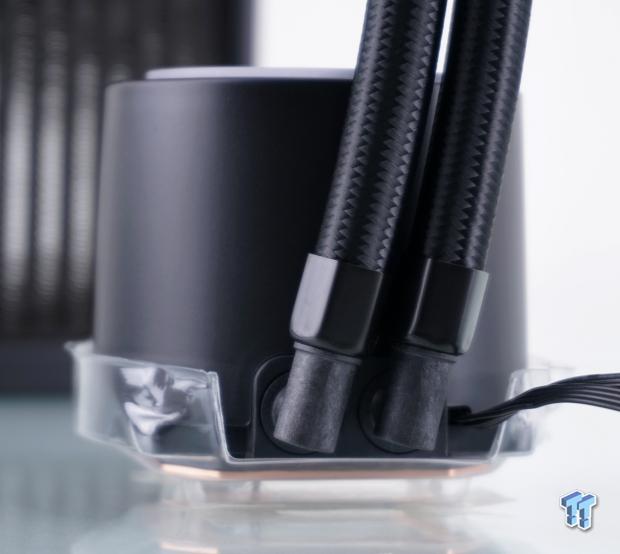
One side of the head unit contains all of the connectivity and is typically the side closest to the memory. Here, we find the pair of 90° swivel fittings with hexagonal covers over the "clamps" and ends of the braided covering. To the right of the fittings, we so see a pair of leads coming from the head unit, one to power the pump, the other for RGB lighting control.
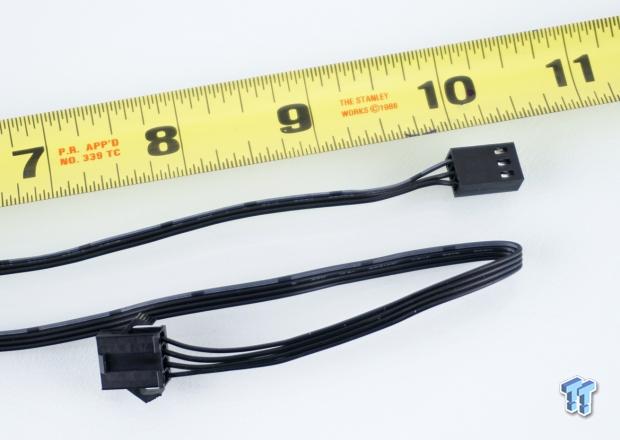
The other ends of those same cables are what we see now. The 3-pin power lead is what powers the pump and is over ten inches in length. The 4-pin connector is for the +12V RGB system and is slightly more than thirteen inches in length.
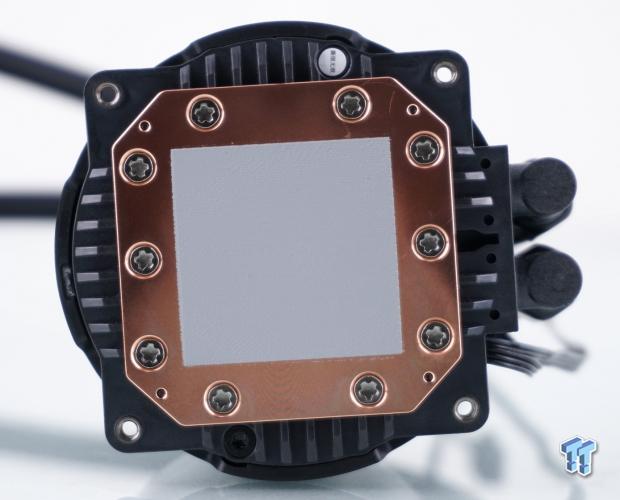
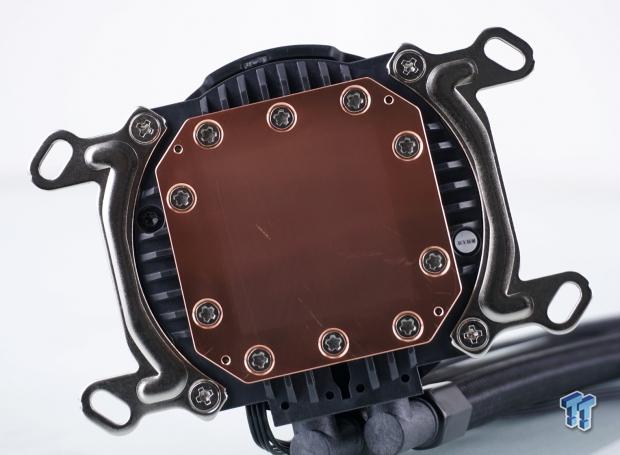
After removing a plastic protective cup covering the bottom of the head unit, we look at the pre-applied thermal paste. The application is quite large and will cover any of the compatible CPUs listed. While Torx screws would allow you to look under the copper base plate and possibly get you into the pump portion of the head unit, there is an anti-tamper sticker that lets DEEPCOOL know if you were poking around in it.
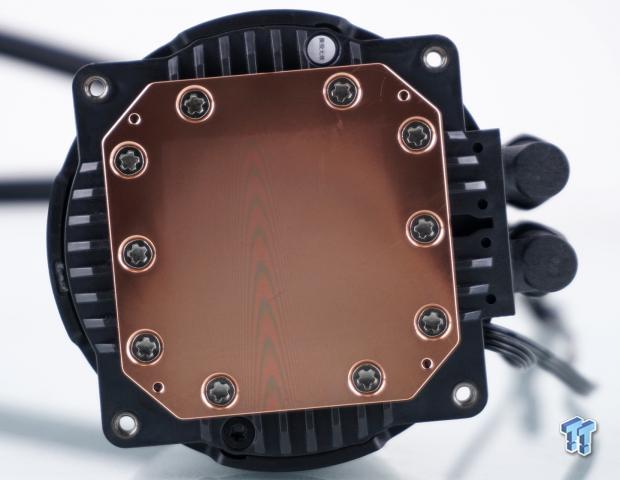
After removing the thermal paste, we get an unencumbered view of the convex copper cold plate. There are very fine circular machine marks left on the surface. The copper is otherwise very clean, without oxidation, and with minimal marks that are in no way deep or detrimental to this cooler's performance.
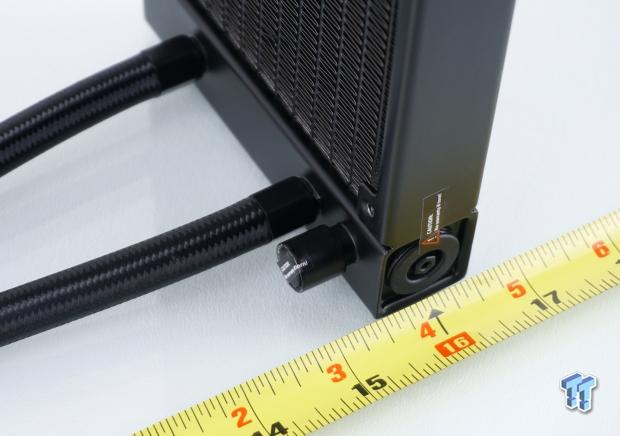
From the butt end of the 90° fittings to the radiator's edge is nearly fifteen and a half inches in length, which is, again, more than some more expensive options offer. The radiator's fittings are handled in the same manner as we saw on the side of the head unit, and we also see the fill-port for the radiator, again, with an anti-tamper sticker in place.
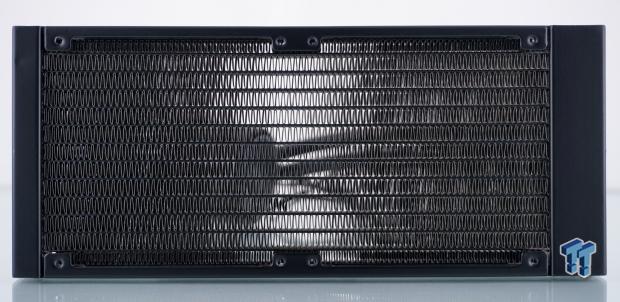
The 240mm aluminum radiator that supports the fans for heat removal also opts for a high FPI count. In a random spot, we counted 23 fins per inch and are glad to see that the fans shipped with the cooler are said to have decent airflow with a fair bit of static pressure to back them.

The radiator's tubes and fins are 24 to 25mm thick, but the frame around them is 27mm thick. It is also made of aluminum, painted with matte black paint, and is plain on all four sides.
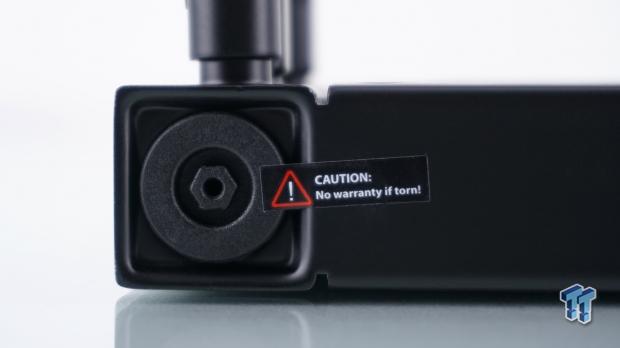
We have no plans to open this, but there is an anti-tamper sticker here, telling you not to look at the Anti-Leak Tech, at least not until the warranty expires. The bag of air, which expands and compresses, is attached to the plastic cover's back. It screws into the side of the header of the radiator, and the pressure is equalized through the hole in the center.
Accessories and Documentation
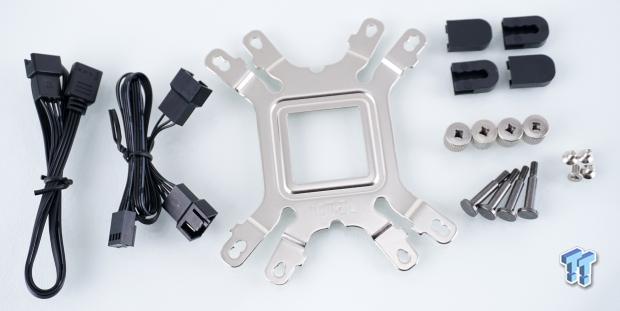
While all of the hardware comes in a large bag, there are multiple smaller bags inside it, one of which contains what you see here. On the left is the +12V RGB splitter cable, with a 4-pin PWM fan splitter cable to its right. In the middle is the universal backplate for most of the compatible installations. To use the backplate, you will need the black plastic clips at the top to lock the studs at the bottom into the backplate. The knurled nuts are used to mount the head unit, and the four small countersunk screws are used to mount hardware to the head unit.
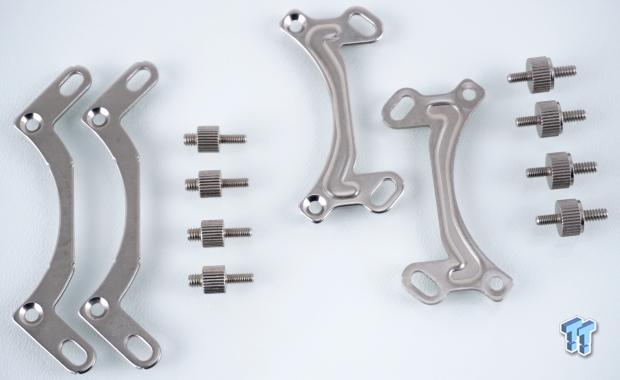
Intel head unit brackets are seen at the left, with the LGA2011/2066 standoffs next in line. We then run into the AMD head unit brackets, with AM4 standoffs. All other socket types should be using the studs and backplate from the previous image to mount these brackets to the motherboard.
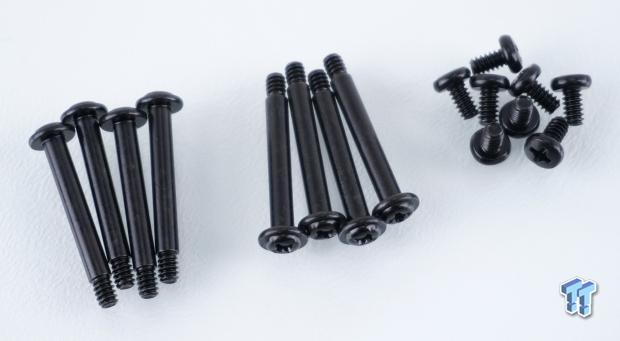
Another bag offers us a set of eight long screws for mounting the fans to the radiator. Suppose the fans are not between the case and the radiator, allowing the long screws to mount the fans and the radiator simultaneously. In that case, DEEPCOOL also sends along eight shorter screws to mount the radiator to the chassis.
The manual is one piece of paper, folded many times, to fit in the box. Once unfolded, a parts list is first, so we know if we have what we need to carry on. Next comes various installations with LGA115X/12001366 being first, LGA2011/2066 second, and on the back many of the AMD compatible sockets, AM4 specifically, ending with images of how to mount the fans and radiator, and even comes with a wiring diagram.
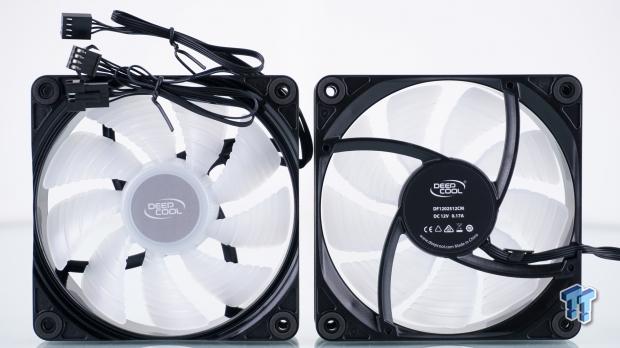
The last bits in the box is this pair of fans. DEEPCOOL sends over a couple of DF1202512CM fans, which have fairly decent specs and have white blades to distribute the RGB lighting from the hubs outward. The frames are black. The mounting holes have small foam pads to isolate them, come with 4-pin PWM connections at the end of twelve inches of wire, and daisy-chain 4-pin +12V RGB clips so that the head unit and both fans can all be connected in series.
Installation and Finished Product
Following the manual, we are shown to address the head unit and install the appropriate brackets. Once we have the AMD brackets, the manual's images show they go on under the head unit, and bracket orientation is only possible one way with the use of countersunk holes to keep the screws flat to the brackets.
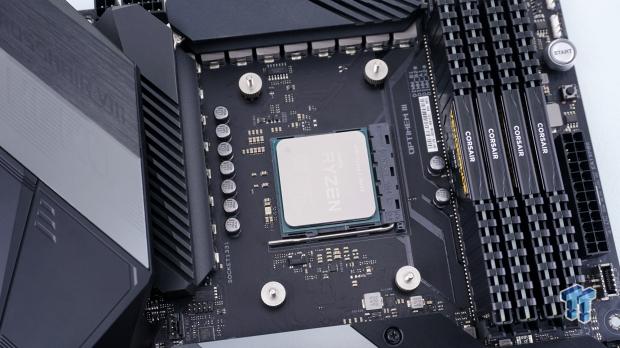
The next thing to do was remove the factory screws from the backplate, lift off the plastic bits of the stock mounting system, and install the AM4 standoffs. We are not shown to put thermal paste on as it comes pre-applied, but we did apply MX-4 at this time.

All we had left to do was to set the head unit onto the CPU, align the brackets, and secure the knurled nuts to the standoffs, screwing them down until we ran out of threads. The head unit does stand proud of the memory to the right of it, but in all ways, the Castle 240R stays well clear of the VRM heat sinks, the memory, and well away from any of the PCI slots.
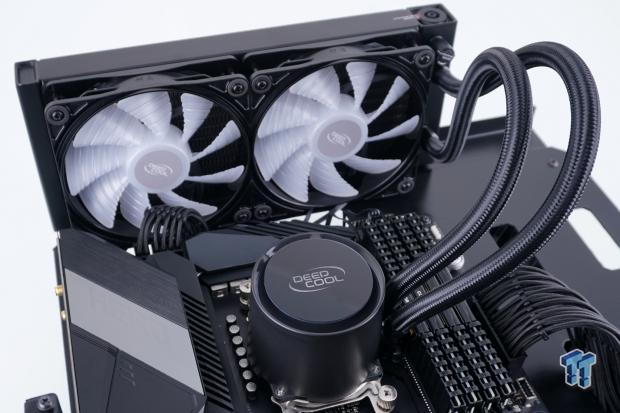
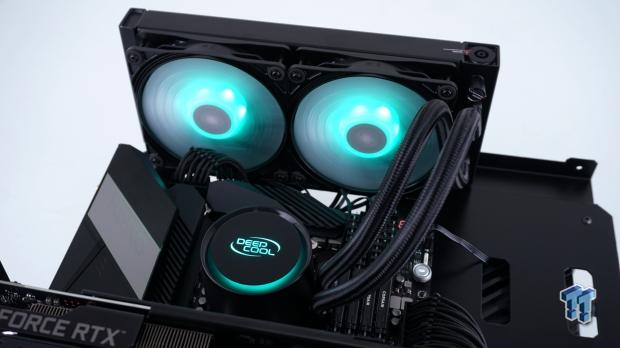
The radiator is now also mounted, and both the head unit and the fans all together in one image makes for a pleasing aesthetic. Nothing too aggressive, yet DEEPCOOL departs from the Captain Series head units and still comes up with something unique.
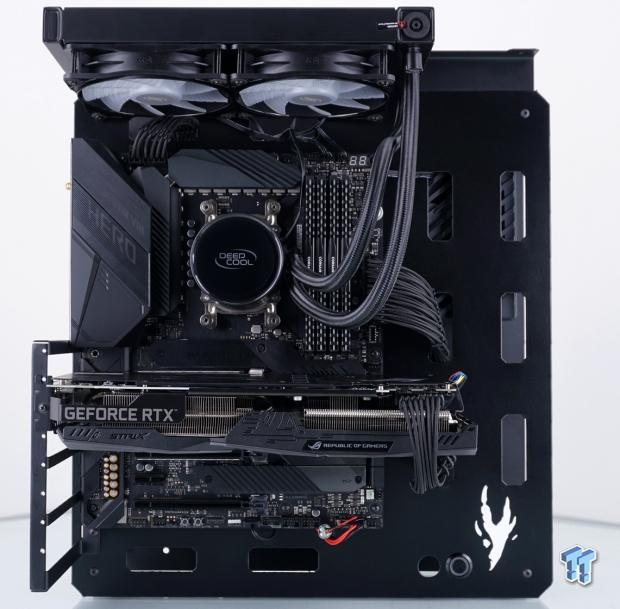
As we step back a bit, we find that with the radiator mounted in the top of just about any chassis, tube length will not be an issue. The Castle 240 R is also well suited for a front-mount chassis, but to get the same amount of RGB glow from the cooler, fans would need to pull through the radiator so that they can glow into the chassis.
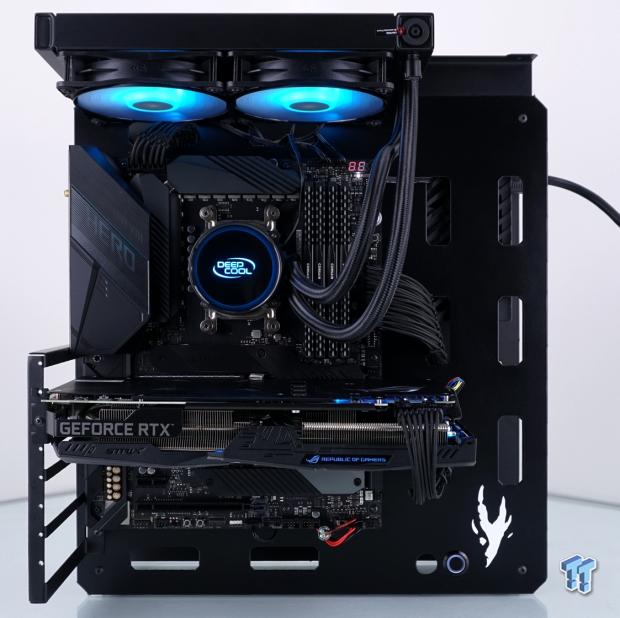
Once the DEEPCOOL Castle 240R is powered up, sync'd with AURA SYNC; we can do nothing but sit back and appreciate the RGB rainbow presented to us. Everything from the I/O cover to the fans and head unit, even the GPU, are all playing in time and delivering an appeal many users can appreciate.
Test System Setup, Thermal Tests, and Noise Results
Chad's CPU Cooler Test System Specifications
- Motherboard: ASUS ROG Crosshair VIII HERO [Wi-Fi] (AMD X570) - Buy from Amazon
- CPU: AMD Ryzen 5 3600X - Buy from Amazon
- Memory: Corsair Vengeance LPX 4000MHz 4X8GB
- Graphics Card: ASUS GeForce RTX 2060 6GB OC - Buy from Amazon
- Storage: Galax HOF Pro M.2 1TB SSD
- Case: Hydra Bench Standard
- Power Supply: ASUS ROG Thor 850W - Buy from Amazon
- OS: Microsoft Windows 10 Home 64-bit - Buy from Amazon
- Software: AMD Ryzen Master, AIDA64 Engineer 6.25.5400, and CPU-z 1.92.0 x64
To see our testing methodology and to find out what goes into making our charts, please refer to our 2020 CPU Cooler Testing and Methodology article for more information.
Thermal Results
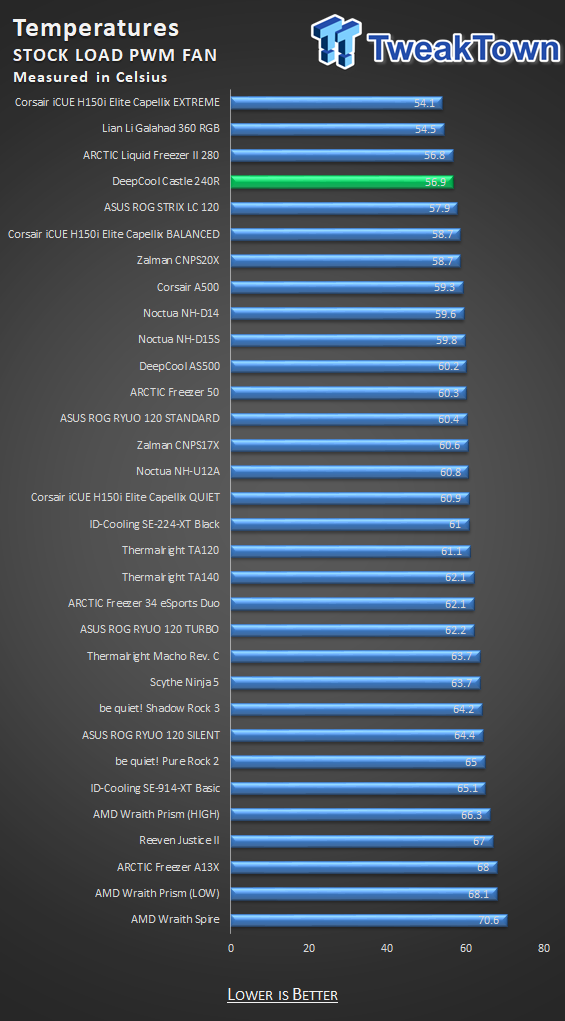
We are impressed with the fourth-place showing, just behind the LFII 280. With an average temperature of 56.9°C and a peak temperature of only 58°C, what can we honestly complain about? For this and all of the tests, the pump is 12V powered with no chill, and the range we saw was 2596 to 2616RPM in all of the testing.

Moving from the stock test into our PWM controlled overclocked run, the Castle 240R slides up a spot, this time passing the ARCTIC. An average temperature of 63.3°C is terrific for an $80 cooler, and the spikes in temperatures were at 71°C; not horrible either.
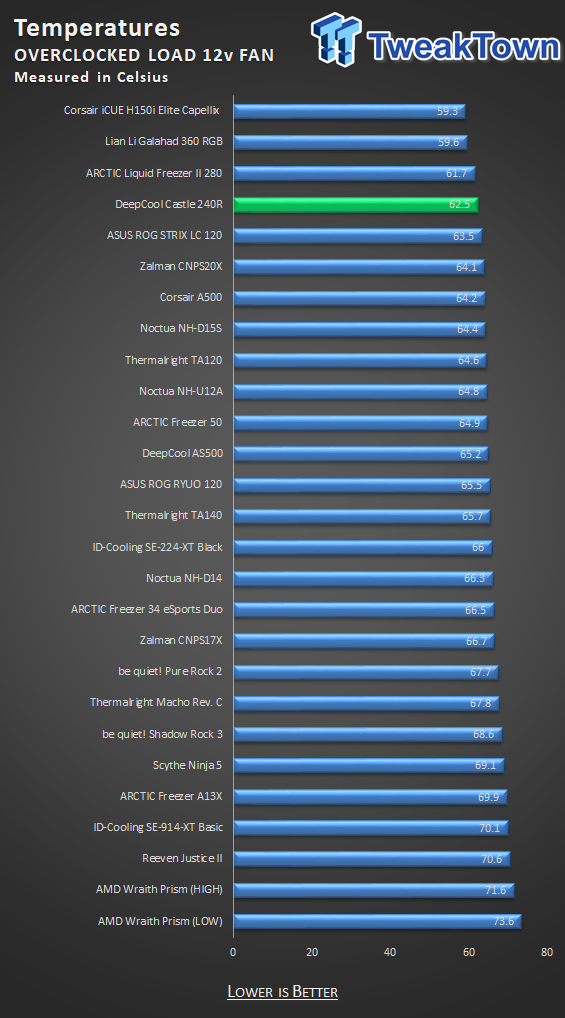
When it came time to unleash the puppies and see which one comes out on top, DEEPCOOL slid back to fourth place for the unlimited test. With the Castle 240R doing the best possible, we ended up with a 62.5°C average but is just 3.2°C behind a nearly $200 AIO, so again, no complaints from us over thermal performance. DEEPCOOL handled their business well here.
Noise Level Results
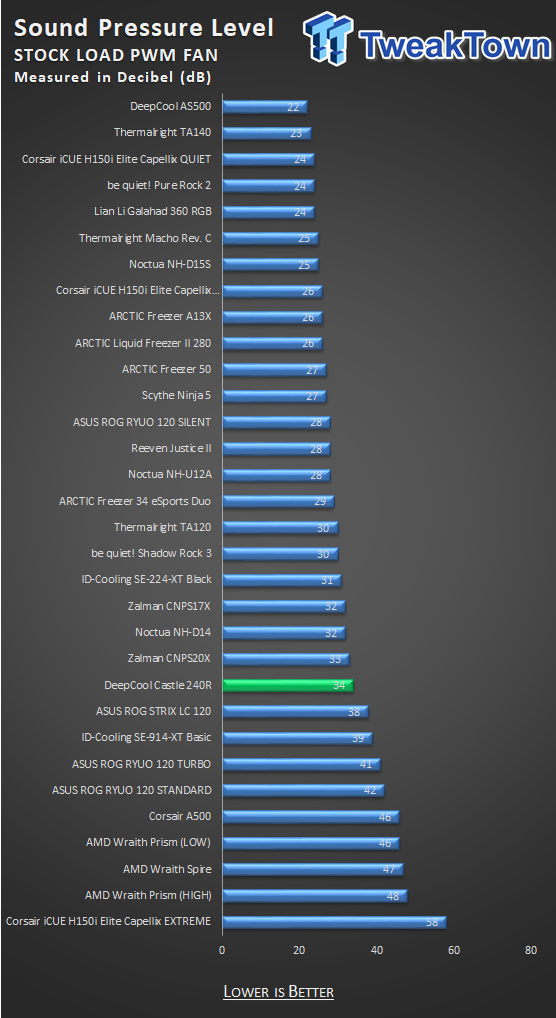
Noise is an area in which DEEPCOOL will not come out a winner, but we are fine with this. We love it when companies dig back into what made AIOs so good in the first place. Performance! Above and beyond all else, it has to beat CPU air cooling. In the stock test run, the fans topped out at 1270 RPM, delivering 34 dB into the room. While we are on the topic of noise, the pump is quiet, to the tune of 24 or 25 dB. There was not a time where we could hear the pump if the AIO fans were spinning.
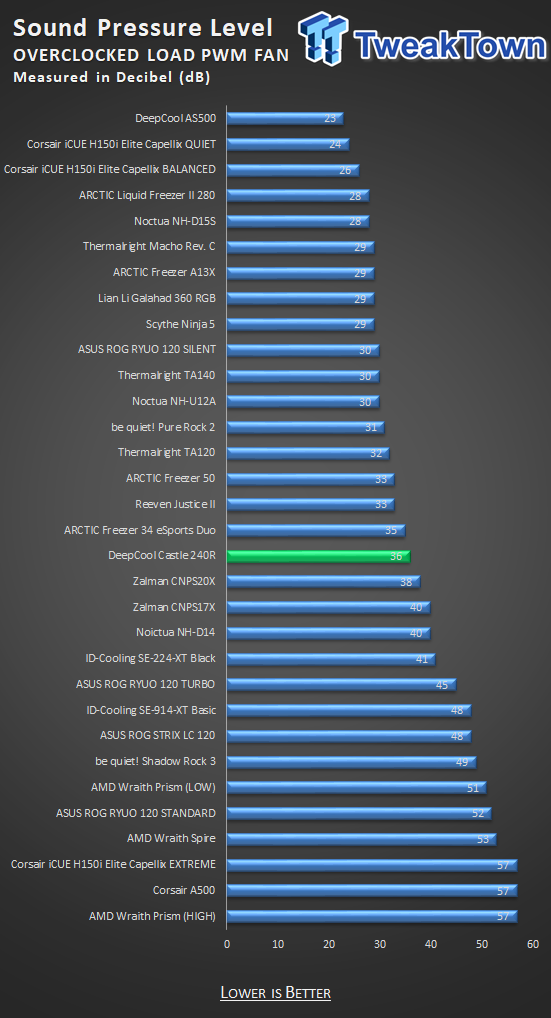
Starting things off at 34 dB for the stock run scared us a bit, we are not going to lie. However, when it came time to let PWM handle its thing, the fans only increased to 1377 RPM, and noise levels moved to 36 dB, and to be honest, we expected much worse.
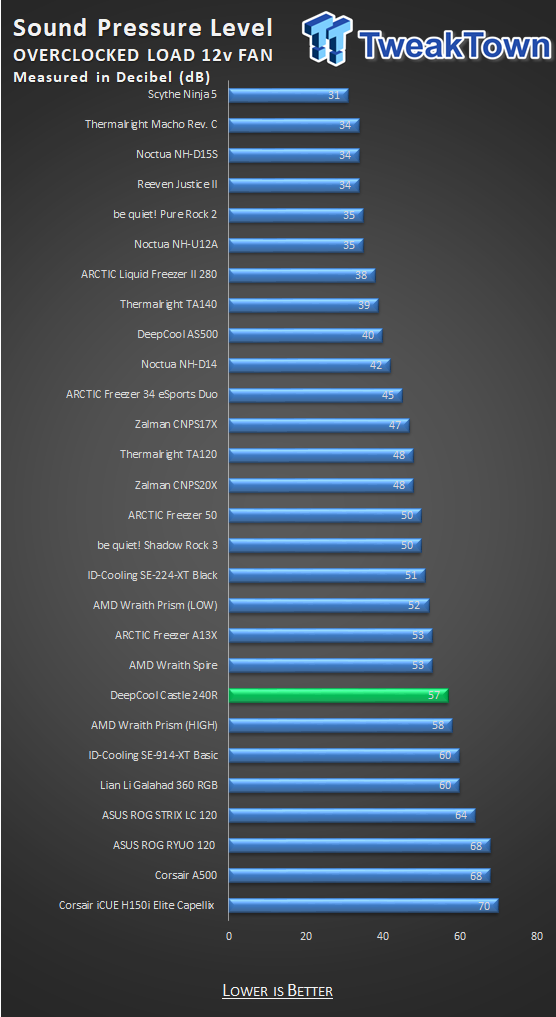
The PWM curve left over 500 RPM on the table for the fans to take advantage of, but the thermal results showed that the less than a degree difference was not worth one more ounce of noise. However, doing what we do, we pushed 12V through these fans, saw them spinning at 1917 RPM, and certainly heard them at their mind-numbing 57 dB.
Final Thoughts
DEEPCOOL has won us over with the Castle 240R. As we looked at the box, we assumed that it was likely that the Castle 240R was just another AI, this time with a new hook. While there is much merit to the Anti-Leak Tech employed in this Deep Cool AIO, it will not be the only factor that helps sell you on it being in your next build. At roughly the same cost as the ARCTIC LFII 280, trading blows with it thermally, we gain RGB this time, we do lose the Darth Minion aesthetic, and while the LFII 280 is quieter, we feel that the aesthetics of the Castle 240R may overpower the desire for complete silence.
Not only do we get better than average thermal results and a prolific glow of RGB illumination from the head unit and the fans, synced perfectly with the rest of the system, but there is also still the fact that the logo on the head unit can be turned, something not too many manufacturers offer at all!
We love that a company can restore our faith in the market and that manufacturers out there do care about the customer and give them great value for their investment. While we are not going to try to say that the Castle 240R even comes close to something like the chart-topping AIO in its feature set, but we are going to say that it does offer enough that you may not care. Is it the most RGB OMG BBQ cooler out there? No. Corsair and NZXT have that pretty much on lock by now. However, it is not an ugly duckling either, and we like it enough that it will now be part of our chassis test system for some time to come. What you get is an attractive and affordable solution, yet strives for some of the best thermal performance.
While it may not be the quietest cooler of the top four contenders, while the PC is loaded, the worst you will hear is 36 dB, and with a headset on, you will never even notice. When closed up inside a chassis, you will have to stop and pay attention to find it in the white noise. It will be there, but it is not obnoxious enough to say it should be of real concern to potential customers.
We feel that much like ARCTIC, DEEPCOOL came out playing hardball and are showing some of the better known AIO producers that they need to up their game. There may come a time when fancy lights, overblown software suites, and TV screens in the head units become fads, and customers start to care about performance first again. For those who are always on the lookout for better deals in tech, you will be hard-pressed to see a 240mm AIO that competes so closely with the larger competition. DEEPCOOL put enough into the Castle 240R to make it more than just interesting.
We honestly are impressed, by the looks, by the performance, by the fact they can deliver all of this to us for only $79.99. Easy to install, easy to wire, and is the first in our hands with Anti-Leak Tech of any kind. It is really hard to put a price on security or peace of mind. Oh, Wait! DEEPCOOL did. It is only $79.99!
 Lian Li B4-mATX Review: a compact mATX SFF case with excellent airflow and premium features
 Ocypus Sigma F36 BK ARGB Cooling Fan Review: high airflow and unified design in one frame
 PCCooler CPS RZ820 Display Review: a flagship-level CPU air cooler with an LCD screen
 MOAIPLAY ORA PRO G1 850W ATX 3.1 PSU Review: high efficiency and 10-year warranty for $119.99
 NZXT H6 RGB+ Compact Dual-Chamber Chassis Review
 Microsoft fires shots at Sony over PlayStation disc phase out by offering free CDs through GitHub
 Sony stock up 7% following decision to terminate game disc production
 Elon Musk's SpaceX showcases Grok-powered smartphone built to reshape AI interaction
 Sony confirms PlayStation Plus price hikes aren't off the table
 Philips unveils a world's first triple-mode gaming monitor designed to be a Swiss Army knife
 Samsung Galaxy Glasses leak reveals AI-first wearable with no display and deep Galaxy integration
 Apple's iPhone is contributing to historically low birth rates in the United States
 Microsoft was planning to build a lightweight, browser-based OS around Copilot
 Subnautica 2 devs earn $250 million bonus, Krafton agrees to pay contract fee
 Intel brings back 13th and 14th gen 'Raptor Lake' CPUs for China as the focus shifts to DDR4
 HighPoint Rocket 1604L Gen5 x16 NVMe SoftRAID AIC Review: half the price with full 59 GB/s speed
 Next Level Racing ERS3 Haptic Seat Review: immersive sim racing comfort with integrated haptics
 ASUS TUF Gaming X870-Pro WiFi7 W NEO Review - Tuffed up
 GIGABYTE GO27Q24G Gaming Monitor Review: Glossy OLED Gaming at 240Hz
 MSI MPG 322UR QD-OLED X24 Review: A Brighter, Tougher 4K 240Hz QD-OLED for $1099
 UGREEN NASync DXP4800 GT Review: powerful 4-bay NAS with AMD Ryzen and dual 10GbE ports
 Dell XPS 14 (2026) Laptop Review - Premium Quality, Impressive Performance
 7 tips to organize your Windows files for faster, easier access
 Intel Arc G3 Extreme first impressions with MSI's Claw 8 EX AI+ - Incredible power for an extreme price
 How to fix Wi-Fi Adapter Not Working on Windows laptops: troubleshooting tips
 Hisense U7SG 4K TV: Modern Entertainment for the New Age
 6 underrated Microsoft Word features worth using to boost your productivity
 Level Up Your PC Gaming with these Fantastic ASUS Prime Day Deals on GPUs, Motherboards, and More
 GIGABYTE Wants to Kickstart Your New Gaming PC or Upgrade with These Limited-Time Deals
 7 Windows settings to change right after installation for better privacy, security, and performance
 I stopped Windows 11 notifications from interrupting me with Do Not Disturb, Focus, and a priority list