
Introduction

Vigor Gaming is a smaller company founded by hardcore gamers with the intent of putting out a product line that will take your enthusiast rig to the next level. Given their background, they have a working knowledge of what it takes to make an extreme system and try to give you the best possible solutions with their growing product line.
On the blocks today is an interesting item, the Monsoon II cooling solution. It takes the proven heatpipe technology currently on the market and adds in a TEC (Thermal Electric Cooling) to enhance an already winning design.
So does it work? Read on as we look at this very question and also go into a bit more depth with regards to TEC cooling as a whole and how it works with the Vigor Gaming Monsoon II.
In The Box

After emptying the box, we find ourselves looking at the HSF, a controller box, a bag containing the mounting hardware and wiring harnesses, and a small instruction manual. At first glance it doesn't look much different than many other products currently on the market.

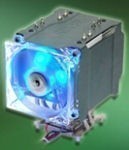
Beginning with the cooler, we see a larger sized box that sits high above the processor. This is pretty much standard fare for heatpipe designs as there is a requirement for a certain amount of piping to be effective.

Turning the cooler over shows the aluminum fins that provide the heat dissipation capabilities for the heatpipes. The shroud that surrounds the unit keeps the airflow moving through the fins to ensure the best cooling possible. The fan itself is a 92mm model that is controlled by the cooling system. It spins at higher speeds when needed and this speed ranges from 2000-2600RPM. Noise output is 24 dBA at the lower speeds and 34 dBA at the high range. A little louder than many coolers, but not to the extent that it becomes too much to bear.

Moving down toward the lower portion of the cooler shows us the heatpipe technology being used. This is already a proven concept that has produced very good cooling results. This particular design uses four full heatpipes to remove the unwanted heat from the base area of the cooler. There are two pipes removing heat from the base of the TEC and two pipes removing heat from the top portion of the TEC.

Above is what makes this unit different from the rest of the kids on the block. For those not familiar with this type of cooling solution, it is a TEC unit, also commonly referred to as a Peltier cooler. The simplified concept behind this type of cooling is that when you pass a current through two dissimilar metals that have been connected at two junctions, you experience the Peltier effect. One side of the plate gets much cooler and the opposite side gets much warmer. This makes a TEC very useful for cooling electronic components, but if you get the processor to remain below ambient temperature, you have issues with condensation building up around the processor and core areas. It doesn't take a rocket scientist to figure out that this isn't a good thing.
Enthusiasts have been using Peltier cooling for several years now, but always with care. What the folks at Vigor Gaming have done is to create a lower powered Peltier unit that doesn't do all the cooling work itself, but works in conjunction with a heatpipe cooling solution. While the Peltier is capable of accepting a good deal more voltage for higher performance, this unit allows only a 5A draw from the 12v rail, so is only rated at 60 watts maximum. This gives you the benefit of Peltier cooling but without the high power draw that most coolers of this type require. Most power supplies should have no issues with this little of a pull, and if your system does have issues, then it was time to upgrade anyway.
Something else to consider is that since this TEC is working in conjunction with the heatpipe cooling and not alone, you won't have those drastic changes in temperature in the event your processor puts out more heat than the device is designed to dissipate. Heatpipes work well by themselves to start with, so you have a firm foundation from the beginning and are simply adding more fuel to the fire, so to speak.

Moving down to the base shows a very smooth finish, but no lapping. If you are one of those who just have to have a shiny base, be very careful when grabbing for the fine sandpaper and polishing compound. The base of this cooler is actually copper and the silver coloring you see above is due to a nickel plating that has been used on the copper material. Nickel isn't the best as far as heat conductivity is concerned, but we'll see how it performs when we start cranking up the heat during our tests.

Besides the heatsink, we also have a monitoring device included with this package. It is a very simple device and includes an LCD display area that allows you to monitor the temperature of the Peltier cooler. That's right, it monitors the Peltier and not the processor temperature, so don't confuse yourself. While some may view this as a downfall, I find it a good idea as you only need to glance and can immediately tell that the Peltier is working properly.
The buttons allow you to change the color of the LCD background and adjust temperature readings from Celsius to Fahrenheit. Pretty simple design overall.

Our final stop in the box consists of the contents of that plastic bag with the cabling and mounting hardware. Also included is a case badge and small tube of thermal interface material. While it isn't the stark white of a silicon based TIM, I will forgo the use of it and stick with the Arctic Silver 5 so that the results will be consistent with previous tests conducted.
Installation Notes
First off, for those afraid to remove the motherboard from the system, turn back now. As is becoming commonplace with heatpipe coolers, the motherboard will have to be removed to allow the installation of the bracket that goes under the board. Since the technology works best when there is a good distance between the core and the top of the heatpipes, coolers tend to be sometimes heavy and often awkward as far as balance is concerned. That said, I have already removed the mainboard of the test system in preparation of the installation.

We will be working with an AMD based system for our testing. The socket above is the AMD Socket 939 and the test processor will be an Athlon FX-53. After the board is removed, you will want to get rid of the upper and lower portions of the socket brace that is normally used to attach your choice in cooling. Once that has been completed, go ahead and move to the back of the mainboard.

Above shows the bracket that is included with the cooler. Take note that it has foam on one side (shown above) to help protect the solder points of the motherboard and keep everything from shorting out. Though common sense, I will say it now: Turn the bracket over for proper mounting! Sorry, just felt it appropriate to make a note of that.

Above is what you should be looking at when you have placed the bracket in its proper place and are ready to begin mounting the heatsink. The holes are set for an industry standard motherboard, so as long as you are using a common board you will have no problems with the alignment of the mounting holes.

After making sure to properly apply a high-quality TIM, place the cooler atop the processor and secure the whole thing in place with the two included mounting screws. A proper installation will have the fan blowing through the heatsink and toward the rear exhaust fan of the enclosure. If the cooler comes to you with the fan pointing the wrong way (like happened to me), you simply unscrew the nuts and bolts that secure the two top mounting plates in place and switch them so they are properly aligned. Once everything was firmly tightened I could feel no movement at all of the cooler. It is a very secure manner of mounting the cooler, but I would still remove it before traveling to your next LAN party.

After the cooler is in place, you will have no issues with clearance. Since the heatpipe cooler sits high above the processor, even the memory modules and heatsinks used to cool capacitors and MOSFETS will easily fit under the cooler.

After the cooler is in place, you can attach the included cabling to the back of the monitoring unit. The unit shown above has the rail system installed that I use in this case (Antec Titan), so expect no issues regardless of how you mount 5.25" drives in your system. After I install the monitor in the system, I only have to attach the cabling to the cooler and a 12v Molex to the unit.
Testing
When it comes to testing a heatsink, I generally try to thrash the system while monitoring temperatures. Since we're talking about a cooling solution that has the processor as its primary concern, I find it easiest to simply run it at 100% load and monitor in the background. This simple method lets me see just what a cooling solution can do and also lets us know where we should consider spending our hard-earned upgrade dollars.
Before getting into the meat of the matter, though, let's take a quick look at the test system:
AMD Athlon FX-53 Processor @ 2.4GHz (Supplied by Newegg.com)
DFI LANParty UT nF4 Ultra-D Motherboard
2x512MB Mushkin "Redline" PC3200 Memory (Supplied by Mushkin)
GeCube X1900XTX Graphics Board (Supplied by GeCube)
Thermaltake PurePower 600w PSU (Supplied by Thermaltake)
Testing will consist of monitoring temperatures at both idle and at load. The processor is running at default speeds but still manages to put out 94 watts of heat. Voltage of the CPU is 1.55v and testing temperatures were a consistent 22C. Arctic Silver 5 is the TIM being used (after a 3-day burn-in) and the test system will be a closed case setup to more accurately reflect the conditions that you would use yourself.
Results

While I have tested many different coolers in the past, I kept my comparisons for this article in the realm of heatpipe coolers. We have already established that this relatively new cooling technology provides a very solid foundation for heatsink performance, usually allowing between a 10-12C differential between idle and load states. But then again, we are also introducing a Peltier to the mix with the Monsoon unit.
After testing is completed I can only say, "WOW!" I had expected nice performance just from looking at the spec sheets, but I was truly surprised to find only a 4 degree difference between idle and load. Add to this that even those temperatures are noticeably lower than the other heatpipe coolers and it looks as if we have a sure winner on our hands.
Also of note is one of the biggest drawbacks to Peltier cooling; their tendency to die with no prior notice. In the case of the Vigor Gaming Monsoon II, even if the Peltier dies, the heatpipe cooler is still in place and will continue to cool your processor adequately. Not as well as when the Peltier is working, but you won't have to worry about killing your processor just because the TEC decides to fly south for the winter. Additionally, if the Peltier does die, an alarm will sound from the monitoring device to let you know that there is a problem.
Final Thoughts

After all is said and done, I have no problems at all with recommending the Vigor Gaming Monsoon II cooler for anyone interested in maximizing cooling for their processor. Mixing Peltier cooling with the tried and true heatpipe cooling technology has produced an extraordinary manner of cooling those high-powered brutes we have come to know and love. Even the older processors that crank out a huge amount of heat will find a welcome relief from this product.
Keep in mind, however, that this cooling solution is made for those using standard enclosures. SFF systems need not apply since there simply won't be enough room inside to mount the cooler. It also isn't the quietest kid on the block, so if silence is your ultimate goal, then you will be disappointed. If you happen to be looking for sheer performance, however, you will be well served.

As far as price is concerned, you can expect to shell out about US$150 or so for this gem. Yes it is rather expensive, but considering that many folks are paying this and more for water and getting nowhere near the performance, it doesn't work out to that much in comparison. Yes, water provides lower noise levels, but Peltier gives you rock solid performance!
Bottom line... If you have been looking at upgrading your cooling but are on a low budget, then turn away now and don't look back. If, however, you are looking for exceptional performance that combines two of the most highly rated cooling technologies on the market, then make sure to take a long, hard look at the Vigor Gaming Monsoon II cooling solution. To put it in its simplest form, it just KICKS ASS!
- Pros
Exceptional cooling
Combines heatpipes and Peltier cooling
Monitor sounds alarm if Peltier dies
Only 5A draw from 12v rail
Installation isn't difficult
- Cons
Price
Rating - 9.5 out of 10 and TweakTown's "MUST HAVE" Editor's Choice Award!

 United
States: Find other tech and computer products like this
over at
United
States: Find other tech and computer products like this
over at  United
Kingdom: Find other tech and computer products like this
over at
United
Kingdom: Find other tech and computer products like this
over at  Australia:
Find other tech and computer products like this over at
Australia:
Find other tech and computer products like this over at  Canada:
Find other tech and computer products like this over at
Canada:
Find other tech and computer products like this over at  Deutschland:
Finde andere Technik- und Computerprodukte wie dieses auf
Deutschland:
Finde andere Technik- und Computerprodukte wie dieses auf  Dragon's Dogma 2 patch delivers some important fixes - but not the one everyone wants
 AMD's top Strix Point Halo APU could have 16 Zen 5 cores in 2 x CCDs, mirroring Ryzen 9000 CPUs
 FBI confirms Chinese hackers have infested US water and energy systems
 Microsoft's new Windows 11 'AI Explorer' feature set to anger AMD and Intel
 High-end PC maker gives advice that could fix Intel Core i9 CPUs crashing in games
 ASUS ROG Swift Pro PG248QP Gaming Monitor Review - Frames, frames, and more frames
 FlexiSpot C7B-Mesh Ergonomic Office Chair Review
 Samsung G8 34-inch QD-OLED Gaming Monitor Review - 175Hz for $900
 ASRock NUCBOX-155H Mini PC Review
 NuPhy Air96 V2 Wireless Mechanical Keyboard Review
 TEAM T-FORCE Siren DUO360 RGB Liquid CPU Cooler Review
 AVerMedia Live Streamer ULTRA HD Review
 AVerMedia Live Gamer 4K 2.1 Review
 XPG Invader X Mid-Tower Chassis Review
 Intel Core i9-14900KS CPU Review
 Everything you need to know about the latest ASUS NUC Mini PCs - NUC 14 Pro and ROG NUC
 How to Overclock Your GPU and Boost Your PC Gaming with ASUS GPU Tweak III
 ASUS's AMD Radeon RX 7000 Series GPU lineup has something for every gamer
 ASUS OLED Premium Care defends the ROG Swift OLED PG32UCDM gaming monitor from burn-in
 Patriot Viper Xtreme 5 Engineering Prototype 48GB Dual-Channel Memory Kit Preview