


Our Verdict
Introduction, Specifications, and Pricing
We have seen the Taichi from ASRock, and while it is their top-end model minus the monoblock equipped Z490 Aqua. ASRock has other boards that are well equipped and worthy of mention, such as the model we have today.
The model we are looking at today is the Z490 PG Velocita. The PG in the name is signifying "Phantom Gaming" and is a more gamer-focused motherboard that is still offering ASRock's engineering prowess and meaningful feature appointments.
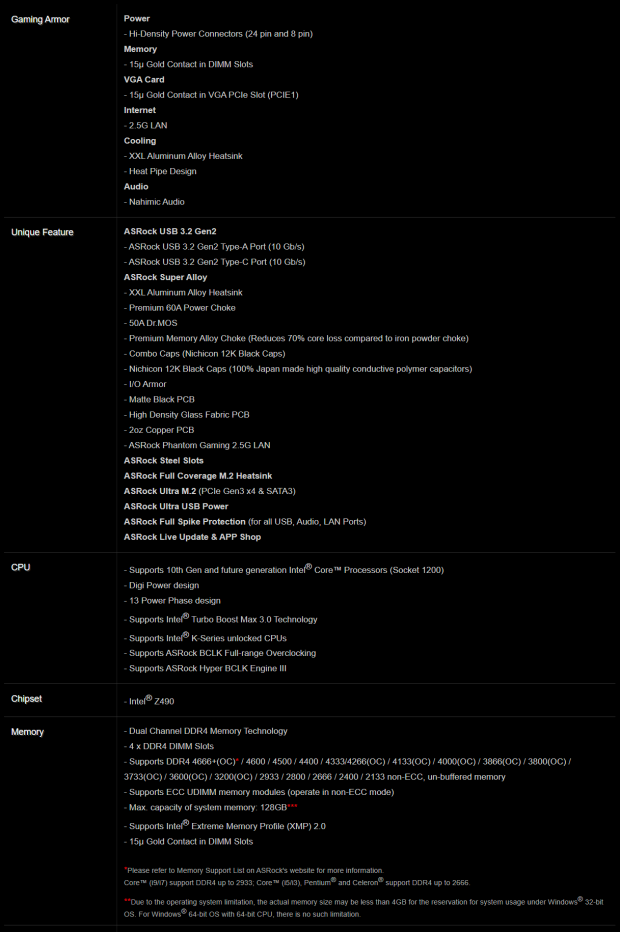
Specifications
Best Deals: ASRock Z490 PG Velocita
Memory is stated to be up to 4666MHz+, which is, of course, going to be with a good CPU IMC and capable DIMMs. This will not be cheap, and I think much like Ryzen, the 3200MHz through 3600MHz range, is more than capable of providing optimal performance with far less tweaking being necessary.
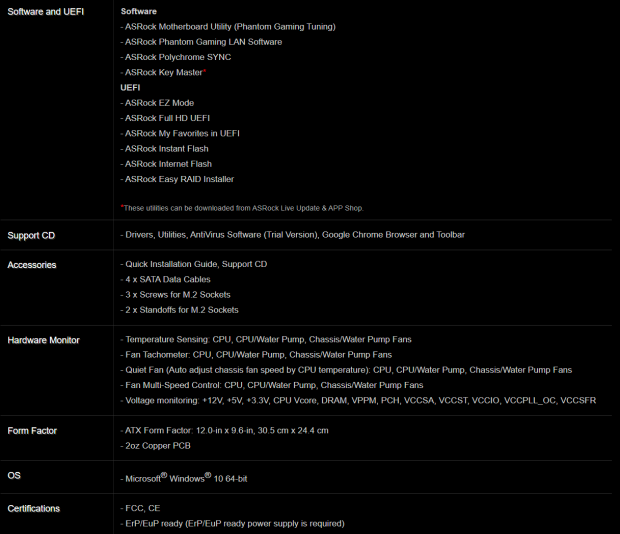
The I/O for the PG Velocita includes 2.5Gb Dragon/Realtek LAN along with a Gigabit Intel I219V backer. USB is up to USB 3.2 Gen 2 via a Type-A and Type-C port, which supports up to 10Gbps. This is not the absolute fastest, which is USB 3.2 2x2 (20Gbps), but it is fast enough to help get up to 1GB/s speeds from your external devices.
The VRM for the Z490 PG Velocita is a DR. MOS powers set up numbering ten total CPU VCore power phases with two phases for iGPU.
Much like the Taichi, the PG Velocita is already setup to support PCIe Gen 4 from the next-gen CPUs out of the box. The x16 PCIe slot is built to PCIe 4 spec, and the second x16 slot is mechanically x16, but with only x4 electrical lanes. This makes the second slot only suitable for CrossfireX or PCIe AIC SSD or other usages.
Pricing
The Z490 PG Velocita, as of the time of writing, is listed at $239.99, and this places the PG Velocita in an immensely competitive position as far as Z490 options go.
Our Latest Socket LGA 1200 Review Coverage
Motherboard Features and Marketing
Here we give space to the motherboard manufacturer to talk about their marketing points, and we assess them and provide our point of view on the claims.

The Velocita has an array of features, especially when considering the price point. Dual M.2 slots with one being direct CPU attached and supporting PCIe 4 bandwidth. The board also has several onboard headers for RGB along with both Gen 1 and Gen 2 USB 3.2 interfaces.
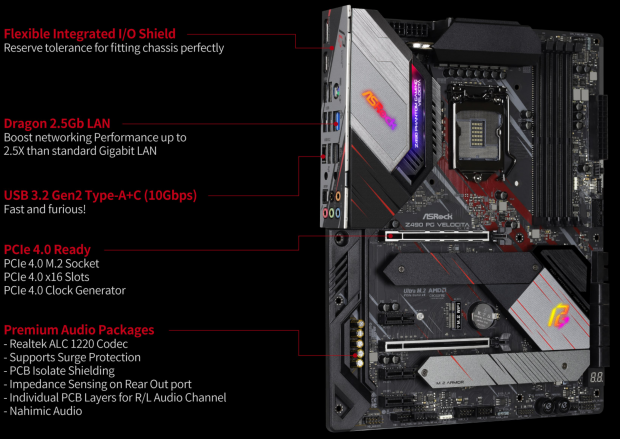
A feature we have seen on ASRock boards recently is the Flexible I/O shield, which is affixed to the rear of the board with screws. Loosening these allows a small amount of movement to fine-tune the I/O shield to the opening of your chassis. Also, here is the Realtek 2.5Gb LAN port, which is becoming more prevalent in the recent motherboard generations. Also, here is the ALC1220 powered audio solution, which also hosts an array of Nichicon gold caps for optimal audio performance.
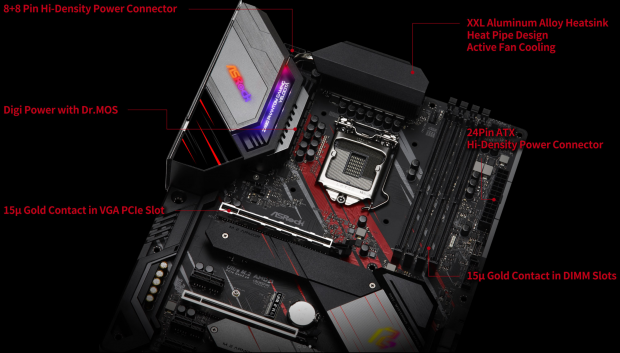
Lastly, we take a look at the build quality and performance features of the board. The PG Velocita hosts dual 8-pin EPS connectors to ensure the 10th gen Intel CPU is adequately fed when under heavy loading. Also, here is the dual-part VRM cooling solution, which employs active cooling fans to make sure that the DR. MOS VRM is kept well under control in case chassis the airflow is not very good.
Packaging and Accessories


The packaging for the PG Velocita is relatively standard for ASRock motherboards. The logo adorns most of the front of the box with feature icons across the lower portion. Flipping to the rear and it is a spec and marketing explosion covering as many of the features that ASRock feel is important to show you in a point of sale environment.
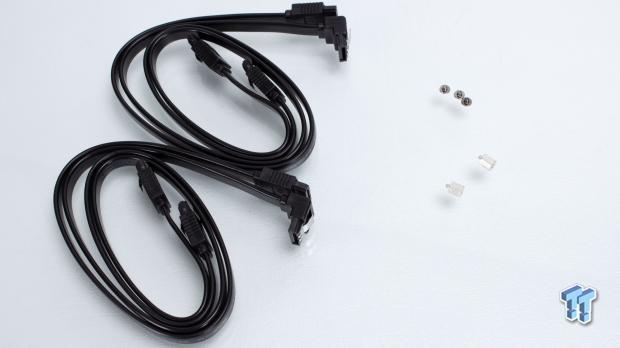
The hardware in the accessory kit is quite simple, with four soft plastic SATA cables. Also included are the mounting lugs and screws for the M.2 slots on the board.


The accessory pack was far more stuffed with what I call paper goods. The documentation and ancillary paperwork are listed below:
- Motherboard manual
- Software guide
- Driver disc
- Phantom gaming card
- Phantom gaming sticker set
- Velcro straps
The paper goods are great for explaining the board and its features, along with how to configure it. Also included are some other trinkets.
Now that the accessories are out of the way, let's take a look at the board itself.
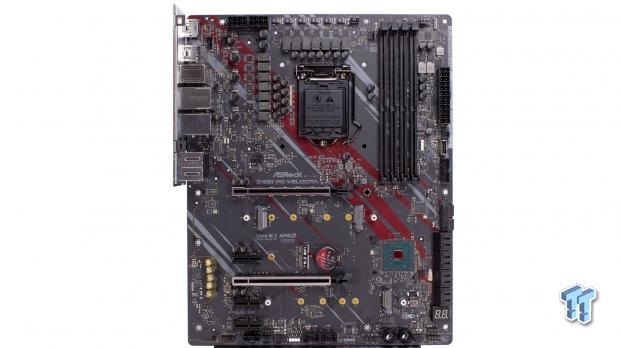
ASRock Z490 PG Velocita Overview

Here we see the PG Velocita and its seven total fan headers. The red circled header is the CPU fan header, while the yellow is a fan/pump capable header with a higher amperage rating. The green headers are all chassis fan headers for ancillary chassis fans.
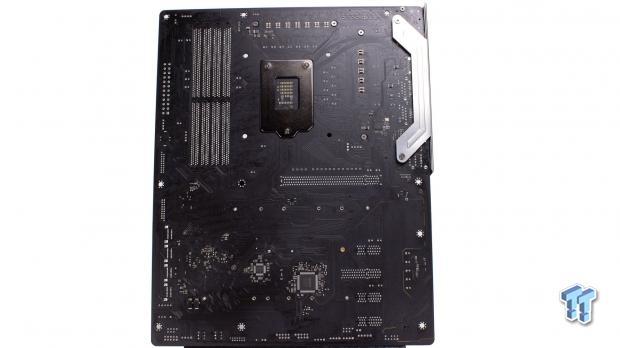
The rear of the Velocita is fairly standard, and here you can see the solder legs for the PCIe slots through their vias, which shows the full x16 top slot while the second x16 is only wired for x4.
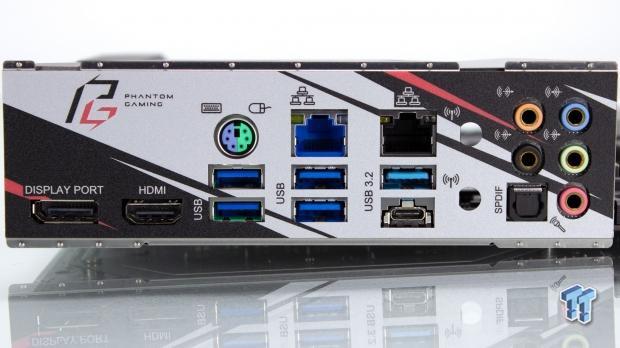
The I/O on the Velocita is well-appointed as follows:
- Wi-Fi Antennae Connector holes
- DisplayPort and HDMI ports
- Combo PS/2 port
- 4x USB 3.2 Gen 1 Type-A ports
- USB 3.2 Gen 2 Type-A port
- USB 3.2 Gen 2 Type-C port
- Analog 7.1ch audio with gold connectors
- Optical SPDIF port
- 2.5Gb RJ45 Dragon LAN port
- 1Gb RJ45 Intel LAN port
One thing worth noting is that there are holes for the Wi-Fi Antennae, but you will have to purchase your Wi-Fi antennae leads and Wi-Fi card, as the Velocita does not come with Wi-Fi out of the box.
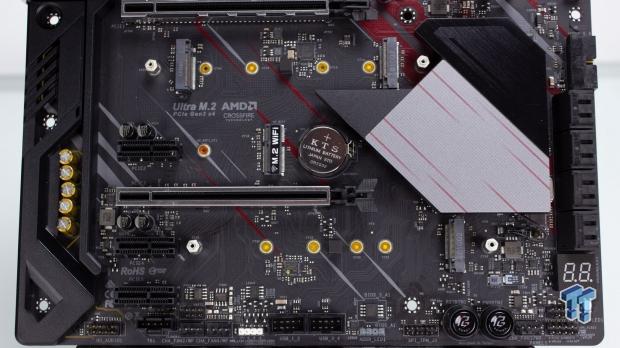
The slot arrangement of the Velocita, as mentioned previously, consists of the top main x16 slot. Then you have triple x1 and an x16 slot, which is mechanically an x4.
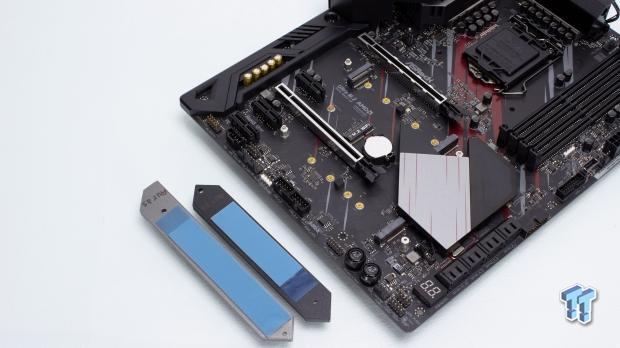
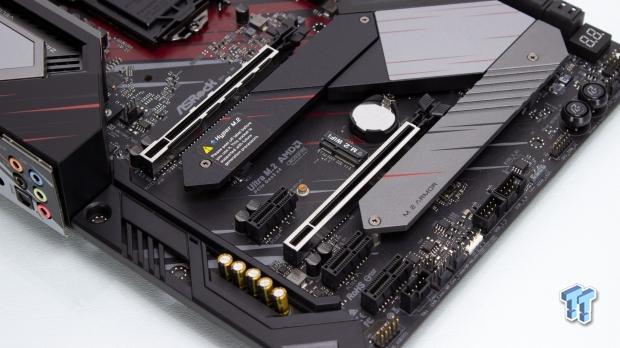
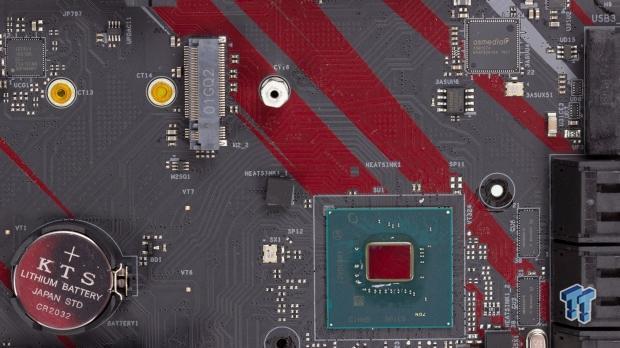
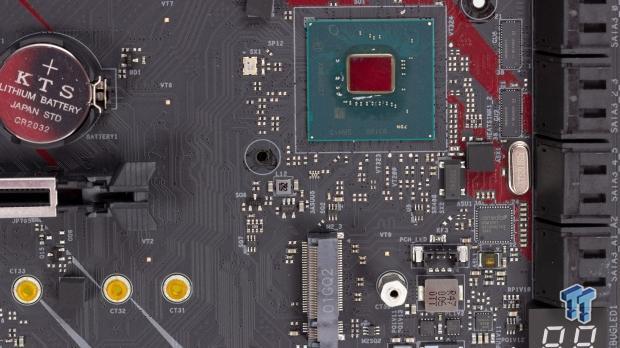
ASRock does something strange with their M.2 slots, with two of them facing each other up top. Only one of these is active M.2_2 in this case, with M.2_1 being void but still here. M.2_3 is PCIe 3 only and across the bottom of the x16/x4 slot.
The lower edge of the board carries various connectivity as follows:
- Front panel audio header
- Thunderbolt header
- 12V RGB and 5V ARGB headers
- 3x Fan/pump 2A fan headers
- Clear CMOS Jumper
- TPM module header
- 2x USB 2.0 headers
- Hex post code LED display
- Power Button
- Reset Button
- Front panel and speaker header
Across the lower edge, the board is well appointed with dual USB 2.0, which is welcome due to the litany of USB devices that use the header such as AIO's and RGB/Fan control appliances offered from various manufacturers.
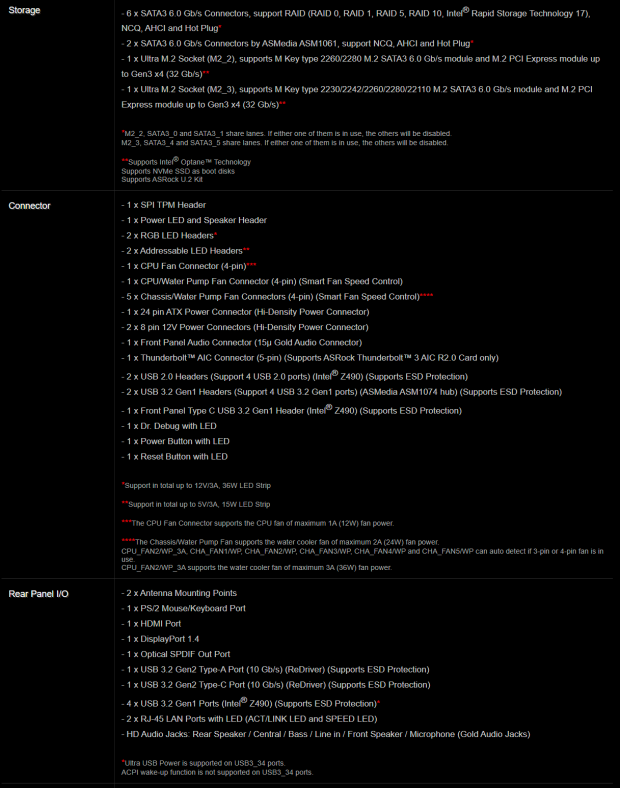
The 24-pin side of the board hosts various connectivity as follows:
- Fan/pump 2A fan header
- 8x SATA 6Gb ports (6x PCH/2x ASMedia ASM1061)
- USB 3.2 Gen 2 header
- 2x USB 3.2 Gen 1 headers
- 24-pin main ATX connector
- 5V ARGB header
The board's edge has quite similar connectivity to what we saw on the Taichi model, and it is more than enough for even the most well-equipped chassis.
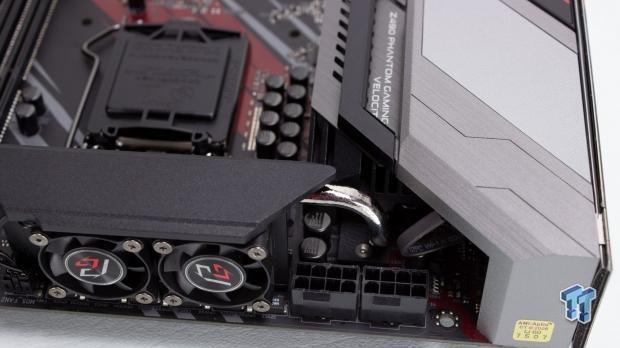
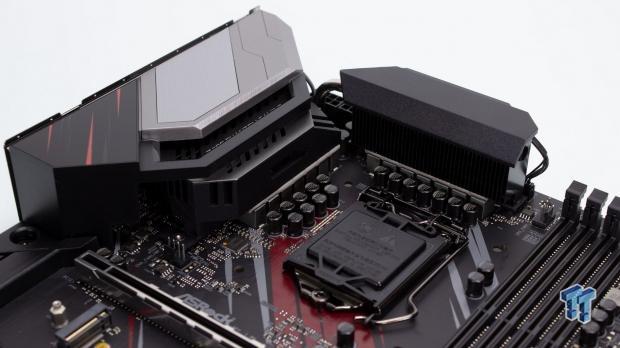
Here we have the dual 8-pin EPS connectors used to power the CPU. The VRM has three total active fans, two of which you can see here, while one is hidden under the aesthetic cover on the I/O side.
Looking into the CPU socket area, it is easy to get confused seeing 14 inductors and assuming it is a 14-phase VCore VRM, but the Velocita only has 10 phases of CPU VCore power. The other four consist of two VCCGT and single VCCIO and VCCSA.
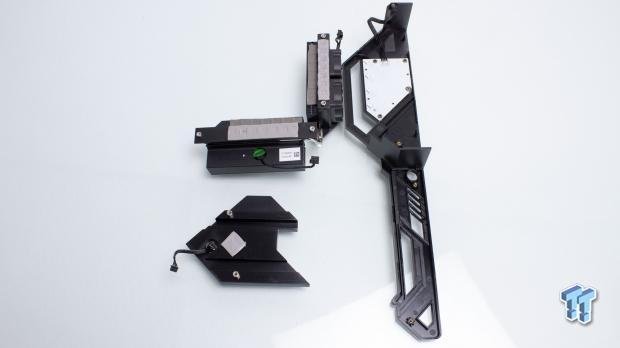
Now, we stripped the coolers and plastic cladding from the Velocita, and as you can see, the cooler's thermal pads have solid depressions. This means that they are making good contact and, therefore, should be more than adequate to keep the VRM under control.
Now, I think it's about time we move on to the PCB and circuit analysis of the Z490 PG Velocita.
PCB and Circuit Analysis
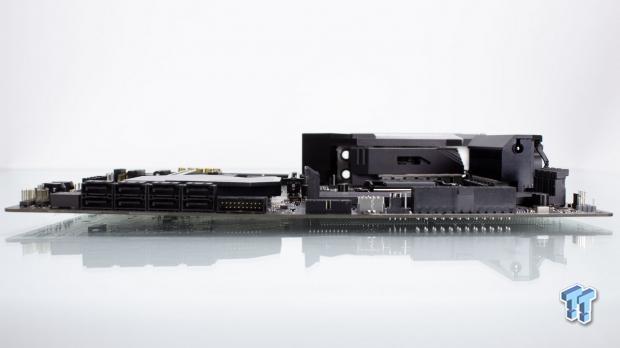
Here we see the Velocita naked, and to be frank, it looks very close to what we saw before as there was not a ton of cladding on the board obscuring view. Now, let's dig into the onboard components and see what we find.


Looking at the VRM portion and we can quickly see that SiC632 50A power stages power the VCore VRM while two SiC654 50A power stages power the VCCGT or IGPU VRM. Another SiC632 power stage powers the VCCSA while VCCIO is powered by a single Sinopower SM7341EHKP dual N-Channel MOSFET. The VRM is controlled by an Intersil ISL69269 controller, which is a 12-phase PWM.
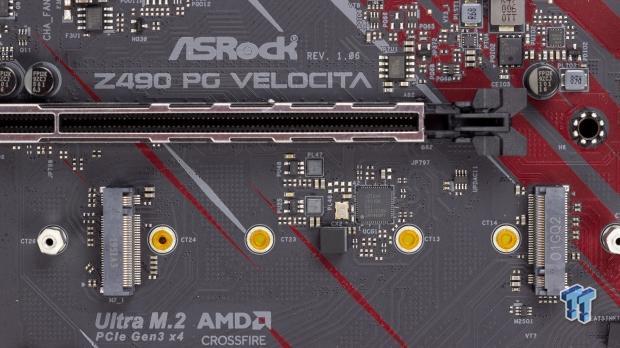
Here mid-board, we have the Renesas IDT6V4 1801BN, which is a PCIe 4 clock generator. Here we also get a look at the dual M.2 slots I had mentioned previously. The M.2_1 to the left is nonfunctional at least as of the time of writing; I am not sure if that one will ever be enabled or if it is a relic of another board design.
Asmedia is next up with its ASM1074, which is a USB 3.0 hub and is used to feed the 20-pin USB 3.0 headers on the board's edge.
Asmedia has another showing here with the ASM1061, which is the SATA 6Gb controller for the two extra SATA ports on the board's edge.


Moving to the board's lower edge and we see the audio solution, which is powered by a Realtek ALC1220 codec, with a TI N5532 headset amplifier, and backed by Nichicon gold audio capacitors.
Also, we have the memory VRM, which is powered by a pair of the same Sinopower SM7341EHKP dual N-Channel MOSFET. The uP1674P PWM controller controls the memory VRM.
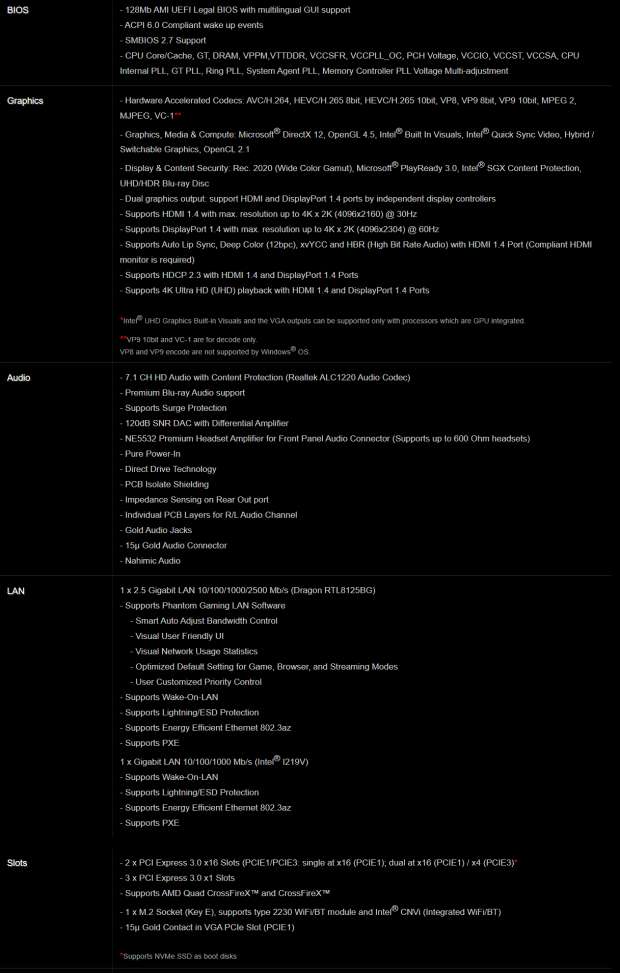
BIOS/UEFI
UEFI
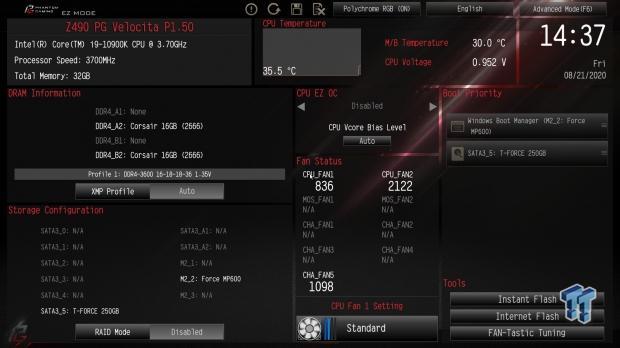
Moving into the UEFI, and the very user-friendly easy mode interface greets you. Of course, we will be moving directly to the advanced mode. We will show you several screenshots of the UEFI below.


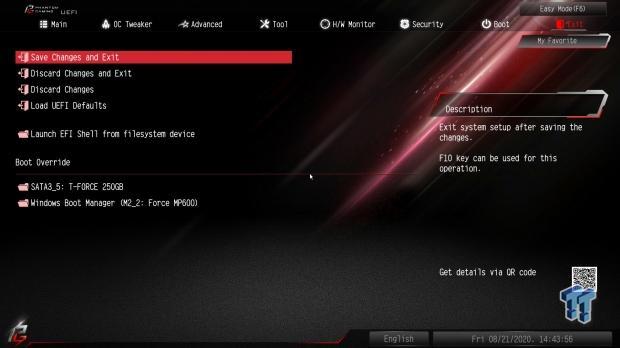
It seemed appropriate to end with the save/exit screen as we move to the OS to get started in testing.
Test System and Configuration
Test setup
My testbench is strictly controlled with a fresh OS for any platform or component change. The system uses all the same components whenever possible to maintain comparable results between platforms. The ambient in the test lab is rigorously controlled at 22C +/- 1C. All tests are run a minimum of three times, and any outliers are discarded, and a replacement test run will be completed to achieve our average results. The use of a TITAN RTX for the testing is to ensure that the GPU is not the bottleneck for performance results, and will best represent the scaling across CPU and platforms.
- Motherboard: ASRock Z490 PG Velocita (buy from Amazon)
- CPU: Intel Core i9 10900K
- Thermal Paste: Arctic Cooling MX-4 (buy from Amazon)
- Cooler: Alphacool Eisbaer LT 360mm (buy from Amazon)
- Memory: Corsair Dominator RGB 3600MHz 16GBx2 (buy from Amazon)
- Video Card: NVIDIA TITAN RTX (buy from Amazon)
- Storage - Boot Drive: Corsair MP600 (PCIe 4) 2TB (buy from Amazon)
- Network Switch: Buffalo Multi-Gigabit BS-MP2008 (buy from Amazon)
- Testbench: DimasTech Easy XL (buy from Amazon)
- Power Supply: Thermaltake 1200W (buy from Amazon)
- OS: Microsoft Windows 10 (buy from Amazon)
- Monitor: ASUS XG438 43" 4K (buy from Amazon)
- Video Capture: Elgato 4K 60 Pro (buy from Amazon)
- Keyboard: Logitech G910 Orion Spectrum (buy from Amazon)
- Mouse: Logitech G502 (buy from Amazon)
WPrime, SuperPi, Cinebench, and AIDA64
WPrime
WPrime is first up and being a multi-threaded benchmark. We know it will scale with any CPU we throw at it. You can manually set the number of workers or threads you want to allocate to the calculation, which we did the total thread count for each CPU to ensure we measure the maximum performance the CPU can offer.
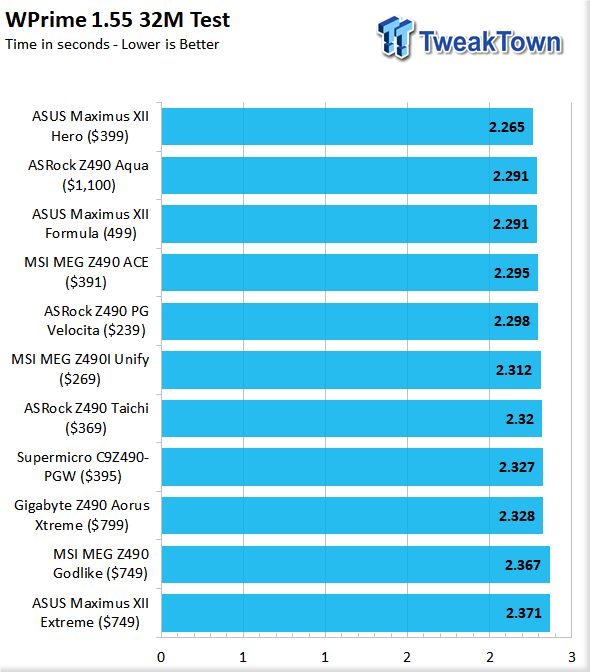
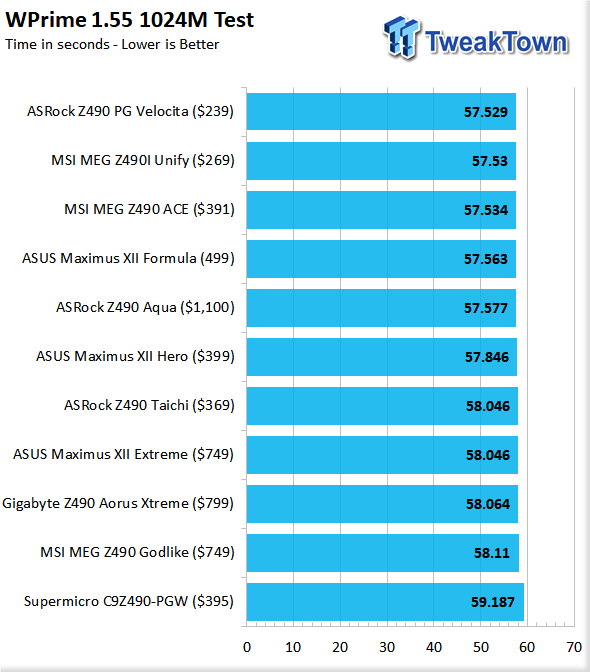
The WPrime benchmark shows the Velocita taking the lead of all of the Z490 boards we have tested on the extended test. The Velocita is in the middle of the pack during the 32M short test.
SuperPi
SuperPi is a much older test, but it's worth including as it is a single-threaded computation workload that really can show in granular detail differences in the computational ability of the silicon being tested. One thing to note is that this is an aging application that tends to favor intel architecture, so don't be surprised when you see much better results by some chips, as those same chips you will see get beaten in other tests.
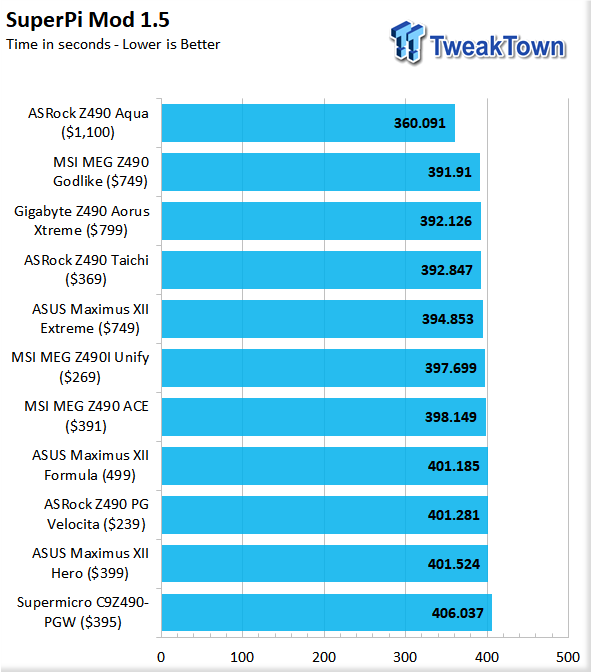
With SuperPi, it is a single-threaded workload, which can show the base efficiency of a platform. Here we see the Velocita lose some ground to several boards. Still, as they are all being within a few seconds of each other, the difference would likely be imperceptible to the end-user in regular everyday usage. Also, do note that future UEFI updates can change the tuning and improve this difference.
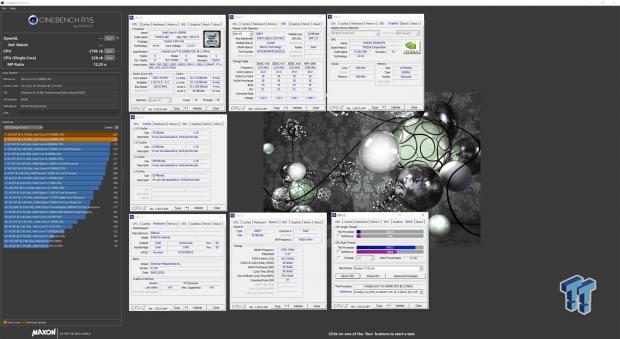
Cinebench
Cinebench is a long-standing render benchmark that has been heavily relied upon by both Intel and AMD to showcase their newest platforms during unveils. The benchmark has two tests, a single-core workload that will utilize one thread or 1T. There is also a multi-threaded test which uses all threads or nT of a tested CPU

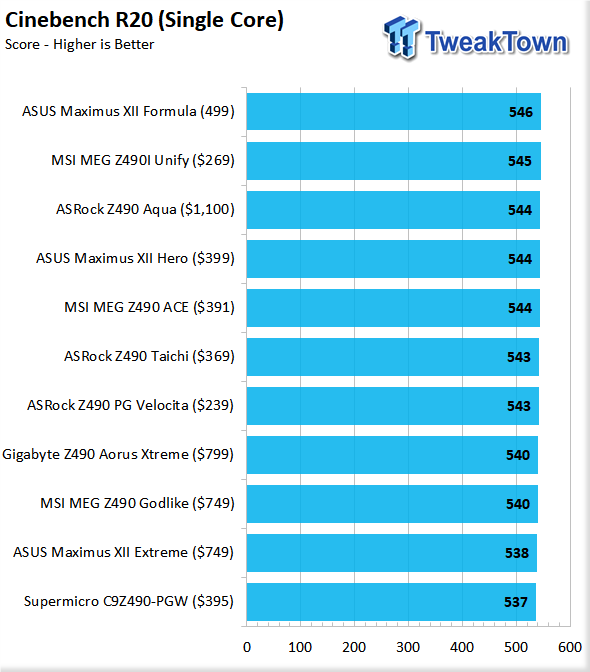
Cinebench shows all of the Z490 boards fall in line with minute differences separating the bunch. The Velocita holds a spot in the middle of the bunch here.
Aida64
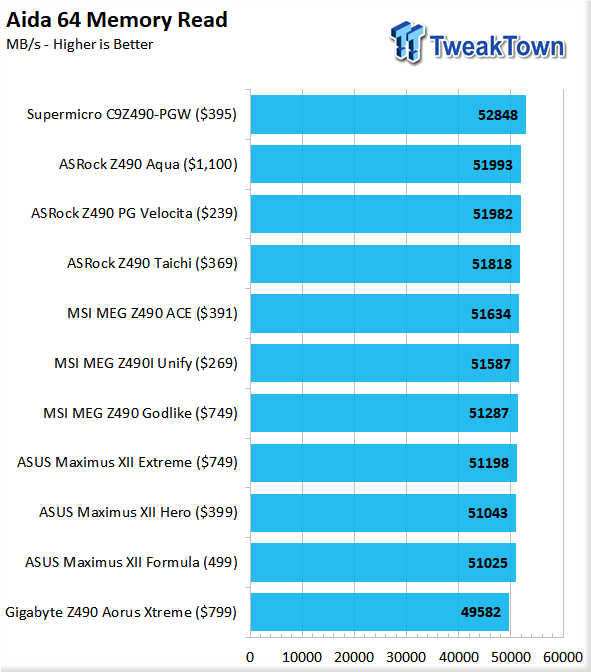
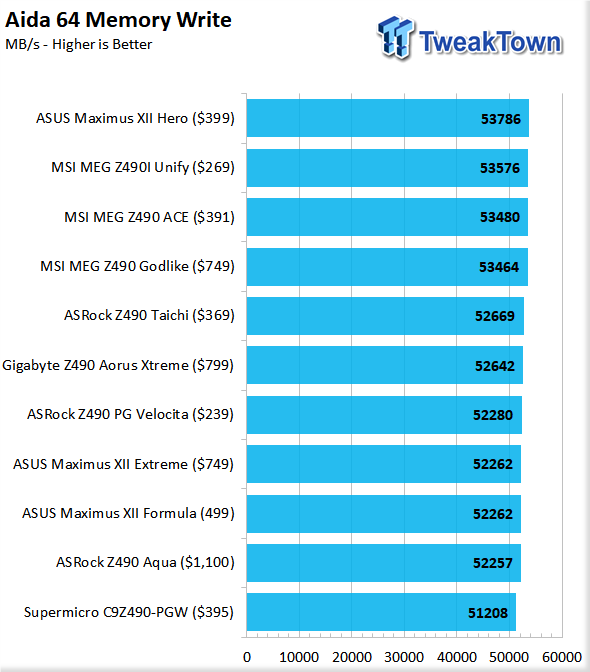
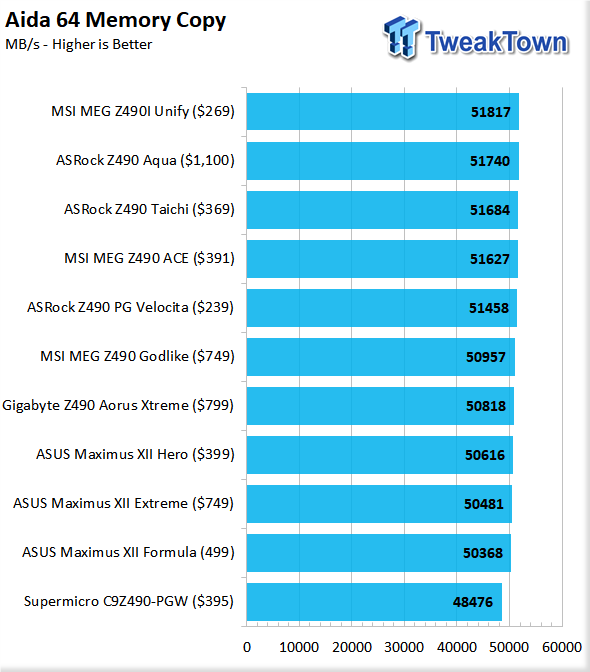
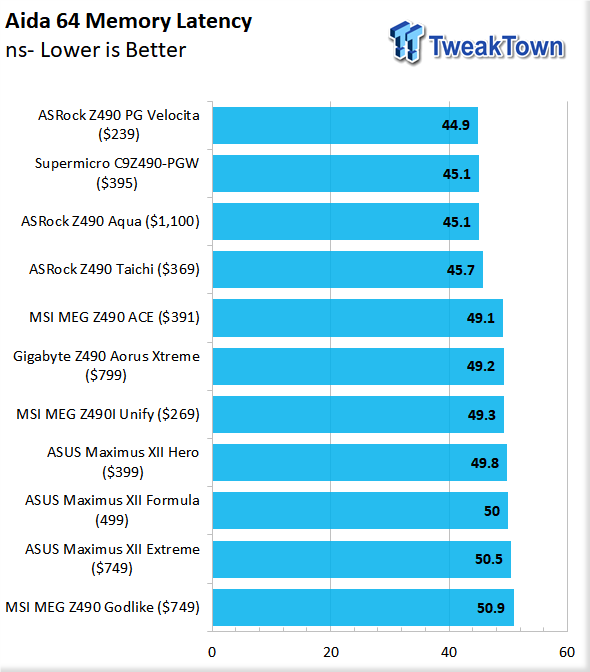
Moving to Aida64, we start with memory performance. The memory performs in the middle of the pack once again in all of the tests, but the Velocita pulls a pack leading latency result, being the only sub 45ns result of all of the Z490 boards we have tested.
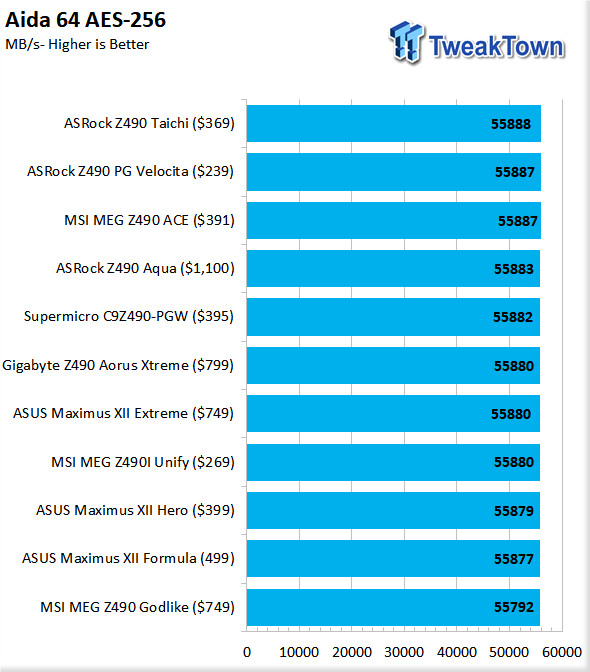
The AES encryption test gives a result in MB/s, and the Velocita takes a nearly top finish here only 1MB/s behind its Taichi brother.
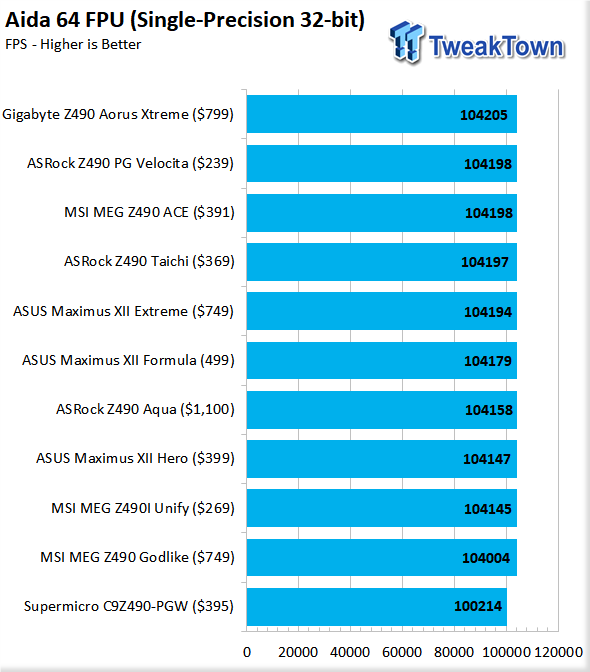
For FPU testing, we have 32-bit single-precision first. Here we see all of the boards stack quite close to one another, but the Velocita once again is right at the top of the stack falling just under the top spot of the Z490 AORUS Xtreme.
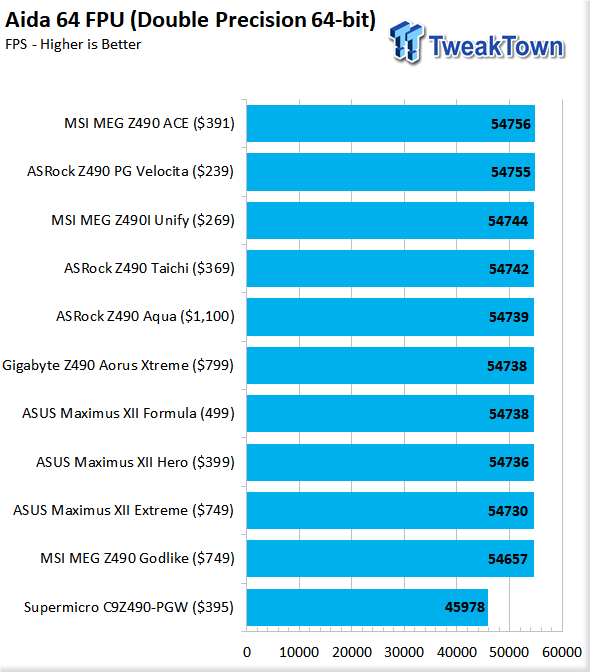
Now with the next level, we have the 64-bit double-precision test. Here the Velocita is 2nd place again falling to the Z490 ACE this time.
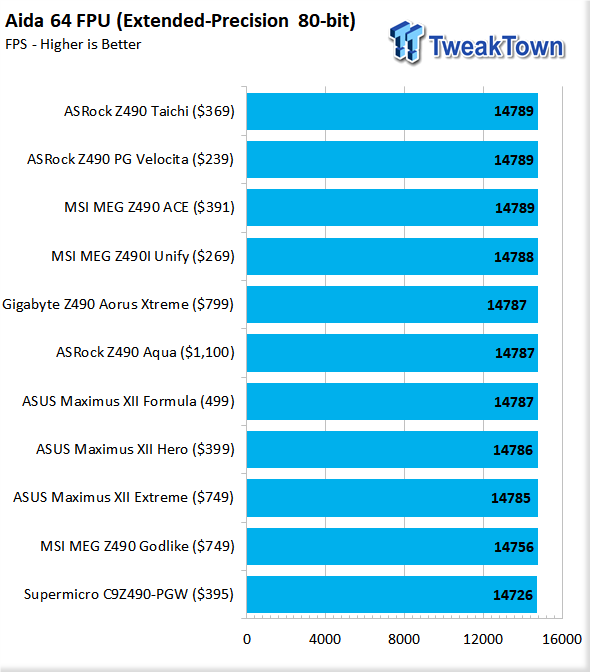
Lastly, we have the 80-bit extended precision test, and the Velocita shares the lead with the Taichi and the ACE.
Handbrake, Blender, POV-Ray, CoronaRender, 7-Zip, and WebXPRT
Handbrake
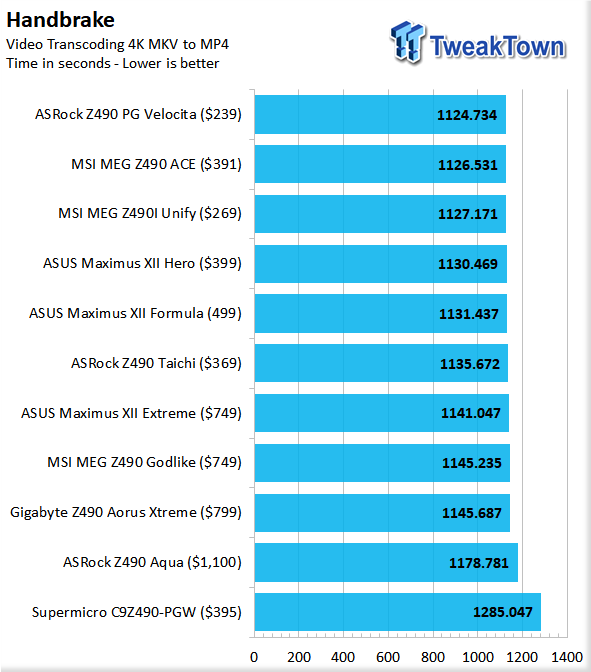
Handbrake is up next, and we are transcoding a 4K MKV to MP4. Here we see the Velocita pull the top of the chart results with the fastest time of all of the boards tested.
7-Zip
7-Zip is an open-source and free compression application. It works well with multi-threading and also can see gains from clock speed as well.
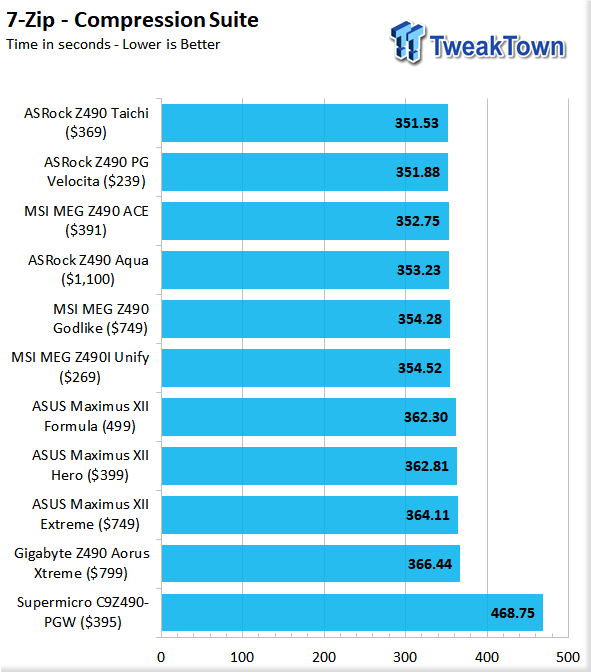
Moving to the 7-Zip compression suite, we see the Velocita and Taichi take the top spots here as well. This speaks volumes to the tuning and optimization ASRock has made for their boards.
WebXPRT
WebXPRT is a browser-based test, and we like this test as this is one of the areas not many think to test. This also happens to be a real-world usage test that can be impacted by the mitigations which have recently rolled through and were patched.
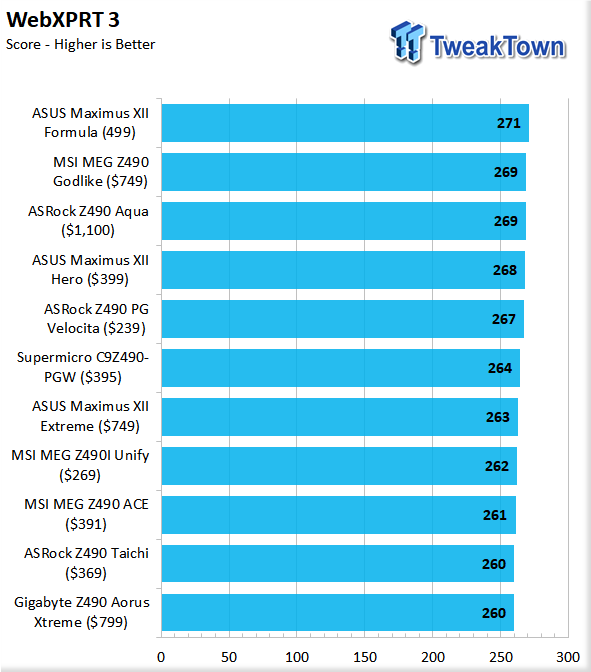
WebXPRT sees the Velocita take up a spot in the middle of the pack, which is not a bad place to be when you consider the price point.
Unigine and UL Benchmarks
Unigine Superposition
Superposition from Unigine is a DX12 based benchmark. We test with the 720p LOW preset as this removes all but the most basic GPU loading, and all of the FPS performance comes from the CPUs ability to push frames to the GPU. This test is far more efficient and speed based rather than being highly threaded.

Unigine Superposition is one of our 3D gaming loads, and we test it at the 720p low preset to remove the GPU from the equation as much as possible and show the impact of the system on graphical performance. Here the Velocita pulls another chart-topping result, which is quite the feat when you consider some of these boards are 3x the price or more.
PCMark 10
PCMark is a benchmark from UL and tests various workload types to represent typical workloads for a PC. Everything from video conferencing, image import, and editing, along with 3D rendering, are tested.
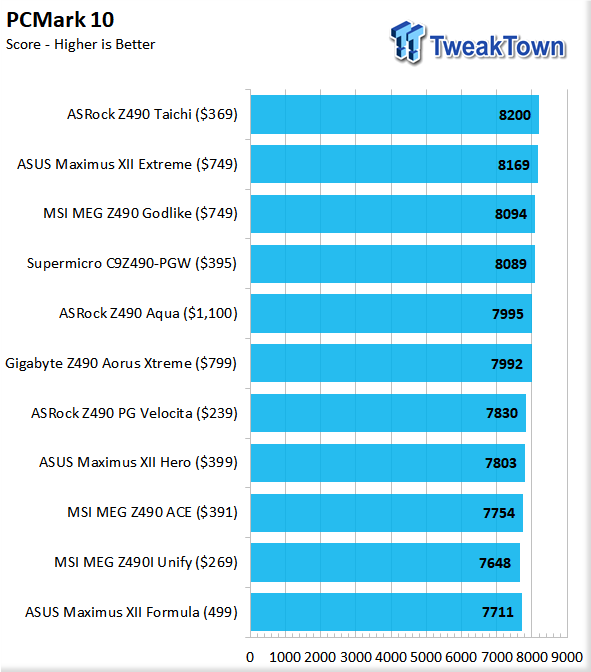
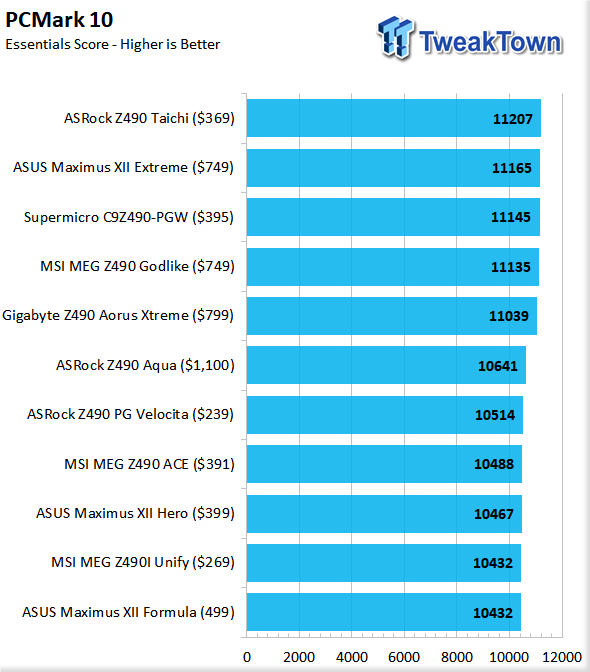
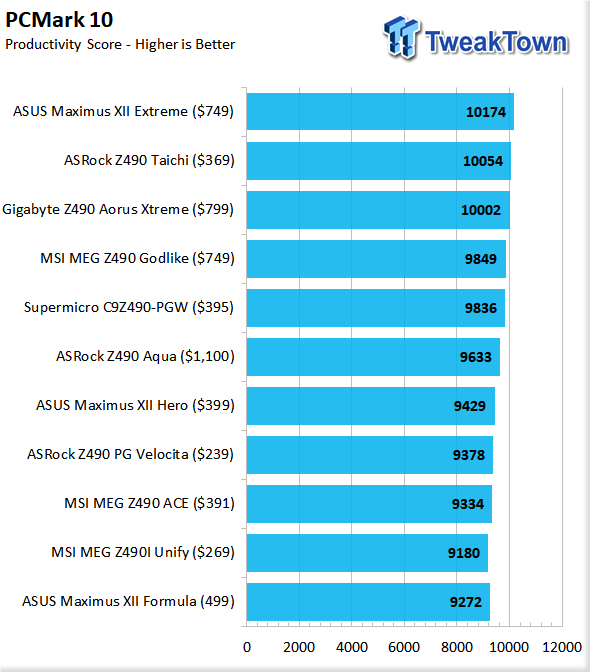

The overall result shows the Velocita taking up a center of the pack placement. The Digital content creation result has the Velocita tracking upwards into a top 3 position.
3DMark Firestrike
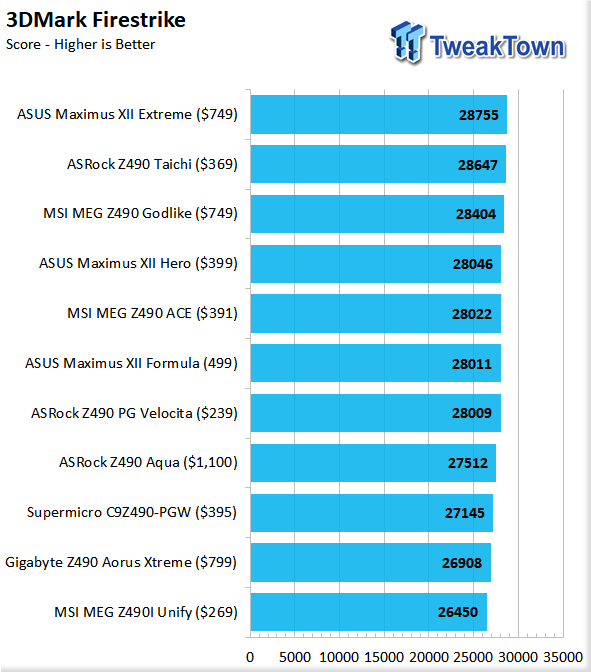
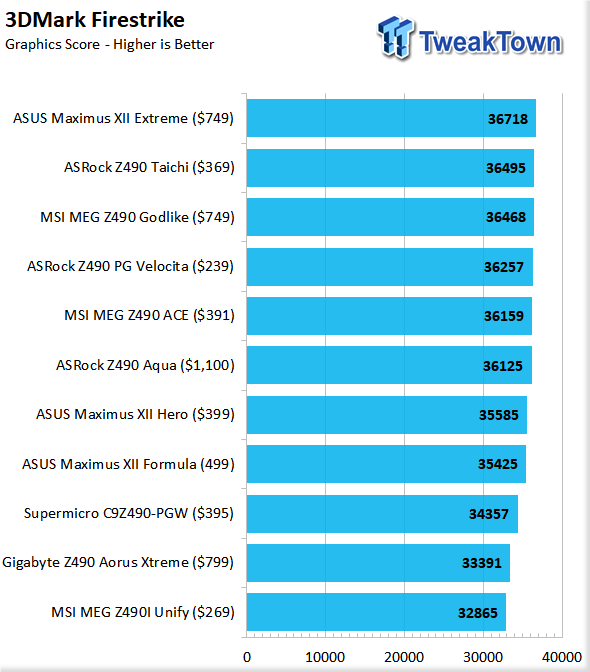
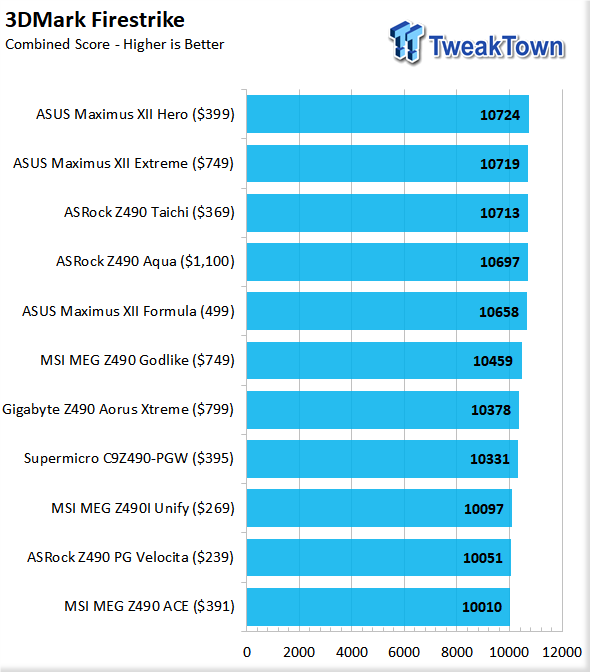
3DMark Firestrike is our second graphics or synthetic gaming test. Here we see the Velocita showing in the lower half of the Z490 results, but in graphics scoring, we see it jump up a bit to 4th place.
3DMark Time Spy
Time Spy is another 3DMark test variant, but this one is for DX12 based systems. This test can be quite stressful, and since its an entirely different load, you may be surprised to see how the results shuffle when compared to Firestrike.
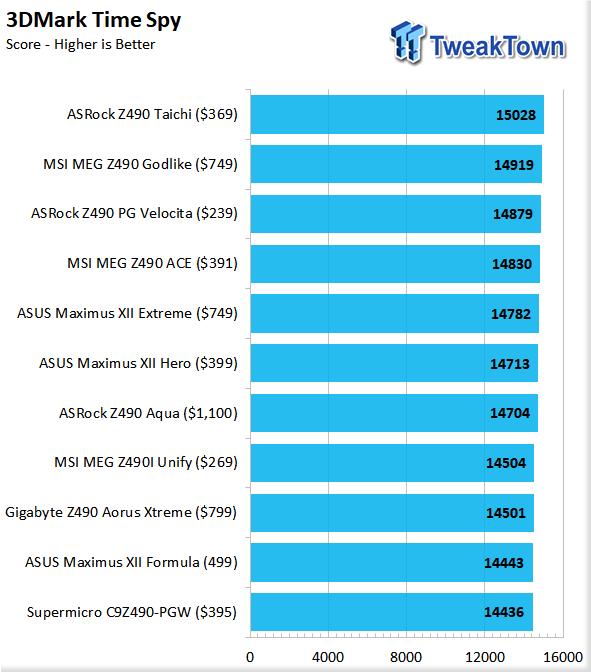
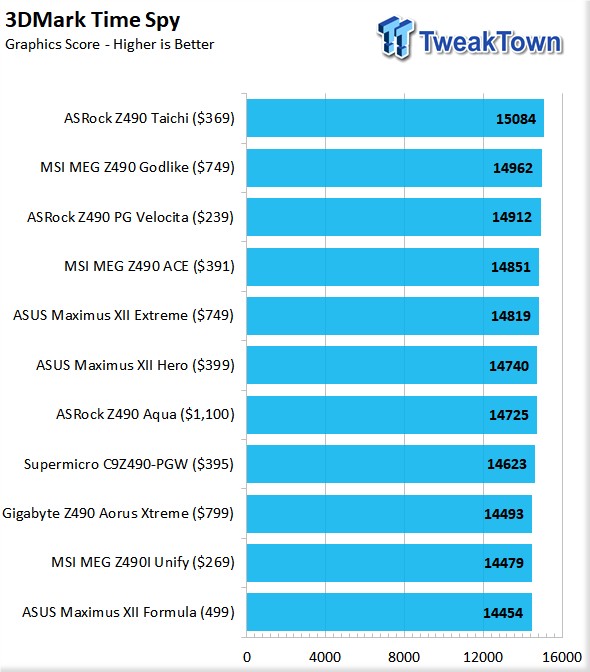
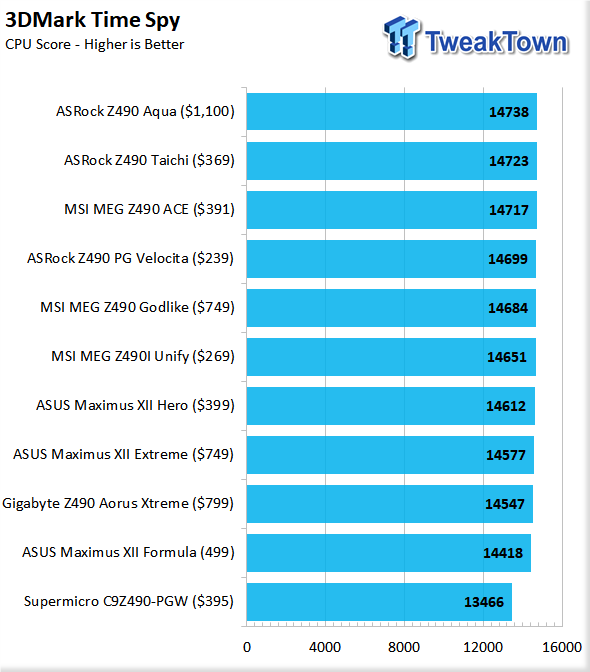
Moving to the newest graphical and gaming benchmark in the UL suite, and the Vewlocita jumps up to 3rd place finishes with only the CPU result dropping to 4th.
System I/O Benchmarks
Storage: CrystalDiskMark
For storage performance, we test the platform using a PCIe 4.0 Corsair MP600 2TB M.2 NVMe drive. It is tested in CrystaldiskMark 7.0.0 x64, and we average the results to ensure a good cross-section of expected performance. Do note that some platforms do not support the new PCIe gen 4, and therefore will cap out around 3400-3500MB/s.
M.2: MP600 2TB
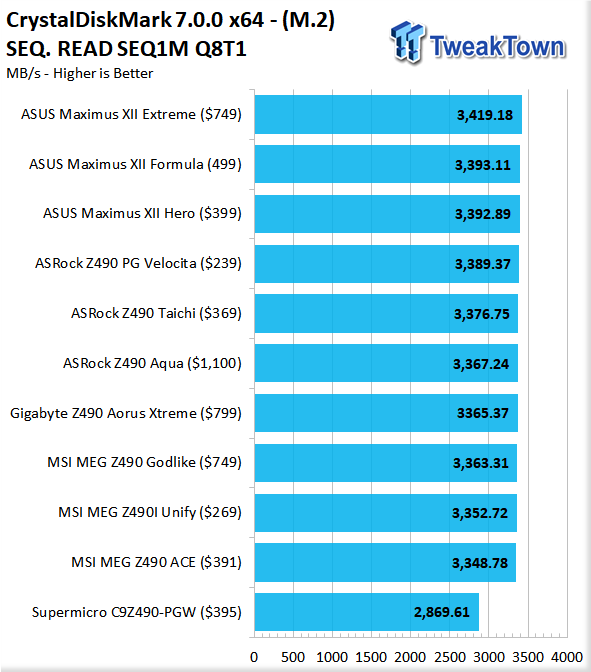
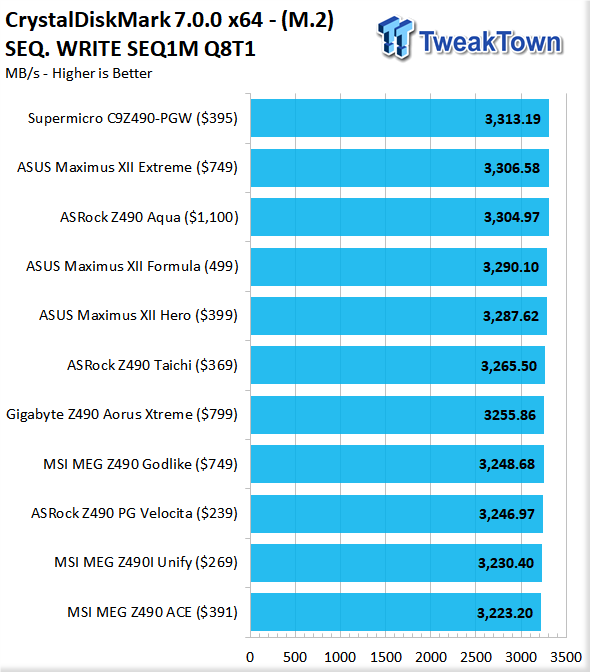

Here, with the MP600, we see the Velocita fall within mid-pack for most of the test, which is about what I would expect being most of the boards are routed a similar way.
SATA: T-Force 2350GB SSD
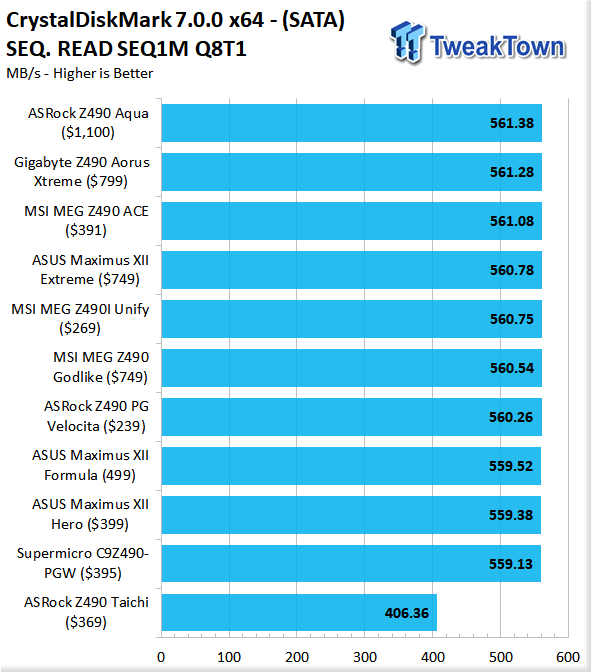
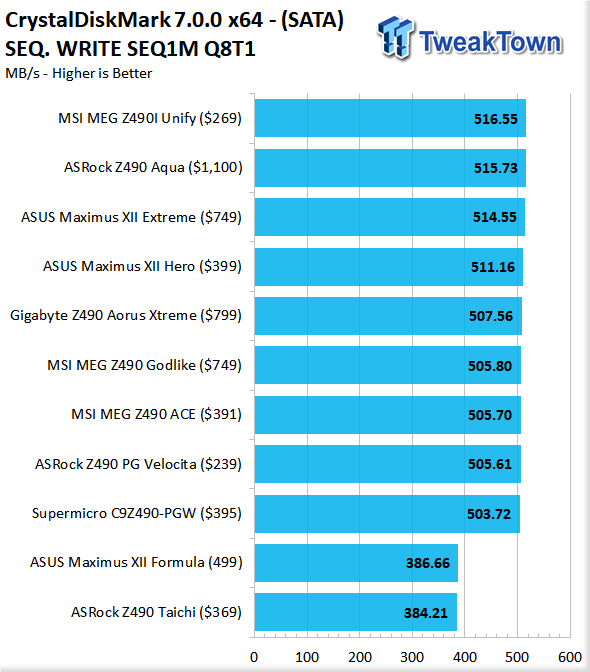
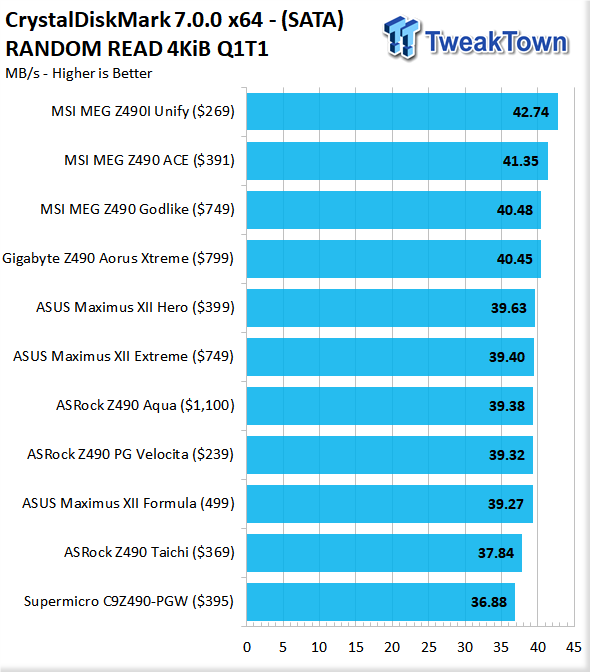

SATA performance is more of the same with the Velocita being matched fo the most part on SATA performance on our test SSD.
USB: WD P50 1TB
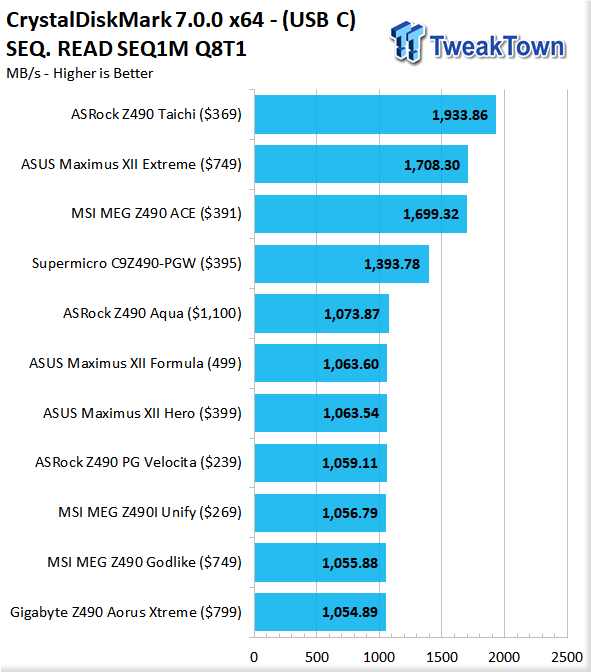
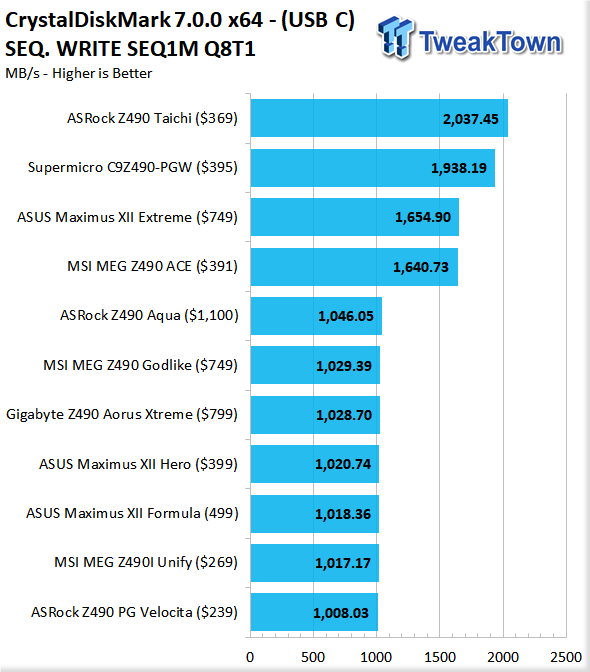
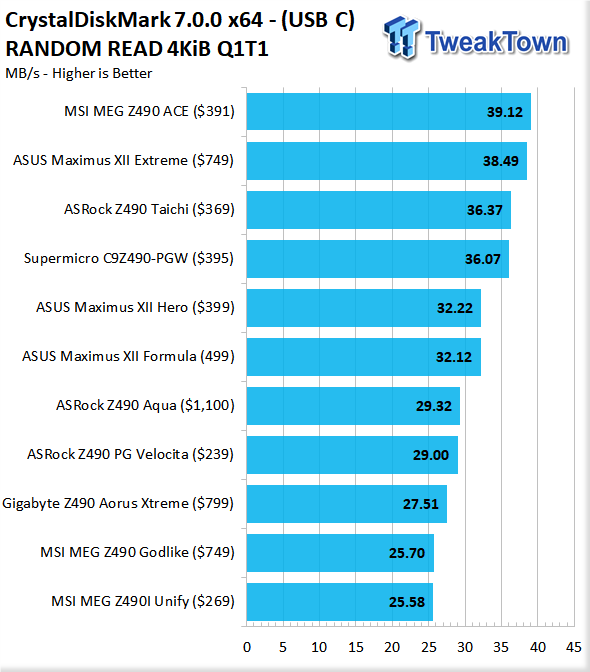
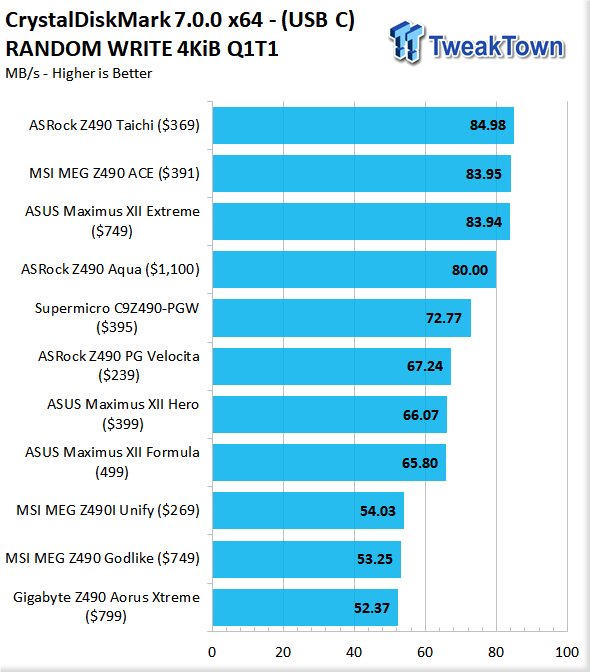
For the external storage, we select the fastest port to test the P50, which is the USB 3.2 Gen 2 (10Gbps) port, and as you see, we top out a little over 1GB/s similar to the other boards that top out at Gen 2 speeds. While I would love to see USB 3.2 2x2 on this board, I have to face the fact that there are boards up to four times or more of the cost of this one with only 10Gbps, so ill take it.
Network testing: Iperf
We use IPerf for network throughput testing; the server is an 8700K based DIY rig with an Aquantia 10Gb interface.
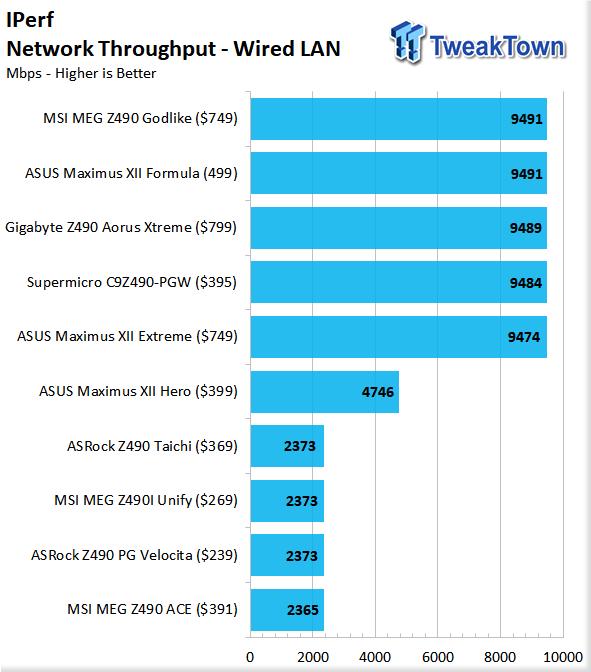
Here we see the top speed LAN port for the Velocita at work, which is the all too familiar Dragon/Realtek 2.5Gb port. Here we see throughput of 2373Mbps, which is right in line with the other 2.5Gb equipped boards.
The next part of network testing is a file transfer test. We use the same endpoint, but we are transferring data from the internal Sandisk Extreme Pro 1TB NVMe SSD.
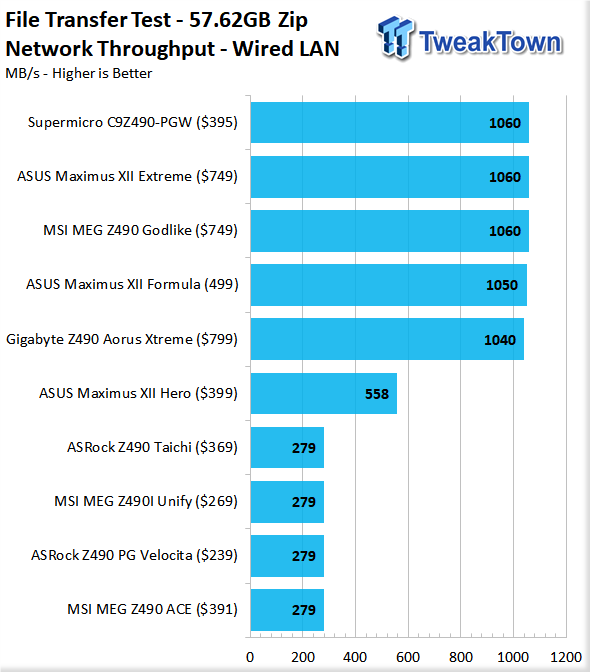
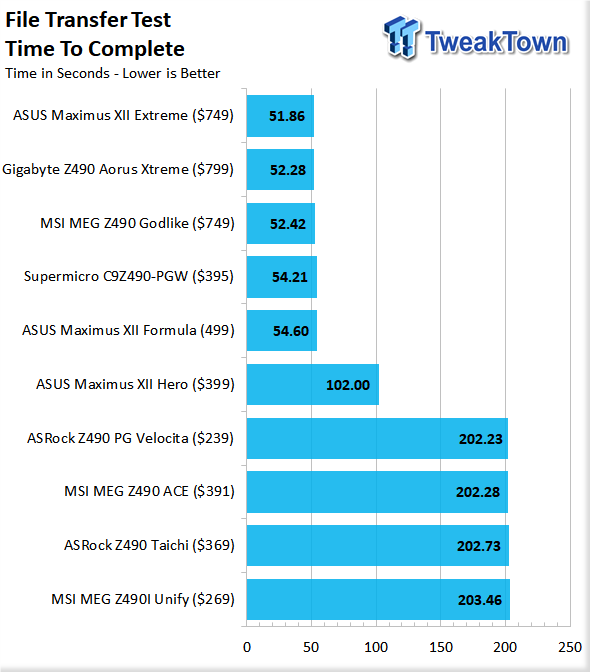
Here we see the file transfer test, which took 202.23 seconds and once again is in line with what we have seen from other boards. While a 10Gb or 5Gb port would be nice to have, at the price point, I cannot rightfully complain very much.
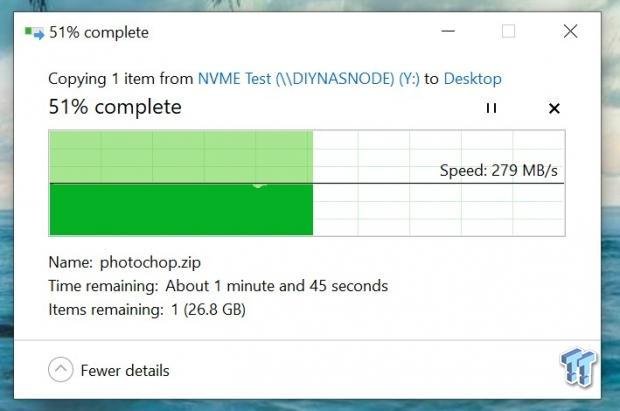
Here we see the actual throughput from windows reporting at 279MB/s from our network endpoint.
Clocks, Overclocking, Thermals, and Power Consumption
Here we will look at the physical and functional performance metrics for the new Z490 motherboards. This includes out of the box clocks, thermals, power consumption, and of course overclocking.
Out of the Box Clocks
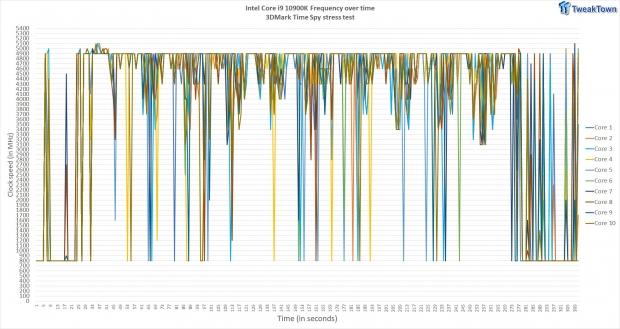
First up is a frequency plot for the 10900K on the Velocita. Here we see spikes up to the 5.1GHz range, and TVB did kick in and showed 5.3GHz blips, it simply was not long enough for our logging to pick it up. Under the Time spy stress test, we see the CPU settle into 4.9GHz and stay there for the duration, except between tests when scenes were loading.
Power Consumption
For power consumption tests, we use a wall meter to test the full system draw. The reason for this is it will represent what the entire system pulls versus our meter, which shows power draw on each PSU cable. The reason for this is that measuring the power draw from the EPS cable, for example, does not take into account VRM losses and, therefore, can show a much higher power draw for the CPU or other device due to an inefficient VRM design or loading range.
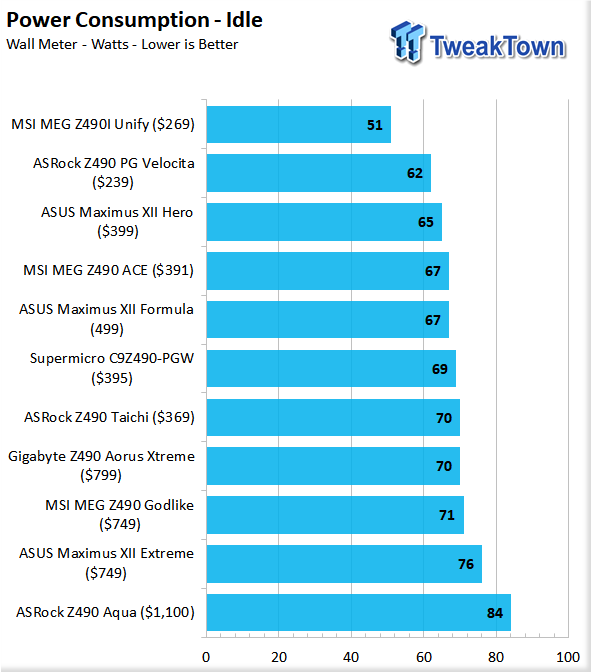
Idle power with the full system and TITAN RTX discrete GPU in place, we see the 10900K rig pulling 62W, which is the lowest idle power we have observed except for the ITX Unify board from MSI.
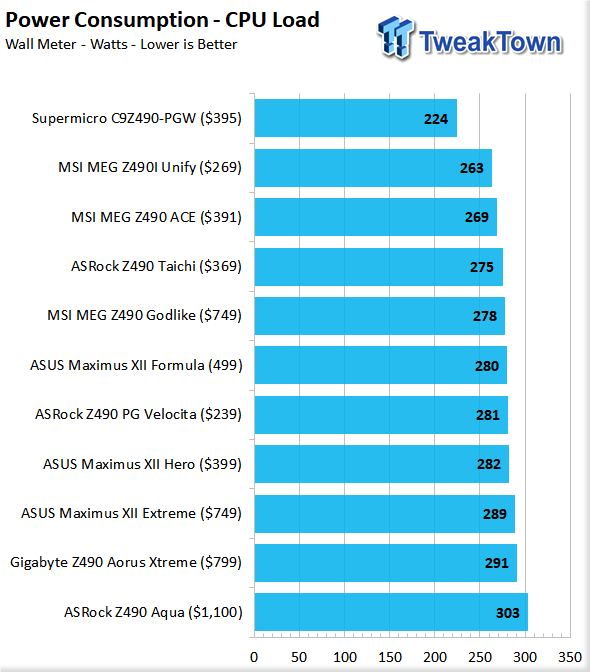
Loading up the CPU with a full FPU load, and the Velocita jumps to mid-pack at 281W.
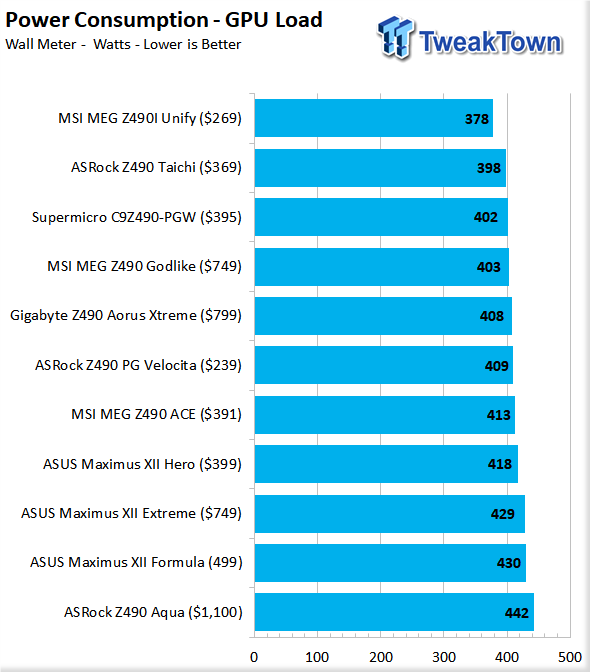
Testing synthetic GPU stress only is an excellent way to show the overhead the CPU adds, as the GPU does not pull more power after it reaches steady state. Here we see the Velocita platform pulling 409W, which is the middle of the pack once again.
Thermals
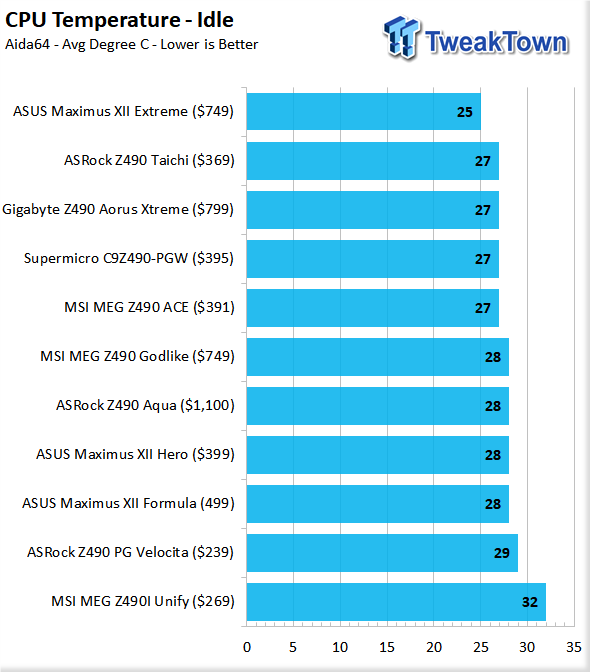
Idle temps for the 10900K in the Velocita is 29C, and that is a couple of degrees warmer than we were used to seeing. Still, I think this has to do with ASRock going a bit more conservative on silicon assumption and adding a bit more voltage to make up for lesser quality CPUs, which may require more for stability.
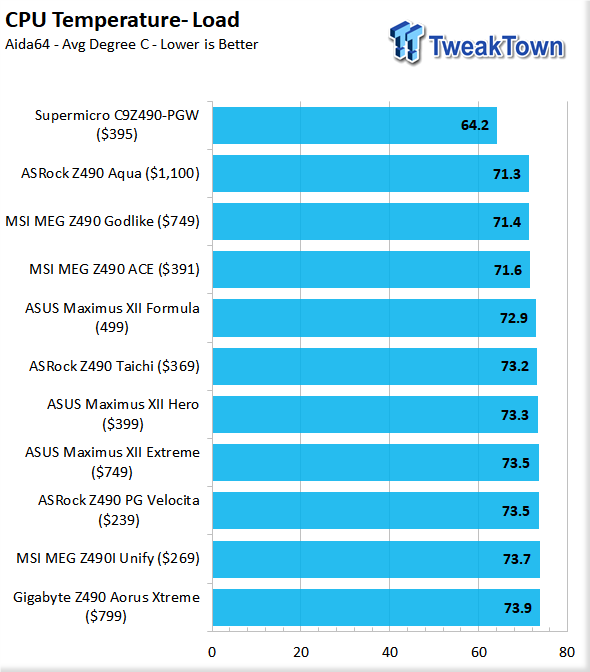
Loading each CPU up with a full burn-in FPU load, and we see that the temperatures leveled out at 73.5C, which is below the top end GIGABYTE and the ITX from MSI, but within reason or a couple degrees spread on the chart.
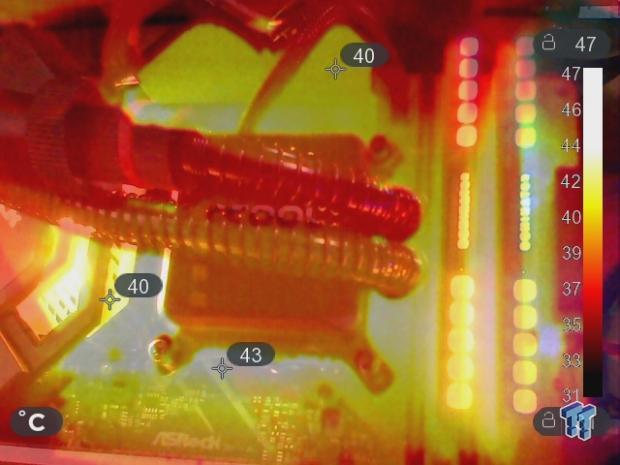
Here we see the Velocita under our thermal imager with a full load on the CPU for over an hour. We see the PCB area near the socket reached up to 43C while the two finned heat sinks reached a surface temp of 40C.
Overclocking
Overclocking with Comet Lake has been a lesson in limitations, both thermally and architecturally. As intel squeezes the 14nm node for all it has, the frequency is now under several boosting algorithms, which help enhance single or dual-core performance to the nth degree. However, it does not leave much on the table for overclocking.
The Velocita was able to push the 10900K to 5.2GHz on all ten cores at 1.312VCore, and that is quite good and fully stable. Some boards take a bit more, but this is about the middle ground for what I have seen this chip fo comparing across several boards.
Final Thoughts
Receiving the Velocita, I was not sure what to expect as I assumed at its price point it would be a massively cut down board to hit a value segment. However, upon testing the Velocita has some significant performance prowess and capability.
What we like
Performance: The Z490 PG Velocita is a strong performer, especially when you consider the competition it is up against and its aggressive price point.
PCIe 4.0: While the PCIe 4 is not here, for Intel at least, we know that by the time it is, there will be even more GPUs and SSD's available that can utilize the faster interface.
Value: The Z490 PG Velocita has a solid value proposition, and with its performance makes it tough to beat.
What do we think could be better?
Wi-Fi: The Velocita is a great performer, but I do think that adding a Wi-Fi card and antennae connectors would have been worth the price increase to users to have the feature. Most users do not want to add this piecemeal, and it could turn users toward another option.
The Z490 PG Velocita is a fantastic value prospect that will not leave most users wanting and has all the right parts to make it a value powerhouse.
 GIGABYTE X870E Aero X3D Dark Wood Review - A woody goody
 ASUS TUF Gaming X870-Pro WiFi7 W NEO Review - Tuffed up
 ASRock Z890 Taichi Aqua Motherboard Review - Flagship features without the flagship price
 GIGABYTE Z890I AORUS Ultra Motherboard Review - Mini-ITX with surprisingly good thermals
 GIGABYTE Z890 AORUS Elite WiFi7 Plus Motherboard Review - Right in the sweet spot
 Australian GTA Online players officially blocked by Rockstar from getting rarest vehicle
 Wizards of the Coast president to leave position as Magic: The Gathering hits record $500M earnings
 NVIDIA GeForce driver 610.88 launches without a resolution for Battlefield 6 Season 4's crashing issues
 TCL debuts Ultimate Pro 32X3B and 27X3B gaming monitors with LG's 4th-gen WOLED panel
 Apple will offer the iPhone and Apple Watch for $17.99 and $11.99 per month
 Memory supply could plummet 70% as AI's endless hunger devours global production
 Valve fixes Steam bug that downloaded games online instead of over your local network
 World's first tri-mode 1300Hz gaming monitor and 12K ultrawide confirmed
 MOZA's first full-cockpit HMA150 motion system adds a new dimension to flying or racing
 Anthropic gives thoughts on open-weights models, especially those from China
 Logitech G316 X 98 Wired Gaming Keyboard Review - Retro-Inspired Board that Falls a Little Short
 Biwin M560 2TB SSD Review - Best Overall Retail-Ready DRAMless SSD
 Logitech G512 X 98 Analog Mechanical Gaming Keyboard Review - An Innovative Two-in-One
 Thrustmaster T.Flight HOTAS 5 MSFS Edition Review
 SteelSeries Arctis Nova Pro Omni Wireless Headset Review - One Headset to Rule Them All
 SteelSeries Arctis Nova 7 Wireless Gen 2 Headset Review - New and Improved, But Is It Enough?
 AMD Ryzen 7 7700X3D Review - Days of Future Past
 Samsung 990 2TB SSD Review - Ninth Gen QLC at PCIe Gen4 Speeds
 ASUS ExpertBook Ultra (Panther Lake) 14" Business Laptop Review
 ASUS ROG Raikiri II Xbox Wireless Controller Review - Ready to Take Control
 Printer Not Working in Windows? How to fix detection, print queues and drivers
 The Ultimate Guide to Personalizing Your Windows 11 Taskbar
 How to Turn Your Windows Laptop Into a Second Monitor with Miracast and Wireless Display in Minutes
 6 Mistakes to Avoid When Buying a Windows Laptop
 I capped Windows Update's bandwidth with Delivery Optimization, and my downloads stopped choking
 I use this decade-old free tool that finds files faster than Windows Search does
 I install and update most of my apps with this Windows command now, and I stopped downloading sketchy installers
 Hisense U6SF 65-inch MiniLED TV: High Performance Meets Leisurely Convenience
 I stopped digging through Windows menus after I set up this one folder
 Don't sell your Windows laptop until you do these things