
The Bottom Line
Introduction, Specifications, and Pricing
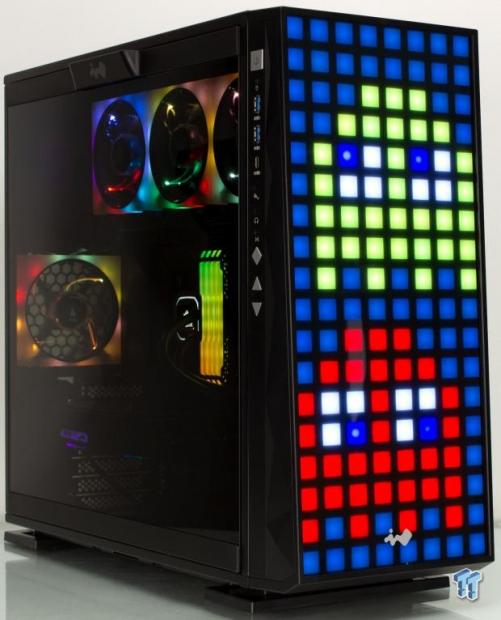
InWin is not one of those companies that need an introduction at this point. If you have seen some crazy boutique builds, mode, or even out of the box insanity, whether it be insane ideas such as infinity mirrors, or just out of this world level chassis designs, there is a chance that was InWin.
InWin for those who are unaware has made a name for themselves offering premium chassis, which in some cases provide never seen design elements or entire feature sets. Things such as mechanization, the previously mentioned infinity mirror, among other more design-oriented elements such as liberal use of brushed Aluminum or other aesthetic and structural features.
The case we have today is the InWin 309, which is essentially a 303 base chassis with a modified front panel and I/O solution. Of course, there was a version similar to this previously based on the same idea, which was the InWin 307, which also had an ARGB pixel art style panel. This is where the 309 shines, quite literally as it has an integrated front LED array that allows multiple different animated effects with the InWin Glow2 software enabling full customization of both the front panel RGB and the installed fan RGB as well.
Key features of the InWin 309 are as follows:
- 144 LED customizable ARGB lit front panel
- Four preinstalled InWin EGO Fans
- Glow2 software allows easy customization of the ARGB lighting
- Integrated microphone, offering interactive lighting effects
- Liquid cooling support at the top, bottom, and rear
The InWin chassis, while it is designed in such a way it should perform well thermally, the chassis primary attraction and feature set is aesthetics based. The liquid cooling is quite good, reaching up to 360mm top and bottom with a 120mm at the rear as well. The bottom 360mm would need to be slim type as it would be directly placed at the boards lower edge, and therefore too thick of a radiator would block motherboard connectivity such as the expansion slots.

The InWin 309 arrives on the market with a part number of IW-309-Black, which is quite nice to see, as it is much easier to decode than some other part numbering schemes we have seen on different chassis. The 309 measures in at 500mm tall while measuring 553mm deep, and 238mm wide. The width should be helpful as it can offer us some extra cable management gap behind the panel.
Motherboard fitment is what you would expect with form factor ranging from ITX up to 12" x 11" ATX. This is big enough to fit most available consumer boards with only the XL-ATX and EATX enthusiast parts not fitting the bill. 3.5" HDD fitment is two, while 2.5" drive fitment is two at default but with an extra tray can reach up to three in total. The PSU is limited to 200mm length. This is more than enough for all but the largest top-end PSUs reaching north of 1200W, and even many of those will fit. The PSU fits up top where the radiator mounting can be, and it mounts on its side, we will look at that when we tear into the 309.
Cooling fitment is exciting and quite expansive for the 309. There are a total of seven fan locations, with three 120mm at the bottom and the top positions and a single 120mm at the rear. The 309 comes with four EGO fans, which are ARGB models with transparent blades. The three included fans have one at the back for exhaust and three at the top section blowing mostly out of the cable management panel. One thing I do like about this layout is that no matter the thickness of the radiator used up top, you cannot interfere with the RAM or motherboard.
The InWin 309 is priced at $199.99, which is both a nice spot but also a tight spot. Placing the 309 in this price range pits it against several powerful contenders. First up would be the Phanteks Evolv X, which is an excellent chassis, and then we have the Dark Base 700 from Be Quiet at ten dollars shy of the $199 mark. We also have the aging 570X from Corsair and the iBuypower Snowblind S, which rounds out equally and lower-priced options in this area.
Priced slightly higher, we find the Define S2 Vision from Fractal Design, which is a solid chassis as well in the $204.99 price range. As you can see, the InWin 309 will have to leave us impressed to earn a spot among the recommended options we have seen to date.
Shannon's Chassis Test System Specifications
- Motherboard: ASUS ROG Maximus XI Hero (Wi-Fi) Z390 (buy from Amazon)
- CPU: Intel Core i7 8700K (buy from Amazon)
- Cooler: Corsair Hydro Series H60 (buy from Amazon)
- Memory: Corsair Vengeance Pro RGB CMW32GX4M4C3000C15 (buy from Amazon)
- Video Card: MSI GeForce RTX 2060 Gaming Z (buy from Amazon)
- Storage: SanDisk M.2 256GB
- Power Supply: SilverStone Strider Platinum 1000W (buy from Amazon)
- OS: Microsoft Windows 10 Home 64-bit (buy from Amazon)
Packaging

InWin packaging we have seen previously bucks tradition opting to open and release the chassis on the large side panel rather than through the smaller cereal box style packaging. I do like it; This was simply because the cereal box style can be a pain to get a chassis out if the handgrip cutouts have been used. I know it is a small thing to mention with general packaging but worth noting in my mind.

Flipping to the first of the box sides and we see the 309 logo with offset black and gray lettering. Also, there are five listed features, which were partially destroyed due to shipping labels. I always try to clean this up for you guys, but sometimes the label glue wins the day, and today is one of those days.
There is also an inventory control label in the top left along with compliance/safety iconography at the bottom right. Above the icons is the color indication, which is black in our case, and the only color the 309 comes in at the time of writing.


The two opposing sides here show the product name on one side, while the other has the InWin naming.

The final side of the packaging has the same dual color 309 naming, along with a copy of the specification table. Across the top, we have six icons with five being focused on features while the last showing ROHS, which while yes, it's a feature, I do find it strange to be included with highlight features such as tempered glass or ARGB fans. But I digress, let's get this thing unboxed.

The 309 comes in a soft white foam external exoskeleton. Inside this frame of protection, we have the 309 in a cloth/fabric style bag, which is meant to keep scuffs and abrasions at bay.
InWin 309 Mid-Tower Chassis

The front of the 309 looks like a solid tempered glass panel like we have seen on the front of several chassis at this point. It is not until you look closer or turn it on that the front LED grid array is revealed, and you see that this is much more than a dormant glass front panel. The lower portion of the panel has a white InWin logo in place, and the panel LED array does run behind this as well.
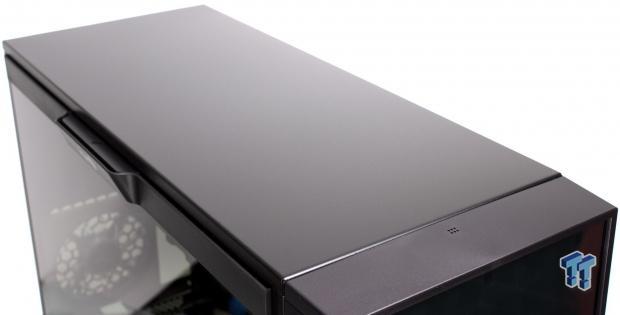
The top panel of the 309 does not have any sort of ventilation and is a solid steel panel on the chassis component. The front panel is plastic, as you see, and has a six-hole microphone opening at the top. This microphone pairs with the lighting effects programmed for the internal fans and the front panel, which have a few reactive modes. These modes react to the sounds in the room, which the microphone picks up.
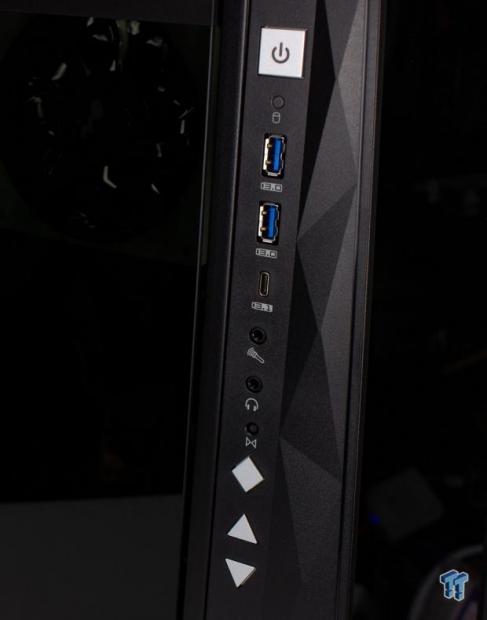
The I/O is found on the primary panel side of the front panel running from the top down.
Here is how the I/O is equipped:
- Power button with integrated power LED
- HDD LED
- 2x USB 3.2 Gen 1 Type-A ports
- USB 3.2 Gen 2 Type-C port
- Microphone 3.5mm jack
- Headphone 3.5mm jack
- Reset button
- Diamond shaped LED & Fan Mode Button
- 2x Triangular LED and fan control buttons
The I/O running down the side is a bit different, as most have it at the top. However, with the number of switches beyond just connectivity here, it makes sense to have it accessible if the system is on the desk next to you and your display. The ability to cycle the various LED effects from physical buttons without always needing to open the software is excellent. Just note that to do more detailed changes or customization to profiles, you will have to use the software.
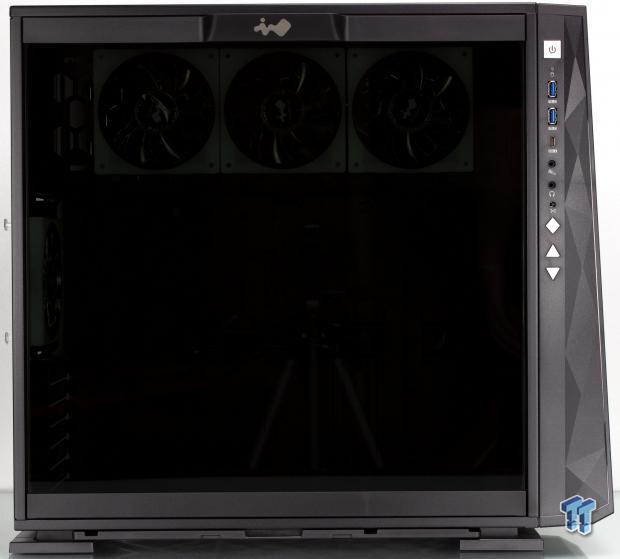
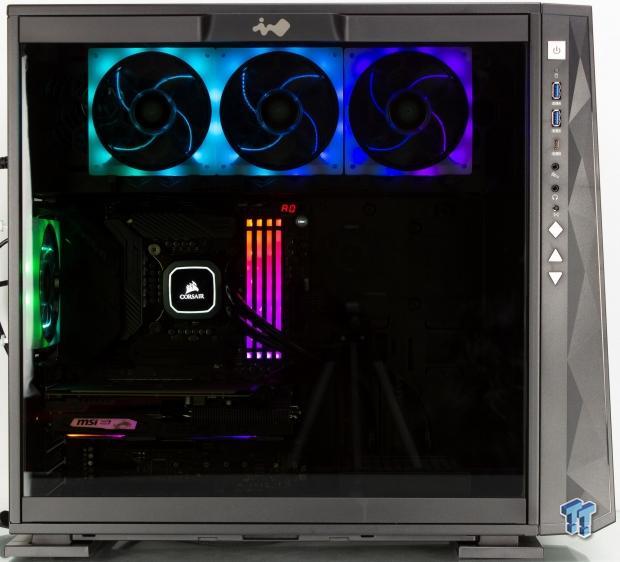
The main side panel is heavily tinted tempered glass. You will not see a whole lot inside if you have darker components without some interior lighting. InWin just happens to take care of that with the four included fans, so that's a plus as your rig will be internally visible when powered on. The panel has no fasteners, relying upon the top latch in the middle of the panel to hold it closed.
The latch does a good job here and contains the panel well in place, but also releases easily when depressed. At the lower edge, we can see the removable dust filter peeking out, and as you can assume, the filter pulls out from this primary side and is a better solution than one that removes from the rear.
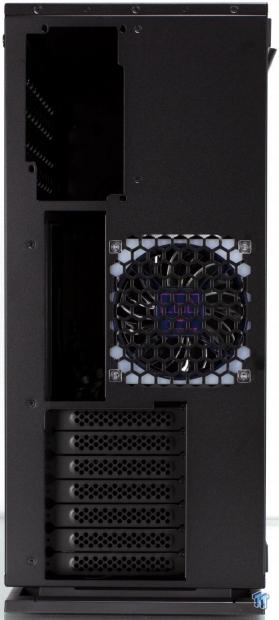
Now looking at the rear, we can finally see something that hints that the layout of this chassis is quite different. Looking up top, we see that the PSU is mounted on its side at the top. This is to make room for the top cable management facing fans or radiator mounting. Everything else looks standard with the 120mm mount I/O shield cutout and the seven expansion slots all where you would expect them.
One thing worth noting is the fasteners that InWin uses for their EGO fans, which are plastic push pins that hold the fans well but are also easily removable should you need. Also, worth noting is the lack of separator bars on the expansion slots, this will allow the entire section to be wide open if you remove all the slot covers. The lack of separator bars will also ensure that there is nothing to block the edge of GPU ports.
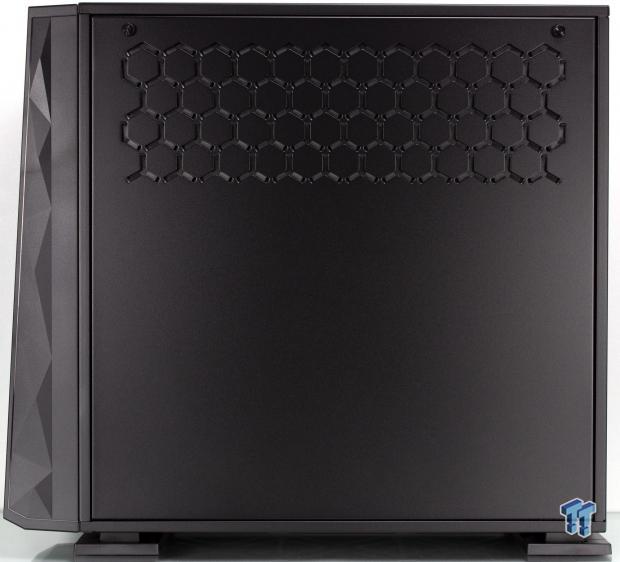
The rear cable management panel also pivots away from the chassis from the top. This is why you see two fasteners up top, as the bottom is retained by tabs into the chassis, allowing it to pivot away and be lifted off. The top section has hexagonal openings, which allow for air to pass out of the 309 in this side form the top tooling mounting.


The bottom of the 309 is dominated by the removable filter and the two large feet. The feet span the two sides, which means that only two pieces are necessary as one in front and one toward the rear covers the needs that generally would be four smaller feet. The feet double as the filter retainer, which the filter slides into from the primary glass panel side. Removing the filter, we see that there is the full mounting capability for up to a 360mm radiator down here. However, as mentioned previously, you will want a thin radiator to ensure you have access to your PCIe slots.
Inside the 309
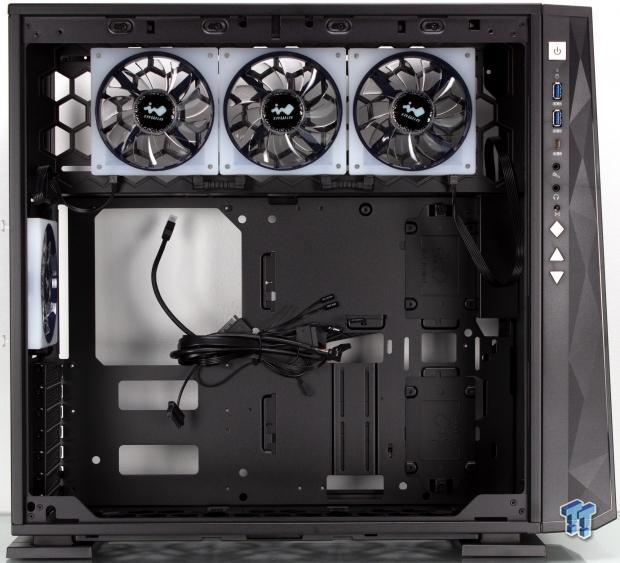
Pulling the central glass panel away from the chassis shows us the interior where you will build your components into. The top is already filled with EGO fans that are daisy-chained together, including the rear fan. This is a proprietary connection from InWin, and therefore if you want to add compatible fans, you will need to get InWin fans to match and work together.
The CPU cutout is adequate for cooler backplates, the one area that I am not a fan of is the limited cable passthroughs. There are a couple in the top fan mounting area. Still, the two elongated rectangular ones on the far edge of the motherboard mounting will require proper management to avoid a messy looking install.
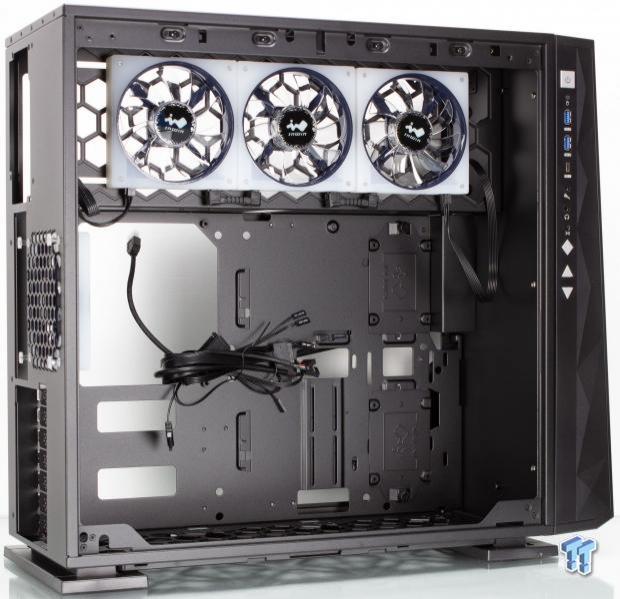
Looking at the front of the 309 from the inside, we see that the panel is solid steel. There is no airflow pass through here or anything like that. This chassis is designed to have the front closed off, and therefore airflow comes in from the bottom and out the top and rear. Up front, we also see the three 2.5" drive mount locations with two trays included along the front edge.
Yes, this does mean your 2.5" SSD or HDD will be visible in the main chamber, so keep that in mind when making component choices. Adjacent to these mounts, we have vertical slits in the metal, which serve to mount the GPU support bracket, which we will see in the accessories soon.


Taking a closer look at the top fan and radiator mounting, we can see that the holes are slotted to allow finite adjustment of your cooling position, along with compatibility should you have a cooling solution that is not a standard hole spacing. This solution is also ideal for the EGO fans since they are daisy-chained, so you can adjust the fan position to best work with the cabling.
Also, of note here are the same plastic fan mounting, which holds well and can make it much easier to pull them slightly to adjust fan position then just press them back into the fan surround firmly. In the rear side, where we see these fasteners is also where the PSU will reside when installed.
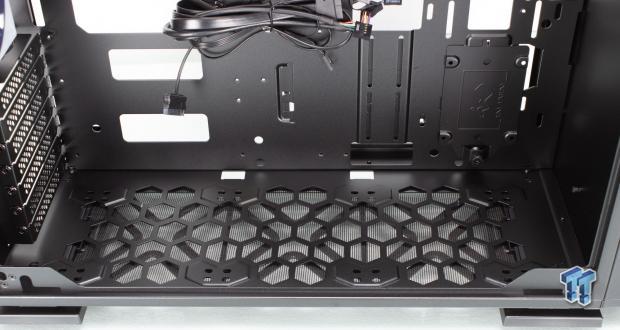
The bottom cooling mounting is not slotted and fixed positioning. The hexagonal openings carry the aesthetic, but also should avoid inhibiting airflow. As you can see, the standoff and expansion slot location is a clear indication that any cooling device mounted down here will potentially inhibit the full slot population, so keep that in mind once again.
Inside the 309 Continued
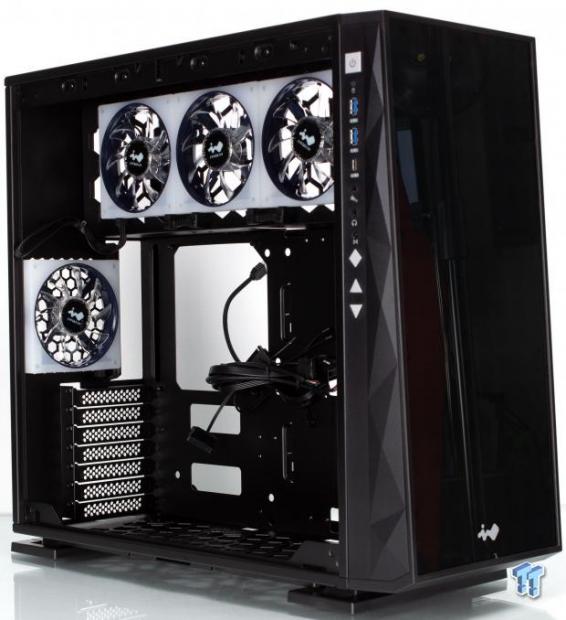
Peeking at the back, and we have the last of the daisy chain EGO fans in the rear. Also, here we can get a view of the vented expansion slots, which are all internally accessible.
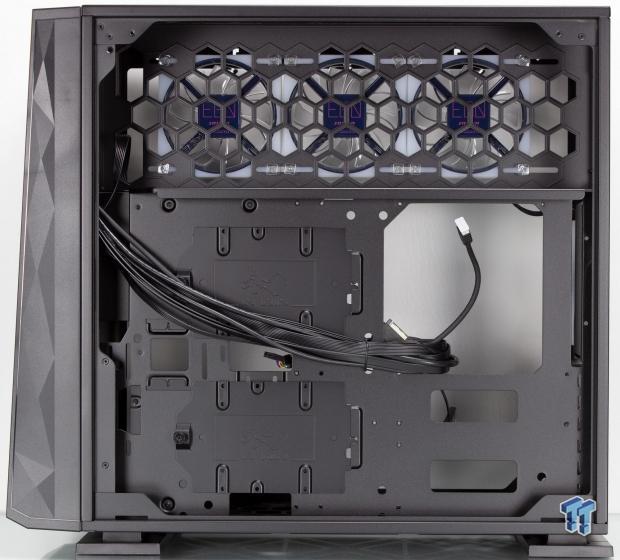
Flipping around to the rear, and we have the cable management area. Here we have a pair of HDD trays and, of course, the bundle of chassis cables that lead to the complex ARGB solution along with front I/O ports. Up top, we have the area we looked at previously, which allows top exhaust airflow for the preinstalled fans or fans and radiator, depending upon needs. There are not a ton of predefined cable tie-down loops, as In Win has several circular holes everywhere, which can be used with a zip tie as well.
However, even those are not plentiful, so you will have to plan out your runs if you want the nailed down cable look. If you do not care about the side you cannot see, there is plenty of space to tuck cables away, as I will show in our test build.

Here we take a quick peek at the 3.5" trays, which are removable but are not toolless. All of the Drive trays require fasteners to mount the drives, which is not a huge deal but is more work than a slide-in drive tray that vibration mounts the drive with quick-swap metal pins.
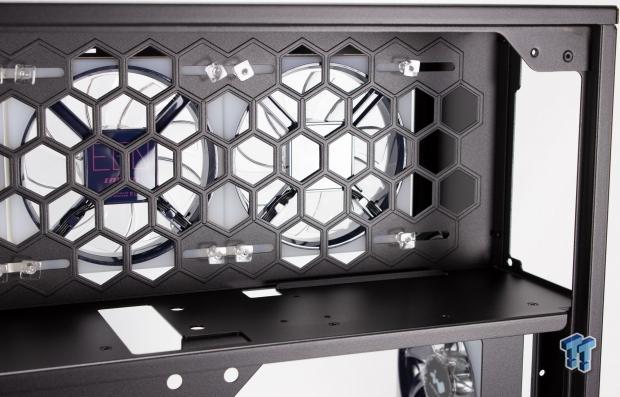
Here we have the PSU area, and as you can see, there are no pads for the PSU to rest on here. The PSU is mounted on its side up here means the PSU will lay on the metal panel above the motherboard top. It is also worth noting that the mounting location for the PSU means that your PSU fan will always be facing the fans as we see here, not the rear panel. This means that the PSU will be pulling air from the main chamber. I would like to see at least a small pad here for the PSU to rest on just to reduce potential harmonics and metal to metal contact.

The cable array due to the intricate ARGB solution is a bit more involved. This is what the front panel cabling consists of:
- 2x SATA power connectors (Feeds LED Lighting and controller)
- 4-pin PWM fan connector (Feeds EGO Fans)
- 3-pin ARGB connector (Feeds motherboard sync to the ARGB controller)
- USB 3.2 Gen 2 connector (Feeds Type-C port)
- Power, Reset, Power LED, and HDD LED connector
- HD Audio connector
- USB 3.2 Gen 1 20-pin connector (Feeds 2x Type-A ports)
- USB 2.0 10-pin "DWE" connector (Connects ARGB controller to the motherboard)
This has everything you would need to get your system up and running, including the lighting effects. One thing to note is that if you want the Glow2 Software to control the fan speeds, you will need to leave the PWM fan header removed from the motherboard; we will, however, let our motherboard control the fan speeds.
Hardware & Documentation

The accessory array is large and enough to easily build the 309. Here is everything you get in the package:
- 7x Motherboard standoffs
- 1x Standoff tool
- 18x Hexagonal head screws (motherboard and PSU)
- 18x 2.5" HDD screws
- 10x 3.5" HDD screws
- 8x Water cooling washers
- 1x GPU support bracket
- 12x M3 thread radiator fan screws (for EGO fans)
- 12x 6-32 thread radiator fan screws (for EGO fans)
- 10x Zip ties
The accessories are adequate to build the rig, and one notable inclusion is EGO exclusive radiator screws fitting both 6-32 and M3 so that you can install the EGO fans up top with a radiator if you are going custom liquid cooling. It also does appear that InWin opted to give a few extra screws across the board to ensure that if you lose one, you have extra over the life of your rig.
Case Build & Finished Product

Here we take a peek of the finished build form the front. Nothing has changed visually as you cannot see in the chassis from here, but this time I pumped my lights up a bit to better display the LED grid on the front, so you can see and understand how the pixel art effect is created. As you can see, there are 144 small squares in a grid, which can all be individually adjusted to make the front panel whatever you want it to be.
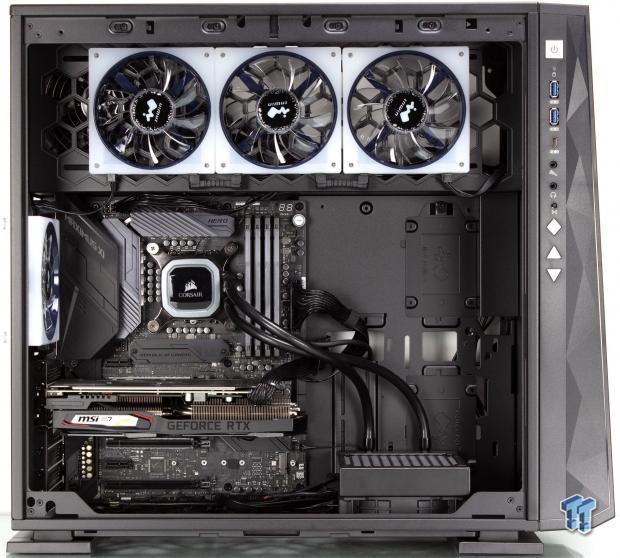
Here we have our testbench built and ready to test the lighting. Yes, I did place the AIO on the bottom for the lighting tests but replaced the rear fan with it during performance testing to ensure we did not have an issue of the radiator feeding air up into the pump, causing cavitation. Much to my surprise, the thermal results were within 1.5C in both the bottom and rear mounting positions.
The cable management options, while they seemed limited, worked perfectly fine for my build, and did not turn out too badly. I would like to see a CPU EPS connector cutout in future chassis just to make the run not have to be across the top of the board.
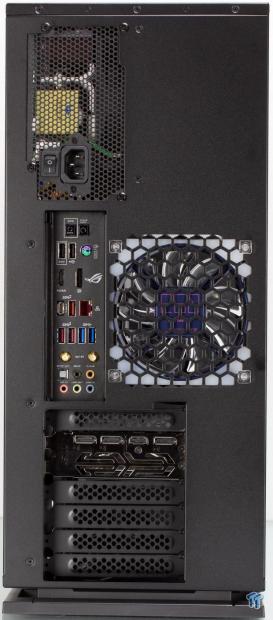
The rear of the chassis fills in as you would expect. There were no issues observed back here, and I would like to point out that the lack of separator bars can be seen here, and it opens up your GPU ports to avoid potential interference. The only other thing is that the 309 is not drilled for the PSU to mount in either direction; you can only install it with the fan facing the inner chamber.
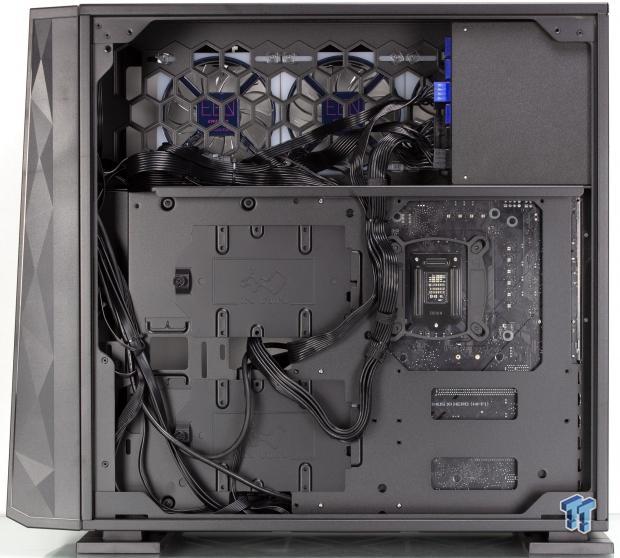
Peeking behind the solid panel to the cable management, we see that the cables can be well managed. The amount of tie-downs does mean that you have to be a bit more judicious with your cable routing if you want the tied down and proper look. However, if that does not matter to you, the area has a large enough gap that everything can sit back here out of sight, and nobody would be the wiser. One thing to note is that there is a passthrough hole in the panel separating the PSU from the cable management area. Mind this; otherwise, you will notice it when you go to close the panel.
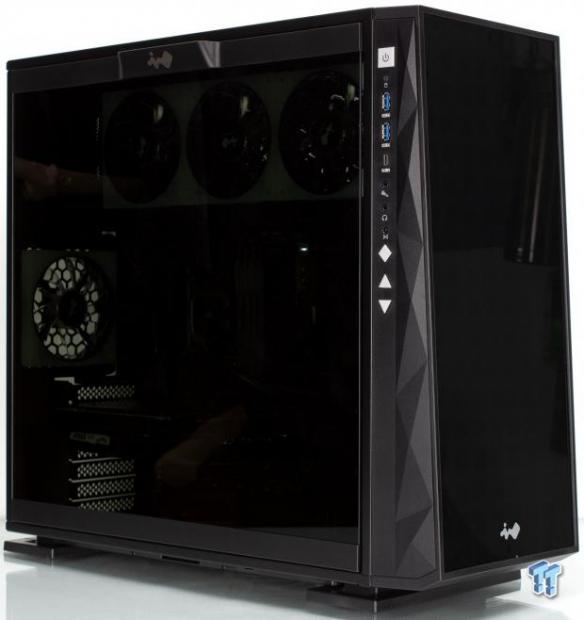
The 309, when built due to its black-panel still is mostly blacked out thanks to its deeply tinted glass main panel. However, with some components such as the GPU being closer to the glass, you can sort of make out the fact that there are parts inside.

The 309 is alive! And here we see the front grid running the RGB spectrum. Once you get into the software, you can change everything to match your desired aesthetic.
Speaking of that, let's move on to the next page where we will do just that.
InWin Glow2 Software

When pulling yup the GLOW2 software, we find that by default, since we connected everything to the board, everything was synchronized accordingly. The toggle at the bottom right edge allows you to switch between motherboard sync or customizable options.

Toggling from motherboard control over to the internal memory profiles of the chassis, and we now have the option to select our LED effects. There are several preset effects, which we will have cycled in the embedded video showing each effect. There are several types and some reactive. Reactive effects are the music option, which uses whatever sound is playing through your PC and works as an audio spectrum visualization in bar format. However, the ECG and Hourglass mode use the top-mounted microphone to react according to ambient sounds. The rest of these are animated effects, which carry over to the EGO fans as well.

Pulling up the settings menu via the cog icon near the minimize button is what you see here. This allows you to adjust the threshold for the microphone reactive effects. Also, the Hourglass can be set as a real hour (60 minutes) or down to a single minute as it is the default. The music mode relies on your native sound device, which you can swap in the dropdown. Also, here is the start with windows option, which I would recommend leaving enabled if you plan to adjust the chassis often.

Selecting the custom option shows an edit button, which you must press to change the frames displayed on the front panel.

Here we have the custom profile creator. This is mostly just making an exceedingly small low pixel bitmap file. The custom mode supports up to four custom frames where you can mimic motion or flip between up to four images. Here you see Clyde and Blinky form Pac Man, but anything that will fit on the 8x18 array will work merely fine. Just remember, this is a low-resolution pixel art, so definition will not be something you strive for.

And here we have Blinky and Clyde on the front; for this, we changed it to one frame to hold the image; otherwise, we could try to make them move back and forth, or even add other images for it to cycle.
Final Thoughts
When I first saw this concept on the InWin 307, it fell in line with the level of crazy design adventures InWin is known for performing. When I saw the 309, it no longer had the semi-opaque front and was a sleek tinted glass instead. This looked prime to make for some fun designs, and as our experience shows, it is capable. The density of LEDs being improved would be a significant plus, as presently, your creativity is stifled by the lack of fidelity/available pixels.
During testing for the InWin 309, we observed an ambient temperature of 23.4C with an RH of 43%. The CPU cooled by a Corsair H60, which is a single 120mm AIO, kept the CPU to an average delta over ambient of 52.8C. The GPU showed a delta over ambient of 36C, which is also quite good. This places the cooling capability in a capable position, only barely losing ground to the Macube 310, but readily beating the S500 from Thermaltake and the Silencio S600 from Cooler Master.
Overall, with the less than standard airflow layout, there is plenty of room to adjust things or even add cooling capacity via the various cooling mounting positions in the top, bottom, and rear.
What we like
There is a decent amount to like about the InWin 309. The first thing is going to be the elephant in the room, and that is aesthetic. Something such as this has been observed only a couple of times, maybe a few if we dig at obscure entries. The 307 ushered in the LED pixel front panel design, and the 309 made it better. While the 307 had its flair, the 309 turned the concept into something that looks much more like something that could fit in as a stealth high-end gaming rig while also able to kick on the party lights and showoff some creativity via the front low pixel count array.
The airflow simply works, even if you would not think that this would be an ideal solution, I do believe both InWin and Lian Li with their PC011 series has proven it viable. The ability to daisy chain things such as fans even if proprietary makes for a much cleaner cabling solution. Even if it does cost you in terms of expandability and choice, the plastic retainers for fans are brilliant as it holds the fans firmly but can be adjusted with zero tools. That is kind of weird when you think about it, the drive trays require fasteners, but your EGO fans do not. This does indeed feel a bit backward.
What do we think could be better?
What we did not like about the 309, I think its safe to start with the same LED array we just finished praising. The LED panel is such a cool idea I am surprised that it has only seen implementation on a few chassis' models. With the progression and increase of use of RGB/ARGB, I knew it was only a matter of time until the attempt to animate it would come into play.
However, the biggest struggle and the most significant stifling moment was when I had ambitious design ideas to make on the front panel and quickly found that 8px wide is simply not much to work with, so the definition is simply not possible. I would like to see what this tech can do, as more LEDs can be addressed independently by controllers. I do not want to have a clear definition of a screen, as the pixel art look is very cool, but 3x the density of LEDs would change the game so to speak regarding capabilities.
The other thing I would like to see better is some sort of protective surface for the PSU to rest upon. Also, tie-down locations that are raised loops or like make it easier to get zip ties through the panel and back to you in the cable management area for tying down cables. Presently we have to have hands-on both sides to push the zip tie back through, which does work, but is also more of a hassle versus having loops pop up where you can easily pass a zip tie through.
Lastly would be the almost complete omission of toolless capabilities. Strangely enough, the Fans were essentially toolless, but the same level of love was not afforded to the drive trays, expansion slots, or anything else for that matter.
With everything we have discussed up to this point, I do think the InWin 309 deserves some serious merit for ushering in a new way of customizing your gaming rig right out of the box. The 309 is not perfect, but it is a solid chassis with an excellent feel for materials and structural integrity. It is not often I would trust using a chassis as a step ladder, but if I was in need, I think this is the one I would grab.
Add to this the fact that nothing else out there as of this time offers the same level of retro-styled customization, except for the Snowblind, which is a similar price point, and you can see that they both hold some cool performance and aesthetic capabilities. There is no way that the InWin 309 could walk away with anything short of a recommendation.
Shannon's Chassis Test System Specifications
- Motherboard: ASUS ROG Maximus XI Hero (Wi-Fi) Z390 (buy from Amazon)
- CPU: Intel Core i7 8700K (buy from Amazon)
- Cooler: Corsair Hydro Series H60 (buy from Amazon)
- Memory: Corsair Vengeance Pro RGB CMW32GX4M4C3000C15 (buy from Amazon)
- Video Card: MSI GeForce RTX 2060 Gaming Z (buy from Amazon)
- Storage: SanDisk M.2 256GB
- Power Supply: SilverStone Strider Platinum 1000W (buy from Amazon)
- OS: Microsoft Windows 10 Home 64-bit (buy from Amazon)
Performance |
95% |
Quality |
98% |
Features |
98% |
Value |
90% |
Overall |
95% |
InWin took the pixel art design capabilities and built them into an attractive chassis style that will likely attract plenty of builders. Don't fret, the performance is solid and matches the aesthetic capabilities for an overall great package.

Similar Content
Related Tags

