

Our Verdict
Introduction, Specifications, and Pricing
Phanteks is one of those companies that makes some excellent case options. That being said, have not checked anything from Phanteks out since 2017 with the Evolv mATX and the Evolv shift mini-ITX monolith style case. Today we have the newest in the eclipse series, the Eclipse P360X. The P360X is based around very similar styling to other eclipse chassis on the market. It carries this a bit further with differentiated front panel airflow design and of course addressable RGB.
The P360X is made for users looking for a solid value option chassis that carries Phanteks quality and design considerations for what makes a Phanteks chassis sought after. Phanteks customers tend to be a very dedicated breed. Many of those who like the styling or features enough that they are willing to fully modify the chassis to fit their custom liquid cooling within the chassis. Whereas other users would find it more sensible to use a chassis designed to fit what they want. Building that kind of customer base is not easy, so it's a clear sign that Phanteks has a good handle on what PC builders want.
Key features per Phanteks marketing are listed as.
- Front ARGB panel lighting and side strip
- New front airflow design
- Removable and cleanable dust filters
That may not seem like a laundry list of special features, but at the value prospect, this chassis offers. It comes in swinging well above its class if it indeed performs and has the quality feel we have come to expect from Phanteks.

The Eclipse P360X comes to market with part number PHJ-EC360PTG_DBK01. That signifies the black model with TG window, but I did not see any other options, and therefore this chassis may only be offered with this single design. However, it can easily be expanded upon as Phanteks receives demands for alternate colors or panel types. The chassis measures in at 465mm tall, 455mm deep and 200mm wide. This places the P360X in the mid-tower chassis sizing as it is commonly accepted.
Motherboard fitment for the P360X is from ITX up to E-ATX, it is worth noting that the E-ATX support is listed as up to 280mm wide. The reason this is important is that E-ATX has many meanings in current consumer tech. Part of that is CEB/EEB, which are much larger boards and will not be supported. However, keep in mind that most consumer boards labeled as E-ATX such as enthusiasts MSI MED, ASUS ROG or other boards of the kind should fit without issue here. 3.5" HDD's have two trays to reside in while the 2.5" fitment uses metal trays in the cable management area. Total 2.5" compatibility of three mounting positions possible with the two included trays. However, once again you can use the 3.5" trays for an SSD each so in reality the 2.5" fitment is 2+2 as long as you are not installing 3.5" drives.
PSU fitment is listed as up to 250mm including cables. We will dig into this more, later in the review. The unique front entry 3.5" trays mean you may have to take into consideration the HDD cabling as well if you plan to use the trays. The PSU is well hidden by a full-length PSU shroud which also happens to be the outer panel of the main chassis side. This is an excellent solution vs. having a full-length glass that sits directly next to a PSU shroud like some chassis. We will look at this more as we dig into the chassis and assess appearance and functionality.
Our Latest Mid-Tower Cases Review Coverage
Cooling fitment for the P360X is not as excellent as some of the top cases we have reviewed but also far from the worst. The P360X tends to be most comfortable with 240mm radiator fitment or dual fans top and front. The front comes with a single preinstalled DC 120mm case fan mounted just in line with the GPU which should help push warm air away and out of the chassis. The top as mentioned previously fits up to 240mm radiators while the front can fit 140mm based up to 280mm or 120mm up to 240mm. The rear fan opening can also support up to a single 120mm radiator, just in case you wanted to maximize your cooling outfit within the P360X.
There are some issues, and they are things I have recently hit corsair and a few others for as well, and this is RAM fitment. While an AIO up to 240mm can fit up top, it will severely limit your RAM height. Even bare memory PCB's are within a single mm of touching the fan on a standard 27mm thickness AIO with standard 25mm thickness fans. This is not to say the P360X is a bad chassis just something I observed when initially measuring. The mounting hole location and drop-down distance until interference with DIMM slots or installed DIMMs is close enough it may become an issue.
The Phanteks P360X is coming to market at $69.99 per Phanteks MSRP, which places it in an exciting price category. In this price range, things tend to get cost down very quickly. Having multiple ARGB components and an integrated controller, along with competent styling, could make the P360X a very qualified contender for your hard-earned dollars. The only chassis I found that had roughly similar capabilities, and RGB is the Antec Dark Phantom DP501 which carries a similar design aesthetic to the P360X and the same price tag. The DP501 in comparison has up to 360mm front radiator support, and also it appears to have more room above the motherboard to fit AIO/radiators without memory interference issues.
Shannon's Chassis Test System Specifications
- Motherboard: ASUS ROG Maximus XI Hero (Wi-Fi) Z390 (buy from Amazon)
- CPU: Intel Core i7 8700K (buy from Amazon)
- Cooler: Corsair H100i Pro RGB (buy from Amazon)
- Memory: Corsair Vengeance Pro RGB CMW32GX4M4C3000C15 (buy from Amazon) [
- Video Card: MSI GeForce RTX 2060 Gaming Z (buy from Amazon)
- Storage: Sandisk M.2 256GB
- Power Supply: SilverStone Strider Platinum 1000W (buy from Amazon)
- OS: Microsoft Windows 10 Home 64-bit (buy from Amazon)
Packaging

The main side of the box has a half shot of the front of the chassis with a white/light grey color. There is also the Eclipse family name in solid black and the P360X in the same white/grey color font. The top and bottom edges of the box carry the front panel air opening aesthetic to have the styling in play.

Rotating the packaging, we find that the other half of the chassis front is wrapped around. The same font and color choices are present here but are typed vertically to fit the design better while keeping the name prominent. The mid-tower designation is emphasized at the lower edge in multiple languages along with a typed out link to the Phanteks website.

The large rear side of the box has an image of the solid side of the P360X. While I understand it is the rear of the chassis; it is weird as it shows very little of the detail. Having an exploded view or something showing users what they would get with the chassis seems much better. The same angular design which matches the front is found on this side as well, and you can also see the similar front panel openings in the image as well.

The final thin side of the box shows the Phanteks name, designed in the Netherlands and other product weight and ID information. This side is more of the business side, which has the applicable labels along with serials and weight listed. Toward the lower portion, we find the certification and safety icons to finish it off.

The P360X comes wrapped in a plastic bag and is encapsulated between two hard Styrofoam end caps to help absorb shock during transport. The plastic bag works to provide a less abrasive layer between the Styrofoam caps and the chassis itself. The glass has an outer layer plastic film which also has the tempered glass warning and is removed in a single peel.
P360X Mid-Tower Chassis

The front of the P360X looks very similar to other Eclipse series cases from Phanteks. There is a difference when you look at the side of each front. Airflow has been enhanced via the two side openings. The addition of ARGB to these openings along with the gap between the TG panel and the PSU shroud is a welcome addition for most users.

The top of the P360X is ventilated with slotted mounting holes for fan and radiator mounting options. The top has a magnetic mesh dust filter in place which can be removed to clean it as needed quickly. We also see toward the RH front is the Chassis I/O which we will take a look at now.
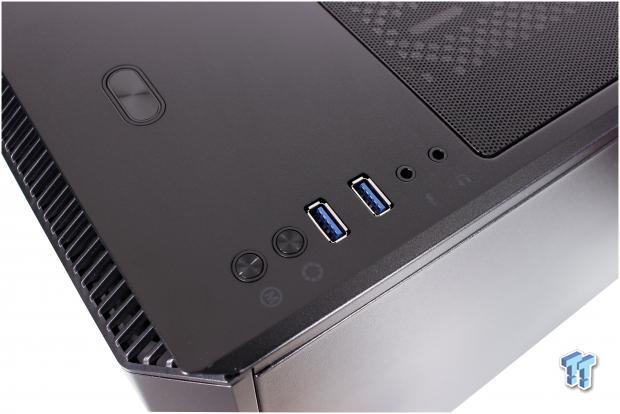
The I/O on the P360X is fairly standard placement and has quite a few things to look at. We will check these out now as they are listed below (left to right):
- Power button
- LED mode Button
- LED color change button
- 2x USB 3.2 Gen 1 Type-A ports
- 2x 3.5mm jacks for headphone/microphone
This is a reasonably standard I/O with no reset button, or power/HDD led activity LEDs. The LED mode can be changed to sync with the motherboard or can be set for multiple preset modes programmed into the chassis. So note that the RGB being addressable means that it is a 3-pin connection and requires a 3-pin connection to your motherboard or ancillary controller if you want to sync it.

The main panel, as you can see, is tempered glass. Something you may not expect is the fact that the PSU shroud area has been extended to the outer panel. This means that you do not have the standard full-length glass panel which sits a mere few mm next to a PSU shroud for a quarter of the height of the panel. The fact that Phanteks chose to deploy the PSU shrouds outer surface as the case exterior is a correct choice and one we have seen previously. I think this choice single-handedly makes a big aesthetic difference and makes for a cool two-tone look.
Inside we see a ton of bubble wrap and a large brown cardboard box. At first, I thought it was one heck of an accessory pack until I unwrapped it and found it was the vertical GPU cable. We will look at later in this review. The Accessory box comes in the 3.5" drive tray which is still hidden at this point. I would suspect that a retail case would arrive at your door with an empty interior which would be visible when unboxing, as opposed to what you see here.

The rear I/O area is relatively standard. One thing to note is that the expansion covers which total seven, do not contain any separator bars or metal strips between them. This is due to the need for open space for the unique Phanteks solution for vertical GPU mounting. We have seen this in some InWin cases previously but having no separator in place between expansion slots. This is a massive plus in my book as it keeps a slightly errant separator from potentially making it harder to seat a display cable fully. This is something which I have experienced in the past. The rear fan port is 120mm size and is slightly slotted to allow a little adjustment to situate it best to meet your cooling needs. Everything else such as the motherboard I/O shield cutout and PSU cutout is reasonably standard.

The P360X has a solid metal panel on the cable management side. The panel has captured thumbscrews which you can see on the rear along with a pull handle to assist with panel removal. Here, we can also see the front air vent, this time on the solid panel side of the front panel area.

The bottom of the P360X chassis is somewhat barren being mostly solid steel panel. There are four plastic angular feet which jut out from the bottom with rectangular rubber pads on each foot to ensure skidding across the table or desk surface is minimized. The rear area shows a large PSU ventilation opening which has a removable, cleanable dust filter which removes from the back. There are four screws near the mid-front area which are used for removal of the 3.5" drive cages should you want more space and do not need them. Moving to the front panel, we find that the ventilation of previous Eclipse series chassis is in place. Herewith the openings allowing more airflow beyond the new RGB lit side strips on the front panel.
Inside the P60X

The front panel comes off relatively quickly with a slight tug from the cutout at the bottom of the front panel. First things you notice are the large white plastic diffusers which are affixed to the rear of the front panel. These are used to diffuse the RGB strips, which we also see here, which creates the color flow effect we know when the system is powered. No cables are connecting the front panel to the chassis which means it can be removed and set aside wholly to avoid any wiring snags or headaches. We usually see when working with front panels whos tethered with internal wiring.
The front also has some other less standard inclusions such as the front accessible 3.5" drive trays. These HDD trays are accessible as you see here once you pull the front panel which is a neat solution I have not seen in quite some time. Next, to the HDD trays, you see a pass-through which has press pins. These collapsible pins make contact with a flat pad on the PCB to provide RGB control to the front panel without needing a solid wire as discussed previously. Above this, we see the removable dust filter which is found affixed with powerful small magnets and two lower tabs that slot into the chassis.

Here we have the touchpads and pins used to power the front panel RGB. If Phanteks can do this on a $69 chassis, I do not see why other manufacturers cannot do this at this point. The pins found on the removable front panel has spring-loaded pin heads. They take up the gap and keep sufficient pressure on the gold pads to ensure a clean contact and achieving proper RGB function.

Lastly, we have the front dust filter removed. As you can see it has tabs at the bottom edge, while it has two strong small magnets to keep, it affixed at the top. Here you can also see the preinstalled 120mm case fan in place, this, of course, can be replaced as mentioned previously. The front fan and radiator mounting has slotted 120 and 140mm mounting to offer flexible cooling options to match your needs.

Here we have a close up of the dual drive trays which support 3.5" HDD or even 2.5" SSD's if you need more than the included dual 2.5" trays.

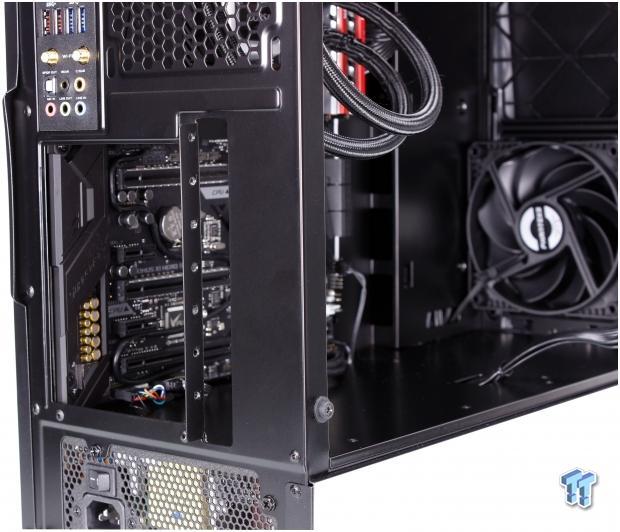
The P360X is an interesting internal layout as it omits standard cable pass-through ports in favor of a raised forward panel. Which is parallel to the motherboard tray but raised so that cables can pass cleanly between the two. This is an interesting solution as it omits the large visible openings we usually see. If you have a motherboard that is wide such as EATX, the connectors may mate right at the opening making for an immaculate presentation. As it stands right now even with a smaller board, this eliminates the normally 90-degree angle most SATA cables need to make to mate with the SATA ports on the motherboard.
The CPU backplate cutout is substantial and should service most any backplate for a cooler IU have ever used. The small cutout at the top left-hand corner where you pass the CPU EPS connector through should be fitted during the early build. Especially if installing a top mount AIO as it will likely be blocked due to the very close proximity of the motherboard to the top panel.

Here we peek inside the front panel of the P360X and take a look form the opposing side of what we had seen previously. Here we see the front filter adjacent to the fan. More importantly, we get a pretty clear view of the space adjacent to the motherboard which can be used for thicker front mount radiators. Being it's limited to 240mm or 280mm models you can make up some of the surface areas by going thicker on the radiator since you cannot fit 260mm here.

Now we take a look at the top, and, as you can see here, the magnetic filter has been moved to the side. Here we have slotted holes for 120mm mounting to allow about 20mm of adjustment for optimal radiator or fan placement. There is also 140mm static mounting, but this is for fans only, as radiators would be a concern for motherboard component fitment due to the wider nature of the 140mm based components.

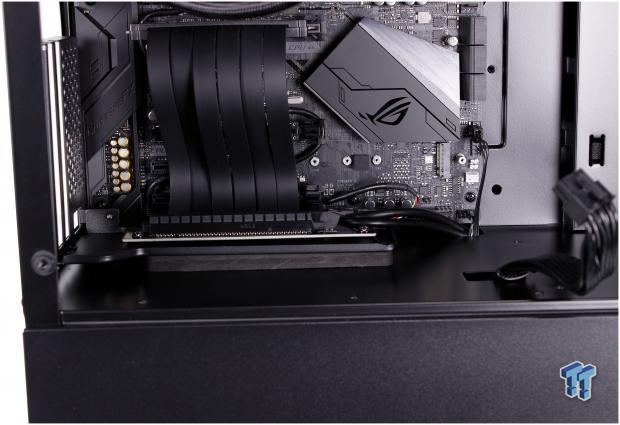
The PSU as mentioned earlier shroud is next on the roster. The PSU shroud is mostly solid with a few cable pass-throughs. This includes one midway toward the glass panel which can be used for seamless pass-through of the GPU power cables to the installed GPUs. The outer surface of the PSU shroud makes up the outer chassis panel. This likely saves cost on the glass panel while in my opinion creating a clean and unique two-tones aesthetic as I mentioned previously.
Inside the P360X Continued

The rear dan mounting, as mentioned previously, is 120mm based with some slotting to the mounting, which should provide a bit more flexibility. There is no fan included in this position as the P360X only comes with one included fan and it is for air ingestion through the front. It is worth mentioning again that the expansion slot covers do not have separation bars like most chassis which means less likelihood of any issues of needing to adjust GPU mounting to connect a display cable.

The cable management area of the P360X is rather simple with triple mounting locations for 2.5" trays. There are two included drive trays back here, which means out of the box you can adjust your drive mounting; however, best fits your needs. Left of this area, we see two preinstalled Velcro tie-downs which can handle the lions share of your cabling management needs. There are a few other areas around the motherboard tray that has pop-out cable management hooks and even a few loops which can be used to fasten cables in place for a much more tidy build.

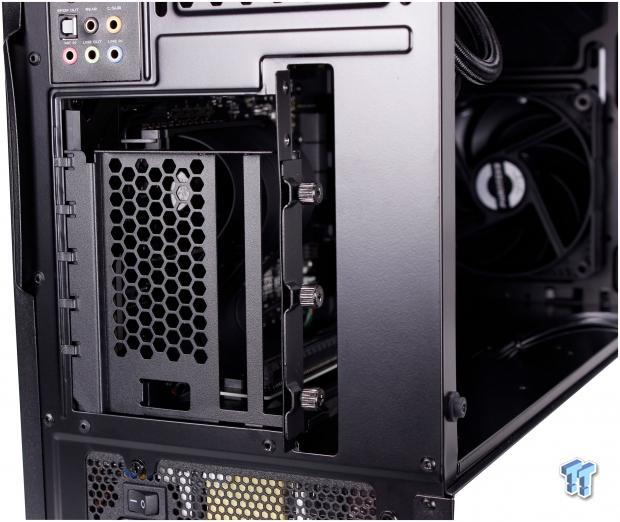
Here we have the 3.5" cage below the PSU shroud and its dual trays, one of which is holding the accessory pack. The 3.5" trays are toolless but will require fasteners if using them for 2.5". The lower cage can be omitted by removing the top screws from the PSU shroud and the screws on the bottom as we showed earlier.

The PSU section is in a standard location, and while it is listed for a massive fitment capability, I believe this is purely based on omission of the 3.5" HDD cage. The PSU has four rubberized foam pads where the PSU can sit to avoid metal to metal contact. Here we also see the ventilation which is filtered and cleanable as needed.

The front panel cables are as follows (left to right):
- ARGB 3-pin output cable (3-pin standard & 3-pin specialized header)
- SATA power lead for RGB control
- HD Audio connector
- USB 3.2 Gen 1, 20-pin connector
- Power Switch connector
- 3-pin ARGB sync connector (to sync with the motherboard)
 
Hardware & Documentation

The accessories are simple but can get the job done. They are as follows (left to right):
- 12x fan screws
- 22x motherboard and SSD screws
- 4x PSU screws
- 2x thumbscrews
- 1x standoff
- 6x plastic zip ties

The manuals included starts with an RMA leaflet which tells you to work with Phanteks directly if there are issues or need for RMA. Secondly, is the actual manual which is quite simple and comes in a multi-fold sheet, like many we have seen before.

The vertical GPU bracket is not a standard accessory as it normally would be purchased separately, but being Phanteks included it, so we could show how it works, we will do so.

The bracket is meant to rotate the GPU into a vertical standing within the stock mounting location. This is why I mentioned the need for the omission of the separator bars between the expansion slots. As you can see here, this bracket should work with any chassis as long as you are willing to mod it if the separator bars are there, as you would have to cut them out.

Here is the bracket, and as you can see, it uses the standard mounting and secure tabs in the chassis to mount and secure the vertical GPU bracket. There is one area of concern that when affixing this bracket, you are omitting all other slots entirely which may not be an issue for most users who only have a GPU in their expansion slots. However, it is worth noting that should you run a sound card, AIC for SSD's or anything else in a PCIe slot, it may require some creativity to use it with this bracket.
Case Build & Finished Product

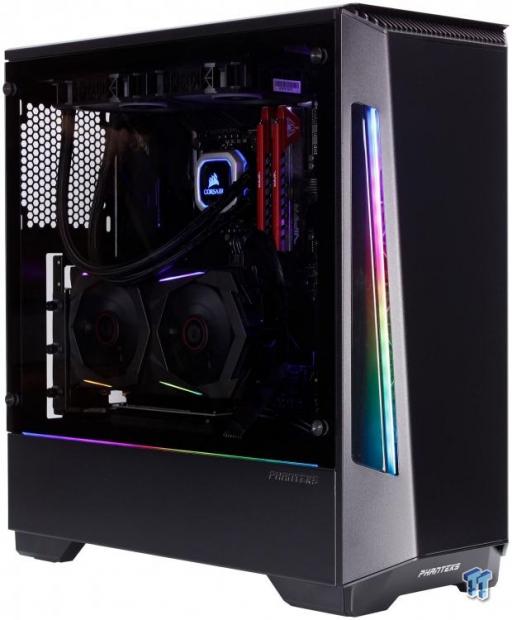
The front of the P360X is the same as when we first looked at when unboxing, as the magic does not come to life until powered. I do think that the P360X has a clean overall aesthetic, but with the RGB going on in the front panel and the side panel gap lighting, I don't think this would fit well into an office environment or home theatre where subdued is far more favorable.
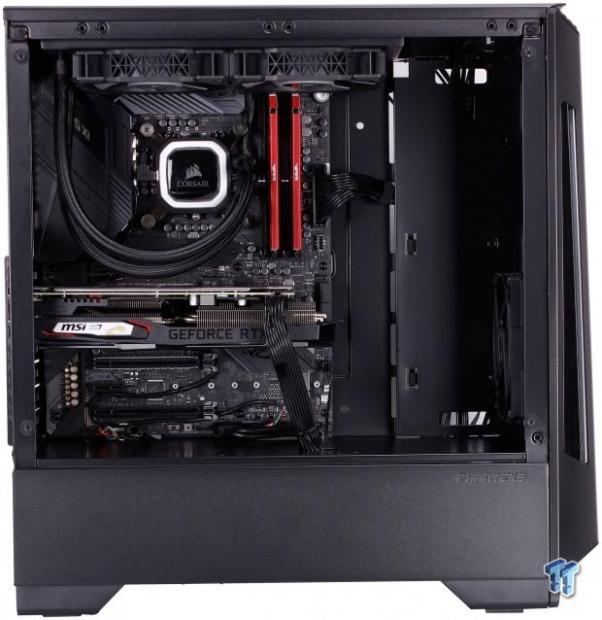
Everything went in relatively smoothly. I say relatively as my prediction earlier in the review came true. You may notice that our standard Vengeance Pro RGB memory is missing since it would not fit with our standard H100i cooler. This is a somewhat common issue with some mid-tower cases, and I would hope that a chassis built around having RGB effects would put a little thought into the component fitment as even PCB for standard naked DIMMs is within 1mm of the AIO fans, so that omits most any other RGB memory from fitting. We had to fall back to one of our safer sets to get the AIO up top.
Yes, the AIO can be mounted in the front if you are so compelled, but Phanteks lists the P360X as being compatible with top mount 240mm based radiators, so that's how we tested. This exposes one area where you will need to have some forethought to ensure your build goes off without a hitch. If you are using an H100i like we are, you may move the included case fan to the rear or top to exhaust.

The rear is as expected; it has everything in its standard place in default orientation. As you can see here, the GPU has no separator across the display ports or even near them, which means unadulterated access to your add-in cards from the outside.

Here we have the cable management area, and as you can see, we used the two Velcro strips to hold the majority of the cabling in place. Since we only had a GPU with an AIO needing power, the cables used were much lesser than some builds may require. As you can see, the 140mm SilverStone PSU has plenty of room, so a reasonably standard 160mm PSU would fit without issues.
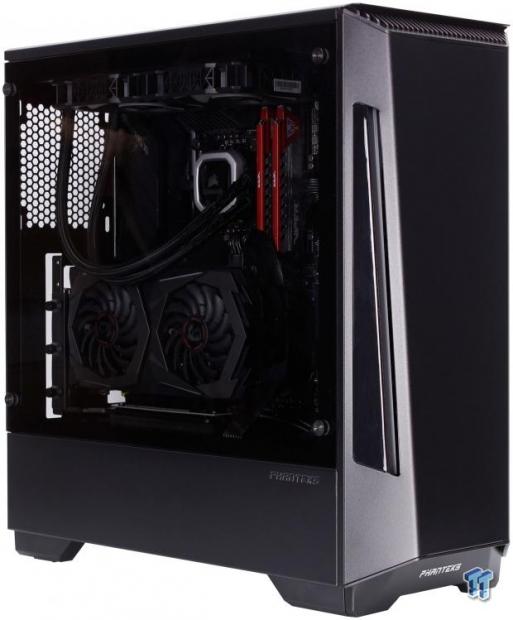
All built and panels applied, we now see the finished product. The P360X looks quite clean with only the shiny plastic in the RGB area, giving away that this may be a more budget build. This is an excellent time to note that like most glossy plastic, this is extremely easy to scratch, so be careful. Overall this build looks very stealthy when powered off, and the P360X looks like a capable and competent chassis, it could be mistaken for a more expensive chassis quite easily.

Someone must have called in the unicorns because the P360X came to life as soon as we powered it on. As you can see the P360X in default offers a full addressable rainbow spectrum to ensure your rig dazzles like most other RGB components nowadays. This is where you can see my displeasure for having to omit our RGB RAM as it would have been right at home in this build.
Case Build Vertical GPU
To install the vertical bracket, you must first remove all of the expansion slot covers. In the case of the P360X, as you can see above, it now has a wide-open area to install. If you use this bracket on a case with strips running between the expansion slots, you would have to remove these for the bracket to work as intended.
Here we have the Phanteks vertical bracket in place. The bracket uses three thumb screws which use the threaded holes used for standard mounting to affix the bracket in place.
With the bracket firmly mounted, we now move inside. Below the bracket, you may notice we stacked a few pieces of the foam we showed previously. This foam has a sticky side which can be used to fix the foam to the GPU bracket. The bracket then rests on the PSU shroud and supports the GPU weight to keep it sitting correctly. You will also notice we routed the rubberized striped ribbon up to the main x16 PCIe slot.

Here we have the rear opening with the GPU installed on the vertical bracket. One thing to note is that now you can see what I was previously referring. All of the other PCIe slots we had previously are now technically unusable, so that's something to consider for users who may have anything from an audio card to thunderbolt, RAID HBA or even a PCIe SSD in a slot. This now becomes far more challenging for someone integrating this into a build unless its GPU only. Thankfully for most and Phanteks, most users only install a single GPU with no other expansion cards, which makes this a great solution.

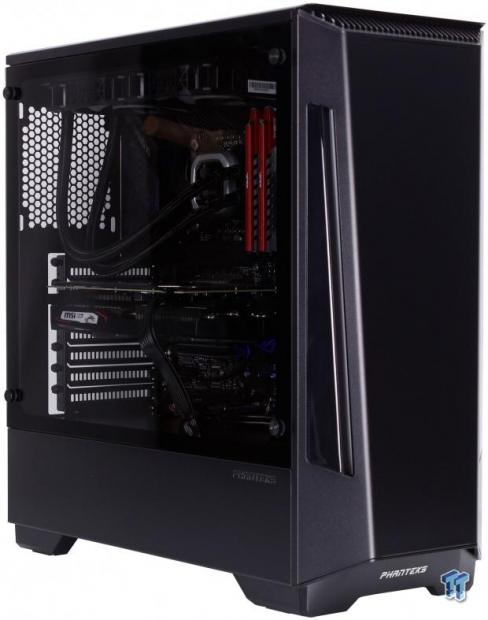
Here we have the GPU now slotted. As you may have noticed, we routed the GPU cable behind the GPU to hide the power and everything much better. The vertical GPU does one thing very well, in my opinion. The vertical GPU hides all of the dead space or empty slots that a standard installed single GPU system would have. This vertical GPU orientation has some aesthetic points going for it along with potentially being a better cooling position which we will test shortly.
The card vertical even with the system off when fully built pulls off a beautiful aesthetic as the curved dual axial fans look mean in contrast to the motherboard above with a glossy AIO pump.
The system now powered, you can see a defined difference in appearance vs. the standard installation. The RGB strips running top and bottom of the dual fans on the GPU make a nice contrast to the front and panel gap RGB flow and feels like a more cohesive overall experience.
Final Thoughts
When I first heard about the P360X, it had some interest as the Eclipse series could benefit from improved airflow in the front panel. I was surprised as to the quality of chassis which I was met with for the meager price of $69. The front and side RGB implementation are excellent, and at this price point, it is borderline astonishing. There is no mistaking this is a cheaper chassis just by the flex of panels like the motherboard tray, but I would argue that at this price point this is a better one than many I have seen.
Testing the P360X with our standard test rig, we did both standard GPU testing and vertical GPU testing to see if it had any impact on thermals. The measured ambient for all testing was 23.8C and an RH of 44%. Firstly we tested the GPU in a standard configuration; this showed an average ΔT over ambient of 46C for the CPU, and the GPU of 38.5C. Moving to the vertical GPU mounting and the CPU was identical at an average of 46C while the GPU showed an average of 38.3C. I have seen many cases where vertical GPU mounts run much warmer due to being butted against the glass side panel of the chassis, and this one spaces the GPU far enough in that it cools as expected and within the margin for error. This is easily a pass as even with just its single installed fan the P360X pulls off some substantial numbers.

First up, let's talk about what we liked with the P360X. The P360X takes the capable Eclipse family and improves it in meaningful ways with the airflow. There is also the ARGB inclusion; which is either an enhancement or not depending on how you view RGB as a whole. The ability to add ARGB to the front in a reliable and nice-looking way along with the side-lit panel gap as well is a definite potential win for those who like synchronizing all of the RGB for a fresh aesthetic. I do like the front exit HDD trays as that's different and feels a bit better to me to install cables where you will not have the rear panel closure potentially catching or braking the connectors off. The fact that every access point has filtration for where air may be pulled in is a substantial benefit, although, mind your pressure setup otherwise if going negative pressure you may draw in a lot of air from the rear which is entirely sans filtration.
Now we come to my knit picks, and admittedly there is not a lot here. The chassis is $69 so, I need to temper my expectations here. The lack of room up top for proper AIO fitment, I feel is probably the biggest misstep of the P360X. I know that seems knit picky, but well as a reviewer that's kind of what I must do. And while the P360X does so much right, that is one thing that should have had a few more minutes in consideration by PM's and engineering alike. The other point of contention for me would be the use of glossy plastic on the front side inlets as this stuff scratches even with a microfiber towel trying to clean it. That, to me, is something that should probably be relegated to the legends of PC history, and we should find a finish that will, at the very least, not scratch by merely maintaining it.
All of this aside, it comes to the very final words. How does the Phanteks Eclipse P360X stack up and does it earn a recommendation for your hard-earned dollar? I would have to say that's a solid yes, the P360X does many things right, and as long as you know what you are getting into, it is an excellent chassis with the capability to house your gear and look like a much more costly enclosure in the process. I don't need to dance and sing happy songs for Phanteks here, as this is indeed a value category chassis, but Phanteks indeed made the best of what they had to give a capable and stable platform for the price point.
Case and point, Phanteks made a $69 chassis that could be mistaken for a $90 unit, and I am ok with this. Just be prepared for what you are getting and plan cooling accordingly.
Shannon's Chassis Test System Specifications
- Motherboard: ASUS ROG Maximus XI Hero (Wi-Fi) Z390 (buy from Amazon)
- CPU: Intel Core i7 8700K (buy from Amazon)
- Cooler: Corsair H100i Pro RGB (buy from Amazon)
- Memory: Corsair Vengeance Pro RGB CMW32GX4M4C3000C15 (buy from Amazon) [
- Video Card: MSI GeForce RTX 2060 Gaming Z (buy from Amazon)
- Storage: Sandisk M.2 256GB
- Power Supply: SilverStone Strider Platinum 1000W (buy from Amazon)
- OS: Microsoft Windows 10 Home 64-bit (buy from Amazon)
 PCCooler CPS RZ620M X CPU Cooler Review
 Cooler Master Cosmos Alpha Full-Tower Chassis Review
 SAMA L70 360mm ARGB AIO Liquid CPU Cooler Review
 Corsair 3200D Mid-Tower Chassis Review
 Antec FLUX Pro Noctua Edition Full-Tower Chassis Review
 Microsoft is improving the responsiveness of Windows 11 with WinUI 3
 Intel confirms collaboration on Googlebook laptops, with Wildcat Lake the likely driving force
 AMD launches Ryzen 9 Pro 9965X3D and Ryzen 7 Pro 9755X3D, the world's first Pro-series Ryzen chips with 3D-VCache
 'What is the purpose of this brightness race?' TCL X11 Mini LED TV hits a staggering 11000 nits, but not everyone's impressed
 Sony has enough PS5 stock for 2026, but consoles could face 'big impact' to price if trends continue
 KIOXIA announces new XG10 Series PCIe Gen5 SSDs for OEMs and consumers
 Everyone's now dropping their Steam Controller to hear it scream - just be careful you don't break the thing
 Sony reportedly looking at cutting PlayStation 6 memory to keep costs down
 Origin Code unveils liquid-cooled DDR5-6200 memory that also has an LCD screen
 GeForce 596.49 WHQL Game Ready driver for Forza Horizon 6 is here
 Memblaze PBlaze 7 7A40 Ocean 61.44TB Enterprise SSD Review - Oceans of QLC at 3.3 million IOPS
 MOZA SGP Sequential Sim Racing Shifter Review
 COLORFUL iGame GeForce RTX 5070 Ultra OC Review - When Style and Performance Meet
 GIGABYTE Z890 AORUS Elite WiFi7 Plus Motherboard Review - Right in the sweet spot
 PNY GeForce RTX 5080 Slim OC Review - A Compact 4K Powerhouse
 HP OmniBook 7 (Panther Lake) 16" Laptop Review
 ASUS ROG Strix X870E-E Gaming WiFi7 NEO - A Crosshair by any other name
 Thrustmaster T598 Direct Axial Drive Force Feedback Racing Wheel Bundle Review
 GIGABYTE's new Ultimate OLED Gaming Monitor Bundle includes Xbox Game Pass
 I automated 5 annoying Windows maintenance tasks, and my PC basically runs itself
 How to Fix Windows 11 Black Screen on Boot or After Login
 The first 8 settings I disable on every fresh Windows 11 install in 2026
 Is Your Ethernet Performance Slower Than Wi-Fi? Here's How to Fix It
 MSI's Project Zero Delivers a Stunning Cable-Free Look to More Gamers
 How to Fix "We Couldn't Find a Fingerprint Sensor Compatible With Windows Hello" in Windows 11
 Why Is My Mouse Moving on Its Own? Here's How to Fix It
 Windows Using Too Much RAM? Here's How to Fix It
 Windows 11 is secretly throttling your apps - here's how to catch it