
Introduction

Odds are good that when you think Corsair, you think of memory. As with so many other manufacturers, though, this company is expanding their product line to cover a more widespread DIY market.
Of course, this isn't the company's first water cooling endeavor. You might remember a full- blown water cooling solution called the Corsair COOL. This product featured several components very similar to the vaunted Swiftech water cooling series. The Nautilus takes a bit different approach than the COOL, however. According to the friendly folks at Corsair, this water cooling solution is reportedly one of the easiest and quickest to install products on the market.
So we will put this concept to test and also take a look at the performance numbers. My past experience with external water cooling rigs has shown an unimpressive collection of low-performance components, so we will take a hard look at this aspect to see if Corsair can do the job right.
In The Box

Once you get the box open, you're greeted with a very neat layout for components. The external unit is protected by plastic and the other main components are safely tucked away under the cardboard flap. So lets get everything out of the box and see what we have to play with.

A quick inventory shows that we should have everything we need to get set up except for distilled water. Besides the external unit, you get a bag full of mounting hardware to cover anything except Socket A and Socket 370 systems. Also included is the cabling necessary to power the system, a PCI bracket, the water block with factory attached 3/8" tubing and a bottle of Corsair brand additive. There is even a small tube of Thermal Interface Material, but I will go ahead and resort to my standard of Arctic Silver 5 for testing.
Before we get into the testing, lets take a little closer look at some of the major subsystems.

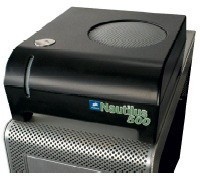
Beginning with the external unit, we see a component that actually has a bit of style. While there is nothing extravagant in the design, we do see an effort in giving it some flowing curves. Since it is going to be sitting outside the case, its good to see that somebody has finally figured out that ugly just doesn't cut it.
Inside the black plastic shell is the radiator, reservoir, cooling fan and pump. While I was not able to get the housing assembly apart, I did manage to gather some information about the internals to give us at least some idea as to what we can expect as far as cooling potential.
The reservoir is a plastic type and has a visible slit on the front of the external unit. This allows you to verify water level at a glance so you can make sure that the unit doesn't start pumping air. This is never a good thing when it comes to liquid cooling of any variety.
The fan sits under the metal mesh you see above. It is pretty standard and has two speed settings (adjustable on the back of the unit) to allow you to adjust the speed and volume levels. With regards to the volume levels, even the high setting was not too loud. The fan spins at only 1800 RPM so the noise levels stay relatively low as a rule. During our testing phase, I'll make sure to check on results from both fan settings to give us as complete a picture as possible with regards to the difference the speed makes.
The pump used in this cooling solution is a low-pressure model suited to the other components used in the system. It works on a 12v rail and pushes 350 LPH (1.54 GPM) with a head pressure of 13.05 feet. The lower pressure should be more compatible with the 3/8" tubing used throughout the system.

Turning the external unit around shows us the business end of it. From left to right you will note the fan speed selector, and port for the power cable, and the two quick-connect couplings for the tubing.

A nice feature of the Corsair Nautilus 500 is its ability to handle any supported socket design right out of the box. You won't have to figure out which processor you want to support when buying it because they're all available in the standard offering.
Besides the mounting hardware shown above, you will also see the two quick-connect tips, quick-snap fasteners for those tips, and a small tube of what looks to be a silicone based thermal interface material.

The waterblock included is factory attached to the tubing of the unit. It is a pretty typical 3/8" food grade tubing material. The block itself is a very low-profile model that is 100% copper and uses what Corsair refers to as "Delphi Micro-Channel Technology". I was not able to discover much about this exact feature, but it works out to having a slim block with channels throughout to keep water flowing in as smooth a manner as possible.

A closer look at the base of the block shows a very fine finish. Even the carpet fibers are reflected back with good clarity, showing an effort to make sure that the base is as flat as possible. This smoother surface will aid in the dissipation of heat into the copper material of the block.
Installation Notes
If you'll recall the introduction, you will remember that one of the big claims from Corsair was regarding the ease of installation of this device. Having worked intimately with almost every style of water cooling in the past, it isn't that uncommon to spend the better part of an hour setting up all components. Even the all-in-one units tested in the past generally require anywhere from 15-30 minutes under good conditions.
I can say right from the beginning that the boasts of an easy installation are generally true. The entire installation of the hardware took maybe six minutes total after beginning with a clean processor and a dab of Arctic Silver 5 in the center to finish and ready to bleed.

Before we begin the installation process, I wanted to show off what a manual is supposed to look like. Full color pictures and a step-by-step detailed set of instructions that will make this an easy task even for the novice. When Corsair makes claims about the ease of installation of this product, this is where it starts.

Mounting the waterblock is a thing of ease. We're working with an Athlon64 processor in our tests today and the installation was very simple. The bracket itself is not attached to the screws commonly used when using a heatsink and this type of processor. Just set the block onto the processor, place the included foam pad and metal shim onto the block, then snap the mounting bracket into place. The only precaution to note here is to make sure that the foam pad and metal shim are set so that it can go in between the metal hose clamps. The foam pad ensures a proper amount of pressure between the block and the processor core.

For those concerned about how the tubing will pass from the exterior to the interior, the answer is quite simple. This PCI bracket pass-through allows you to get the tubing set up properly. Just feed it through the bracket and cut to an appropriate length. Attach the quick-release tips and insert them into the back of the external unit.
I had a concern with this area of the installation. While it is a simple and quick step, the hose is quite tight going through the PCI bracket and there are no rubber grommets to protect the tubing. Any water system is going to create at least a small amount of vibration due to the pump circulating water, so this could be a concern over time.

Once the hardware is in place (yes, it really is that easy), you empty the contents of this COOL additive into the reservoir of the external unit. Fill the remainder of the reservoir with distilled water, then refill as the system cycles through its circulation system. As always, make sure that you use distilled water only in your cooling system. Tap water has impurities that can cause corrosion later on down the line, and this is definitely something you do not want in your cooler.
With regards to the hardware installation, it is as fast as Corsair says it will be. Don't be too quick to bleed the system, however. I found that this was the slowest part of the installation process. The goal of the bleeding is to remove all the air from the circulation liquid and it took between 10-15 minutes to accomplish this. The system was fully operational and there was no danger to the processor during this phase, but just be patient and get all the air out before closing off the reservoir and calling it good.
Testing
When it comes to testing out a cooling setup, the primary concern is all about processor temperature. With this thought in mind, I have found that the simplest way to see the effectiveness of a cooling solution is to run the processor through a burn-in that uses 100% of the processing power while monitoring the temperatures. Before we dig any deeper into performance, though, lets take a quick look at the test system.
AMD Athlon FX-53 Processor @ 2.4GHz (Supplied by Newegg.com)
EPoX 9NDA3+ Motherboard (Supplied by EPoX)
2x512MB Mushkin "Redline" PC3200 Memory (Supplied by Mushkin)
GeCube X1900XTX Graphics Board (Supplied by GeCube)
Thermaltake PurePower 600w PSU (Supplied by Thermaltake)
Testing will consist of monitoring temperatures at both idle and at load. The processor is running at default speeds but still manages to put out a good deal of heat. Voltage of the CPU is 1.55v and testing ambient temperature was a consistent 22C.
I'll be using a Thermaltake POLO 735 and the asetek VapoChill Micro with both the High End and Low Noise fans as comparison models since both have done a very good job to date of producing excellent results during all kinds of testing.
Results
You may have noticed that I used some rather high-end coolers in our example. The main reason for this is that a majority of our readers tend to fall toward the enthusiast category. Besides, why would we want to compare a cooling a solution against some low performance rig that most of us wouldn't use anyway?
So we planted a couple of decent air coolers in the system and also the Corsair Nautilus 500. When everything was finished up we see that while the numbers show a good deal higher than solid air cooling models, they aren't out of range. When considering this product, you'll want to make sure that you know how your system will be used. If you're into hardcore overclocking, then you might want to go ahead and work yourself into a full blown water system and not an external model. If, on the other hand, you're looking at a first time water solution to get the hang of things, AND you don't have any plans on heavily overclocking the system, then this model would work just fine. After all, even at high fan speeds the noise was hardly more than a high speed VGA card cooler at low RPM.
So in the end, we have a mixed bag of thoughts regarding the performance of this unit. The results exceed stock cooling by roughly 8-10 degrees, but it isn't going to set any records either.
Final Thoughts
For those who know me, they know that I have had minimal luck with all-in-one water cooling solutions. While this one impressed me a good deal more than others I've tested in the past, it still isn't up to par with a high quality air unit or full blown water. With 3/8" tuning and only 350 LPH flow rates, there is only so much a water solution can do.
So what it comes down to is simple; what are you going to use your system for? If you are a diehard enthusiast looking to get the most out of your system, then you would be well served to bypass this product. But if you're looking to experiment with water or are running a more standard computer and want something that will perform well with little noise, then the Nautilus 500 may be just what the doctor ordered.
As far as price is concerned, you can expect to shell out about $150US for this product. While it may seem expensive for the numbers, keep in mind that is about $100-150 cheaper than parting out a full water cooling system. It is certainly better than stock, but it won't do nearly as well as a high performance air setup.
For those who want a very easy and quick means of attaching a cooling setup to their system, the Nautilus unit tested is exceptional in both of these categories. In less than 10 minutes I had the entire hardware system set up and ready to go. Bleeding isn't the fastest process, but this is a one time task so isn't that big a deal. Just make sure that you take the time to get all the air out before sealing off the reservoir.
Bottom line... If you have been considering breaking into water but are not ready to build your own cooling system just yet, then you would do well to take a look at the Corsair Nautilus 500 system. While it isn't capable of handling the load of a highly overclocked machine, it is more than ready to handle a moderate rig with very little noise and a good deal less cash than you would need for a component based water cooling solution.
- Pros
Decent cooling on non-performance systems
Cheaper than full component based water setup
Excellent instruction manual
Very fast setup
Quiet
- Cons
Mediocre performance on power rig
Metal on plastic where tubing exits case
3/8" tubing
Small 350 LPH pump
Price -vs- performance
- Latest Pricing
Rating - 7.5 out of 10
 United
States: Find other tech and computer products like this
over at
United
States: Find other tech and computer products like this
over at  United
Kingdom: Find other tech and computer products like this
over at
United
Kingdom: Find other tech and computer products like this
over at  Australia:
Find other tech and computer products like this over at
Australia:
Find other tech and computer products like this over at  Canada:
Find other tech and computer products like this over at
Canada:
Find other tech and computer products like this over at  Deutschland:
Finde andere Technik- und Computerprodukte wie dieses auf
Deutschland:
Finde andere Technik- und Computerprodukte wie dieses auf  FBI confirms Chinese hackers have infested US water and energy systems
 Microsoft's new Windows 11 'AI Explorer' feature set to anger AMD and Intel
 High-end PC maker gives advice that could fix Intel Core i9 CPUs crashing in games
 Windows 10 users: Get ready to be bugged about creating a Microsoft Account
 TT Show Episode 31 - AI-Powered iPhone and PS5 Pro and an AI-Generated Romantic Comedy
 ASUS ROG Swift Pro PG248QP Gaming Monitor Review - Frames, frames, and more frames
 FlexiSpot C7B-Mesh Ergonomic Office Chair Review
 Samsung G8 34-inch QD-OLED Gaming Monitor Review - 175Hz for $900
 ASRock NUCBOX-155H Mini PC Review
 NuPhy Air96 V2 Wireless Mechanical Keyboard Review
 TEAM T-FORCE Siren DUO360 RGB Liquid CPU Cooler Review
 AVerMedia Live Streamer ULTRA HD Review
 AVerMedia Live Gamer 4K 2.1 Review
 XPG Invader X Mid-Tower Chassis Review
 Intel Core i9-14900KS CPU Review
 Everything you need to know about the latest ASUS NUC Mini PCs - NUC 14 Pro and ROG NUC
 How to Overclock Your GPU and Boost Your PC Gaming with ASUS GPU Tweak III
 ASUS's AMD Radeon RX 7000 Series GPU lineup has something for every gamer
 ASUS OLED Premium Care defends the ROG Swift OLED PG32UCDM gaming monitor from burn-in
 Patriot Viper Xtreme 5 Engineering Prototype 48GB Dual-Channel Memory Kit Preview