
The Bottom Line
Introduction, Specifications, and Pricing
GIGABYTE launched a sole X399 motherboard for AMD's Threadripper CPUs at launch. However, other vendors didn't do much better. As the high-end desktop market is quite niche, motherboard vendors typically only put out a few high-end motherboards for the new sockets. At X399 launch, most of the motherboards we saw were aimed at gamers, they have tons of RGB LEDs, gaming NICs, and looked like gaming motherboards. However, that isn't what the X399 platform is about.
The X399 platform is about power, workstation power, productivity power, and while gaming falls within the abilities of the X399 platform, it's not the only thing the platform is about. That is why GIGABYTE went back to the drawing board and designed the X399 Designare EX, GIGABYTE's second X399 motherboard designed to improve on their first.
Let's take a look.
Specifications

The X399 Designare EX features a dual Intel NICs, USB 3.1, triple M.2 slots, support for 4-way multi-GPU, a Thunderbolt 3 GPIO header, Wireless AC, and high-end audio.
Pricing
The X399 Designare EX will cost $399.99.
Packaging and X399 Designare EX Overview
Packaging and Overview
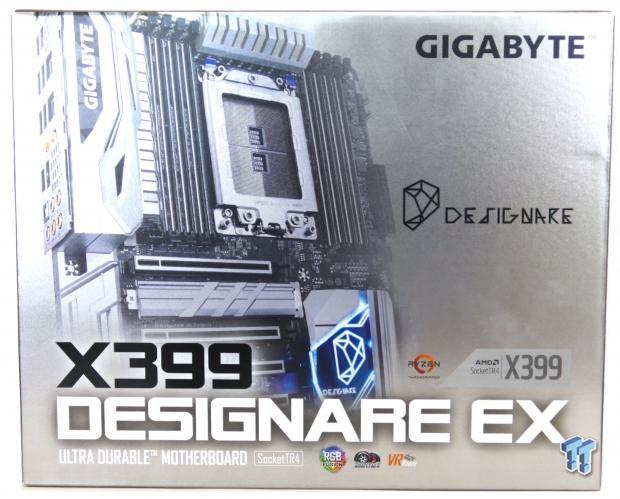
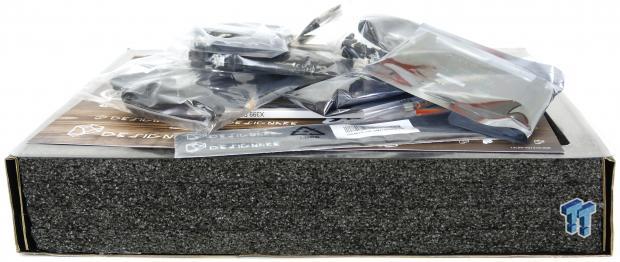
Final retail box and packaging are top notch and are some of the best regarding quality and design I have seen thus far. The designare line of the motherboard is about stability, modding, and even power users (workstation-esque). They are basic but get the job done, and they typically follow a silver/white color theme.
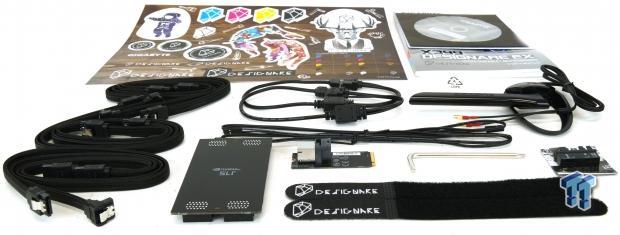
The accessory package includes six SATA6Gb/s braided cables, SLI HB bridge, Velcro cable straps, Torx wrench, two EC temperature sensors, two RGBW extension cables, WIFI antenna, M.2 screws, G-Connector, M.2 to U.2 adapter, Designare stickers, driver DVD, and manuals.
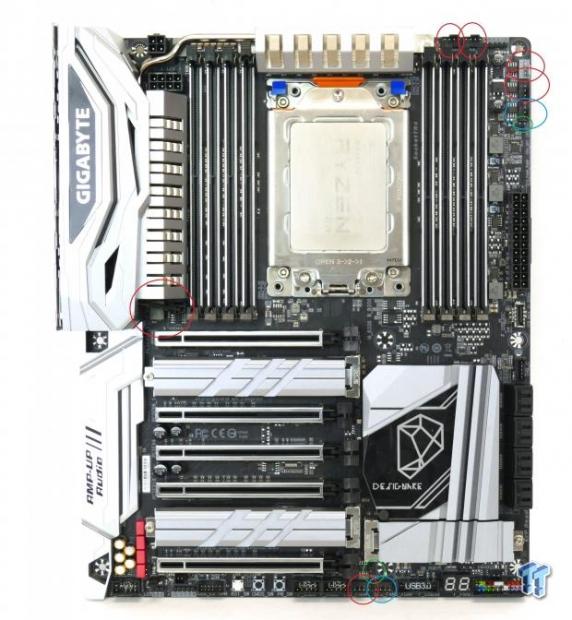
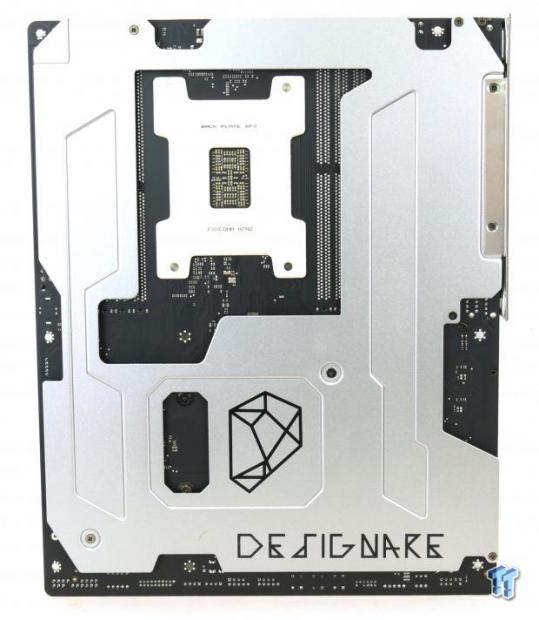
The motherboard has a whopping eight hybrid PWM/DC mode fan headers situated around the PCB. Five headers seem to be grouped in the top right corner of the motherboard. Two pump headers circled in blue, offer full speed as their default mode. The other features are circled in red. The motherboard has seven built-in temperature sensors used to control fan speed based on fan curves you can set in the UEFI or in Windows.
There are also two headers for EC temperature sensor probes, which are actually included in the box, so you can put those wherever you want and use them as fan reference, the headers are circled in green. The back of the motherboard has a huge metal shield, and the shield helps top reinforce the PCB and strengthens the motherboard. It also reduces the chance of you shocking the board while installing it.
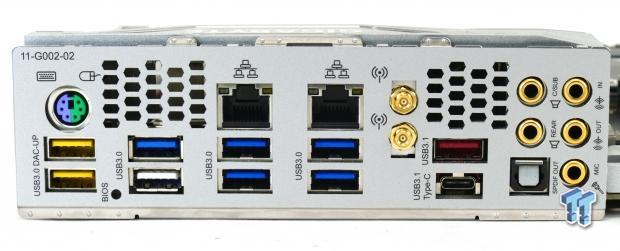
The rear IO panel features PS/2 Keyboard/Mouse, eight USB 3.0 ports (yellow are DAC-UP 2, white is also for USB BIOS recovery), two 1Gbit LAN ports, WIFI antenna connectors, USB 3.1 type-A, USB 3.1 type-C, and 7.1 gold-plated audio outputs with S/PDIF optical. The vents you see in the integrated IO shield are for the hidden fan that cools the VRMs.
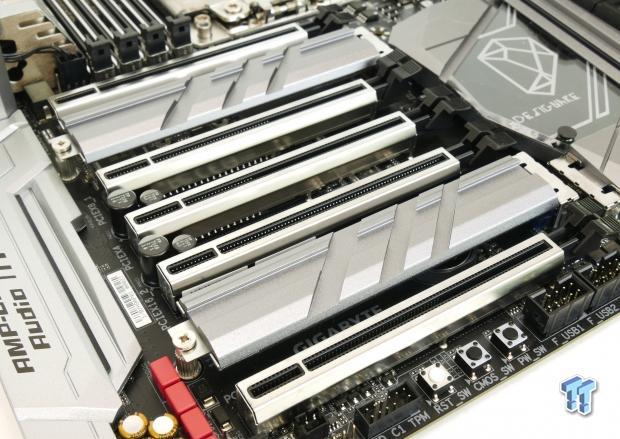
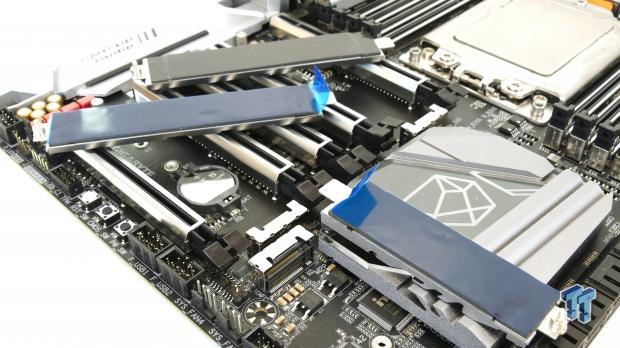
The PCI-E layout is super easy to understand, the first slot is always x16 PCI-E 3.0, the second is always x8 PCI-E 3.0, the third is always x4 PCI-E 2.0, the fourth is always x16 PCI-E 3.0, and the fifth is always x8 PCI-E 3.0. You can run up to 4-way SLI/CrossFireX. GIGABYTE provides three x4 PCI-E 3.0 M.2 slots; each one has a really awesome M.2 shield that doesn't only cool down your M.2 drives but also greatly aids in M.2 drive installation by holding the M.2 screw in place (seriously, that's more important to me than cooling my M.2 drives).
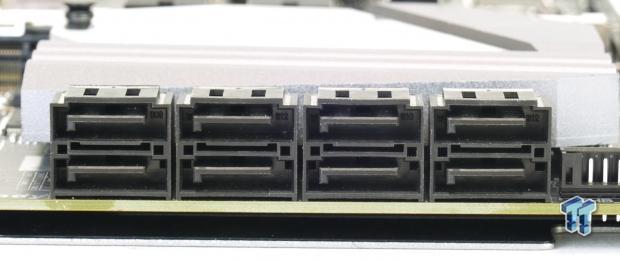
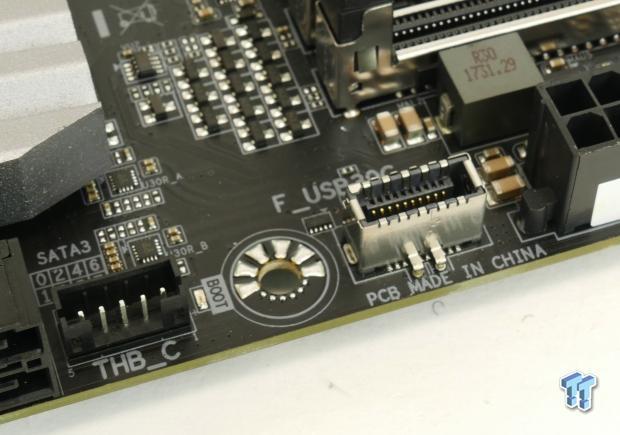
Eight SATA 6Gb/s ports connect to the chipset, there is no port sharing or switching on this motherboard. A USB 3.1 type-C header is located right below the 24-pin connector, and right near that is the Thunderbolt 3.0 GPIO header, which means this motherboard will support a Thunderbolt 3.0 add-in card when AMD and Intel finish certification.
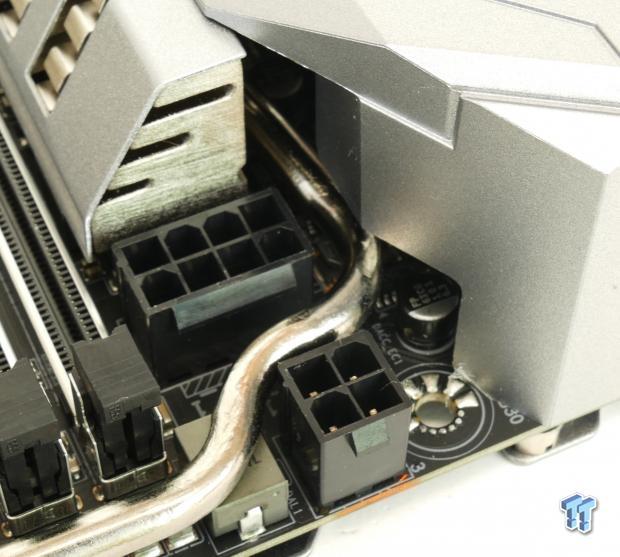
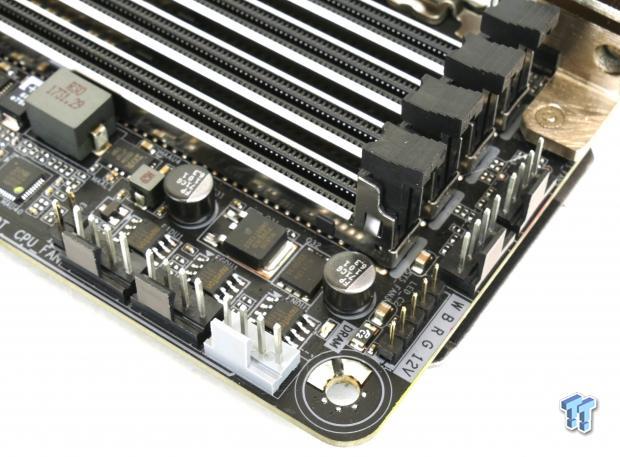
The motherboard features an 8-pin and a 4-pin 12v power input for the CPU power; you should plug both in. Near all of those five fan headers sits one of the RGBW headers, it can also just be used for normal RGB LED strips and UV strips.
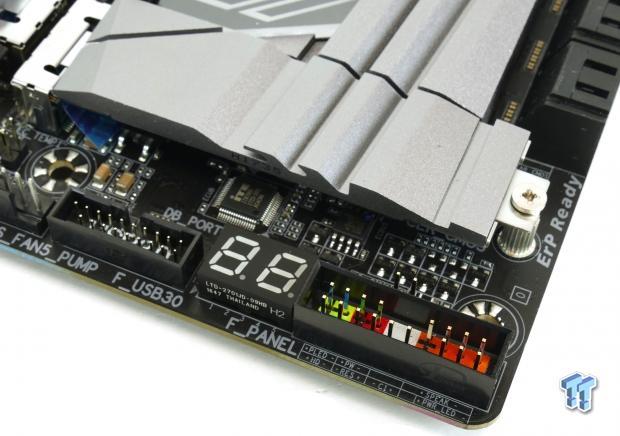
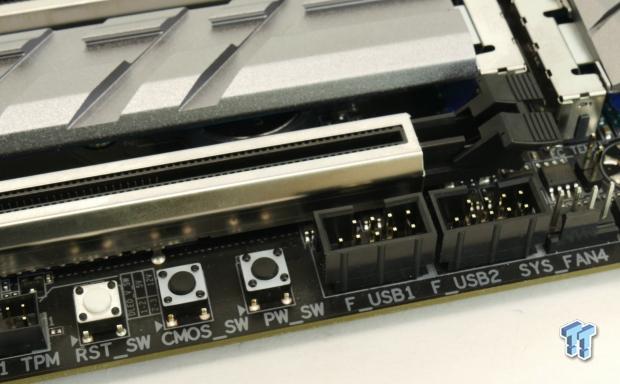
A beautiful POST code display is located right near a USB 3.0 internal header. We also get power, reset, and clear CMOS buttons on the motherboard, although I am not sure they placed clear CMOS so close to the power and reset switches and didn't change its color, you will need to be careful if you are going to use these buttons. You also get two USB 2.0 internal headers.
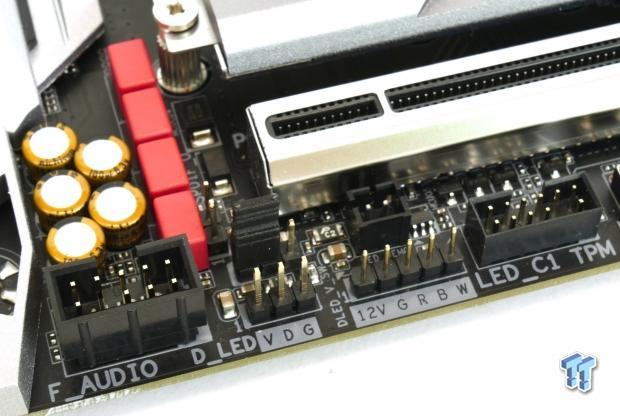
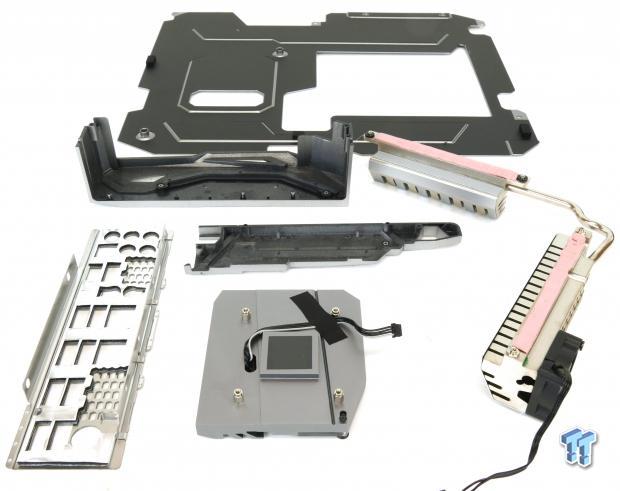
We find another RGBW header, but also a digital/addressable RGB LED header. Above the digital RGB header is a jumper, and this jumper allows you to change the digital RGB power from 5v (default) to 12v. The heat sink on the X399 Designare EX for the VRM is actually much different than the one used on the X399 AORUS Gaming 7.
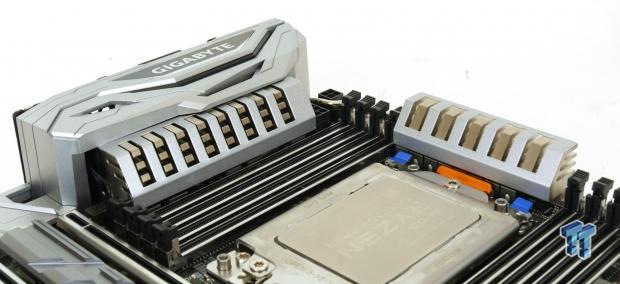
It has more surface area as the fins have been redesigned, and it also comes with a small fan attached. The fan will turn on when MOSFET temperatures reach 90C (I never saw it on). The motherboard has an integrated IO panel and rear shield, both of which are nice improvements.
GIGABYTE X399 Designare EX Circuit Analysis
Circuit Analysis
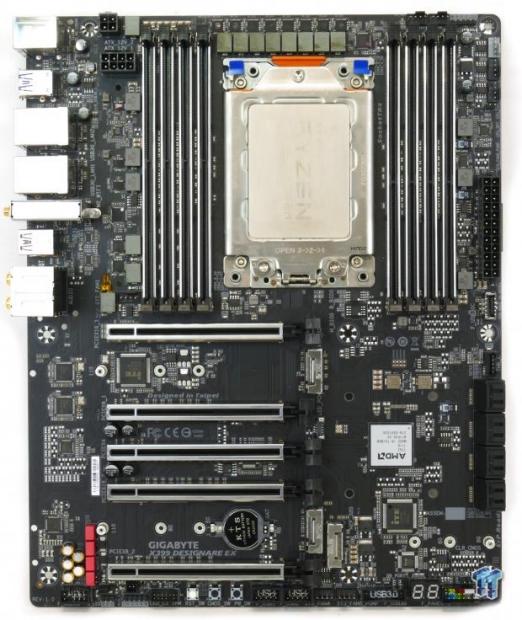
The X399 Designare EX reveals its secrets.
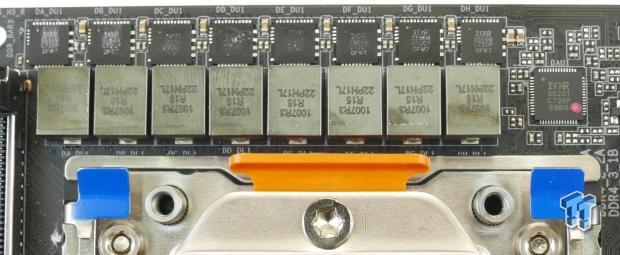
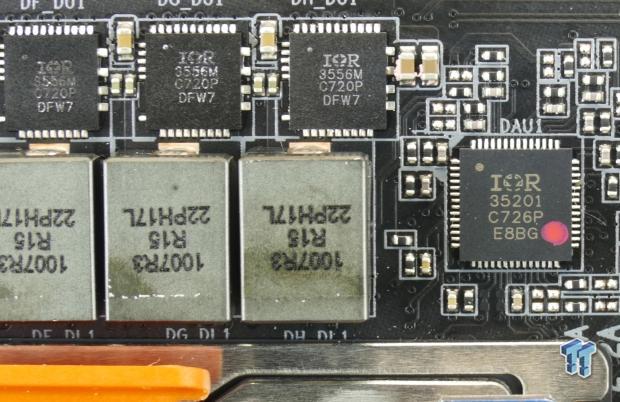
We get a true 8-phase VRM. Eight IR3556 are used, each is a 50A fully integrated (driver plus FETs) PowIRstages, and controlled by a fully digital IR35201 PWM controller in 8+0 phase mode. The inductors are rated for a maximum saturation current of 76A, and tantalum POSCAPs on the rear complete the LC (inductor/capacitor) filter circuit.
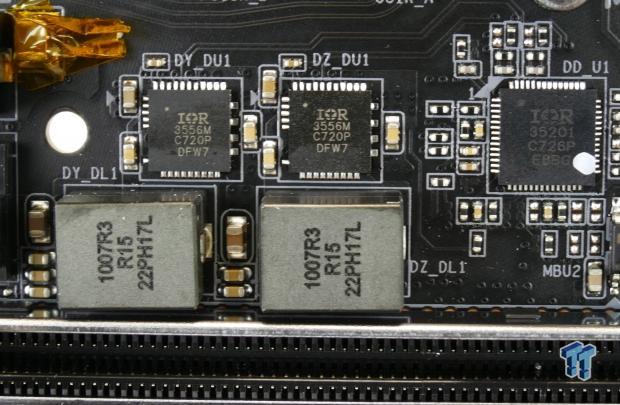
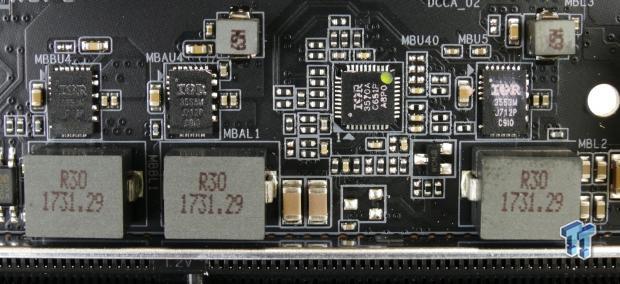
The SoC VRM is controlled by an IR35201, which handles two IR3556M 50A power stages and the same 76A inductors. The memory VRM uses an IR3570 3+2 phased digital PWM controller and two IR3553 (40A) PowIRstages for the main DDR4 voltage rail and one IR3553 for the DDR4 VPP.
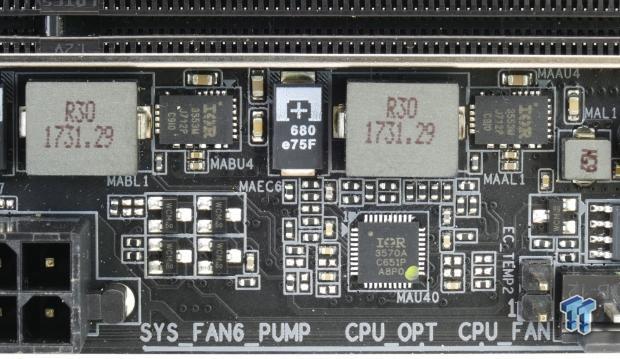
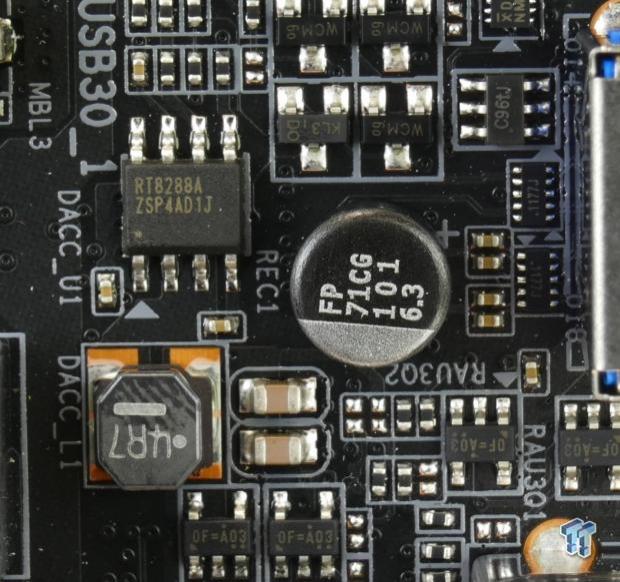
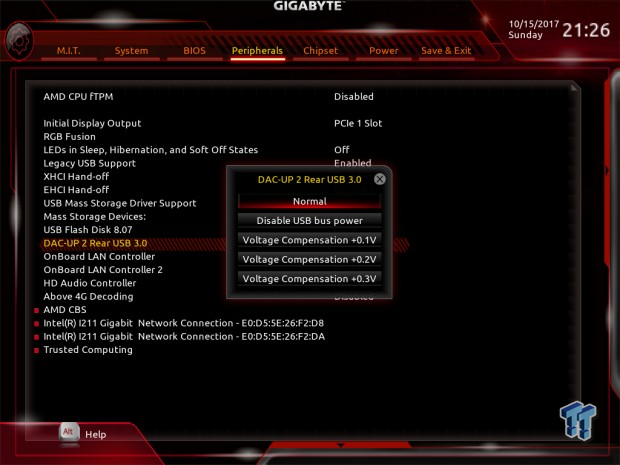
Here we have the second memory VRM that uses the IR3570 digital PWM in a 2+1 phase mode. It controls two phases that make up the main DDR4 voltage, and one phase that most likely is for the DDR4 VPP rail (overkill). The Richtek RT8288A controller is used for GIGABYTE's DAC-UP 2 feature, which allows you to disable USB 3.0 voltage and only allow for data, or even boost the voltage above 5v.
GIGABYTE X399 Designare EX Circuit Analysis Continued
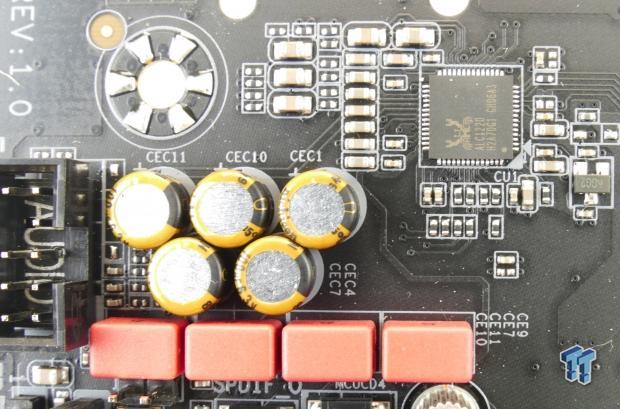
We find a dandy Realtek ALC1220 codec with an integrated amplifier and support for up to 120dB SNR. GIGABYTE added some Gold Series Nichicon electrolytic audio capacitors and some WIMA film capacitors to improve audio.
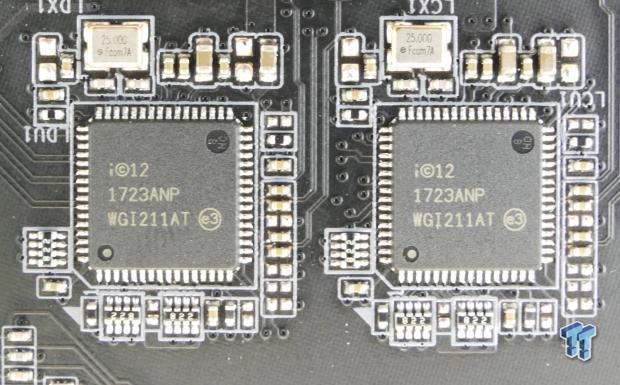
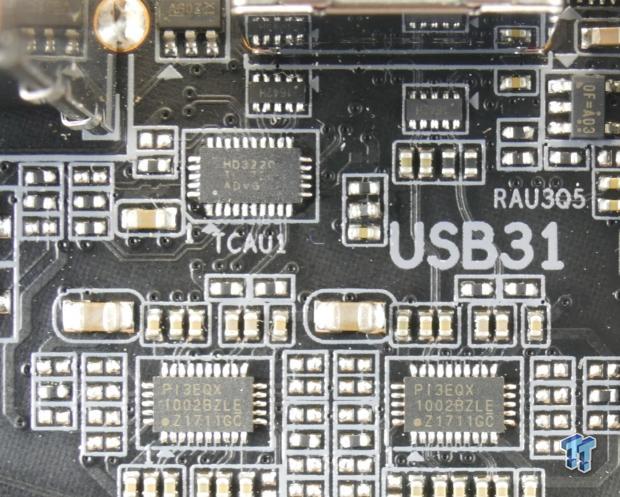
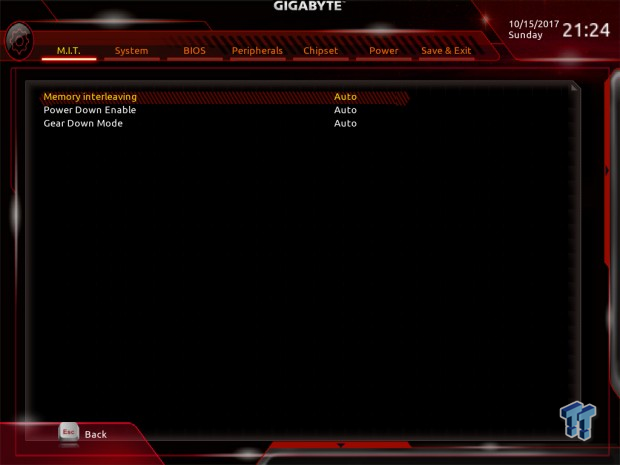
GIGABYTE replaced the single Killer NIC on the Gaming 7 with dual Intel i211AT NICs, and you also get the Intel Wireless AC 8265NGW 2x2 card. If you blue screen booting into Windows 10, go into the UEFI, change memory interleaving to channel mode, and then go into Windows and update the wireless card's drive and then set channel interleaving back to auto. It's an issue most motherboards with this Intel card face. The rear IO USB 3.1 comes from the chipset (FCH) and two Pericom USB 3.1 re-drivers, the PI3EQX are used to improve signal strength. A Texas Instruments HD3220 MUX is used for the type-C switch.
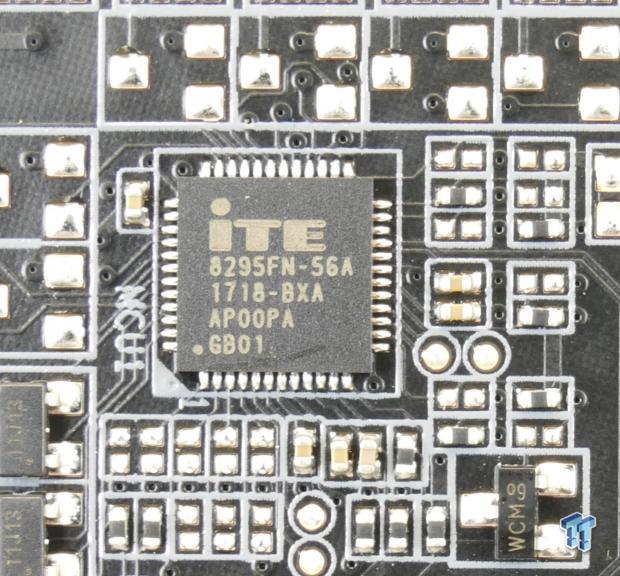
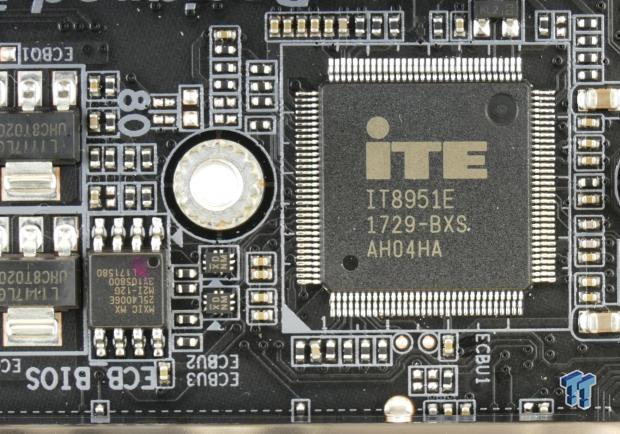
An ITE IT8295FN provides RGB capabilities on the motherboard and through the headers. The ITE IT8951E is a microcontroller responsible for the QFlash+ technology that allows BIOS recovery through a USB stick.
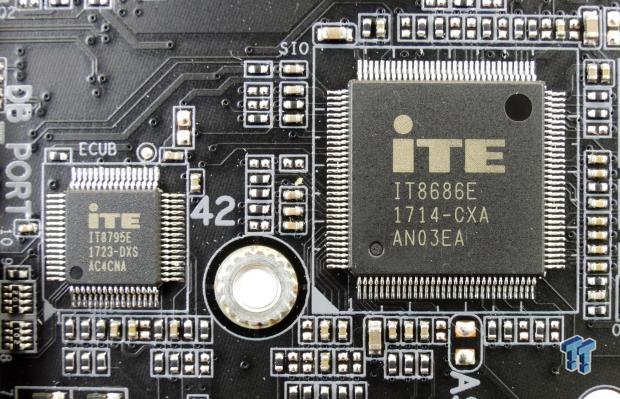
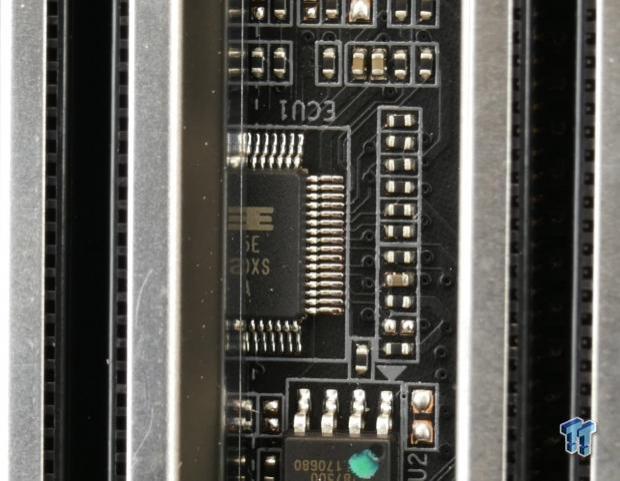
An ITE IT8686E acts as the SuperIO, provides monitoring, some fan control, and the PS/2 port on the rear IO. The ITE IT8795E acts as an embedded controller (like the "EC" temperature headers) and provides extra fan control and functionality. We find a second IT8795E under one of the PCI-E slots.
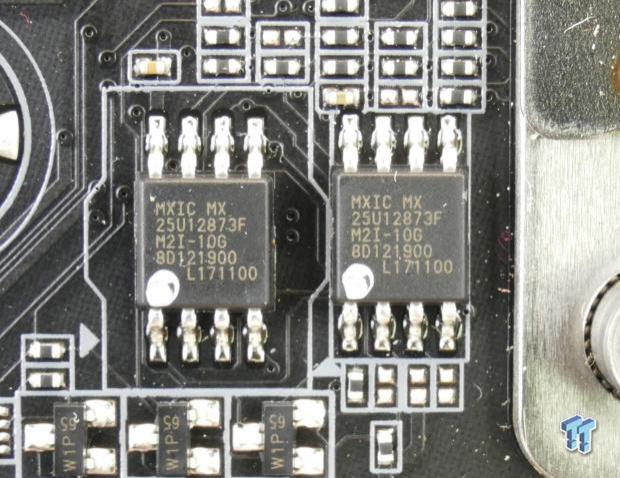
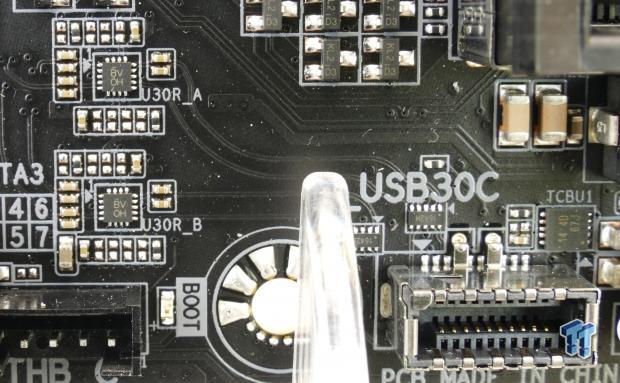
Two BIOS ROMs are found near the CPU socket, and these 128Mbit/16MB ROMs provide extra protection through firmware redundancy (but I don't think you can switch between them). The internal type-C header is actually USB 3.0 based, and it seems that GBT has implemented some type of repeater of voltage control chip for the signal to the header.
BIOS and Software
BIOS
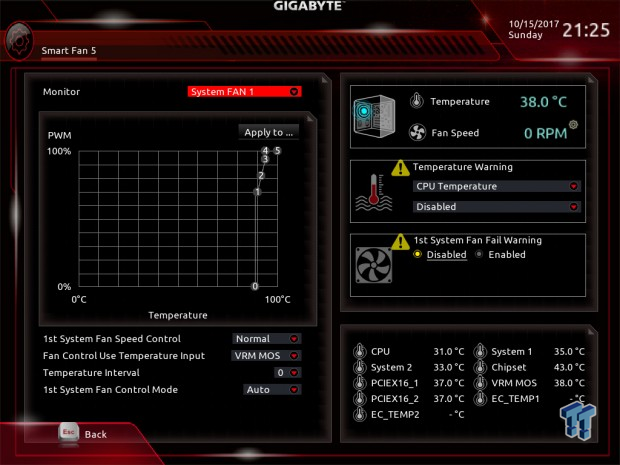
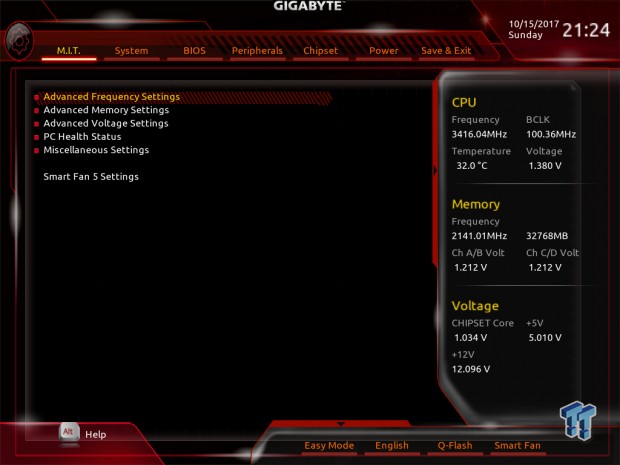
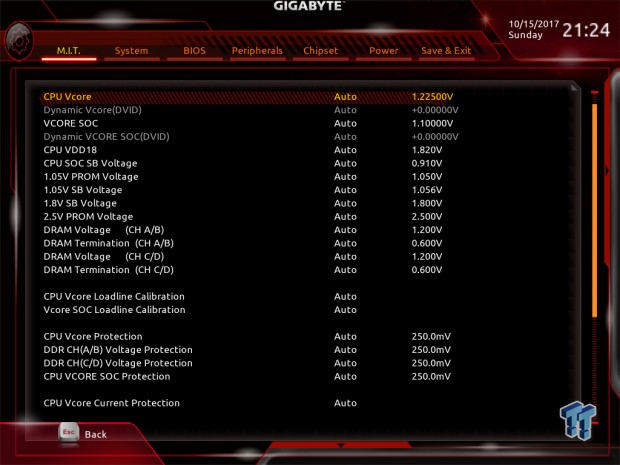
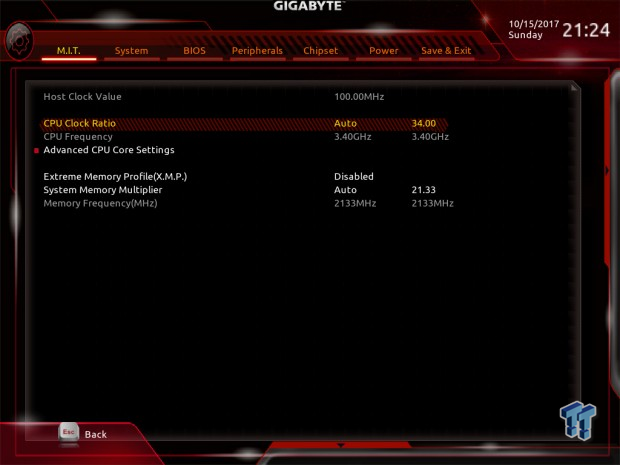
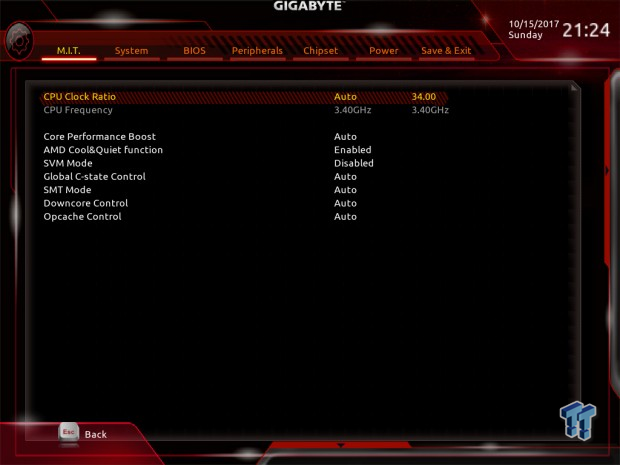
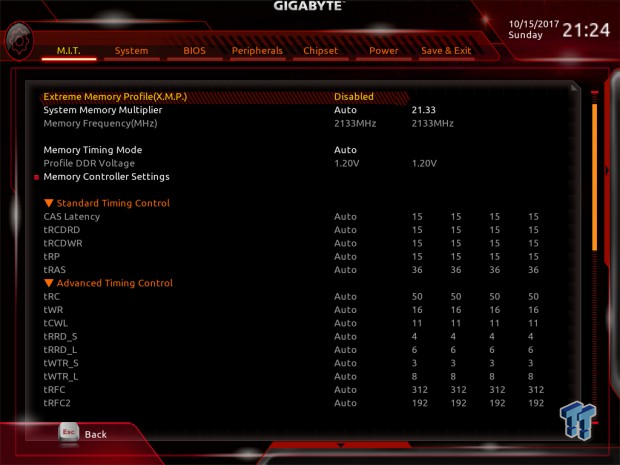
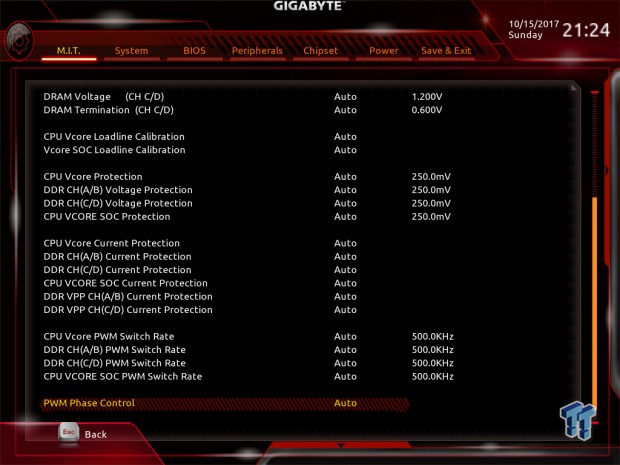
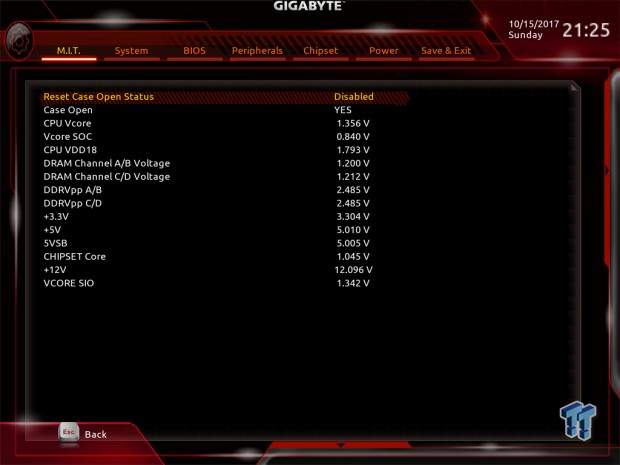
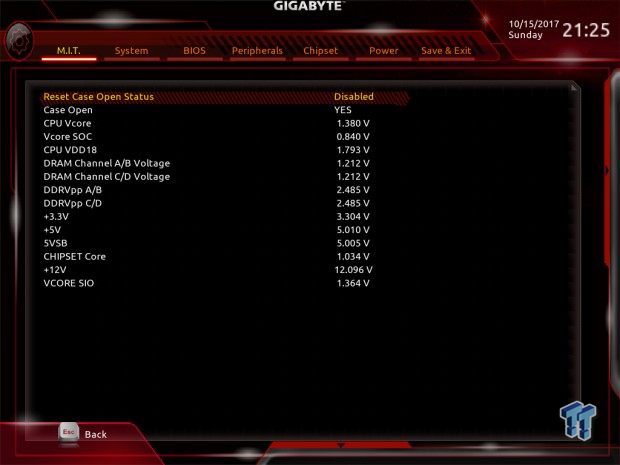
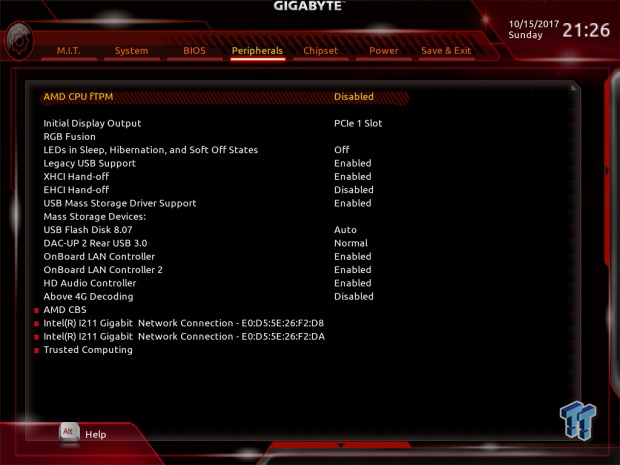
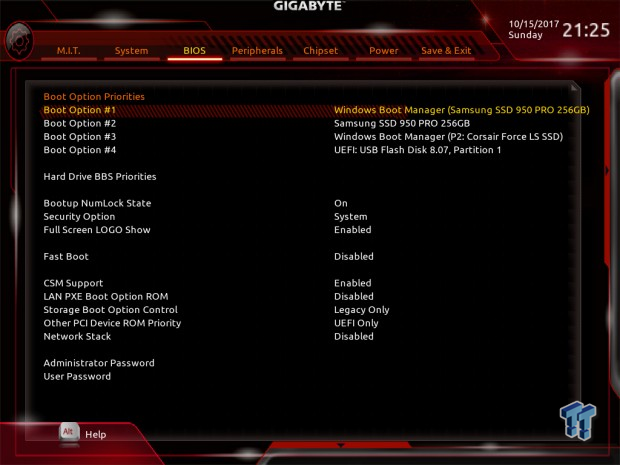
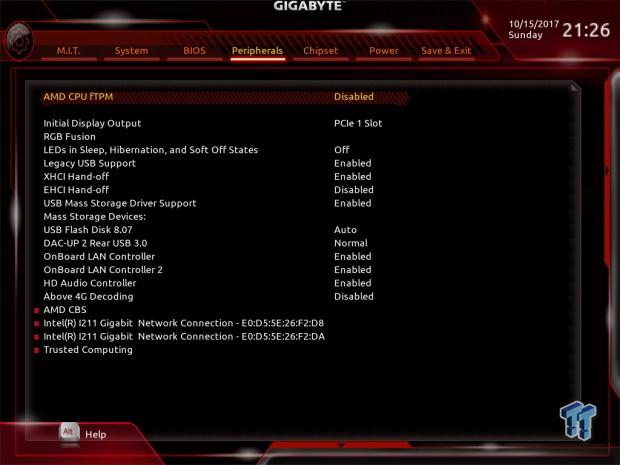
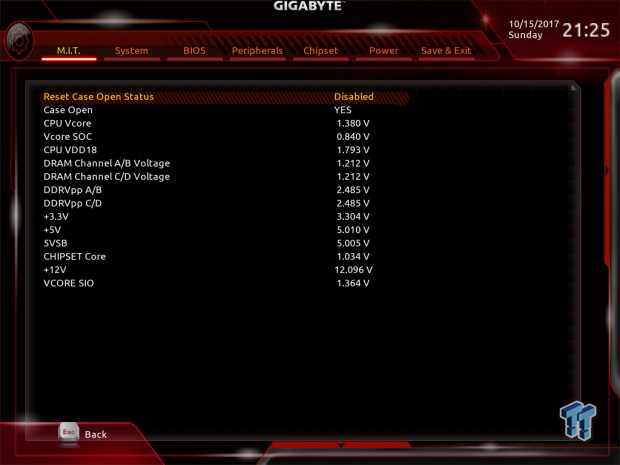
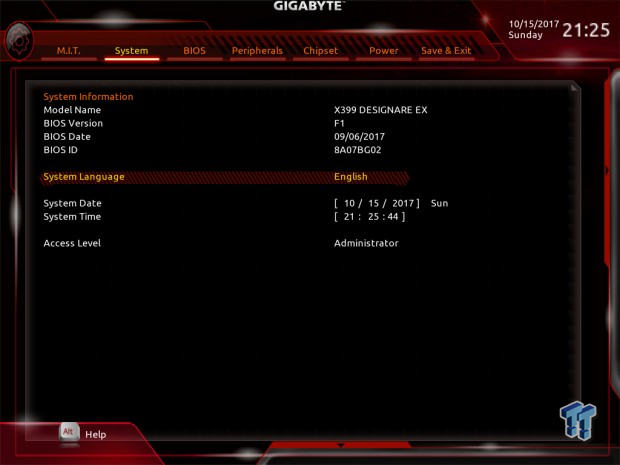
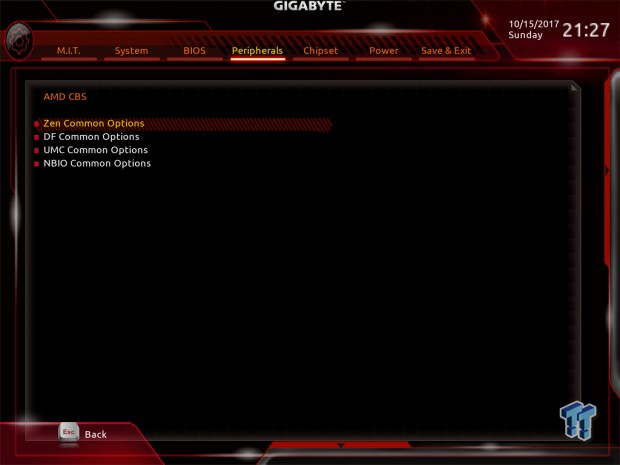
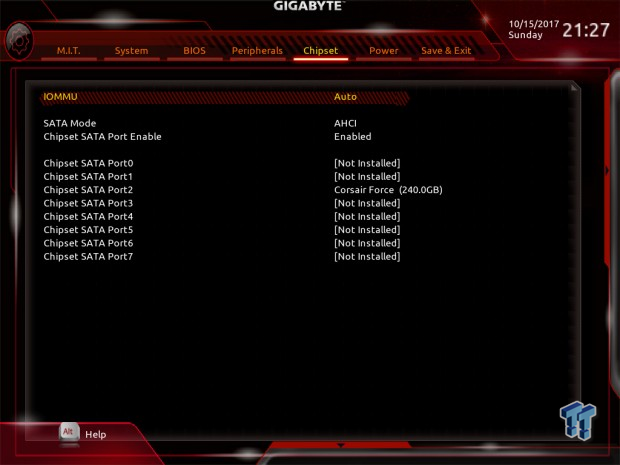
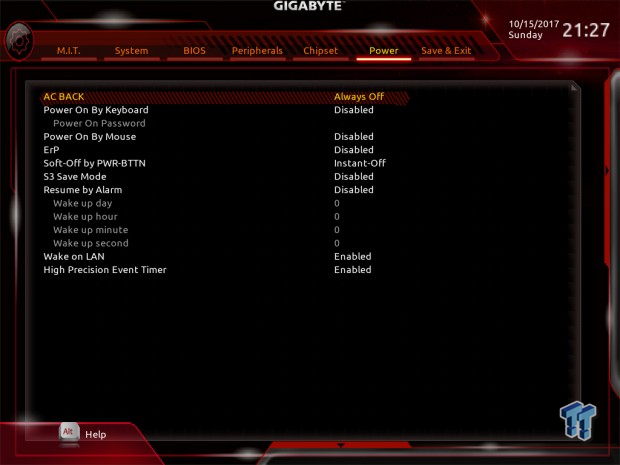
GIGABYTE's UEFI for the X399 Designare EX is pretty much identical to that of their X399 AORUS Gaming 7. The UEFI provides all the overclocking settings you need to take your CPU and memory to their maximum.
GIGABYTE also added in AMD's CBS menu, and that is where you find AMD's low-level UEFI settings for controlling hardware, such as special memory settings, NUMA/UMA switch (although you can do that through channel interleaving), and even per core Pstate control. Fan control was also top notch in GUI form.
Software
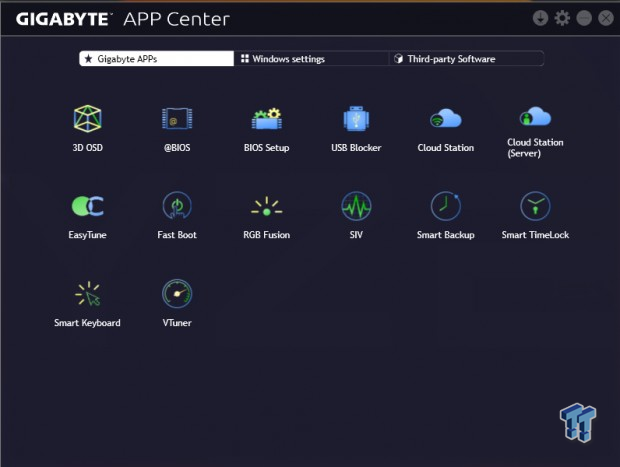
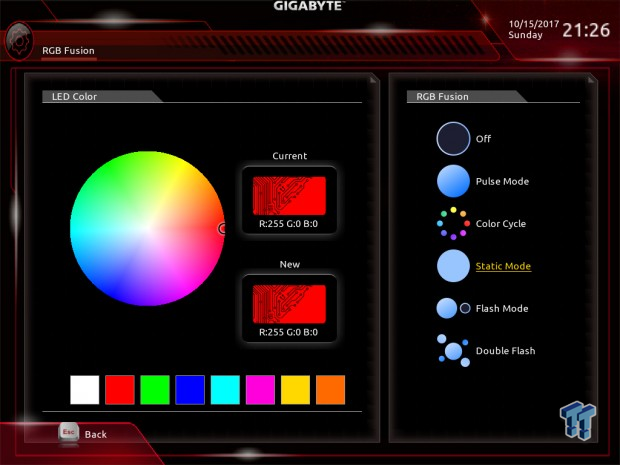
GIGABYTE's software suite includes 3D OSD, @BIOS, BIOS Setup, USB Blocker, Cloud Station, Easy Tune, Fast Boot, RGB Fusion, SIV, Smart Backup, Smart TimeLock, Smart Keyboard, and VTuner.
Test System Setup
Steven's Motherboard Test System Specifications
- Motherboard: GIGABYTE X399 Designare EX
- CPU: AMD Ryzen Threadripper 1950X
- Cooler: Enermax Liquitek 360 TR4 - Buy from Amazon
- Memory: TridentZ 8GBx4 RGB 3200MHz
- Video Card: NVIDIA GeForce GTX 1080 Ti - Buy from Amazon / Read our review
- Storage - Boot Drive: Samsung 950 Pro 256GB
- Storage - SATA6G Drive: Corsair LS 240GB
- Storage - USB Drive: Corsair Voyager GS 64GB - Buy from Amazon / Read our review
- Case: ThermalTake Core P5 - Buy from Amazon / Read our review
- Power Supply: Corsair RM1000 - Buy from Amazon / Read our review
- OS: Microsoft Windows 10 - Buy from Amazon
- Monitor: ASUS PA328 ProArt 32" 4K - Buy from Amazon
- Keyboard: Corsair K70 LUX - Buy from Amazon
- Mouse: Corsair M65 PRO RGB - Buy from Amazon / Read our review
- Headset: Corsair VOID RGB Wireless - Buy from Amazon / Read our review
- BIOS: F1
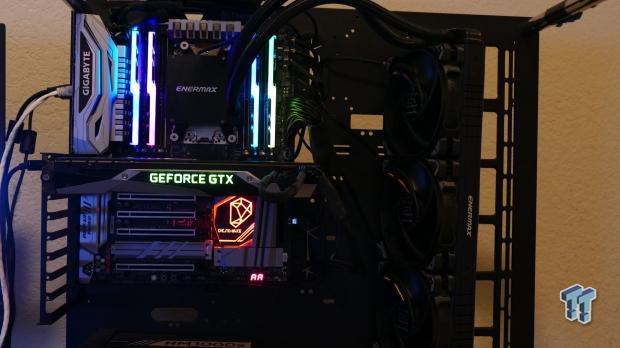
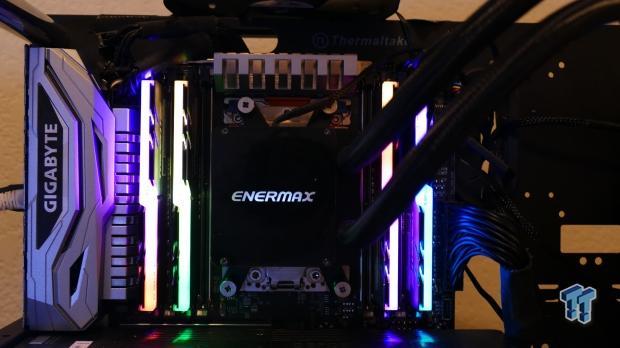
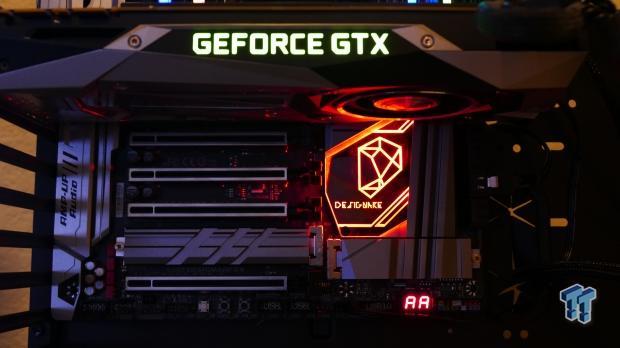
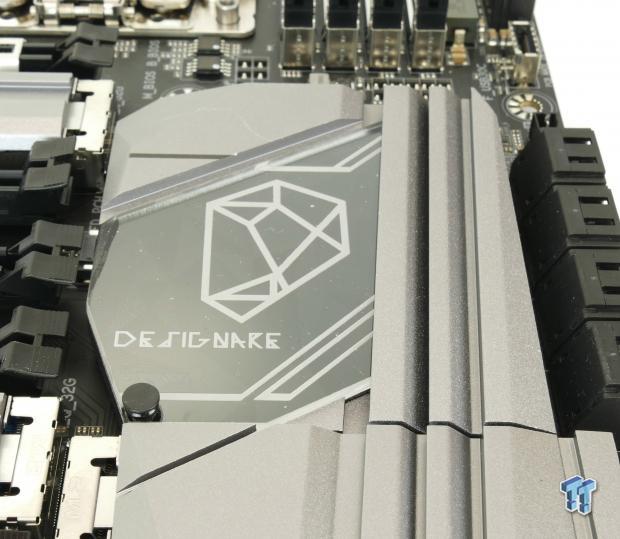
RGB LED naysayers can rejoice; the X399 Designare EX has almost no RGB LEDs. Only the chipset (FCH) heat sink has some RGBs that illuminate the Designare nameplate that you can actually replace with a custom creation. The X399 Designare EX looks much more like a workstation motherboard than the X399 AORUS Gaming 7 it replaces.
Overclocking
Overclocking Results
CPU Overclocking
AMD's Threadripper platform is quite interesting, as AMD stated the top 5% of Zen dies become Threadripper CPUs. That is a big deal, as that would also mean the CPU should overclock quite high, or at least consistently high.
My best overclock on the X370 platform was 4GHz with 3200MHz memory speeds after months of BIOS updates so that I will aim for the same here. Most people get limited around 4.1GHz, and I know my 1950X can't do 4.1Ghz stable on all cores without tons of voltage or better cooling.
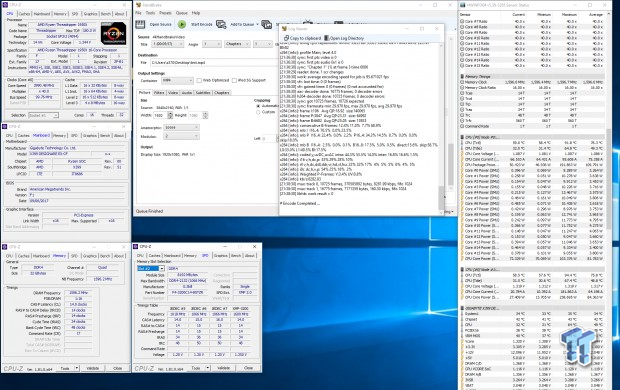
Overclocking was fairly easy, I just set the CPU multiplier to 40x, XMP to enable, and typed in manual voltage of 1.32 with LLC level Turbo. I was off to a nice and stable 4.0GHz overclock. The motherboard also has a new heat sink design with a built-in fan, but that fan never turned on.
CPU, Memory, and System Benchmarks
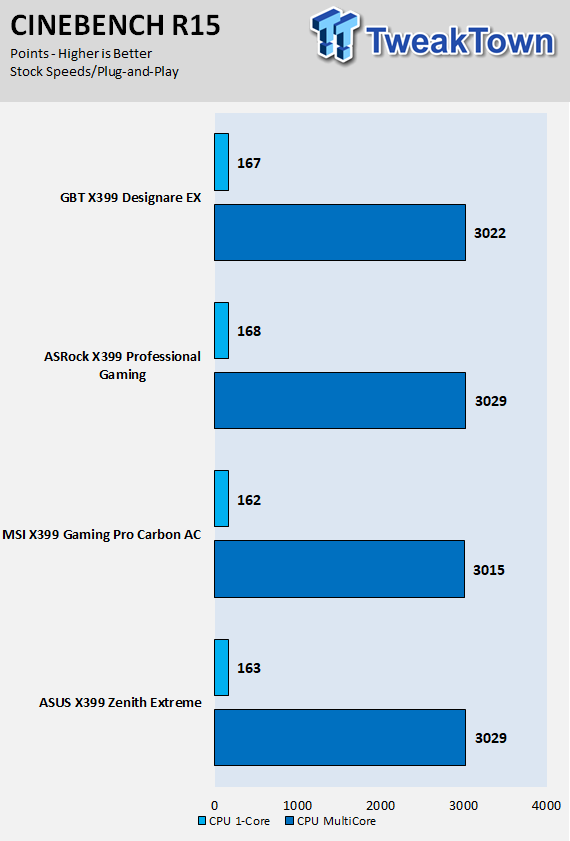
CINEBENCH R15
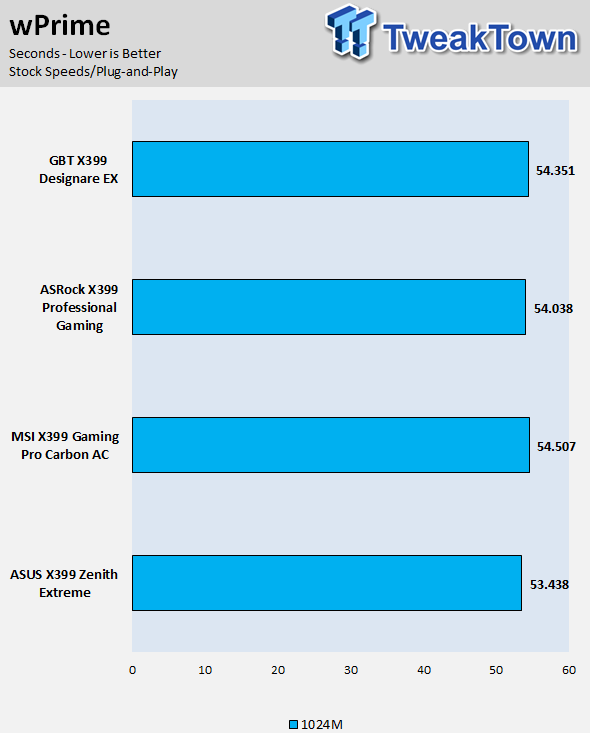
wPrime
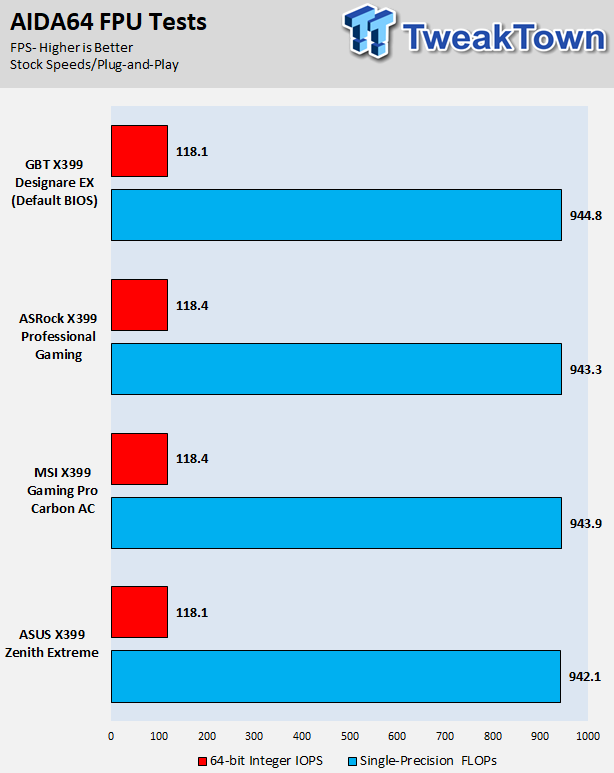
AIDA64 FPU
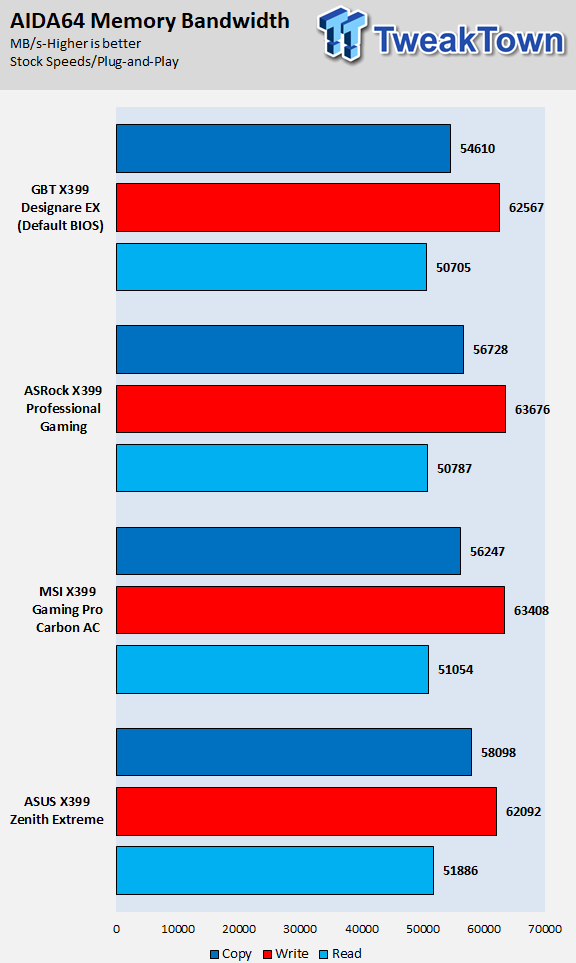
AIDA64 Memory
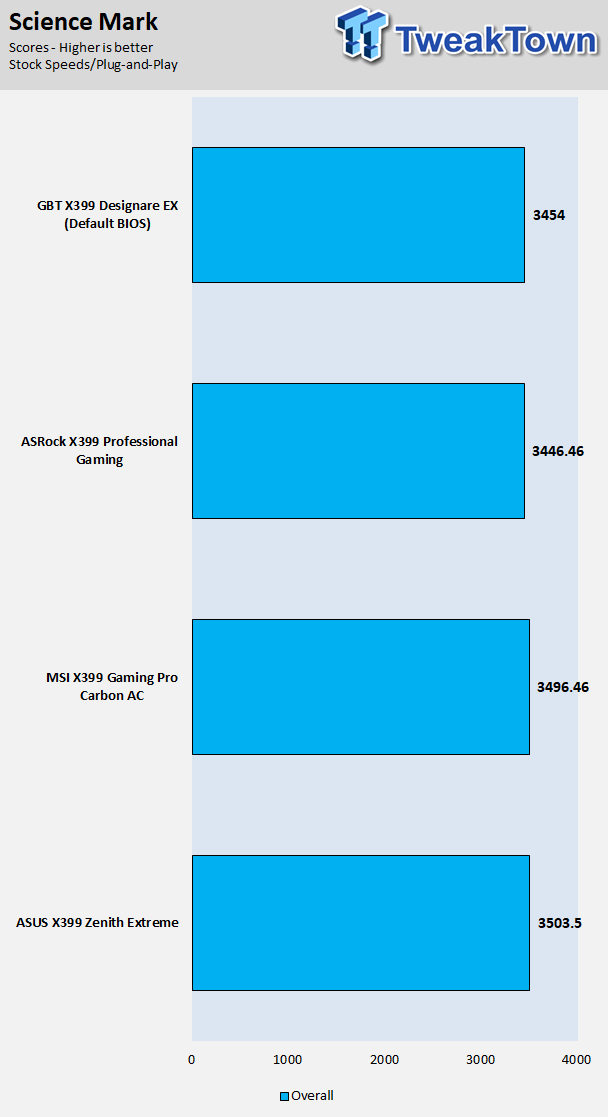
ScienceMark
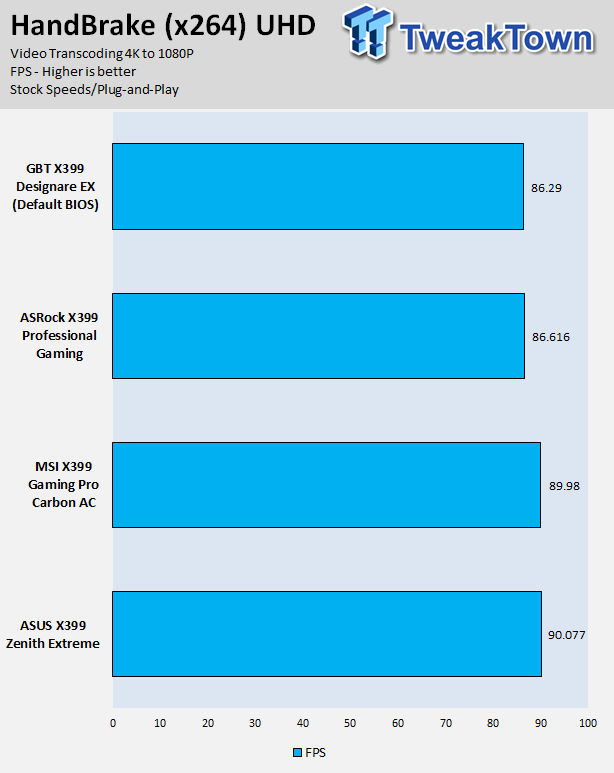
HandBrake
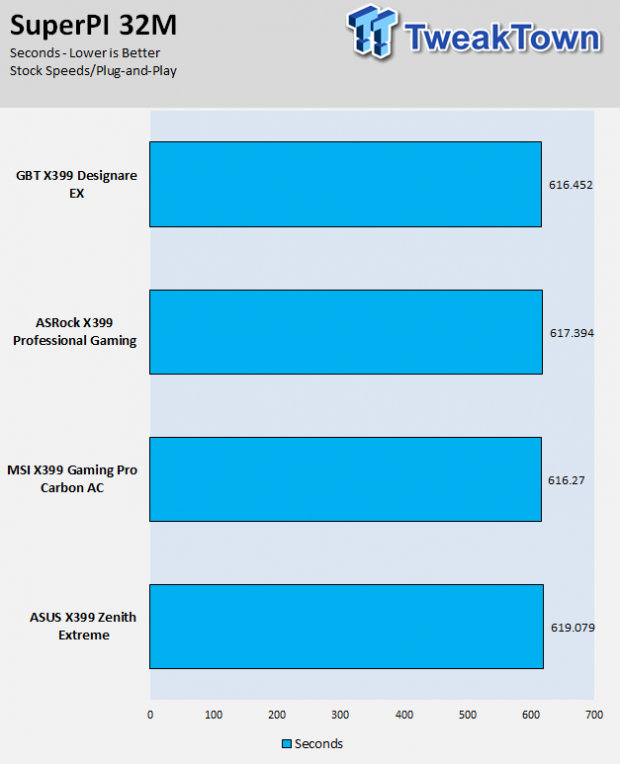
SuperPi 32M
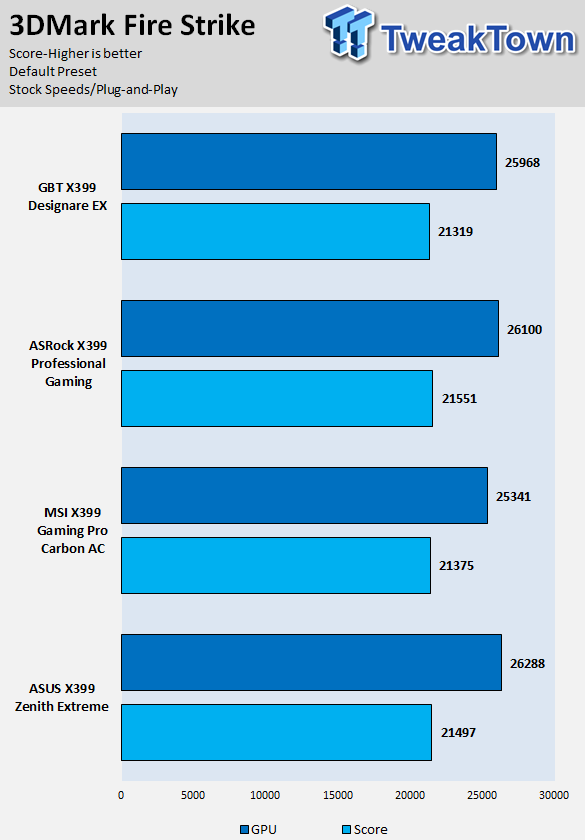
3DMark: Fire Strike
3DMark: Cloud Gate
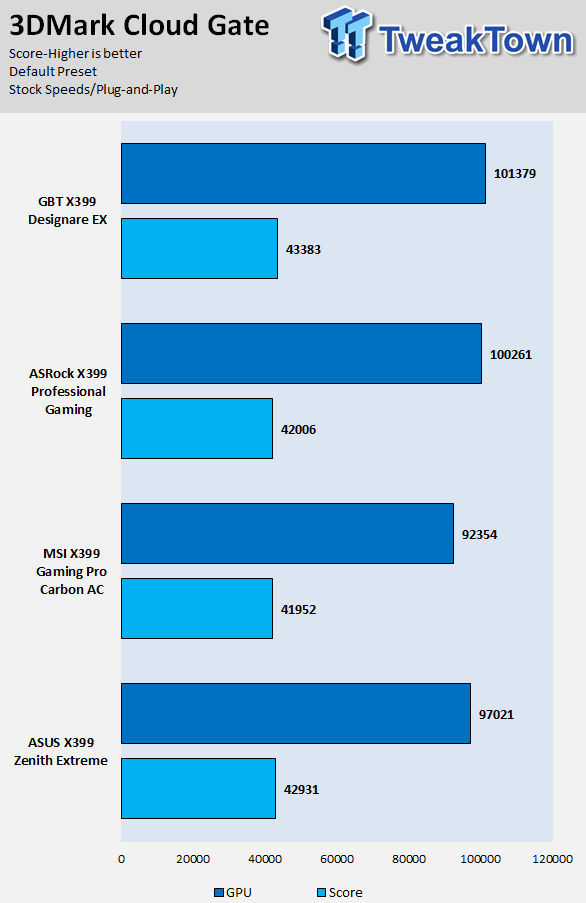
ResidentEvil 6
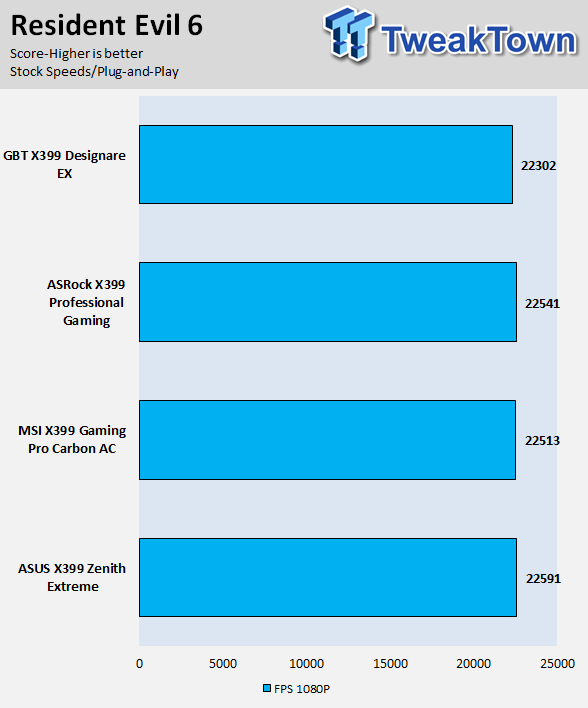
The X399 Designare EX performs well in the benchmarks. Although the motherboard is currently within the early stages of its BIOS, performance is decent and we did not find any performance pitfalls.
Overall, in CPU, memory, and GPU tasks, the motherboard performed as it should.
System IO Benchmarks
CrystalDiskMark SATA6G:
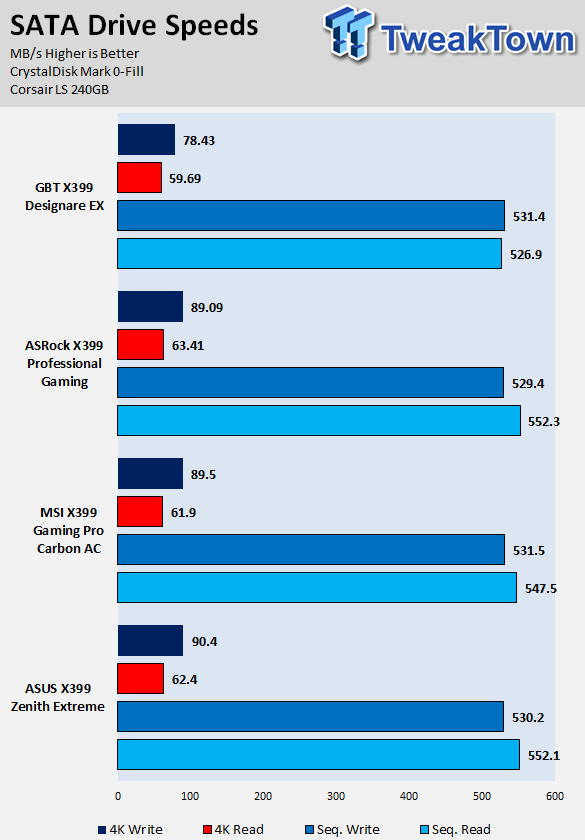
CrystalDiskMark M.2:
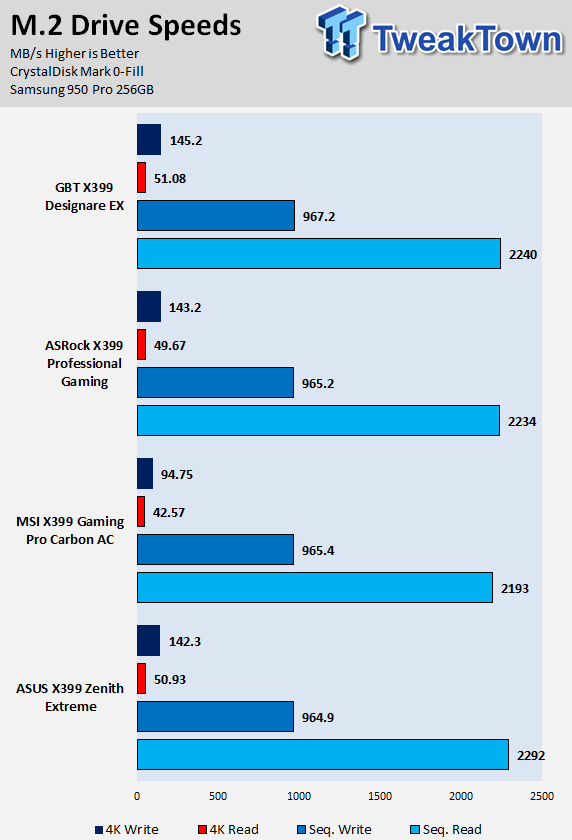
ixChariot Network Throughput:
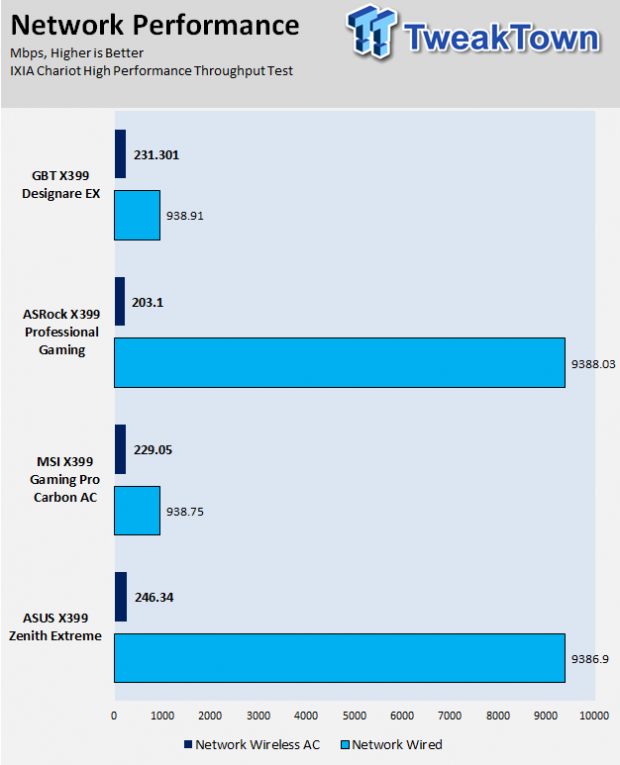
The X399 Designare EX's SATA storage performance is average while its M.2 performance is excellent. Networking performance is where it should be for a motherboard with a 1Gbit NIC, as the other two boards in there have 10Gbit NICs.
Audio RMAA 5.5:
I disable all audio features, set the correct bitrates, and then test the audio with a loopback test.
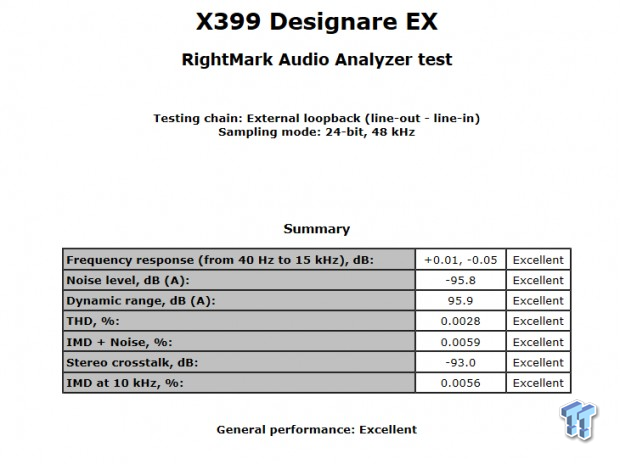
Sound Judgment by Ear: Excellent. It has a solid ALC1220 implementation. There are five ratings for audio: 1. Problems, 2. Okay, 3. Acceptable, 4. Very good, 5. Excellent
Thermal Imaging and Power Consumption
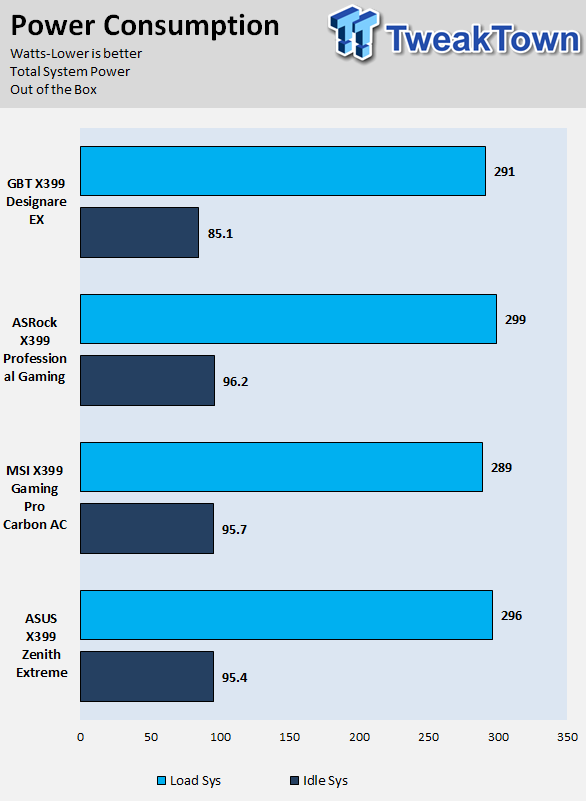
System power is measured at the wall with an AC power meter.
Note on Thermal Images: In the temperature section, we use our Seek thermal imaging camera to capture the surface temperatures of major components on the board. I look at the VRM and then all other things that light up the screen. If there is something to worry about, then I will state it. Otherwise, I will just show the hotter running parts of the board for fun. Unless some component is over 80-90C, then there isn't anything to worry about.
All systems will act differently, so I will look for commonalities, such as how far from the VRM the heat spreads through the PCB and the difference in temperature between the front side and backside of the PCB. Keep in mind, the majority of the heat from the VRM goes into the PCB as it is a giant soldered on copper heat sink. A larger difference in temperature between the back and front of the PCB points towards a more effective heat sink.
Thermal Testing at Stock Speeds:
The image on the left is always at idle, and the image on the right is at load. During ALL TESTS, There is no airflow direct at the VRM
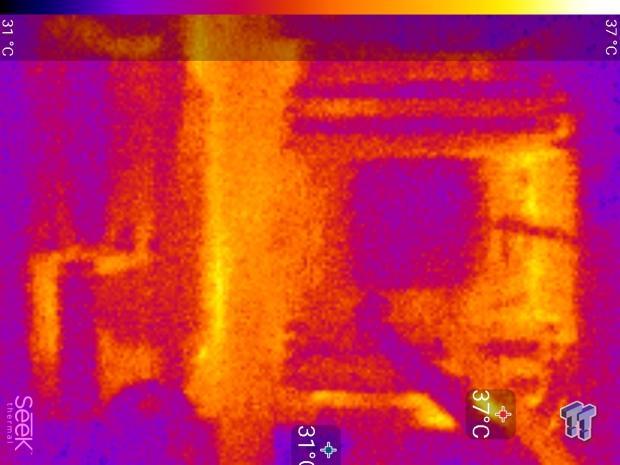
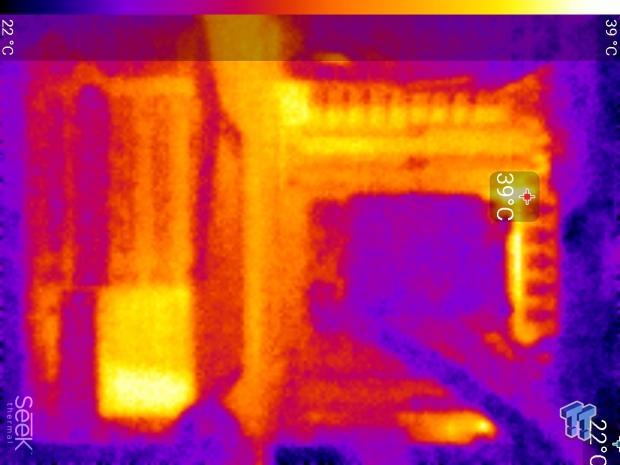
Full frontal.
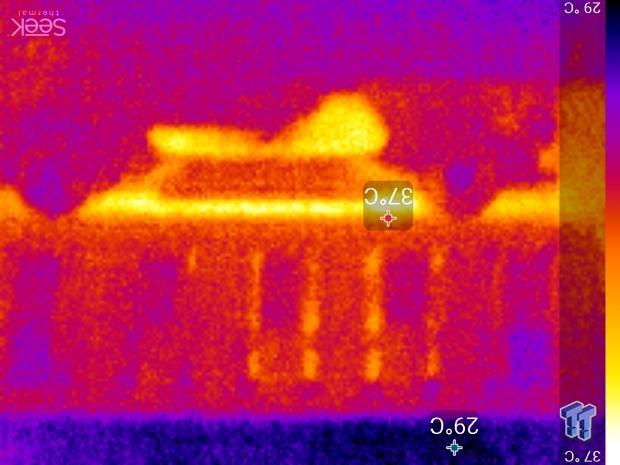
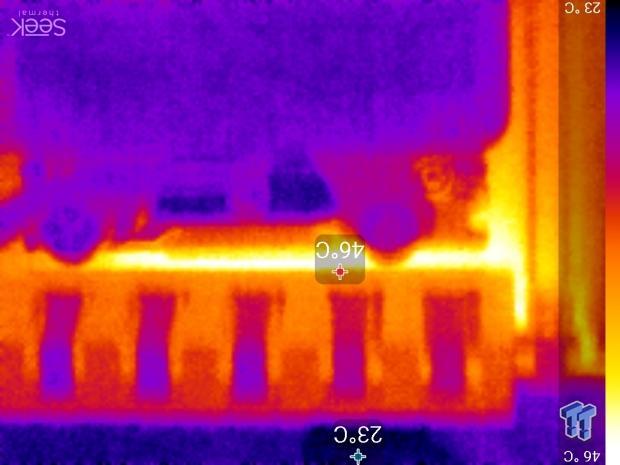
Up-close of the front of the VRM.
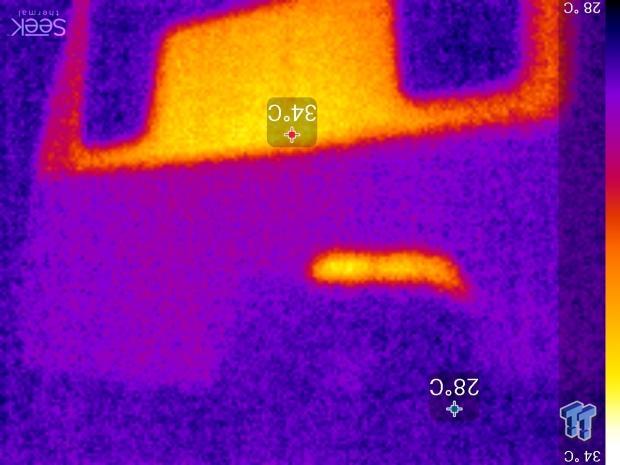
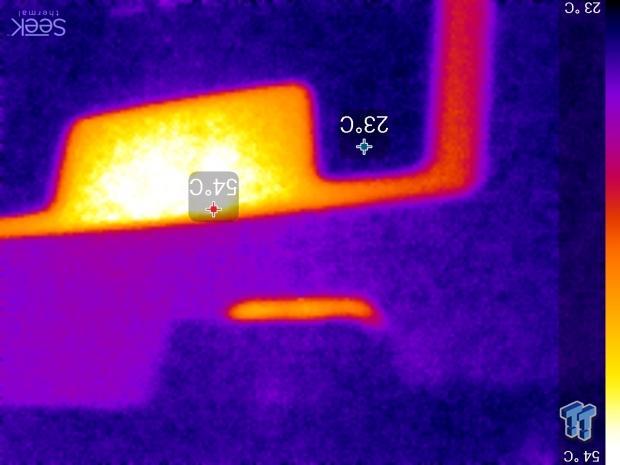
Up-close of the back of the VRM.
The X399 Designare EX's new redesigned heat sink is built to take full advantage of any case airflow. However, this worst case testing scenario doesn't do it justice, and if the MOS temperature doesn't go over 90C, the VRM fan won't spin up.
The VRM fan didn't spin up, but our VRM stayed within operating parameters. It's the same physical VRM as the X399 AORUS Gaming 7, and the topside heat sink temperature is a few degrees cooler while backside temperature is a bit hotter, and that's due to the Gaming 7 having more mass, while the Designare EX is designed for a case environment with airflow. In a case, the Designare EX should do much better than the Gaming 7. Things stayed under 60C, so I would say it had great thermal performance.
What's Hot, What's Not & Final Thoughts
Here are key points about the GIGABYTE X399 Designare EX.
What's Hot
Redesigned VRM Heatsink: GIGABYTE and other vendors realized after X299 launch that the VRMs on X299 and future X399 motherboards had to be robust, and their coolers had to be excellent. The X399 AORUS Gaming 7 had a heat sink designed to take advantage of airflow but also have enough mass to act as an actual sink in case airflow isn't present. The X399 Designare EX's heat sink is a bit different. GIGABYTE figured that they should optimize more for airflow, and they did that by adding more surface area with more "fins." In the situation where there is no airflow, such as on our test bench, GIGABYTE decided they would create airflow with a built-in VRM fan. The good news is that fan never kicked in on our motherboard because their MOS temperature sensor never went over 90C, meaning the heat sink has a nice failsafe and works in many ways. VRM quality is excellent as well.
Fan Headers and Sensors: Eight fan headers on board might seem like overkill, but in a workstation or any other type of high-performance motherboard, you might actually be able to use them all. Each header can use one of many temperature sensors, and that includes some built into the VRM as well as two external sensors that are actually included with the motherboard. I also like how they grouped five of the headers in the top right corner of the motherboard, as they were perfectly situated for my water pump and three radiator fans. I should mention, one of the eight fan headers goes to the VRM heat sink fan.
Triple Intel NICs: GIGABYTE scrapped the Killer NIC and added in two Intel wired NICs. Now the motherboard has two wired Gbit NICs and one 2x2 Intel wireless AC card. The change in NICs alone shows how GIGABYTE shifted more away from a gaming motherboard and more towards a workstation motherboard.
More Serious Look: The integrated IO shield is a nice feature, but the shift from RGB LEDs towards a more professional silver look is one many will find appealing for an X399 build. Rear IO shield is also a nice touch, providing protection resulting in a sturdier product.
Future Thunderbolt 3.0 Support: We see a Thunderbolt 3.0 GPIO header, but no mention of it in the manual. That is because it hasn't yet been finalized by AMD/Intel/GBT or certified, but it's there, so hopefully, it will come one day. We have seen GIGABYTE add in Thunderbolt 3.0 hardware and not advertise it until it's ready (even after product launch), and hopefully, that's the case here (no promises).
What's Not
USB header and Clear CMOS Button: I don't understand why they would have a clear CMOS button, of the same color as the power button, right in between the power and reset buttons. So be mindful of that. I also would have liked to see the USB 3.0 internal header further up below the 24-pin connector.
Final Thoughts
The GIGABYTE X399 Designare EX is an excellent alternative to the X399 AORUS Gaming 7 from GIGABYTE. Quality is excellent, component selection is top notch, and it's unique in its own right. The X399 Designare EX might seem very similar to the X399 AORUS Gaming 7, but it is not. Where the Gaming 7 is all about gaming, the Designare EX is all about professionalism. The Designare EX dropped the single Killer NIC for two Intel ones and a USB 3.1 internal header for a USB 3.0 type-C header, and it picked up a Thunderbolt 3.0 GPIO header.
GIGABYTE also added the rear PCB shield for structural integrity, redesigned the heat sink for better VRM thermals inside a case, added a VRM fan as a failsafe, and slapped on an integrated IO shield for easy installation. For $10 than the Gaming 7, you get a few more features on the Designare EX, and I think they are worth the $10. I should note that the Designare line was actually developed for modding enthusiasts, and that's why it has a silver aesthetic, comes with those cool stickers, and has the light up custom overlay on the chipset heat sink.
Regardless, it's a bright addition to GIGABYTE's line up, capable of fully supporting the X399 platform and its features, in a sleek, cool, and professional manner.

| Performance | 89% |
| Quality | 92% |
| Features | 97% |
| Value | 92% |
| Overall | 93% |
The Bottom Line: GIGABYTE's X399 Designare EX is a very unique X399 motherboard loaded with features, re-designed to take full advantage of the platform, and it has a few surprises that are sure to impress.
PRICING: You can find products similar to this one for sale below.
 United
States: Find other tech and computer products like this
over at Amazon.com
 United
Kingdom: Find other tech and computer products like this
over at Amazon.co.uk
 Australia:
Find other tech and computer products like this over at Amazon.com.au
 Canada:
Find other tech and computer products like this over at Amazon.ca
 Deutschland:
Finde andere Technik- und Computerprodukte wie dieses auf Amazon.de
Similar Content
Related Tags
