


Our Verdict
Introduction, Specifications, and Pricing
Raidmax has made it back onto our radar with the Alpha chassis, and even now we are not positive it was their best effort. We would not go as far to say that we were super impressed with the Alpha chassis we recently looked at. However, we feel that everyone can have a bad day, so there is no sense in holding a grudge. Things can, and usually do improve. That being said, we are here today with our eyes wide open, ready to look at what else Raidmax has to offer us.
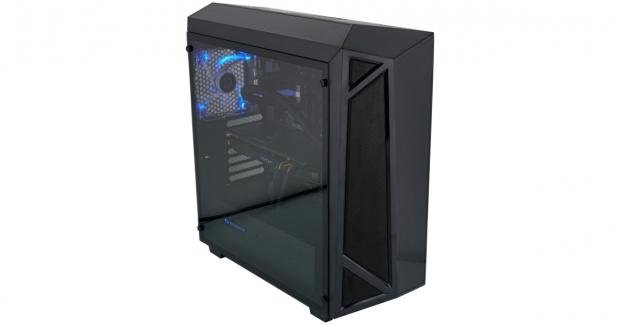
Moving forward, we now have a chassis which uses the latest trends to its advantage. In the case we have today, you will find things like tempered glass, use of refined materials like brushed aluminum, and all housed in a chassis designed with a unique aesthetic appeal. This does not mean they put lipstick on the previous design. In fact, this is a whole new look for Raidmax, and when asked to review this chassis, it was the looks that initially sold us to request this sample to be looked at much closer.
Now, we bring you to the reason we have you here, the Raidmax Sigma ATX Tower Chassis. Raidmax is about to flip the script from what we have seen, to have us glowing about what you are about to see. Not only is this chassis refined, but its styling is also aggressive, there is modularity built into it, room for water cooling, and LED lighting in all the right places. Forget what we may have said about Raidmax in the past, as it takes just one case to be a hit, and we feel the Sigma is that chassis for Raidmax.
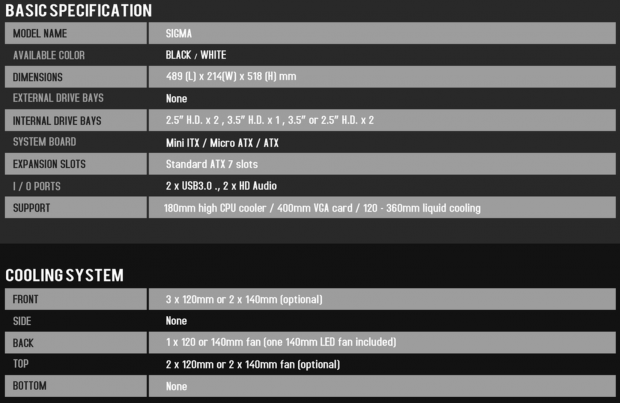
In the chart which is provided on the Raidmax Sigma webpage, we see that this chassis comes with a choice of a black version, or another in white, both using a mix of steel, brushed metal inserts, mesh inserts and ABS plastic. The Sigma stands 518mm tall, it is 214mm wide, and it is 489mm deep, with no mention of its weight, but we did read elsewhere that it is nineteen pounds. Neither chassis comes with any external drive bays, but on the inside, they can hold a pair of 2.5" drives behind the motherboard tray, a single 3.5" drive can be installed on the floor, and there is a cage that accepts a pair of either 2.5" or 3.5" drives. The motherboard tray will fit a Mini-ITX, Micro-ATX, or an ATX motherboard, and at the back of the Sigma, there are seven expansion slots. The front I/O panel offers USB 3.0 ports and HD Audio jacks and is also where the power button, reset button, and HDD activity LED is as well. The chassis is not so restrictive either. The CPU cooler can be 180mm in height, the video cards can be 400mm long, and there is modularity to allow for very long power supplies.
Cooling inside of this chassis has a few options to choose. The front of the chassis can take three 120mm fans or a pair of 140mm fans. The sides of the chassis offer no cooling options, but at the back of the chassis there is a 140mm blue LED fan placed in that location, but you can trade it out for a 120mm fan too. The top of the chassis offers room for a pair of either 120mm or 140mm fans, but the floor of the chassis has no locations for additional cooling. Water cooling support matches the fan layouts. The front of the chassis can take a 360mm or 280mm radiator, while the top can use another 280mm but only a 240mm radiator due to the location of the front I/O panel. The back of the chassis can also house a radiator, and it can be either 120mm in size or 140mm.
Restrictions are not even that restrictive, but we will cover them. The CPU cooler can be up to 180mm in height that covers a ton of air cooling options out there. They mention the VGA length at 278mm with the HDD cage in, but this only applies to the lower cards. With the HDD cage removed, all slots have 420mm of room there. Last is the mention of the PSU. If you plan to fill the floor with fans or water cooling, you need to keep the PSU to 180mm or less. If not, there is room for 220mm of PSU until you run into the raised section on the floor. Lastly, we are provided a list of all of the past and currently offered Corsair Hydro series coolers that will fit inside of this chassis.
The Sigma is aggressively styled, it comes with a tempered glass side panel, and is a design that will be admired by many. So, when it came time to look around at the pricing, we were not surprised to see what the Sigma is selling for currently. The price is still well below the $100 mark that is the typical glass ceiling for this size of chassis, and we are pleased to tell you, you will not have to dig quite that deep to obtain the Sigma. Whether looking for the white version, or the black version we have for you now, you are asked to shell out $79.99. This is across the board pricing, as nearly everywhere we looked, this is the going rate for the Sigma, and we feel the pricing is justified.
Our Latest Full-Tower Cases Review Coverage
Chad's Chassis Test System Specifications
- Motherboard: GIGABYTE GA-Z68X-UD4-B3
- CPU: Intel Core i7 2600K (buy from Amazon)
- Cooler: Corsair H80i GT (buy from Amazon)
- Memory: G.Skill Ripjaws F3-12800CL6D-4GBXH
- Video Card: ZOTAC GeForce GTX 970 AMP. Extreme Edition (buy from Amazon)
- Storage: SuperSpeed 128GB SSD
- Power Supply: SilverStone SST-ST85F-G (buy from Amazon)
- OS: Microsoft Windows 7 Ultimate 64-bit (buy from Amazon)
Packaging
The front panel of the box which contains the chassis has us looking at the bottom half of the front bezel, where we can also see the Raidmax light show that is presented on the top of your desk. The bottom left corner is where Raidmax put their name and logo, and the Sigma name and Greek symbol are a bit larger and presented just right of center.

On the side panel, we find the name and logo at the top, with a pair of cases shown below it. Both model numbers are present under their respective case images, and there is a brief set of specifications found at the bottom.
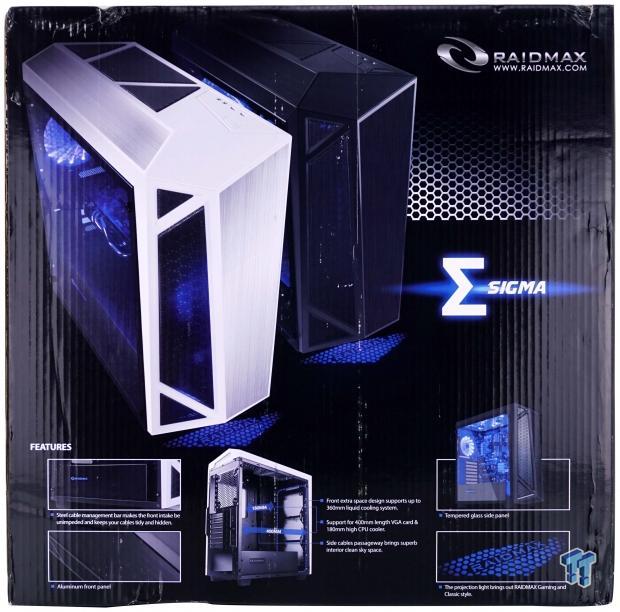
The back of the box shows both cases again, while their naming is found off to the right of them. At the bottom, five images are pointing out things like the PSU cover, the use of aluminum, liquid cooling support, long video card support, cable management, tempered glass side panel, and the LED light projection.
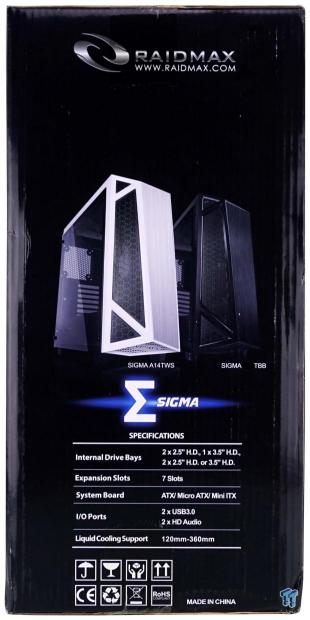
The second side panel is nearly identical to the one on the opposite side of the box. We do not see a sticker with the model number under the black chassis image, and at the bottom, the UPC code has been removed for iconography.
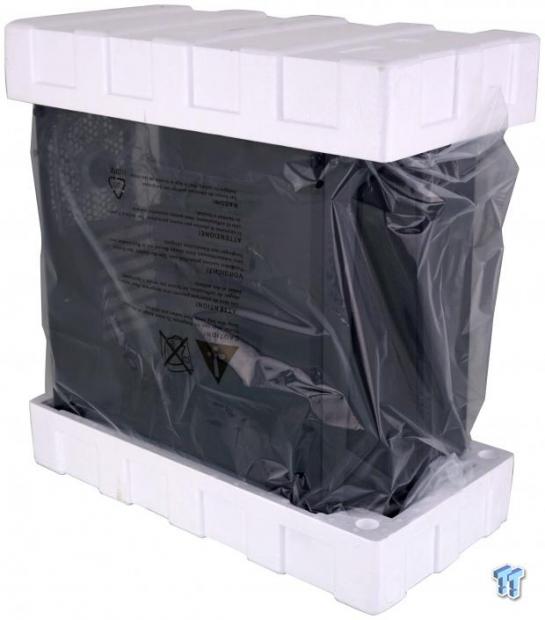
The tempered glass side panel does come with a layer of plastic covering the outside of it, while a plastic bag surrounds the whole case. With those bits working together to protect the chassis from minor scratches, it is up to the short and thin Styrofoam end caps to protect the Sigma from the major tumbles and drops along the route to your door. Considering the box looks as rough as it does, we are pleased to see that the inner packaging has held up well, enough, in fact, to leave our Sigma unblemished.
Raidmax Sigma ATX Tower Chassis
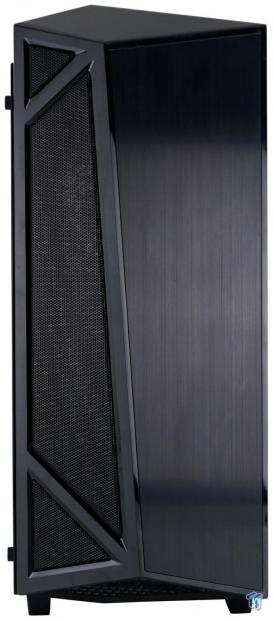
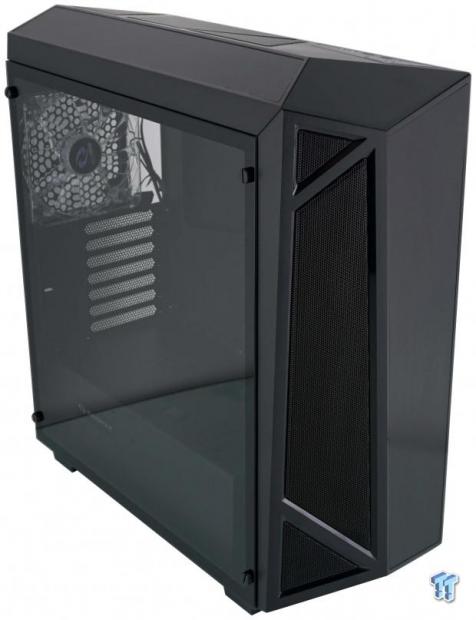
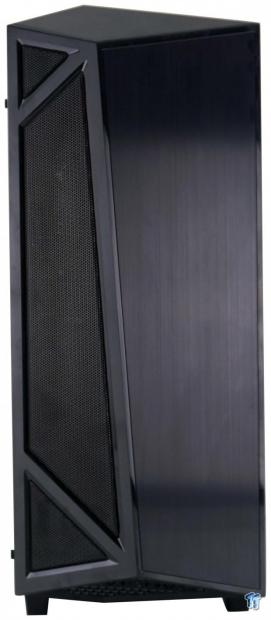
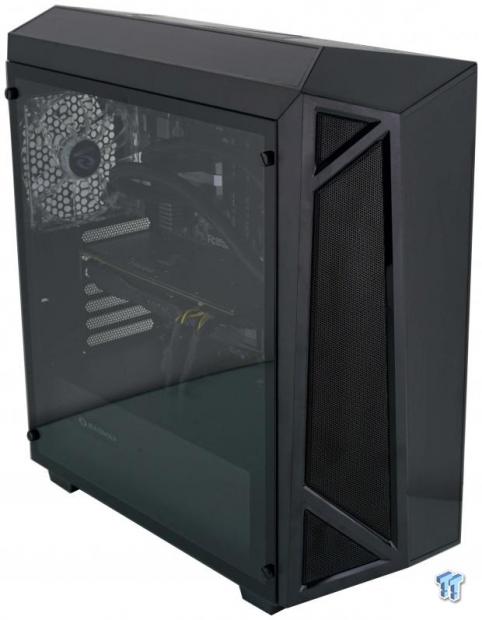
The front of the Sigma offers quite a bit of styling, with the angular lines, sections of mesh, and large brushed aluminum insert. Not one angle used here are square to another, nor do any run on a level horizontal plane.
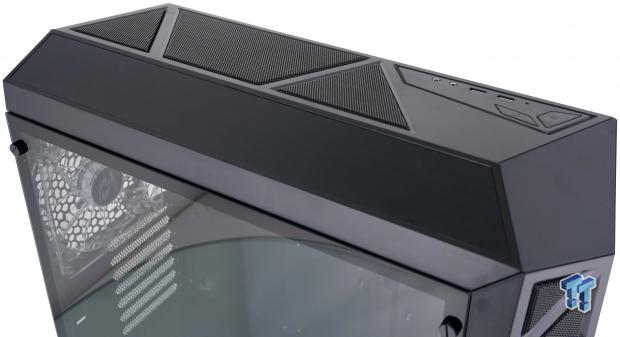
The top of the chassis mimics the styling on the front, but the aluminum and mesh inserts have swapped sides. Again, there are many angles and sections of plastic adding style to the design.
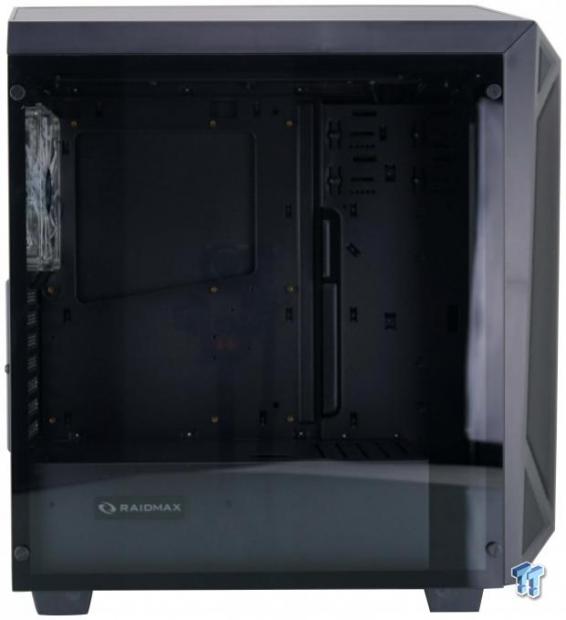
The left side of the chassis is entirely glass, tempered glass with a slight tint to it, to be exact. Thumbscrews hold the glass in place, as it aligns well with the plastic of the bezel and the top cover.
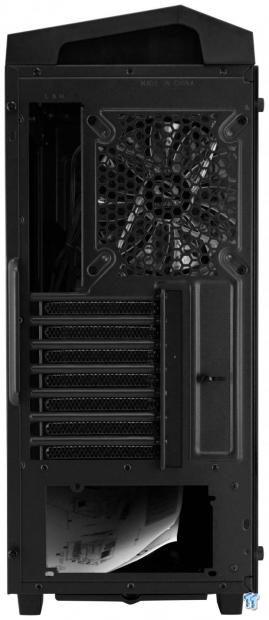
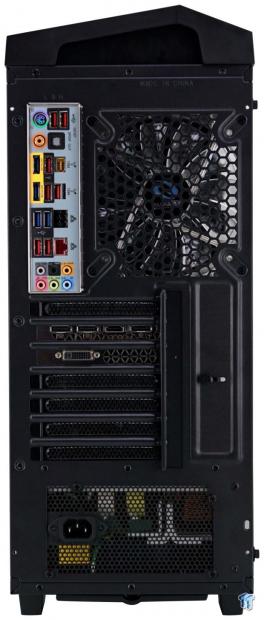
The back of the Sigma starts at the top with a thick plastic top cover that can be easily removed. Below the cover is the rear I/O area and the exhaust fan. Moving down a bit more we find the externally accessed expansion slots and the cover to the right blocks any passive ventilation. The large hole at the bottom, you guessed it, is for the PSU.
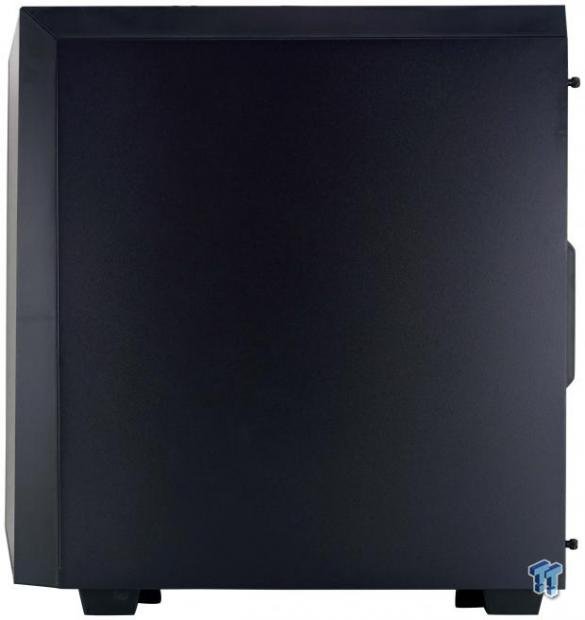
The right side of the chassis has little to offer outside of a huge expanse of textured black paint on a flat steel panel. We do see that it aligns well like the glass panel does to the plastic components, and this panel is held in place with a pair of thumbscrews.
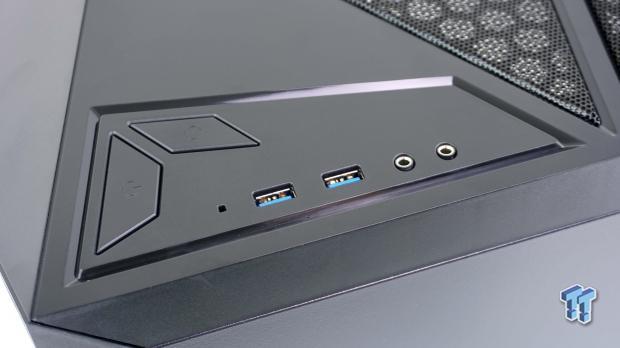
Above the right side panel of the chassis, in the top cover, we finally get to see the front I/O panel. There are similarly sized buttons for the power and reset, and a tiny square hole where the HDD activity light glows from. Along the edge, we see the USB 3.0 ports and the 3.5mm jacks for HD Audio connectivity.

Under the chassis, we find rectangular legs with oval rubber feet on them, pushed very near the corners for stability sake. The PSU cover at the back is easily removed for cleaning, and we see screws which allow one part of the HDD cage to be removed, and also see grommets for mounting an HDD to the floor of this chassis. Also, notice the bottom of the bezel, it is shaped so that an LED light will show that in reverse on whatever the Sigma stands on.
Inside the Sigma
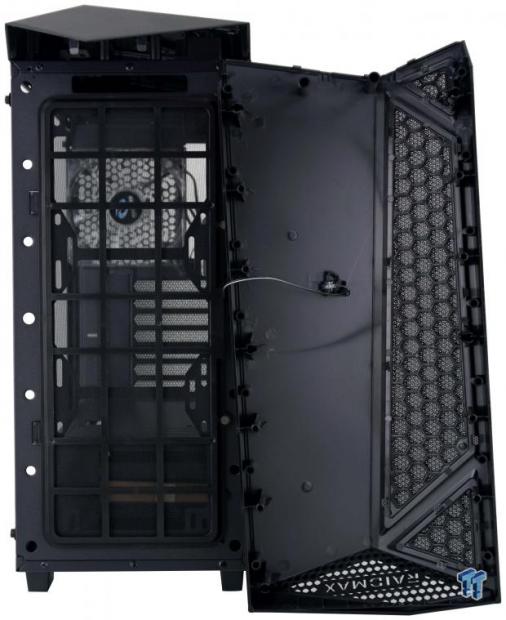
We do like that the wires from the front I/O panel are attached to the chassis, but there is still a lead for the LED in the bottom of the bezel which stays glued to it. The front of the chassis has a large dust filter which runs from top to bottom, and is magnetically attached to the right, and hinged on the left.
The inside of the Sigma offers two cooling zones due to the PSU cover at the bottom. There is a gap left at the front to support thin radiators with water cooling, and the brass threads for the tempered glass have grommets applied so that it can support the glass when the screws are removed.
Inside the front of the chassis, we see nothing but room for fans. You could install three 120mm fans or a pair of 140mm fans. The motherboard tray to the left of it is slightly inset, has room for wires to pass through, and even has remnants of where the ODD bays used to be in a previous design.
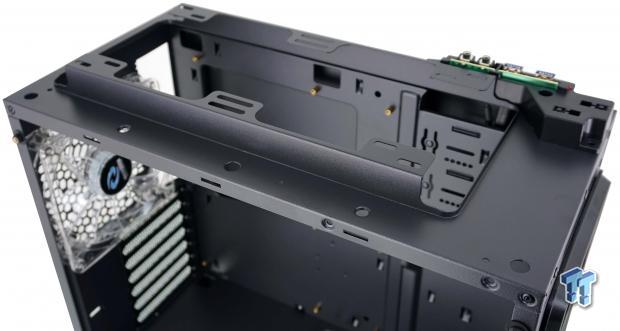
The top of the Sigma, once the stylish cover has been removed, has a raised section for mounting extra cooling. Being raised allows for fans to be above the chassis, and it also allows for the use of thin radiators, as fans are still able to clean the motherboard.
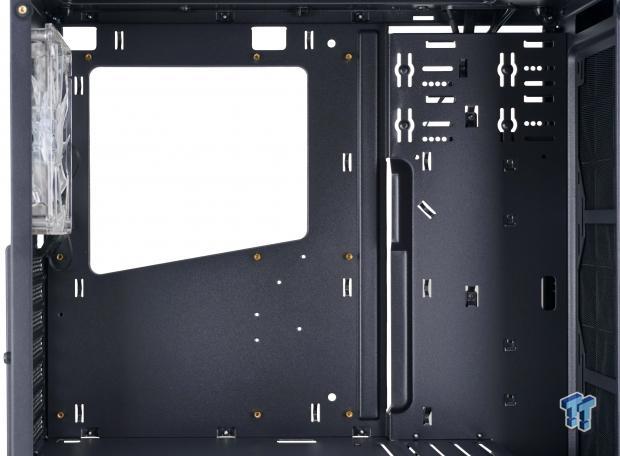
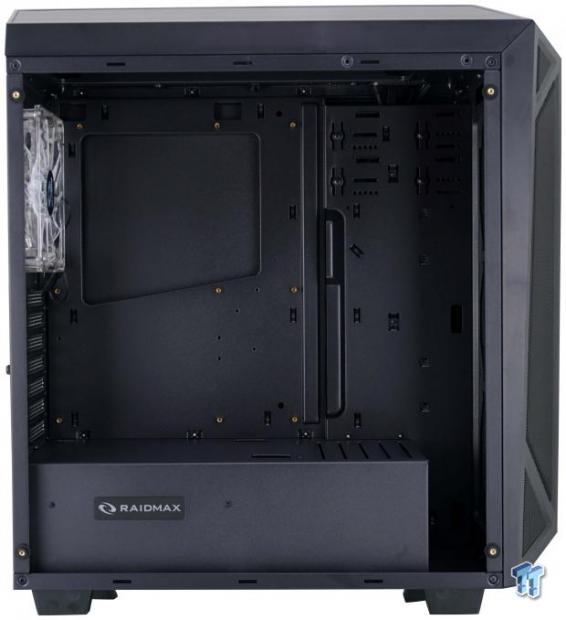
The motherboard tray ships with all of the standoffs in the tray for an ATX motherboard. Two holes at the top and a slot to the right of the motherboard ease wire management, and the SPU cooler access hole is wide enough it becomes a wire pass-through with Mini-ITX boards. When it comes to securing wires to the tray, there are twelve locations conveniently placed to use.
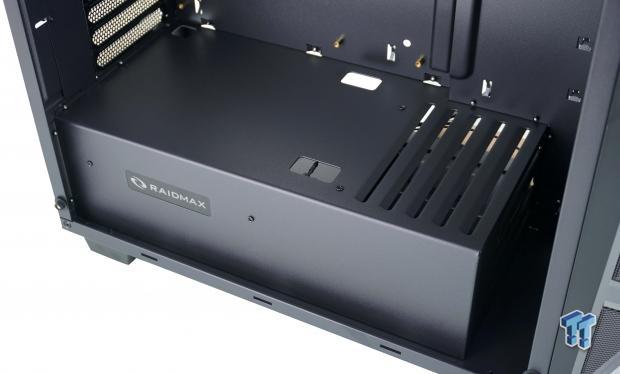
The PSU cover is solid on the side of it, where there is an LED backlit Raidmax plaque screwed into the cover. The top of it delivers a hole for the front I/O wiring, another for PCI-e power cables, and is louvered at the front to scoop some of the air from below and push it toward the video card intake fans.
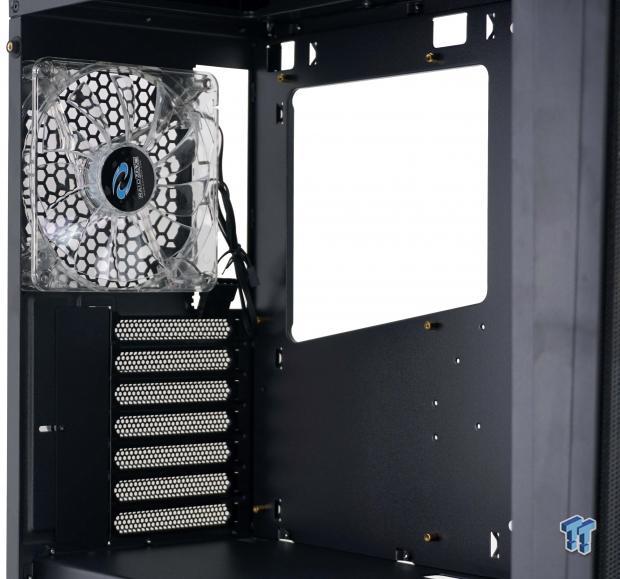
The back of the chassis houses the only fan sent in the case, and it is the clear 140mm blue LED fan seen hanging there. It is powered via a 3-pin connector at the end of the lead, or you can power it via Molex 4-pin, which is also connected in the lead.
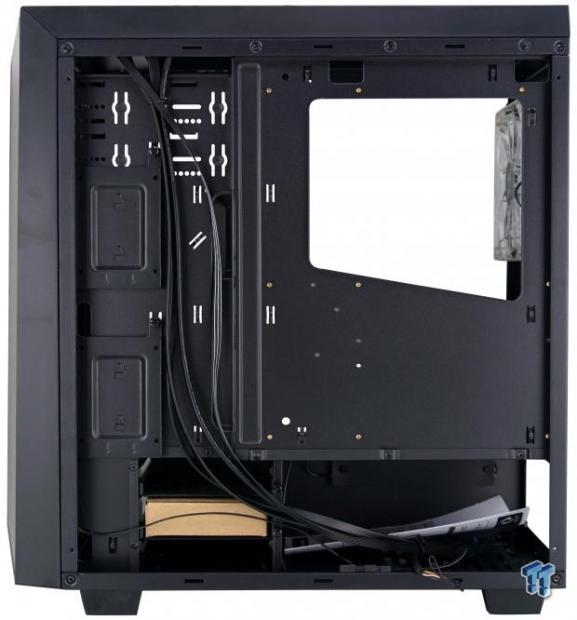
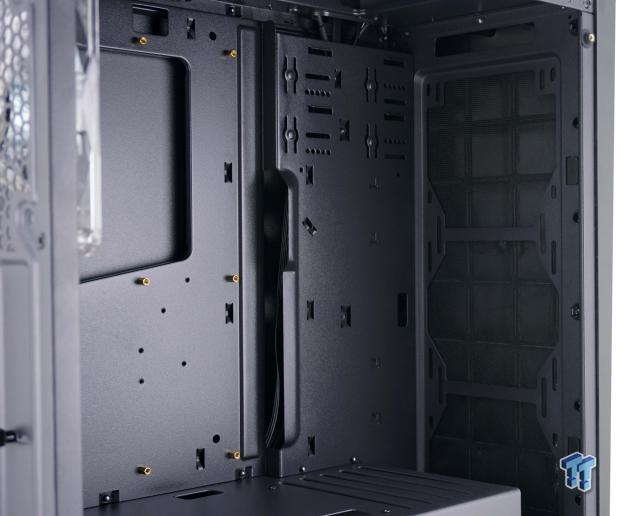
Behind the motherboard tray we are given 20mm of room across most of the top section, but even more room where the SSD trays and the front panel wiring is currently. Looking under the PSU cover, we see the hardware in the HDD cage, and the manual is laid in where the PSU will be soon.
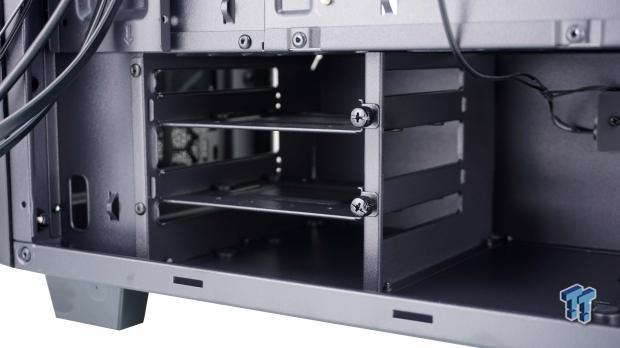
The HDD cage has two trays screwed into it, and both trays can house either a 3.5" or 2.5" drive. The support structure on the right side of the cage is removable, which gives more room for longer power supplies, or it can be used as a large area to route excess wires into.

The power supply rests on plastic legs with rubber feet on top of them, and under the PSU the chassis is well vented for the intake fan. We can also see the backing for the Raidmax LED plaque, and the lead which needs to be powered.
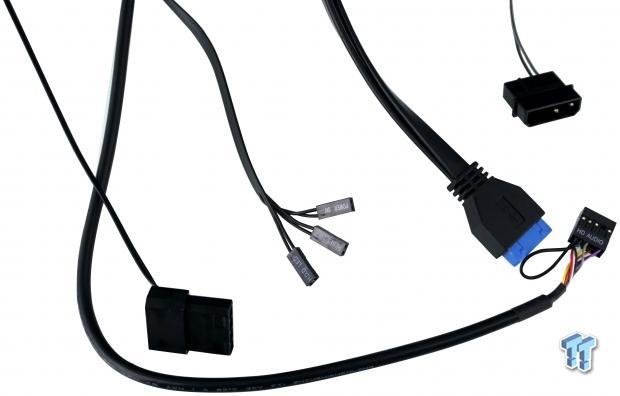
The 4-pin Molex on the left is from the front bezel so the chassis can make the desk glow, and to the right we see the black wires from the LDD LED, power button, and reset button. Next in line is the native USB 3.0 connector, we see the HD Audio connection just below it, and to the right is the Molex power plug from the Raidmax plaque on the PSU cover.
Hardware & Documentation
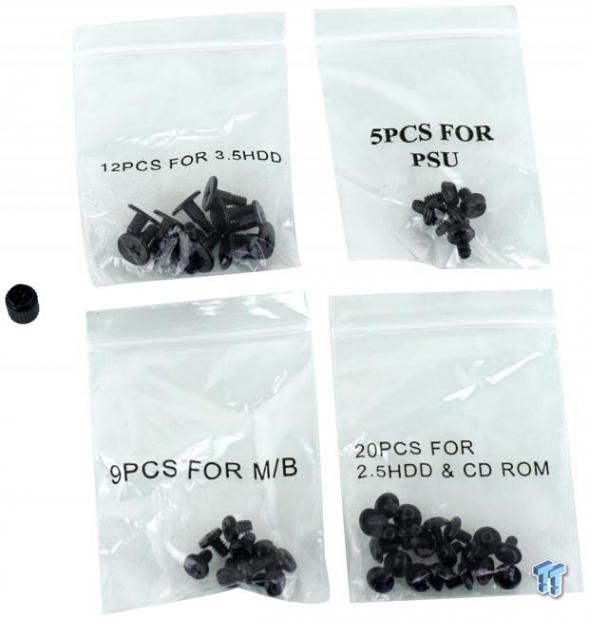
We do like that Raidmax has simplified the installation process by clearly marking what all the hardware is for, and how many bits should be in the bags. There are twelve screws for hard drives, and five screws for the PSU. The Sigma comes with nine screws for the motherboard, twenty screws for the 2.5" drives, and they also send along a socket for the standoffs, should you not be using an ATX motherboard.
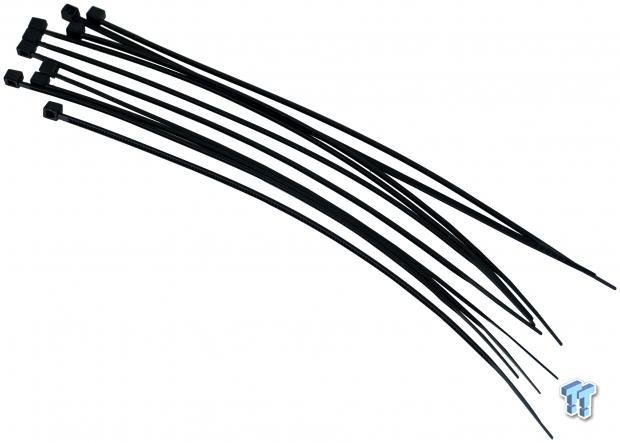
Since there is a full glass side panel, Raidmax wants to help with the wiring as much as possible. This is why they have sent ten zip-ties, to make certain that only what has to be, will be seen through the glass.
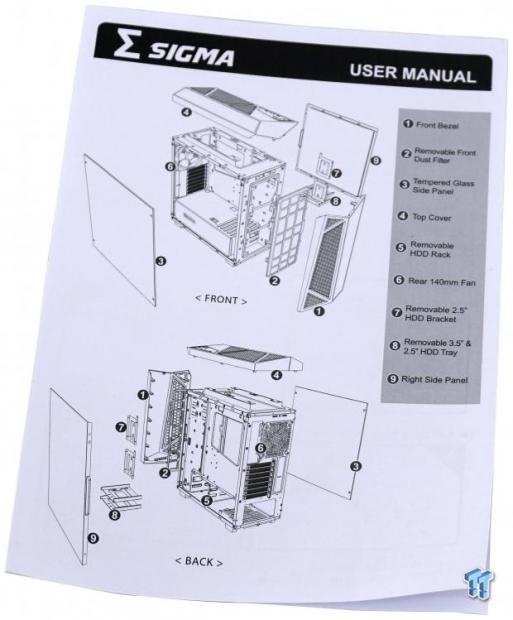
The user manual gets right down to business since the parts list is not needed. A pair of exploded diagrams point out everything you need to know about the Sigma, and on the next page, and the following pages, there are many more images of how to install components. There is limited text involved, but the images are good enough to assist even the beginning assembler.
Case Build & Finished Product
The front of the Sigma has nothing changed about it from the time we took it out of the box till now. While this uniquely stylized front panel may be odd to some, we applaud Raidmax for stepping out of the box and giving us something attractive yet unique enough to know what chassis this is at just a glance.
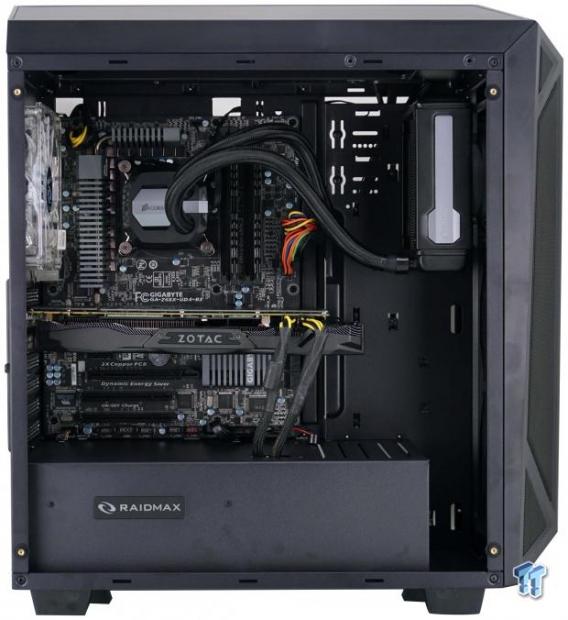
There is enough room above the motherboard for water cooling without conflict, and we see that the card is not aging all that much. The PSU cover and wire management keeps the interior clean and unfettered, and with the easy access to the front of the chassis, mounting the AIO could not have been easier.
The PSU sat right in place to be screwed into the chassis, and we did not have to fight the expansion slots or the cover to get the card mounted. The dust shield also snapped right into place, leaving is with no issues during the build process.
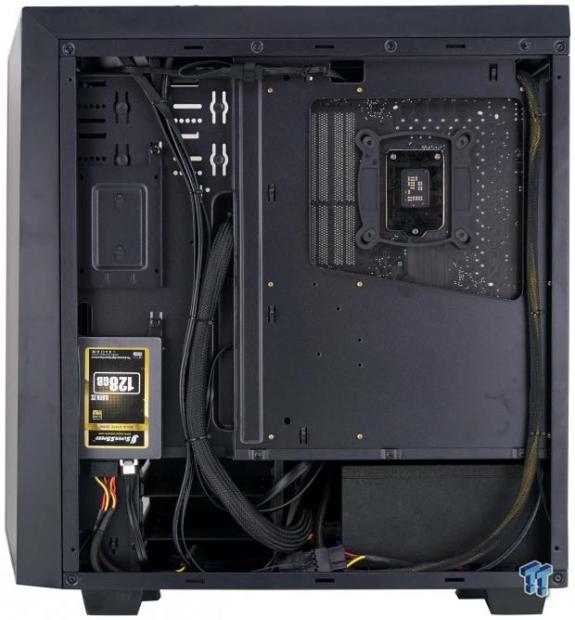
We did populate one of the two SSD trays at the left and found ample room to wire the system alongside it. We were able to make all three Molex connections at the bottom of the chassis and hid the fan lead under the 8-pin. We did not have to remove the HDD cage to fit the PSU, and there is access to the bays through the wires.
All back together now, the Sigma is ready to do what it does. The tint of the tempered glass is slight and does not hinder the view inside of the chassis without an internal source of light.
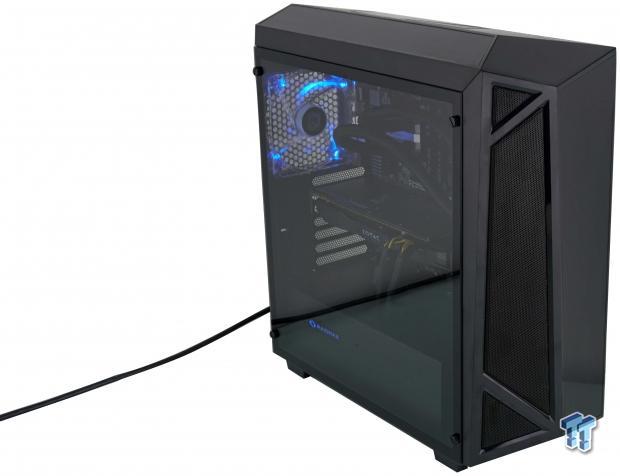
Once powered, we hear only 28 dB of noise coming out the back of the Sigma, and there is quite the light show going on. Not only does our video card and AIO light up, but the rear fan, the Raidmax plaque on the PSU cover, even the Raidmax name and honeycomb pattern surrounding it under the front bezel all takes the Sigma a step above many other cases.
Final Thoughts
The Sigma is a chassis we did not expect to see. By this, we simply mean that we expected an aesthetically pleasing chassis, but we did not expect to like it as much as we do. The outside is a harmonious blend of brushed aluminum, steel mesh, and uniquely shaped plastic frames for the top and front of the chassis. The tempered glass side panel is another thing which helps the Sigma out, not only bringing up the cool factor but offering a view into the tidy interior. We also like the way that the LED fan lights up the bulk of the main compartment, the LED backlit Raidmax plaque on the PSU cover, and we were even fond of the Enermax name and pattern displayed just under the front bezel. The low amount of noise associated with this chassis is also huge, and there is plenty of room to expand upon the cooling in any way you see fit. The single fan does not sufficiently cool the chassis in our opinion, but many users will opt for an AIO to go in the front or up top, which will bolster the cooling capabilities of the Sigma.
The interior is well thought out, and we love that the dust filters are easily removable. Wire management is easily handled, not just with the access holes around the motherboard, but with a plethora of tie points and the near dozen zip-ties that shipped in the box. We found no issues when it came to mounting the components either. Everything either snapped right into place or can be screwed in with little effort, easing the entire build process as much as possible. While we usually have something bad to say with all of the good, in the instance of the Sigma, we cannot come up with a single thing that sticks out and is worth mentioning to try to sway you away from this case.
The Raidmax Sigma ATX Tower Chassis is worth the investment in our minds. At $79.99, whether you want it in black or white, leaves you with a bit of money left in your pocket to go to other things. The feature set is well-rounded, the layout and aesthetics are on point, and there is even a bit of modularity of you do not have a need for 3.5" drive locations. Everything about the Sigma well thought out, and seemingly no stone was left unturned. In our humble opinion, it seems that Raidmax is trying hard, and they should be on your radar when it comes to your next chassis purchase.
Chad's Chassis Test System Specifications
- Motherboard: GIGABYTE GA-Z68X-UD4-B3
- CPU: Intel Core i7 2600K (buy from Amazon)
- Cooler: Corsair H80i GT (buy from Amazon)
- Memory: G.Skill Ripjaws F3-12800CL6D-4GBXH
- Video Card: ZOTAC GeForce GTX 970 AMP. Extreme Edition (buy from Amazon)
- Storage: SuperSpeed 128GB SSD
- Power Supply: SilverStone SST-ST85F-G (buy from Amazon)
- OS: Microsoft Windows 7 Ultimate 64-bit (buy from Amazon)
 Lian Li B4-mATX Review: a compact mATX SFF case with excellent airflow and premium features
 Ocypus Sigma F36 BK ARGB Cooling Fan Review: high airflow and unified design in one frame
 PCCooler CPS RZ820 Display Review: a flagship-level CPU air cooler with an LCD screen
 MOAIPLAY ORA PRO G1 850W ATX 3.1 PSU Review: high efficiency and 10-year warranty for $119.99
 NZXT H6 RGB+ Compact Dual-Chamber Chassis Review
 Microsoft is changing the classic File Explorer 'right-click' Properties in Windows 11
 iPhone Fold vs Galaxy Z Fold 8: Apple's first foldable could be $600 more
 MSI launches its epic $7,000 Titan 18 HX Dragon Edition Draco Epic gaming laptop
 Young Australians want esports at the Olympics, but that support drops dramatically among older generations
 Global PC shipments decline as the DRAM and supply crisis takes hold
 Reddit and other major publishers are considering blocking Google as AI Overviews continue to hurt their traffic
 Palworld's 1.0 launch pulled its concurrent player count from 58,000 to nearly a million in a matter of days
 AMD's 256-core EPYC Venice die shot has been spotted on Moscone Center banners ahead of Lisa Su's keynote
 GTA Technical Director comments on GTA 6 running at 60 FPS on consoles
 Samsung just entered Meta's dominated smart glasses market with Galaxy Glasses
 Thrustmaster T.Flight HOTAS 5 MSFS Edition Review
 SteelSeries Arctis Nova Pro Omni Wireless Headset Review - One Headset to Rule Them All
 SteelSeries Arctis Nova 7 Wireless Gen 2 Headset Review - New and Improved, But Is It Enough?
 AMD Ryzen 7 7700X3D Review - Days of Future Past
 Samsung 990 2TB SSD Review - Ninth Gen QLC at PCIe Gen4 Speeds
 ASUS ExpertBook Ultra (Panther Lake) 14" Business Laptop Review
 ASUS ROG Raikiri II Xbox Wireless Controller Review - Ready to Take Control
 MOZA FMP18 Panel Bundle Review: authentic F/A-18 Hornet cockpit controls for flight sims
 Micron 6600 ION 245.76TB Enterprise SSD Review - Best in Class Programming Speeds
 MOZA MA3F EFCM Flight Control Module Review: authentic Airbus A320 autopilot panel for simulators
 I capped Windows Update's bandwidth with Delivery Optimization, and my downloads stopped choking
 I use this decade-old free tool that finds files faster than Windows Search does
 I install and update most of my apps with this Windows command now, and I stopped downloading sketchy installers
 Hisense U6SF 65-inch MiniLED TV: High Performance Meets Leisurely Convenience
 I stopped digging through Windows menus after I set up this one folder
 Don't sell your Windows laptop until you do these things
 6 PC cleaning mistakes to avoid for safer hardware maintenance
 Phison and Intel Take Aim at Local AI's Memory Wall with aiDAPTIV
 How to Remap Keyboard Keys in Windows using Microsoft PowerToys
 7 tips to organize your Windows files for faster, easier access