Introduction and Packaging
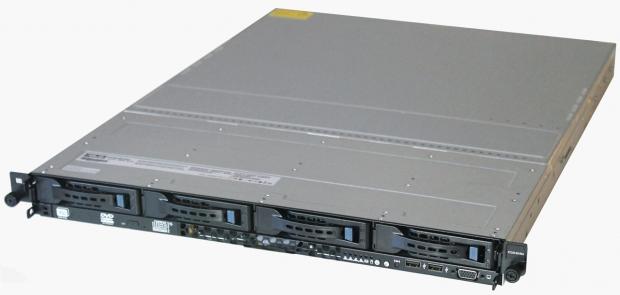
Compact 1U servers are commonplace in the data centers these days, ranging from single socket all the way to quad socket machines.
ASUS has a strong offering in the desktop and enthusiast area but they also have a string line up of servers to meet data center needs. ASUS makes servers that offer superior performance with reduced power usage and able to run cooler.
The server we are going to look at today is the ASUS RS300-E8-RS4 1U single socket server. Let us look at some of the key features that this server offers.
The RS300-E8-RS4 offers enhanced I/O expandability with 2+1 expansion slots. One PCI express 3.0 x16 slot and one PCI express 3.0 x8 slot which can power two dual full-height add-on cards. The RS300-E8-RS4 includes a PIKE expansion slot for optional upgrades to SATA/SAS storage and RAID systems.
ASUS has included exclusive Beat Thermal Chokes, used on their ROG line up of motherboards to improve power efficiency. With the unique fin designs of these chokes gives them the ability to handle greater stress and operate around 4C cooler for added stability. These chokes have increased stability by the use of highly conductive and efficient gold-treated coatings. These designs significantly increase power efficiency up to 91%.
ASUS also offers an exclusive air cooler, developed for HTA (High Ambient Temperature) environments to maintain stability in sustainable 40 degrees centigrade stress while reducing power loss.
It also includes an inside bay that can house up to two SSD's to increase performance. This server also offers tool-less rail assemblies, which snap into place. Let us get started on getting this server setup and running.
Packaging
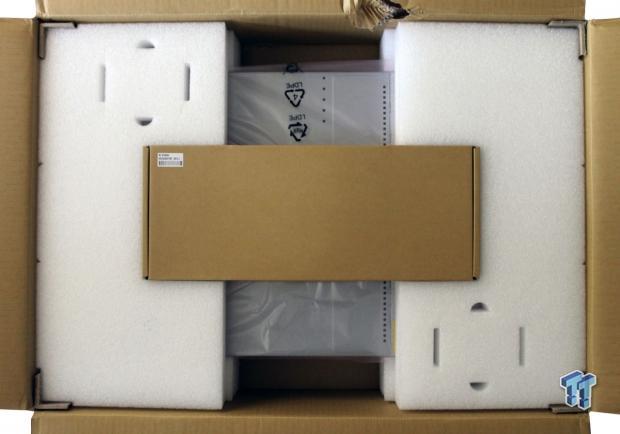
Opening the shipping box, we find the contents layout, the server comes packed with foam inserts on each end that come split into two pieces. The accessory box comes placed in the middle for easy removal.
The top center of the box took a hit by the shipping company. There is plenty of space in the shipping package to absorb this kind of damage and no harm done to any of the components inside.
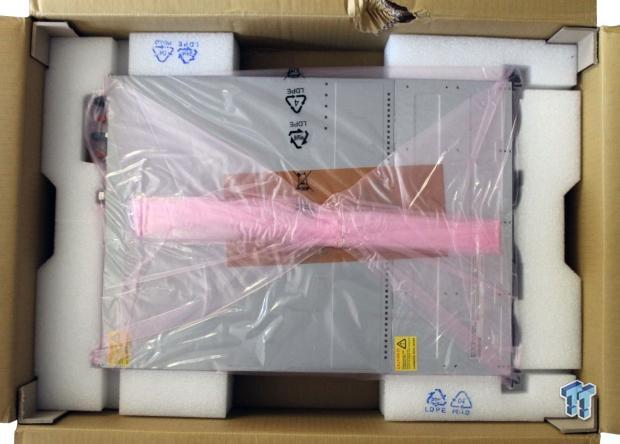
After removal of the accessory box and the top foam inserts we can see the server wrapped in plastic for protection.
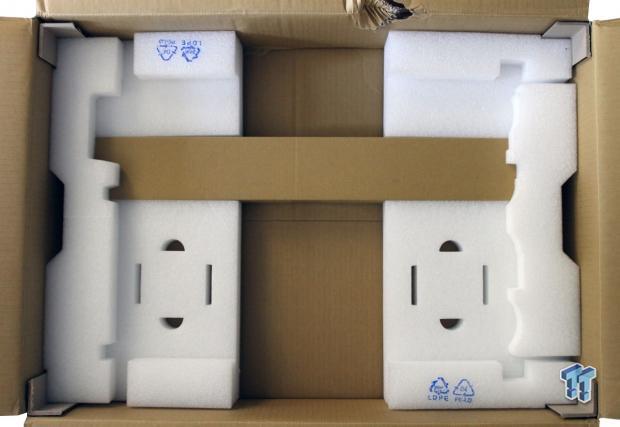
Now with the server removed we find the rail kit box located in the bottom of the shipping box.
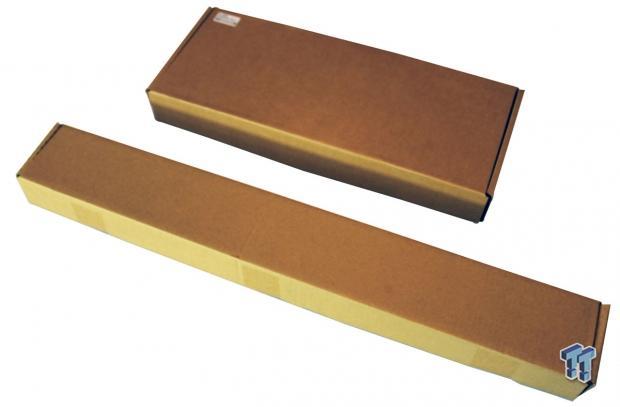
Here we have the accessory box and the rail kit.
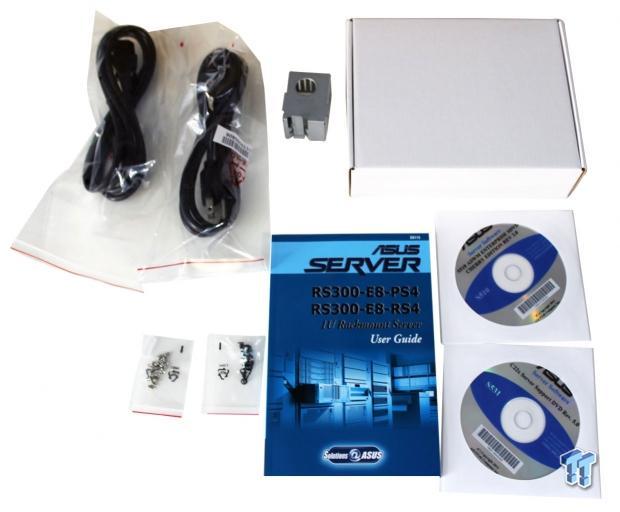
The contents inside the accessory box are as follows:
1 x RS300-E8 User's Guide
2 x Bag of Screws
2 x AC Power Cable
1 x RS300-E8 Support DVD
1 x ASWM ENTERPRISE DVD
1x Box with CPU cooler
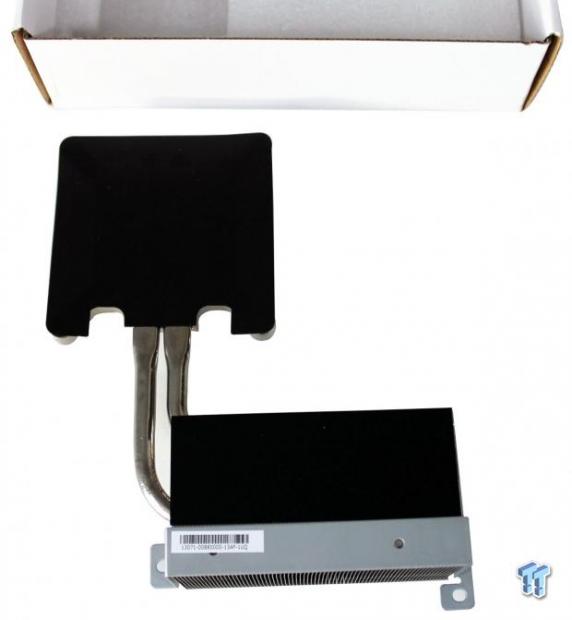
In the white box, we find the CPU cooler. It comes in one piece and uses six screws to mount inside the server.
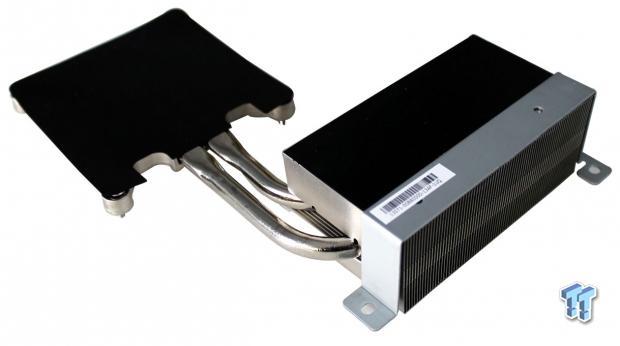
Here is another look at the CPU cooler. The design is passive and uses heat pipes to channel the heat from the CPU to a radiator that sits up next to the main server cooling fans.
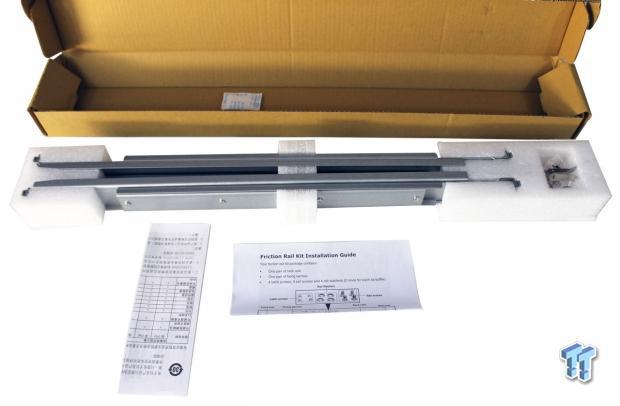
Here are the contents of the included rail kit. Two tool-less rails and a package with mounting screws and side locking spring.
Specifications, Layout and Installation
Specifications
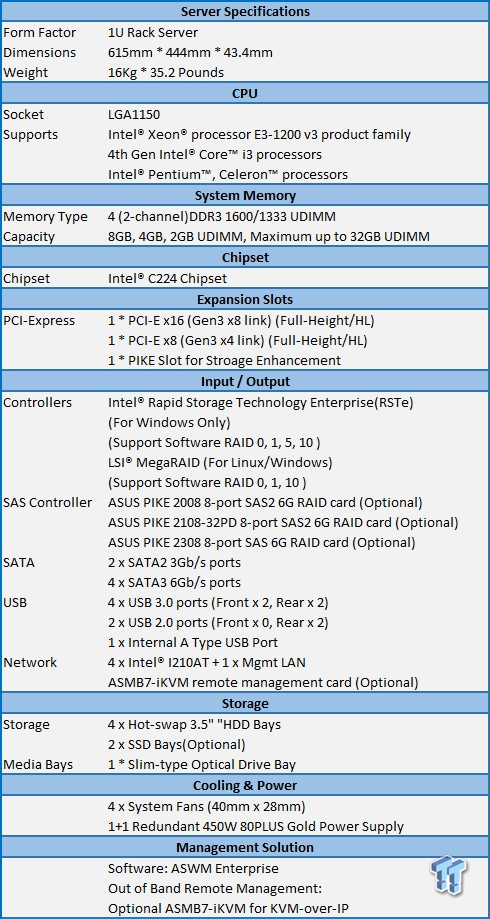
The RD340 has a wide range of storage options and plenty of LAN ports for connectivity. Optional Raid adapters can greatly increase storage performance. The RD340 can also use an impressive 192GB of RAM.
Layout
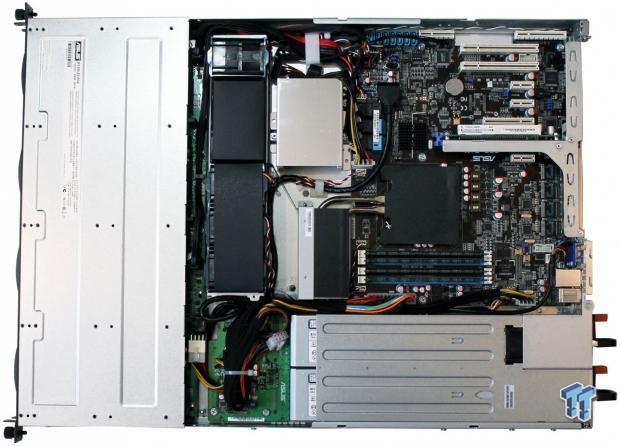
Here we are looking at the top of the RS300-E8-RS4 server. On the fan bar, you can see a single 40mm x 28mm system fan at the top that will move air into the PCIe area. Down below that you will find the other 3x 40mm x 28mm system fans, which direct air into the CPU heat pipe radiator.
The capacity of the four system fans to provide good airflow seems somewhat limiting, but after running this server on very high loads we found no heating issues and the system maintained normal operating temperatures with ease.
The silver box just to the right of the top system fan is the SSD bay if you decided to use this server with up to two SSD's installed in the area.

Looking at the front of the server, we find the four hard drive bays at the top, with a DVD drive at the lower left side of the server. The lower right side has system status LED's, USB, and power buttons.

The back of the server has plenty of airflow access, which helps to keep this server cool. At the top center and far left you can see two spring loaded thumb screws that are used to hold the lid in place. No extra screws are needed to hold the lid in place. Simply unscrew the two thumbscrews and pull back on the lid to gain access to the inside components.

Taking a closer look at the front left side of the server we can see status LED's followed by the power button, Locate Switch and Reset button. Next are two USB 3.0 ports, followed by another front VGA port.
Status LED's are: LAN4, LAN3, LAN2, LAN1, Message LED, HDD Access LED.
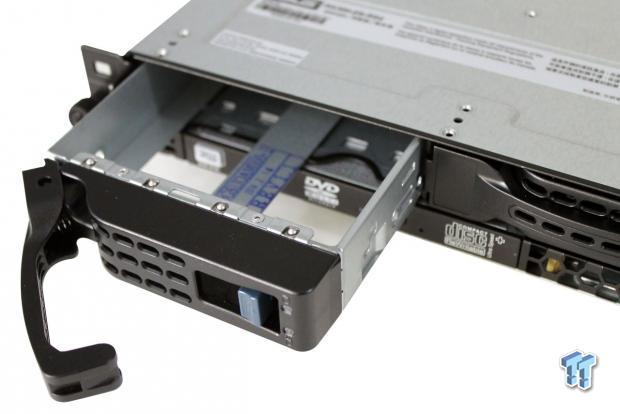
The hard drive cages unlock and slide out with ease. There is not much to these, simple cages stamped out of sheet metal, but they are strong and do not flex around. The front has 2X status lights on the right; these have a clear plastic light bar that travels the length of the cage to LEDs in the back plane.
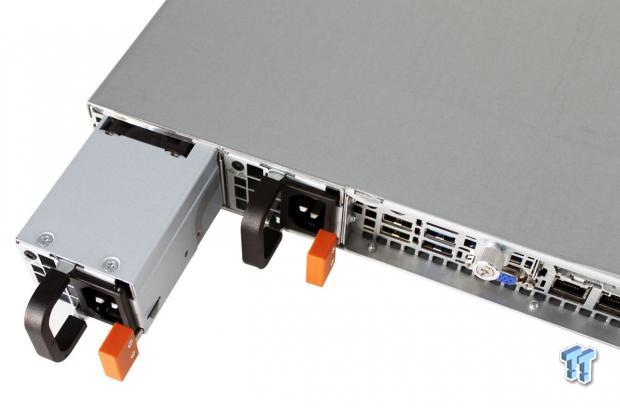
To remove each of the 450 watt redundant PSU's, push in on the orange lever and pull on the black handle to remove a PSU. Remember to unplug the PSU first.

At the back of the server I/O area, we find a PS2 keyboard/mouse connector with two USB 2.0 ports below. The next stack has the remote management LAN port with two USB 3.0 ports below. This is followed a VGA output port and four more LAN connections. Above that are the two PCIe expansion ports.
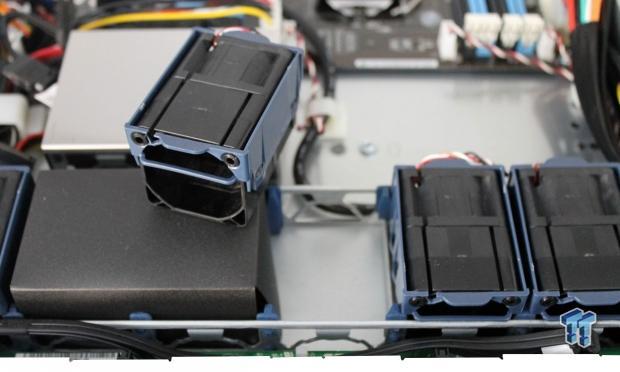
All four of the 40mm x 28mm system fans can be replaced by simply lifting up on the fan and pulling it out.
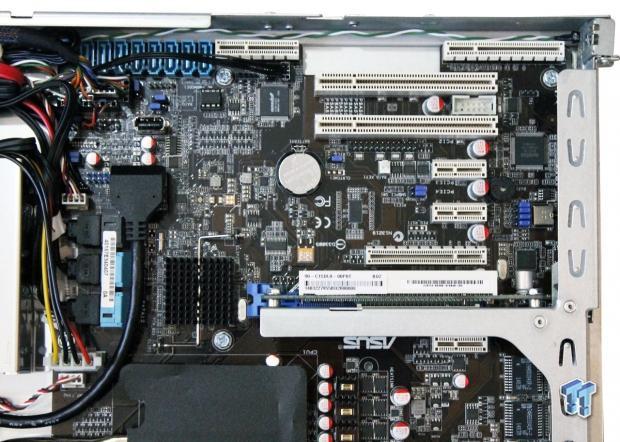
Now looking at the I/O area of the motherboard we can see at the top the PIKE slot for storage enhancement. The server can run with onboard storage controllers or for added performance, you can use optional PIKE storage cards:
- ASUS PIKE 2008 RAID card (90-S00CS0130T)
- ASUS PIKE 2008/IMR RAID card (90-S00CS0140T)
- ASUS PIKE 2108-32PD H/W RAID card (90-S00CS0150T)
Just to the left of the PIKE slot we can see 8x SATA PIKE serial attached SCSI (PSAS) connectors that support both serial attached SCSI (SAS) and serial ATA (SATA).
Down below these we see the front USB 3.0 connector and then two SATA2 (black) and four SATA3 (blue) connectors. The four SATA3 (blue) connectors connect to the front hard drives in this unit. The two SATA2 (black) connectors do not connect to anything; these connect to the SSD bay on the left.
Below the top row of blue SATA ports is an Internal A Type USB Port.
The middle bar which has a Blue PCIe slot under also has a riser card attached so a half height or full height expansion card can be installed.
Installation

Here we are getting ready to install the CPU and RAM. This is a simple installment, remove the socket-protecting cap, lift the socket retention clamp and flip back the CPU hold down clamp. Insert the CPU, flip back the hold down clamp, and lock back in place the retention lever.
To install the RAM, insert each RAM stick into its socket and lock in place with the retention clamp.
To install the CPU heat sink, place it on the CPU so that the radiator is facing towards the front of the server and screw in place.
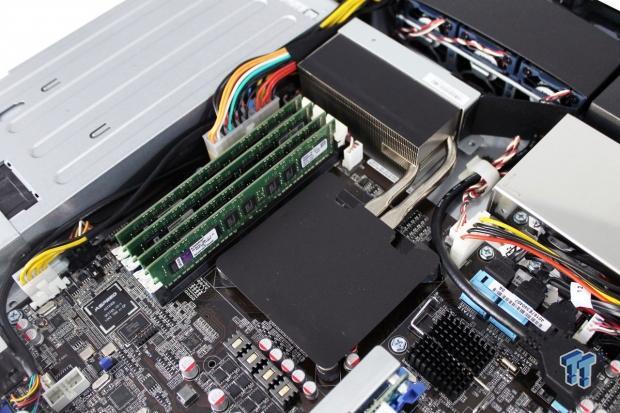
Here we have the CPU heat sink and RAM installed. You can see the three system fans at the top of the picture, these fans blow through the heat sink radiator which then follows down to the RAM and out the back of the server.
Directly behind the CPU heat sink you can see the four ASUS Beat Thermal Chokes which are also used in ASOS ROG line of motherboards - this technology helps lower operating temperatures and ensure low energy loss.
Let us move on to getting the RS300-E8-RS4 racked up and then start our testing.
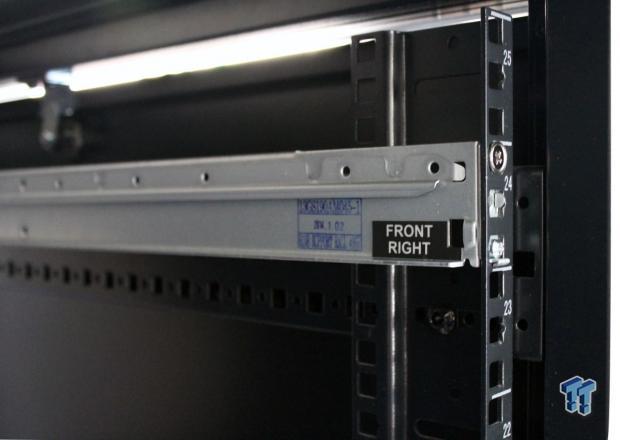
Each rail has a label for left and right side of the cabinet. As you can see in the picture, you simply insert the rail into the grooves and then screw in the retaining screw to attach the rail to the cabinet. Then repeat this step at the back of the server cabinet.
It may not be completely tool-less as you do need to screw in the retaining screw, but that is all there is to it.

The last step is to attach the fixing latch to the server case. Position the latch so the "T" is facing the front of the server and then use to the two screws to attach it to the server case.
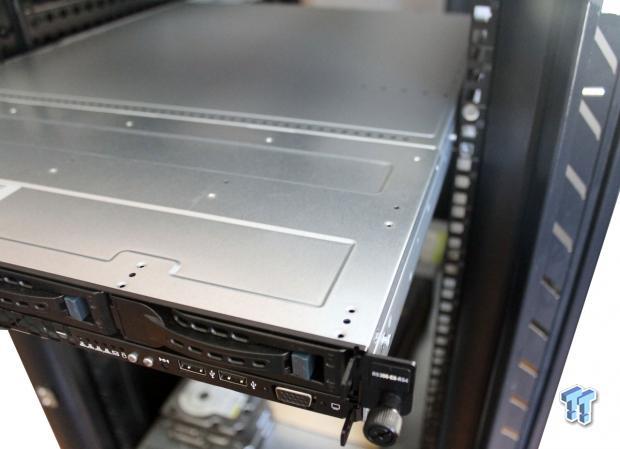
To slide the server into the rack just place it on the rail guide and push the server into the rack. You will feel the fixing latch on both sides of the server lock the server into place.
That is all there is to racking the RS300-E8-RS4 up into a cabinet. Four steps and install the server.
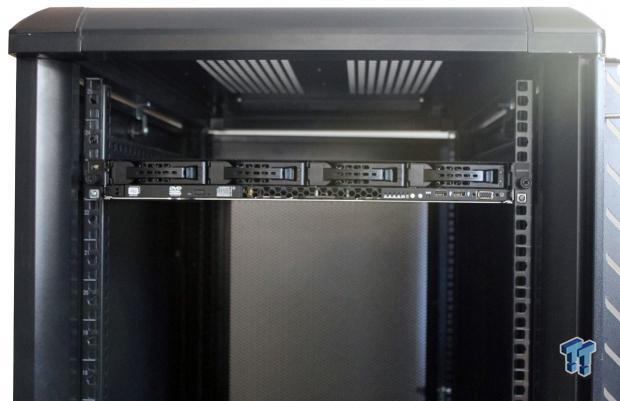
Here you can see the RS300-E8-RS4 installed into our test rack. This was about the fastest server install we have done yet. This took a total of about 10 minutes to install this server with no fuss or problem lining everything up. It just worked well.
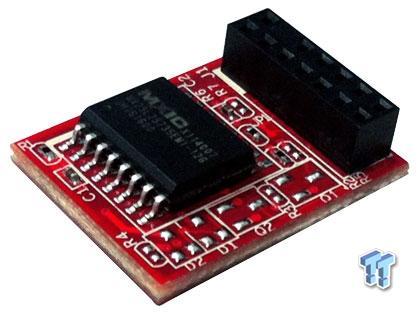
We also wanted to add that if you wish for your server to use remote management by IPMI/iKVM you will need to get Out of Band Remote Management: Optional ASMB7-iKVM for KVM-over-IP. This is an optional item.
BIOS and Software
BIOS
The BIOS for this server is typical so we will only show key BIOS screens.
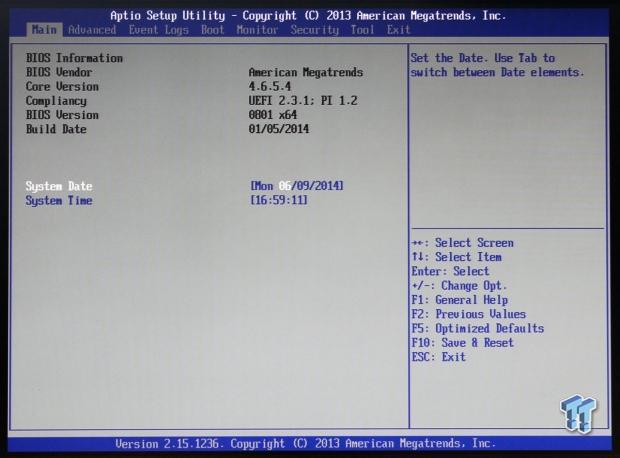
This is the main BIOS screen you see when you first enter the BIOS.
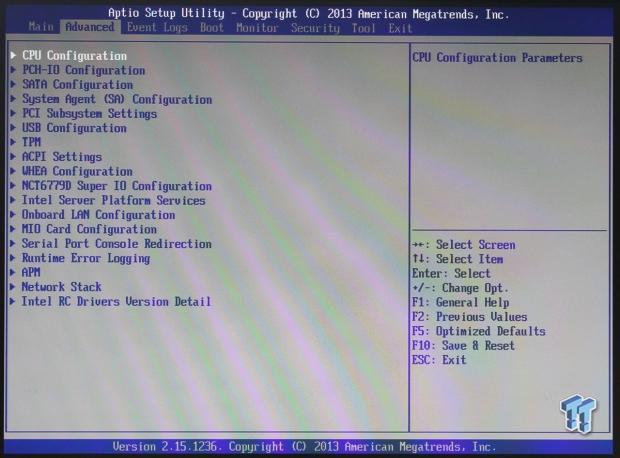
Here we see the advanced tab.
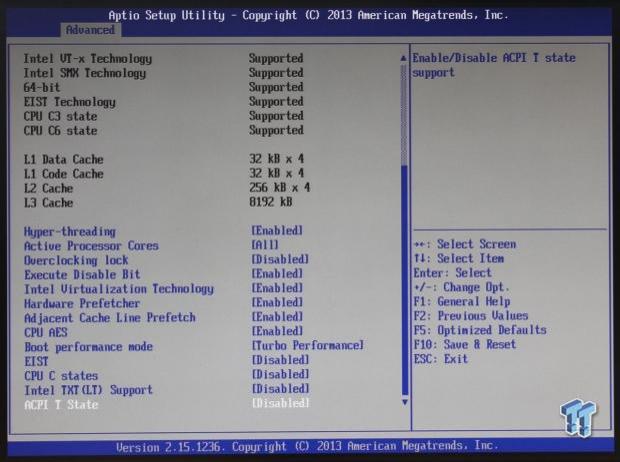
This is the advanced processor configuration tab. We set this server up so that speed step and other power features turned off so we can get the maximum performance out of the server while we test.
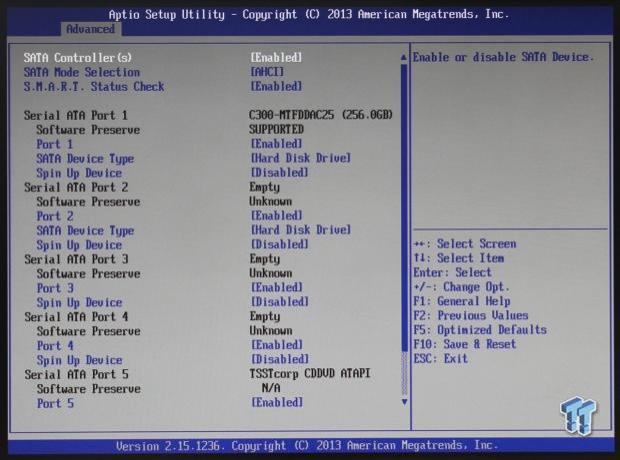
This is the SATA controller advanced tab where you can set configuration options for the SATA ports.
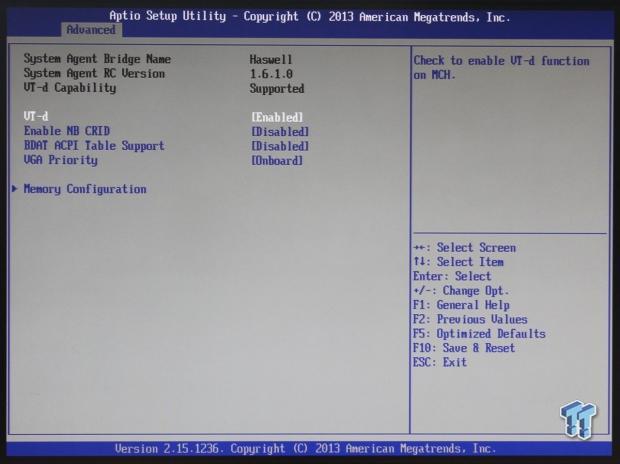
Here we are looking at the advanced system agent configuration (SA) tab and options that can be set.
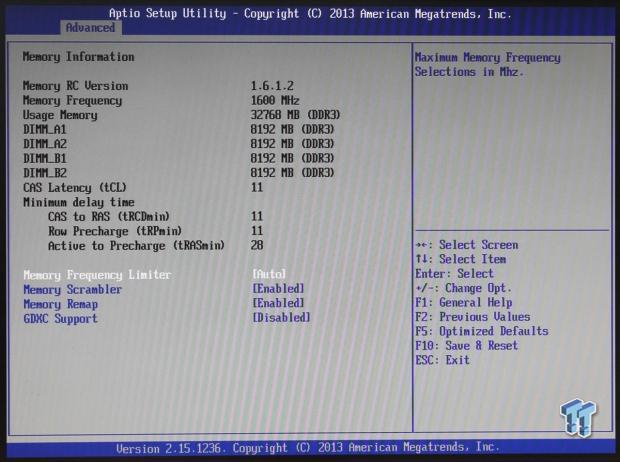
Next, we see the advanced memory menu, which shows memory information and other options.
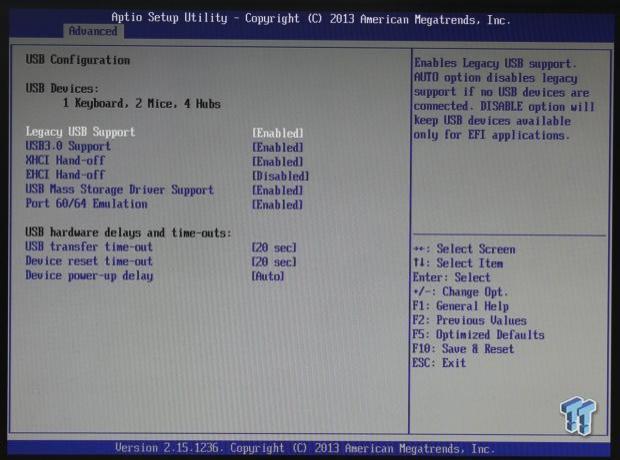
Here we see the advanced USB configuration menu and the options to change.
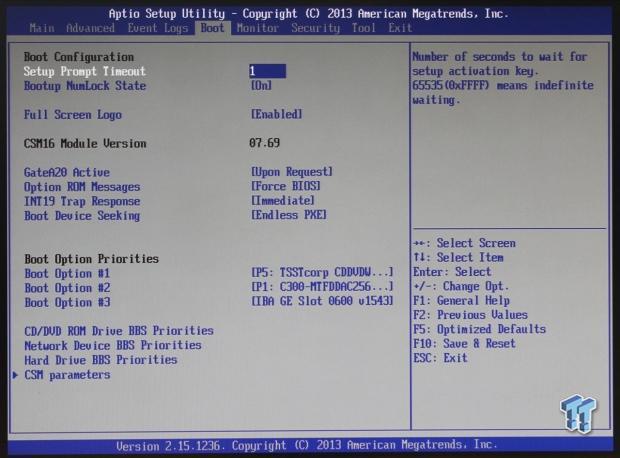
Looking at the boot options tab now and options that you can change.
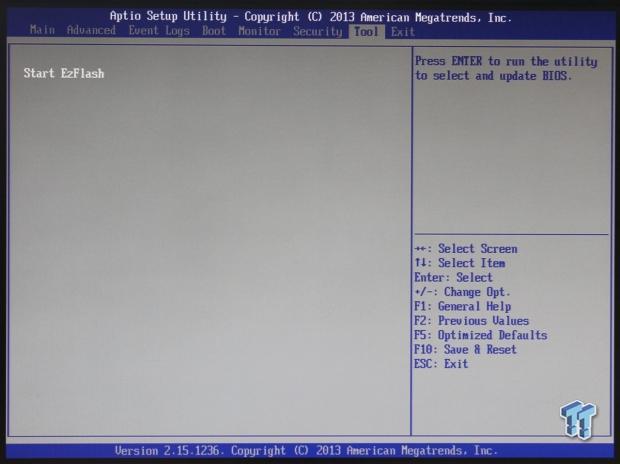
For the tools menu allows you to do a BIOS update with EzFlash.
Software
The ASUS RS300-E8-RS4 Server comes with two driver disks, one is the standard driver disk and the second is the enterprise driver disk.
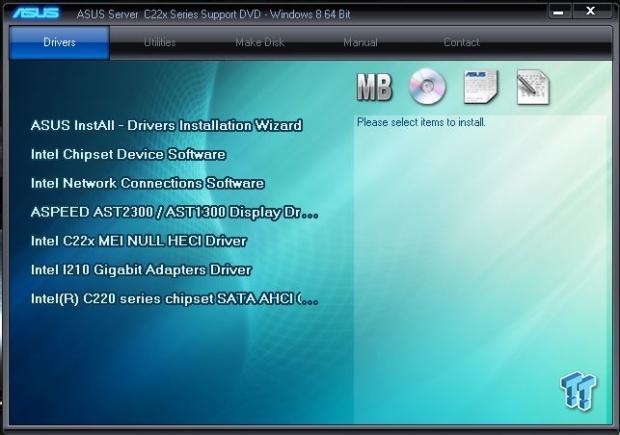
The first disk labeled C22x Server Support DVD Rev. 5.0, which includes all the drivers you will need for a server setup.
For a fresh install, the only option you really need to do is click the first one. It installs all the drivers for the system, or you can click each one of the separate drivers listed below.
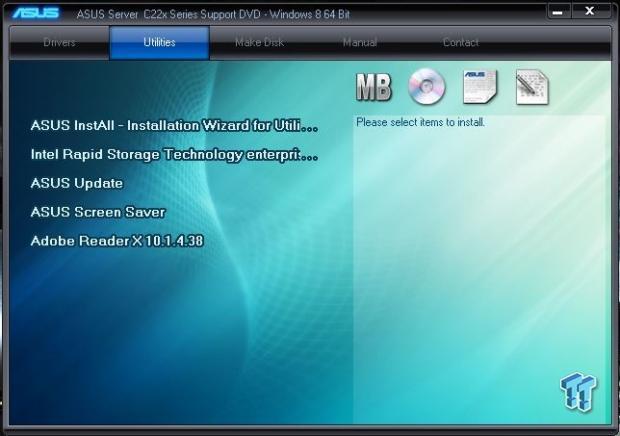
Here is the utilities listed for this disk.
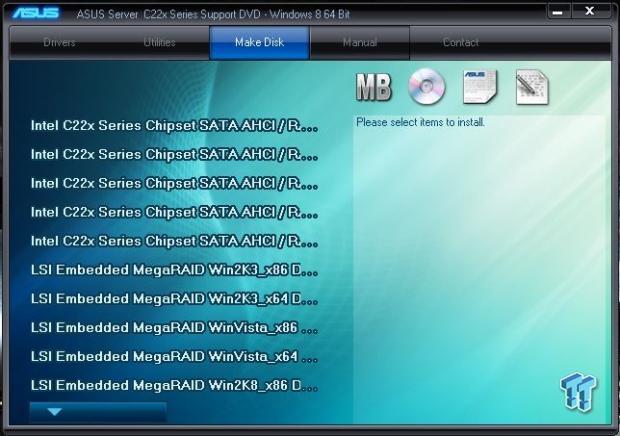
The make disk menu will create an Intel RAID Storage disk for you.
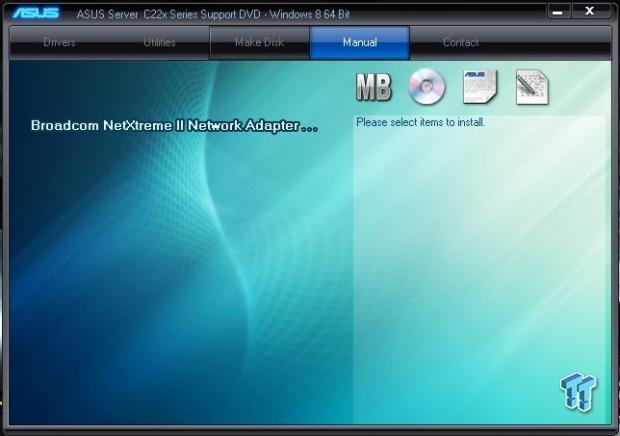
The manual tab has a pdf for the Broadcom NetXtreme II Network Adapter.
The last menu item is contact information.
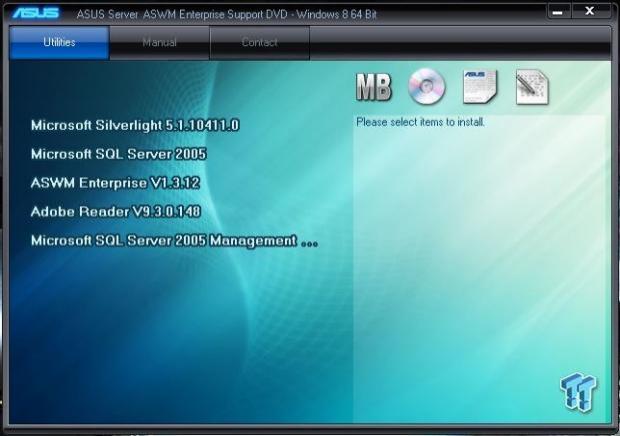
The second disk labeled S510 ASWM Enterprise SDVD Cherry Edition Rev. 2.0 and has drivers for enterprise setups.
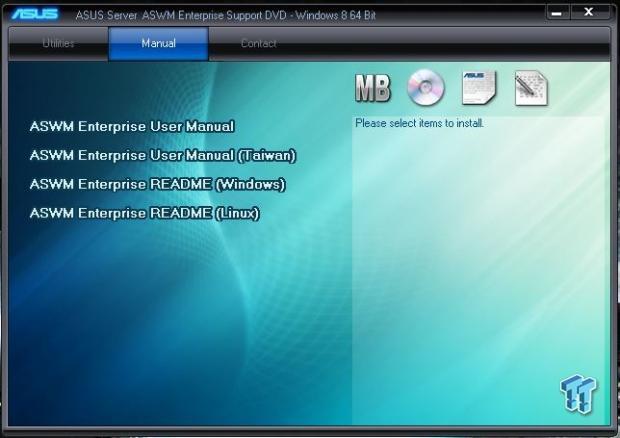
Under manuals, we find the ASWM Enterprise user manual. The contact menu has the same information that is on the first disk.
Test System Setup
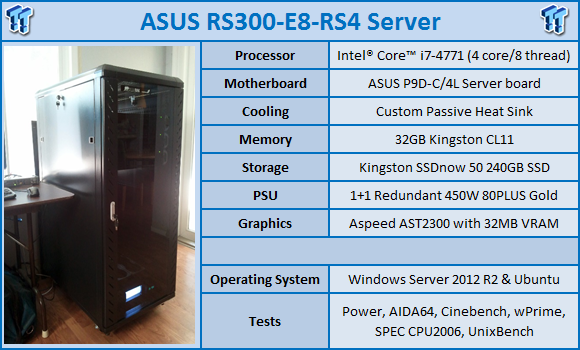
For all tests that we ran, we used optimized BIOS settings for max performance.
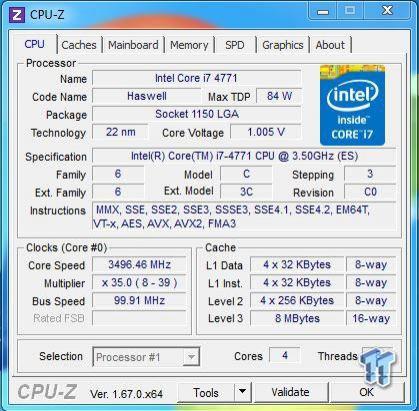
This is the CPUz screen showing the various stats of the Intel i7-4771 CPU's. As you can see, this CPU has a Max TDP of 84 watts, and core voltage of 1.005V. The Intel i7-4771 has a clock speed of 3.5GHz with a Turbo speed of 3.9GHz with 4 cores/8 threads. With the i7-4771 we come close to reach 4.0GHz on turbo so this should make for a nice fast server CPU.
The memory installed is 32GB of Kingston KVR16R11S4/8HA, CL11 1600MHz ValueRAM Server Premier Line. The memory modules are manufactured using a locked BOM (bill of materials) which are important to customers who use or build white box systems and require the brand and revision of the DRAM to always be the same.
Kingston can fully control the BOM (down to the chip die revision) as this is critical in server systems requiring maximum stability and uptime. For all tests that we ran, we used optimized BIOS settings for max performance.
System and CPU Benchmarks
Cinebench 11.5
CINEBENCH is a real-world cross platform test suite that evaluates your computer's performance capabilities. The test scenario uses all of your system's processing power to render a photorealistic 3D scene. This scene makes use of various different algorithms to stress all available processor cores. You can also run this test with a single core mode to give a single core rating.
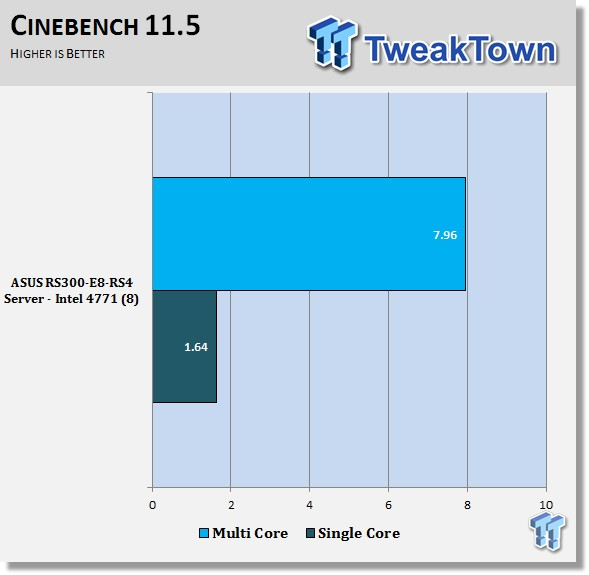
Here we get our first look at what the Intel i7-4771 CPU can do on the RS300-E8-RS4 server. Cinebench is mostly a CPU benchmark so this gives an idea on what CPU power this server has installed.
This is a good score for a single socket LGA1150 server.
Cinebench R15
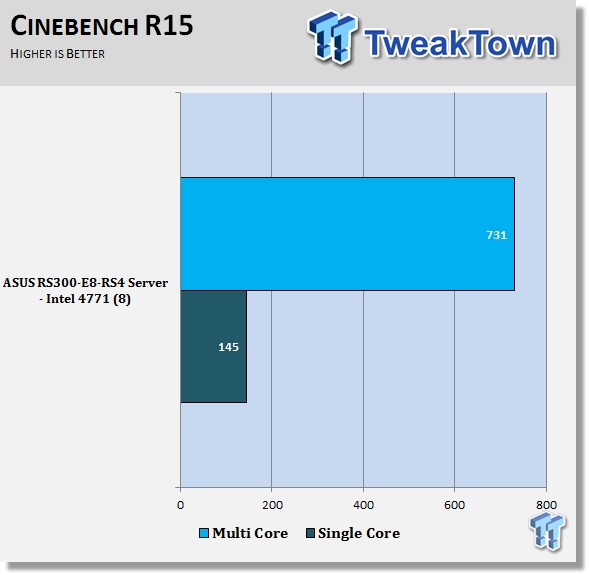
Just like in the Cinebench 11.5 results, we see a lower single threaded score and a much higher multi-threaded score.
We like the multi-threaded scores on this server; it really shows a lot of power installed into a 1U server based on a socket LGA1150 system.
wPrime
wPrime is a leading multithreaded benchmark for x86 processors that tests your processor performance. This is a great test to use to rate the system speed; it also works as a stress test to see how well the system cooling is performing.
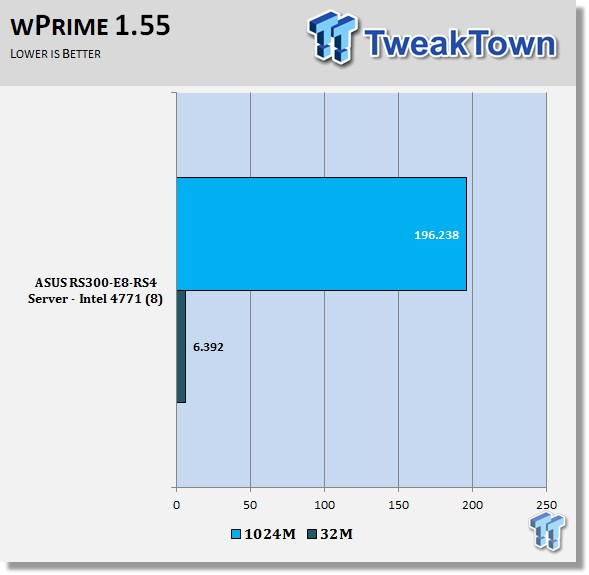
Just like in the Cinebench scores wPrime shows similar results the Intel i7-4771 CPU shows a lot of potential for this server.
Memory Benchmarks
AIDA64
AIDA64 memory bandwidth benchmarks (Memory Read, Memory Write, and Memory Copy) measure the maximum achievable memory data transfer bandwidth.
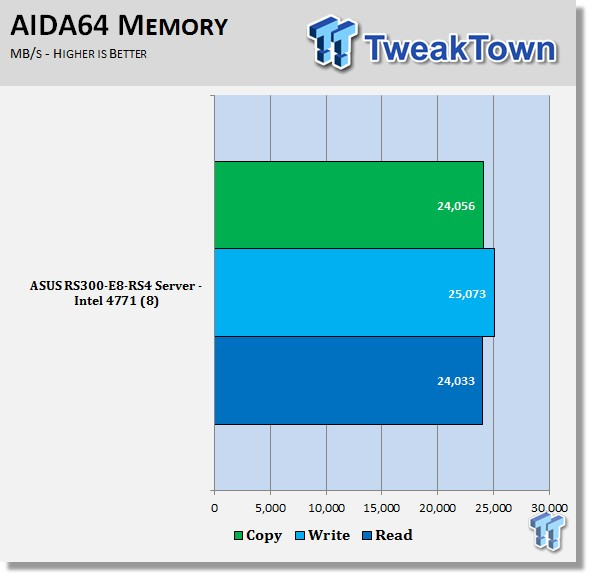
AIDA64 memory tests show the RS300-E8-RS4 using Dual-Channel memory has good memory bandwidth. To improve memory bandwidth higher speed memory sticks would help.
LinX
LinX 0.6.4 is a CPU benchmark that measures floating-point operations per second, and used to compare CPU performance; it is also a very good stress test to run.
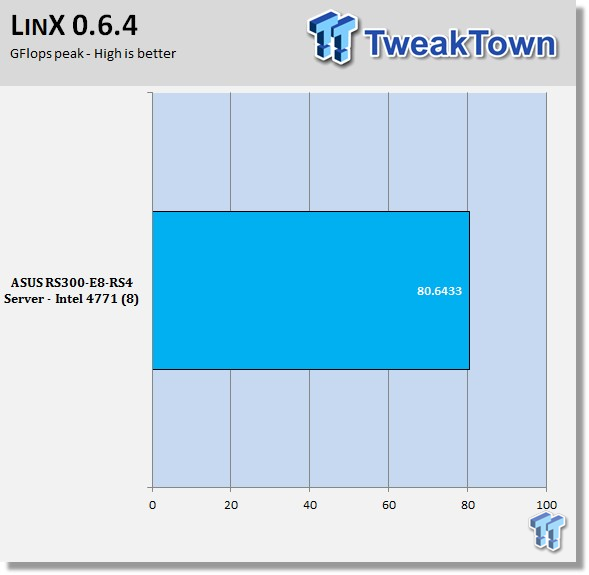
The RS300-E8-RS4 using Dual-Channel memory has good LinX results. Just like in the AIDA Memory tests, higher speed memory sticks would improve this result.
UnixBench 5.1.3 and SPEC CPU2006v1.2
UnixBench
UnixBench has been around for a long time now, and is a good general-purpose bench to test on Linux based systems.
This is a system benchmark, and it shows the performance of single threaded and multi-threaded tasks.
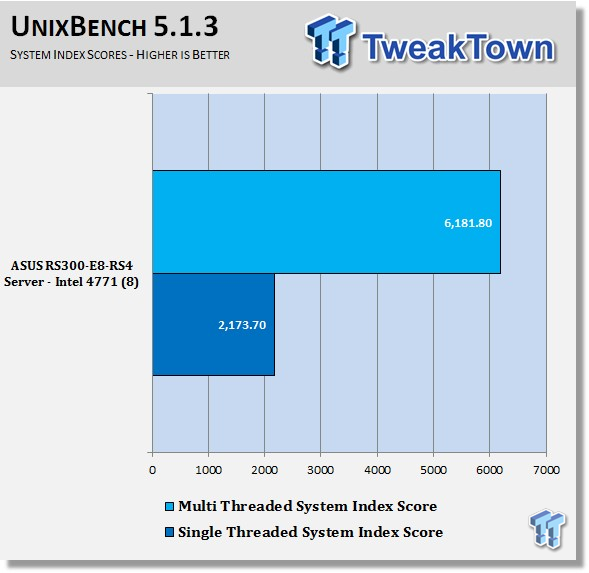
This shows the system indexes after a complete UnixBench run. Here, we get an idea of how much performance gains we get using multi-threaded applications. However, many applications use single threaded, so this number is really the base, and a higher clock speed will increase both indexes.
Now we are seeing that the Intel i7-4771 in the RS300-E8-RS4 come very close to other systems we have tested. This is starting to look very good for the RS300-E8-RS4.
SPEC CPU2006v1.2
SPEC CPU2006v1.2 measures compute intensive performance across the system using realistic benchmarks to rate real performance.
In our testing with SPEC CPU2006 we use the basic commands to run these tests.
Runspec –tune-base –config=tweaktown.cfg then int or fp
To do multi-threaded we add in –rate=40 on the RD340.
When SPEC CPU first came out these tests could take up to a week to run, but as computers become faster, our tests can take up to four days for a full run.
The user can do many thing to effect the results of CPU2006 runs, such as compiler optimizations, addons like Smartheap and different commands used in to start the tests.
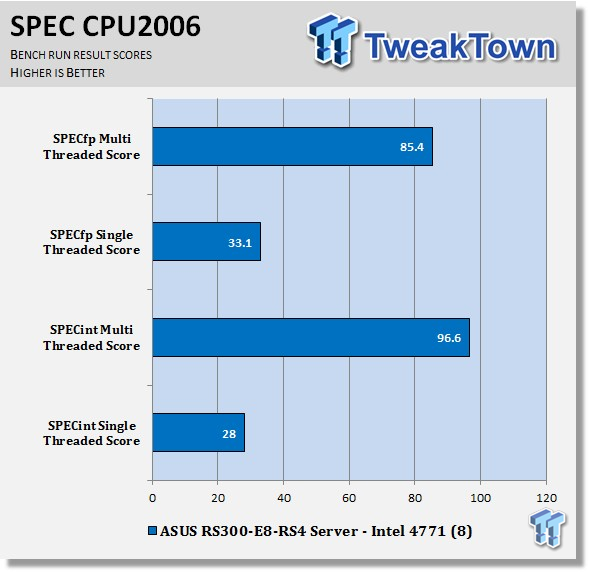
Here, you can see the SPEC scores after full runs for Integer (int) and Floating Point (fp) tests.
Single core runs show how fast (speed) a CPU can perform a given task. In the multi-core runs, we set SPEC CPU2006v1.2 to use all threads, and this is a measure of the throughput of the system.
We were impressed with the CPU power on this server; single threaded results are good with the Intel i7-4771, which makes its response time very good. It also has the ability to bounce back with multi-threaded results.
These numbers show that the RS300-E8-RS4 server has a fair amount of server power packed into a 1U system.
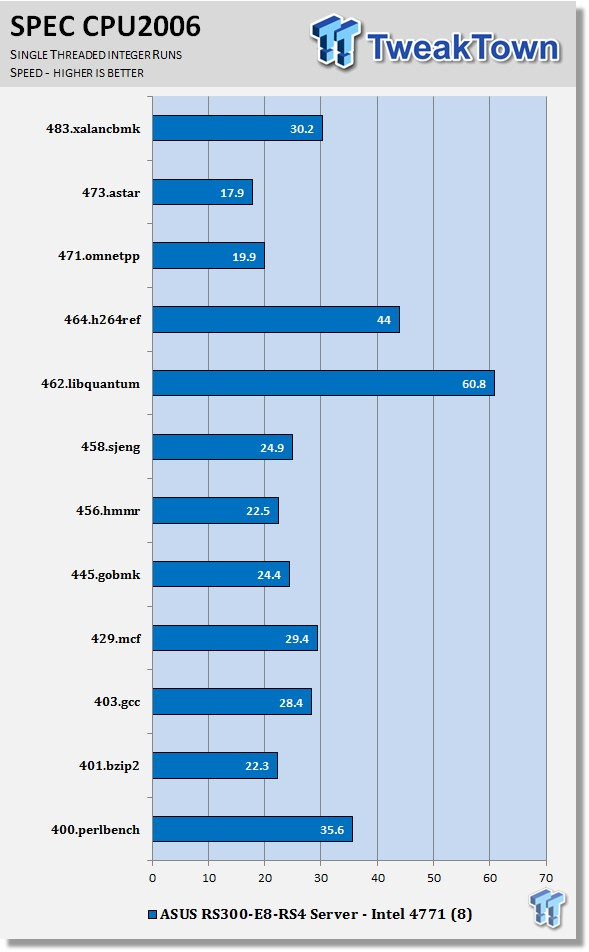
Looking at the results of single threaded integer runs, we can get an idea of speed at which the Intel i7-4771 can crunch through the different integer tests. Not all CPU's are equal here, and ones that have a higher speed will perform these tests faster. In this case, this is the stock speed of the Intel i7-4771. Naturally, using an overclocked system or CPU's with a higher stock speed will generate higher results.
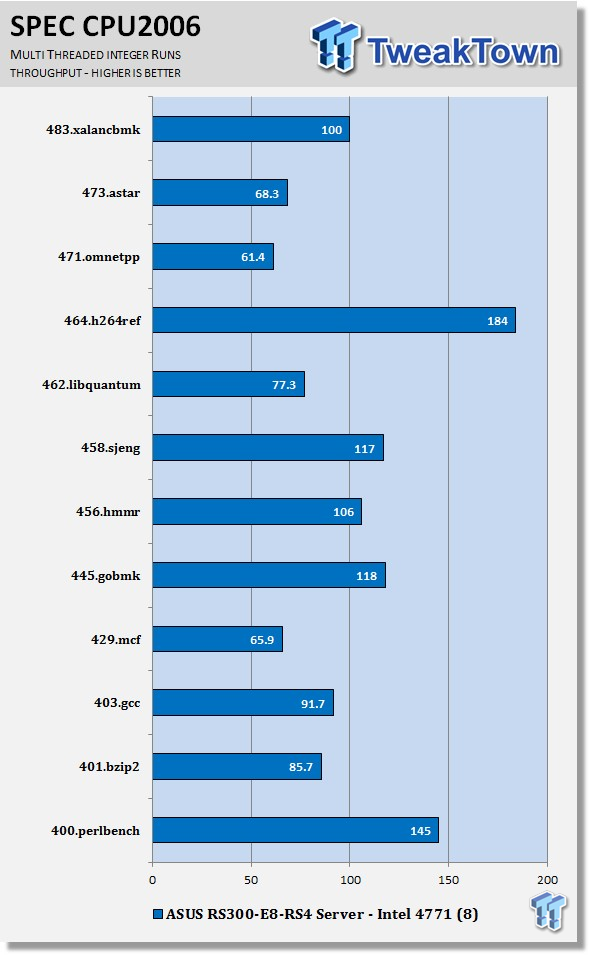
Now we run the test using all eight threads of the Intel i7-4771, to measure the throughput of the system. In this test, more cores/threads will have a greater effect on the outcome.
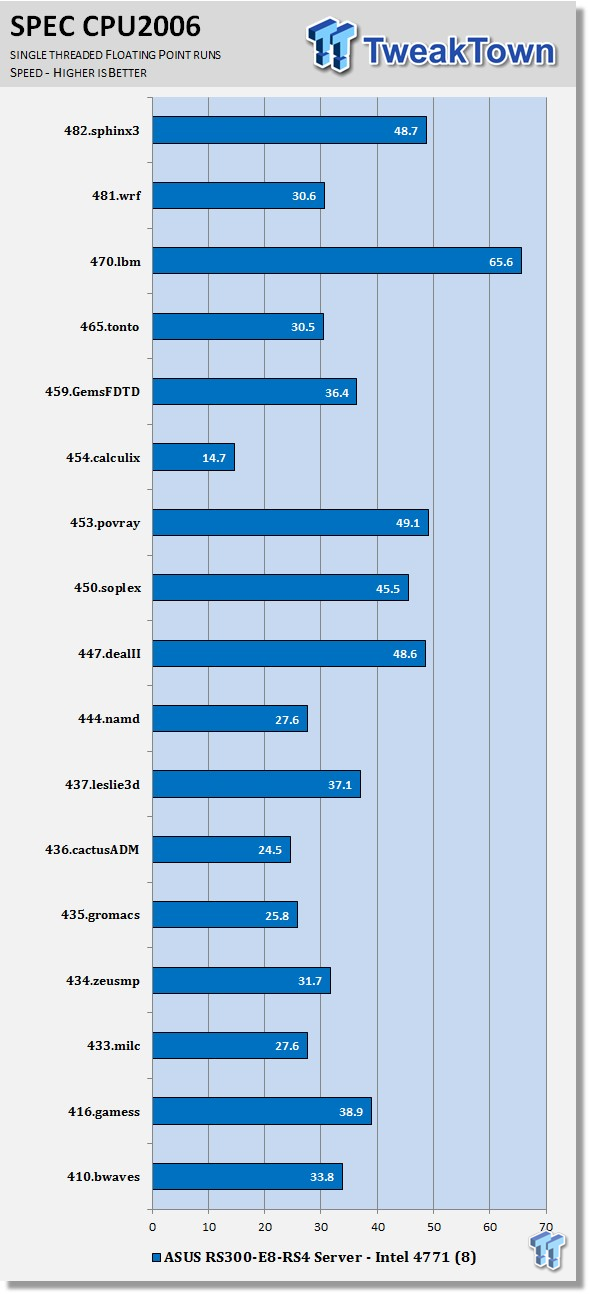
Just like the integer tests, we now run the floating-point tests in single (speed) mode.
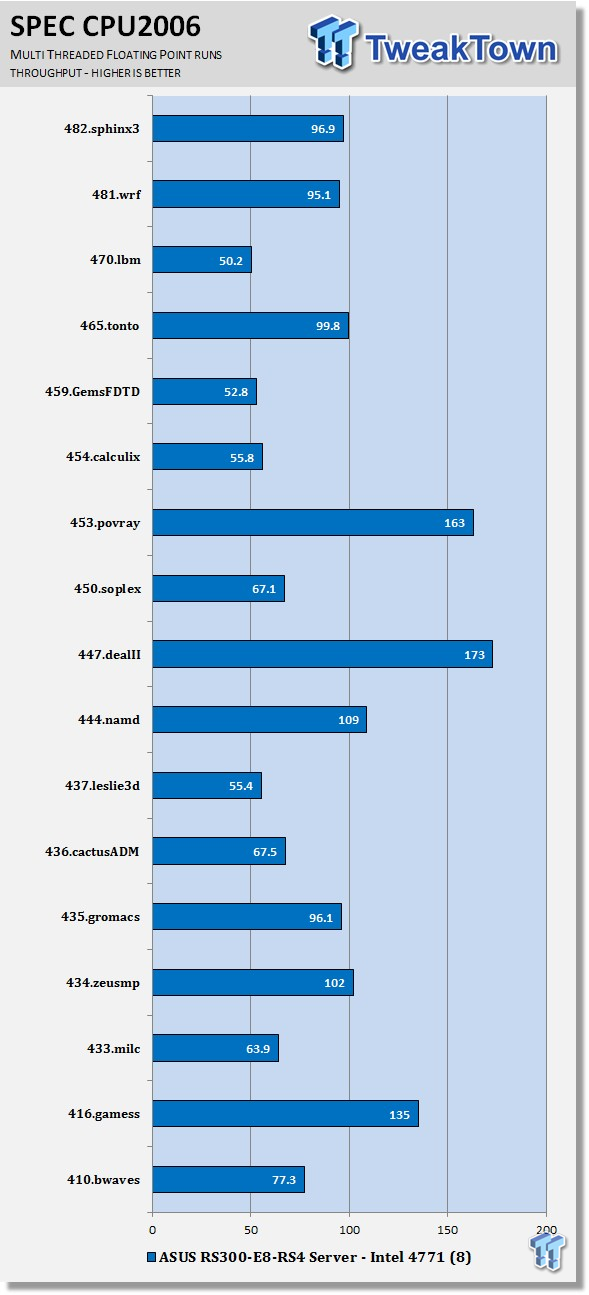
Here, we see the results of the multi-threaded floating-point run that uses all eight threads of the Intel i7-4771 CPU. Like the multi-threaded integer test, more cores/threads will have a greater impact on the test.
Power Consumption and Final Thoughts
Power Consumption
We have upgraded our power testing equipment and now use a Yokogawa WT310 power meter for testing. The Yokogawa WT310 feeds its data through a USB cable to another machine where we can capture the test results.
To test total system power use, we used AIDA64 Stability test to load the CPU, and then recorded the results. We also now add in the power use for a server from off state to hitting the power button to turn it on and take it all the way to the desktop. This gives us data on power consumption during the boot up process.
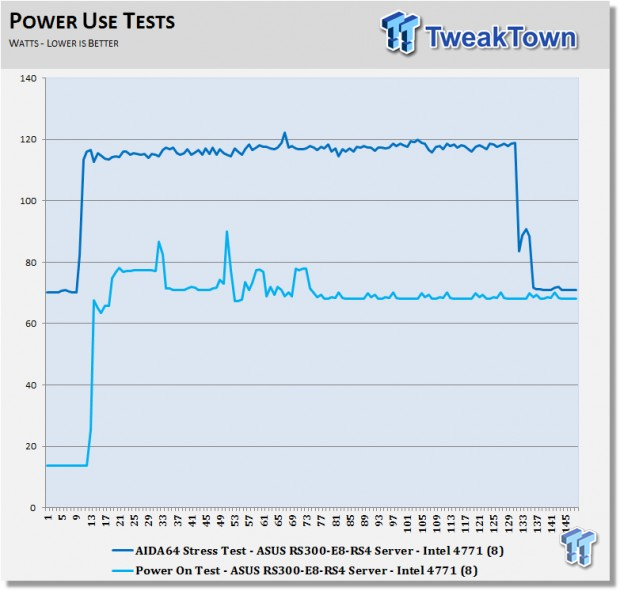
Single socket systems can use very little power, the RS300-E8-RS4 uses very little, in fact just a tad more than a 100watt light bulb at full load. At idle we see about 70watts used while sitting on the desktop.
Our power on boot test also shows it at about 18watts with the system turned off and then settles down to about 70watts after a full boot.
These low power use numbers also have an effect of heat output of the system. Under full loads, the back of the server has a minor heat output.
These numbers scale up very well when you consider a rack of these and the costs to run.
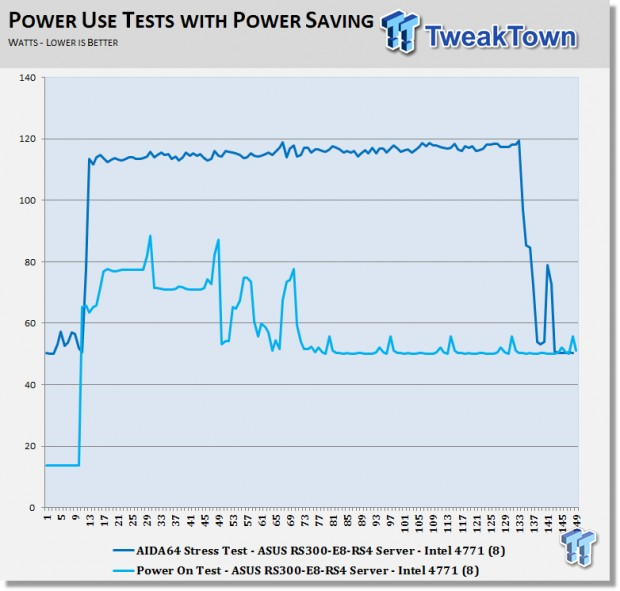
We wanted to test what the low power saving states would be like in these tests. We set the BIOS to default settings, this has all the power saving features turned on, and we reran our tests.
This had a big effect of power usage. The normal power use now on the desktop has dropped from ~70watts down to ~50watts.
The fully loaded power use remained the same but after that was finished power use drops down to ~50watts.
Turning these features on in the BIOS can result in large power savings depend on how loaded the server is.
Final Thoughts
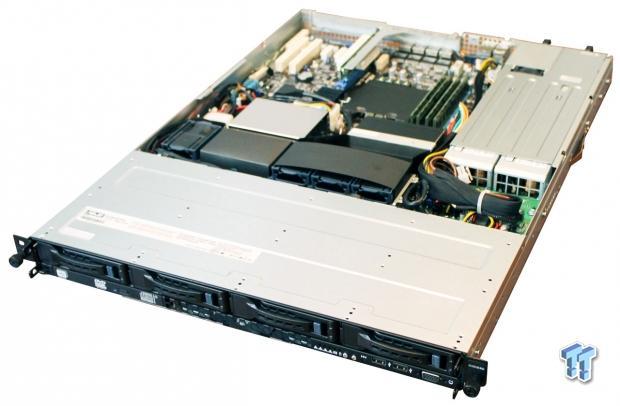
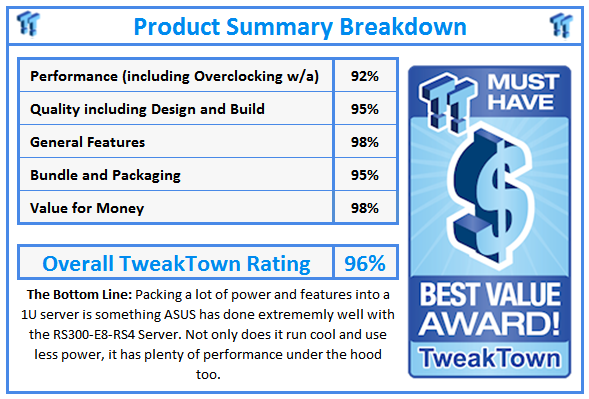
ASUS, well known for making top of the line desktop and enthusiast motherboards and they have used this experience to create the RS300-E8-RS4 Server.
The RS300-E8-RS4 server offers up a great package that performs well and has low power use. Features that ASUS includes are exclusive Beat thermal chokes used in the ROG line of motherboards and the included ASUS CPU air cooler aid better power efficiency and stability.
There are also plenty of storage options to pick from, built-in LSI RAID storage system gets you up and running without any extra costs. The ability to add in a PIKE card to increase storage performance is also a plus if that is needed.
We liked the included SSD bay, which you can use to add two SSD's and RAID them together and install your OS on this for greater system performance or other uses. The front of the server also has a VGA port which aids in system maintenance.
We also found that this server ran very cool and had low heat exhaust out the back. Data centers have high cooling costs and everything helps to alleviate the heat loads. Low power use was also a big plus, which lower running costs.
Installing the server into a rack was also painless with ASUS tool-less rail design. This was about the easiest rails we have installed and only took a few minutes to rack up and get a server installed into a cabinet.
We did find that the wire management inside the server was not as clean as we would like, but nothing really blocked airflow. Overall, the ASUS RS300-E8-RS4 Server performed very well and was simple to setup and use.

 United
States: Find other tech and computer products like this
over at
  United
Kingdom: Find other tech and computer products like this
over at
  Australia:
Find other tech and computer products like this over at
  Canada:
Find other tech and computer products like this over at
  Deutschland:
Finde andere Technik- und Computerprodukte wie dieses auf