Introduction and Package
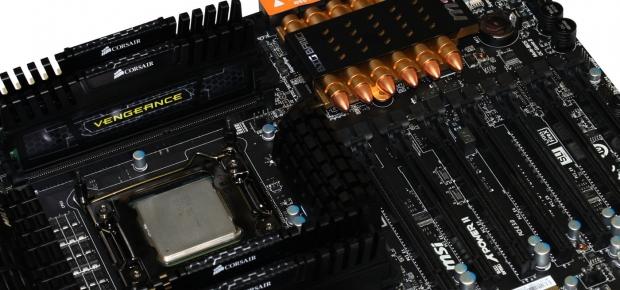
It's been a while since we've looked at a motherboard and since that one it was a while before then we looked at one as well. Like how we went on this massive run of X79 motherboards towards the end of last year, this year has been dominated by video cards.
While the motherboard side of things has been a bit quieter recently, a couple of good looking ones have arrived that we need to get stuck into. While it looks like the video card market isn't going to slow down any time soon, the motherboard market on the other hand is about to go into overdrive as we see the launch of the Intel Z77 Express Ivy Bridge platform soon.
The most recent board we're looking at today comes from MSI and is the latest to be part of the Big Bang series. The Intel X79 Express based Big Bang XPower II looks the part, but how does it go when we get past its looks?
Well, that's exactly what we're going to find out today, but there's a few things we need to do with the first being checking out the massive package that MSI have put together. Once we've done that we'll take a closer look at the board to see what's going on with it before moving into the BIOS.
From there we'll take a quick look at the overclocking side of things before we get into the performance side to see just how the MSI Big Bang XPower II performs. As we just said, though, the first thing we need to do is check out the package that MSI has put together.
Package
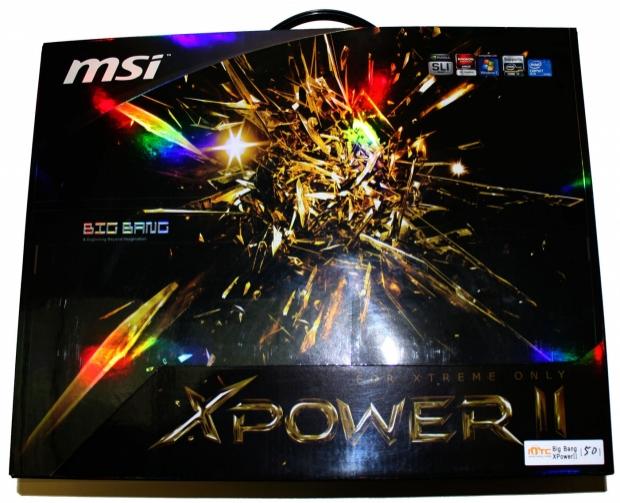
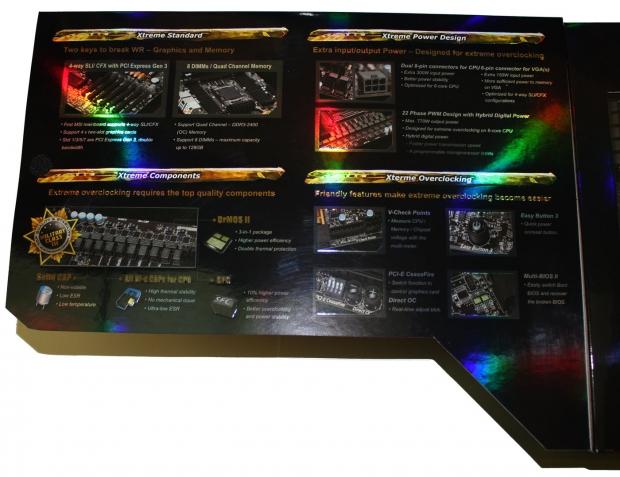
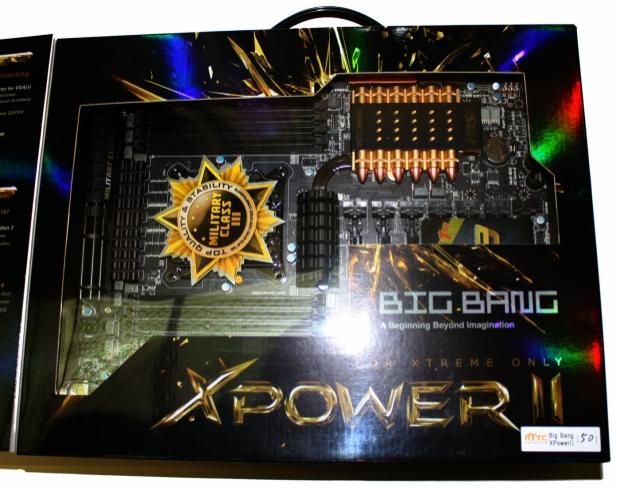
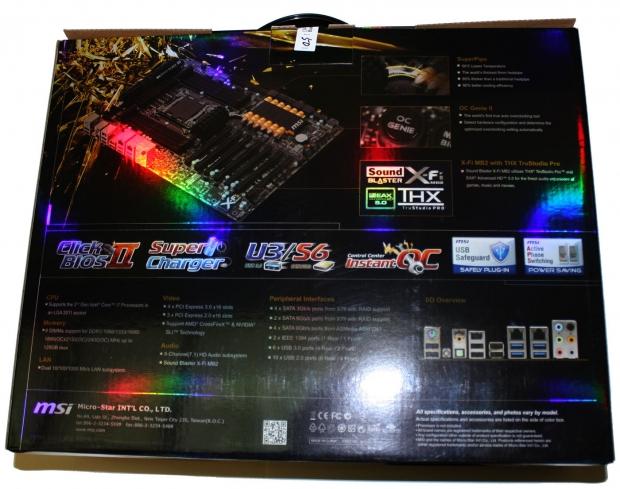
In typical high-end motherboard fashion from MSI we've got a pretty big package going on and you can see we get a lot of detail in regards to some of the main features including a flap that opens up and gives us a closer look at the board itself.
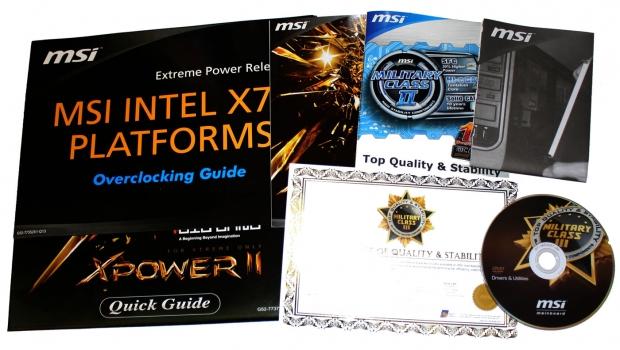
On the paperwork side of things we've got an absolute heap including manuals and guides alongside the Certificate of Quality & Stability in regards to the Military Class III feature. Along with all that we've also got the standard driver CD.
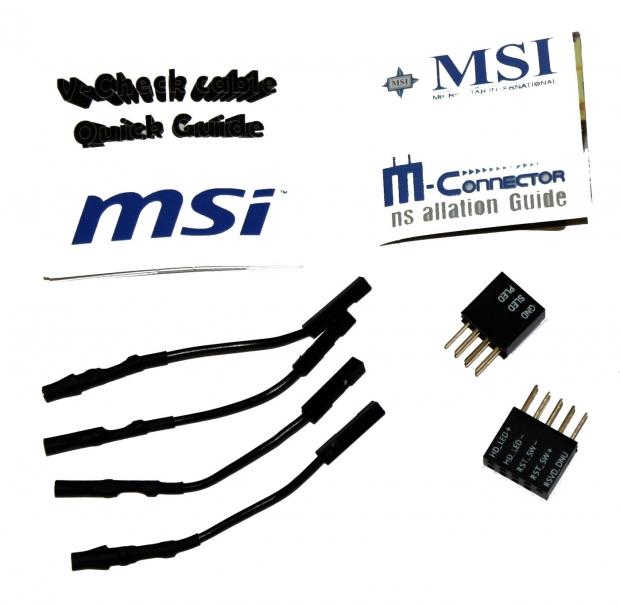
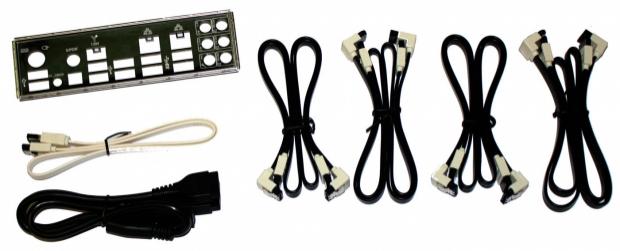
On the connector side of things we've got voltage cables that let us check the voltage of certain areas via the V Check points along with M Connectors. On the SATA cable front we've got a total of eight as well as one eSATA cable, external power for a hard drive and I/O back plate.
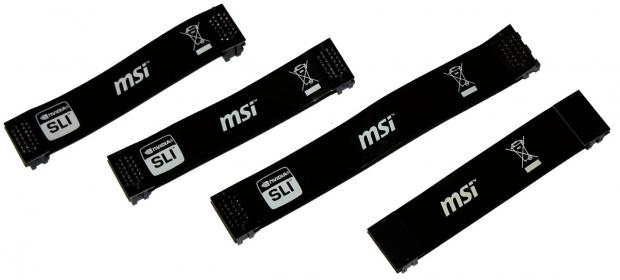
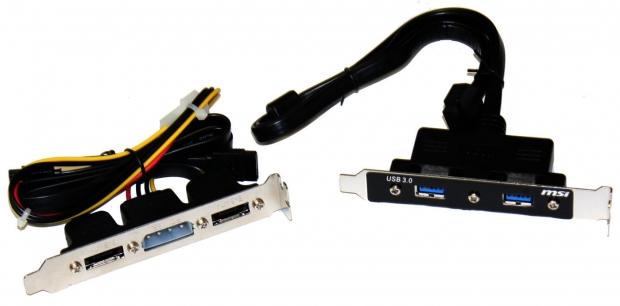
Alongside all that we've got a bunch of SLI connectors in the bundle and two add-ons which include two USB 3.0 ports along with another add-on including a pair of eSATA ports.
The Motherboard
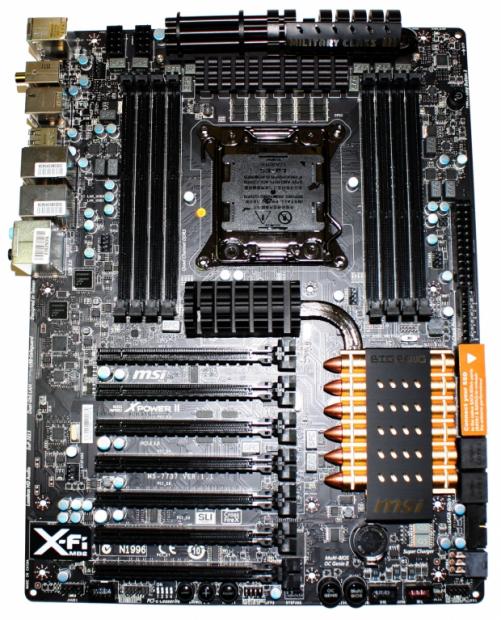
Looking dead on to the motherboard the first thing you notice is almost the exclusive all black color scheme that MSI has got going on, apart from the gold on the ammo clip towards the bottom right the black on black look is awesome. We've seen ASRock use it recently and the slight bit of gold on offer from MSI make for a really awesome color scheme.
The whole ammo clip and mini gun heatsink up the top also grows on you pretty quickly so you shouldn't find yourself too bothered by them. They just add to the whole experience that MSI is going for here.
One of the biggest things to note about the MSI Big Bang XPower II is the form factor of the board. This is an XL-ATX motherboard, so before you buy make sure that your current case supports the larger sized boards or the case you're going to buy supports it. There would be nothing worse than trying to install the board to then discover that it doesn't fit in your case.
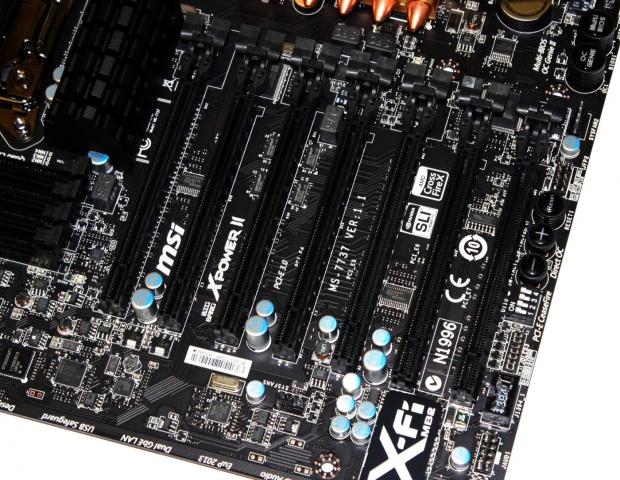
Moving in closer we can see that MSI has gone for exclusively a PCI Express x16 setup with a total of seven PCI Express x16 slots. This is a setup that is designed for people who want a serious video card setup. This configuration allows for four dual slot cards to be run in Quad SLI or CrossFireX, depending on your video card of choice.

Running across the bottom of the board we've got a lot of the normal culprits present with the firewire and USB headers. Some of the stand out options here, though, includes the toggle switches that allow you to disable PCI Express ports, which help you figure out which card is causing issues in the event of larger setups. This prevents you from having to remove cards in and out of your system.
We've also got the DirectOC buttons which well, give you the ability to overclock via a push of these buttons. Along with that we've also got a reset button, OC Genie button and finally a larger button that lets us swap between the Multiple BIOSs installed. Also next to the battery we can see a LED debug reader that makes figuring out any posting issues easier.
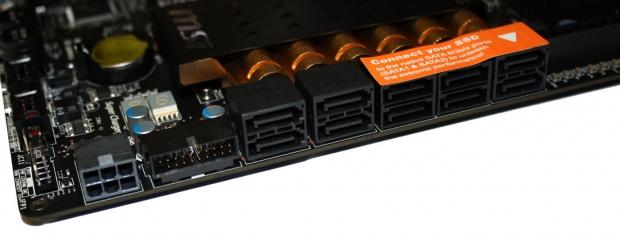
Turning the corner you can see on the far left we've got a 6-pin power connector which is used for those who are opting for larger video card setups, especially those going down the path of three or four cards. Next to that we've got a USB 3.0 header and a total of 10 SATA ports.
As for the SATA port setup we've got two SATA III ports running off the Intel X79 chip along with four SATA II ports running off the same chipset along with a further four SATA III ports that run off the ASMedia 1061 chip. As the sticker suggests, if you're only running one or two SATA III drives you'll want to use the furthest right ports that are the SATA III ports that run of the Intel X79 chipset.
The Motherboard Continued
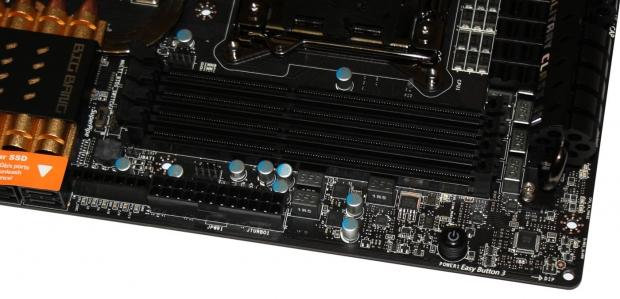
Continuing to move around the motherboard we come up to the top half and on the far left next to our SATA ports you can see the V Check points which are used with the included cables to check voltages in certain areas on the board. Next to that we've got the main 24-pin ATX power connector and closer to the top we've got the power button.
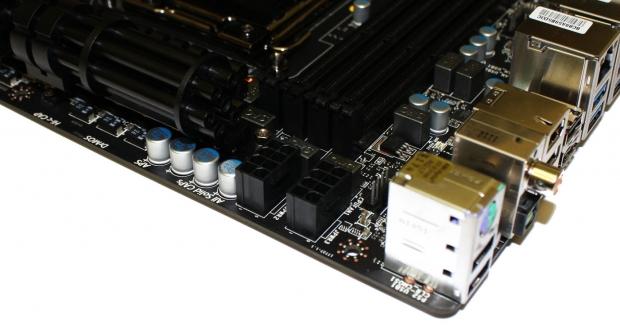
Following the trend of added power connectors you can see in the top corner we've got two 8-pin CPU power connectors. For those who are using only one or two video cards, the extra 6-pin power connector won't be needed. Outside of extreme overclocking, you're not going to have a big need for the use of the second CPU connector.
Also here we get a better look at the Gatling gun heatsink that MSI have implemented. We haven't been sold on the whole gun theme that we saw GIGABYTE start to use a while ago and we continue to not be all that sold on it now. At least the fact it's black means it blends in with the board and it doesn't stand out like a sore thumb.

Moving back a bit we can again see the Gatling gun heatsink and really it doesn't look too bad amongst the black color scheme. We also get a look at some of the other heatsinks that are present, the eight DDR3 DIMM slots supporting up to 128GB of 2400MHz DDR RAM via overclocking and finally a look at the CPU socket which is pretty clean looking.
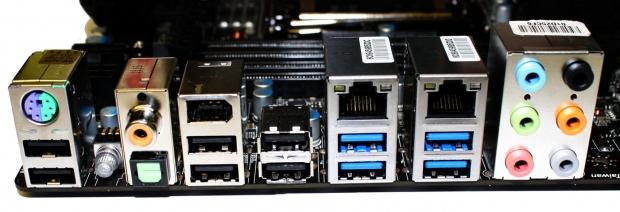
Finally we finish off with the I/O side of things and starting from the left we've got a combo PS2 port and two USB 2.0 ports. Moving along we've got a clear CMOS button along with a coaxial and optical audio out port running off the Realtek ALC892 HD codec.
Continuing to move over we've got four more USB 2.0 ports and a Firewire one running off the VIA VT6315N chip. The next batch of connectors includes four USB 3.0 ports running off the NEC D720200 chip and two Gigabit ports running of the Intel 82579V and 82574L controllers. Finally we finish up with six auxiliary connectors that run off the same Realtek HD codec.
BIOS
Moving away from the board itself and into the BIOS you can see a fairly familiar setup thanks to the Click BIOS II integration which we've became quite a fan off. It's been a lot nicer to use than the original Click BIOS we saw introduced last year.
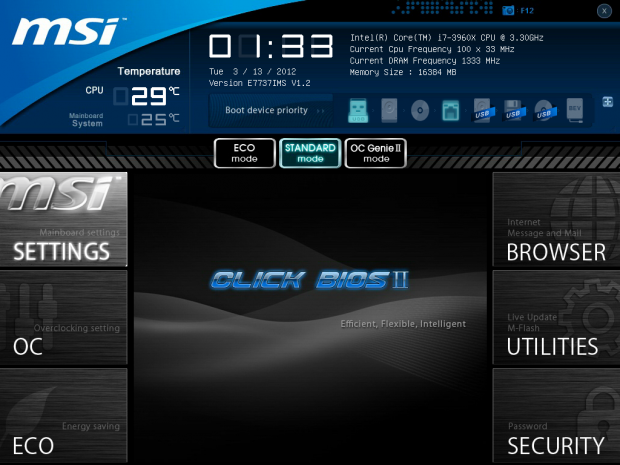
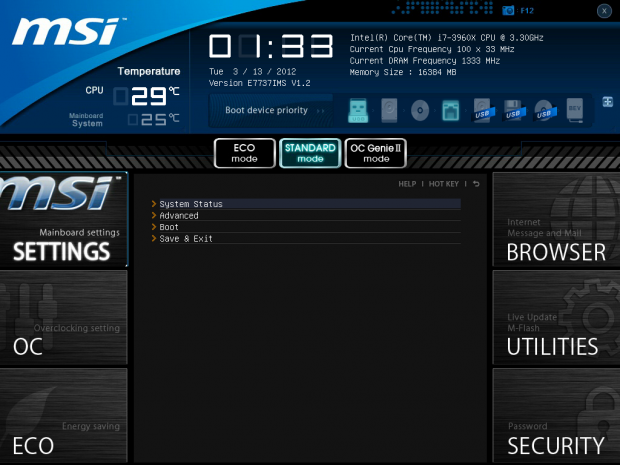
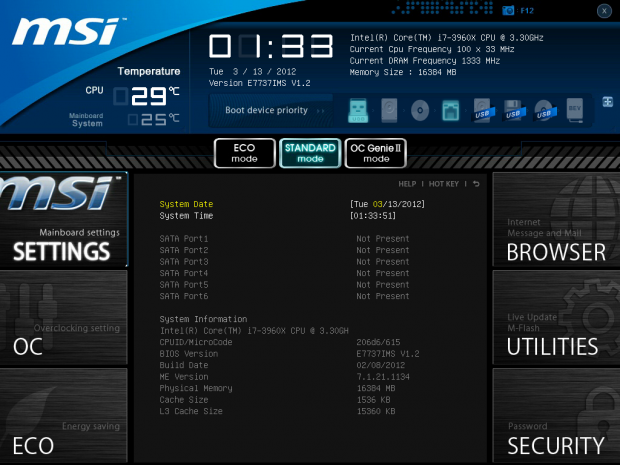
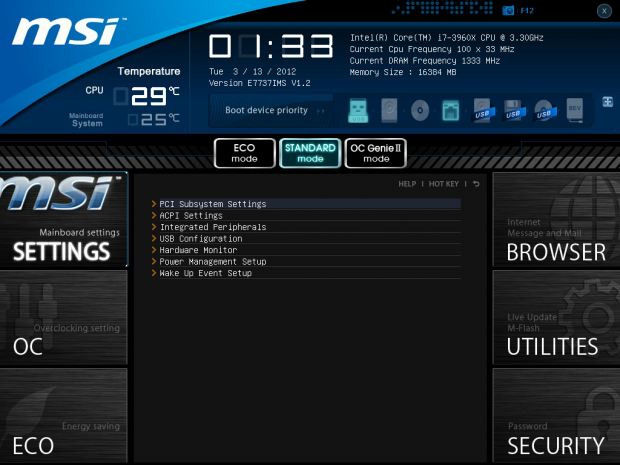
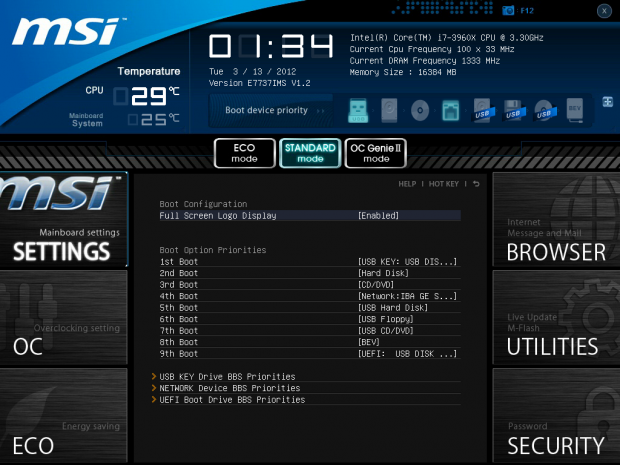
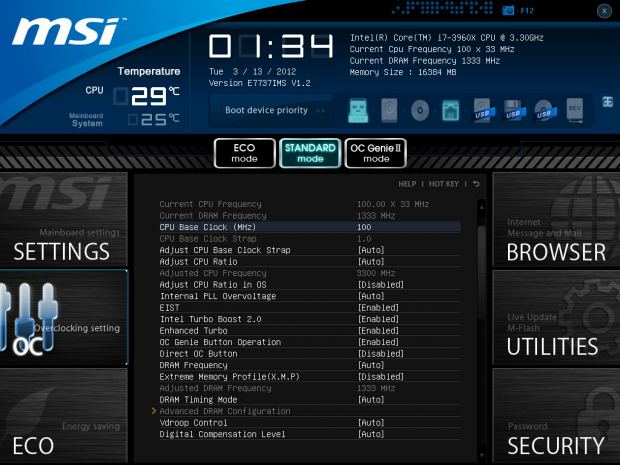
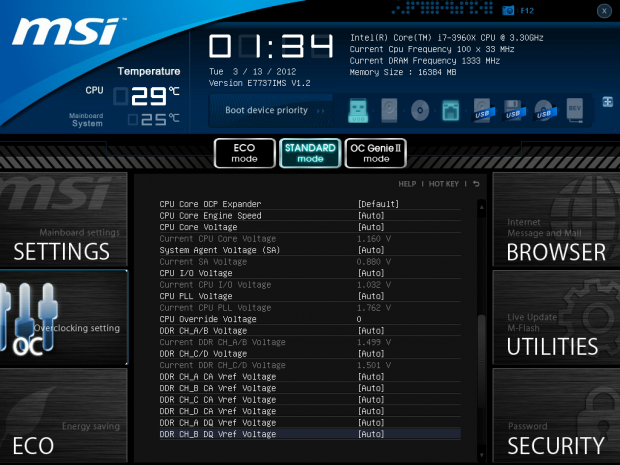
In typical fashion, if you're heading into the BIOS you'll probably want to be in the OC area and if you've used Click BIOS II in the past you shouldn't have any troubles here.
Unlike the original X79 board we looked at from MSI at the launch of the Sandy Bridge-E platform, this one worked a lot nicer with everything getting up and running straight away when it came to overclocking. We'll talk about that a little more in just a moment, though.
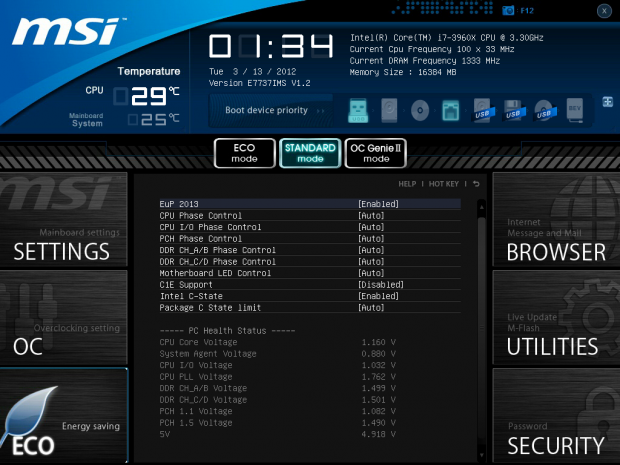
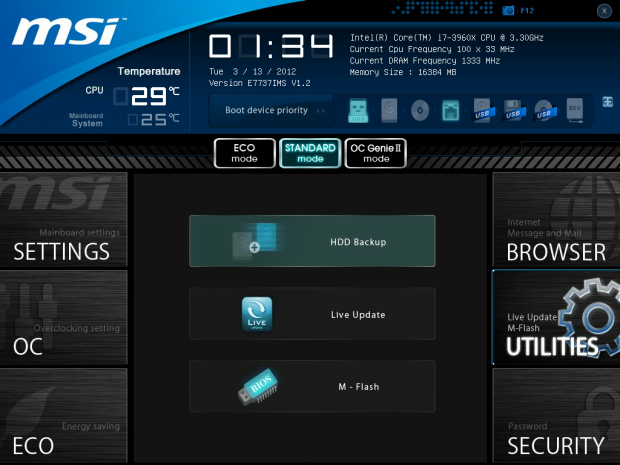
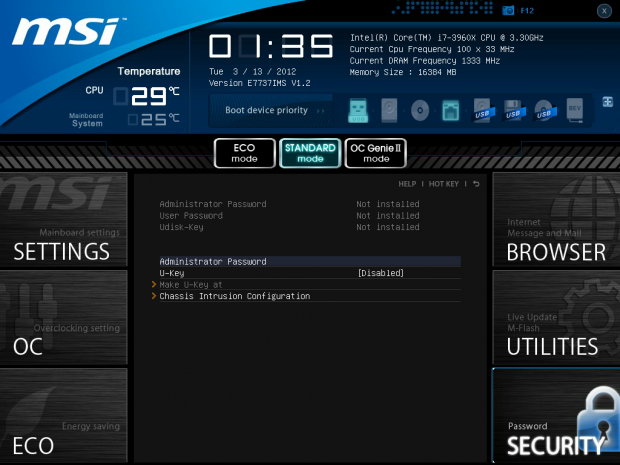
Moving through the rest of the BIOS you can see everything is fairly self-explanatory so let's get into the overclocking side of things before we cover the performance of the board.
Benchmarks - Test System Setup and Overclocking
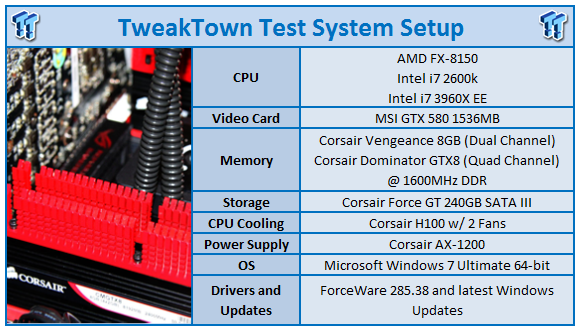
We would like to thank the following companies for supplying and supporting us with our test system hardware and equipment: Intel, ASUS, MSI, Western Digital and Corsair.
Having a look above you can see our motherboard testbed line up today. We won't go into too much detail as everything is really shown above and when we move into our benchmarks on the upcoming pages you'll get an idea of the boards we're using today in our comparison. Instead we'll just get into the overclocking side of things.
At the end of last year our 3960X left us for greener pastures; our new 3960X hasn't had a chance to really stretch its legs. The first time we used the processor we managed to get just over 4.6GHz out of it.
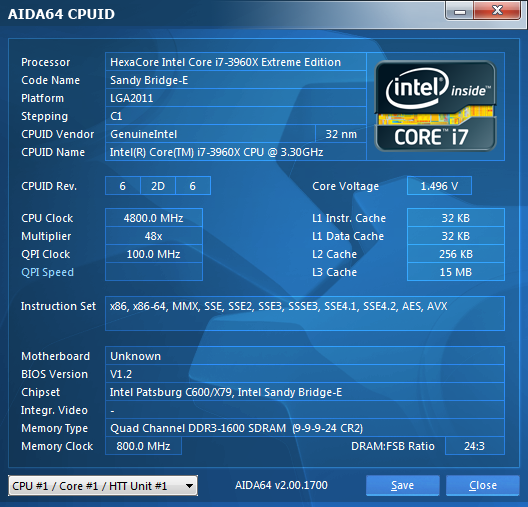
Today we managed to get better than that with the MSI Big Bang XPower II which saw our CPU come clocked in at 4.8GHz via a 48x multiplier. Unfortunately this is where it stopped for us and we have this feeling that our current 3960x just isn't as strong as our original one that died.
Moving to a 49x / 50x multiplier of a 48x multiplier with a 105BCLK resulted in us not being able to get into Windows. While we had no issue booting, when it was time for the Windows logo to show up on the screen, our system would just hang. We tried messing around with the voltages a bit and the BCLK, but it just didn't want to go any further.
The good news is that 48x was extremely easy to get and was absolutely rock solid stable. We literally just bumped up our voltages across the board, changed the multiplier to 48x and we ended up in Windows straight away, every time. The solid nature of this makes it a really nice everyday overclock. With more time you could probably find yourself dropping the voltage down a little bit as well.
Let's get started!
CPU Benchmarks
HyperPi 0.99
Version and / or Patch Used: 0.99
Developer Homepage: www.virgilioborges.com.br
Product Homepage: www.virgilioborges.com.br
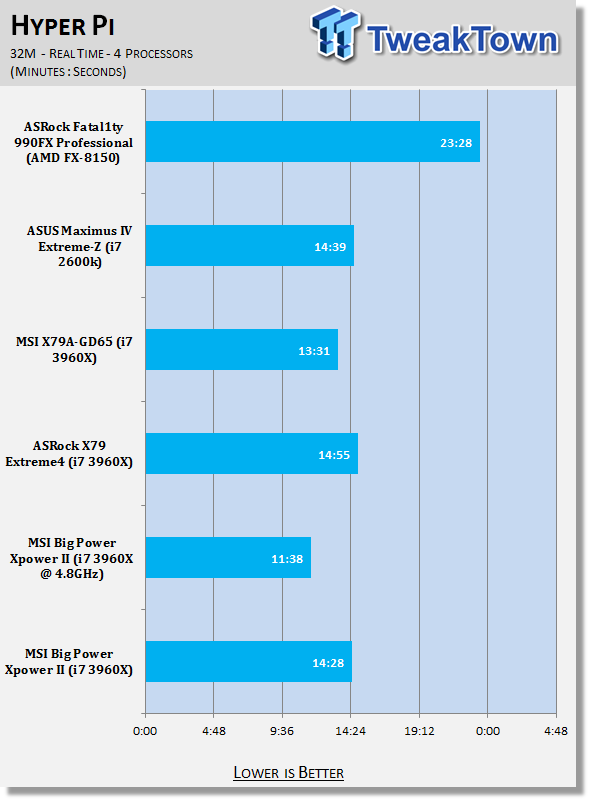
HyperPi is a front end for SuperPi that allows for multiple concurrent instances of SuperPi to be run on each core recognized by the system. It is very dependent on CPU to memory to HDD speed. The faster these components, the faster it is able to figure out the number Pi to the selected length.
For our testing we use the 32M run. This means that each of the four physical and four logical cores for the i7 and the four physical cores of the i5 is trying to calculate the number Pi out to 32 million decimal places. Each "run" is a comparative to ensure accuracy and any stability or performance issues in the loop mentioned above will cause errors in calculation.
AIDA64
Version and / or Patch Used: 1.00.1035BETA
Developer Homepage: http://www.aida64.com
Product Homepage: http://www.AIDA64.com
Replacing Everest in our labs is AIDA64. This new testing suite is from the core development team from Lavalys and continues that tradition. The guys have thrown in better support for multithreaded CPUs as well as full 64 bit support. We use this to test memory and HDDs for now, but may find ourselves opening this up to other areas of the motherboard.
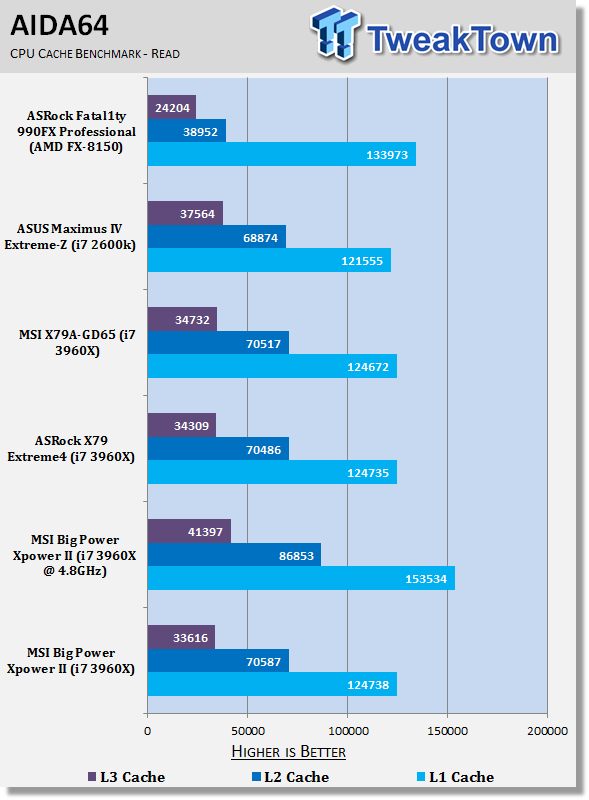
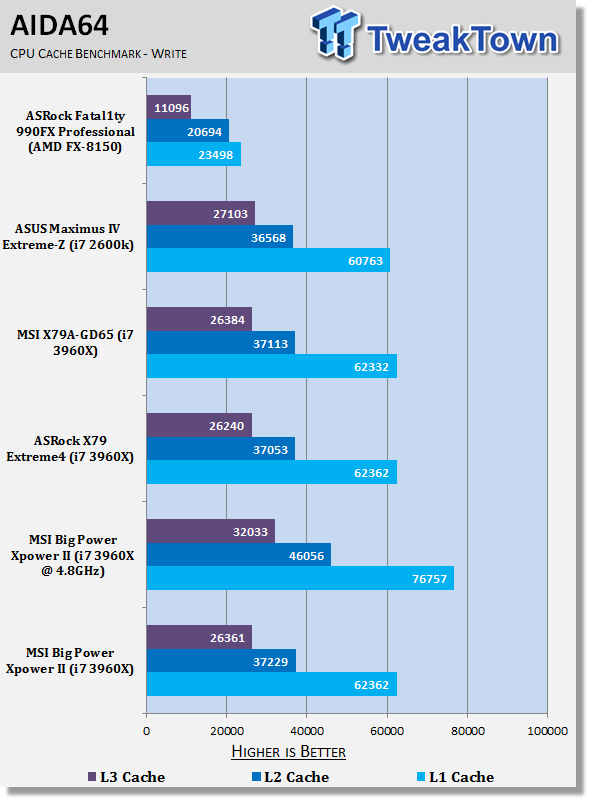
Out of the box performance doesn't really hold any major surprises with for the most part we see the Big Bang XPower II perform just as we'd expect. As always, though, take a bit of time overclocking and you can see a really nice boost in performance that helps separate the board from the stock clocked offerings.
System Benchmarks
PCMark 7
Version and / or Patch Used: 1.04
Developer Homepage: http://www.pcmark.com
Product Homepage: http://www.pcmark.com
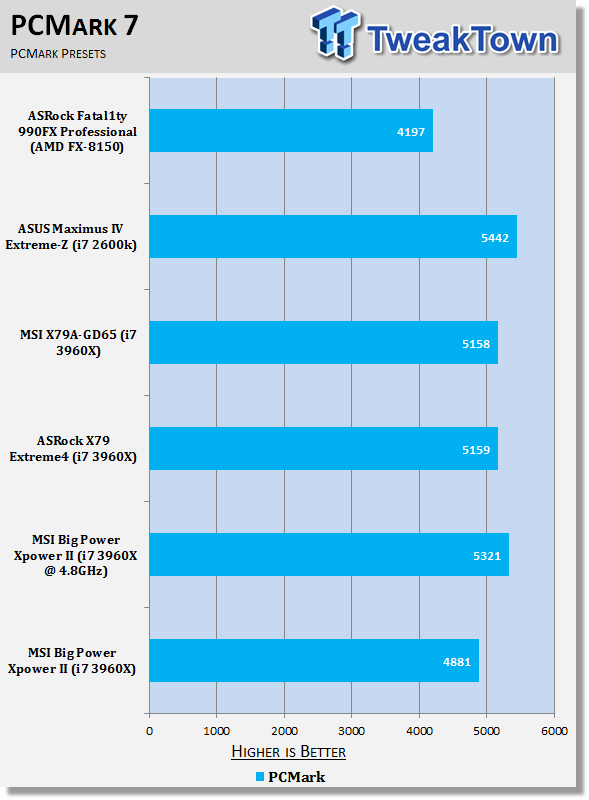
PCMark 7 includes a range of tests that give different views of your system's performance. In the Advanced Edition you can choose which tests to run. The common use and hardware component tests are unavailable in the Basic Edition.
Overall system performance is measured by the PCMark test. This is the only test that returns an official PCMark score. The Lightweight test measures the system capabilities of entry-level systems and mobility platforms unable to run the PCMark test, but it does not generate a PCMark score. Common use performance is measured by the scenario tests - Entertainment, Creativity and Production - each of which results in a scenario score. Hardware component performance is measured by the hardware tests - Computation and Storage - each of which results in a hardware score.
MediaEspresso
Version and / or Patch Used: 6.5
Developer Homepage: http://www.cyberlink.com/
Product Homepage: http://www.cyberlink.com/products/mediaespresso/overview_en_AU.html?fileName=overview&r=1
MediaEspresso is a blazingly fast media universal converter that can transcode your videos, photos and music files and out put them to a huge range of portable devices including mobile phones, portable media players and even game consoles. With technologies like Smart Detect, Direct Sync and CyberLink's TrueTheater™ video enhancements, you can not only forget about complicated format, resolution and output settings, but your converted file will come out the other side looking better than when it went in!
PCMark 7 continues to be a little funny on the X79 platform and you can see out of the box it sits a little lower here. Overclocked we do see a nice little boost in performance, though, which equates to a gain of over 10%.
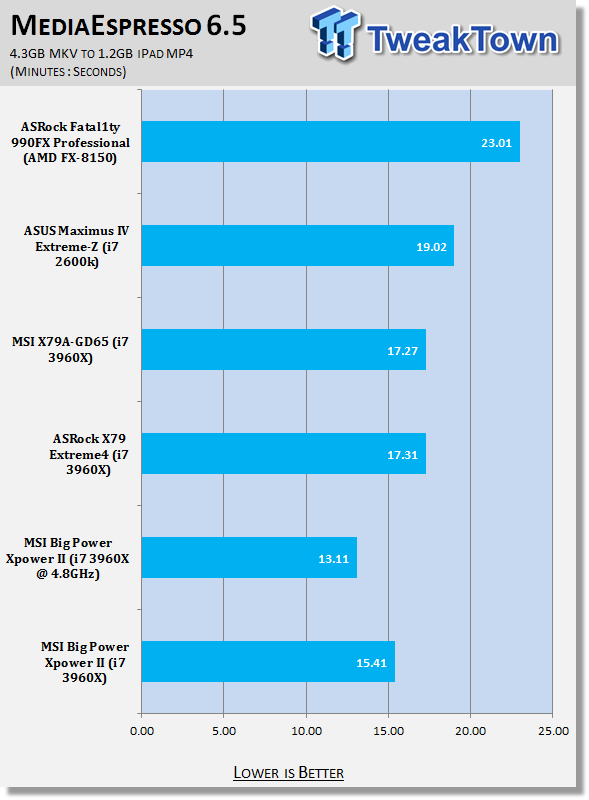
MediaEspresso performance on the other hand is really good. Out of the box we can see it's stronger than a lot of the other motherboards here and we can see that number gets only better when we move to the higher clock speed via the overclock.
USB 2.0 and 3.0 Benchmarks
AIDA64
Version and / or Patch Used: 1.70.1400
Developer Homepage: http://www.aida64.com
Product Homepage: http://www.AIDA64.com
Replacing Everest in our labs is AIDA64. This new testing suite is from the core development team from Lavalys and continues that tradition. The guys have thrown in better support for multithreaded CPUs as well as full 64 bit support. We use this to test memory and HDDs for now, but may find ourselves opening this up to other areas of the motherboard.
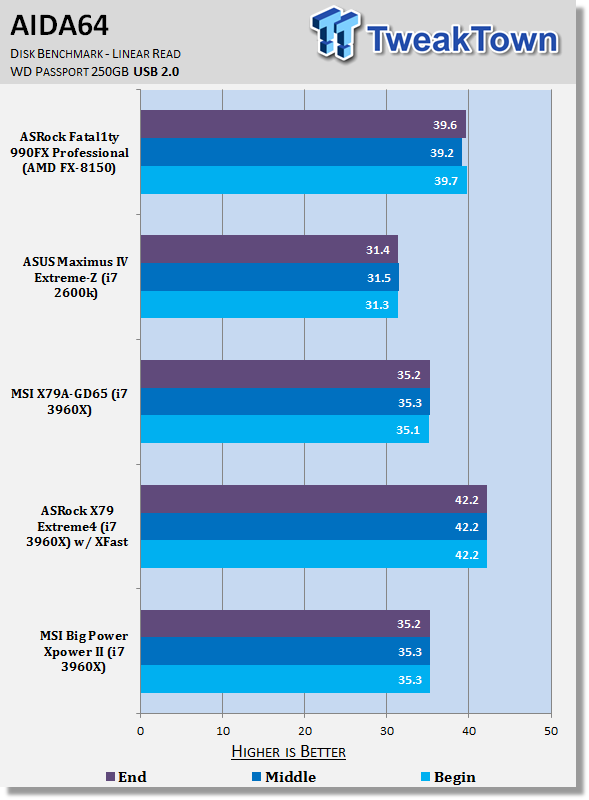

USB 2.0 and 3.0 performance lines up just as you'd expect with most of our other boards here. The only time we see it really fall behind is compared to the ASRock offering which uses XFast technology to boost USB 2.0 and USB 3.0 performance.
SSD Benchmarks
AIDA64
Version and / or Patch Used: 1.70.1400
Developer Homepage: http://www.aida64.com
Product Homepage: http://www.AIDA64.com
Replacing Everest in our labs is AIDA64. This new testing suite is from the core development team from Lavalys and continues that tradition. The guys have thrown in better support for multithreaded CPUs as well as full 64 bit support. We use this to test memory and HDDs for now, but may find ourselves opening this up to other areas of the motherboard.
HD Tune Pro
Version and / or Patch Used: 4.61
Developer Homepage: http://www.hdtune.com
Product Homepage: http://www.hdtune.com
HD Tune Pro gives us accurate read, write and access time results and for the last couple of years has been gaining popularity amongst reviewers. It is now considered a must have application for storage device testing.
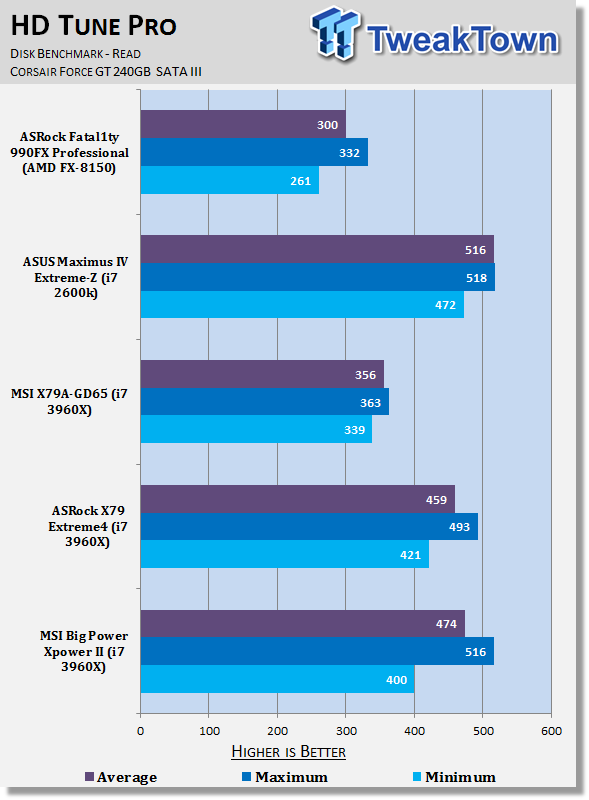
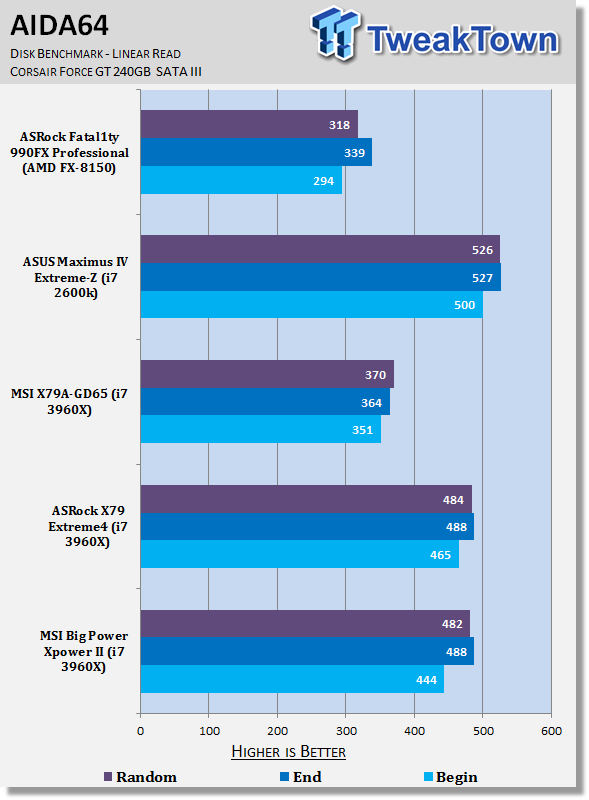
Looking at our SATA III SSD performance we can see this MSI board is significantly better than the MSI X79A-GD65 we looked at closer to launch. Compared to our other setups it sits just about where we'd expect with nothing too shocking being seen.
Memory Benchmarks
AIDA64
Version and / or Patch Used: 1.00.1035BETA
Developer Homepage: http://www.aida64.com
Product Homepage: http://www.AIDA64.com
Replacing Everest in our labs is AIDA64. This new testing suite is from the core development team from Lavalys and continues that tradition. The guys have thrown in better support for multithreaded CPUs as well as full 64 bit support. We use this to test memory and HDDs for now, but may find ourselves opening this up to other areas of the motherboard.
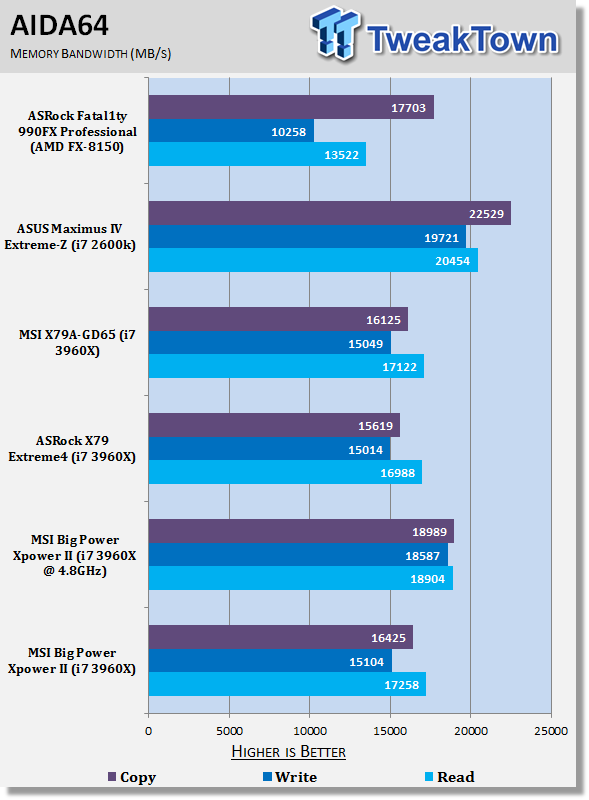
In typical X79 fashion we see Quad Channel memory performance lag behind the Z68 Dual Channel Performance. Overclocking does yield a nice performance gain, but it's still behind the Z68 board running at stock.
If you want to find out more about Quad Channel / Dual Channel memory performance, I'd recommend you read our Intel X79 Quad Channel and Z68 Dual Channel Memory Performance Analysis.
Gaming Benchmarks
3DMark 11
Version and / or Patch Used: 1.0
Developer Homepage: http://www.futuremark.com
Product Homepage: http://www.3dmark.com/3dmark11/
3DMark 11 is the latest version of the world's most popular benchmark. Designed to measure your PC's gaming performance 3DMark 11 makes extensive use of all the new features in DirectX 11 including tessellation, compute shaders and multi-threading. Trusted by gamers worldwide to give accurate and unbiased results, 3DMark 11 is the best way to consistently and reliably test DirectX 11 under game-like loads.
Metro 2033
Version and / or Patch Used: Latest Steam Update
Timedemo or Level Used: Built in Benchmark
Developer Homepage: http://www.4a-games.com//
Product Homepage: http://www.thqnordic.com/
Metro 2033 is an action-oriented video game with a combination of survival horror and first-person shooter elements. The game is based on the novel Metro 2033 by Russian author Dmitry Glukhovsky. It was developed by 4A Games in Ukraine and released in March 2010 for Microsoft Windows and Xbox 360.[3] In March 2006, 4A Games announced a partnership with Glukhovsky to collaborate on the game.[4] The game was announced at the 2009 Games Convention in Leipzig;[5] a first trailer came along with the announcement.[6] A sequel was announced, currently titled Metro: Last Light.
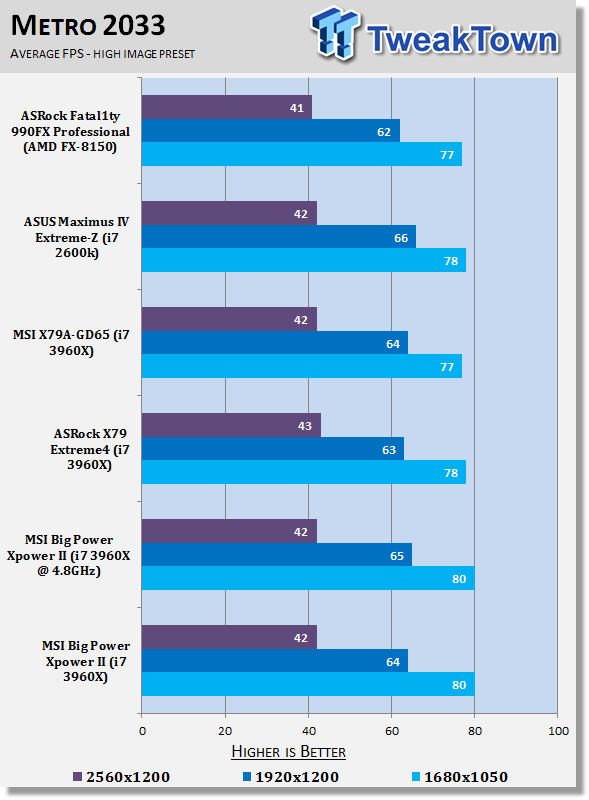
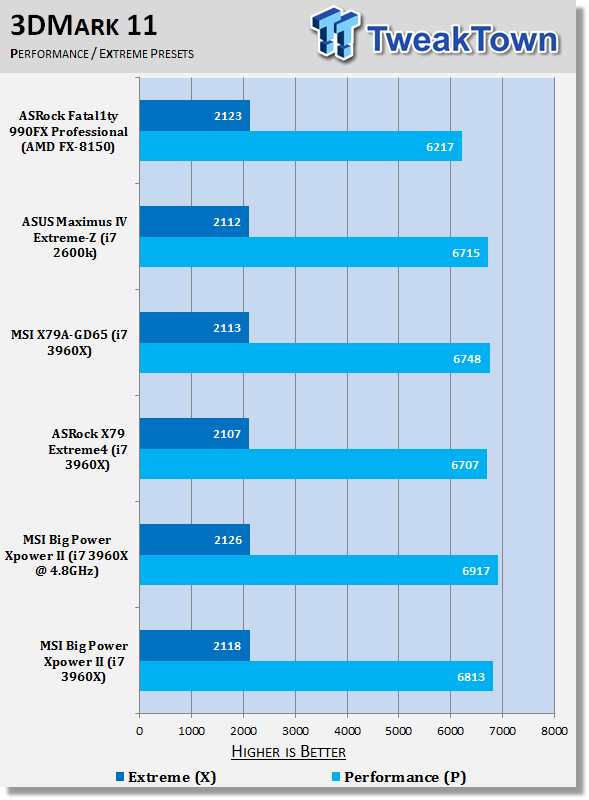
Gaming performance is very much what you'd expect - that means out of the box the numbers line up with our other Intel setups and overclocked we see a slight boost in the lower resolution 3DMark 11 Performance preset.
Temperature and Power
Power Consumption
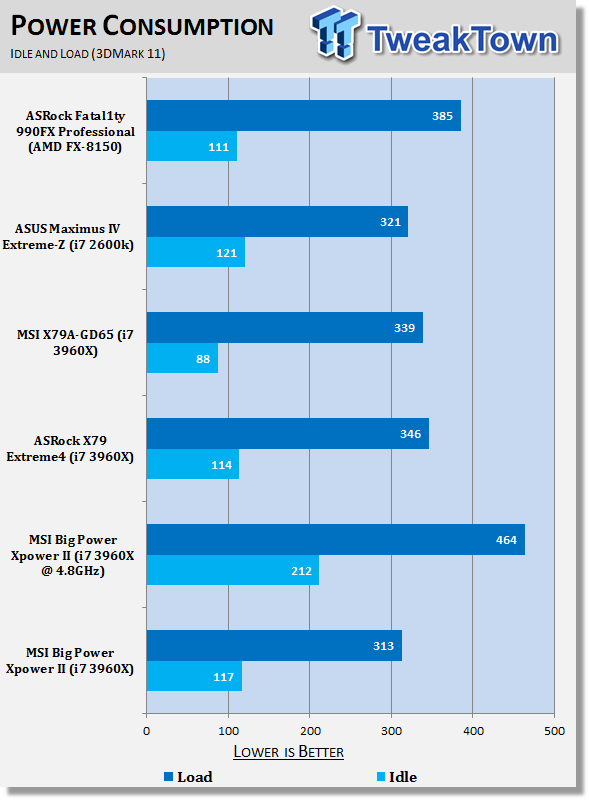
As big and mean as the MSI Big Bang XPower II looks, the power draw out of the box is pretty good and at load it sits a nice chunk below the other X79 offerings. The only time we see it shoot up is when we start to overclock and that comes as no surprise as we start bumping up voltages.
Core Temperature
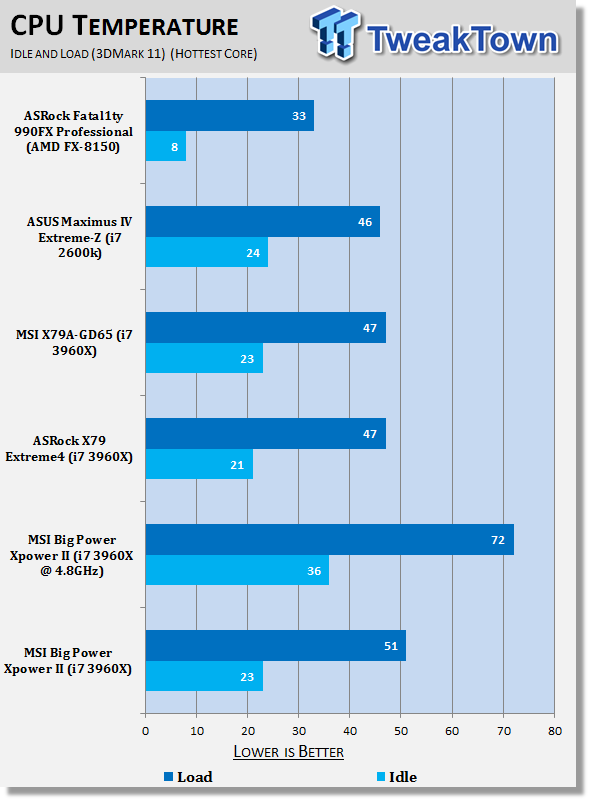
On the CPU temp side of things the idle temperature is pretty standard and lines up with our other X79 boards here. At load we can see it sits a little warmer, but only by 4c - nothing too major at all.
Final Thoughts
MSI has done a really nice job with the Big Bang XPower II motherboard and the Big Bang name is really well deserved. It doesn't matter if you're just looking for a quality motherboard to game on or something to do some real overclocking on, the Big Bang XPower II clearly caters to a huge audience.
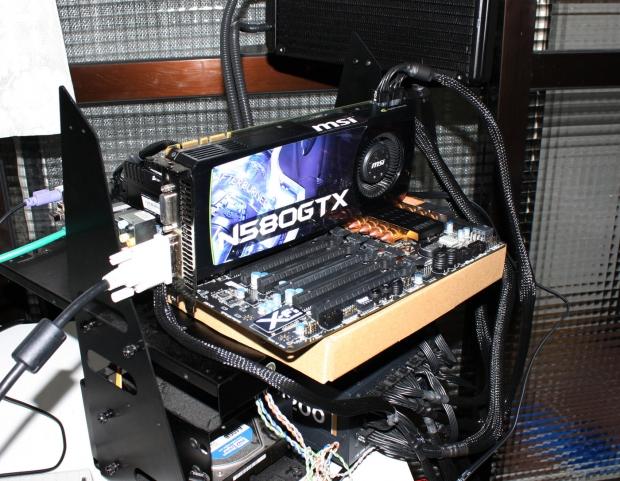
If you skipped through the initial text on the first few pages then it's worth knowing that this is an XL-ATX motherboard. That means it's bigger than your standard full size ATX motherboards and requires a case that supports the format.
Our Lian Li T60 testbed doesn't actually support XL-ATX and for that reason we had to get a bit ghetto with the installation of the motherboard. Like we mentioned earlier, it's something that is important to note as not having the ability to install your brand new motherboard because your case doesn't support a motherboard this size would be extremely disappointing.
Overall, though, the Big Bang XPower II is just a really nice motherboard. The Gatling gun and ammo clip might be a bit too much for some of the older people out there, but I wouldn't let it turn you off too much. The black and gold color scheme does overall look really nice, too.
Support for massive four way video card setups is really cool and we've got more extra power connectors then you can poke a Corsair AX1200 at. If you want to get serious with your setup, MSI really does allow it here.
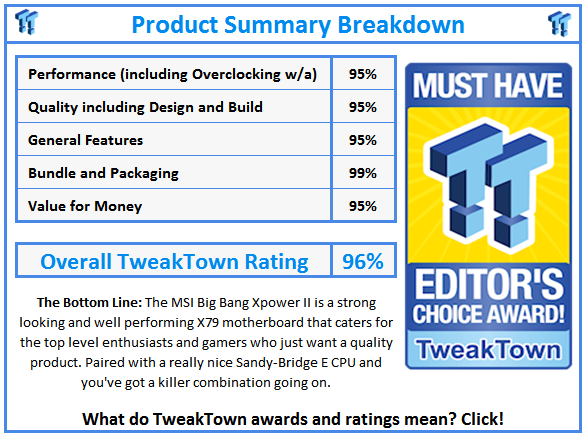
Outside of the board, though, we've also got a massive bundle which comes with just a bucketload of extras that also help make the board stand out. The MSI Big Bang XPower II just ticks all the boxes and while at $389.99 it's not cheap, considering what's on offer, that doesn't come as a shock to us. From a value perspective, it's still there thanks to everything that is on offer.

 United
States: Find other tech and computer products like this
over at
  United
Kingdom: Find other tech and computer products like this
over at
  Australia:
Find other tech and computer products like this over at
  Canada:
Find other tech and computer products like this over at
  Deutschland:
Finde andere Technik- und Computerprodukte wie dieses auf