


Introduction
Back at CES (during the G1-Killer launch) we were shown something pretty special; besides the G1 we mean. While Tim Handley was telling us about the virtues of the G1-Killer line-up, he flashed us a picture of a new board that was still under development. This was an early image of the X58A-OC. The concept was a streamlined product intended just for overclocking and performance.
You still get audio and LAN on the board, but for the most part the extras that are on many boards are gone. Of course, with the items removed other pieces have been dropped in to handle the extra voltage and current load from pushing the CPU and multiple GPUs to extremes. Despite the lack of all of the "extra" features, the price is still $380 from Newegg.com.
Now this board has been out on the market for a few months and we have had some time to play with it. So let's see if the X58A-OC is worth its price tag.
The Package and Contents
Package and Contents
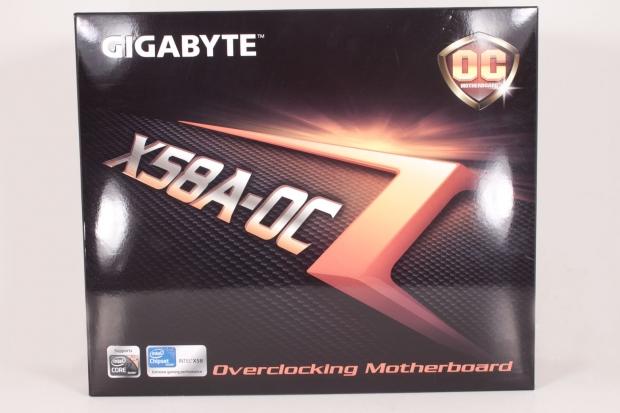
The box the X58A-OC came in is pretty cool looking. It is glossy black with the name of the board on the front. The graphic is clean (as is the rest of the box front). There is very little to clutter up the look of the box. However, GIGABYTE did want to make sure that they got the message across to you that this is a board for overclocking. The text is along the bottom and there is a badge in the upper right hand corner.
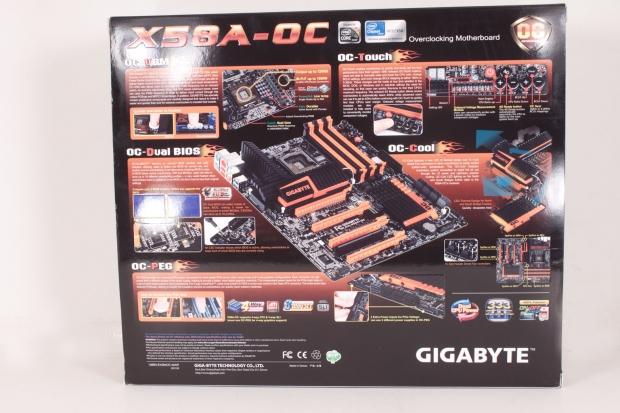
The back is much more detailed and includes a full view of the X58A-OC. You also get a listing of the features (although not all of them). Still, the box is clean; even the marketing messages are not the usual hard sell.
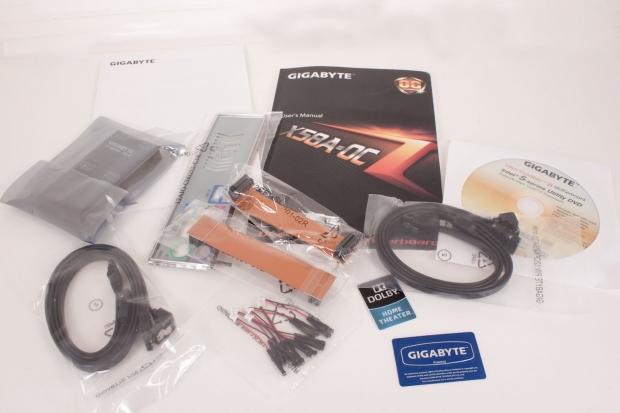
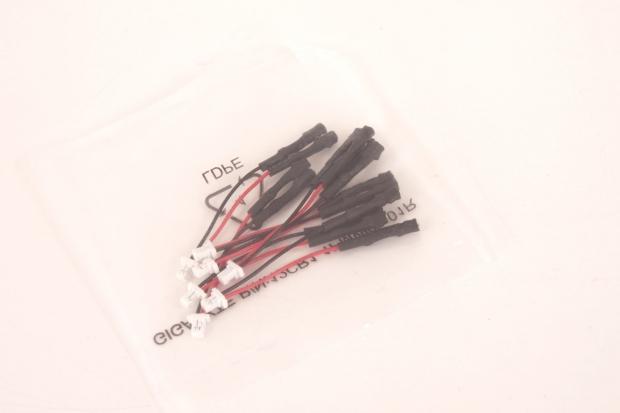
The goodies in the box are pretty impressive too. You get multiple SLI/Crossfire bridges (along with a tri-SLI bridge). You get some good quality SATA cables and some voltage read point cables. These plug into the motherboard (we will show you where in a few) and let you read the various voltages right off of the board.
So far things are looking good; now let's see if this follows into the board design.
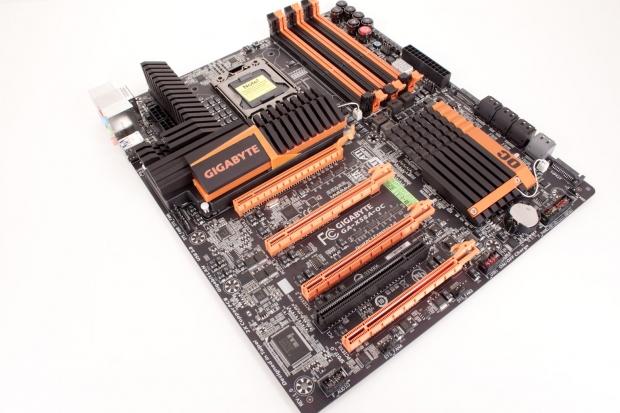
The Motherboard
The X58A-OC is a seriously nice looking board. The combination of orange and black does give it a halloween look, but it is still good looking. As with most X58 boards, it follows the ATX layout.

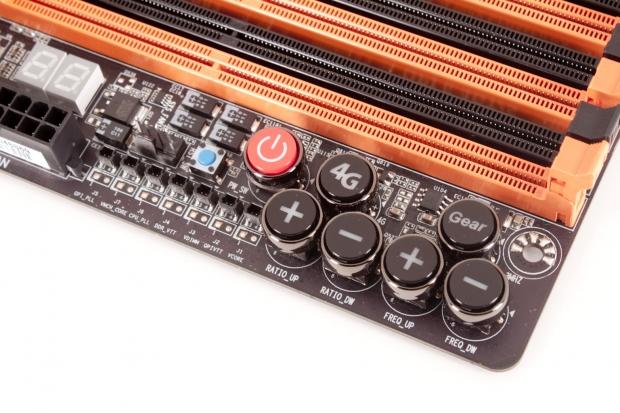
Kicking our walk-around off at the upper right hand corner, we find the controls. We have the Power Button, a Blue Reset button and a few other controls that relate to overclocking. You have controls to move the ratio (the multiplier) up and down right next to controls for the frequency.
Behind these there is a button labelled 4G and one labelled Gear. The 4G button lets you get right to 4GHz with one touch while the Gear button switches between 1MHz and .5MHz BCLK adjustments. You can also see the plug-ins for those voltage read cables we showed you earlier.
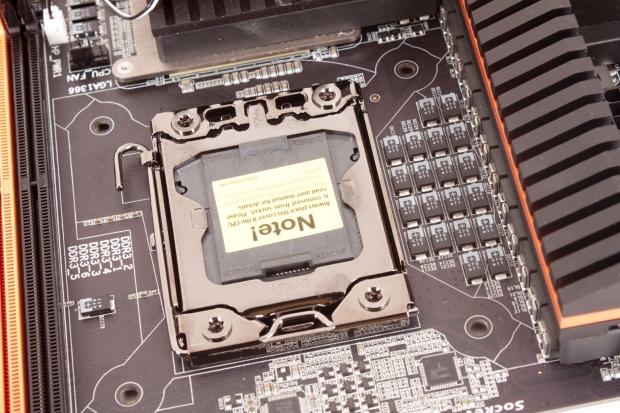
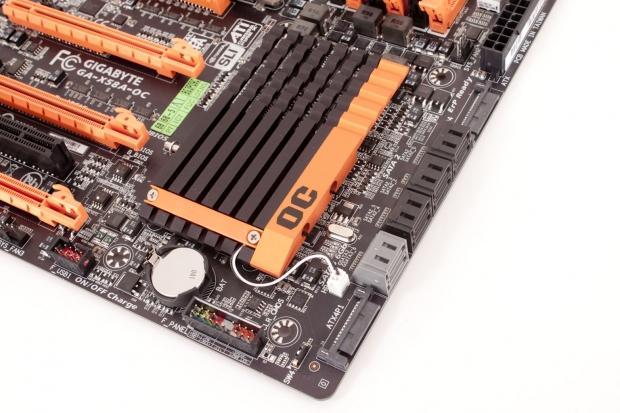
Looking closely at the CPU socket, we see that GIGABYTE has changed the type of capacitor that they are using (at least for this board). There are a couple of reasons for this. One is the new CAPs are more efficient and the other is that the height makes it easier to fill with insulating putty. GIGABYTE also changed up the Ferrite Chokes and added in some nice 50A ones.
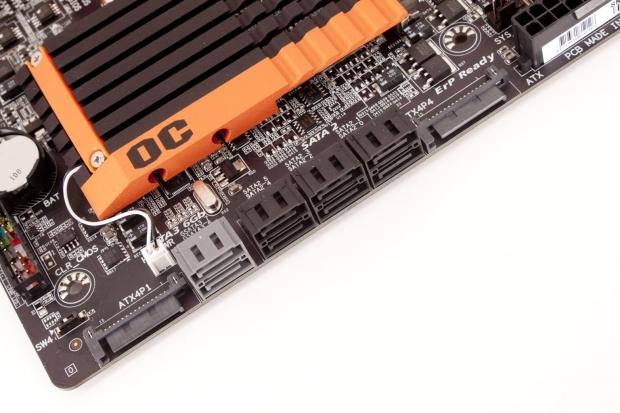
Right behind the cooling for this beefed up power regulation setup we find a pair of 8-pin Aux power ports. These are there to keep power flowing to the CPU and to the rest of the board.
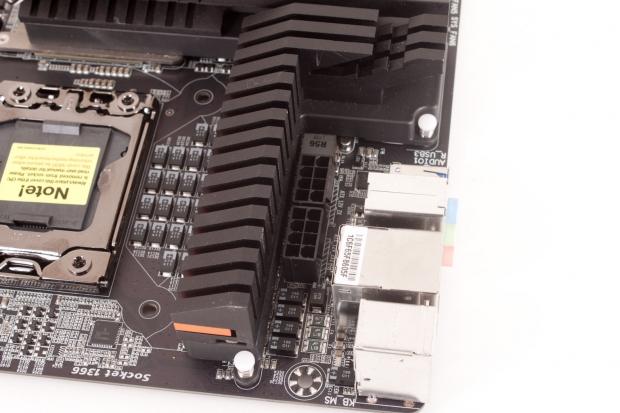

The cooling on the power regulation extends over to the X58 chipset. This is right on top of the primary x16 PCIe slot. There is still enough room so there is no chance of contact. I would be a little concerned about the combined heat build-up between the primary GPU and the X58 chipset.
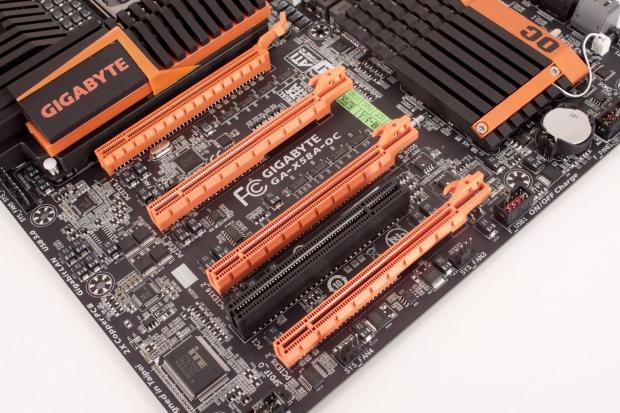
The peripherals are stripped down; you get two x16 PCIe slots (slot one and three) and two PCIe x8 slots (slots two and four). In between two and four there is a single PCI 2.1 port for those legacy items you might need for overclocking.
Looking at the lower right hand side of the board, we find the cooling for the ICH10R. GIGABYTE has thrown in a light (which adds to the style of the board). There are eight SATA ports; six are SATA 2.0 and two are SATA 3.0. You will also notice that there are two ports that look like SATA power ports. These are there to provide extra power to the PCIe ports if you are using three or more GPUs.
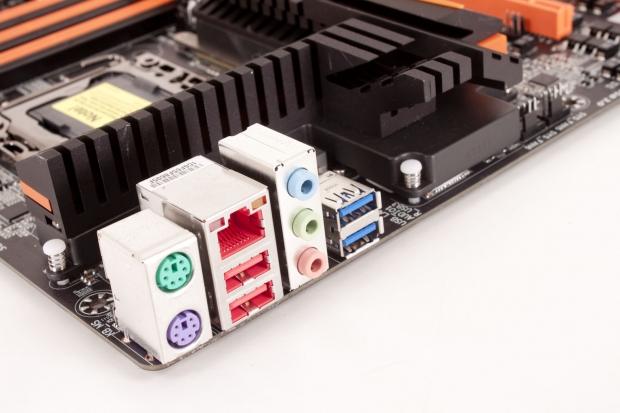
The I/O ports are also stripped down. You get two PS/2 ports, two powered USB 2.0 ports, a GBe LAN port, two USB 3.0 ports and then some simple audio ports; Line-In, Line-Out and Mic.
The BIOS
BIOS
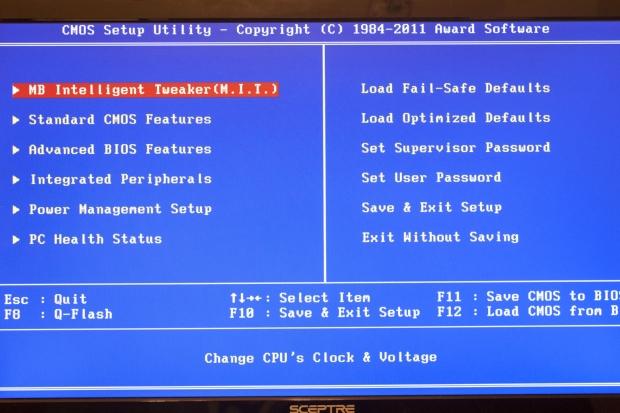
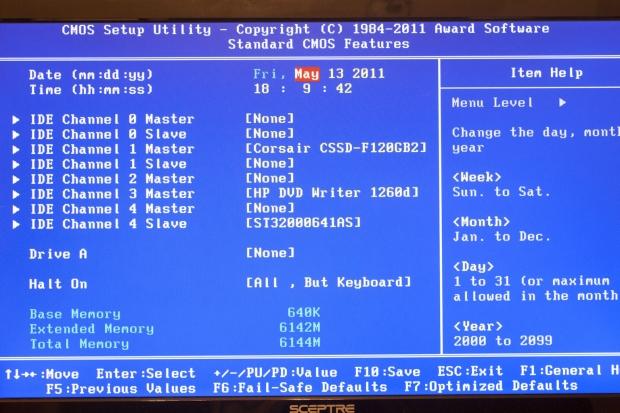
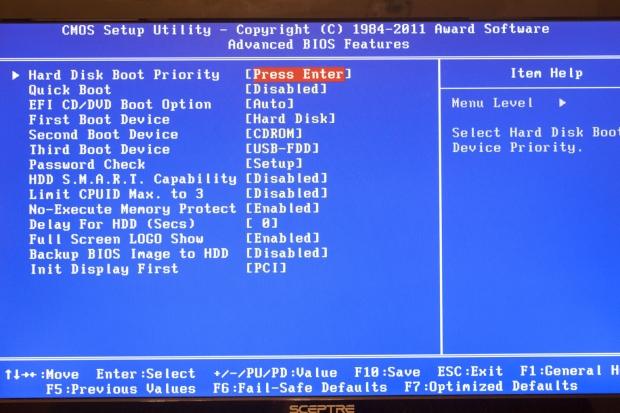
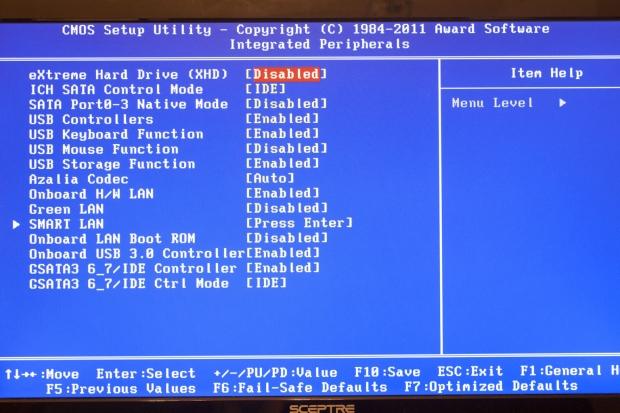
There is not much that is different in the X58A-OC's BIOS; it is built off of GIGABYTE's familiar Award BIOS. The first item is the Motherboard Intelligent Tweaker page (M.I.T.); not much that we have not talked about before here. Still, it does have what you need to get your overclocking done.
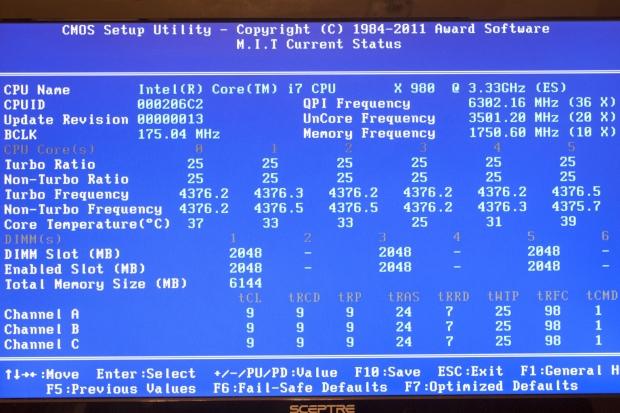
You have your current status page.
The rest of the BIOS is fairly typical for an X58 board.
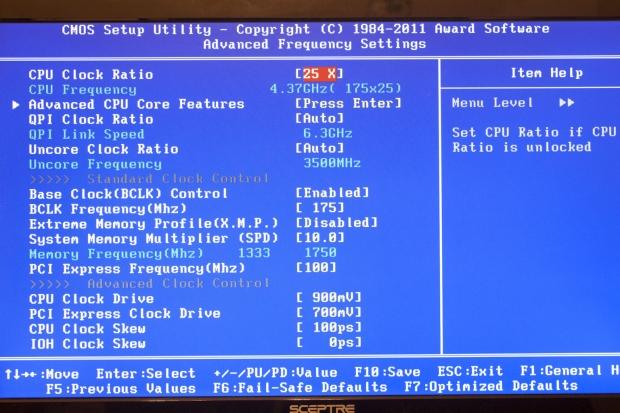
The next item inside the M.I.T. page is the Advanced Frequency page. Here is just what you would think; items to change the BCLK, Ratio and also the drives and skews for the CPU. You also have some rudimentary items for tweaking the memory.
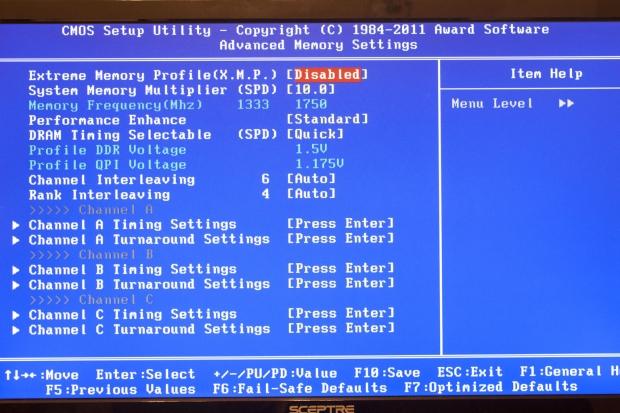
But if there are not enough memory settings for you on the Advanced Frequency page, there is always the Advanced Memory Settings page.
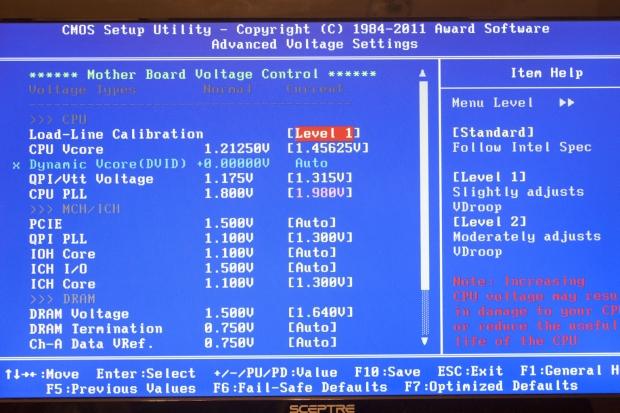
If you are looking for voltage options, they are here too; in the Advanced Voltage Settings page (of course).
There is more to the BIOS than just these pages, but they are pretty routine.
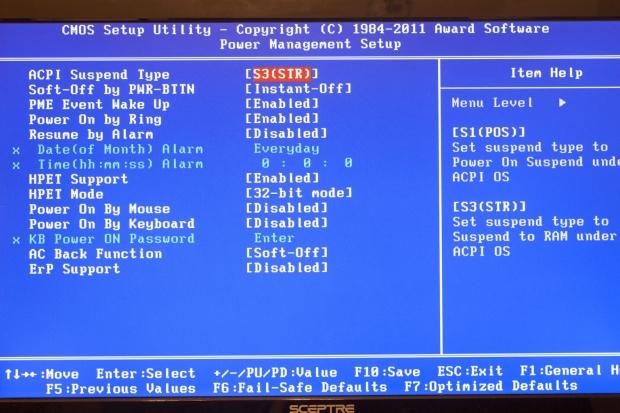
Even the power management settings are fairly routine.
Overclocking
The X58A-OC is designed as an overclocking motherboard. It is intended to be pushed to the limits. You have beefed up power regulation, extra ports to the board for more level power and room for insulation and cooling. The BIOS is a little mundane (to be honest), but the board is intended to run flat out. This has an up side and a down side. On the one hand, you can get quite a lot out of the X58A-OC. The only problem is that to get there you have to make sure all of your components are at the top of their game too.
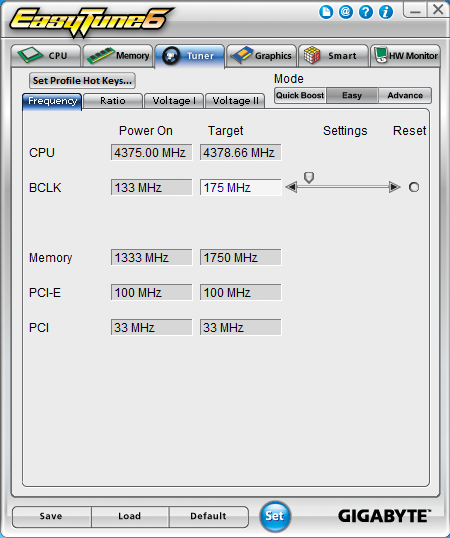
In our test setup we ran into a few issues. Our top OC was only 4.375GHz (175x25). This is only a 1.1GHz boost from the stock clock speed. The reason we could not get higher? Our cooling and the RAM we were using. Whenever I tried to push beyond that 175MHz BCLK, the voltage needed was just too much. I could get into Windows, but I would quickly see the temperatures get saturated under any real load.
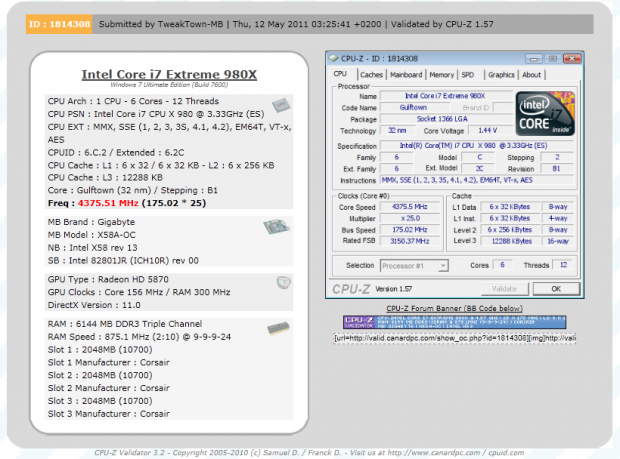
You can see the CPU-Z validation here.
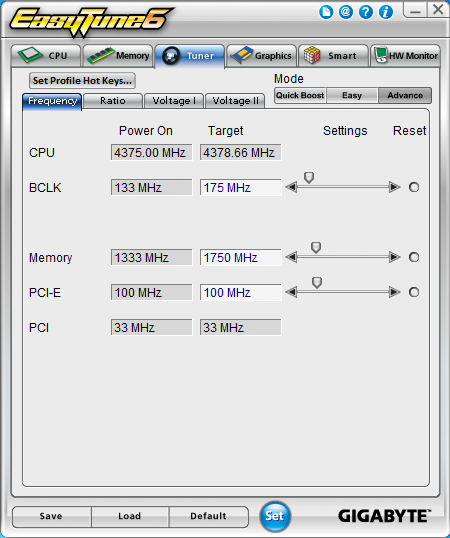
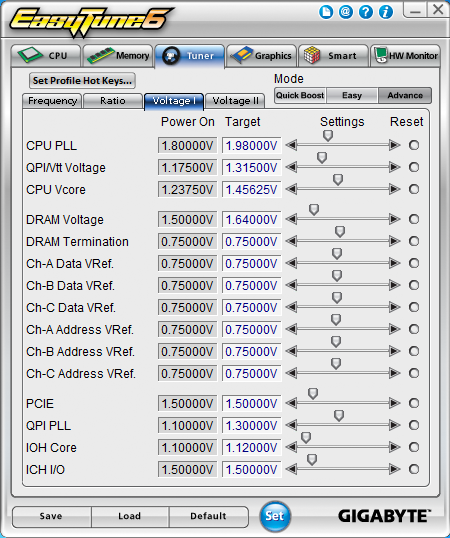
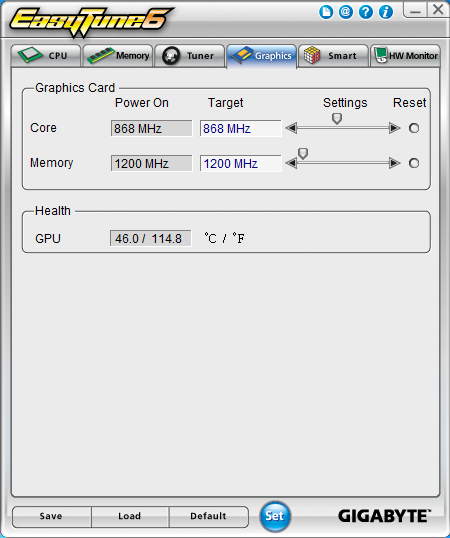
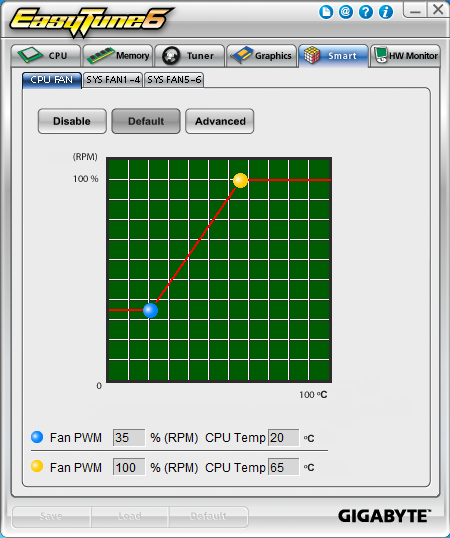
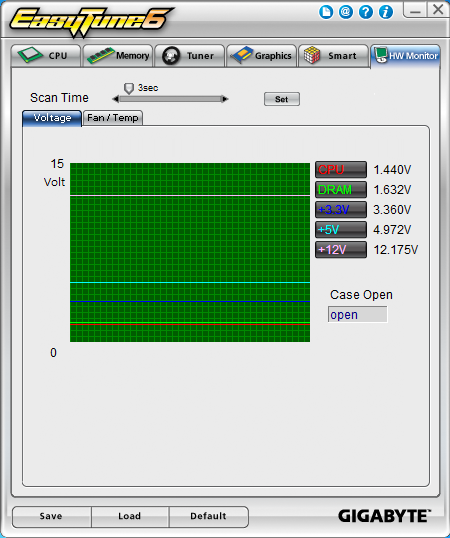
EasyTune 6
We have talked about this overclocking/monitoring software on multiple occasions. It is functional and has some nice add-on features, but not much changes from install to install. We will cover some of the highlights and let the pictures do the rest of the talking.
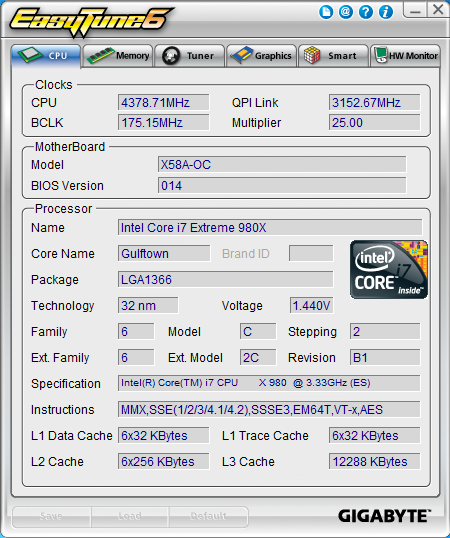
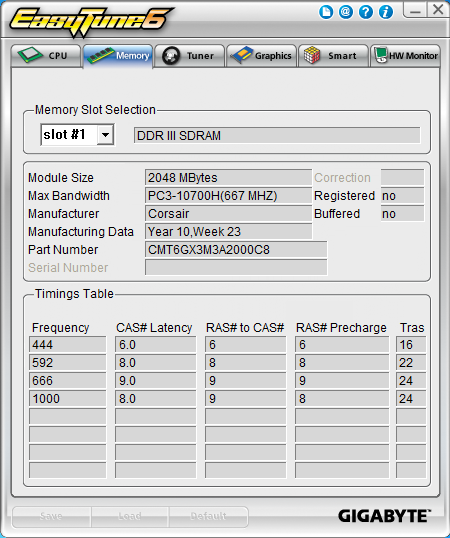
The Two CPU-Z like pages are nice to get a quick look at what you are getting for overclock speeds, but if you are serious you are still going to end up using CPU-Z in the end.
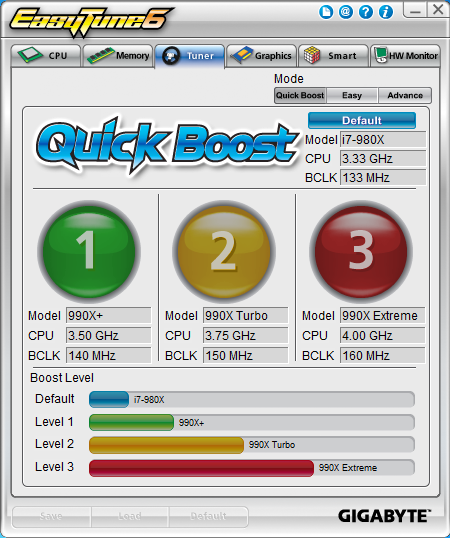
The Tuner pages have some interesting features even for those that might be very new to overclocking.
GB has included tools for everyone from beginner to expert.
You even have the option to tweak your GPU (at least most of the time).
You also have a few options to adjust/monitor fan profiles along with temperatures and voltages.
As all overclocking results are dependent on the hardware you use, your results may vary. Results of our overclocking tests are included in the performance section with the stock scores.
Important Editor Note: Our maximum overclocking result is the best result we managed in our limited time of testing the motherboard. Due to time constraints we weren't able to tweak the motherboard to the absolute maximum and find the highest possible FSB, as this could take days to find properly.
We do, however, spend at least a few hours overclocking every motherboard to try and find the highest possible overclock in that time frame. You may or may not be able to overclock higher if you spend more time tweaking or as new BIOS updates are released. "Burn-in" time might also come into play if you believe in that.
Test System Setup and Comments
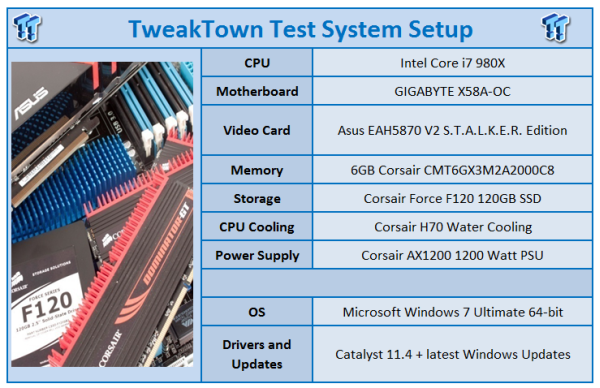
We would like to thank the following companies for supplying and supporting us with our test system hardware and equipment: GIGABYTE, ASUS, Intel, Corsair and Sceptre.
The X58A-OC is simple to setup and get going if you are only setting things up for normal usage. If you are going for an upper level overclock there is (of course) going to be some tinkering. It took some time to get the OC we did as there really is a lot to play with. You still get GIGABYTE's one step install for the basics and for the installation of the utilities.
We did run into one thing that surprised us; we could not get the system to run properly with AHCI and an SSD. For whatever reason the system would begin to install and then fail after the first boot. We tried to install the AHCI drivers during the Windows 7 install, but even that did not work. It seemed to be more of a BIOS issue than anything else. This will come back to haunt us during tests that need HDD speed.
Synthetic Tests - Part I
With any system you will want to see a combination of synthetic testing and real-world. Synthetics give you a static, easily repeatable testing method that can be compared across multiple platforms. For our synthetic tests we use Finalwire's AIDA64, Sisoft Sandra, Futuremark's 3DMark Vantage and PCMark Vantage, Cinebench as well as HyperPi. Each of these covers a different aspect of performance or a different angle of a certain type of performance.
Memory Bandwidth
Memory is a big part of current system performance. In most systems slow or flakey memory performance will impact almost every type of application you run. To test memory we use a combination of Sisoft Sandra, AIDA64 and HyperPi 0.99.
Sisoft Sandra
Version and / or Patch Used: 2011
Developer Homepage: http://www.sisoftware.net
Product Homepage: http://www.sisoftware.net
Buy It Here

The X58A-OC was at the lower end of the scale for both stock and overclocked performance. I would have thought it would have performed much better. It reminds me of the P45 days when you could get high clocks on GIGABYTE's boards, but at the cost of memory performance.
AIDA64
Version and / or Patch Used: 1.00.1035BETA
Developer Homepage: http://www.aida64.com
Product Homepage: http://www.AIDA64.com
Buy It Here
Replacing Everest in our labs is AIDA64. This new testing suite is from the core development team from Lavalys and continues that tradition. The guys have thrown in better support for multithreaded CPUs as well as full 64-bit support. We use this to test memory and HDDs for now, but may find ourselves opening this up to other areas of the motherboard.
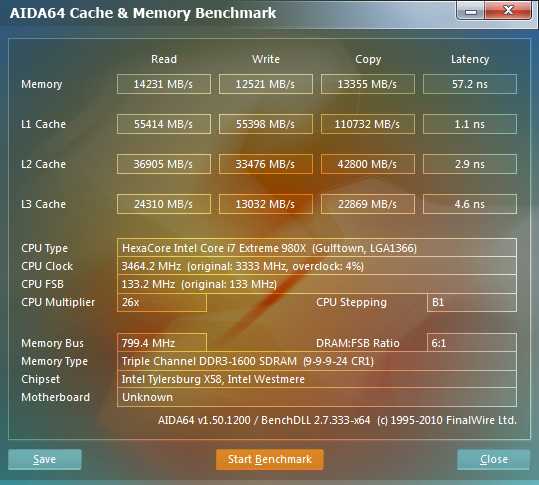
Stock Memory Performance
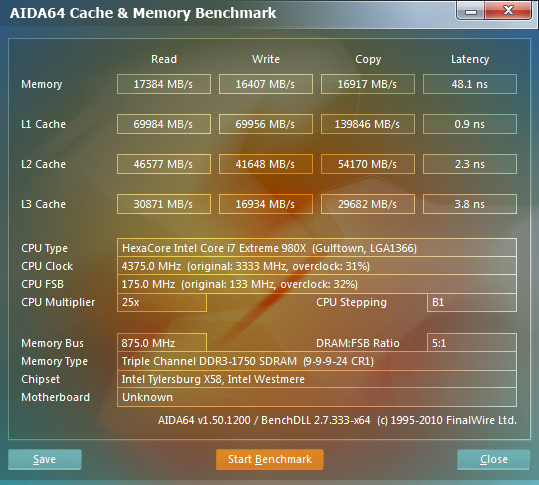
Overclocked Memory Performance
AIDA64 tells the same tale. It looks like the read and write speeds are just not there like they should be on an X58 based motherboard.
HyperPi 0.99
Version and / or Patch Used: 0.99
Developer Homepage: www.virgilioborges.com.br
Product Homepage: www.virgilioborges.com.br
Download It Here
HyperPi is a front end for SuperPi that allows for multiple concurrent instances of SuperPi to be run on each core recognized by the system. It is very dependent on CPU to memory to HDD speed. The faster these components, the faster it is able to figure out the number Pi to the selected length.
For our testing we use the 32M run. This means that each of the four physical and four logical cores for the i7 and the four physical cores of the i5 is trying to calculate the number Pi out to 32 million decimal places. Each "run" is a comparative to ensure accuracy and any stability or performance issues in the loop mentioned above will cause errors in calculation.
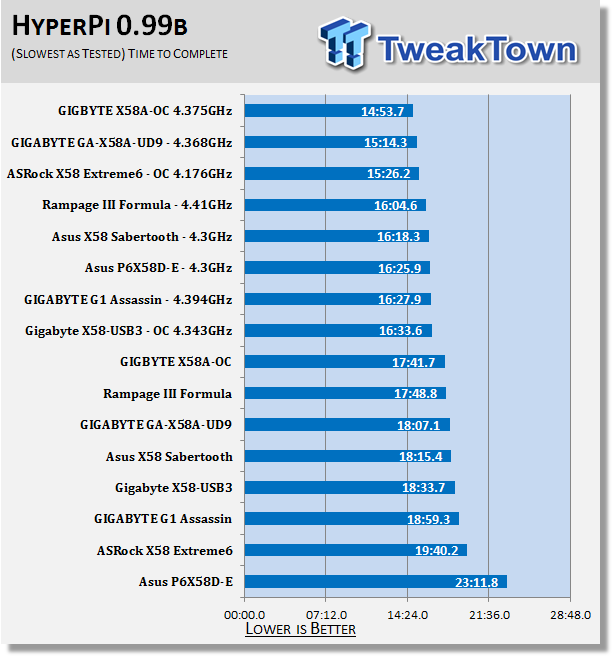
Ah, the X58A-OC has made up for its lack of performance with memory by doing quite well with HyperPi.
Synthetic Tests - Part II
Disk Drive Controller
The system drive controller is an important part of system performance. In most modern boards your drive controller will run off of the PCI-e bus. The PCI-e bus performance can be affected by poor trace layout as well as many other design choices that show up on different boards.
For testing we use Sisoft's Sandra and Everest.
SiSoft Sandra
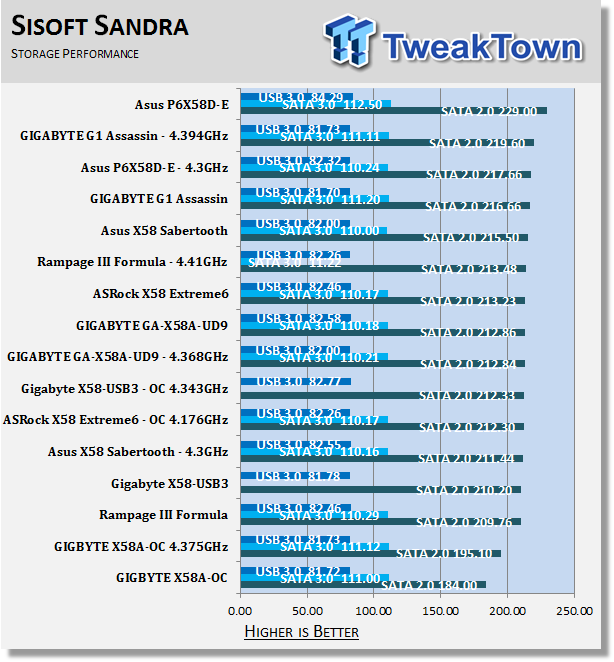
Ouch! The X58A-OC did not do well here at all. The SATA 2.0 performance is just not where it should be. Even overclocked we are not seeing what we should.
AIDA64
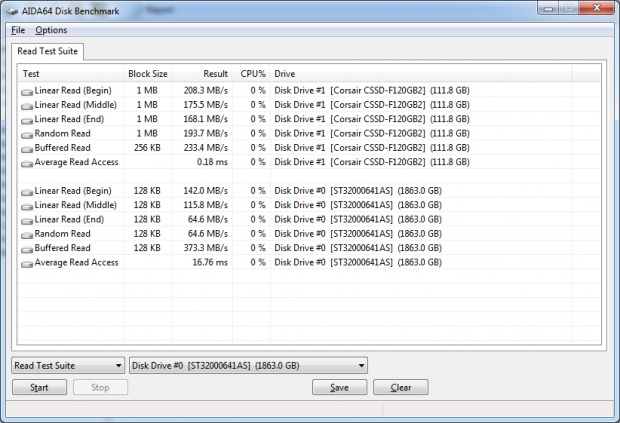
Stock HDD Performance
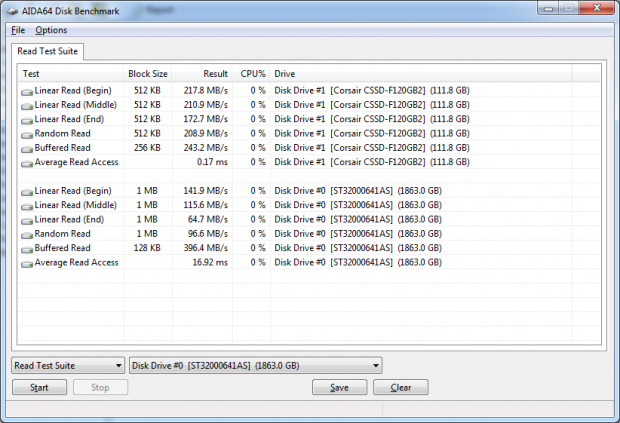
Overclocked HDD Performance
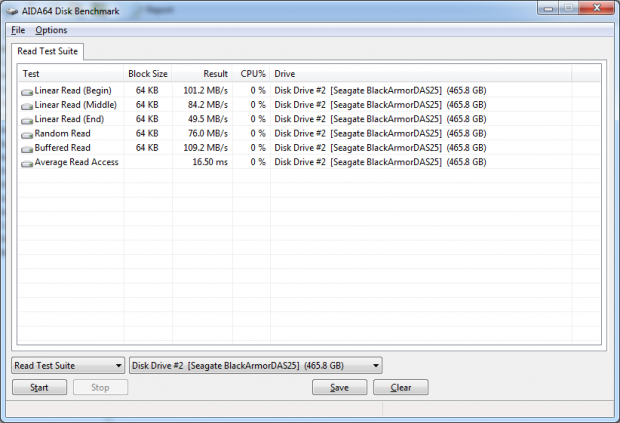
Stock USB 3.0 Performance

Overclocked USB 3.0 Performance
AIDA64 just shows more of the same.
Synthetic Tests - Part III
Here is where we dig out the FutureMark tests.
PCMark Vantage
Version and / or Patch Used: 1.0.0.0
Developer Homepage: http://www.futuremark.com/
Product Homepage: www.futuremark.com
Buy It Here
For overall system performance we use PCMark Vantage. This is run in both x86 and x64 mode to give the best indication of performance.
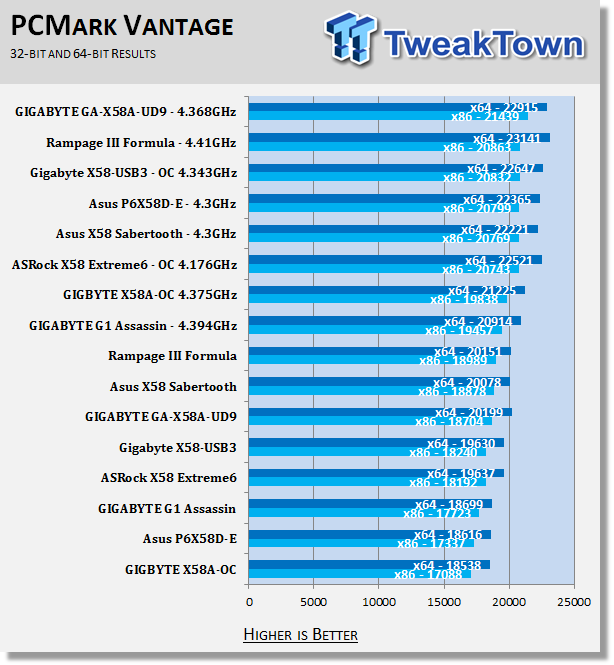
You know, we said it before; the fact that we had to use IDE compatibility mode is going to hurt. Here is the proof. The PCMark Vantage scores are just disappointing. I really hope that GIGABYTE can fix this issue with a BIOS update soon.
3DMark 11
Version and / or Patch Used: 1.0.1
Developer Homepage: http://www.futuremark.com/
Product Homepage: http://www.3dmark.com
Buy It Here
For synthetic gaming tests we used the industry standard and overlockers bragging tool 3DMark 11. This is a test that strives to mimic the impact modern games have on a system. Futuremark went a long way to change from the early days of graphics driven tests to a broader approach including physics, AI and more advanced graphics simulations. 3DMark V11 uses the DX11 API in addition to having support for CPU based Physics. Gone are the days of the PhysX inclusion giving you inflated scores.
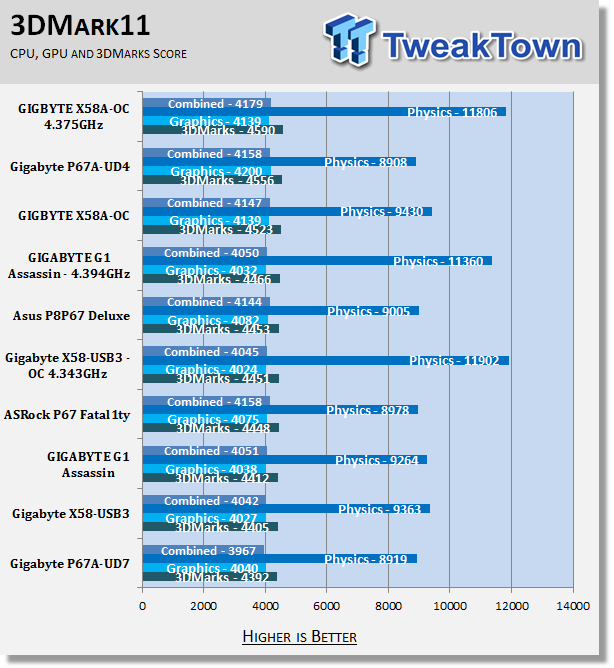
Although the performance difference is only a handful of points, the X58A-OC does manage to hit the high points on our chart. It looks like this is one test that GIGABYTE intended the X58A-OC to run.
Cinebench R11. x64
Version and / or Patch Used: R11.5 x64
Developer Homepage: http://www.maxon.net/
Product Homepage: www.maxon.net
Download It Here
Cinebench is a synthetic rendering tool developed by Maxon. Maxon is the same company that developed Cinema4D, another industry leading 3D Animation application. Cinebench R11.5 tests your systems ability to render across a single and multiple CPU cores. It also tests your systems ability to process OpenGL information.
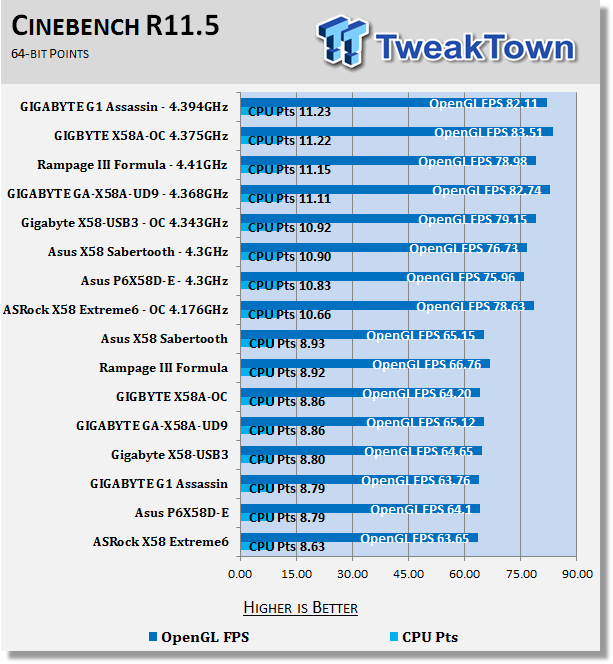
In Cinebench the X58A-OC does fairly well. It is in the upper group for both stock and overclocked runs.
Real-World Tests - Part I
Real-world testing allows us to see how well a product will perform when used in the same manner as it would be in your house or office. It is an important side to performance testing as it can uncover hidden glitches in the way a product performs.
It is especially true when testing a mainboard; there are so many components of a board that have to interact that any problems between parts can cause a failure of the whole.
For real-world testing we use some common applications and functions. We test with LightWave 3D for rendering performance, AutoGK for transcoding from DVD to AVI and two games for gaming testing.
Rendering
Rendering of 3D Animation is a system intensive endeavor. You need a good CPU, memory and HDD speed to get good rendering times. For our testing we use LightWave 3D. This software from Newtek is an industry standard and has several pre-loaded scenes for us to use.
LightWave 3D
Version and / or Patch Used: 9.6
Developer Homepage: http://www.newtek.com
Product Homepage: http://www.newtek.com/lightwave/
Buy It Here
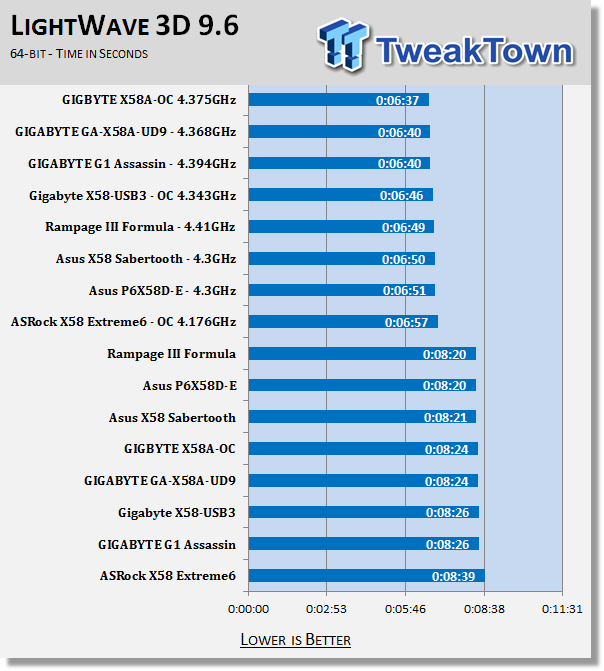
The LightWave scores look good.
AutoGK
Version and / or Patch Used: 2.55
Developer Homepage: http://www.autogk.me.uk/
Product Homepage: http://www.autogk.me.uk/
Download It Here
AutoGK stands for Auto Gordian Knot; it is a suite of transcoding tools that are compiled into an easy to install and use utility. It allows you to transcode non-protected DVDs and other media to Xvid or Divx format. For our testing purposes we use a non-DRM restricted movie that is roughly 2 hours in length. This is transcoded to a single Xvid AVI at 100% quality.
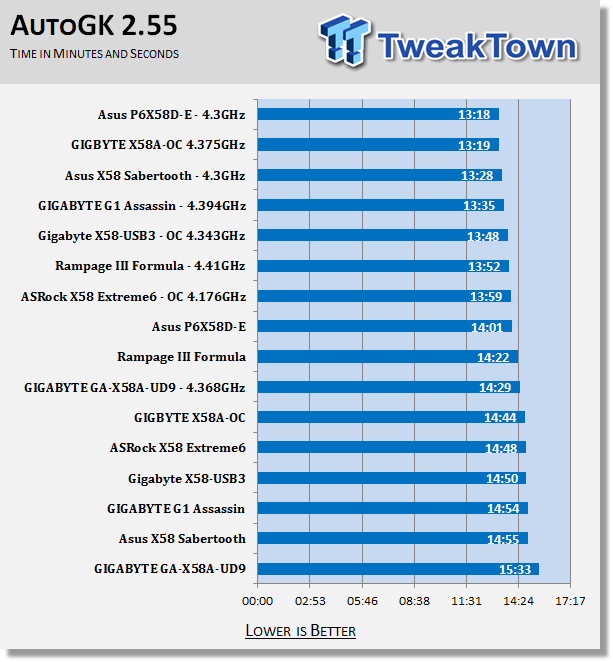
Now this is odd; despite the poor HDD performance we do see pretty good AutoGK times.
Real-World Tests Part II
Here we have our real gaming tests. Each of the games we chose use multiple cores and GPUs. They are able to stress the system through use of good AI. Both have decent positional audio that adds impact to the sound subsystem of the board. We ran each game through the level or parts listed and recorded frame per second using FRAPS. This brings the whole game into play.
*** A word on gaming as a motherboard test; ***
Despite the fact that most games are very GPU limited, we are still noticing HDD and even audio creating issues in gaming performance. Because of this you may see differences in the number of frames rendered per second between different boards. Usually the difference is very small but occasionally, because of bad tracing, poor memory or HDD performance this difference is significant. The issues are often more prevalent in older versions of DirectX but can still pop up in DX10 and 11.
Call of Duty Modern Warfare 2 (DX9)
Version and / or Patch Used: 1.0
Timedemo or Level Used: First combat until the school is cleared
Developer Homepage: http://www.infinityward.com
Product Homepage: http://modernwarfare2.infinityward.com
Most of you know about the game Modern Warfare 2, it caused quite a bit of controversy in the latter half of 2009. The game is a first person shooter with a heavy combat emphasis. It follows the events in the first Modern Warfare very closely and brings back several characters from the original.
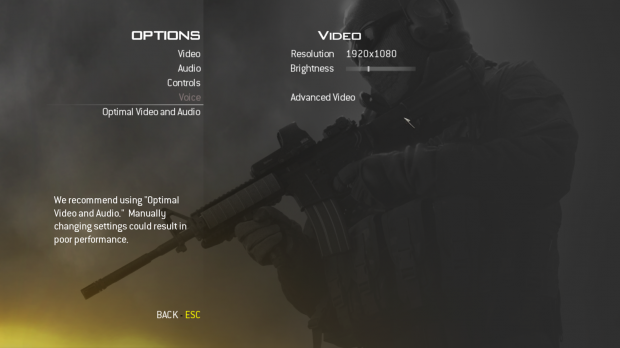
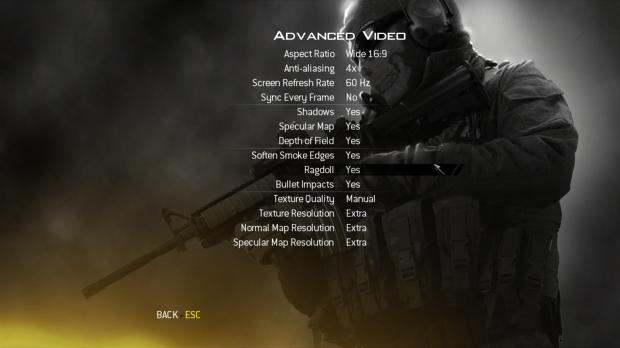
As with most games in the Call of Duty franchise it features a heavy AI load. This is not because of a complex AI routine, but more due to the sheer number of enemies in any given combat situation. It is also our single DX9 based game in our testing suite. Settings are shown below.
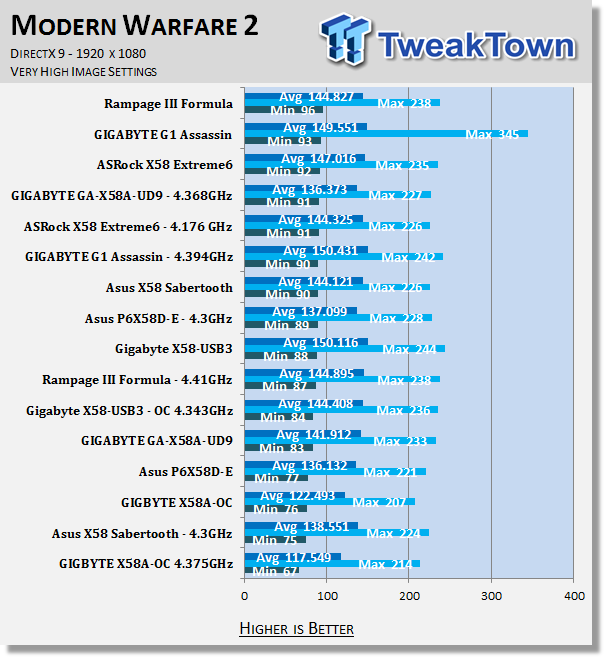
While the X58A-OC is at the bottom of the performance group, you would not be disappointed by its gaming performance if you were to use it as a gaming platform. I mean after all, with a minimum frame rate of over 65 FPS what's not to like.
Far Cry 2 (DX10)
Version and / or Patch Used: V1.00
Timedemo or Level Used: Clearing the Safe house through to the Rescue
Developer Homepage: http://www.ubi.com
Product Homepage: http://farcry.us.ubi.com
Far Cry 2 is a large sandbox style game. There are no levels here so as you move about the island you are on you do not have to wait for the "loading" sign to go away. It is mission driven so each mission is what you would normally think of as the next "level".
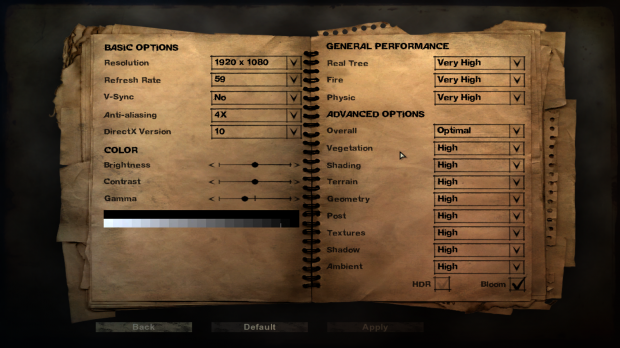
In the game you take the role of a mercenary who has been sent to kill the Jackal; unfortunately your malaria kicks in and you end up being found by him. Long story short, you become the errand boy for a local militia leader and run all over the island doing his bidding. Settings we used for testing are shown below.
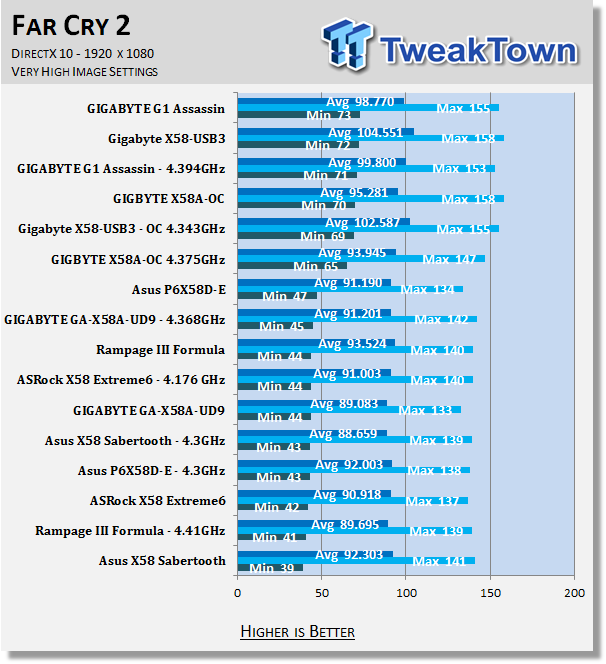
You can read this one in two ways. One, there is something wrong with Far Cry 2 that is causing the scores to be way off. Two, the delta visible is still proportional and the scores balance out. Either way, the X58A-OC can play Far Cry 2.
Battlefield Bad Company 2 (DX11)
Version and / or Patch Used: V1.00
Timedemo or Level Used: From washing up on the beach to the mine fields.
Developer Homepage: http://www.ea.com/
Product Homepage: http://badcompany2.ea.com/
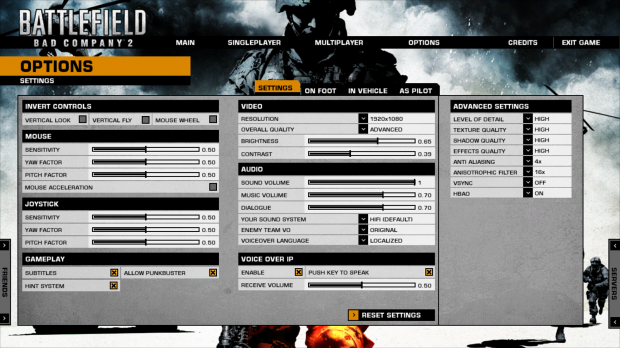
Battlefield Bad Company is another sequel and also another game "franchise". Bad Company 2 is also our DX11 Shooter game. The game follows a fictitious B company team on a mission to recover a Japanese defector. This puts you back in World War II (at least for the beginning of the game) while the multi-player game is centered on much more modern combat. For our testing we used the single player mode. Settings are shown below.
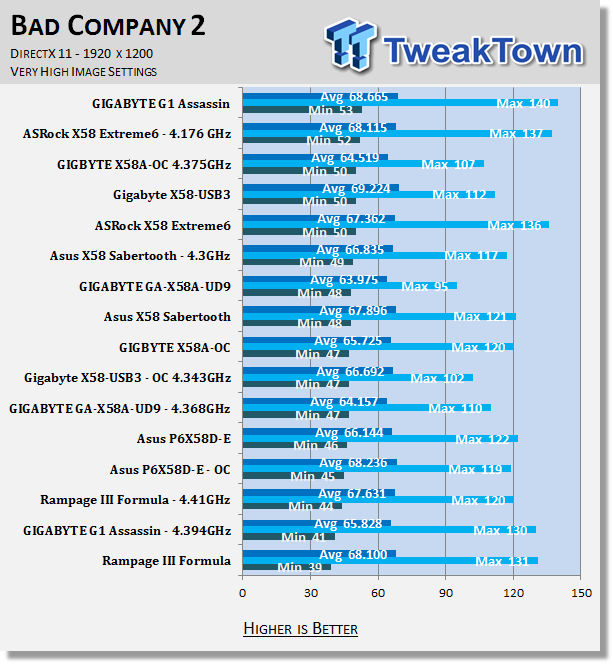
For Bad Company 2 the performance is good. It is not top of the range, but it is still more than good enough to satisfy most gamers.
Gaming Conclusion
The X58A-OC is intended as an overclocking motherboard. It is not designed to be a gamer's board. It can pull it off, but not at the same level as a board that has been designed and tweaked to deal with everything that goes along with gaming.
Power Usage, Heat Tests and Final Thoughts
Power Consumption
We are now able to find out what kind of power is being used by our test system and the associated graphics cards installed. Keep in mind; it tests the complete system (minus LCD monitor, which is plugged directly into an AC wall socket).
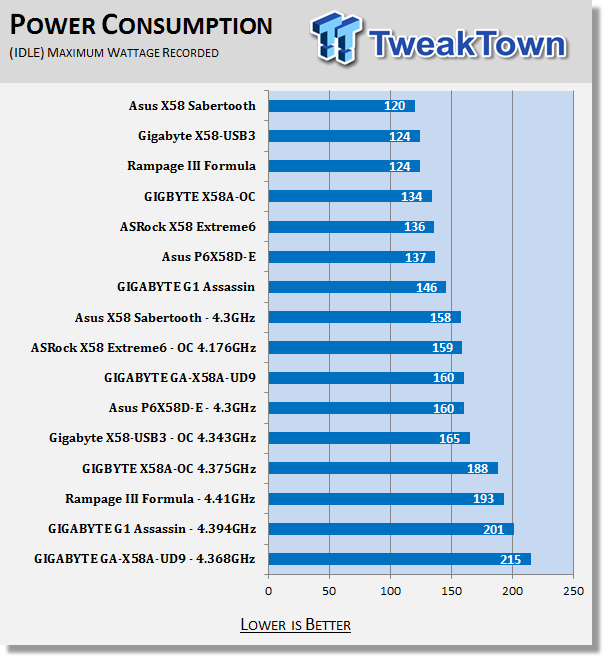
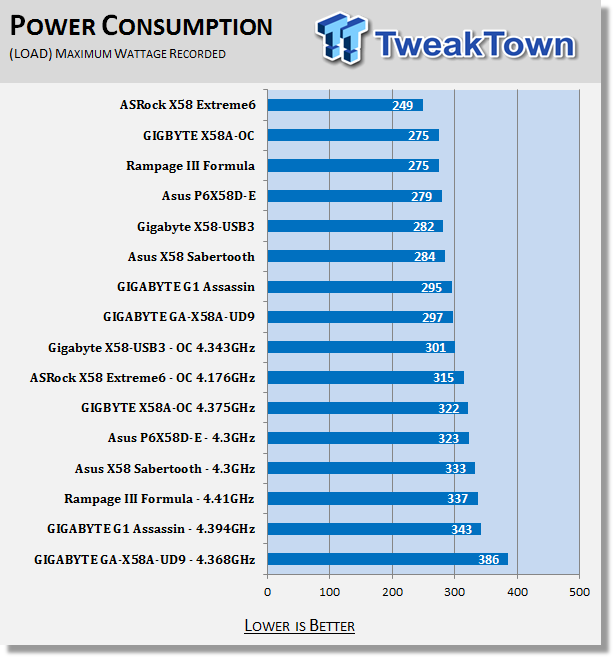
Power draw with the X58A-OC is pretty good considering everything that it has going on. Even with all of the power connectors populated we saw much more efficient use of power than on many other boards. It looks like with better components you get better power efficiency.
Heat Generation
As a new measure, we are now monitoring the heat generation from the key components on the motherboard; this being the Northbridge, Southbridge (if it contains one) as well as the Mosfets around the CPU. The results are recorded at idle and load during the power consumption tests.
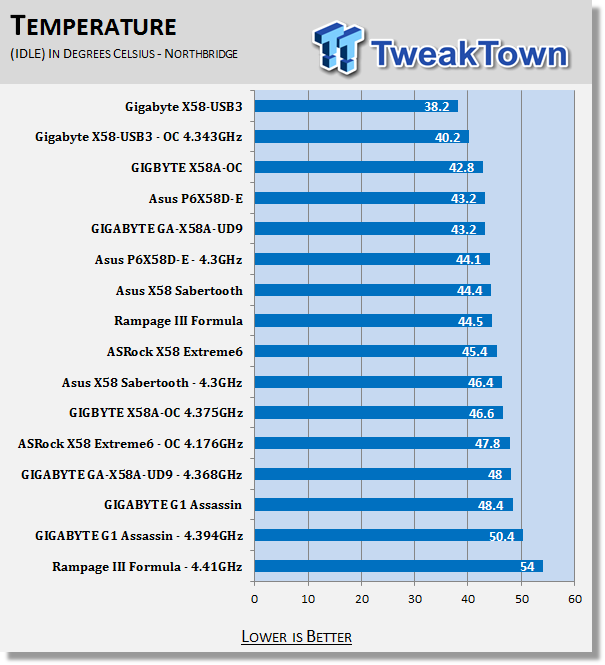
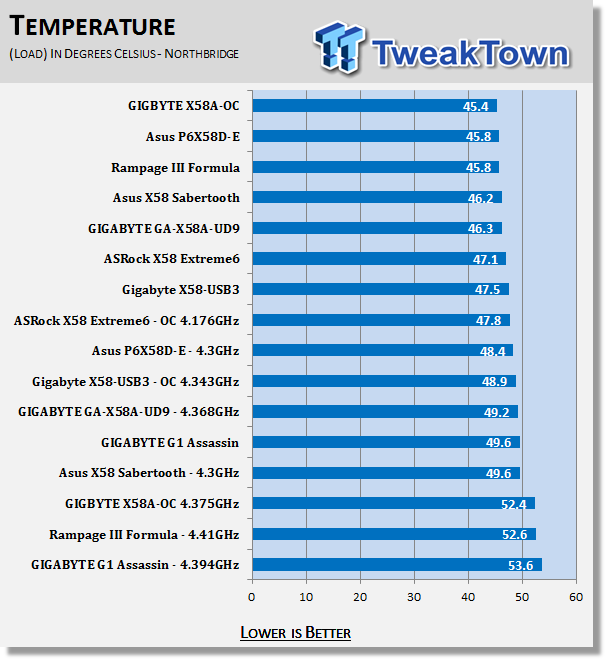
The temperatures are not bad at all either. I really would have expected them to be higher, but again the higher quality components some into play here.
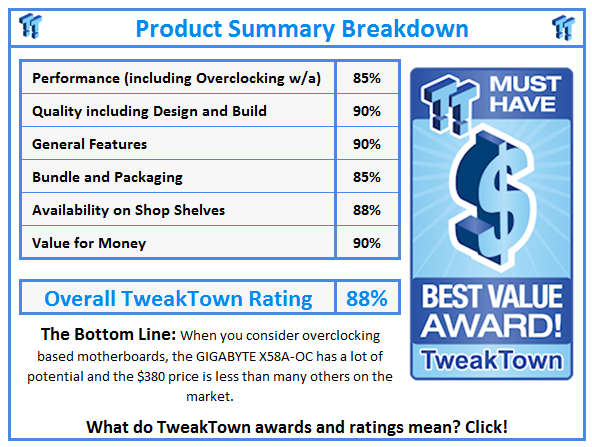
Final Thoughts
The GIGABYTE X58A-OC is a board meant for overclocking. It has some issues, though. We were not able to get as high of a clock as we hoped and even then we did not see all of the performance numbers we expected. 3DMark11 performed great, but the PCMark Vantage scores were not there. This was due to the issue that we saw with our SSD and the SATA controller on this board. We have not been able to sort this issue out yet, but have a feeling that GIGABYTE will have a fix for this in the near future.
Still, even with those items it is obvious that they put a lot of thought into the design and component selection. You would not be making a bad decision if you picked one up. After all, there are benchmarks, tests, and scores that do not care about drive speed or at the very least do not care about the differences between IDE mode and AHCI. When you add in the $380 price tag things still look pretty good.
Our Latest Socket LGA 1366 Review Coverage
 GIGABYTE X870E Aero X3D Dark Wood Review - A woody goody
 ASUS TUF Gaming X870-Pro WiFi7 W NEO Review - Tuffed up
 ASRock Z890 Taichi Aqua Motherboard Review - Flagship features without the flagship price
 GIGABYTE Z890I AORUS Ultra Motherboard Review - Mini-ITX with surprisingly good thermals
 GIGABYTE Z890 AORUS Elite WiFi7 Plus Motherboard Review - Right in the sweet spot
 Giveaway: Win an ASRock B850 Riptide WiFi and Phantom Gaming PG-850G PSU
 China's CXMT is on track to nearly match Micron's DRAM production capacity by the end of 2026
 NVIDIA's RTX 50 Super GPUs have reached board partners, but launch is on hold over 3GB GDDR7 pricing
 Amazon's God of War series is recasting Kratos after Ryan Hurst suffered an on-set injury
 Physical games don't matter to GameStop, CEO says
 GameStop CEO Ryan Cohen wants to buy eBay and build out an in-game digital marketplace
 KB5101650 Windows 11 update is causing some Dell PCs to shut down unexpectedly
 Bethesda on Elder Scrolls VI, Fallout 5 Xbox exclusivity: 'It's too early to comment'
 Assassin's Creed Black Flag Resynced makes in one day what Shadows took four days to earn
 Bethesda gives news on Elder Scrolls 6, confirms 4 Fallout projects, new Starfield content
 SteelSeries Arctis Nova 7 Wireless Gen 2 Headset Review - New and Improved, But Is It Enough?
 AMD Ryzen 7 7700X3D Review - Days of Future Past
 Samsung 990 2TB SSD Review - Ninth Gen QLC at PCIe Gen4 Speeds
 ASUS ExpertBook Ultra (Panther Lake) 14" Business Laptop Review
 ASUS ROG Raikiri II Xbox Wireless Controller Review - Ready to Take Control
 MOZA FMP18 Panel Bundle Review: authentic F/A-18 Hornet cockpit controls for flight sims
 Micron 6600 ION 245.76TB Enterprise SSD Review - Best in Class Programming Speeds
 MOZA MA3F EFCM Flight Control Module Review: authentic Airbus A320 autopilot panel for simulators
 Turtle Beach Stealth Pro II Wireless Gaming Headset Review - Premium Sound, Fantastic Features
 MOZA MGX1000 Instrument Panel Review: a realistic Garmin G1000 replica for immersive flight sims
 I install and update most of my apps with this Windows command now, and I stopped downloading sketchy installers
 Hisense U6SF 65-inch MiniLED TV: High Performance Meets Leisurely Convenience
 I stopped digging through Windows menus after I set up this one folder
 Don't sell your Windows laptop until you do these things
 6 PC cleaning mistakes to avoid for safer hardware maintenance
 Phison and Intel Take Aim at Local AI's Memory Wall with aiDAPTIV
 How to Remap Keyboard Keys in Windows using Microsoft PowerToys
 7 tips to organize your Windows files for faster, easier access
 Intel Arc G3 Extreme first impressions with MSI's Claw 8 EX AI+ - Incredible power for an extreme price
 How to fix Wi-Fi Adapter Not Working on Windows laptops: troubleshooting tips