Introduction
With the random products I receive sometimes, like memory with a cooler or even better, for graphics card coolers, what I have found is that tinkering with components inside my cases has become a real pain in the rear end. This alone had sent me on the quest for the simplest design that would fit my needs and take up the least amount of room possible. I had thought of a Lian Li motherboard tray and just laying things out on a table, but that just doesn't work for me. I already had the Banchetto 101 and the Lian Li Pit Stop, but while they were both excellent products in their own right, they just weren't what I was looking for.
This quest dropped me off at Cooler Master's website, and I got to looking around. On the global site I located what I thought would do exactly as I needed. A small footprint, super simple layout, and ease of use are what led me to send a request for this design. I do realize that this chassis is older; it was released over a year ago to be more specific, but this chassis suits my needs exactly, and I am going to bring you my experience with it anyways. Not only to show you what such a simple design is capable of, but I also want to inspire a redo.
The Test Bench V1.0 from Cooler Master is what I will be going over today. While this product is no longer widely available, I think it is a product well worth mentioning, and with a few minor changes could easily take the market by storm with a version 1.1 or 2.0 depending on how they want to name it. Hopefully as I take you through he build and my thoughts on the use of the Test Bench V1.0, it will inspire you as it did me to help this chassis design have a comeback, as I feel it is one of the easiest test benches I have used to date! - Stick with me as I get through what the chassis offers, look at the images, and hopefully I can inspire others to feel the same way as I do about the Test Bench 1.0 from Cooler Master.
Specifications, Availability and Pricing
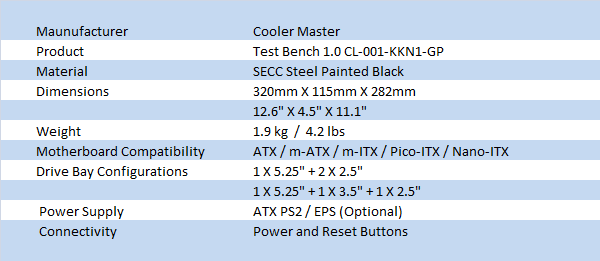
The Cooler Master Test Bench V1.0 is made completely from steel that has an SECC coating, and then gets a full coat of flat black paint. Cooler Master than takes white paint and sprays their name on the front, top and right side of the unit, so you always can see their logo from any angle. The words "test bench" are not placed anywhere on the unit, rather it gets replaced with "labs". Beyond aesthetics, the Test Bench has room for a power supply and an assortment of drive options. You can run two 5.25" devices plus a 2.5" hard drive, or one DVD drive, one 3.5" hard drive, and there is still room for that 2.5" drive. Remember, this is a test bench, not a server case, and with that, there are plenty of spaces to get everything you need for testing or benching in a space of 12.6" X 11.1", and the chassis is only 4.5" tall.
Supporting any motherboard ATX and smaller makes this unit very handy for me, as I use ATX, m-ATX, and even my m-ITX for testing all sorts of things either for you as my readers, or just to see if my Atom processor can do any gaming once I strap a GTS 450 on it. This little 4.2 pound chassis has everything I need to get by. Cooler Master didn't give this unit a ton of options, but adding a power and reset button along with PSU venting, wire management holes, and tool-less risers placed this unit on my shelf for definite future use in testing.
While things are a fair bit easier for me to access than for the average buyer most times, I find it hard to believe that no one in the American market seems to show stock of this chassis. I have to assume they finally ran out of stock, and never asked Cooler Master for more. Now, I have no idea how many Cooler Master had on hand, but I would imagine an email to the sales department might put you on the fast track to attaining one in the US. I was able to locate the unit at ComEuro.net, which appears to be a German site. Here they have the product listing for £60.39. That roughly translates to around $93 dollars in the US market. I have to assume that as with most products sold by retailer when supply goes low, prices tend to go up a bit.
The Packaging

The Test Bench 1.0 comes in a plain brown box with black text and images printed on the box. This side covers three features; the open structure, the small size and high flexibility, and the easy to use riser system. On the right you can see a rendering of the unit with and without components.

Eight languages show that this is the Test Bench V1.0 and where to go for support.

A full list of specifications is placed here to make sure you know just what you can expect to get with this chassis.

Coming full circle we see that both sides of the box match each other. With such a basic concept I guess there isn't a whole lot to show off.

Too bad UPS had to cover the text and images, but as you go to cut the box open you are greeted with the name, the website, and the largest rendering of the Test Bench V1.0 on the package.

Out of the box I see the unit is centralized and secured with high density foam caps at each corner of the Test Bench. This kept my sample safe, and the plastic liner kept any scratches from ruining the paint job on the chassis.
The Cooler Master Test Bench V1.0 Open Air Chassis
The Cooler Master Test Bench V1.0 (CL-001-KKN1-GP) Open Air Chassis

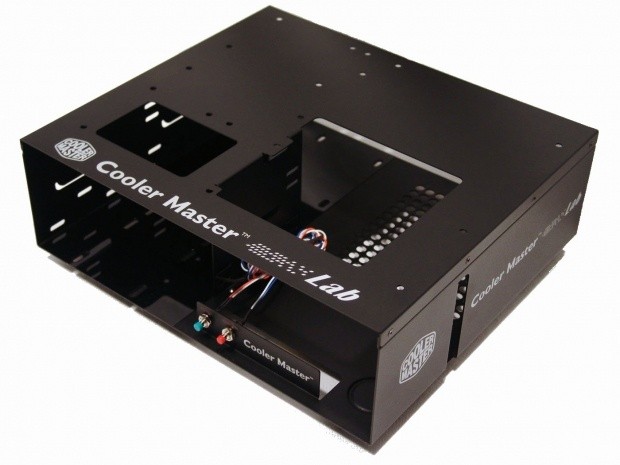
You can see what I mean when I said the design is simple. The Test Bench V1.0 offers just the necessities to get the system under way. Here we can see a large open area on the left for drives and wiring, and a matching large area to the right. This time though, you have room for the power supply just behind the pair of buttons.

The green button is for powering the motherboard and the red button is for reset. Both buttons are set into this steel panel that also carries the Cooler Master naming.

The right side of the Test Bench has a cut-away that gets folded in to use as a mounting spot for the power supply. In front of the opening is the Cooler Master logo, while behind it, you get Cooler Master...Lab.

Looking in this all black unit from the back, only the holes really show. There is a pair of holes at the top and the ventilation at the bottom of the unit that I will show in the next couple of images.

The left side has tabs cut out and folded in to support drives as they are slid into place. There are also various slots to accept included hardware for securing the devices in the Test Bench.

Looking down onto the top of the unit, Cooler Master has added holes for ATX and smaller motherboard risers. There is also a small hole above the drive bays for SATA cables and such, while the larger hole over the power supply will allow you to run the power wires under the motherboard for a cleaner look while testing. If the power supply didn't take up much of this hole, I would say it was possible to use to change back plates, but that would take some finesse while the PSU is in place.

The unit gets supported with four large rubber feet, while the steel floor gets some ventilation and a few more slots for mounting drives. You can use the slots on the right to install a 2.5" drive directly to the floor, freeing up a slot in the front for another device.
Accessories and Documentation
When I opened the package I didn't find any sort of paper work inside of the box. With the simple concept and the small drawings on the outside, I was left to figure it out as I went. To be really honest, all you need to know is how to wire a motherboard, turn a screw driver, and push in a few clips. After you see the hardware, it becomes much simpler to understand what to do.

Wrapped tightly in a plastic bag, just floating free in the box, you will find all the assorted hardware shipped with the Test Bench V1.0. There are nine plastic risers that push into the holes on the Test Bench and the longer end acts as a riser. The board gets set on the risers and gets held in place by the pressure the head of the riser applies in the holes of the motherboard. The bottom row holds a group of around twenty screws for mounting the drives, or to use with the four brass risers that follow them. On the right you will find eight hex head screws to use to mount the power supply, while the other four hold the other end of those brass risers.

As I got to one of the holes I had a slight issue with these plastic clips. Thankfully I grabbed the brass risers and was able to continue with the build even though I was clumsy enough to break off four of them. While I really liked the way the plastic risers worked, they are a bit brittle.
The Build and Finished Product
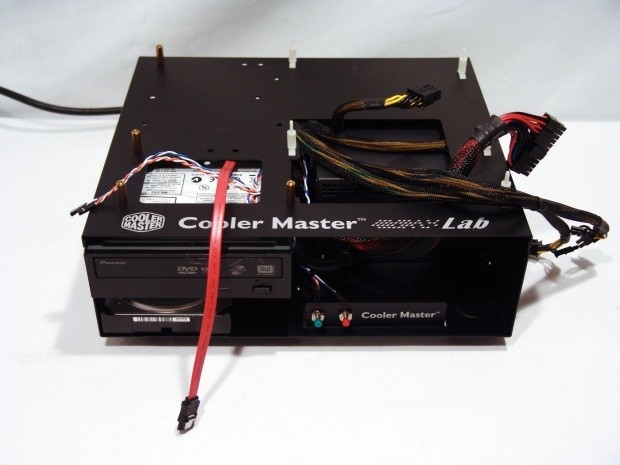
I went ahead and installed the power supply, the optical drive and the 3.5" hard drive and got all of the wiring ready to install the motherboard. As you can see, both of the large holes work well for running the wiring to appropriate section of the motherboard, for easy and clean looking connectivity.

With very little effort I sat the motherboard on top of the plastic risers. They slide about halfway down due to the weight of the board, but require a gentle push to seat them properly. The other four brass risers I simply added a screw to. With some good planning and some careful wire tucking underneath, you end up with a very clean looking system.
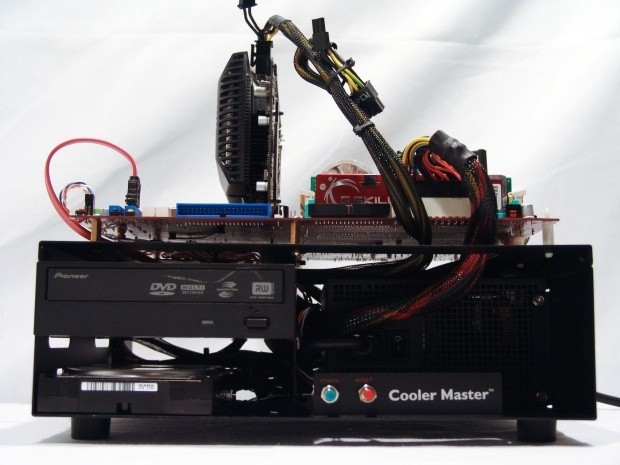
Getting down to eye level you can see with my setup there is a bit more room for tucking wires and routing the cables. If you were to use two 5.25" devices and the 2.5" drive in the back, wiring would be much tougher to hide in my opinion.

Something I really liked in this design is that the power and reset buttons are right near the power supply switch and plug. Convenience is the key here! As this is a Test Bench, quick access to the power switch without having to blindly feel for it behind the chassis is very nice to see.

I would strongly recommend use of a modular power supply for such a small unit. As you can see, if I had those extra wires hardwired to the unit, I would be hiding a rats nest back here. Something I noticed as well is that the base could have used a fifth foot. One in the center of the chassis would have kept the floor from deflecting under the weight of the power supply.

With the ATX board installed you can see the Test Bench V1.0 is only slightly bigger in the foot print it is going to use on the desktop. With the power wire running out the back along with all the motherboard connectivity on the back of the chassis, even the USB and monitor cables should be out of the way and make for a clutter free testing environment.
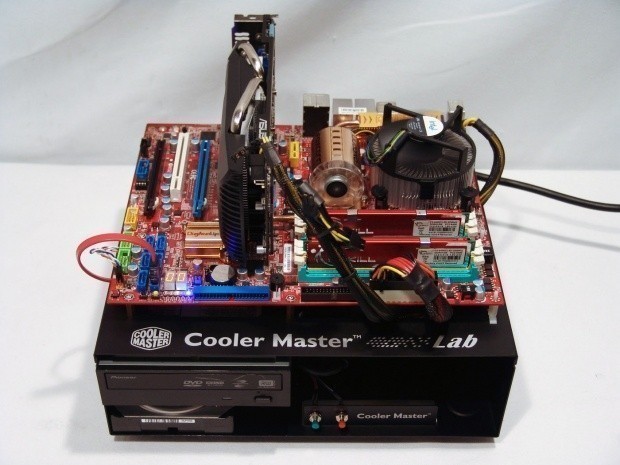
I did power up the chassis to test the functionality of the power switches and just to make sure I didn't short anything out. While this unit does not offer the water cooling capabilities of the Banchetto 101, it doesn't have a cooler clearance issue as did the Pit Stop due to the carrying handle. What you do get is a small, very usable product that can get the job done.
Final Thoughts
Now I can't deny that this Test Bench V1.0 has already seen its day, and likely will be hard for you to locate one. What I hope to do at this point is really inspire Cooler Master to take this unit back to the drawing board and offer us an updated version. I found very few issues with the unit. To be specific, I loved the plastic risers, but the brittle plastic may break if they are installed any way other than "perfect". There are ways to get around this little issue, so I was still able to use my Test Bench V1.0 with pleasure. An extra foot wouldn't hurt either, but the flex of the floor didn't translate to any deviation of the motherboard tray, so I can't say it is a major concern.
While it certainly fulfilled my checklist for points I wanted in my test bench setup, there are a couple of things I would have liked to have seen, but they just aren't offered. A support for expansion cards would be awesome, even if it was just rods with screws to keep the card aligned in the slot properly. The second addition would be some USB connectivity on the front. While I know it is easy to get to the motherboard USB ports, getting screen shots and saving them to a thumb drive, or even loading the OS would have been made more comfortable during normal use with this simple addition. I really hope that Cooler Master takes this to heart and can over us a new version of the Test Bench and bring a new option to this segment; open air test benches.
Like I said, in the U.S. market you are going to be hard pressed to find this unit any longer. It's a shame really as I really do like this simple, yet elegant solution to test benches. Even if I was asked to pay the equivalent of the £60.39 asking price at ComEuro.net, or roughly $94 US dollars, I would have, as this chassis does everything I need it to. What I would love to see is a slightly stronger model, with more appropriate supports, and a bit more connectivity for around the same price, so that those who missed out or can no longer find this chassis have a chance to enjoy the time using the Cooler Master Test Bench V1.0 as I did. Don't let the score fool you, things like availability and the easy to break risers do get reflected in the otherwise great score.



 United
States: Find other tech and computer products like this
over at
  United
Kingdom: Find other tech and computer products like this
over at
  Australia:
Find other tech and computer products like this over at
  Canada:
Find other tech and computer products like this over at
  Deutschland:
Finde andere Technik- und Computerprodukte wie dieses auf