


Introduction

First off, I need to apologize to Thermaltake, as this product got set behind some others and I should have had this done earlier. Secondly, I would like to apologize to my readers for not showing you this in a more timely fashion, leaving you without seeing the benefits of the chassis I am about to show you.
If you are even slightly computer savvy and have been shopping for anything PC related, I'm sure you have run across the name Thermaltake in your travels. Everything from power supplies, chassis', and cooling has been handled for years by them, and they did quite well making a name for themselves. A while back we did get the opportunity to look at a couple of the mid and full tower chassis' in the Element series designed for gamers and having cooling and wire management being of utmost importance.
Today the Element series is taking a turn, or a reduction to be more precise. The chassis we are about to look at is quite Spartan compared to its much larger brethren, as this chassis isn't exactly directed at gaming as the others were. This time the chassis gets dropped to about the height of your favorite 12 oz. beverage, and is designed to go in a HTPC environment or a low power web surfing and email machine if you don't want to include this to your home theater.
Today we are looking at the Element Q from Thermaltake, and it is what they call a Mini case - Keeping some styling cues from the Elements we have seen previously along with some nice design features on the inside that I am not used to seeing in chassis' of this size. So what exactly is a mini case, and what does it have to offer? Keep reading as I am about to show you a chassis that has won me over!
Specifications, Availability and Pricing

This mini-ITX desktop or HTPC chassis is made from steel inside and out, and the front is capped with black plastic that houses the signature Element red trim. The outside of the entire chassis is black while the inside is left exposed. In the front there is room for a full sized 5.25" optical drive above a slot for either an internal 3.5" drive or it can be used to install a floppy drive externally. Below these you find the front I/O panel behind a cover with a press to release lock. Once the panel is open it will expose the connectivity for the two USB 2.0, MIC, and headphone jacks.
On the floor you will find room to install only an m-ITX motherboard. Due to the placement of the included 220W SFX power supply, motherboards that require much more cooling than what you will find on my Intel Atom board, this won't allow for much in the way of additional cooling, and is specified for just such a board for that reason. The power supply contains the only fan that will be cooling the chassis. As the Q is shipped, it hasn't any additional fans, but will allow for an 80mm to go in the side if additional cooling is needed.
Now, I'm all for great deals, and when the great deal happens to be on something that packs more than what you expect it to have, makes that deal so much sweeter. Thermaltake offers you room for full sized components, offers sleek looks, and takes it a step further with silence while under power. But at what price? I am pleased to say that the Element Q isn't going to hit that hard in the wallet for what you get in return. One look at Google shows that there is no shortage of this chassis. While not the best price I found online, Newegg.com asking $64.99 isn't the cheapest, but it is very competitive, plus there is that homey comfort feeling when dealing with Newegg over some of the lesser known companies. Whether you press your luck for the best pricing or go with the tried and true, I am about to show you it is well worth that pricing!
Packaging
The Packaging

The Element Q follows the rest of the line up and uses a black box with the Thermaltake red stripe going around it. The VL5000 Series of cases is what the Element Q seen on the front falls into. As you can see, even the chassis itself carries the red striping as the much larger Element chassis did.

Three features of the Element are listed on this side. They cover the form factor, the looks, and the silence of operation in this list.

Major features of the chassis are listed on the rear of the box along with images and tests to explain how they benefit you. Externally they cover the front I/O, looks, and the ventilation. Internally they cover the drive assemblies, the expansion slot, and the included power supply. The bottom takes you on a 360° trip around the outside of the Element Q for your viewing pleasure.

If you buy one of these from the store, you will find a specifications chart on this side to aid you with knowledge on what can be expected with the Element Q. UPS didn't think it was so important, so they went ahead and blocked our view of it.

The Element Q is very small and easy to get stacked on when in transit. The Styrofoam ends secure and center the chassis while the plastic liner keeps the abrasions at bay and allowed me to receive an Element Q in perfect condition.
The Thermaltake Element Q Mini Case

The front of the Element Q is all black and very simple with red trim that looks like a smile at the bottom. To add a bit of perspective to what you are looking at, the chassis stands just taller than a 12 oz. can of soda. The bulk of the top half is used by the 5.25" bay with a cover installed if you have no need for an optical drive. Between the power and reset buttons with indicator LEDs under them, there is the cover for the 3.5" drive bay for a floppy drive, or an internal hard drive and you leave the cover in place.

Under the Thermaltake logo on the front is where the front I/O is located. This panel allows connectivity for two USB 2.0 devices with a microphone and headphone jack between them. On the far right side you can see the pressure lock mechanism that keeps the door locked shut when it's closed.

The side is drilled to allow for an intake of air flow. The holes are drilled in a chevron pattern and will accept the use of an 80mm fan on the inside of this three sided panel.

Looking at the back of the Q you see that the top and both sides are made of one piece of steel and locked into the chassis by four screws. The power supply is mounted just above the rear I/O, so tall heat sinks are out in this chassis. On the right there is an expansion slot of a TV tuner or a HD audio card.

This side of the chassis shared the same pattern as did the other side. With only the power supply moving air inside the chassis, the added ventilation is welcomed.

The bottom of the chassis has a raised rail at the front and the back to allow the chassis to take footing on something. In all four corners you see two lines. These denote where to place the thick rubber feet that come packed inside the chassis.
Inside The Thermaltake Element Q Mini Case

After removing the cover for the chassis we see the interior is simple in design and layout, but offers all the room you will need to house what is needed for a good HTPC. The instructions get taped to the floor, the hardware is twist tied to the rail in the optical drive bay, and of course the included PSU is already mounted.

I pulled out the Thermaltake 220W power supply so I could show it off a bit and what to expect for connectivity. I do like that this SFX power supply has a plastic hook on the side to allow it to hang on the top rail of the chassis for extra support.

Not that my setup is going to pull anywhere close to the 15A or the 180W rating of the 12V rail, so it will most certainly cover my needs. Even if you want to run a single slot VGA, there is still potential with this supply of power.

And here is the ventilation for the chassis, and of course the power supply fan. This 80mm fan does double duty as cooling for the power supply and the only draw of air in the chassis as it comes shipped.

Connectivity of the power supply consists of the 20+4 pin, a rail with two 4-pin Molex connectors and ends in a floppy power connection. Behind these are the rails with the 4-pin CPU power line and the two SATA power connections.

Back inside the chassis, the front I/O wiring is long enough to reach the back of the Element Q. Getting the Audio, USB, and the switches and LEDs hooked up won't be a problem.

Getting ready for assembly, I pulled the front bezel off the Q to let you see what is going on behind the scenes. The front I/O is built into the chassis and stays in place. To get access to remove the drive covers you must be sure the wiring is free before you pull it too far away. I do like the added touch to actually mount the wiring to the bezel so that they don't get in the way when you slide drives into place.
Accessories and Documentation

The hardware included with the Element Q is pretty basic, but gives you everything you are going to need. Of course, you need a chord to plug in the PSU, so Thermaltake ships one. There are 5.25" to 3.25" adapters if you want to use a smaller hard drive in the build. There is a motherboard speaker along with a full set of screws for the motherboard, the floppy drive, and optical drives. That leaves the sticker sheet containing the large rubber feet for the bottom of the chassis.

The instruction booklet is multi-lingual. Both the written text along with the drawings will answer any of your installation questions. With the chassis design and implementation being so straight forward, if you have ever built a PC, there shouldn't be anything here that will confuse you. Along with the instructions Thermaltake ships some paperwork with information pertaining to the warranty and its conditions.
The Build and Finished Product

I grabbed my ZOTAC Atom/Ion motherboard and installed the m-ITX board into the chassis. All of the front panel wiring is a breeze to install, and I could route it and actually had to tie some of the wires together to shorten them.

I chose to install a 3.5" hard drive in the Q just to show you that you can. Since there is a top on the chassis and you can't see the inside, I didn't care if it hung over my RAM sticks. There is also room enough to use the normal SATA cables as well; no need for 90° ends.

Something else I like about this design is that it allows for a full sized optical drive. This will make installing any optical drive you have handy, or a good reason to buy a Blu-ray drive. I folded the ends of the cables just to make things look neat for the images. There is plenty of room for these as you are about to see.

With the SFX 220W power supply in place you can see there is plenty of room to get things installed and even have a bit of room left to tidy up the wiring.

Looking in from the side with all the components in place, you can see Thermaltake leaves enough room to get air flowing inside the chassis. Even though it is only one fan doing all the work, there is sufficient room for it to draw all the air it needs.

Putting the top and sides back on, the chassis looks much the same as it did when we first saw it. The only thing that has changed from the outside is the optical drive, which does sit flush with the front and leaves a nice look.

The rear of the chassis fills up fast, but there is room for everything I needed. I didn't have a spare TV tuner to install or this system would be getting hooked up in my living room immediately. All we need to do now is add the power cord and get to the testing.

When under power the only thing you may need to contend with is the bright glare of the red HDD activity light and the blue power lights. There is a benefit to that brightness; if you just want to glance to see if it is on, it will for sure let you know, as they are easy to see.
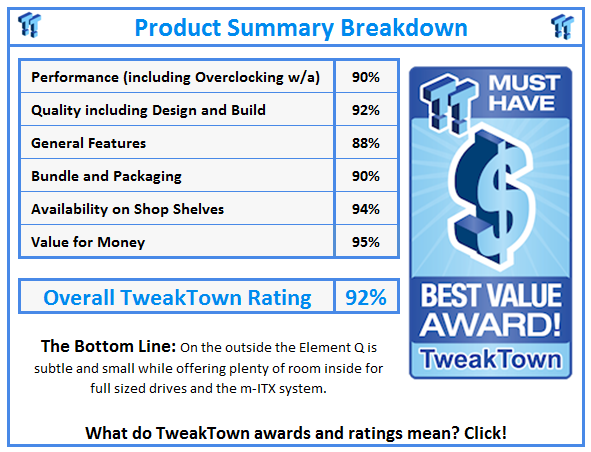
Final Thoughts
The Element Q is the perfect solution to my plans for internet usage and streaming movies to the comfort of my couch. The simplistic exterior with just a flash of red is going to fit nicely. Thermaltake wasn't joking when they pointed out the three Qs on the packaging. This case is in fact very small (Quintessence)! - It is nice to look at, although "Qute" (or cute) inflects images of puppies and kittens, and this isn't furry nor does it have a tail, so I will go with it having very nice styling. Then we have "Quiet" and with only one fan doing the work. And that fan is well inside and to the back of the chassis, so it leaves no audible trace of its presence. Whether in open air or when I set it in my entertainment center did I even get a slight reflection of noise; it is most certainly quiet.
The simple design of the inside of the chassis is a huge plus from where I stand. Most users already have a desktop hard drive or two and a few 5.25" optical drives lying around. For the Element Q to be designed with both to be able to be used in such a small foot print was a shock. In many others like this, I have to go into my specialty parts pile and pull out my slim optical drive and notebook HDDs to get one of these up and running. For my needs this chassis is exactly what I needed. Now I just need to go to Newegg,com and order me a BR drive and another TV tuner and I will be all set for my HTPC needs.
This chassis has been on the market for a while now, so getting one anywhere Thermaltake is carried will be easy. When the chassis was first released it had an MSRP of $80 and with what I found it was worth every dollar of that pricing. As with many parts as time went by, prices do tend to drop a bit. Finding the Element Q on Newegg.com for $64.99 isn't a total surprise and it works in our favor. Looking at the chassis for $65 makes the deal that much sweeter, and if you have a system similar to mine, this may well be the perfect case for your HTPC needs.
Our Latest Small Form Factor Cases Review Coverage
 MOAIPLAY ORA PRO G1 850W ATX 3.1 PSU Review: high efficiency and 10-year warranty for $119.99
 NZXT H6 RGB+ Compact Dual-Chamber Chassis Review
 Lian Li HYDROSHIFT II 360P OLED Curved Liquid CPU Cooler Review
 ID-Cooling FROZN A620 SLK CPU Cooler Review
 GAMDIAS Atlas P6 CG Dual Chamber Mid-Tower Chassis Review
 AMD plans to increase the price of its graphics cards by 10-15% in the second half of 2026
 Black Myth Wukong mirrors GTA V success with 30 million copies sold in less than 2 years
 Steam Controller supply can't keep up with demand, Valve pushes orders to 2027
 Steam Machine shipments spotted, as Valve is rumored to launch the gaming PC next week
 HDMI 2.2 products are coming in 2027 as chip makers begin sampling FRL2 silicon this year
 Solo dev tries to make his own GTA 6 with AI, as he got tired of waiting for Rockstar
 Repair channel buys ASUS RTX 4090 for $222 and finds plastic die with fake NVIDIA markings
 Epic's gen AI use deters partners, Vampire Survivors x Fortnite might get cancelled
 Sony seems to confirm singleplayer first-party PlayStation games will remain console exclusive
 Speed Racer (2008) 4K Ultra HD Blu-ray Review: a stunning remaster of the cult classic
 Navman MiVue Smart True 4K Surround Dashcam Review - Seeing In All Directions At Once
 IQUNIX Magi96 Pro Aluminum Low Profile Mechanical Keyboard Review - Premium Build, Satisfying Sound
 Asetek Forte S-Series Racing Simulator Bundle Review
 Razer Pro Type Ergo Wireless Split Ergonomic Keyboard Review - Built for Comfort and Support
 ASUS ROG Strix Morph 96 Wireless Gaming Keyboard Review - Great Performance, More Affordable
 SAPPHIRE Radeon RX 9070 GRE PULSE OC Review - A New 1440p Challenger Has Arrived
 I read the Windows Backup app screen carefully, and it does not back up what most people think
 Low Sound Volume on Windows 11? How to fix audio issues and restore normal volume
 8 Critical Warning Signs You Should Never Ignore in Windows 11
 This Windows security feature protects Documents from ransomware, but it is off by default
 Windows 11 already has a voice typing tool, and it is the one most people are not using
 Quick Assist is the only remote-support tool I open when a relative calls about their PC
 The PowerToys utilities I keep enabled on every Windows 11 PC, and the ones I turned off within a week
 TweakTown's Best of Computex 2026 Awards - The Best Hardware, Gaming Gear, and AI
 Phison E37T SSD Controller Exclusive Preview - The Fastest DRAMless SSD Platform Yet