Introduction
Cooling components is the name of the game; not only to overclockers, but it's just as important for the longevity of the hardware for those who run their components at stock settings. With most chassis designs there aren't many that try to keep groups of components isolated to try to keep heat levels of the whole chassis at bay. Chassis' like the Raven and Obsidian come to the forefront as chassis' that attempt a similar design. While the Raven took things a bit further and rotated the chassis design 90 degrees to the right, under normal usage I found the design wasn't all that beneficial to keeping things cooler. Corsair on the other hand, took the drives out of the mix by not pushing air across them and then into the motherboard area. This did help as they also redirected the airflow inside to keep a sufficient amount of ambient air coming into the main compartment to actually show a couple of degrees drop in temperature to the mainboard, CPU and GPU temps.
Most of us already know that Lian Li designs some of the best chassis' in overall concept, materials chosen, and ease of installation/use. The last time I had the pleasure of using a Lian Li chassis, I took a look at the Lian Li PC-B70, and that chassis was a real pleasure to use. It had a huge window, plenty of sexy aluminum inside, and even sexier anodized aluminum on the exterior. The PC-B70 also has sound deadening material placed inside to deaden any unwanted noises inside the chassis. In my opinion this was done to keep up their standard, as chassis' with windows do allow more noise to travel out of the interior, and possibly annoy the end user.
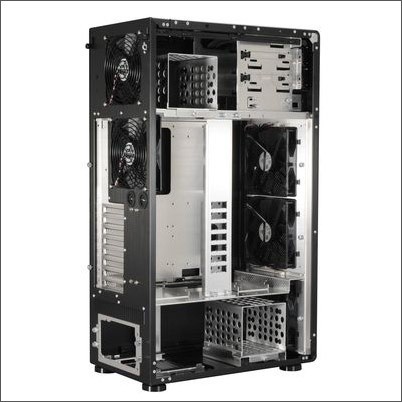
This time around Lian Li implements a three chambered design in this Tyr series chassis to separate components. The design consists of one at the top that holds optical and possibly hard drives, one that holds the mainboard, CPU and GPU's, and one at the bottom for more drives and the power supply. This concept is separated by sheets of aluminum and each section or chamber has its own cooling, no sharing in this chassis. Today we are looking at the PC-X1000 Super Tower. Let's get though the specifications and see what this chassis is all about.
Specifications, Availability and Pricing

The PC-X1000 is an all aluminum tower, inside and out. The exterior of all the panels including the front are black anodized, brushed aluminum, while the interior panels are exposed, brushed aluminum for a nice looking contrast with the door off. The entire chassis is held together with either thumb screws or Phillip's head screws that allow the end user to remove what isn't useful to them or even completely disassemble the chassis to its basic components. The size of this chassis may make it undesirable to some users with tight spaces for their rigs. This chassis stands almost 27" tall and is only about 17" from front panel to rear I/O. Holding the box in my own hands, it didn't seem like it weighs just over 21 pounds empty, but that's what Lian Li says it is, so I'm going with the fact I don't guess weight well. One bonus of a tall chassis that Lian Li took full advantage of, and that it the ability to offer an eight expansion slot configuration to allow Tri-SLI and 3-way Crossfire with dual slot cards to evacuate air out of the chassis instead of the typical seven slots that tend to block the airflow of the bottom GPU.
Cooling this large chassis is no easy feat; there is quite a volume of air that needs to be circulated to keep temps at bay, and even more to move to show temperature improvements. Lian Li takes five 140mm fans, all with ball bearing hubs, to cool the PC-X1000. There is one in the top chamber, three in the middle chamber, and one in the bottom chamber to accomplish the task at hand. This combined with an almost hidden fan controller will allow you to place up to five fans on a switch and customize the level of airflow you desire.
Going through the usual channel, Google Shopping, there are six e-tailers that show stock of the PC-X1000. There is quite a range of pricing as well. I found this chassis listed for as little as $349.99 at Newegg, plus shipping, and as high as almost $500 at other e-tailers. My guess is that if this chassis strikes your "I got to have it" chord, you will be purchasing it from Newegg. They by far have the best deal currently. Even though this chassis has been out for a few months at this point, it is still on shelves and ready to fill any list of gifts for this holiday season.
Packaging
The Packaging
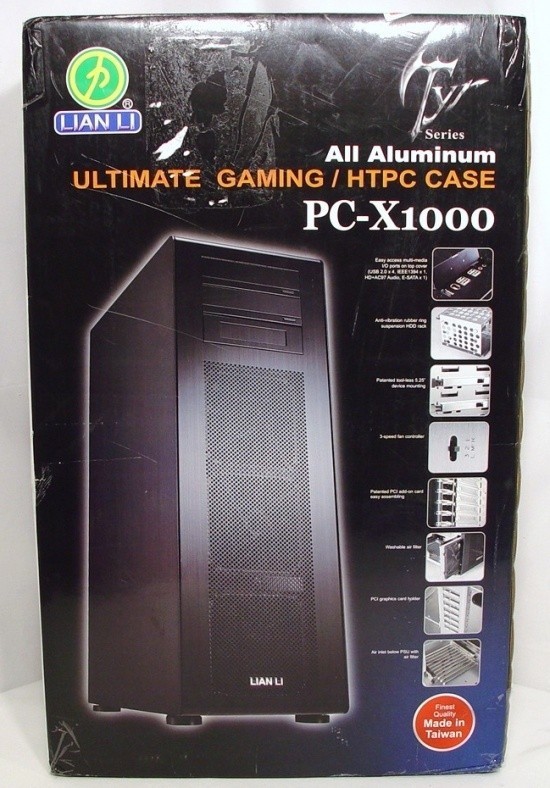
Lian Li uses an all black background to highlight both the chassis image as well as the eight feature windows on the right of the panel. Both the front and rear panels are the same.

The sides of the Lian Li PC-X1000 packaging show a view inside the chassis with the door removed. Below this image is a specifications list in six varying languages. Again, both side panels mirror each other.
Once the box is removed, I was pleased to see Styrofoam running down the entire front panel. This did a terrific job of centering the chassis during shipment while protecting its pretty face along the way. As with most chassis', the PC-X1000 is also bagged to keep abrasions down during the bumpy ride in delivery.
The Lian Li PC-X1000 Super Tower Case
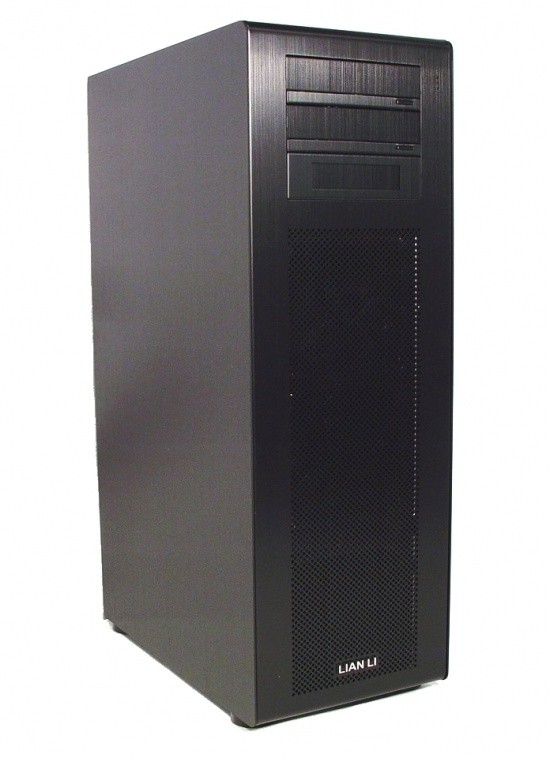
Removing the foam and plastic bag reveals what I am used to in a Lian Li chassis, tons of sexy brushed aluminum. This time there is no window with the PC-X1000, but depending on where this chassis is placed, there really is no need. For daily use I have it sitting on the floor, and cannot see inside it if it had a window anyways.
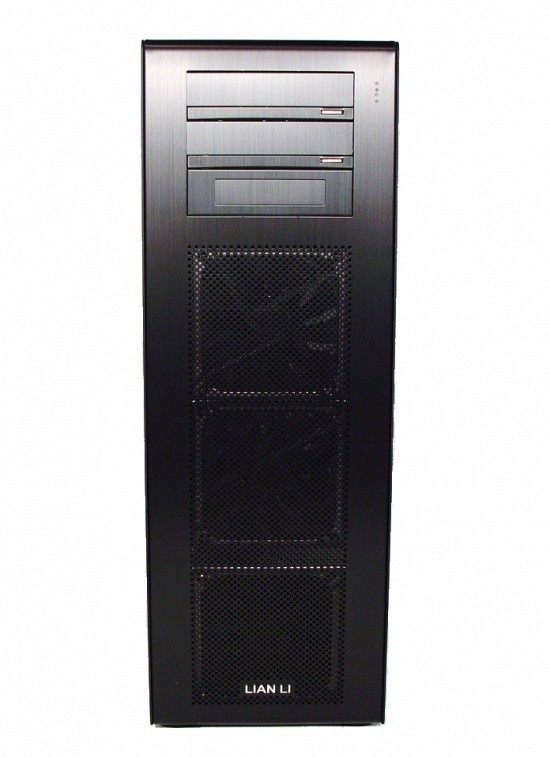
The front panel houses the three 5.25" bays, the bottom of which converts to house a floppy drive if desired. The top two have "stealthed" drive covers, while the bottom drive does not. Below these, there is the vented section of the panel that allows the three, 140mm, front fans to get all the cool air they need to supply the interior. At the very bottom you will find the bright silver name plate.
You can see, just as I mentioned, the side panels are one huge solid slab of aluminum to close things off. These are full panels and the edges of the panel are on the exterior of the chassis and can be seen from the front, top and rear of the chassis.
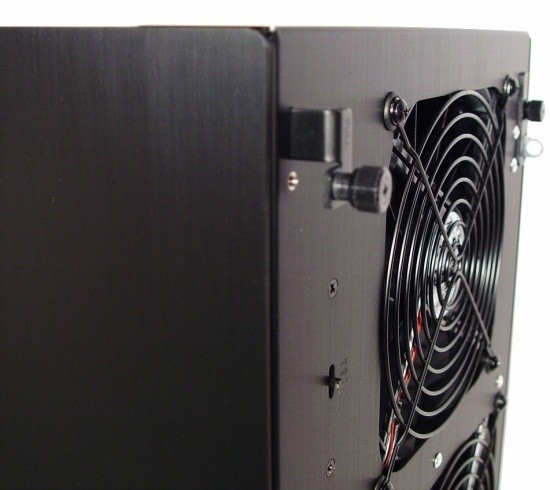
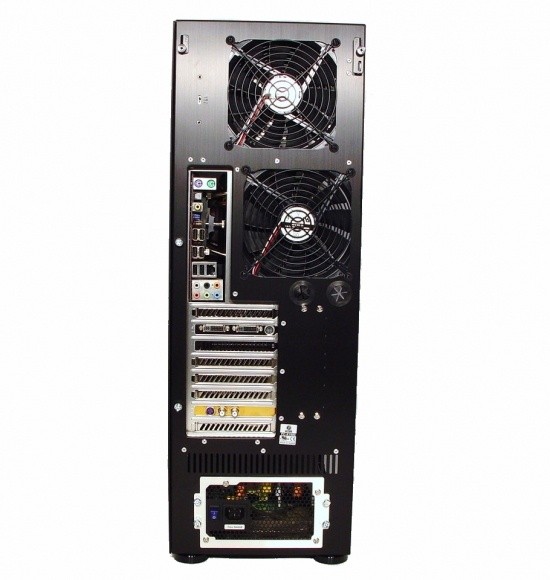
The rear of the PC-X1000 has a lot of things to show off. At the top there are the door panel releases on either side of the top 140mm fan. Just to the left of this fan is the "hidden switch" for fan control (I will show this more in depth a bit later). Moving down, there is another 140mm fan next to the rear I/O panel. Just under this fan Lian Li placed the water cooling pass through for tubing if you plan to use an external radiator for cooling. Moving down a bit more, we see eight vented expansion slots next to a vented area in the chassis. All the way at the bottom is where the PSU is housed, and has a removable plate you can mount to the PSU, then slide it in through this side and attach the plate back to the chassis.
At the top, very close to the front of the PC-X1000 is a hideaway door for the front I/O ports. Lifting the door exposes one e-SATA, one IEEE 1394 (Firewire), and four USB 2.0 ports. At the right side, Lian Li placed the headphone and microphone 3.5mm jacks. Not only does the door of the I/O give a clean look when closed, it will also keep dust out of the ports when not in use. Flanking the right side of the door is the larger power and smaller reset buttons.
As we look at the bottom of the PC-X1000, we can see even here Lian Li cuts no corners. Full black brushed aluminum is used here, too. The feet are made of all black plastic with rubber feet that get screwed into place. Between the left two feet is the vented area for the power supply to draw air if used in the fan-down position. Lian Li also includes a snap-in dust filter to keep things clean inside the chassis.
At the top of the rear of the chassis, you will find two thumb screws. These are attached to a slide bar mechanism, and once unscrewed and pulled out gently, the door panels almost fall from the top and allow you to remove them.
Inside The Lian Li PC-X1000 Super Tower Case
As if the thick aluminum panel itself isn't enough to hold its own weight and still not flex, Lian Li adds side support brackets and top and bottom rails that are used for mounting. I did try to warp or flex this panel a bit, and came up empty and weak, I wasn't able to make this panel warp or flex.
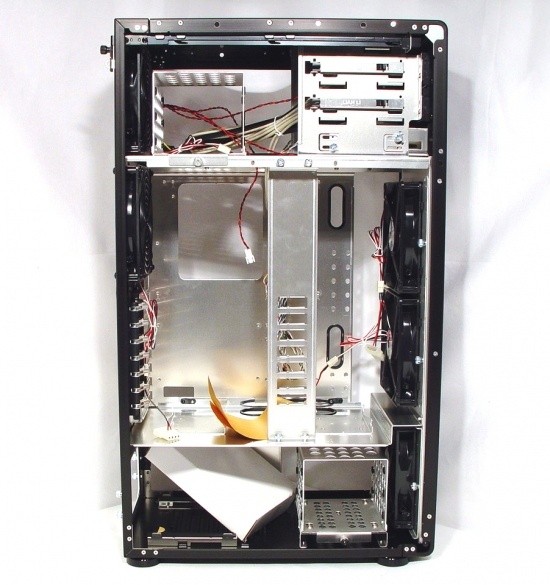
With both panels removed we can get a good look at what makes the PC-X1000 tick. As I mentioned there are the three separated chambers of the chassis. The entirety of the interior, minus the top and rear panel are all made of exposed bushed aluminum, and looks quite appealing when the panel is off, whether it's removed for cleaning or showing off to friends, I like the looks of the bright , exposed interior.
Spinning the chassis 180 degrees, we get a good look at the removable motherboard tray and all the places you can conceive to hide wiring and keep the clean look of this chassis intact. Everything inside of here is built with ease of access in mind, and even from this side all the major components are easy to get into place and mounted.
Separating the chambers makes them a bit easier to explain. The top most chamber houses up to three 5.25" drives, and can simply be held in place with the tool-less lock on the top two. The bottom bay either needs a floppy drive place into the tray supplied inside and mounted, or remove it and add a third 5.25" drive with thumb screws supplied. Towards the rear is a removable, three drive, hard drive cage. Cooling this section of the chassis is a single 140mm fan placed in the rear panel to draw warm air off the drives and get it moving directly outside.
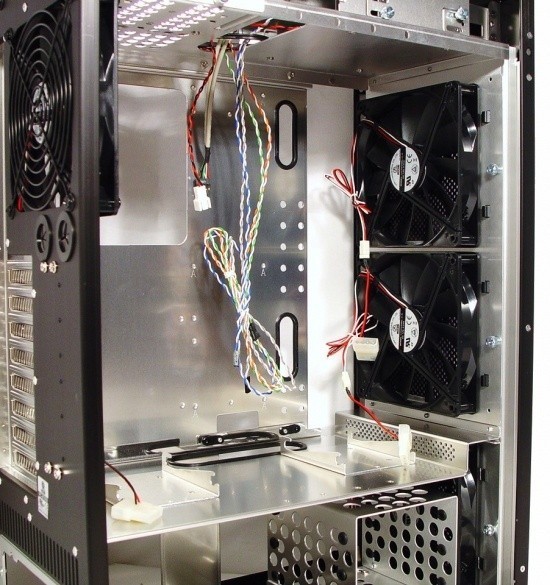
The front of the main chamber houses dual 140 mm fans to bring in cool ambient air. These fans are mounted to a removable plate. Take out those two thumb screws and the whole plate can be removed at once for cleaning and access to the dust filter on the other side. There is a bit of room to the right of the removable tray to hide some wires, but Lian Li adds plenty of management holes to aid in keeping things tidy.
This angle of the center chamber shows off the rear I/O and expansion slots. There are eight, vented slots available, and they all are held in place with the heavy duty, tool-less, latching mechanism which I loved in my previous sample. This is a very solid bracket even when cards like GTX 280's are installed. Two things we couldn't see in the last image are the rather large CPU cooler, back plate access hole in the motherboard tray, and the optional trays on the floor for SSD placement. Both of which are appreciated features, although I wish I had an SSD to set in the bracket. On the rear panel is a 140mm fan to exhaust the CPU fans heat and draw off the motherboard components.
The bottom chamber consists of the last of the 140mm fan supplying air from the right, and blows across another removable HDD rack. Once the air goes past the bays, it can supply air from the front to the PSU. Whether the fan of the power supply is up or down, Lian Li has it covered.
Inside The Lian Li PC-X1000 Super Tower Case - Continued
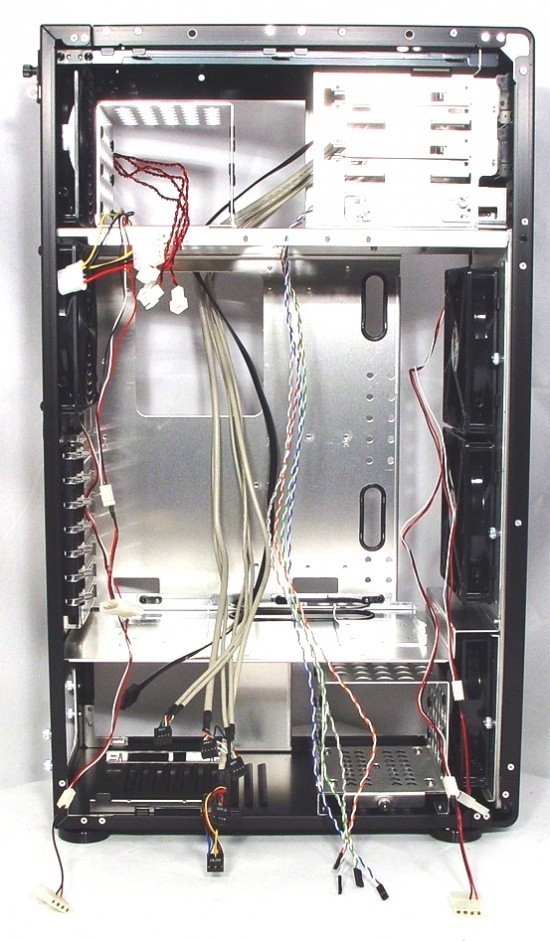
Untying and straightening out the front I/O wiring, I was quite surprised to see the length of the cabling. As you can see, getting the wiring where it needs to be on your motherboard of choice shouldn't be an issue at all. All the 140mm fans have both 3-pin connections and 3-pin to 4-pin Molex adapters, and are plenty long enough for easy connection later in the build.
Taking a closer look, the front I/O wiring has connections for two USB 2.0 ports (double wired to supply the 4 ports), one IEEE 1394, and a HD / AC97 Audio connections. There is also the power, reset, HDD activity, and the power LED headers. The adapters on the fans can also be seen a bit more clearly here.
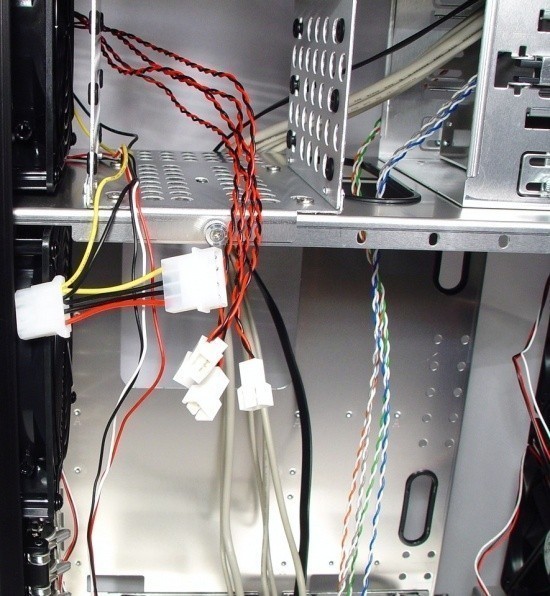
In the top left corner you will find a 4-pin Molex connection as well as four 3-pin fan connections. These are there to make it possible to control up to five total fans off of one switch.
On the rear of the chassis, just left of the exhaust fan is a three stage switch. This can be set to low, medium and high depending on personal needs in chassis cooling.
Looking at the actual PCB, you can see there are three total connection points. Now you can supply the four fans with the dual splitters on CON1 and CON2, and either find another splitter for CON3 or just use it singularly with one fan connected. I found no literature on the maximum output of the fan headers, nor do I know enough about resistors to do the math.
Accessories and Documentation
Inside of a plain white box that is strapped into the chassis for shipping is four major components of the "goodies". There is a baggie that contains all the screws and miscellaneous hardware needed to get the PC-X1000 functioning with your components. Lian Li also includes a plastic sorter to keep parts organized during and after the build. At the very bottom are two, separately packaged, almost two foot long SATA cables, both of which have a 90 degree connection on one end.
Once I went through all the bags and got the "goodies" all sorted, I figured I should show everything Lian Li includes. Inside of the sorter's lid you will see a small wrench that fits the typical hex head/Phillip's head screws that go in a PSU or possibly to mount drives that take the same size threads. Next to the wrench are four rubber pads with tape on one side. This can be used at your discretion to cure any rattles or vibrations that may arise. Inside of the sorter there are the long GPU support screws at the left. The top row consists of anti-vibration grommets used for drive mounting. To the right of those are the risers and thumb screws used to mount the motherboard. The bottom row has smaller screws for smaller threaded drive mounts.
Moving right, there are the drive screws that combine with the grommets for drives that slide into the trays. The last compartment houses a ton of thumb screws for using in the HDD racks. Flanking the right and left are the SATA cables while an assortment of GPU support pieces are underneath. That leaves us with the two zip-ties, the motherboard speaker, and a wire management clip that can go anywhere on the right side of the motherboard tray it may be needed.
I did not find any literature in my chassis or box. This wasn't an issue until I got to one specific point of the installation. That point was when I went to install an optical drive. The front of the chassis is not removable, and the stealth covers don't come out the front either. What I found was if you remove the HDD cage from the top, the optical drive slides in from the back and locks into place quite easily. Even with a slight stall in the build, I will say that Lian Li did a great job with keeping things simple enough to only make me think that part through. Keeping everything but the mounting of some of the motherboard thumbscrews tool-less helps to keep installation very self explanatory.
The Build and Finished Product
The build could not have been more pleasurable. With a removable motherboard tray, I was able to load the board, cooler, and ram on the tray then slide it all in as one assembly. Removing the HDD rack is easy and a must for installation, it just simplifies things to have it out of the chassis, and to be able to build subsystems and assemble them into one complete package. Dropping in your favourite PSU is simple with the removable plat too. This allows you to route the wires and get them under way as you slide the PSU in from the rear and re-assemble the plate to the chassis. All of the management holes are not only well placed, but have a plastic edge to protect the wiring from being cut against the cut aluminium edges.
Once the GTX 285 and the ATI tuner were installed I spun the PC-X1000 around to get a look. Even the rear of the chassis is appealing and clean.
The two zip-ties they supply are nice, but not enough for my needs. Even though there isn't a window, and simply closing the door makes any wire management a non-issue. I, however, can't stand a rats nest of wires, and with the flow of air from front to back in the three chambers is very important to the concept, I felt tidying things behind closed doors was a must. It doesn't take much thinking to find the correct wire positions, the proximity of the rear panel to the tray kept me from wiring my 24 and 8-pin connection behind the tray. Never fear, the supplied clip holds them in place and against the tray quite nicely on the front.
One last step and we can close up the doors and power her up. I had to install the GPU support bar. This bar is adjustable in three positions. I currently have it in the right most for my GTX 285. If you have shorter cards, the bar can be moved two steps further left to accommodate those as well. From previous experience I know that these supports will only work if there is a corner of exposed PCB on the card. For instance, my full-cover GTX280 won't work as there is no "corner" to hook the support to.
I plugged in the PSU and was greeted with a boot on the first try, however my timing was off. I was able to get an image of the power LED, the amber HDD activity light below it would just flash in its current state. One I got it hooked of to a monitor and got a full system boot, the light kicked right on. Fully running I was left with a near silent, sleek and sexy, brushed aluminum chassis.
One thing I really liked was, when the lights are down in the room, there is no obnoxious lighting emanating from this chassis. I even placed a Xigmatek DK fan on my cooler just to see if it would show through. You have to get on an even line with the cooler, and even then the LED's are barely visible. So in the day you have one sexy piece of hardware to look at, but at night you can sleep with it in the room, or even through it out in the living room as an HTPC show piece.
Final Thoughts
By now my readers ought to know, I am a huge fan of brushed aluminum over black paint on a chassis exterior, and I don't really care so much about the interior, as long as it isn't plain primed steel. Lian Li really steps up to the plate and offers a sleek all aluminum interior even though unless you are building, cleaning, or showing it off, you will never see it. From everything I have seen to date from Lian Li and Lancool, they don't know how to cut corners in production; even their budget minded chassis' are top notch. The PC-X1000 of the Tyr series of chassis is no exception to that rule.
During my time with the chassis I only had one issue, and it was more a matter of my brain absorbing the design of the chassis. Once I figured out I couldn't get to the optical drive bays from the front, there was only one logical answer as to how to install them. Construction throughout is superb, and I was all over inside this chassis, leaning on the floor and even the top separator as I was trying to tuck and hide wiring. Let me tell you this, I have been inside many chassis' with floor panels to separate the PSU, and some of them are scarey with the flexibility of them. Lian Li does not have this issue; the gauge of aluminum and the way it's all assembled makes this chassis solid as a rock and vibration free during use.
Since I housed known components in the chassis that I use daily, well, I should say my girlfriend uses daily, I have overclocked and monitored this system under F@H and OCCT testing at both stock settings as well as in an overclocked state. While I haven't had the time to re-clock her system, over the past couple of days I was able to monitor the CPU and GPU temperatures under load at stock settings. I am pleased to say that with the fans on high, controlled with the switch, testing reports a six degree drop in OCCT on the CPU, and an eight degree drop in my GPU temperatures while running F@H (yes on the same WU even). In my opinion a great concept has been implemented and brought to realization in the PC-X1000; there are only two reasons why there shouldn't be one in your home; size and/or price.
If you don't have a special place to house your rig, like under a desk or inside a cabinet, then the height of the PC-X1000 doesn't come into play. The second, and most important factor, is pricing. I have had more expensive chassis' in front of me, and to be honest, they aren't still here in my PC room like the Lian Li is, and I feel it has a comfy home for quite some time to come. It is tough to beat what Lian Li offers inside and outside the PC-X1000. I mentioned that this chassis can be found near $500 at some e-tailers. But the best deal on the internet has to be the $350 USD pricing. My thought is to save the $150 and buy more components by grabbing the PC-X1000 at Newegg for $349.99, plus shipping. This chassis is worth every penny!















 United
States: Find other tech and computer products like this
over at
  United
Kingdom: Find other tech and computer products like this
over at
  Australia:
Find other tech and computer products like this over at
  Canada:
Find other tech and computer products like this over at
  Deutschland:
Finde andere Technik- und Computerprodukte wie dieses auf