Introduction to Overclocking and the Basics
Supermicro's dedication to the enthusiast high-end desktop world has recently been solidified with the launch of their C9X299-PG300, which is not only designed to provide you with the latest technologies, but also support 300W power consumption off the bat.
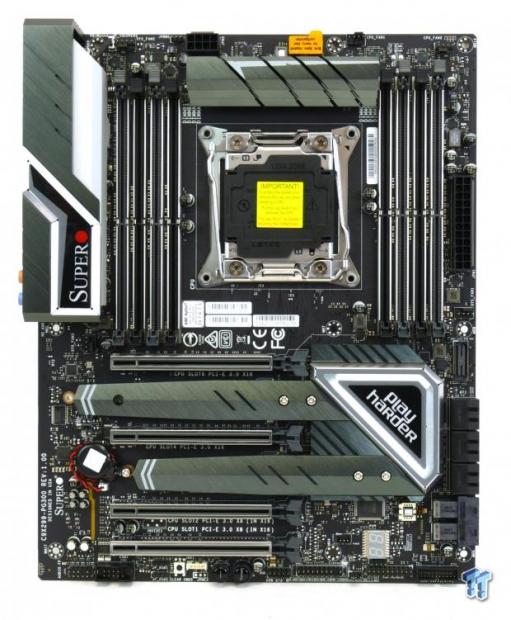
The motherboard fully supports a 300W TDP, which is crazy high, and to do that it utilizes one of the strongest 8-phase VRMs found on a motherboard.
It utilizes the latest in Infineon PWM control technology and power stages, and today we will teach you how to overclock Skylake-X CPUs on the platform, specifically with this motherboard. Many might not be that familiar with Supermicro's UEFI BIOS, but we are happy to report all the settings are present to allow you to overclock your CPU and memory with ease, and we have been commissioned by Supermicro to bring you this article on how to overclock their new motherboard. The review of this motherboard is up, so if you have more questions not covered here, please look at that.
The Flow Chart
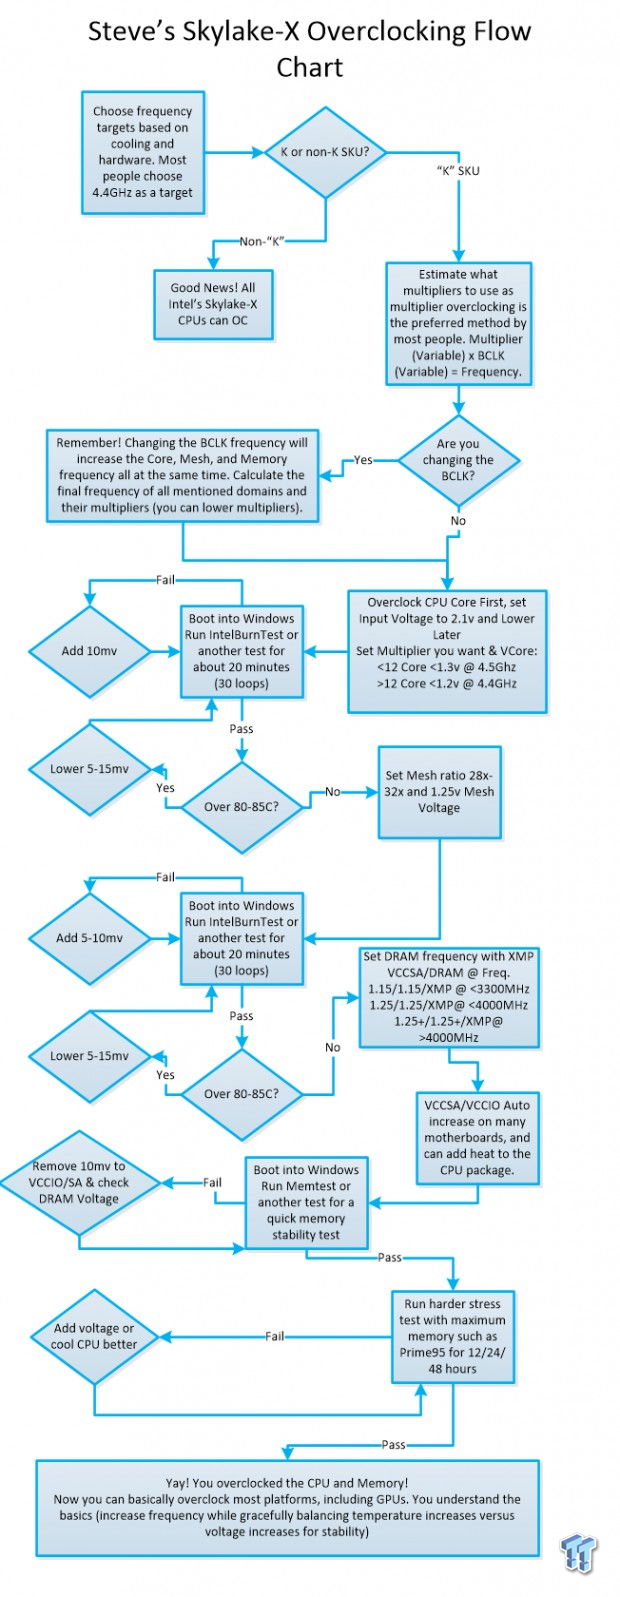
The flow chart above details how to begin to think about overclocking a Skylake-X CPU. The first thing you need to realize is that there are two types of Skylake-X chips; low core count (LCC) and high core count (HCC) dies. As a rule of thumb, the 7900X and CPUs below it use the LCC die, while the 7920X and above use the HCC die. The difference in regards to cooling capability without delidding is quite large as the HCC dies make much more contact with the internal heat spreader and can be cooled more easily. However, they also draw a lot more power, especially the 7980XE and 7960X.
Disclaimer and Before You Begin Overclocking
Disclaimer Overclocking your CPU technically voids your warranty. However, if you want to overclock and still be covered, Intel does provide an aftermarket overclocking warranty here: (PTPP). Overclocking can also damage your CPU, especially if done incorrectly. This guide is about how to overclock, but doesn't take responsibility for damages that could occur; you bare sole responsibility for any damages that may arise. The price of the PTPP ranges from as low as $69 for the 7800X to $150 for the 7980XE.
Have you Overclocked Before?
If you have overclocked before and understand hardware selection and the basics of overclocking, you should skip to the next page. The first part of this guide is for those who want to know what to do before overclocking.
Where do I start?
Supermicro X299 Overclocking Guide Overclocking Guide Systems
CPU: You will need a "K-SKU" CPU, but all Intel Supermicro X299 Overclocking Guide CPUs are X-SKUs which is basically the same thing. The guide does not cover Kaby Lake-X CPUs, as they are different.
Motherboard: Supermicro X299 motherboards are covered here.
DRAM: While we still recommend buying a kit off the Qualified Vendors List (QVL), up to 3600MHz is a good target for easy stability, and you should take advantage of quad channel memory and buy a kit with four or eight sticks.
Cooler: High-end air coolers might be okay, but we recommend at least a 240mm all-in-one watercooler. Custom watercooling is best, but it might be complicated for many.
PSU: I would leave about 400-500W aside for a nice overclock on an 7980XE, and maybe 200-300W for a 7900X.
You enter the BIOS/UEFI by hitting delete once you see the splash screen or when you see the keyboard receive power. To save and exit you press F4.
CPU Core Setup
You must first get into the "Advanced mode" to find overclocking settings.
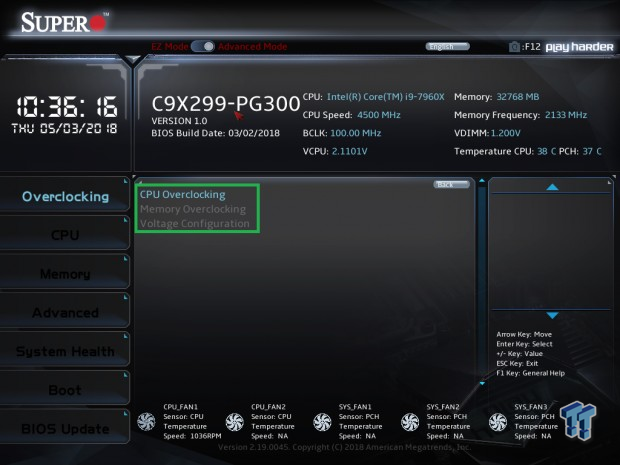
There are three submenus under the Overclocking menu. We will tackle the CPU menu first, then voltage, and then memory.
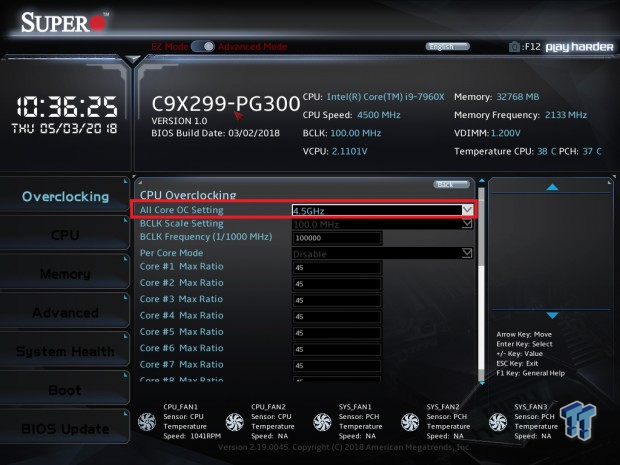
You will need to set "All Core OC Setting" to the overclock frequency you are aiming for. Setting this to 4.5GHz instead of leaving it on manual seems to increase some behind the scenes locks on overclocking.
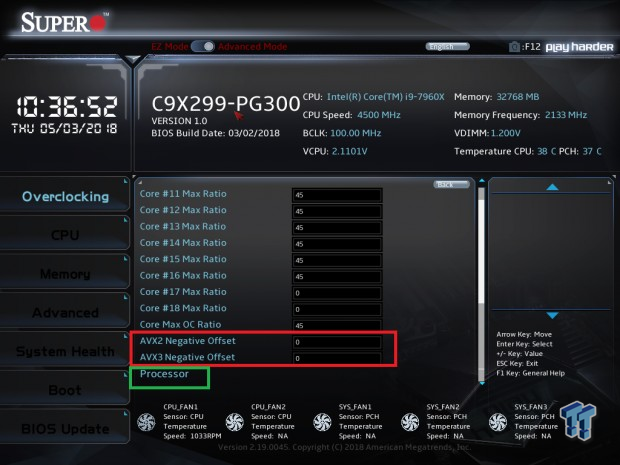
Now you can set some AVX offsets here (they are reduction ratios), so setting a ratio of two for both will take CPU frequency from 4.5GHz to 4.3GHz when the AVX units are engaged. AVX 2 and AVX 3 (also known as AVX-512) engage AVX units inside the CPU that can require higher levels of voltage and current, and many stability tests engage these units but not all applications use them. Games and most applications don't take advantage of AVX, but many professional and content production software applications might. One common application that uses AVX is Handbrake. Once you decide if you want to set an offset or not, then you need to click "Processor" at the bottom of the menu, and that will take you to an advanced menu.
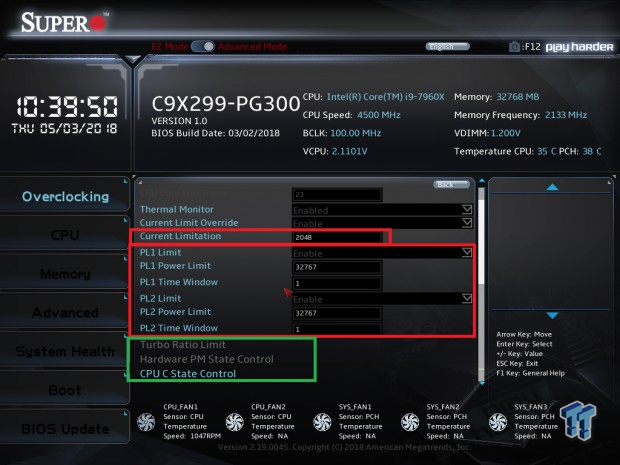
Now we need to increase the current limit so that our CPU can utilize a higher power level that the overclock will require. That is called the "Current Limitation" and you need to set this to 2048, which is the maximum setting. I would recommend not touching the PL1 and PL2 limits, and watch these to make sure that setting any other setting does not lower these limits. There are three more menus at the bottom of the "Processor" sub-menu, these are Turbo Ratio Limit, Hardware PM State Control, and CPU C State Control. The latter two will allow us to control if the CPU frequency stays Fixed or moves Dynamically.
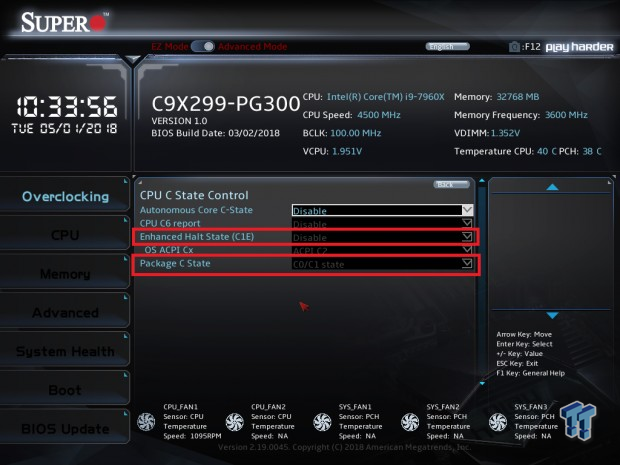
A fixed overclock would mean that we are trying to get the CPU to stay at its maximum Turbo ratio (45x in this case) all the time, even when the load is light. A dynamic frequency would mean the CPU frequency will modulate up and down depending on load, so it saves power. For fixed frequency, we will need a fixed voltage for the CPU, and for dynamic, we will need the voltage to go up and down, and we will tackle those in a bit. If you want the CPU frequency to be dynamic you will can leave C State untouched and HW P-States untouched. If you want a fixed frequency, then I recommend disabling "Enhanced Halt State (C1E)", and I also set "Package C State" to C0/C1 since those are the most awake states.
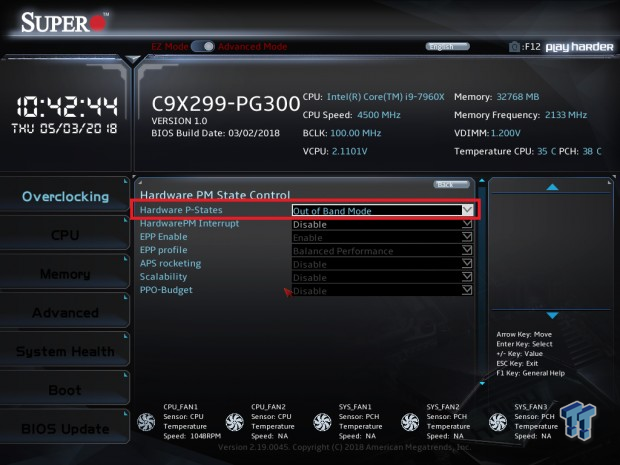
If you want to have a dynamic CPU frequency then don't touch "Hardware PM State Control" settings. If you want it to be more fixed, then set "Hardware P-States" to disable. That will allow Windows to control the state of the CPU, and if you set your Windows Power Plan to "High Performance", you should get a fixed maximum CPU frequency even at idle.
Voltages, Mesh, and DRAM Overclocking
Voltage Settings
The default "Core Voltage Mode" is Adaptive, and we can use this if we have a dynamic frequency, but if we have it fixed it is better to set this to Override. With Override we will set 1.185v, and that will result in roughly 1.185v internally. With Adaptive we set a ceiling voltage in the "Core Extra Turbo Voltage" setting, here it is set to 1200, which is 1.2v. However, the setting we set is the maximum voltage and it will allow voltage to scale with frequency.
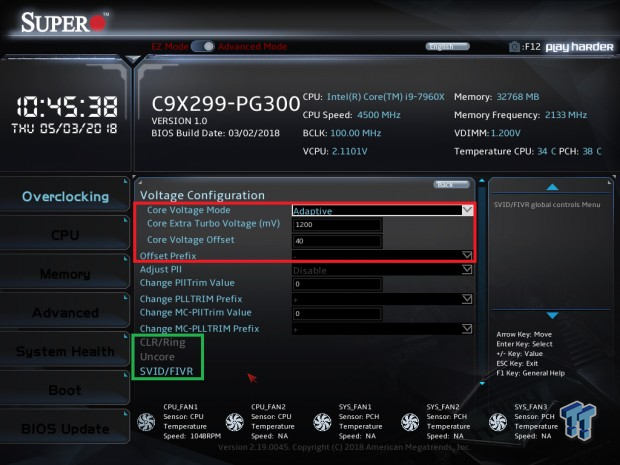
Now, Adaptive voltage we set might not what we get, in fact here we got 1.240v in Windows, so we proceed to set a negative ("-") "Offset Prefix" and a "Core Voltage Offset" to 40, which will result in 1.2v under load. With the voltage going up and down such a large range, it could overwork the VRM resulting in voltage spikes when the voltage is ramped up, as the feedback loop of the VRM might be too slow. A solid VRM will help you avoid shooting more voltage than you want into your CPU, so on a motherboard like this you should be just fine with Adaptive voltage mode since it will provide a good input voltage. Now, we also need to change our Mesh frequency, Uncore voltage, and SVID/FIVR.
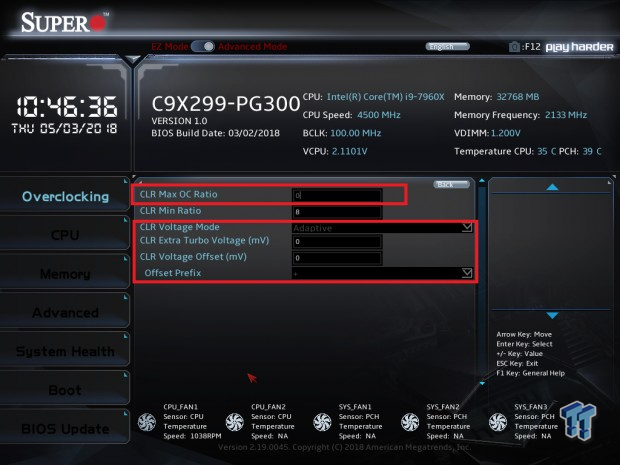
If you click on the CLR/Ring menu you will be taken to the "CLR Max OC Ratio", which is your top "Mesh" frequency. The Mesh interconnects the CPU cores, and it might be called cache or ring speed in other places. We recommend a range between 28 and 32, we set 30 for 3GHz. The voltage mode for this setting is much like the CPU VCore voltage, and we set around 1.2-1.25v for this setting.
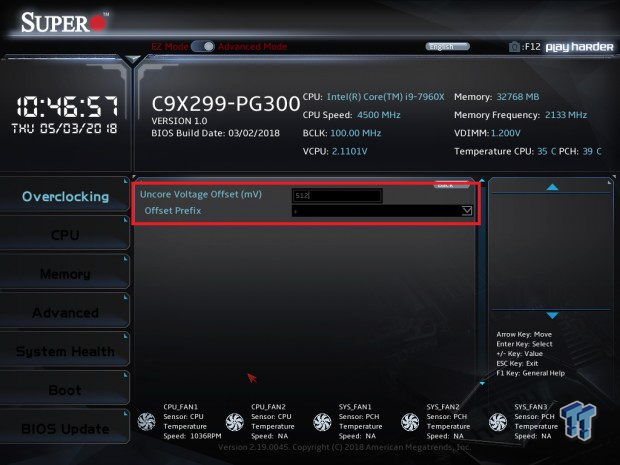
Now motherboard BIOS engineers typically set up "Auto-Rules", and in this case they have for the Uncore Voltage Offset (mv), so we will lower this from 512 to 256. The offset here is internally derived from the internal VRM (FIVR), as are the CPU Core and CPU Mesh voltages.
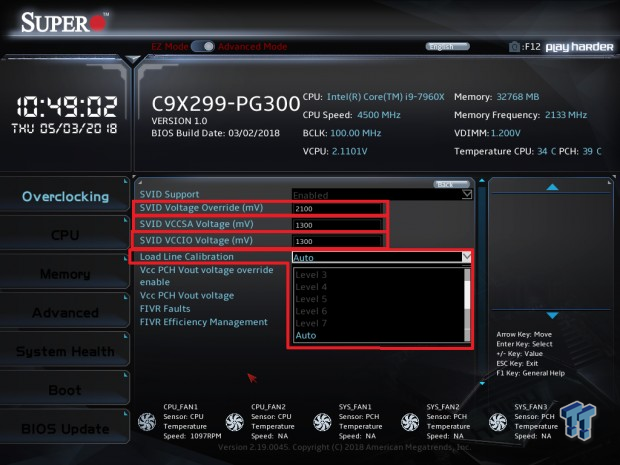
However, as we raise frequency and internal voltages we also need to increase our external VRM settings or else performance will take a hit. We will set "SVID Voltage Override (mv)" to 2100 for 2.1v. The default input voltage is 1.8v, but 2.1v is what we need to set to unlock performance. We leave "Load Line Calibration" on "Auto", but there are seven levels you can try out. We saw that when we set 2.1v with LLC auto we get anywhere between 2.1-2.08v, which works great for us. The "SVID VCCSA Voltage (mv)" and "SVID VCCIO Voltage (mv)" are set a bit high when you set XMP, 1.3v on both is a bit high. We will lower this to 1.25v for the VCCSA and 1.15v for the VCCIO.
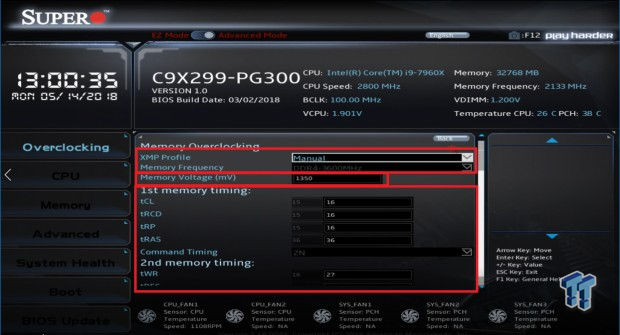
Here we set XMP for our memory, but you don't necessarily need to utilize XMP to overclock memory. You can also select a "Manual" option that allows you to overclock memory through the multiplier and memory timings. A neat little feature that Supermicro motherboards offer is the ability to easily tweak XMP timings by setting XMP and then changing to manual mode, where it retains the XMP timings. That way you can take down timings one by one.
SuperO Booster, Results, and VRM Thermal Testing
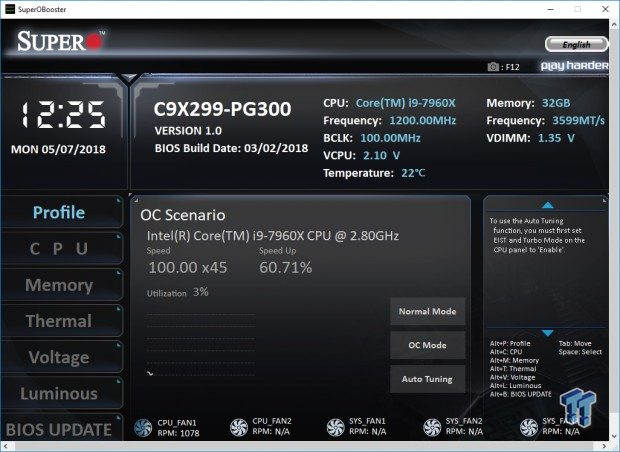
SuperOBooster works well on this new motherboard, and it offers some basic profiles including "Normal Mode", "OC Mode", and "Auto Tuning".
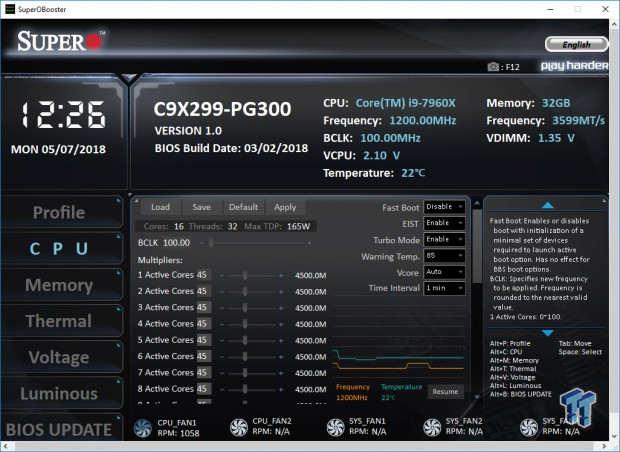
The CPU menu allows you to change the CPU Ratio on-the-fly, and if you want to change all the ratios at the same time you should increase the last core. If you want to reduce all ratios at the same time you need to reduce the first one. We can also see monitoring of the CPU, as well as options to set VCore and Turbo Mode/EIST. Don't disable EIST.
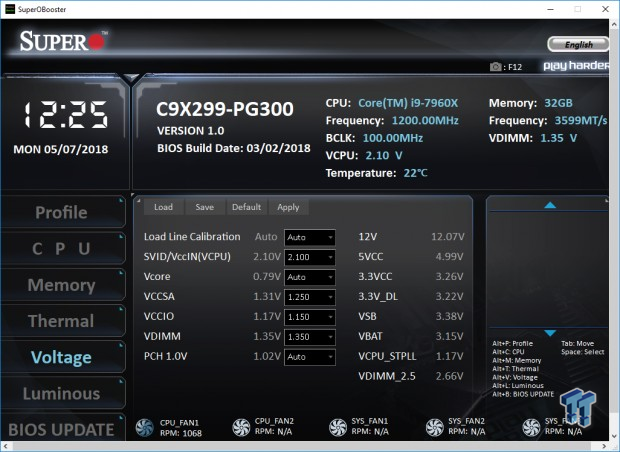
The Voltage Menu is where you can set voltages, and it's also where you can monitor the CPU Input Voltage "SVID/VccIN(VCPU)", I couldn't find another place where you can monitor it. You can change the voltages and LLC on-the-fly.
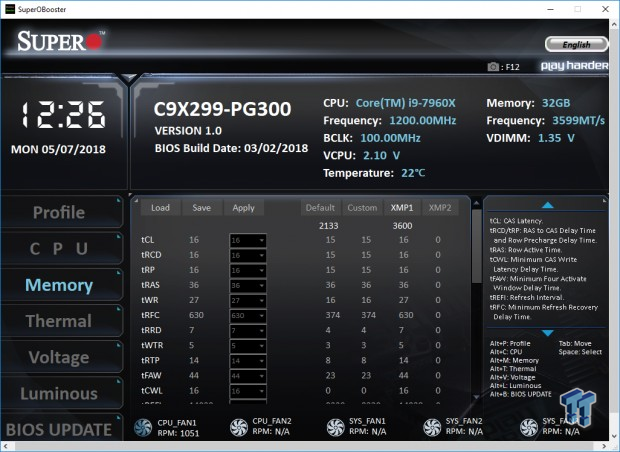
You can also change timings and set frequency/XMP, but those will require a reboot.
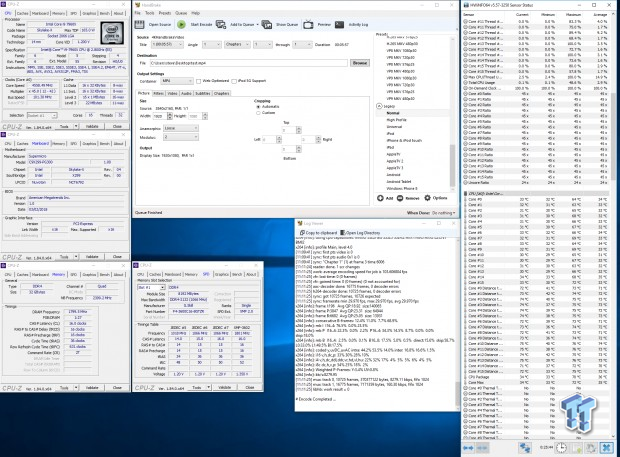
Here we can see some of the results, this is a quick overclock check using Handbrake to transcode a large 4K video. It uses AVX and puts a decent load on the CPU. However, if you want to test CPU stability 100% you should use a program such as Prime95 and run it for many hours, some people run it for days. I would make sure your temperatures don't go over 80C, and try to use as little VCore as possible.
Here we can see how the VRM temperature is during an overclock compared to a competitor board in the same price range. All tests have been standardized as much as possible. The performance of the VRM is stellar. I ran 20 loops of IntelBurnTest at 4.4GHz, which enables AVX units at 4.4GHz and I lined up the timing enough so you can see that the temperatures drop at the same time once the test finishes. To keep VRMs simulated real-world and not worst-case scenario, we had a 120mm fan blowing in the general direction of the VRM area.
The temperature readings are of the hottest and coldest spots on the screen, and there is a rough scale on the left of each screen. Ambient temperature was roughly the same (23-24C). At its peak the Supermicro board tops out at 42C while the competitor board goes to 50C, which is roughly 19% higher at the hottest spot (which is what is measured). If you are wondering why the competitor board has a colder area over the VRM heat sink, it is because it uses some plastic on top that doesn't absorb heat like the metal in the heat sink.
The competitor board went from 33C at idle to 50C at load, which is a 17C increase. The Supermicro motherboard went from 29C idle to 42C load, which is a 13C increase. Even with 50% less VRM power stages the Supermicro motherboard does quite well versus the competitor board. If you have questions or comments regarding overclocking this motherboard, please feel free to email us directly.

 United
States: Find other tech and computer products like this
over at
  United
Kingdom: Find other tech and computer products like this
over at
  Australia:
Find other tech and computer products like this over at
  Canada:
Find other tech and computer products like this over at
  Deutschland:
Finde andere Technik- und Computerprodukte wie dieses auf