Introduction to Overclocking and The Flow Chart
Overclocking Skylake-X
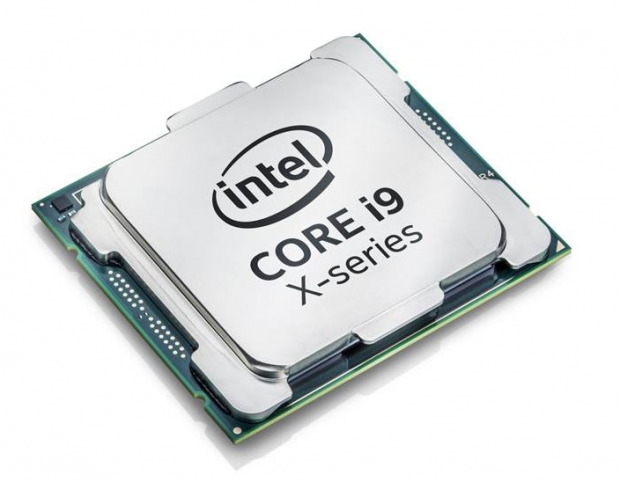
Intel's Skylake microarchitecture has come a long way since it was introduced. The basic microarchitecture is used in Kaby Lake CPUs, Kaby Lake-X CPUs, Coffee Lake CPUs, and with slight modifications in Skylake-X CPUs. At the time of Skylake launch, Intel called the microarchitecture its "best ever". Its domination, even in recent times, reflects the strength of the microarchitecture. However, with the launch of Skylake-X, Intel made some actual modifications to improve upon the original architecture.
Intel boosted core count a lot, and because of the new higher core count CPUs Intel moved towards a mesh architecture and abandoned their ring architecture for the new CPUs. The change was made so that cores could communicate with each other without having to go all around the ring bus. The new mesh doesn't affect overclocking too much but will come into consideration later in the guide. The new CPU also features new AVX hardware and supports AVX-512, which will also come up later in the guide.
The Flow Chart
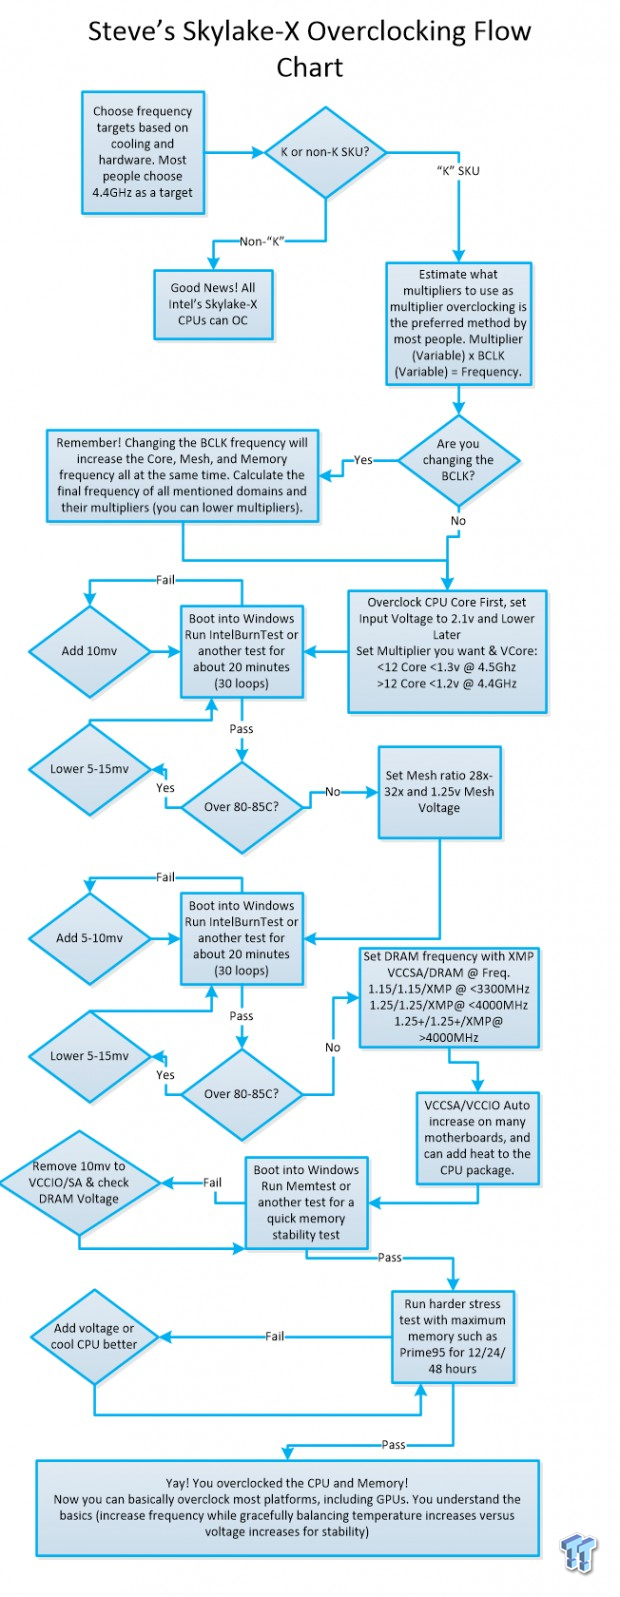
The flow chart above is just a suggestion on the order of operations for you to get a taste of how we will overclock the CPU. However, before we go further, we must mention that there are two types of consumer Skylake-X CPUs. You have Low Core Count (LCC) CPUs with up to 10 cores (7900X is max), and then you have High Core Count (HCC) CPUs with up to 18 cores (7980XE is max).
The HCC CPUs are extremely voltage sensitive when it comes to temperatures, but the LCC CPUs can take a few more millivolts and still stay under 80C. You want to shoot for overclocking your CPU first, then move to the mesh, and then memory. You don't need to overclock the mesh, but it's not super taxing to do so and can give you a performance boost.
Disclaimer and Before You Begin Overclocking
Disclaimer Overclocking your CPU technically voids your warranty. However, if you want to overclock and still be covered, Intel does provide an aftermarket overclocking warranty here: (PTPP). Overclocking can also damage your CPU, especially if done incorrectly. This guide is about how to overclock, but doesn't take responsibility for damages that could occur; you bare sole responsibility for any damages that may arise. The price of the PTPP ranges from as low as $69 for the 7800X to $150 for the 7980XE.
Have you Overclocked Before?
If you have overclocked before and understand hardware selection and the basics of overclocking, you should skip to the next page. The first part of this guide is for those who want to know what to do before overclocking.
Where do I start?
Skylake-X Overclocking Guide Systems
CPU: You will need a "K-SKU" CPU, but all Intel Skylake-X CPUs are X-SKUs which is basically the same thing. The guide does not cover Kaby Lake-X CPUs, as they are different.
Motherboard: You need an X299 motherboard, but there are two stages so far. The first stage is the first round of X299 motherboards launched at Skylake-X launch, and they are solid for CPUs up to the 7900X. However, it quickly became clear that those earlier X299 motherboards didn't have the best VRM heat sinks, and the VRMs would actually throttle the CPUs if they weren't cooled, so vendors went back to the drawing board since Intel's HCC CPUs were coming out and the initial launch motherboards weren't enough. If you have a CPU with 12 or more cores (HCC), look at the stage two motherboards that were launched months after the initial motherboards launched. You can typically tell if a motherboard is stage two if it uses larger heat sinks that have more surface area.
DRAM: Intel and motherboard vendors have greatly improved DDR4 compatibility and speed potential, at least compared to Broadwell-E. While we still recommend buying a kit off your motherboard's Qualified Vendors List (QVL), up to 3600MHz is a good target for easy stability, and you should take advantage of quad channel memory and buy a kit with four or eight sticks.
Cooler: High-end air coolers might be okay, but we recommend at least a 240mm all-in-one watercooler. Custom watercooling is best, but it might be complicated for many. The new Skylake-X CPUs use a lot of power, and that power has to go somewhere.
PSU: I would leave about 400-500W aside for a nice overclock on an 7980XE.
You enter the BIOS/UEFI by hitting delete or F2 (on most boards) during boot up. For most boards you have basic and advanced modes, I always skip to the advanced mode and tend to navigate with the keyboard. To enter a setting you either type (or delete and then type), use +/- keys, or you click and scroll. Then you have to "Save & Exit" the BIOS/UEFI for the settings to apply (typically F10 key).
CPU Multipliers and Voltages
CPU Multipliers
We are including all brands in this guide because vendors tend to rename Intel's settings to their own brand's typical naming scheme.
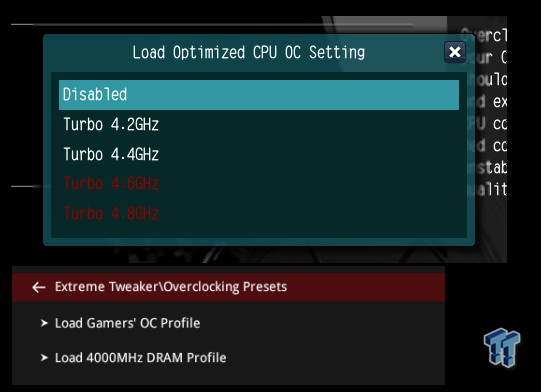
Multi-core Enhancement is a feature that will take all CPU cores to maximum Turbo frequency, which is out of Intel's specifications, but it's an easy overclock. However, some vendors have built-in overclocking profiles. We tend to avoid them, but if you like, you can apply them and see what settings they change.
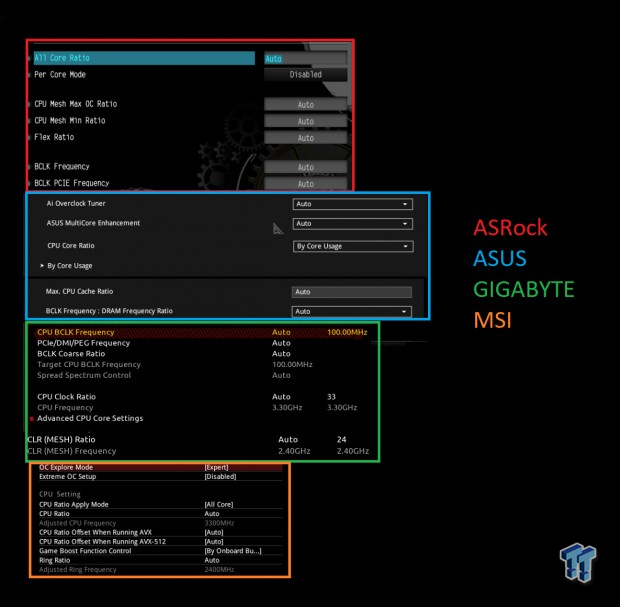
We are going to bunch all the CPU ratios together. For starters, you can do a per core overclock, where you overclock each core to a different level, but we prefer putting all cores to the same level. On some brands, you get more types of overclocking modes, such as ASUS allowing you to set XMP, which then enables all cores to maximum Turbo ratio. All Core Ratio, CPU Core Ratio, CPU Clock Ratio, and CPU Ratio are all the same setting; your CPU's multiplier. The Flex Ratio is the minimum ratio the CPU will sit at when idle.
The platform also allows you to change the BCLK for the CPU and memory separately from the system's BCLK in case you want to overclock with it, but we recommend sticking with ratio/multiplier overclocking. CPU Mesh Max OC Ratio, Max CPU Cache Ratio, CLR (Mesh) Ratio, and Ring Ratio are all the same thing; they control the speed of the mesh/cache. You should OC the CPU first and then the mesh, as the CPU core frequency has a more profound effect.

AVX uses parts of the CPU typically not used and as such will greatly increase power consumption, temperatures, and it could require more voltage to remain stable. Intel has added in an AVX Offset setting, which allows you to set a number of multipliers for the CPU core to drop down to if AVX is engaged. The new Skylake-X CPUs feature not only AVX-2 but also introduced AVX-512 (AVX-3). The setting is important if you are crashing because of AVX workloads.
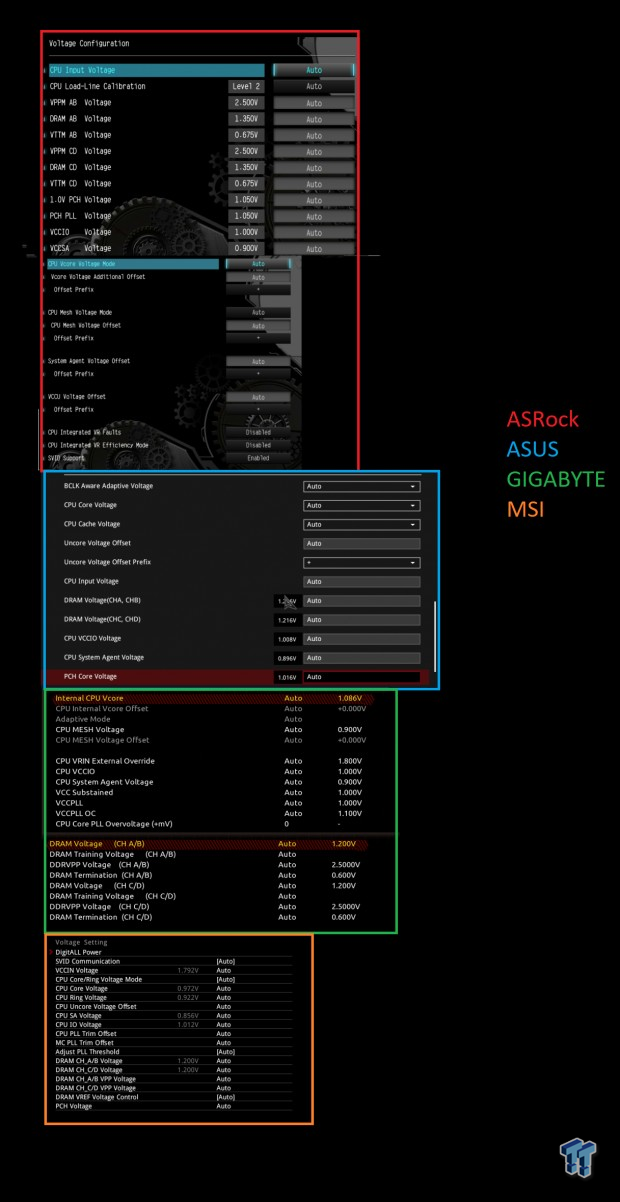
The CPU now has two voltages because Skylake-X brings back the Integrated Voltage Regulator. You get a CPU Input Voltage, by default this is 1.8v, but you should definitely increase this voltage. If you don't, you will be bottlenecking performance. I would set 2.0 or 2.1v for the Input Voltage. CPU Input Voltage is also called CPU VRIN External Override or VCCIN Voltage. CPU VCore is the voltage to the cores and derived from the internal voltage regulator. I would stay under 1.3v for LCC CPUs and 1.2v for HCC CPUs. In the case of VCore, you will be limited by your cooling, so you won't be able to get away with 1.4v unless you have a delidded CPU or really good cooling.
You also can use offset, adaptive, or manual voltage modes. If you run your CPU at maximum frequency at all times, then you can use override mode, but if you are going to let the CPU multiplier go up and down according to load, then you will want to set adaptive or offset mode. CPU Mesh/cache/ring voltages are all the same thing and can be set up to 1.3-1.35v to help increase mesh frequency. VCCSA and VCCIO are also from the motherboard (external) and help with memory overclocking. On this platform, VCCSA helps more than VCCIO from what I have seen, if you are trying for a memory OC above 3200MHz, I would start with 1.15v VCCSA and move up, but I wouldn't go over 1.3v for 24/7 use. Some of ASRock's motherboards have an internal VCCSA as well, and you can set that offset to around +0.4v if you are clocking really high. If you are going to increase DRAM voltage manually you need to do it twice, once for channels A and B and once for channels C and D.
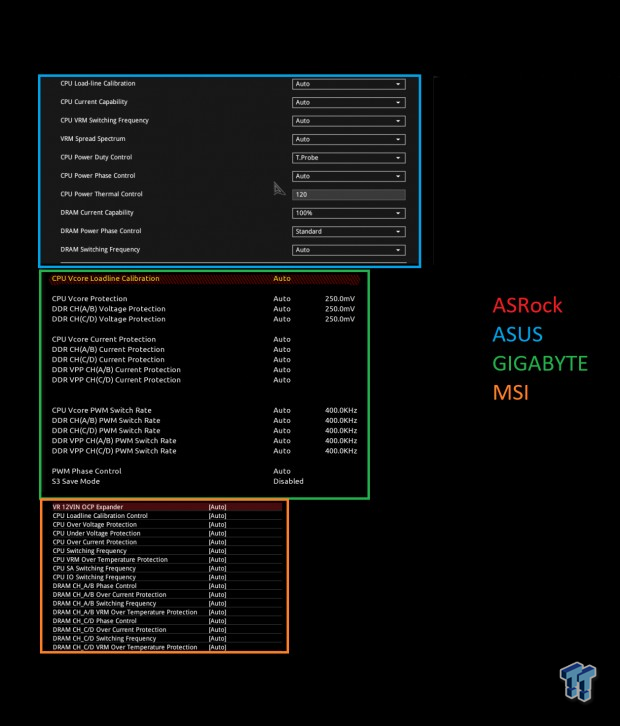
CPU Load Line Calibration can help reduce the drop in the input voltage to the motherboard; I prefer the second highest level. On this platform, because power consumption is so high, you will need to increase current limits and any other type of protection mechanisms because you will easily hit their limits. I would not increase switching frequency since that will just increase overall temperature of the VRM. On MSI's motherboard, you should increase the setting called VR 12VIN OCP Expander and CPU overcurrent protection at the same time. You might not want to increase over temperature protections though.
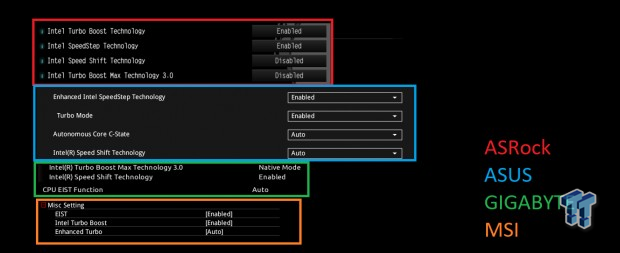
To make the CPU frequency stay stable many people try to disable EIST, but what they don't know is that depending on how the vendor has implemented EIST, it might actually disable your ability to overclock. I would leave Turbo Mode, and EIST (Enhanced Intel Speed Step) enabled.
Power Settings and DRAM Overclocking
Power Saving Settings
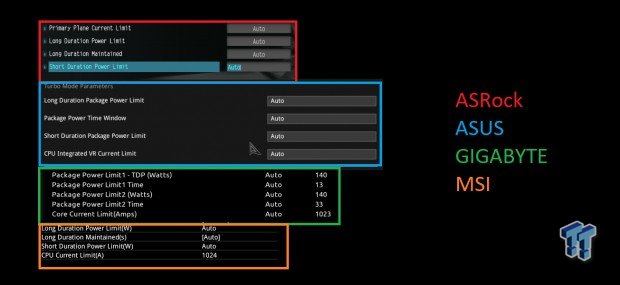
Now, this next step wasn't really necessary on previous CPUs, but you should be maximizing Turbo current and wattage limits on this platform. These are typically found under advanced CPU features menus, and they are separate from your PWM controller's power limits. I would just type in an ungodly high amount and let the motherboard then just default to the highest it offers.

If you want your CPU to stay at maximum frequency at all times, you can disable C-state support and set your power plan to High Performance in Windows. If you want CPU frequency to drop when load drops then I wouldn't really touch C-states.
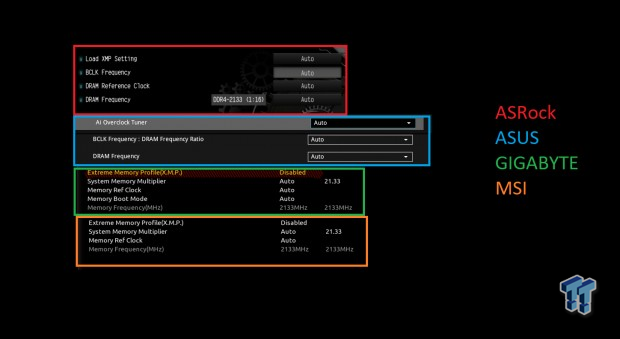
The easiest way to overclock memory is by enabling Intel's Extreme Memory Profile (XMP). It will take your kit to the level it's designed for and is pretty easy to stabilize. You can also manually set the DRAM multiplier and change between 1.00x and 1.33x reference clock multipliers to expand the granularity of memory speed settings (so memory speed can be set in 100MHZ and 133MHz increments; i.e. 2600MHz, 2666MHz, 2800MHz, 2933MHz. If you manually set the multiplier, you must also manually set DRAM timings and voltage, as XMP sets those for you.
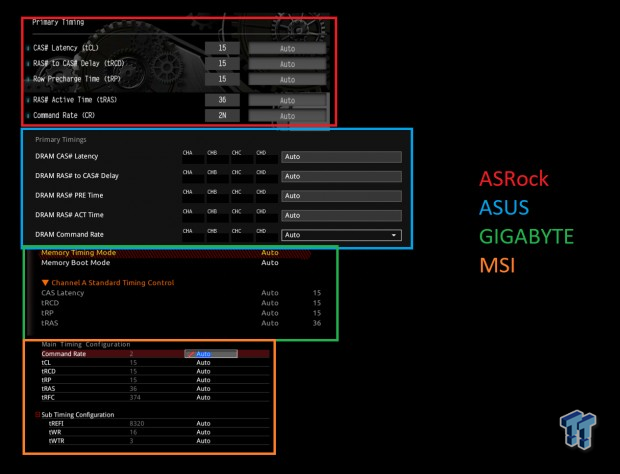
Memory timings are a bit more difficult to conquer as there are so many of them, but you can mess around with the primary timings (like CAS latency). Some motherboards like ASUS's ROG boards also have built-in memory overclocking profiles made by their extreme overclockers. These primary timings are listed on your kit's sticker.
Stability Testing
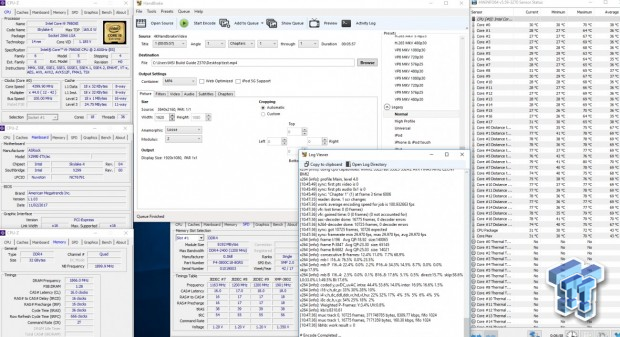
I like to use HandBrake as a quick check to see how my CPU is doing. In the case of the stability test above, it was to see if the motherboard could sustain our CPU's typical overclock of 4.4Ghz at 1.185v with a 3.1v input voltage and 3733MHz overclock. We used a +0.4v VCCSA offset to get the memory that high and a 1.5v DRAM voltage. We didn't mess much with the mesh, but you might be able to get to 3.2Ghz with 1.25-1.3v mesh voltage.
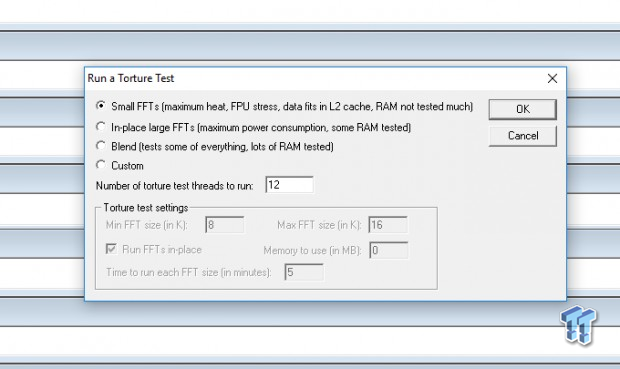
Now, if you remember the flow chart from the first page, I have intermediate stress tests placed after each stage and then a hefty test at the end. That is because stress testing can take days at a time, some people will not call a system "stable" unless it can withstand two days of Prime95 with AVX. I recommend finding a stress testing program that can be run in minutes to an hour, and then when you have tuned all your knobs, then run something like Prime95 for a day or two. I mainly use three stability testing programs; HandBrake encoding of a 4K video (very quick but shows performance and uses AVX), Intel Burn Test with a decent chunk of memory usage (has AVX and can be run however long you like), and Prime95 blend one day and small FFTs for another (latest version with AVX).
Now, there are many out there who still use older versions of Prime95, mainly because older versions didn't utilize the AVX. If AVX is crashing your system because it is overly intensive, you should use an AVX offset, that is what it is there for. However, if you do that you should also use an older version of Prime95 or another stress test without AVX so that you can also test out your maximum multiplier.
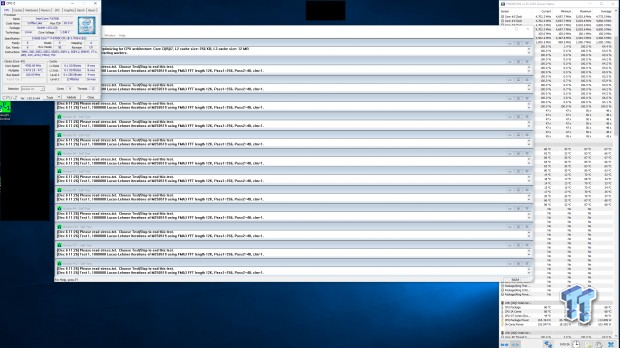
Prime95 has a few different tests you can run. The default test is a blend test, which tests most everything, but isn't going to demolish CPU core instabilities as Small FFTs would. There is some documentation on how to disable AVX use within Prime95 by adding in a string in the local.text file created when the program runs, but from my testing, that method didn't work. Many people also use RealBench for hardcore testing. AIDA64 also has a built-in test, and you can choose what you test (core, FPU, etc.) but I would increase the amount of RAM used in that test as the default value is a bit low. AIDA64 is considered a "safe" test by many, but it's not super intensive like Prime95.
I would recommend using an AVX offset if you will use that same offset in real life, but you need to make sure you stress test with a program that doesn't use AVX. In the end, you will be faced with many different roadblocks when you overclock, but the rule of thumb is increased frequency requires increased cooling or increased voltage. Voltage is a double-edged sword because as you increase voltage, you also increase temperatures which decrease stability, so in the end, increasing cooling is one of the best methods of increasing your overclock. I hope this guide has helped as a primer on Skylake-X overclocking; if you need any help or advice feel free to reach out to us in the comments or email the author directly.

 United
States: Find other tech and computer products like this
over at
  United
Kingdom: Find other tech and computer products like this
over at
  Australia:
Find other tech and computer products like this over at
  Canada:
Find other tech and computer products like this over at
  Deutschland:
Finde andere Technik- und Computerprodukte wie dieses auf