


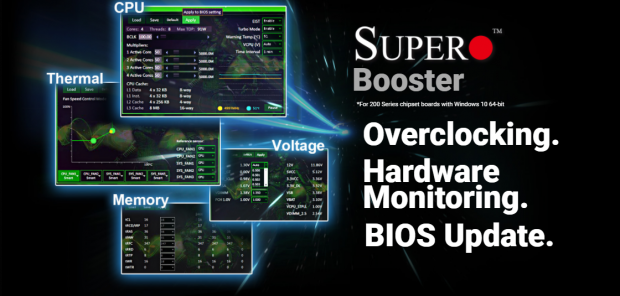
Introducing the SuperO Booster Application
This guide has been commissioned by SuperO to help explain and give tips on their brand-new software application, the SuperO Booster.
Many of you might know Supermicro as the server company founded over 20 years ago in Silicon Valley, but more recently, Supermicro gave birth to a subsidiary called SuperO. The same high-quality components, engineering expertise, and reliability Supermicro server customers have come to expect can be found on SuperO gaming motherboards. SuperO makes more than just motherboards, but today we will focus on their latest motherboard software application, the SuperO Booster.
While we have seen many generations of Supermicro/SuperO motherboards, until recently, almost all changes had to be made in the UEFI. There was almost no software bundled with their motherboards. Everything from enabling XMP to setting fan control curves had to be done in the UEFI, and that alienated many users. While many of us (enthusiasts) are quite happy with entering the UEFI to overclock, to change boot drive order, or to change fan control schemes, a lot of users are afraid of changing something by accident and damaging their hardware.
One reason motherboard vendors create software is to cater to the majority of buyers who never enter the UEFI for anything more than changing boot drive order. Intel saw this trend as well and created their XTU application for overclocking, but each vendor also has their specialized software that is custom tailored for their product.
The SuperO Booster is designed to facilitate everything from overclocking to controlling your fans. The software will allow you to overclock the CPU and memory, enable XMP, change voltages, control fans headers, and even update the UEFI all from Windows 10. Some of these tasks will require rebooting, but not all. For instance, you can change the CPU voltage, LLC, and multiplier without even having to reboot. Let's take a look at the software.
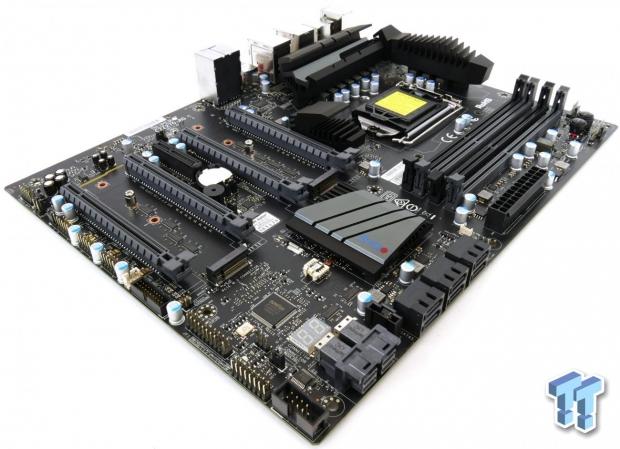
The motherboard I used is the C7Z270-PG. If you hadn't figured it out, the PG stands for Pro Gaming, and the motherboard is designed to facilitate x16/x16 for two GPUs or x8 each slot for four GPUs. It's a very high-end motherboard and offers a slew of features as well as excellent power delivery. Features in the SuperO Booster application might change depending on the model of motherboard used.
Where to Find the SuperO Booster


To download the software, you just need to find your motherboard's product page on the SuperO website, and then navigate to the "Downloads" page. Once you reach your motherboard's "Downloads" page, you will need to choose the "Driver" tab, and select your OS. For now, the SuperO Booster utility is in its infancy and is only supported under Windows 10. SuperO also wants your feedback on the product, so if you want multi-OS support let them know in our comments section or their social media (e.g. Facebook or Twitter).
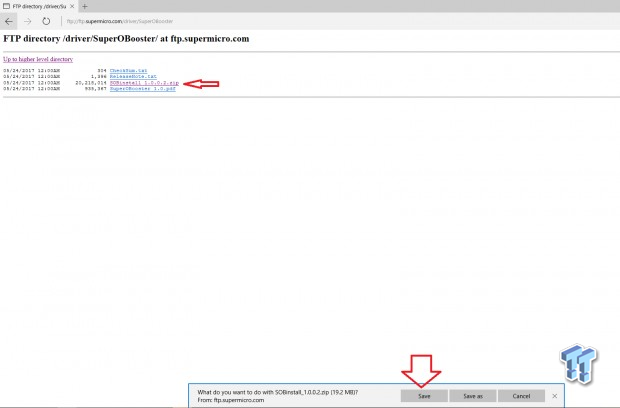
Once you click the download button, you will be redirected to an FTP directory. You will see many files, but the only one you need is the SOBinstall ZIP file. Clicking the ZIP file will produce a download prompt. There is currently a link on the SuperO landing page, it creates a pop-up Window with the FTP Window you see above, so if it's not coming up you will need to enable pop-ups. SuperO has a guide/manual that details many of the settings in the software; it can be found on the FTP page.
Software Walkthrough and BIOS Update
Software Walkthrough
In this section, I will go over each of the five menus and tell you what each setting does and how to use the software.
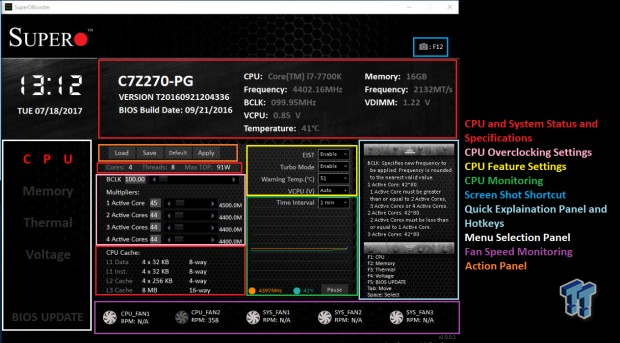
The software mimics the UEFI, and the skin changes depending on the motherboard you use. Since the C7Z270-PG has a black and gray theme, you get a black and gray background, while on the C7Z270-CG you get a green and black background. I have gone ahead and sectioned out all the settings you might interact with. There are quick keys, such as F12 for a quick screenshot (saved as PNG) and function keys for swapping quickly between the menus. The CPU menu is the first menu you encounter, but the first four all have the same "Load," "Save," "Default," and "Apply" buttons boxed in orange. You can also save configuration files and load them later, and I will explain why this is useful in the overclocking section.
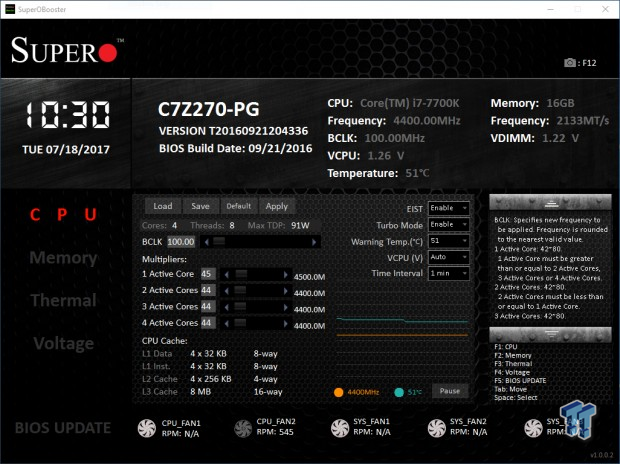
Fan speed monitoring at the bottom (boxed in purple) never changes, even when you switch between menus. There is also a quick explanation box to the right, and when you highlight a setting, you get a quick explanation of what each setting does. The CPU menu offers per-core frequency and BCLK selection. There are also EIST, Turbo, CPU VCore, and Warning temperature settings boxed in yellow. Boxed in green along with a graph and a time interval setting, you get real-time CPU frequency and temperature monitoring. You can control the refresh interval in seconds right above the graph.
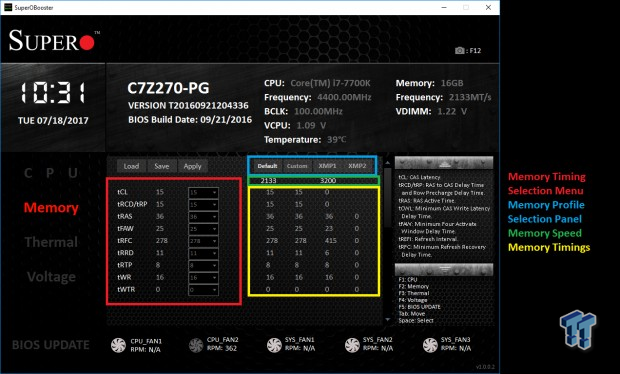
The memory menu offers the basic memory timings available on the platform. You can select between the Default profile and three others. Two of those are XMP if your module supports XMP, and one is a custom memory setting option. Having the custom option right near the XMP option will allow you to experiment with tightening (lowering) the timings to try and improve performance. XMP is what most people tend to use unless they are extreme overclockers, as it is the most stable form of memory overclocking. Memory settings can be applied, but they require a reboot to take effect.
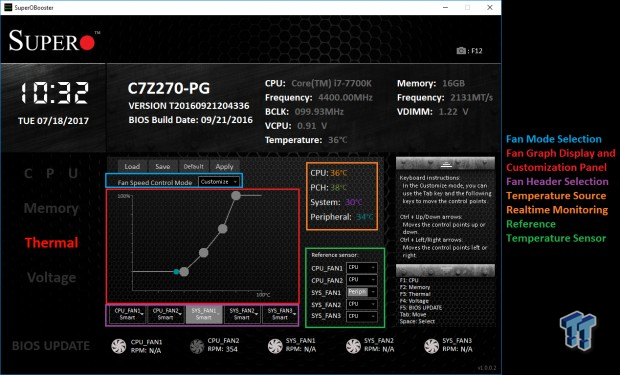
The Thermal menu is basically just a fan control menu. You can customize the fan curve of each Smart Fan Header, or select one of a few presets. The two CPU fan headers will use the CPU temperature as a reference while the system fan headers will use the system temperature by default. Changing the mode to "Customize" will allow you to pick between the CPU, PCH, System, or Peripheral temperatures as the reference temperature for each header. To change the curve in Customize mode, you just drag any of the four control points. There are keyboard shortcuts to do this as well, and you can find those in the Quick Look Up menu on the far right.
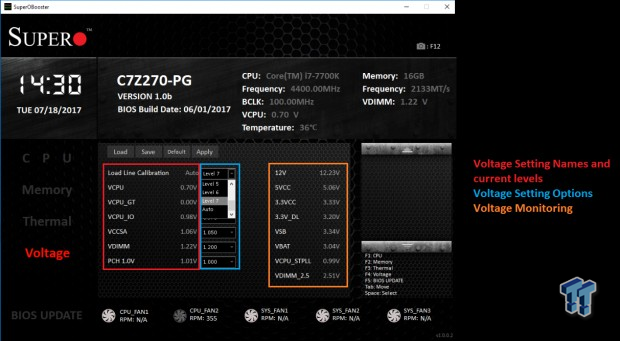
The Voltage menu allows you to change the Load Line Calibration and many of the voltages required for overclocking. The VCPU voltage is also available on the CPU menu page, and it's one of the only settings you will need to alter to overclock your CPU. The motherboard does offer real-time voltage monitoring, but it does not monitor all the voltages that can be altered.
BIOS Update

When you first click on the "BIOS UPDATE" menu, you will be prompted to download the BIOS from the SUPERMICRO website. I had initially hit "Yes," but my connection failed to establish a link with Supermicro's servers. However, that is probably good news, since it's better to download the BIOS locally and extract it and all of its contents into another folder to update the BIOS. So, instead of hitting "Yes" when prompted to download the BIOS from the website, you can hit "No."
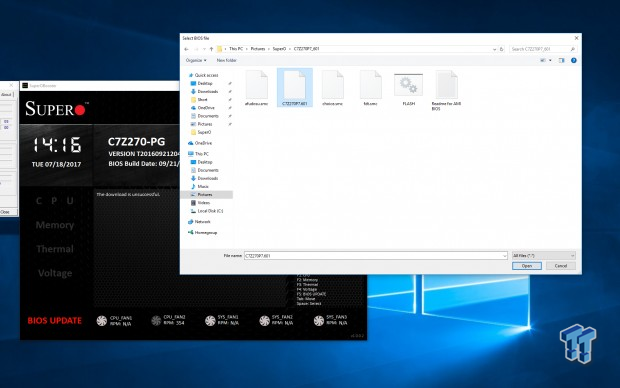
When I hit "No" to downloading the BIOS, a pop-up screen asked me to locate the BIOS file. You should have already extracted the contents of the BIOS update package, and you will select the file that starts with your motherboard's name. In this case, I selected the file named C7Z270P7.601. The BIOS file will typically be 8MB in size when compressed and 16MB when extracted. So, if you are unsure of which file is your BIOS, just view the extracted folder contents in detailed view mode, as the BIOS ROM is 16MB (128Mbit) in size and needs a 16MB ROM.
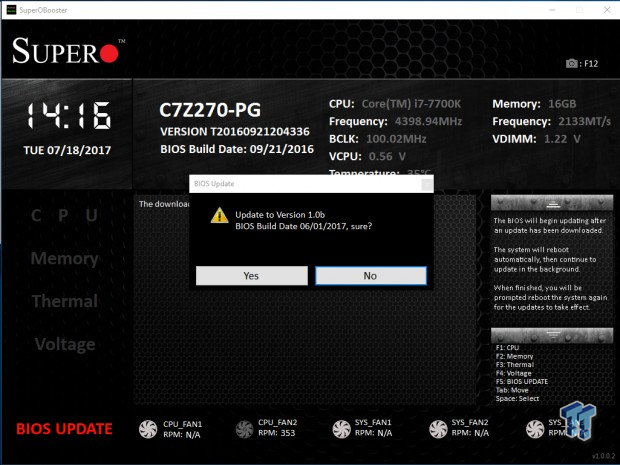
Once you double click on the BIOS file, the program will ask you if you are sure you want to update. It asks because updating the BIOS is a risky business no matter what hardware you are working with. Rest assured you will be okay because Supermicro does offer BIOS rescue through a built-in system that allows for rescuing the system after a corrupt BIOS flash. Once you click "Yes" to the prompt, it will let you know the system needs to reboot to unlock the ME region for flashing.
The process is automated, and it will reboot once to unlock ME region flashing, boot into Windows and flash the BIOS (a prompt will pop up with the status of the flash), then it will reboot, and hopefully, you will be back at your desktop. Don't ever interrupt flashing; this flash took me about 10 minutes to complete.
CPU and Memory Overclocking
The video below describes the steps necessary to achieve a simple 5Ghz overclock with XMP using the SuperO Booster application.
The SuperO Booster is currently only offered on their Z270 chipset motherboards but will be available on their X299 offerings when those motherboards are released. The first thing you want to do is pick your battle. I highly recommend overclocking your CPU first and then moving on to memory overclocking. That is particularly the case with the Z270 platform, where memory and CPU overclocking don't really interfere with each other.
I would start at 1.3v VCore ("VCPU(V)") and 4.8GHz on all cores. Most 7600Ks and 7700Ks reach their maximum stable frequency around 1.3v with a decent cooler, but sometimes there is a little wiggle room. The CPU's temperature will be your limiting factor. You will probably have to manually set LLC too, but I will talk about that later down in the guide.
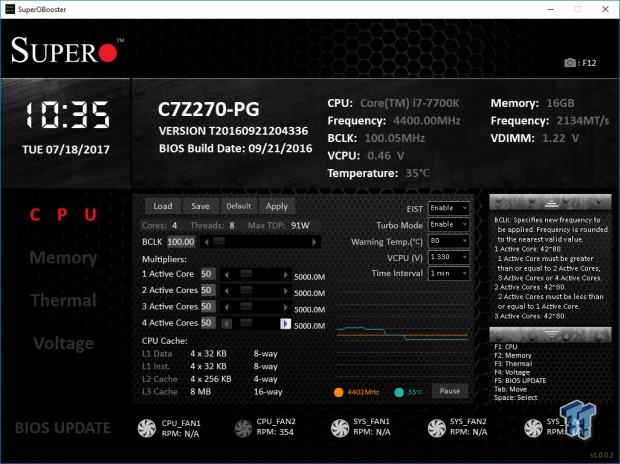
The SuperO Booster allows for per-core overclocking or all cores at once. To save time, you can drag the bottom slider on the 4th active core to an overclocked multiplier; I would start at 47x or 48x. You can overclock with BCLK as well, but most people just prefer multiplier based overclocking as it's simple and easy. You need to leave EIST and Turbo Mode enabled if you want your CPU to overclock. If you want your CPU to almost always run at maximum frequency, you need to change your Windows Power Plan to "High Performance." You might also want to raise your CPU Warning Temp to 80C, and you can also increase your VCore (VCPU), or wait until we reach the voltage page.
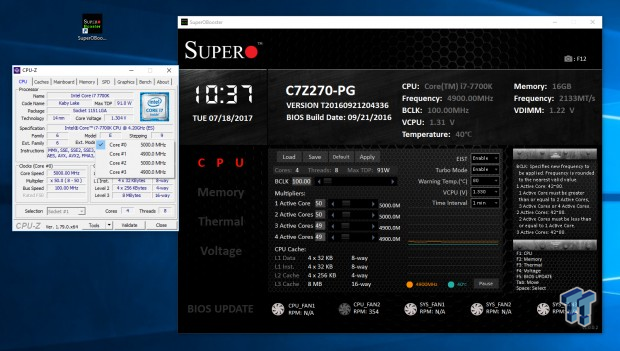
You can also apply different overclocks to different cores, meaning you can run two cores at 49x and two at 50x if that helps with stability. Once you "Apply" the CPU multiplier, the effects will happen in real-time, so don't hit apply unless you have already increased your VCore (VCPU). If the system is totally unstable, the motherboard will reboot and reset your settings. If you find your overclock is unstable then you need to tweak voltages, but you also have one other weapon; Load Line Calibration (LLC).
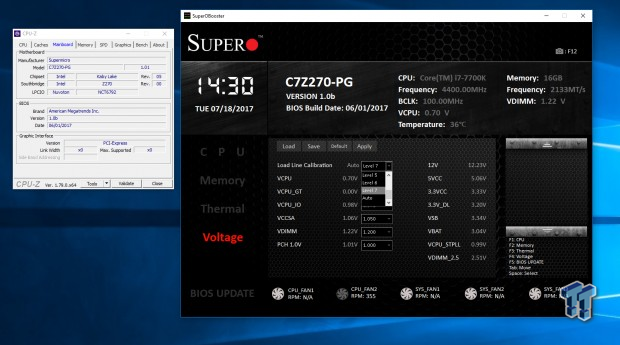
LLC will reduce voltage drop under load. For example, if I set 1.3v, I might get 1.3v at idle, but when I apply a load, the VCore voltage will drop in proportion to that load, perhaps as low as 1.22v. LLC reduces or reverses this voltage drop, and greatly helps with stability when overclocking. The SuperO Booster application offers LLC levels 1-7 as well as Disable and Auto modes. Level 1 is the strongest and will result in the voltage actually increasing under load. Level 2 offers a slight minimal drop in VCore, and the drop gets larger as you get closer to level 7. I recommend Level 2 or 3.
CPU and Memory Overclocking Continued

Let's say you messed up on the overclock and it's not stable. To return to default values you can just press the "Default" button, and then press "Yes" to reset the settings or "No" to return to your previous settings. While CPU overclocking and voltage changes do not require a reboot, memory overclocking does.
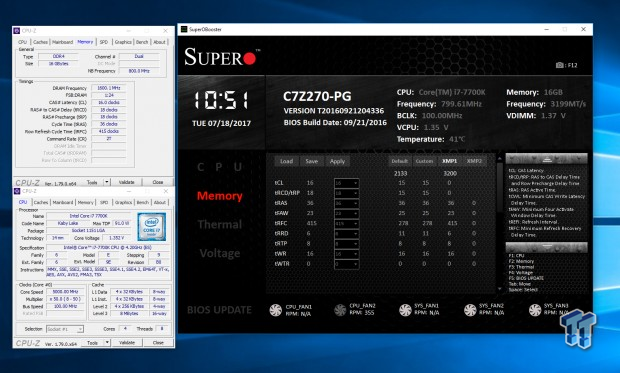
On the memory tab, you have a few options; Default, Custom, XMP1, and XMP2. XMP2 is only available if your kit supports two XMP profiles, most don't. The profile in use is the one highlighted, so in the case of the image above, XMP1 is activated. If you would like to customize your memory overclock, pressing "Custom" will unlock timings and an additional box will appear where you can select the memory frequency. Don't forget to manually set your DRAM voltage and VCCSA and VCCIO for the internal memory controller.


If you hit apply and a setting requires a reboot to go into effect, then you will be prompted to reboot. Pressing "Yes" will start a countdown timer (you get 6 seconds), and then the system will reboot. It's important that you not hit the restart button, as the motherboard won't apply your overclocked settings. Supermicro motherboards have a feature where they will reset all settings if they encounter any problems, but there is a way around having to re-enter all of your settings again. The SuperO Booster program has a built-in profile system, so you can save and load profiles as you wish.
Thermal Menu Fan Control and Final Notes
Thermal Menu Fan Control
The Thermal Menu is basically just fan control. Each of the five Smart Fan headers (PWM headers) on the motherboard I used can be controlled independently through the SuperO Booster. Each header can use one of four profiles including Quiet Mode, Stable Mode, Full Speed Mode, and Customize Mode. Quiet is the default setting for all headers. You also have the ability to change the reference temperature each header uses for each fan's curve. You must be in Customize Mode to change the reference temperature for each header.
The reference temperature can be either the CPU, PCH, System, or Peripheral. On the C7Z270-CG-L, you also get a TH temperature, which is the temperature from an external thermistor. Currently, the C7Z270-CG-L is the only motherboard that offers the "TH" reference, as it's currently SuperO's only board with a thermistor header. The color of the temperature will change on the graph depending on what temperature is chosen for reference.
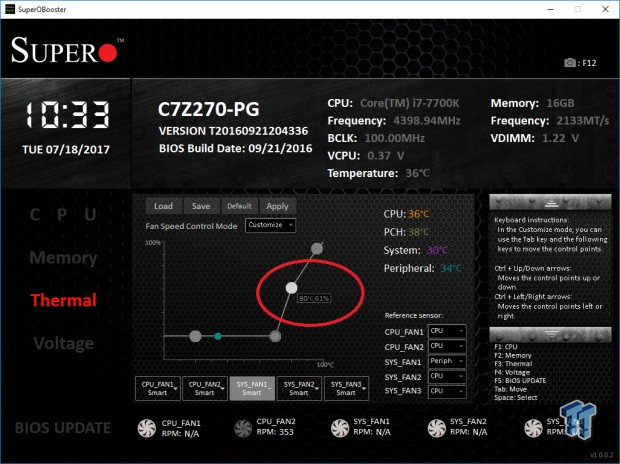
You can use a mouse to customize the position of each control point, but if for some reason your mouse isn't working you can use keyboard shortcuts to control the points. Use "Tab" to move from one point to another, and then use "CTRL+up/down/left/right arrow keys" to move each point up, down, left, or right. You get four control points for each header, and I like to maintain the fan at minimum RPMs until a certain temperature, and then ramp up when the sensor hits a temperature I feel is warm (usually around 60C).
The graph has Temperature on the horizontal X-axis and PWM percentage on the vertical Y-axis. Each point has a temperature and PWM percentage, and to find exactly what it is, you just need to click or select the point.
Final Notes
SuperO's SuperO Booster is a step in the right direction, as one thing SuperO boards were missing was easy to use Window's based fan control and BIOS updating. The overclocking changes are a nice touch, and the real-time mechanics of the software provide a quick and easy way to test out the CPU overclocking capabilities of the motherboard and CPU. Even the LLC levels are real-time, and that's made possible by the use of cutting edge PWM controllers SuperO tends to use on their motherboards.
Some of the options you have seen today might change depending on the motherboard you use and BIOS version. For instance, although the C7Z270-PG I used in this article didn't change, the LLC option only showed up in the software application after I updated the UEFI. In fact, the SuperO Booster is almost a carbon copy of the motherboard's UEFI, and like many other things, SuperO just works and works well. It's a simple, lightweight software application, and the only thing I could find wrong with the software was the labeling of the time interval settings for the CPU monitoring graph. It's labeled as minutes, but it should be seconds.
Feedback like that is what SuperO is looking for with their motherboards and this new software application. They want your comments and suggestions as they look to adapt better to the market, so please leave your comments and feedback here, or even on their social media channels such as Facebook, as they will be reading them.
SuperO wants to hear from you on here on their Facebook or Twitter pages!
 Black Flag Resynced is a win for Ubisoft, pirate remaster achieves 2 million sales in 24 hours
 Giveaway: Win an NZXT H6 RGB+ Case, Kraken Elite AIO, RGB Fans and 1200W PSU
 Ubisoft responds to Black Flag Resynced DLC critics by telling them they're 'not a requirement'
 NVIDIA is reportedly preparing the GeForce RTX 5090 SE to sit between the RTX 5080 and 5090
 id founder John Carmack comments on sad fate of studio
 Report: Minecraft profits used to fund Xbox games portfolio
 Assassin's Creed Black Flag Resynced has $80 worth of cosmetics and time-saving DLC
 Need For Speed seemingly on ice as Criterion becomes a Battlefield studio
 51 Ubisoft employees who worked on the successful Assassin's Creed Black Flag Resynced have just been laid off
 AMD expands Ryzen 200 and 100 'Hawk Point' APU lineup with 11 new SKUs
 Micron 6600 ION 245.76TB Enterprise SSD Review - Best in Class Programming Speeds
 MOZA MA3F EFCM Flight Control Module Review: authentic Airbus A320 autopilot panel for simulators
 Turtle Beach Stealth Pro II Wireless Gaming Headset Review - Premium Sound, Fantastic Features
 MOZA MGX1000 Instrument Panel Review: a realistic Garmin G1000 replica for immersive flight sims
 Simagic Zeus Formula Steering Wheel Review: premium build and advanced inputs for F1 racing
 GIGABYTE X870E Aero X3D Dark Wood Review - A woody goody
 The Super Mario Galaxy Movie (2026) 4K Ultra HD Blu-ray Review
 KTC H49S66 5K2K (5120x1440) 49-inch 180Hz Gaming Monitor Review
 HighPoint Rocket 1604L Gen5 x16 NVMe Software RAID AIC Review: half the price with full 59 GB/s speed
 Next Level Racing ERS3 Haptic Seat Review: immersive sim racing comfort with integrated haptics
 Don't sell your Windows laptop until you do these things
 6 PC cleaning mistakes to avoid for safer hardware maintenance
 Phison and Intel Take Aim at Local AI's Memory Wall with aiDAPTIV
 How to Remap Keyboard Keys in Windows using Microsoft PowerToys
 7 tips to organize your Windows files for faster, easier access
 Intel Arc G3 Extreme first impressions with MSI's Claw 8 EX AI+ - Incredible power for an extreme price
 How to fix Wi-Fi Adapter Not Working on Windows laptops: troubleshooting tips
 Hisense U7SG 4K TV: Modern Entertainment for the New Age
 6 underrated Microsoft Word features worth using to boost your productivity
 Level Up Your PC Gaming with these Fantastic ASUS Prime Day Deals on GPUs, Motherboards, and More