Introduction and Location and Signal Strength
Introduction
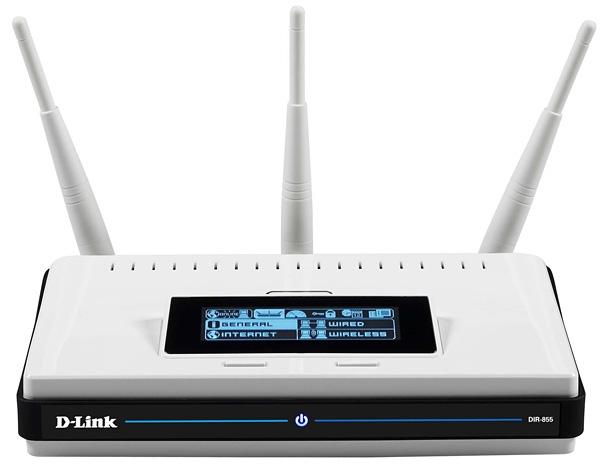
This guide came about since I was experiencing issues with my personal home Wi-Fi network. Initially I suspected my iPhone to be the cause of poor wireless performance on my home network due to issues Apple has been seeing with its iOS mobile operating system in the 6.x version range. Not wanting to wait for Apple to fix certain compatibility issues, I decided to investigate my own network to see if the issue could be there. It turned out the issues I was facing with poor Wi-Fi performance was not a fault of my iPhone, but my network.
Therefor I want to share my personal experiences with fine tuning my wireless network for optimal performance - that is, increased throughput (speed) and general performance (radio range). The tips and tweaks provided in this guide are simple to execute and often forgotten even by seasoned tech experts. Even if your network is performing well, these tips should be able to squeeze out some extra performance. Let's cover them one by one, and hopefully by the end, your wireless network is running great once again, or better than it ever has operated.
This guide is going to use a D-Link DIR-855 wireless router as the base for settings and such. Most wireless routers include almost exactly the same settings; they may just be worded differently and found in different locations - just hunt around for them. The first tip right out of the gate is to ensure that your router is running the latest firmware update. Often after logging into your router through its web-based control panel, you can enter the settings area and check that you have the latest firmware version if you're connected to the internet. If not, visit the manufacturer's website and check. It's worth the time as firmware updates can not only fix bugs, but also improve performance and open up new settings.
Step 1 - Location and Signal Strength
The first and probably most important thing we need to look at is the location of your wireless router or access point. It's often one of the simple things that are forgotten, and in my case, the position of my router caused issues with my Wi-Fi network.
Ensure that your router is positioned in the most central location of your home or office. While this is not always easy to achieve, you'll find that the more central, the better. Also make sure there are as few objects near the router as possible and it is positioned as high as possible. If you are in a single story house, make sure the router is central and positioned above nearby objects, such as furniture. If you are in a multistory complex, put the router on the middle floor or upper floor. If you find that your router is unable to provide enough signal strength to cover the whole building, you may need to look into adding an access point or turning an old, unused router into an access point (a previously published popular TweakTown guide).
In my case, I live in a three-story townhouse with my router on the first floor and I have an old router that I turned into an access point on the third floor. It's an old house with very solid construct (big, thick walls), and that means it's very tough for the radio signals to pass through. All I did was have an electrician run a CAT6 or such gigabit ethernet cable from the first floor to the third floor. Newer houses constructed mostly of wood or less obstructive materials may not require the same, as wireless signals can pass through easier.
Another issue I faced was having another wireless device placed closely to my wireless router. When I was experiencing issues with my wireless network, I had a Skype wireless receiver for a Skype / landline phone right next to my router or at times even sitting right on top of my router. It turned out by having this additional wireless device so close to my router it heavily impacted its signal. All I had to do was move the Skype wireless receiver away (I moved it around one meter / 3 or 4 feet away) from the router and just that simple move improved the network greatly. Also ensure that other electronics such as microwaves and such are nowhere near your router as they will likely cause interference.
Radio Channel Selection and Router Settings
Step 2 - Radio Channel Selection
Now that the position of the router is sorted, it's time to login to it and change some settings. We'll cover more settings in the next step, but I figured this option deserved a section of its own. Most routers are factory configured to run on channel six (CH6). The issue with this is that if you live or work in a densely populated area, there are likely to be at least a few other routers nearby also operating on the same channel and competing for air space on that channel.
Most of the time your router will work fine even if on the same radio channel as others, but you'll see some improvement in performance by selecting a channel that is open and unused by other wireless devices. My router was selected to auto select the best channel, but it turns out that option didn't really work well at all. As far as I know my router kept its selection as CH6, even though that was not the best setting.
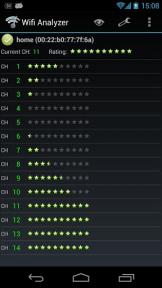
There is a very hand and free app on the Google Play Store for Android devices which enables you to examine your nearby area and easily determine which channel is the best choice for you. Most of your neighbors won't know it, but they'll want to thank you for adjusting your channel, if they knew. The app we're talking about is called Wifi Analyzer and can be downloaded here from the Play Store. Once you've got it installed on your device, on the screen (as pictured above), you'll be able to see the ratings for the best channels available.
In my case I changed my channel from CH6 to CH1 as that was one of the two best channels recommended by the app. On another section of the app you can also get a listing of nearby wireless networks and see what channels they are using. Check this and the recommended channels by the app and then determine which channel is best for you. Ideally you will select a channel that is not used within your routers wireless range.
Step 3 - Router Settings
In this section we'll go over some of the settings you can change in your router to improve wireless performance. These settings are based off my D-Link DIR-855 router, but as mentioned, your router should have similar settings, they may just be worded different or located in a different area.
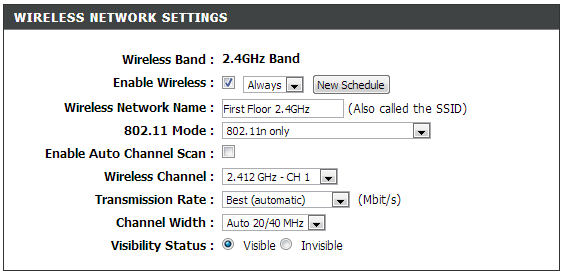
The first notable setting here is the type of 802.11 mode your router uses. You should have your router only run one type of wireless mode as it results in less switching and improved performance. We only saw a slight improvement from adjust this, but we're going to include it in this guide anyway as every bit helps. Depending on the wireless devices connecting to your router, select one option which works best. In my case the option of "802.11n only" works best as most of my devices connecting are modern and support this protocol.
If you have older devices, such as laptops, they may only support up to 802.11g, which means you should select "802.11g only", as your wireless mode. If you find that users are unable to connect their devices, you may have to go back and select mixed mode, which operates 802.11b, 802.11g and 802.11n. As a side note, if you have a very new router, it may support gigabit wireless or 802.11ac.
As mentioned in Step 2 we recommend manually selecting the radio channel, so in our case "Enable Auto Channel Scan" has been disabled. Under "Wireless Channel" is where you can select the best channel for you as discussed in Step 2. For "Transmission Rate" you'll want to select "Best" - if you want to control how much speed users get out of your router, you can play around with this setting. Ensure that "Channel Width" is set as "Auto" or "Auto 20/40 MHz". The last option we see here is "Visibility Status" and this determines if your network SSID (network name) can be seen by nearby wireless devices.
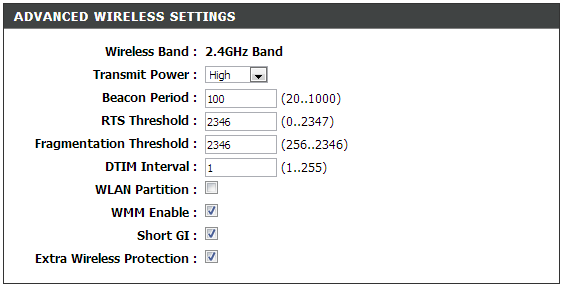
Under the advanced settings area of my router I can changed advanced wireless settings, as you can see in the screenshot above. By default most routers are configured from the factory with less than optimal performance settings. Match your settings up with mine in the screenshot above, I find them to work best. The only option I have disabled is "WLAN Partition" which is used to prevent wireless devices from connecting and accessing files to other computers on the network. If you have strangers using your network, you may want to enable this option.
Another option which may appear is called "Extra Wireless Protection" and this option only become available when you select "802.11n" only for your wireless mode. Disable it if you are running an 802.11n only wireless network. If you happen to see a slowdown in performance or issues, as some have noted, change it back.
Wireless Security, Range and Checking Performance
Step 4 - Wireless Security
While not strictly about improving performance, security is an important part of your wireless network, so we want to cover it quickly in this guide. In my opinion the best home level security option for most routers is WPA-Personal. It's not the strongest, but still quite good. Most routers come with security disabled, since it results in less tech support calls to the manufacturers when users first try to setup their device. Hit the security settings area of your router and make sure that you have security enabled. I can't see a time where you would not have security enabled, as with it disabled, anyone is free to connect and use your Internet and so forth, hence slowing things down for you.
If you are really concerned about security, you can setup your router to only accept certain wireless devices. You'll need to find the area in your router which enables you to input device MAC addresses. Every device that connects to a LAN or the internet has a unique MAC address. Once you've enabled this option and added in the MAC addresses, only devices which those exact matching MAC addresses will be able to connect to your wireless network. Some say this method is even better than WEP or WPA, but keep both enabled for the best security. Just remember it can be a hassle to manually add a new MAC address every time someone new visits or every time you get a new device.
Step 5 - Extending Range / Directing Range
While we could go on for pages and pages, one of the final things we want to discuss is extending radio range or directing it to our needs. With most routers you are able to remove the standard antennas that come included. These included antennas do the job for standard housing and offices pretty well, but if you really want to boost your performance, extend range or direct the range to a certain area, you have some options.
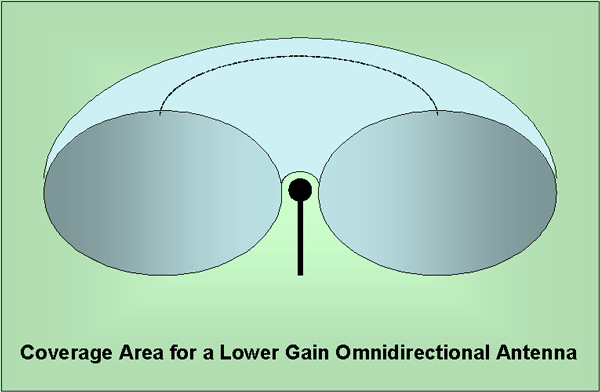
If you have a large house or office or just want to increase the range or power of your wireless network, you can easily buy aftermarket antenna's to replace the existing standard antennas on your router. If I take my D-Link DIR-855 router for example, it comes with three 2dBi Omni Direction antennas attached out of the box. While taking a look at the Newegg website for aftermarket wireless antennas, there are literally dozens to pick from. One of the options with the highest Newegg buyer rating is the TRENDnet TEW-AIO70B 7dBi Indoor Omni Direction Antenna. It has rated signal strength of 7dBi which is quite a bit more powerful than the standard 2dBi factory default antennas on my D-Link router.
They are not overly costly, at the time of writing, Newegg is asking about $27 for one - just remember for best performance, you'll want to order the same amount of antenna's as you are replacing on your router. I would highly advise against not replacing all of the antennas on your router, as not replacing them all and mismatching them could and likely will cause issues or less than stellar performance. In my case that would mean buying three antennas, which would be around an $80 investment, and that would greatly improve the performance and range of my wireless network.
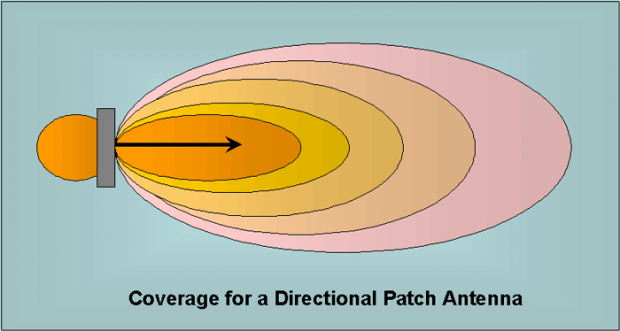
Along the same subject, we also have the option of directing your wireless range, but you'll need to pull out your credit card for this job, too. If you are not interested in pushing your wireless in a certain direction, instead just having it cover a general round area, select an Omni Direction Antenna. However, say for example, you have a really long house or maybe even a farm where you are looking to get internet access in a field or shed, you need to select a Directional Antenna. As the image indicates above, these push the direction of the wireless to a direction of your choice based on the directional placement, rather than just covering a general oval shape area as with Omni Direction antennas.
Step 6 - Checking Performance
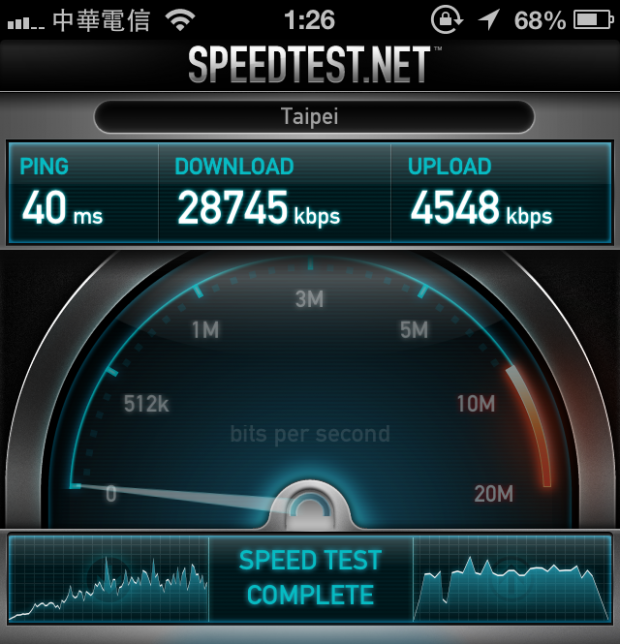
Once you've following all of the tips and tweaks in this guide, you'll want to run some tests to see what works and what doesn't. Our tips and such in this guide are not an exact science, and depending on your product, building and location, some settings / placements may be better than others. One of the easiest tests (although not exactly consistent) is to run a speed test using speedtest.net - they also have apps for iOS and Android if you want to try on your smart device.
I say not exactly consistent as it relies on your internet connection to run a ping (latency), download and upload test and the performance of that is a varying factor that always changes depending on what you are downloading / uploading, the time of the day and so on. While not scientific or 100% accurate, I was able to add an extra 3 - 4Mbit from my fiber internet connection by following the tips in this guide on my iPhone.
A more solid and accurate test would be to setup a file transfer from one computer to another. For example, have a file send from your desktop PC to your laptop and make sure the laptop is always positioned in the exact same location and conditions to get an accurate measurement of wireless performance. Time how long it takes to copy the file from A to B. LAN Speed Test (Lite) by Totusoft is a good little application to make this test easier for you, but there are dozens of these apps out and about for you to try.
We hope you enjoyed this guide and it resulted in you seeing improvements with your wireless network. If you have any tips, tweaks or suggestions to share, please leave a comment below for everyone to see and try!


 United
States: Find other tech and computer products like this
over at
  United
Kingdom: Find other tech and computer products like this
over at
  Australia:
Find other tech and computer products like this over at
  Canada:
Find other tech and computer products like this over at
  Deutschland:
Finde andere Technik- und Computerprodukte wie dieses auf