Introduction and Vision
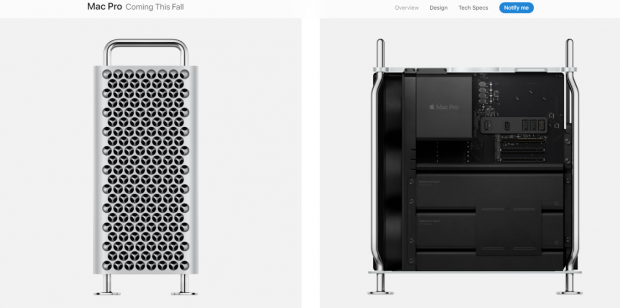
We all know that Apple's Mac Pro designers spend a lot of time creating custom-built desktops with intricate custom form factors and exteriors inspired by household items found in kitchens. Some have criticized the 2013 Mac Pro for looking like a trashcan and the soon to be released model for looking like a grater, but while it is fun to poke fun at their exterior designs, they are very high-end machines with top of the line hardware. However, they have many downsides. We can build a workstation with faster and bigger specifications compared to their entry-level offering, using the same platform and CPU generation, and still come way under budget compared to their cheapest model.
Supermicro came to us a few months ago and asked us to build a machine similar to the new Mac Pro, and we took on that challenge. Our configuration will use a CPU with 50% more cores than their entry-level machine, with more DRAM in a faster configuration, an SSD with double the capacity, and a much faster GPU. We will also come in thousands of dollars cheaper than the $6K Apple is asking for their new Mac Pro.

Apple is sticking with Intel for their new workstation CPUs, specifically the Intel® Xeon® 3000 series with up to 28 cores. We will be using a 12-core, as that is what Supermicro lent us for this project. The new CPUs utilize Cascade Lake microarchitecture on the latest 14nm node. If you are looking at Apple's specifications for the offered CPUs and notice a mismatch in cache sizes compared to Intel's site, that's because Intel's site only lists L3 cache, while Apple's adds up L3 and L2 caches.
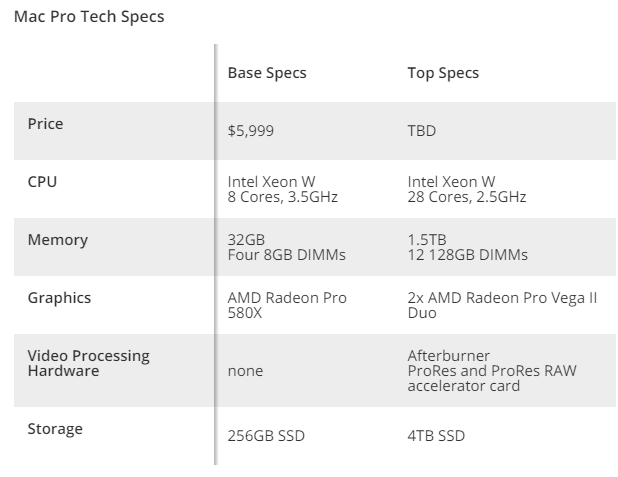
Base pricing of the new Mac Pro will be $5,999, and that's for only an 8-core CPU with 32GB of RAM in quad channel, a Radeon Pro 580X GPU, and a 256GB SSD. We will build a system that will take full advantage of the CPU, including hexa-channel DRAM, expanded PCI-E slots using a PEX chip, and full room for expansion. Like the Mac Pro, our workstation will utilize the Xeon W CPU, which requires high-end enterprise grade hardware such as RDIMMs.
Let's take a look at what we did.

Supermicro X11SPA-T Motherboard
| Today | Yesterday | 7 days ago | 30 days ago | ||
|---|---|---|---|---|---|
| CAD $1479.82 | CAD $1479.82 | CAD $1456.91 | |||
* Prices last scanned on 4/25/2024 at 1:08 am CDT - prices may not be accurate, click links above for the latest price. We may earn an affiliate commission. | |||||
Hardware Selection
CPU: We are using the latest generation of Xeon W CPUs, which are some of Intel's newest CPUs meant for workstation users. We are using the Intel® Xeon® W-3235 Processor, which requires a lot of cooling.
Motherboard: Now that we have picked a CPU we need a pick a motherboard. The socket for the Xeon W is much larger and bigger than the typical LGA2011-v2 socket. Supermicro sent us their C621 chipset X11SPA-T motherboard, which does support the new Xeon W CPUs. You can also take into consideration the number of PCI-E slots you would like, in the case of this motherboard there is a PEX8747 chip that takes x16 lanes and outputs x32, so that we have a total of seven PCI-E slots.
Four of the slots are x16 slots that can operate at x16 all the time depending on M.2 slot usage and x8 PCI-E slot usage. The motherboard also has IPMI, which is a remote management capability to remotely configure and even use the system. You might also want to take form factor into consideration as it will affect case selection, as workstation and server motherboards don't always use the ATX standard. In our case the motherboard is E-ATX, which is easy to match with a large enough case.
RAM: The Xeon-W CPUs cannot accept just any DDR4, you must use RDIMMs, so we used six sticks of Samsung M393A1G40EB2-CTD 8GB DDR4-2666 RDIMM registered ECC memory. You can also save money by just using two sticks for dual channel or four for quad channel, but if you use less than six sticks you won't get the performance benefit of hexa-channel RAM.
Storage: The motherboard has eight SATA 6Gb/s ports and three x4 PCI-E M.2 slots all connected directly to the CPU, so there is no DMI bottleneck. What this means is that if you RAID all four slots using a Virtual RAID On CPU (VROC) key, you will get maximum performance. We should mention you lose the bottommost PCI-E x16 slot if you utilize all the M.2 slots. You can also use PCI-E add in cards for storage. We opted for a Samsung PM981. Be advised that if you want to use VROC for NVMe RAID, there is a list of approved drives on Intel's website, and you will want to buy one of those SSDs to make sure things run smooth.
Case: A few months back you might have read our review of the Xeon W-3175X, which utilizes the same socket as our Xeon W, but the motherboard we used required a special case since it utilizes the SSI-CEB form factor. You will want to check the form factor of your motherboard to pick a case. In our case (no pun intended) we were lucky since our motherboard uses the E-ATX form factor. We reused our cased from that build, the Andees AI Crystal XL AR.
Power Supply: The CPU has a 180W TDP, so we are going to budget 220W for it. Our RTX 2080 Ti will cost us about 300W, and we will double that to 600W in case we want to add another down the line. The motherboard's chipset has a 15W TDP, the PEX8747 has an 8W TDP, and the 10Gbit NIC requires a heat sink so we estimate 5W of power. The motherboard has a lot of other features as well, so we will budget around 50W for the motherboard. We estimate the system could use up to 1000W, so we used a 1200W power supply. Steady power is very important, and PSUs are one of those things that go before other system components.
We will stick with the tried and true AX1200i from Corsair which not only has the highest level of certification, but also a 10-year warranty. We should also mention that if you use more than four PCI-E slots, you lose your warranty if you don't attach a third 8-pin ESP power connector, so if you are going to a very high wattage system you will want a PSU with more than two 8-pin ESP power connectors, or at least one with many PCI-E power connectors so you can use a 6-pin to 8-pin power adapter.
Cooling: You might choose to go with a basic LGA-3467 cooler capable of handling a 200-220W Xeon CPU for around $50, but these typically tend to be built for datacenters and can be quite loud. In our case we went with an EKWB Phoenix 360 Annihilator, so we can turn the fans down and run the system at maximum performance. However, keep in mind that the LGA-3467 socket has no hold down mechanism, and many instruction manuals recommend a cooler that mounts to the CPU, which you then attach to the motherboard, so research is recommended depending on your level of expertise.
- Motherboard: Supermicro X11SPA-T
- CPU: Intel® Xeon® W-3235 12-Core 24-Thread Processor
- Cooler: EKWB Phoenix 360 Annihilator
- Memory: Samsung M393A1G40EB2-CTD 8GB DDR4-2666 RDIMM
- Video Card: NVIDIA GeForce GTX 1080 Ti FE
- Storage - Boot Drive: Samsung PM981 512GB M.2
- Case: Andees AI Crystal XL AR
- Power Supply: Corsair AX1200i
Total Cost Breakdown
- CPU: $1387
- Motherboard: $604
- RAM: $534
- SSD: $99
- Case: $269 (Towers that support E-ATX start at $91 on Newegg)
- PSU: $339 (1200W 80+ Platinum PSUs start at $129 on Newegg)
- Cooler: $400 (Noctua NH-U12S DX-3647 is $99 and would offer much more value)
Total: ~$3,628, which can go down significantly if we change out the cooler, PSU, and case for more reasonably priced models. If we go with the alternatives mentioned above, system costs comes to ~$2,939, and we could use the extra wiggle room to double our SSD capacity, and the system would chime in at 50% the cost of the base Mac Pro.
A look at the Motherboard
Supermicro's X11SPA-T Motherboard
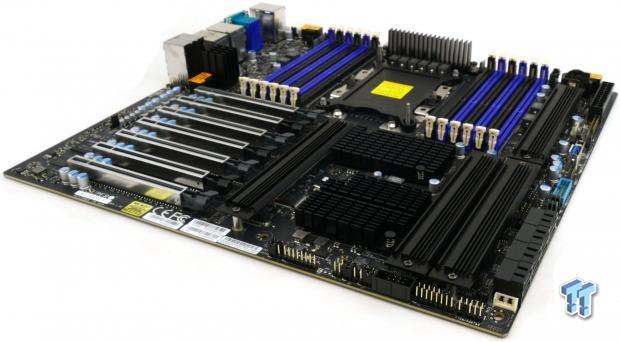
Considering the motherboard is meant for serious workstation users, we didn't expect to find reinforced PCI-E slots or black heat sinks, or even a black PCB for that matter. Supermicro decided to spice things up a bit since this board is meant for enthusiasts and not the data center, so if you want to put the rig on display you would have no problem.
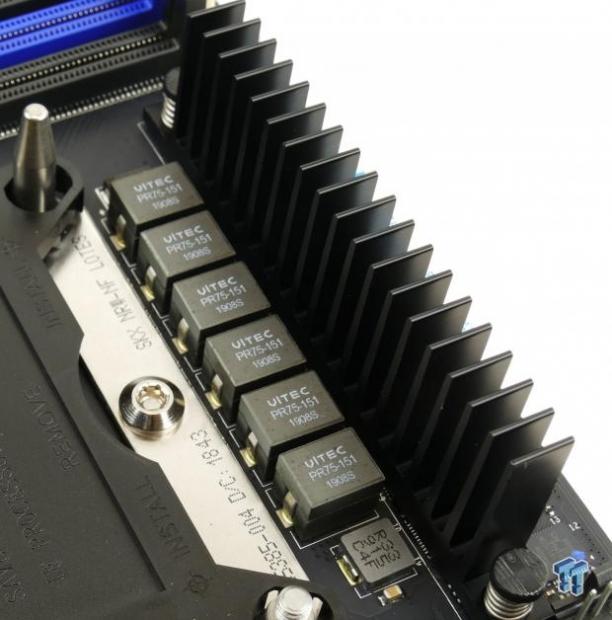
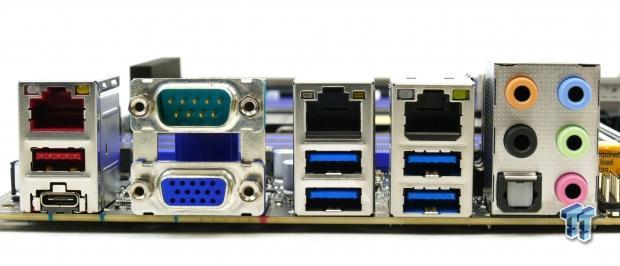
The VRM is in a 6+1 phase configuration, and considering Intel is pretty strict with their TDPs for the Xeon W, we are happy to see Supermicro used their top of the line power stages and 70A inductors. The heat sink here should be enough to cool the VRM, but if you aren't using an air cooler we recommend a fan blow in the direction of the VRM. The rear IO features a 10Gbit LAN port (red), USB 3.1 10Gb/s type-A and type-C ports (red), a COM port, an onboard VGA port, four USB 3.0 ports, a1Gbit IPMI port (near COM port), a 1Gbit port (Intel), and 7.1 audio outputs with S/PDIF out.
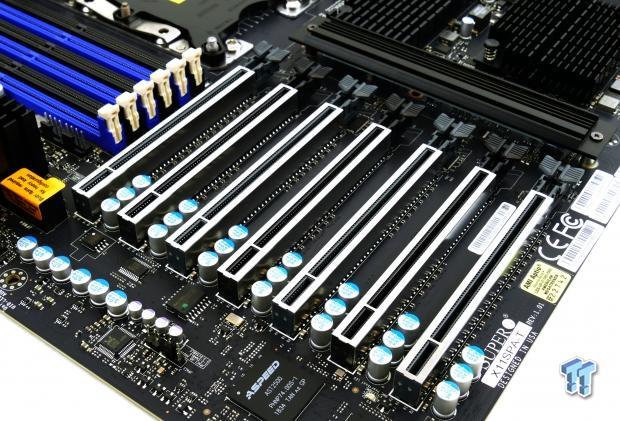
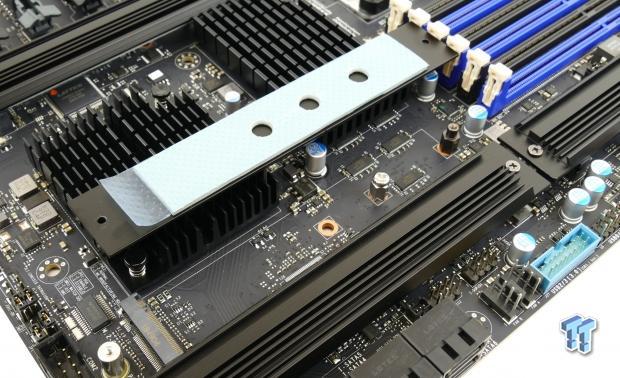
The PCI-E layout is x16/x8/x16/x8/x16/x8/x16. The bottom and top ports each get x16 from the CPU, while the rest of the ports get x32 lanes from the PEX8747 chip. The top PCI-E x16 slot shares x8 with the slot right below it. The two x16 ports in the middle will operate at x8 if the x8 ports below them are in use. The bottommost PCI-E x16 slot and all four M.2 slots share lanes, so if you use all four M.2 slot you won't be able to use the PCI-E slot. Each M.2 slot operates at x4 PCI-E 3.0 and they don't support SATA drives. We should mention that slot naming is a bit upside down, slot 7 is at the top and slot 1 is at the bottom.
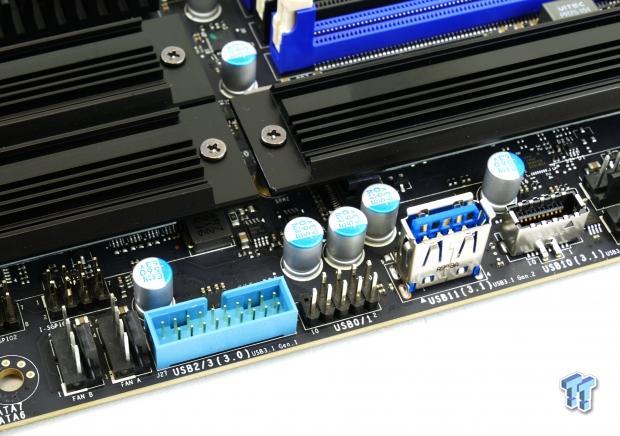
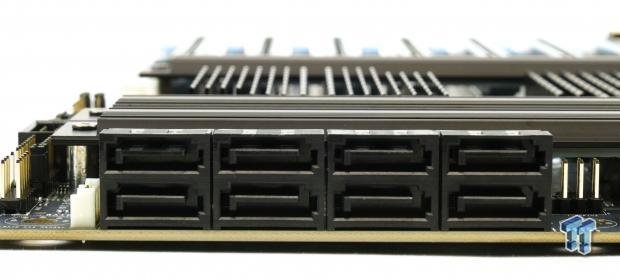
There are ten PWM fan headers on the motherboard that support up to 2.5A, so use 4-pin fan headers if you want to control the fans (3-pin fans will run full speed). There is a USB 3.0 internal header, a USB 2.0 internal header, a USB 3.0 type-A port, and a USB 3.1 10Gb/s type-C header onboard. Eight SATA6Gb/s ports are connected to the CPU.
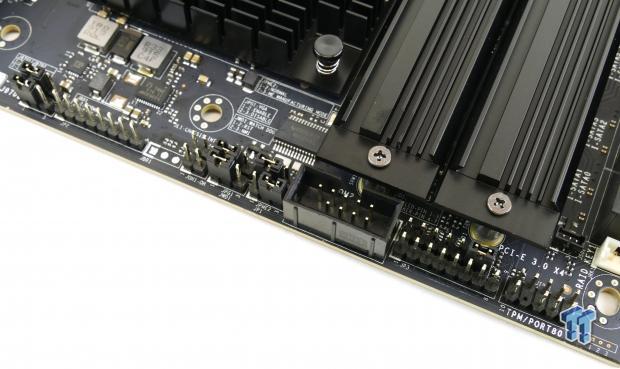
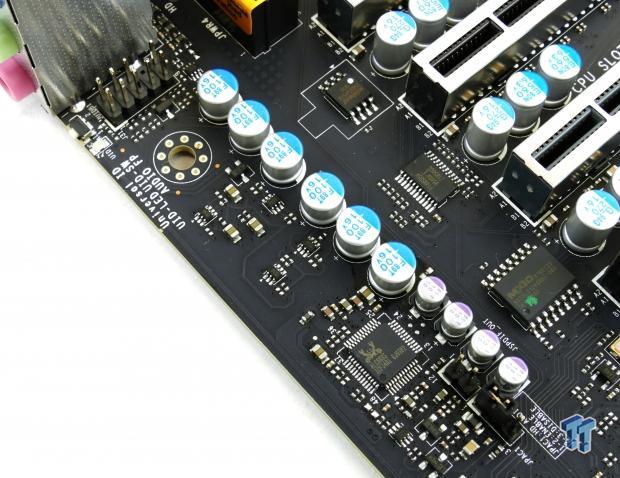
At the bottom of the motherboard we find many jumpers, one of them can come in handy as it can disable the onboard VGA port, which by default is the primary display output. We also find a COM port and our TPM header in the bottom right corner. The audio header is located right above the PCI-E slot.
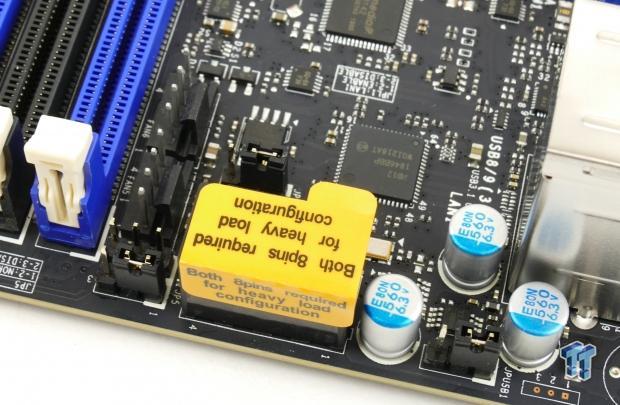
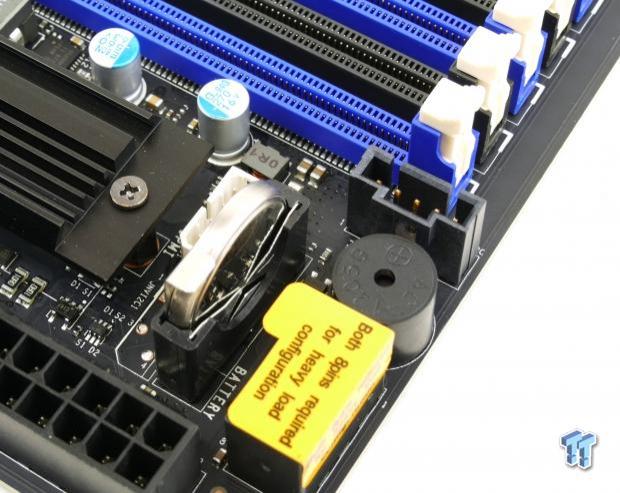
There are a total of three 8-pin 12v ESP power connectors on the motherboard. You only need to plug in the ones at the top of the motherboard for operation. However, if you use more than four of the PCI-E slots you need to use all three 12v power ports or you will void your warranty. Supermicro supplies a 6-pin PCI-E power to 8-pin 12v power converter in case your PSU only has two 8-pin wires. There is a beep code speaker at the top of the motherboard, and it can come in handy since there is no debug display.
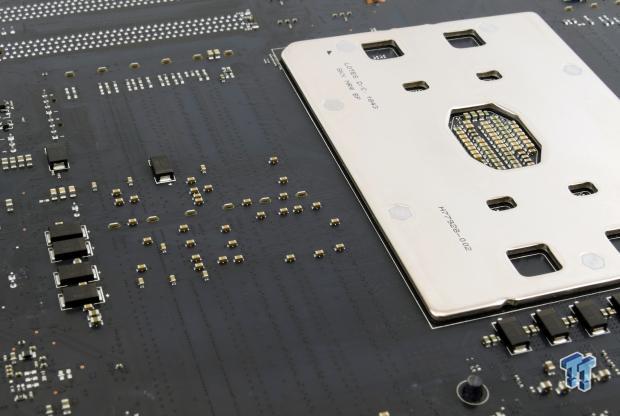
SMD DIMM slots pick up less electrical noise compared to through-hole DIMM slots, meaning a cleaner signal. For comparison sake, the $1.7K ASUS Dominus Extreme, which supports the 28-core Xeon W-3175X, uses through-hole DIMMs, and it can even overclock memory. Here we see SMD DIMMs for better signal integrity even though the maximum DRAM speed is 2933MHz. This attention to detail is appreciated, and we will mention the Mac Pro also uses SMD DIMMs.
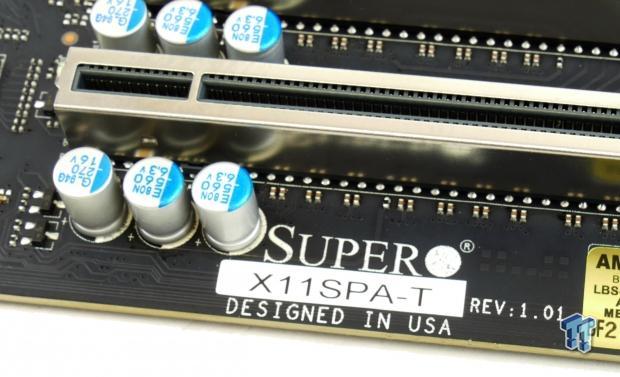
We just wanted to take a second and mention that this motherboard, the X11SPA-T is designed in the USA. Supermicro is one of few if any major motherboard manufacturers that design in the USA. We have personally visited their offices in the USA, and we can attest it's a full on operation and not just marketing and sales like most other motherboard vendors.
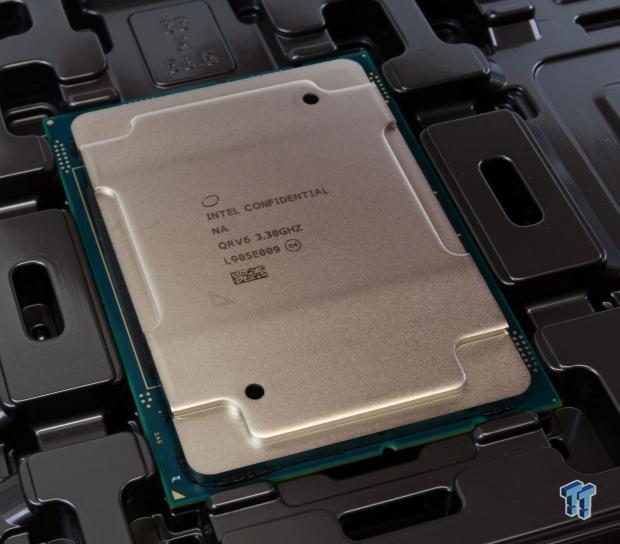
Here is our Xeon-W CPU.
Building the System
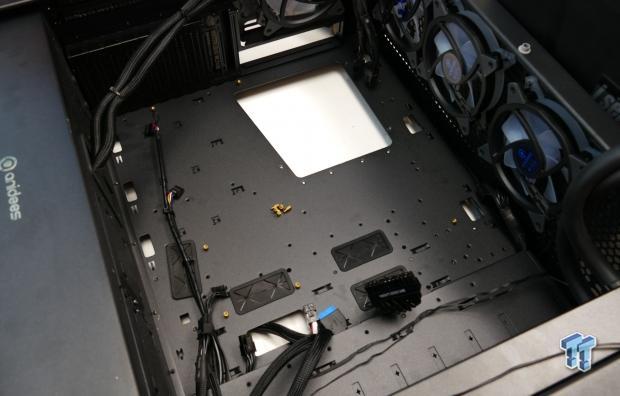
The first step is to compare the holes on the motherboard and install the case standoffs accordingly. Pay close attention as you don't want the blocked E-ATX mounting holes sitting on conductive standoffs in the top left corner or center of the motherboard.
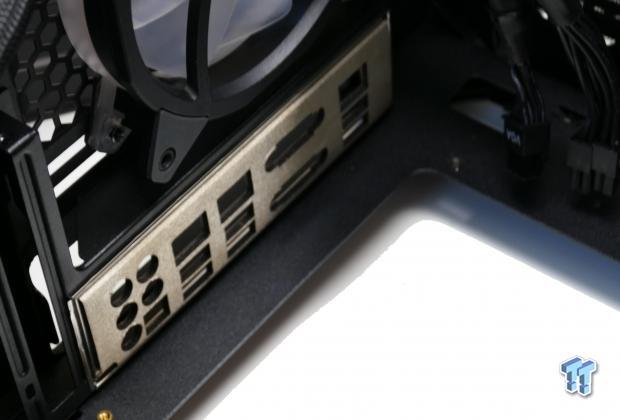
The rear IO shield needs to be installed before you install the motherboard, as it is one of the most forgotten steps in PC building.
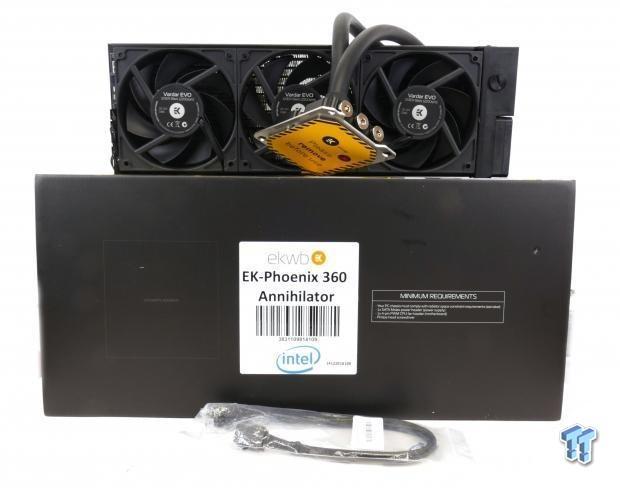
Our water cooler weighs a significantly amount, and as you can see needs very strong mounting.
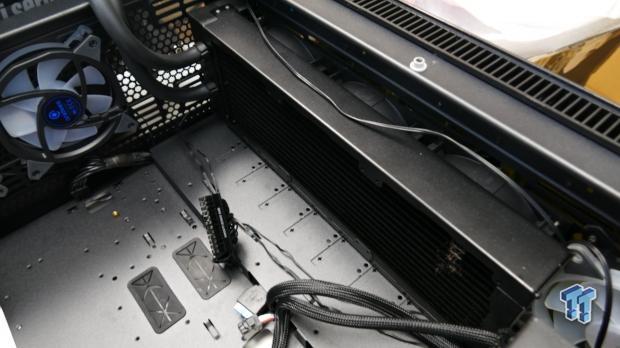
We always opt to install all-in-one water coolers before the motherboard. It is also useful to pre-position your power and data cables.
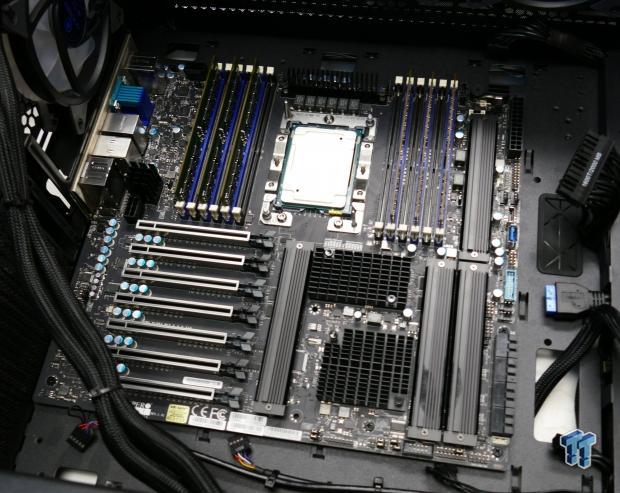
We like to install DRAM, M.2 drives, and CPUs on the motherboard before installing the board into the case. In the case of the LGA-3467 socket, there is no socket hold down, in most cases you are supposed to mount the CPU to an enterprise cooler, but in this case we opted to put the CPU in the socket once we installed the motherboard, and then install the cooler.
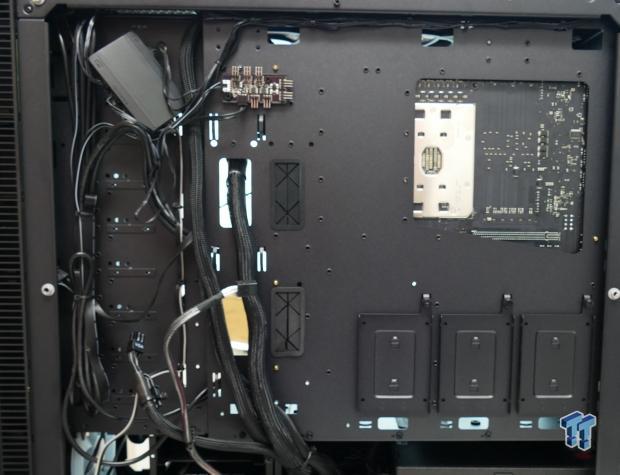
Cabling is also very important, once you get all the power and data cables attached you can then snag extra and tighten things up at the back of the case to improve airflow. Airflow is very important with a machine this powerful and higher temperatures, even by 5-10C can greatly affect the longevity of your hardware.
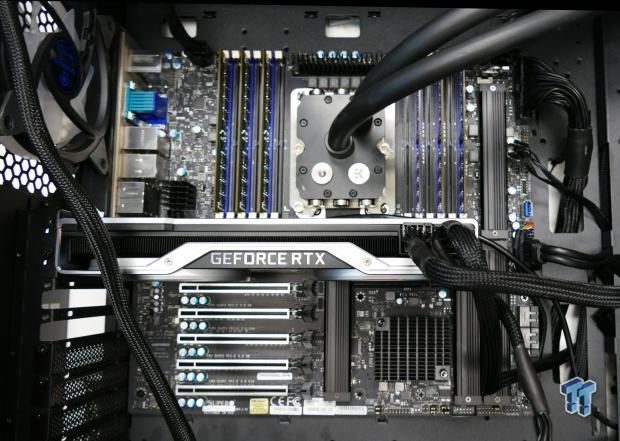
Here we have our system all installed and ready to go, what a beauty.
Configuring the System
There are three ways to get the system up and running and into the BIOS, and the main way people get into the BIOS to configure it is by using the main GPU to output to their monitor. That will not work here in most cases because the default VGA device is the onboard VGA port, so if you have a VGA monitor then you should be fine. If you do not, there are two ways to get into the BIOS. The first is to use IPMI, which is a way to remote into the system from another PC on your network, and the second is to use the onboard jumper to disable the VGA port (by default it is enabled). We will go over how to use IPMI.

You access the workstation through a web-browser. However, you probably don't know the IP address of the PC. First thing we did was use another PC that is plugged in and near our PC, and run "ipconfig" to get the IP address of our PC/cable. Then we connected that PC to WIFI and unplugged its LAN cable. Next thing to do is take that cable and make sure you are plugged into the middle black LAN port on the rear IO, that goes to the baseboard management controller that is used for IPMI specifically.
You can turn the system on, if you hear a few millisecond beeps and then one loud one, then that means the system has passed POST successfully. From our second computer we typed in one IP address one more than that of our other PC, so our other PC was 10.1.10.13, and we tried 10.1.10.14 and it worked perfectly. There are other ways to scanning for IP addresses on your network if that doesn't work. Login is ADMIN and password is ADMIN (case sensitive) by default.
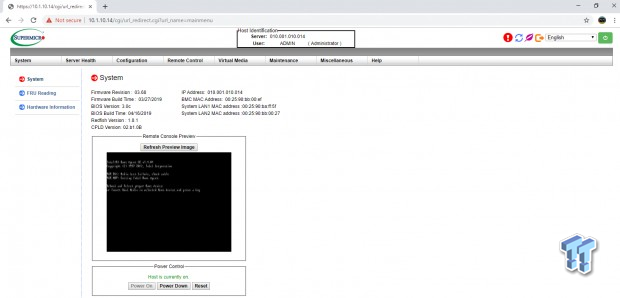
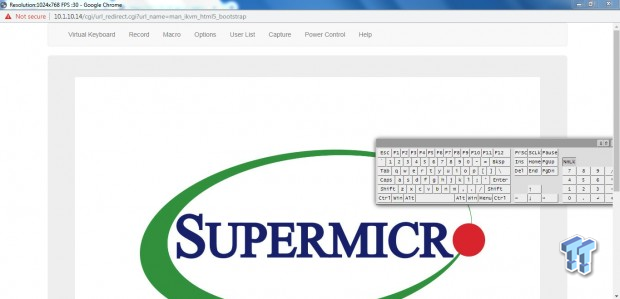
We can see here that we see a BIOS hang screen, so we know our build is successful. You can also power up and down the system from here. We go over to our virtual KVM, and use the keyboard to restart and enter the BIOS by pressing "delete". Then we can proceed to change our default VGA output.
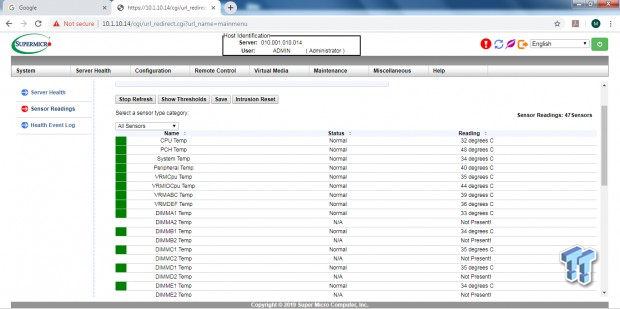
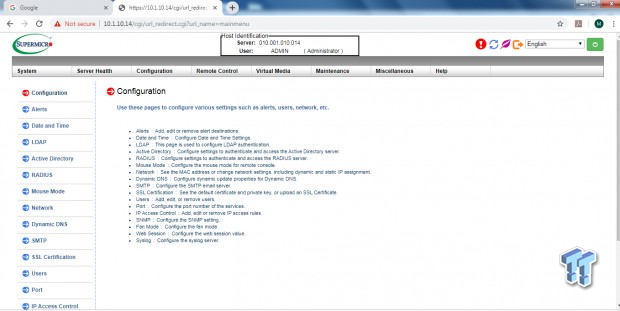
The IPMI interface also allows you to watch the system and make sure it is healthy. It also has very many configuration options. Not all motherboards support IPMI, it's a somewhat costly addition since it's like its own mini computer system and requires a BMC microcontroller, DRAM, a BIOS chip, and in this case a dedicated LAN controller.
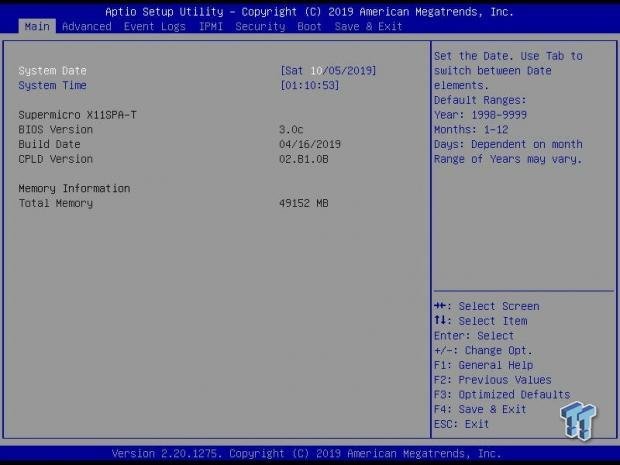
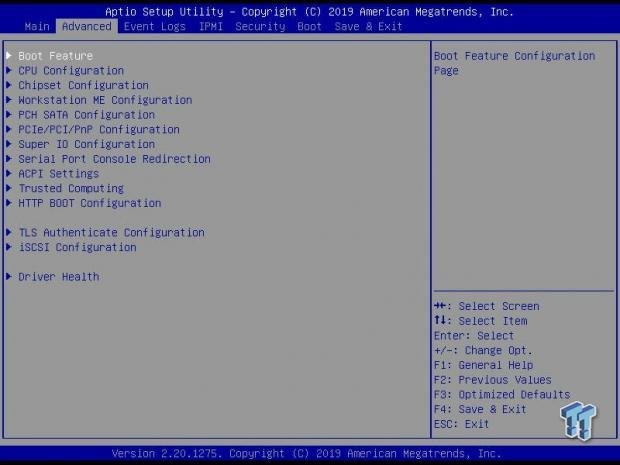
The BIOS is pretty basic looking, but filled with options. Here we can see all of our DDR4 is being detected.
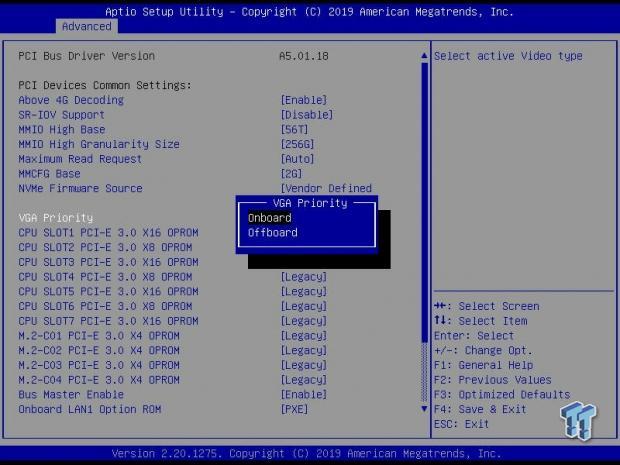
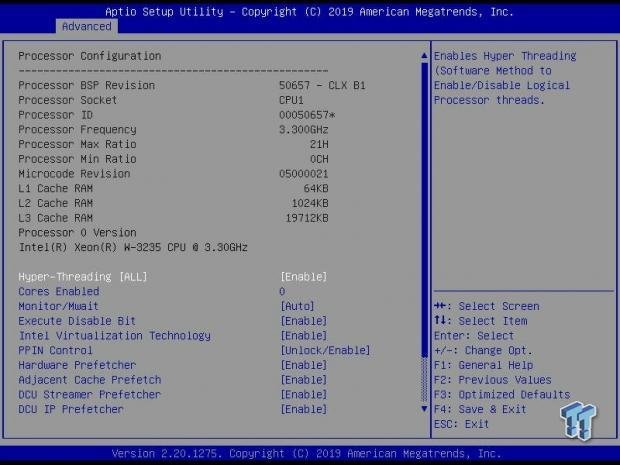
The first thing we did was change VGA priority. If you are going to do NVMe RAID you will need to change the M.2 OPROM's to UEFI. Here we can also see all of our CPU features.
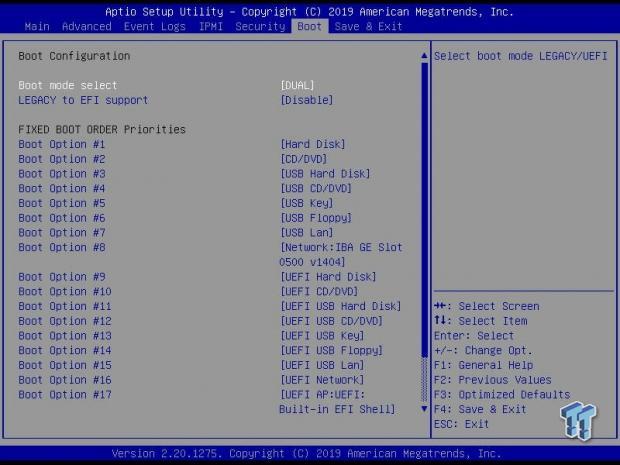
The last thing we wanted to do was to change our boot options. These days you can just use UEFI booting, but by tradition legacy is first. We recommend using UEFI. After this part you just press "F4" to save and exit, and then you can install whatever OS you want, from Linux to Windows, you might even try and make a Hackintosh if you wanted to as well, but we make zero promises to whether or not it will work.
Conclusion
It's easy to use cars as analogies for computers mainly because they are both machines, but also because their markets are so varied and there is a vast selection of models and options. Would you spend double on a car that is not only significantly slower, but can also do less, can only be serviced at official locations, and has fewer features? Some people might say yes if we were comparing a $20K car to a $40K car, but let us shift this conversation to the high-end, where the dynamic of showing off changes. We could say that the faster and more equipped car costs $100K while the more expensive, slower car costs $200K, so it is not as if you are buying a Bugatti, but both are head turners. In this case, we can shift the conversation to the high-end range since we are talking state of the art workstations with high core-count Xeon-W processors.
The machine we built could be built with little difference from our build at less than half of the cost of the entry-level Mac Pro that will cost $6K. If you are worried about aesthetics, there are countless numbers of case designs, it is not hard to find a nice brushed aluminum case with different types of front facing vents, and who knows, maybe one designer was inspired while grating cheese. If you are thinking of a Hackintosh machine, you should know this motherboard does have the i210-AT LAN controller which is supposed to be compatible and the Realtek ALC888S codec, but we make no promises. In the end, our machine uses a faster Xeon with 50% more cores, 50% more DRAM, uses 50% more memory channels, an SSD that is 100% bigger, and costs 50% less. We also are using one of the best PSUs on the market as well as a liquid cooler.
Some people might make the argument that Apple's design quality is better or that Apple does not cut corners when it comes to their desktops, but the truth is there is not much wiggle room to cut corners with high-end workstations. Someone might argue that the RAM is better and that the Mac Pro is using registered ECC DIMMs while most people would just toss in some unregistered DIMMs, but that could not be true on this platform as RDIMMs are required for all Xeon-W CPUs. Someone might argue that the Mac Pro has more room for expansion, but in this case our motherboard uses the PEX8747 to offer many expansion slots as well. The motherboard also features the latest technology such as a 10Gbit NIC and USB 3.1 10Gb/s. Someone might argue that the cache size is larger on Apple's website, so maybe someone might think that Apple is using different CPUs.
The truth is if you look close enough you will see Apple is adding up L2+L3 cache to reach those numbers; Intel doesn't even do that. Then someone might say that the Mac Pro uses a more powerful cooler that runs quieter, but that's an easy argument to deflect as well. Apple specifies that their cooler than handle 300W, the water cooler we used is designed to handle double that, and in testing the $91 Noctua NH-U12S DX-3647 alternative handled a 28-core W-3175X at 300W, and its fans are rated for 22dB, which is just above a whisper. We also used best in class storage with the latest NVMe technology and one of the best GPUs money can buy.
In the end if you can put together a computer, then you can do at least 50% better than Apple for 50% less, and these days putting together a computer is like building Legos as everything fits only one way and if you do get stuck the internet 99.99% of the time has your answer. Some people worry about compatibility, but with workstations and system at this price range, options are much more limited on the open market so things tend to become a bit more compatible in the workstation ecosystem. If you are worried though, Supermicro has compatibility lists for RAM, HDDs, SSDs, M.2 drives, operating systems, and even add-in cards (AOC) specifically for this motherboard.
Still, we understand there are people out there who will pay a $3K tax to avoid building a PC or people who are die-hard Apple fans. For those people, the 2019 Mac Pro might be a good sensible buy, and they might even consider pairing it with Apple's new Pro Display XDR monitor that costs $5K and does not come with its $1K stand or $200 VESA mounting bracket. At the high-end of the market sometimes prices are inflated and people still buy the product because there is nothing else out there, but this time it's just too much for too little.
It's 2019, would you really spend $6K on an 8-core machine, with a 256GB SSD, a DRAM configuration that doesn't take full advantage of the memory controller, and a somewhat entry-level graphics card? If you would not then hopefully this guide will help you build your high-end workstation.
