


Our Verdict
Introduction, Specifications, and Pricing
When the name FSP as a company is brought up, most people will immediately think of power supplies. With good reason as well, as over the years, FSP has made quite a name for itself in this area of the PC market. However, as many other companies have been doing lately, they want to spread their wings a bit and move into other markets to bolster sales and profits. We have seen battery banks, and even recently caught wind of a couple of air coolers, but we did not see it coming that FSP was about to enter the chassis realm as well.
The main goal with FSP to enter this market is in offering a mainstream design suited for the masses. Rather than to take the road of an elitist design where they would sell in limited numbers, the plan is to dole out a chassis which is attractive, conforms to many of the latest trends, and is a chassis in which many will put their money down to obtain this case. FSP is sticking with a mid-tower design, which delivers things like an attractive fascia, comes with LED fans, room for multiple high-end graphics cards, and even has room for water cooling support. All things that the masses tend to look for when it comes to picking out their next chassis to build inside of.
We have absolutely nothing to go off of outside of our experience with the quality of the power supplies we have used in the past, but going from just that, our expectations are high. What we are bringing to you today is the CMT210 Mid-Tower Chassis, which seems to be a serious contender in the massive market of smaller cases to house beastly systems. We are also aware that there are to be four versions of this same design, all of which offer either black, blue, red, or silver accents in the bezel, which adds a touch more style and flash to the designs exterior. With all of that out of the way, and with little more to go on than what we have experienced so far with this chassis, we feel we should dive right in and see what the FSP CMT210 Mid-Tower Chassis is all about.

While we were borrowing the chart we see here, it appears to be that CMT is the series of the chassis, and the 210 is the model within that series. All of the CMT210 offerings are mid-tower form factor, they are all painted black, and all are comprised of SECC steel and bits made of ABS plastic. The CMT210 weighs in at 4.7 kilograms, and it stands 460mm tall, it is 200mm wide, and is 432mm from front to back. The chassis can house either an ATX, Micro-ATX, or Mini-ITX motherboard, it has USB 3.0 and USB 2.0 ports along with HD audio in the front I/O panel, and at the back of the chassis, there are seven expansion slots.
FSP mentions that CPU coolers can be up to 160mm in height and fit inside, video cards can be 360mm long and still fit, but there is no mention of the size of the PSU which can fit. There are no 5.25" bays in this design, but there is a cage for three 3.5" drives, and three other locations for 2.5" drive mounting with the use of special clips.
Cooling inside of the chassis is handled out of the box with a pair of fans. There is a single 120mm blue LED fan found in the front of the chassis, and there is another matching fan found in the back of the CMT210. Optional cooling can be had on the front of this chassis, as there is room for a trio of 120mm fans, or optionally, a pair of 140mm fans. The front of the chassis is also where the bulk of the water cooling support is housed. You could also hang a single 120mm radiator in the back of the chassis, but the top and the bottom of the chassis offer no fan placement locations at all.
What we are finding is that FSP is not just breaking into the chassis market with the CMT210 chassis, they are doing it with a reasonable price point as well. What that means is that even if you do not tend to spend much on a chassis, this still fits in your wheelhouse. The CMT210 also lends itself to be a solid choice for builders who want a decent feature set, but more or less just need a box which can easily house the goods needed to build a gaming or office system. As we look, we see that both Newegg and Amazon are offering this chassis at the same exact price, and we find it to be listed at just $59.99. So far, it seems that not only did FSP think out the design, but they are also very aware of the market, and what it takes to stand out above the rest in the huge market that is mid-tower cases.
Our Latest Mid-Tower Cases Review Coverage
Chad's Chassis Test System Specifications
- Motherboard: GIGABYTE GA-Z68X-UD4-B3
- CPU: Intel Core i7 2600K (buy from Amazon)
- Cooler: Corsair H80i GT (buy from Amazon)
- Memory: G.Skill Ripjaws F3-12800CL6D-4GBXH
- Video Card: ZOTAC GeForce GTX 970 AMP. Extreme Edition (buy from Amazon)
- Storage: SuperSpeed 128GB SSD
- Power Supply: SilverStone SST-ST85F-G (buy from Amazon)
- OS: Microsoft Windows 7 Ultimate 64-bit (buy from Amazon)
Packaging
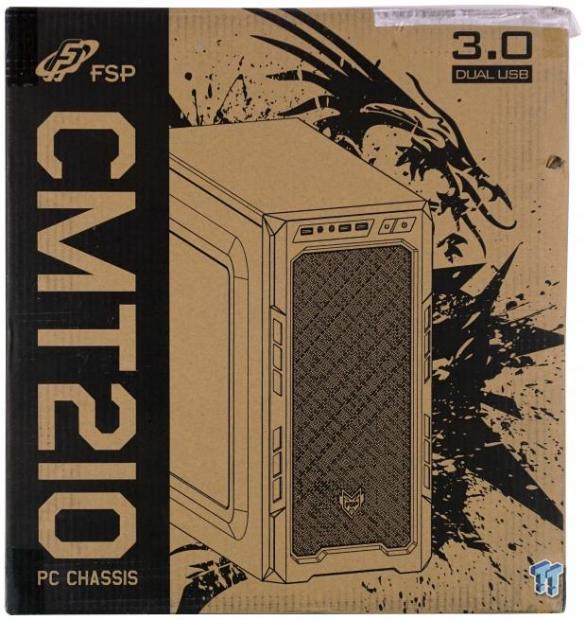
The FSP CMT210 comes shipped inside of a plain cardboard box, with black ink applied to present information. The company name, logo, and the product name are found in the wide black strip on the left, allowing the rest of this panel to be used to display an image of the chassis in front of some dragon art.
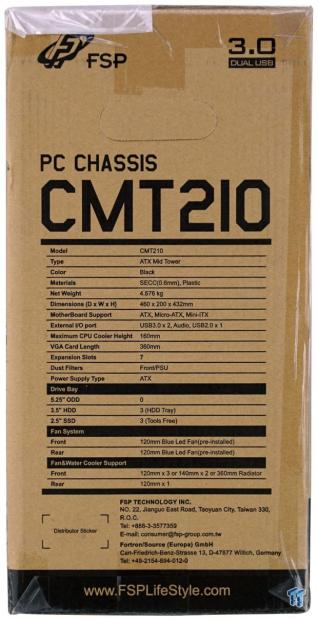
The right side panel of the box shows the company and that this chassis has dual USB 3.0 ports on the top, but below the handle is a specifications chart, much like the one we just covered. Under the company information with address, phone number, and where to send emails, we also see the site address at the bottom.
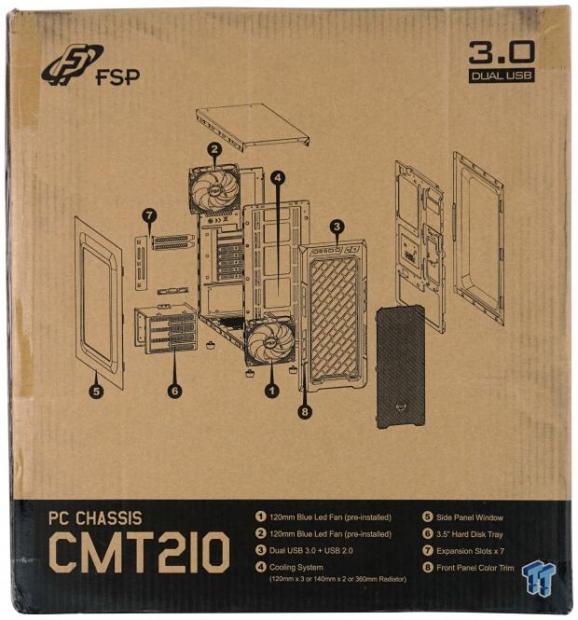
The back of the packaging is used for a large exploded view of the CMT210, but the view is exploded beyond actual capabilities. At the bottom, to the right of the chassis name, each of the eight components of the chassis is described.
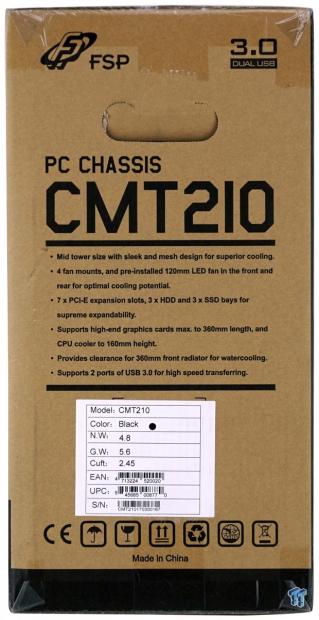
The last of the external panels is where FSP offers a list of six features found in this design. They include the mid-tower nature and its superior cooling, four fan locations and the inclusion of 120mm LED fans, seven expansion slots and storage, support for 360mm video cards, 360mm of water cooling clearance, and that there are two USB 3.0 ports. Just above a row of icons, there is a sticker which denotes the chassis color but also has a small sticker in black, denoting the accent color.
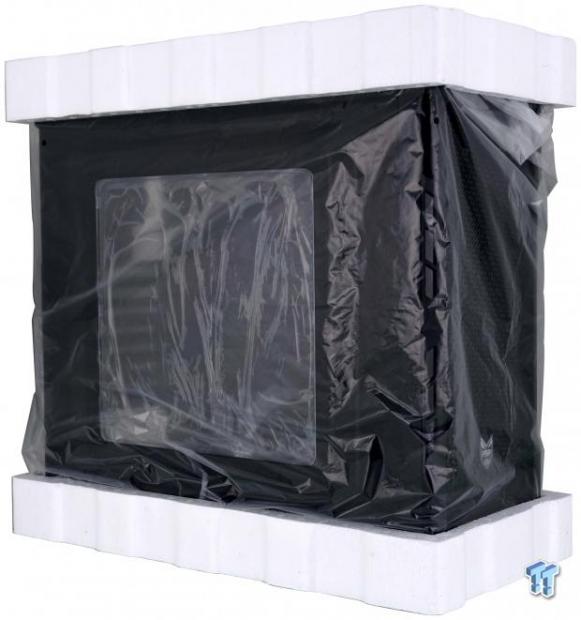
The window on the left side of the CMT210 is covered with plastic both inside and outside, and the entire chassis is wrapped in a plastic bag. Once that is done, we see that FSP uses thin Styrofoam caps at the top and bottom, much smaller than we are used to seeing, but still were adequate to deliver this CMT210 to us in superb condition.
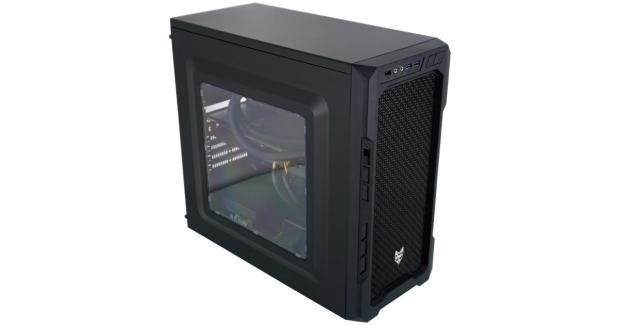
FSP CMT210 Mid-Tower Chassis

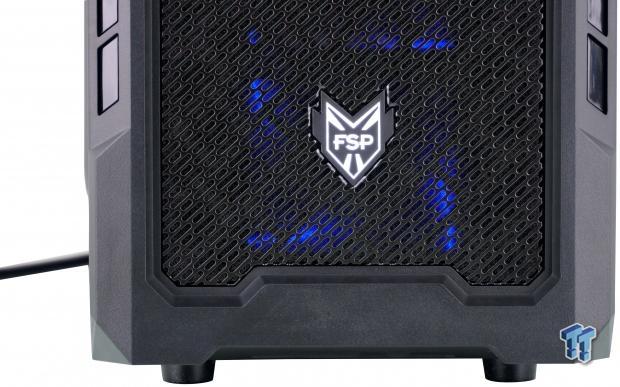
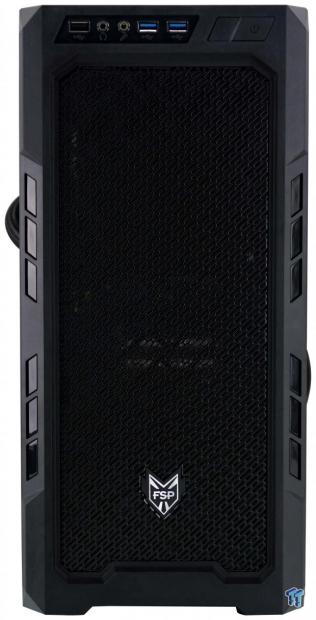
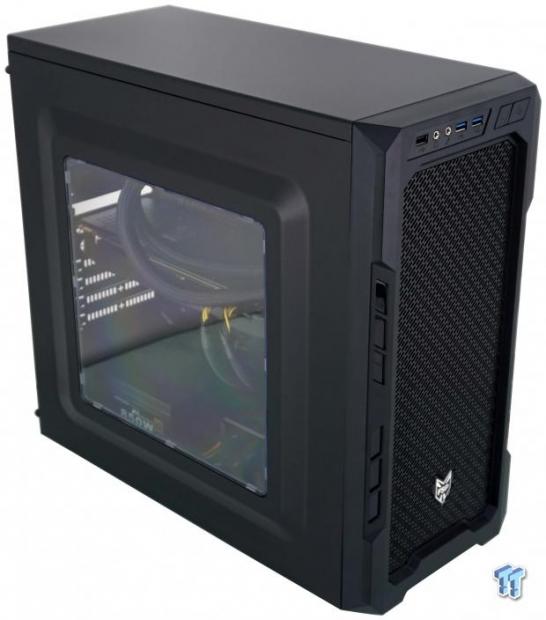
The front of the CMT210 is aggressively designed with all of the angles surrounding the large mesh center section. There is a new FPS logo used on the front of the chassis, and the six slits on either side of the bezel are where the color options are to change the look of this case.
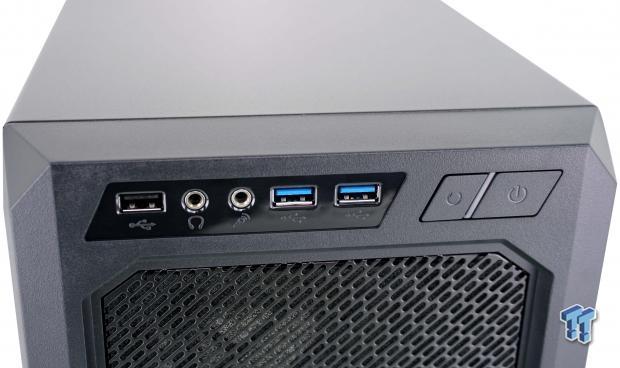
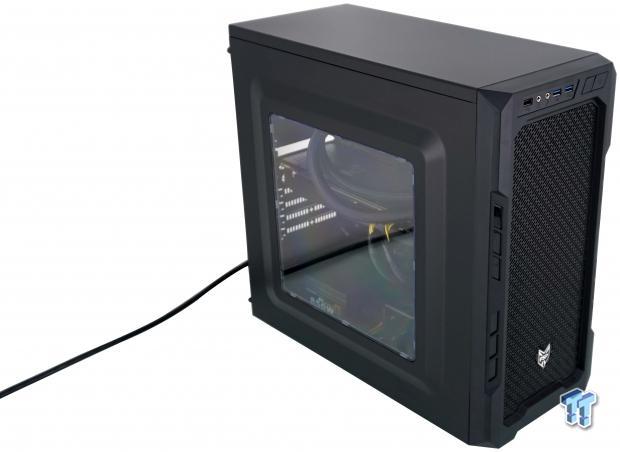
At the top of the front bezel, we locate the front I/O panel. From left to right, we see the USB 2.0 port, a pair of HD Audio jacks, a pair of USB 3.0 ports, a reset button, HDD activity LED, and the power button. Also notice, behind the panel, all we see is a flat expanse of steel on the top.
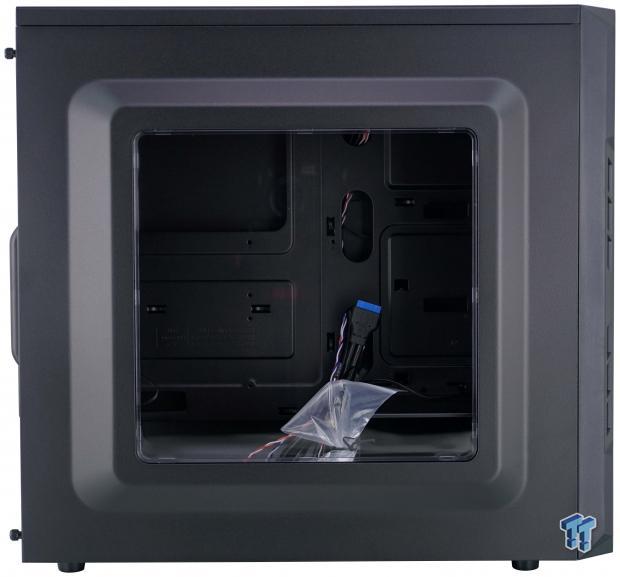
The left side of the CMT210 has a side panel which aligns well with the frame of the chassis, it is bumped outward in the middle, and has a medium sized, clear, side panel window.
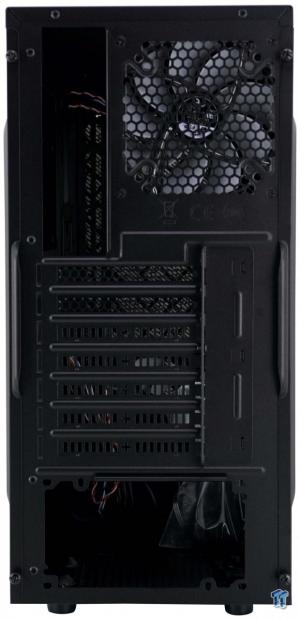
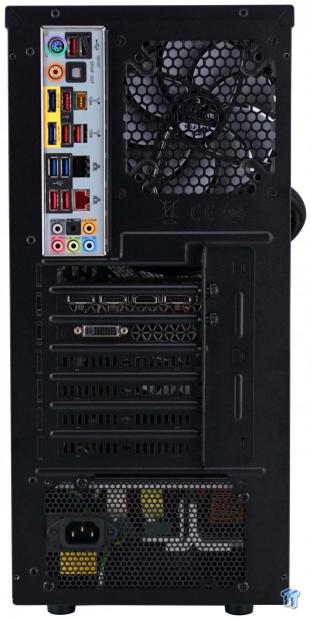
At the back of the chassis, we see that the rear I/O and exhaust fan have been pushed up to the top, just above the externally accessed, seven expansion slots. Below the expansion slots is a large hole which is where the PSU is to be mounted.
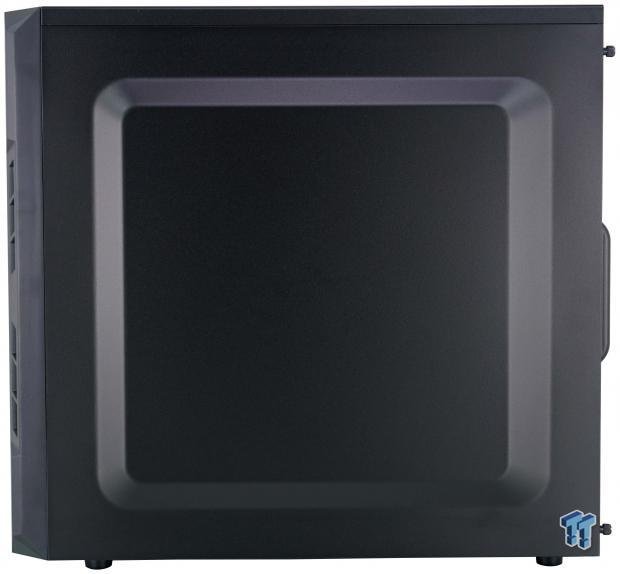
The right side of the CMT210 is near identical to what we saw on the left side, just that this time there is no window. However, the bump in the panel will make it easier to wire behind the motherboard tray and no cause conflict with the removal or replacement of this panel.
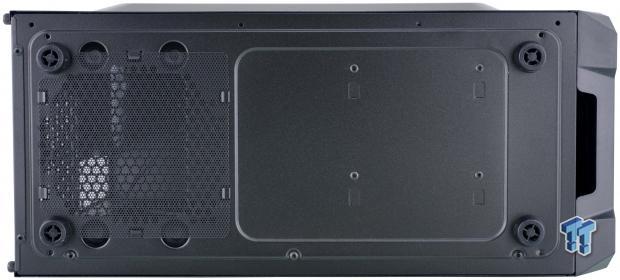
Under the chassis, we find hard rubber feet used to support this tower. At the back is a removable dust filter for the PSU, but it is not easily accessed with the tower upright. Near the front of the chassis, we can see four rivets which hold in the HDD cage, which means it is not removable.
Inside the CMT210
With a hole at the bottom to grasp the bezel with, it is easily removed from the front of the CMT210. At the same time, we see that the wires are attached to the bezel and that the dust filter inside of the bezel is fastened into the plastic, making it tough to remove and clean.

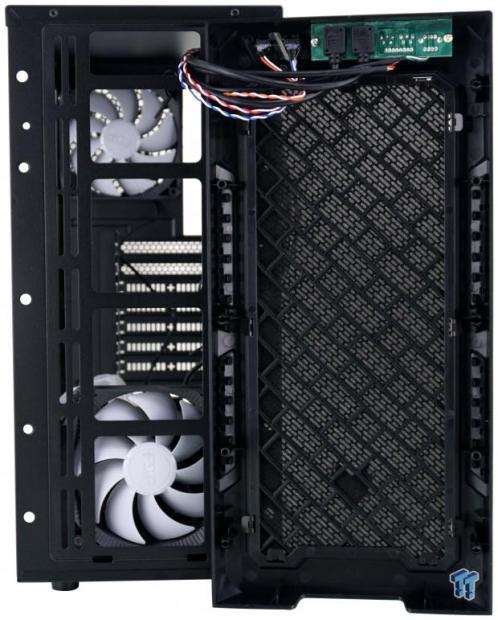
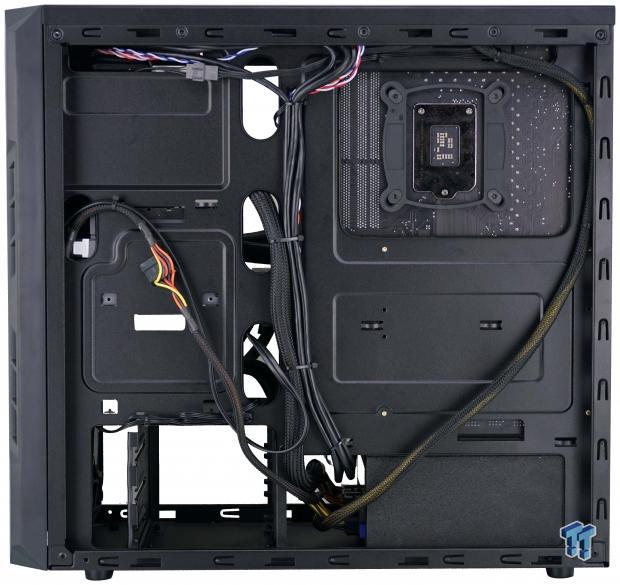
The inside of the chassis is one vast chamber, only broken up by the HDD cage where the hardware is strapped to. The chassis wires are run behind the tray at the top but return to the front at the bottom, and are tied together, so they do not flop around and cause any damage in transport.
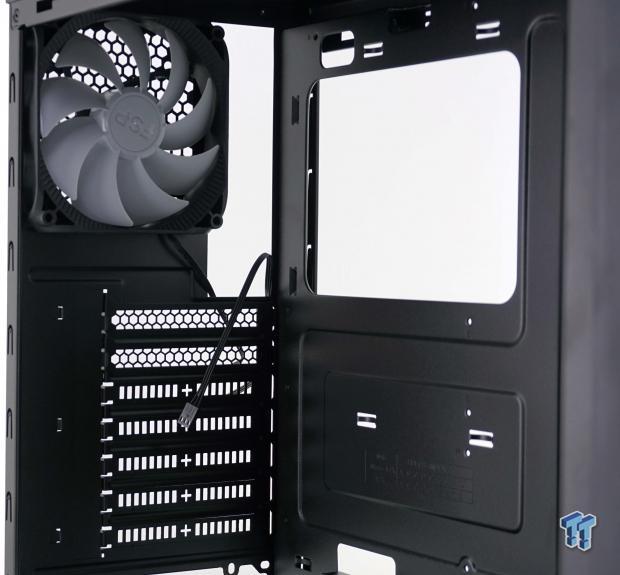
The front of the CMT210, at the top, we see that the front of the chassis has slots to accept 120mm and 140mm fans at nearly any height and adjustment. There is not an ODD bay in this case, but we do see two of the 2.5" drive mounting locations built into the motherboard tray.
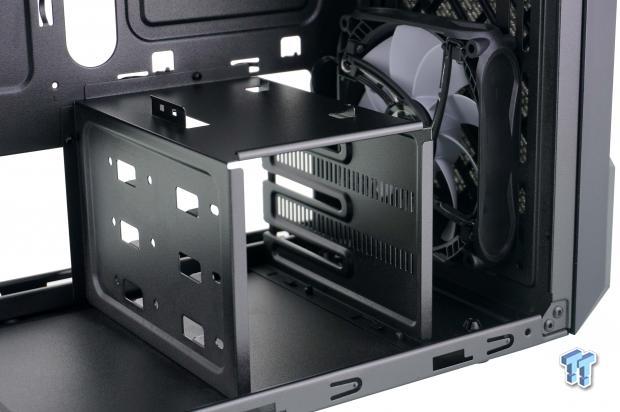
Still, at the front of the chassis, just this time looking towards the floor, we find the 120mm blue LED fan that ships in the front of the CMT210. Just behind the fan is an HDD cage which can house three 3.5" drives requiring screws to mount them, and on the top of the cage is the third location to mount a 2.5" drive.

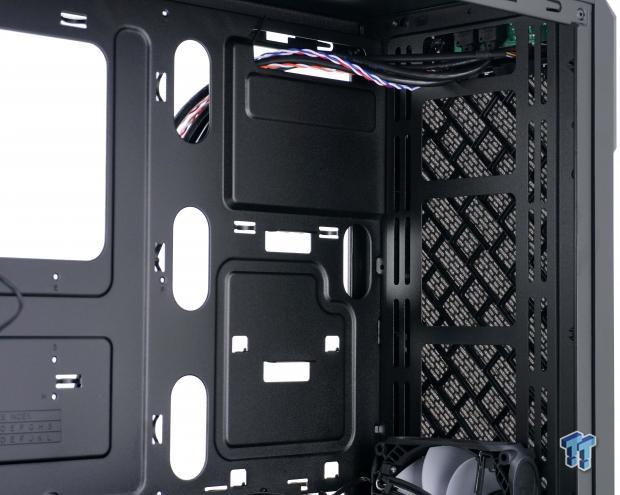
The motherboard tray is clearly labeled for standoff placement and has a large CPU cooler access hole near the top. We also find seven total locations where wires can be passed through the tray, none of which use grommets, and there are also twelve places to tie wires to.
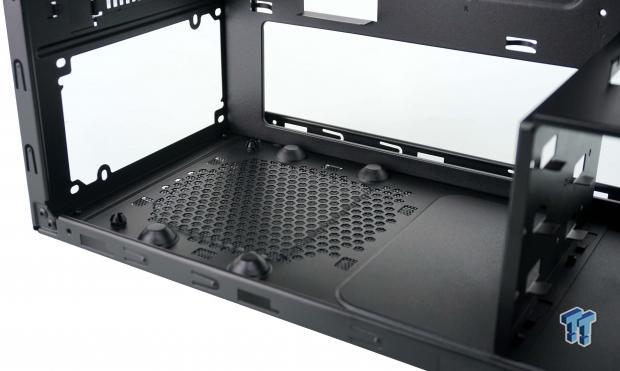
The floor of 6the chassis is used to support a PSU on top of four raised sections of steel. We can also see that the bottom of the motherboard tray is wide open, allowing the wires from the PSU to go through to the back without any hassle at all.
The back of the chassis is where we find the second 120mm blue LED fan that is shipped inside of the CMT210, and we can also make out the lead ends in a 3-pin connection. The expansion slots are offered where the top two are removable and replaceable, but the following five are break-out covers.
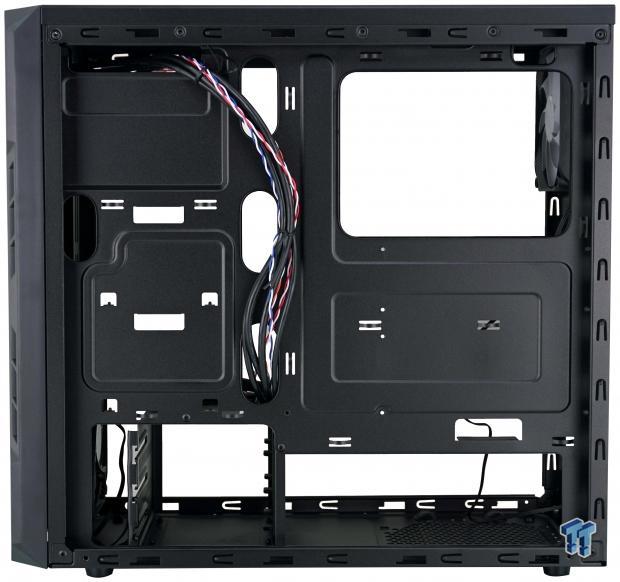
Behind the motherboard tray, we do not find anything special, no hidden bays, or any fan hub or LED hub. What we do get is a motherboard tray that is inset 15mm from the frame, and has many ways to route wires so that the bump in the side panel can be utilized as extra space for bulk wire runs.
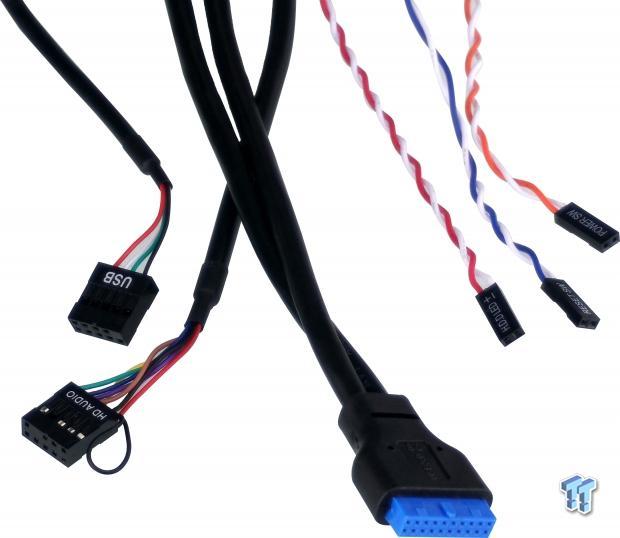
We like that the USB 2.0, USB 3.0, and HD Audio cables are sleeved with a black coating. However, we do think that FSP should have also covered the multi-colored wires from the HDD LED, power switch, and reset switch leads.
Hardware & Documentation
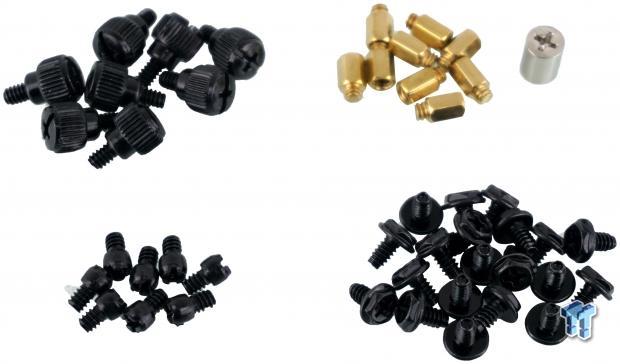
In the bag of hardware, we find what we see here. There are thumbscrews used to securely mount the hard drives in the cage, there are nine brass standoffs, and FSP also includes a socket to drive them in. The eight odd shaped screws are not addressed in the manual, so we do not know why they are here, but the hex-head screws are to be used to mount the motherboard, PSU, and graphics cards.
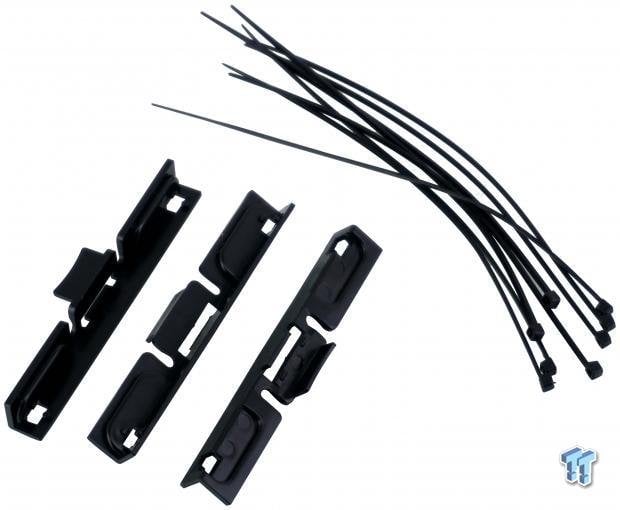
FSP also wants to make sure that the customer can wire the chassis properly and keep it tidy by providing a set of eight zip-ties. The trio of brackets you see below them is what holds the 2.5" drives in place. These brackets will clip onto the screw holes of the 2.5" drive, and then in the chassis are used on tabs to lock the drive to the steel, without the need for tools.
The manual is basic in its information delivery, but you will find a thorough step-by-step guide for placement of the major components. We do feel that the parts list could have been done better, or at least alluded to what the odd screws were for.
Case Build & Finished Product
The view from the front of the FSP CMT210 does not change when the build is completed. We do see the AIO tubing, and we even see some wires on the right side, but since the side panels are expanded outward, this is of no consequence to the chassis.
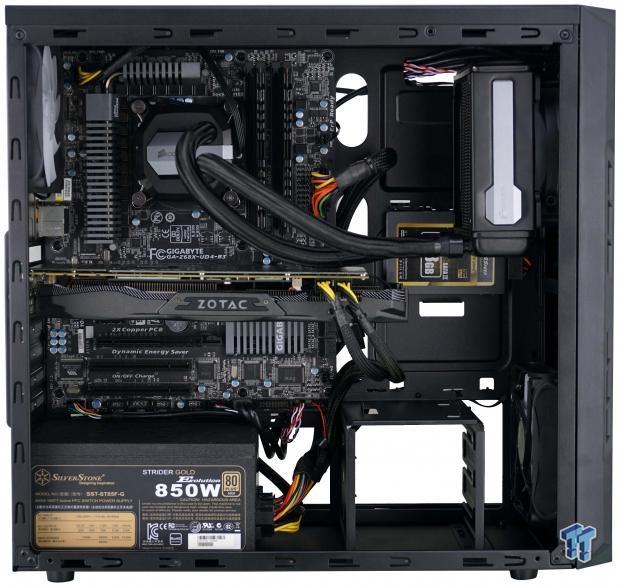
We managed to fit all of the usual suspects inside of the CMT210. We hung the AIO in the front, at the top, as the HDD cage will only allow for thinner radiators to be used. The motherboard sits high in the chassis which could play up with some tower coolers, and the video card is sagging a bit. The PSU fits well without conflict from the HDD cage, and we even hung the SSD on the motherboard tray, so it can also be seen through the window.
The dust shield fits without issue, and we had no issues when it came to aligning the video card. Since we did not use an HDD in the build, we chose to use thumbscrews to hold the card into place, and we also found no hassle getting the PSU mounted on the bottom.
We were able to tend to the wiring without much trouble, as there are many places to attach the wires to the motherboard tray. We could have bundled everything together and not caused conflict with the fitment of the side panel, but we chose to spread it out to show how well the CMT210 accepts whatever the wiring needs may be.
As mentioned a few times, we had no issues when it came to replacing the side panels onto the chassis. We are afforded a sufficient view of the hardware inside of the chassis through the clear window, and the styling is starting to grow on us a bit more as we finished things up.
Once powered on, the view of the blue HDD activity LED is blocked from view at this angle, and we cannot see much of the blue LED fan in the mesh front panel either. However, we can make out the slightest glow of blue light on the AIO tubes and on the top of the GPU backplate.
Final Thoughts
For FSP to take the plunge into the chassis game, they have done well. The chassis is aggressively styled on the front bezel, yet is not something childish. We like that there is an option to get the slits on the sides of the bezel in red, blue, silver, or black like we see here, but there is not any mention as to if the fan LEDs change to match the colors, or if all models come with blue fans. While not modular on the inside, the CMT210 provides us with plenty of room for our gear, there were no hassles when it came to installing them, and even without the use of grommets, the wire management is top notch. With this design, affordability sets the CMT210 above many out there, and with water cooling support, and a few neat things found along the way, it is a chassis in which many will be able to do nearly anything they desire inside of.
Although at first glance the CMT210 appears to be a winner, we did find a few things along the build process which we found off-putting. First of all, there is the manual. We feel it could have been delivered with better information so that we do not guess as to what to do with some of the hardware. We do not like that the HDD cage is not removable. We would prefer it to be, as it would allow the lowest fan to blow into the chassis, and if removed, would also add room for custom water cooling parts like a reservoir and a pump. We like that there are dust filters present, but the fact that the PSU filter is near impossible to remove while the chassis is upright, and the hassle of removing the one in the front, it makes them pointless. Had the wires not been attached to the front bezel, we could just wash the whole thing, but that is not an option in this design.
We do like the FSP CMT210 overall, but it does have its small issues to be aware of. For those of you out there who build machines and leave them to sit for a year of two without maintenance, by all means, go out and get this case if you are into the styling and features. For those out there who are a bit spoiled and like everything to be modular, and if a feature is offered, it should work flawlessly, maybe the CMT210 is not your cup of tea.
All told though; we may be expecting a bit too much from FSP and this CMT210, as it only costs $59.99. That being said, for entry into the chassis game, FSP has made a solid effort, and we hope they continue on this mission and can make a go at this so that we may see more cases from them in the future.
Chad's Chassis Test System Specifications
- Motherboard: GIGABYTE GA-Z68X-UD4-B3
- CPU: Intel Core i7 2600K (buy from Amazon)
- Cooler: Corsair H80i GT (buy from Amazon)
- Memory: G.Skill Ripjaws F3-12800CL6D-4GBXH
- Video Card: ZOTAC GeForce GTX 970 AMP. Extreme Edition (buy from Amazon)
- Storage: SuperSpeed 128GB SSD
- Power Supply: SilverStone SST-ST85F-G (buy from Amazon)
- OS: Microsoft Windows 7 Ultimate 64-bit (buy from Amazon)
 MOAIPLAY ORA PRO G1 850W ATX 3.1 PSU Review: high efficiency and 10-year warranty for $119.99
 NZXT H6 RGB+ Compact Dual-Chamber Chassis Review
 Lian Li HYDROSHIFT II 360P OLED Curved Liquid CPU Cooler Review
 ID-Cooling FROZN A620 SLK CPU Cooler Review
 GAMDIAS Atlas P6 CG Dual Chamber Mid-Tower Chassis Review
 HDMI 2.2 products are coming in 2027 as chip makers begin sampling FRL2 silicon this year
 Solo dev tries to make his own GTA 6 with AI, as he got tired of waiting for Rockstar
 Repair channel buys ASUS RTX 4090 for $222 and finds plastic die with fake NVIDIA markings
 Epic's gen AI use deters partners, Vampire Survivors x Fortnite might get cancelled
 Sony seems to confirm singleplayer first-party PlayStation games will remain console exclusive
 NVIDIA GeForce GTX 1650 modded with 8GB of GDDR6 memory doubles performance in God of War and Unigine Superposition
 Apple will be working with Intel to design and build its chips in the USA, confirms President Donald Trump
 GTA 6 pre-order date revealed by Rockstar
 Anthropic's CEO confirms he can be fired as CEO through the company's own authority
 Speed Racer (2008) 4K Ultra HD Blu-ray Review: a stunning remaster of the cult classic
 Navman MiVue Smart True 4K Surround Dashcam Review - Seeing In All Directions At Once
 IQUNIX Magi96 Pro Aluminum Low Profile Mechanical Keyboard Review - Premium Build, Satisfying Sound
 Asetek Forte S-Series Racing Simulator Bundle Review
 Razer Pro Type Ergo Wireless Split Ergonomic Keyboard Review - Built for Comfort and Support
 ASUS ROG Strix Morph 96 Wireless Gaming Keyboard Review - Great Performance, More Affordable
 SAPPHIRE Radeon RX 9070 GRE PULSE OC Review - A New 1440p Challenger Has Arrived
 ASRock Radeon RX 9070 GRE Steel Legend Review - The RDNA 4 Mid-Range Reshuffle
 I read the Windows Backup app screen carefully, and it does not back up what most people think
 Low Sound Volume on Windows 11? How to fix audio issues and restore normal volume
 8 Critical Warning Signs You Should Never Ignore in Windows 11
 This Windows security feature protects Documents from ransomware, but it is off by default
 Windows 11 already has a voice typing tool, and it is the one most people are not using
 Quick Assist is the only remote-support tool I open when a relative calls about their PC
 The PowerToys utilities I keep enabled on every Windows 11 PC, and the ones I turned off within a week
 TweakTown's Best of Computex 2026 Awards - The Best Hardware, Gaming Gear, and AI
 Phison E37T SSD Controller Exclusive Preview - The Fastest DRAMless SSD Platform Yet