Introduction, Specifications and Pricing

Up until a few months ago, you could safely say that EVGA was better known in the PC game for video cards and motherboards, and you would not have been off the mark at all. It wasn't until we saw news of them developing a new chassis that we were able to review for you, that we realized EVGA was cracking through their perceived shell, and opening up opportunities in other segments of the market. Maybe after seeing the long success of companies like Corsair and NZXT, EVGA realized there is more money to be made if they tried their hands at their own entries, rather than doing what we saw with their CPU cooling clones over the years.
Any way you want to see their latest actions, EVGA has put their design team to work on coming up with new peripherals for the gaming scene, and it seems they came out swinging with a new pair of unique mouse designs. These two mice are very closely related -brothers, if you will. One design uses a base made of an aluminum plate at the bottom, and on top of that is a piano black plastic shell. With the more exotic brother of the two, that plastic top has been replaced with carbon fiber, not only for lightness and increased strength, but also definitely for the aesthetic "cool" factor. Both versions offer the same internal components with the use of Omron switches, and an Avago ADNS9800 Laser sensor, and EVGA offers some pretty serious software to customize these mice to bend to almost any desire.
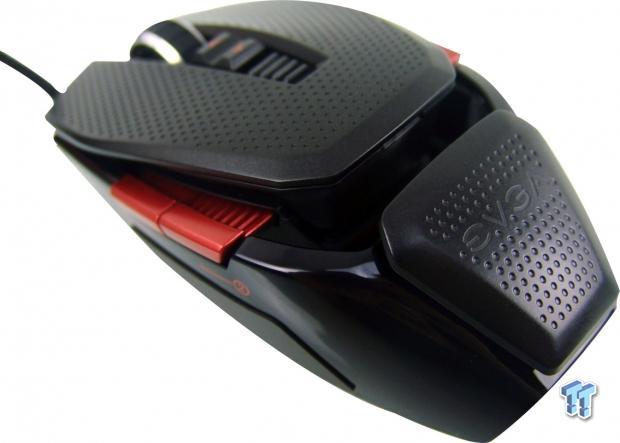
Today we will be having a look at the new EVGA TORQ X10 mouse in its original form, without the carbon fiber. However, since the two mice are essentially the same in their design, by seeing the original version, you can be assured that the information found here will apply if you opt for the TORQ X10 Carbon. We know firsthand that while EVGA's chassis was unique and nice in a lot of ways, it wasn't overwhelmingly impressive. Building a mouse is in no way an easier task to accomplish, but from what we have already seen on paper, it looks like EVGA made a lot of the right choices to fit into the already quite full gaming peripherals market. That being said, we are on the lookout for anything odd, but unless they did something drastically wrong here, we feel that EVGA definitely has a product worthy of any gamer's attention.

The chart offered by EVGA covers quite a few potential questions for those looking to purchase a new mouse. Right off the bat, EVGA starts by displaying the use of the 8200 DPI Avago ADNS9800 laser sensor that most other companies are currently offering in top-tier mice. The next question to come to mind would be: what switches are used under the right and left click buttons? To answer that question, we can see that we not only get Omron switches, but Omron switches with a twenty million click lifespan.
The chart then goes on to show there are nine programmable buttons on this mouse. The chart also shows the minimum weight of the mouse is 121 grams, empty without the cable, and with weight added, the TORQ X10 will top out at 134 grams. We can also see there is a 1ms polling rate, seven LED color options, PTFE feet, and it also offers five profiles and 512 KB of onboard memory to store settings in the mouse. Another very cool, and original feature in this design is that the top is adjustable, so while the 114.3mm of length, and the 51.15mm in width will never change, the top will raise from 31.75mm to 38.1mm with the built-in adjustment system.
In the features list we again see mention of the five profiles the TORQ X10 offers, but we also see that this is one of the few ambidextrous solutions on the market, making it equally as useful for a right handed user as it would for a left hand user. The features list also covers the adjustable height again, which is a strong selling point, as the mouse is customizable to fit exactly the way you want in your hand. The features list mentions the 8200 DPI again too, but this time it covers the On-the-Fly DPI adjustments as well.
Here is where they address the adjustable weight system that allows for two weights in the TORQ X10, and they offer six weights in various increments as well. The features list concludes by covering the use of high-end materials and components, touching on the robust software, and finishing with the fact that PTFE feet are used for effortless gliding on any surface. One important fact that is not covered in this chart is that EVGA also delivers the TORQ X 10 mice with a three-year warranty.
Availability for a product that is so new is about what we would expect to see. Not many retailers have stock currently, but we do see that this mouse can also be bought directly through EVGA for $89.99; of course with a bit more for shipping. Oddly, they point to a link at Newegg.com on their product page that offers an amazing deal at the time of writing this. There you can get the TORQ X10 for $49.99, and they are throwing in a free mouse pad as a promotional deal. We also looked elsewhere, but most of the hits are for the TORQ X10 Carbon, which lists for close to $100 on average. The MSRP of the TORQ X10 is what we expect from a device offering what EVGA has produced, and we feel even if you miss out on the promotional deal, the near $90 pricing should not scare you away, as you get plenty of bang for your buck in the TORQ X10.
Packaging, Accessories and Documentation

While the angled package with an exposed product is nothing new, EVGA does do it in style with the TORQ X10 front and center, backed with that bold red sheet. Near the front we see that they state this is built from the ground up with hardcore gamers in mind; they also list some features that express their sentiment.

On the right side of the packaging we find a top down view of the mouse, much like what you see at the front. Here they cover the fact that this mouse will change color with the profile switching and explain what color goes to each profile.

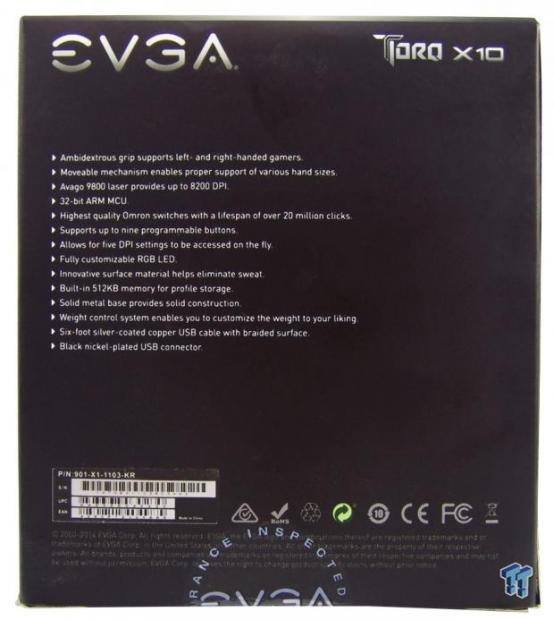
On the back, under the naming at the top, we find a long list of features. Some of these we covered previously, but we do see mention of an 32-bit ARM MCU, innovative surface materials, and a six foot cable with a black nickel plated USB connector.

The last panel on this package offers an idea of how the actuator mechanism raises and lowers the top two plates of the TORQ X10 mice, although there is no actual mention of how it is accomplished.

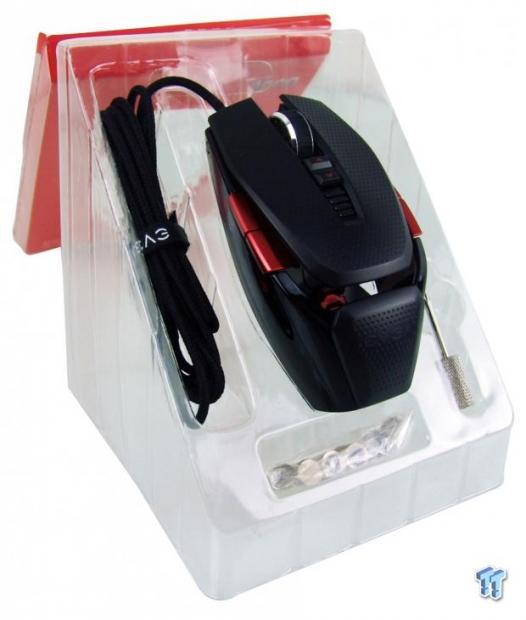
Since there is thin cardboard used on the outer packaging, it is all up to the plastic inner packaging to protect the mouse. Once we lift the cover that keeps the TORQ X10 in the package, we see the cord is neatly tucked next to it, but we also see six weights, and a Torx head driver (the latter is likely why the naming is what it is).

The knurled Torx driver is used to adjust the actuator mechanism via a Torx head screw in the heel of the mouse, allowing for the height adjustments. As for the six weights in the back, we get two that weigh in at 6.1 grams, the next set at 3.8 grams, and the last set with the largest holes are 1.9 grams each.

Inside of a small black envelope marked "ACCESSORY," we find the side pads that can be applied to help eliminate slippage on the shiny plastic surface of the TORQ X10. We also see the Quick Guide that shows where all the bits are on the mouse, and what they are for. The other guide is for the weight installation, which explains the weights are supposed to be 6, 4, and 2 grams by design.
EVGA TORQ X10 Mouse

As we look at the left side of the TORQ X10, we see at the left that the main top section is separated from the bottom, and there is even a steel pivot point visible in the lower plastic section. As we move right, we see more of that piano black finish, along with the large red buttons marked one and two.

At the back we find the plastic terminates in a widened arch. Above the plastic is the heel pad, which is also separate from the lower frame. Below the arch, we see the large Torx head screw, and this is how the top is adjusted.

Since we have an ambidextrous design, the red side buttons here are also labeled as one and two, but as we know via software, the painted on numbers are of little reference to their capabilities.

As we look at the front of the mouse, we can see the sides wrap around under the dimpled right and left click buttons. We can also see that the USB cabling comes out from the side rather than out of the middle as we would normally see in ambidextrous designs.

Behind the heavily segmented scroll wheel, we quickly run into two more buttons used as the DPI on-the-fly buttons by default. Just behind them are four bars that will denote the level of DPI in use when the TORQ X10 is powered.

Connected to the mouse is this six foot braided cable. The length is fine for most instances, but we also get a Velcro tie to tend to the wiring if you plan to travel with it. To keep the all black styling going, instead of gold plating for anti-oxidation reasons, EVGA used black nickel.

As we flip the TORQ X10 over on its back, we see two very large PTFE feet used to support the mouse in its near effortless travels across the desktop. We can also see the side buttons through the cut-away in the metal base plate, and there is the default profile selection button to the right of the sensor's eye.

The mouse ships with the top in its lowest position, totalling just slightly more than 31mm in height. If your hand desires a bit more curve to the top of the mouse for comfort, simply stick the Torx screwdriver into the screw in the heel of the mouse, and start turning it to the left.

After a couple of turns, the TORQ X10 is now in its fully raised and upright position. While 7mm doesn't seem like much on paper, when using the mouse, that 7mm can make all the difference to long term use and comfort.
Inside the TORQ X10

Once the top sections are raised, there is a little groove just at the back edge of the front section that allows you to get a fingernail in there and pop off the top. The reason for this is to allow access to add weights to the area behind the LED DPI indicators.

To add weight, simply find what single weight, or any combination of two weights makes the mouse feel best for your needs. For the purposes of this image, we set in 8 grams worth of weight into the removable rubber weight holder.

After a little more disassembly of the TORQ X10, we can now see some of the internal components. For instance, we can see that EVGA supplied an Omron twenty million click switch under the left click button.

The top two buttons behind the scroll wheel use these TTC switches, which, just like the right and left click buttons, offer medium action with an audible click. The side buttons have a similar feel and sound to them, but we were not able to get the mouse torn down far enough to verify brand.

The scroll wheel uses a pad style switch for its click feature that is also audible when pressed; it is just slightly out of focus in front of the second Omron switch, with the part number D2FC-F-7N(20M), verifying the lifespan of these switches.

Removing the base plate would have allowed us to see the bottom of the PCB housing the laser sensor, but the MCU and actual laser sensor IC are on the flip side, so again, we could not verify what they are in images. However, we do get an idea of how the Torx screw works the red actuator system to push the center of the mouse up.

It was also at this point that we checked back with the paperwork and grabbed the book that shows where to install the anti-slip pads to the side of the TORQ X10, and as you can see, we applied them as described. These do add much more grip than the shiny plastic could ever hope to offer.

At this point we went ahead and connected that black nickel USB 2.0 connection, and plugged it into a PC. Now we have the TORQ X10 in one version of its lighting. The naming at the back and the lighting of the scroll wheel are customizable, but the DPI indicator LEDs will display in red at all times.
Software

In the EVGA software we see it says "Unleash" at the top, and just below that, the software identifies the TORQ X10 that is connected. The top arcs are settings for DPI levels and mouse sensitivity, which can be set by moving the needles, or with the boxes under them. In the lower section we see the default button settings by hovering over any of the nine buttons, and this is also where you switch from right to left hand use.

Under button settings is where you can reassign any of the buttons to do as you wish. The left column is only a snippet of the preset options, and the next column is where you select which button to set. We also see that by clicking on the "Profile" arrow at the bottom we can select which of the five profiles we are setting functionality to.

The DPI section under the advanced settings is where you can adjust the four levels of DPI wanted for each of the four on-the-fly settings. By use of the sliders, or direct entry on the right, the DPI ranges from 200 to 8200. To the far right is where the polling rate for each setting can be set.

The OS section, under the same tab, allows users the option to use angle snapping and mouse acceleration, or you can turn both off. We also see another sensitivity adjustment, scroll speed adjustment, and a place to address the double click speed with a test that flips the switch if you click the right speed.

The last section here is for the LEDs. This is where the LED mode is set to either on, off, or a breathing mode. Lower in this window is how the scroll wheel LED or LED1, and the EVGA LEDs or LED2 are changed. There are six options other than the stock red, and the brightness levels can also be adjusted.

Under Macro, we can name the command we want to build, and hit the record icon below it. The commands pop up on the right side, and will display the time intervals between each press, as well as timed commands.

The Macro Management section also allows users to search through anything on a local hard drive, and either import old ones, or later in the life of this mouse, you can also bring up commands you have built with the TORQ X10, but just did not want to store them on the mouse at that time. If they show at the left, they are currently on the mouse.

Profile management is where you can do much like what was offered for macros, but this is for the whole shebang. When you get a profile just right, be sure to save it. If you pick up the game later, or you plan to play games at a friend's you don't typically play at home, one stop here and you can shuffle through all of the full profiles, and only store what you want onboard at any given time.
Final Thoughts
While we still do find 8200 DPI to be a bit on the extreme side of needed amounts of travel and tracking, we do know there has to be a few out here willing to wrangle with a mouse at that sort of sensitivity level. However, for us, the sweet spot is in the 4000 to 6000 DPI range for faster things like desktop use, surfing web pages, even in more open world games where exacting precision isn't life or death. For stunning accuracy, everyone knows that lowering the DPI will allow users to be more precise with their aiming, and having the on-the-fly DPI buttons on top, and with a total of five levels, four that are LED identified, and on identified with no LEDs present, it makes all needs for a mouse easily covered with a press or two behind the scroll wheel.
We experienced no jitter at high DPI levels, no tracking issues on any of the surfaces we tried, and with the full software suite, customizing it to your every want and desire is possible in this design. Not only can you have Macros on the mouse, but with all the buttons and the various profiles, one could really go nuts with all the options that the EVGA TORQ X10 offers. Personally, we didn't even mind the lack of color options, as we found the default red LEDs to suit this mouse the best.
We did run into one issue with this overall design though. We did love the fact that the center of the mouse raises as the front section and rear section take on a more drastic angle than when we first saw the TORQ X10 out of the box. However, once in the upright position, we found that while speed scrolling with the wheel, say scrolling down a Facebook wall, as we got to the back side of the wheel we were constantly changing the DPI to a higher level. This was not an issue when it was flat, but it's something to be aware of when deciding on this as your next purchase.
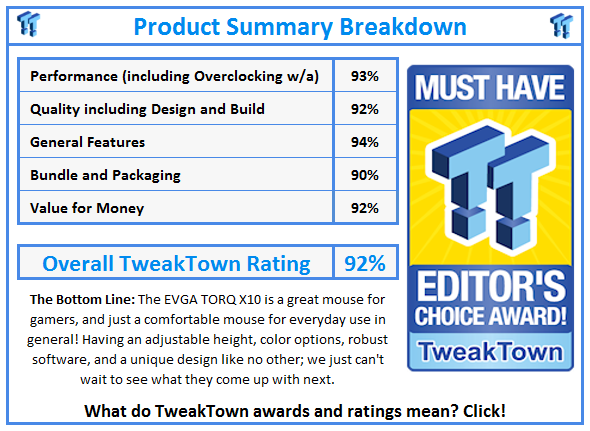
We feel EVGA really did a great job with what they have brought to the table this time in the peripherals segment. Choosing all of the top-tier components of the leading selling mice on the market is a great start; implementing them into this easily convertible, ambidextrous design, and being able to make a smaller mouse feel so comfortable to use with the grip pads added on is excellent. Of course, adjusting the height so it takes the strain out of the wrist and palm, for any grip style is also exceptional.
We applaud EVGA for doing so well with their first go with a mouse design from the ground up, and whether you choose the Carbon, or the TORQ X10 you have just seen, we feel it is money well spent to try one of your very own. If you do happen to get in on the promotional deal on Newegg.com, this TORQ X10 from EVGA is an outright steal, and you get a free mouse pad.


 United
States: Find other tech and computer products like this
over at
  United
Kingdom: Find other tech and computer products like this
over at
  Australia:
Find other tech and computer products like this over at
  Canada:
Find other tech and computer products like this over at
  Deutschland:
Finde andere Technik- und Computerprodukte wie dieses auf