Introduction
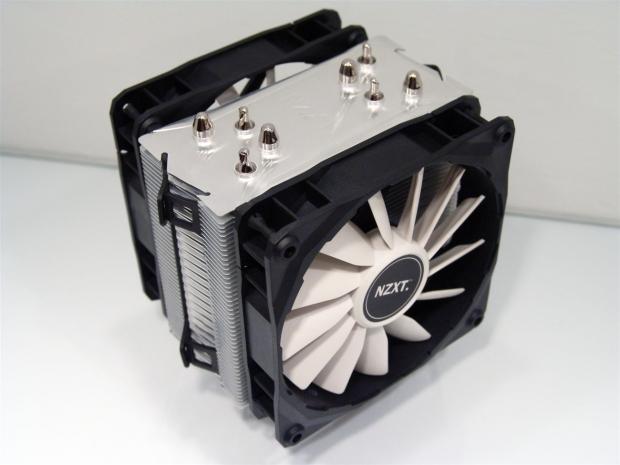
Not too long ago I was given the HAVIK 140 by NZXT and not only was it a super efficient cooler, it made it into my spare rig and cooled the i5 750 since I received it. To say the HAVIK 140 impressed me is an understatement. I did find a long term issue with the rubber fan mounts getting cut by the sharp edges of the fins, but NZXT corrected the issue for me when I addressed it with them. This also gave NZXT a heads up to look at the fan connections used on the HAVIK 140s and see if there isn't something they can do to make this stop happening all together.
Since I have already seen what the new version has in store, the first thing I looked at were the fan mounts. While they are built from the same molds for the rubber to be formed into, I do believe the consistency of the rubber is a bit thicker and stronger this time around; at least they sure feel that way compared to the broken version I have sitting here. I am glad to see that all aspects of this design have been gone back over to even improve on the smallest things.
Improving technology is what it is going to take to make a 120mm fan powered version perform to the level of the HAVIK 140 with its pair of 90 CFM 140mm fans blowing across the stack of fins and the twelve ends of the six pipes running through it. Essentially the HAVIK 140 has everything built into it that you would assume would make a good performing cooler. As with anything in the cooling industry, if you are dropping from 140mm fans to 120mm fans and using fewer pipes to deliver the heat into the path of the airflow, something has to give. Soon enough we will find out if the performance is what takes the hit, or if the cooler performs really well; the sound levels are likely to go up to compare to the flow that the 140mm version offers.
Today we are going to be getting to know the HAVIK 120 from NZXT. I just got this cooler within the last week and from what I can see today on the internet, news of the cooler has been removed from the secret vault and is all over the web now. There are some issues with fitting the bigger 140mm version into tighter cases and NZXT seems to have thought it through pretty well with this design. Less obstruction on the motherboard, lighter and easier to use and it fits in more places than the HAVIK 140 will - all great reasons to settle in and keep reading about the new HAVIK 120 from NZXT.
Specifications, Availability and Pricing
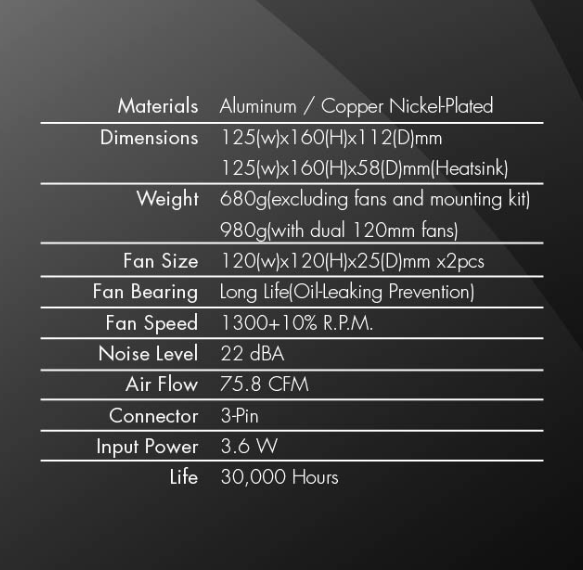
Starting at ground level and working my way up, the HAVIK 120 uses a copper base and aluminum top combination to encase the four 8mm heat pipes that route the heat out of the base. Both the copper base and these copper pipes receive a nickel coating to prevent oxidation on the copper surfaces. As the pipes leave the base, the two outer pipes make gentle bends and get the forty-six aluminum fins pressed on the pipes all the way to the bottom. The inner pair of pipes make much tighter bends prior to getting to the fins and due to this, the bottom pair of fins is not attached to these pipes, but they are pressed inside the other forty-four fins as they go through the body and protrude through the top of the HAVIK 120.
At this point it is up to the pair of included revamped 120mm FZ fans that can deliver up to 75.8 CFM per fan. With the fan spinning on its long life bearing at 1300 RPM, NZXT rated this fan with a 22 dB sound level. Both fans use 3-pin connectors for power and in the hardware kit there is a pair of Y-splitters; one with a low noise resistor in line and one without so you can power both fans from one motherboard header. Something I like about what NZXT does with the hardware for mounting is that they offer universal mounting first of all, so both AMD and Intel are covered. The ingenious way that the AMD hardware is designed to work with two pieces of the Intel hardware to allow the HAVIK 120 to sit in the appropriate position in the chassis no matter what orientation the socket is in. Not only do we have a cooler that is smaller to fit into more both dimensionally and in its 980 gram total weight with the fans installed, it will look proper in any build. And as long as it works well, we can't ask for more than that.
Since the cooler just went public today as I type this out, there is no availability to speak of at this moment. I was able to track down that NZXT is suggesting a retail pricing of $55 for the HAVIK 120. Looking at the pricing of the HAVIK 140 that has been around for a bit now, I see prices start at $59.99 and are still working their way close to $85 in some locations. For five dollars, room allowing, I will still say go for the HAVIK 140 at this point, but for those who just don't have the room, or don't like the way the HAVIK 140 covered or conflicted with the memory, the HAVIK 120 is the perfect solution and shows exactly why NZXT addressed it and is now offering the HAVIK 120 CPU cooler for our benefit as well as theirs. I don't think it will be much more than two weeks time until we start to see this cooler hit the shelves. In fact, likely by the time this airs, you will be able to locate one somewhere, just maybe not at your favorite outlets right away.
The Packaging
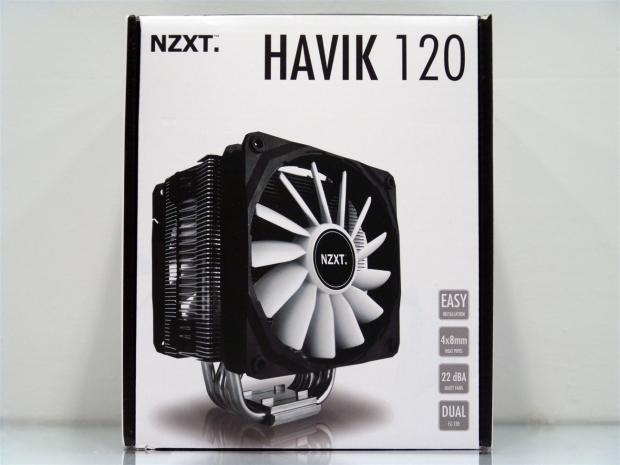
The HAVIK 120 comes in a very similar package to its bigger brother. The black trim on the sides surrounds the white front panel that displays the cooler in full view along with four points covering the easy installation, the four 8mm heat pipes, the 22 dB noise rating and the dual fan nature of this cooler.
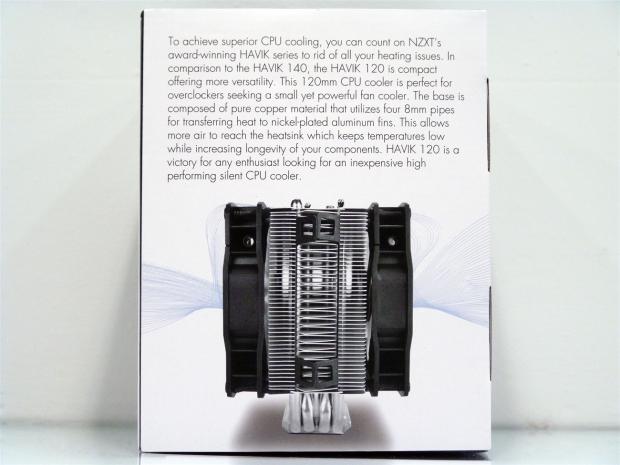
On the side you get a side view of the HAVIK 120 along with a brief statement from NZXT about the HAVIK series and the 120 in more detail. Summarizing, the HAVIK 120 offers versatility, larger pipes and nickel plating to deliver an inexpensive, performance enthusiast cooler.
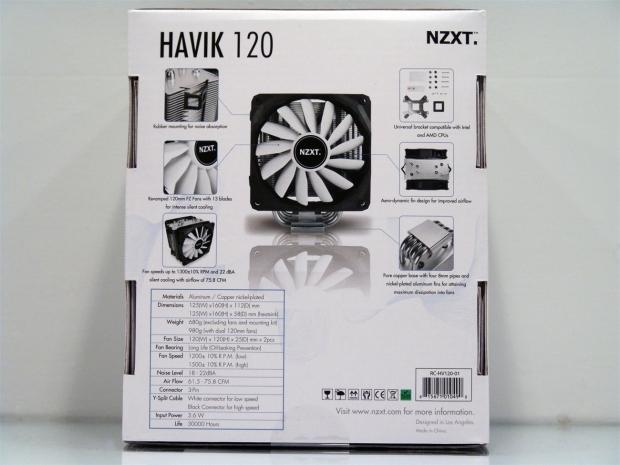
The back of the packaging offers finer details about the HAVIK 120.It covers the rubber fan mounts, the thirteen blade FZ fans and their speed, the hardware is laid out to see, and they cover the design of the fins and the base. At the bottom you get the specifications.
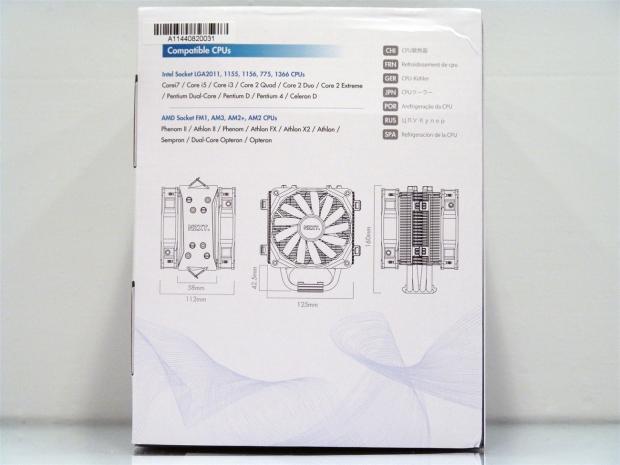
Here we find all of the compatible sockets the HAVIK 120 fits. Simplifying the information, this cooler will fit anything from Intel, LGA775 and newer, including LGA2011. For AMD buyers, this will work with any CPU from Socket AM2 though AM3+ and socket FM1. The bottom of this side is used for technical drawings with all the dimensions you will need to see if it will fit into your build.
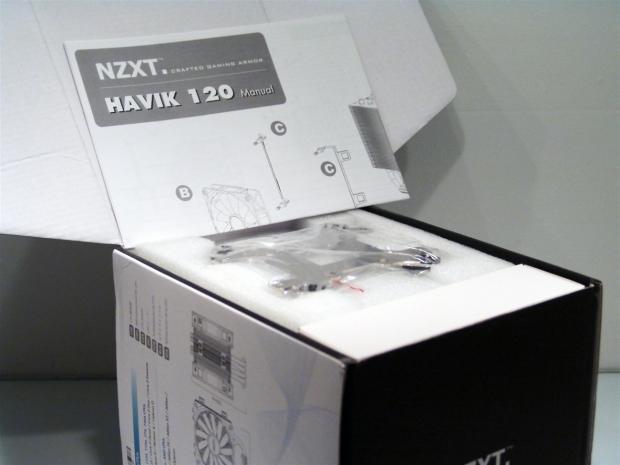
Lifting the top of the box exposes the installation manual and the Intel universal back plate shipped on top of the foam. The cooler, fans, and the rest of the hardware is snugly packed in below.
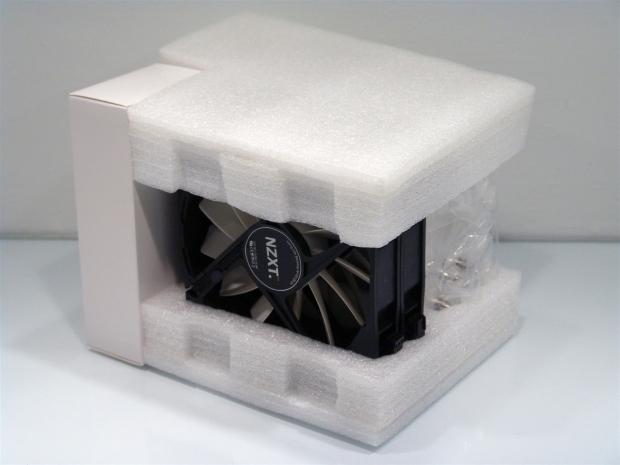
The hardware box on the left is fit into a notch in the high density foam that surrounds the pair of FZ 120mm fans and the body of the cooler wrapped in plastic behind it. This definitely is sufficient packaging in my book as it delivered an intact and ready to install product.
The NZXT HAVIK 120 CPU Cooler
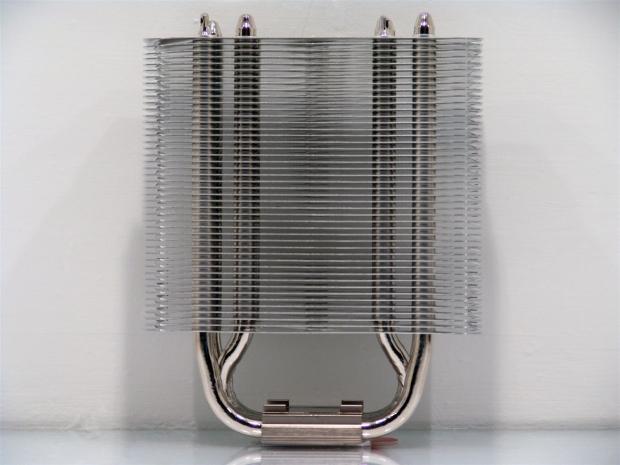
Looking straight into the HAVIK 120, you find a stack of forty-six aluminum fins that get pressed over the four copper heat pipes that draw the heat from the copper base, all of which gets a nickel plating.
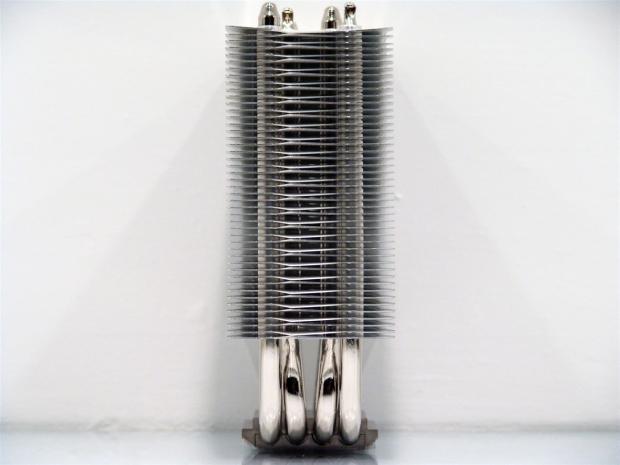
Down the side of the fins you can see that the ends of the fins are bent in pairs so that the tips touch. This makes for a half open and half closed design for the airflow as it escapes out of the sides of most open side designs similar this, NZXT addresses some of that escaped flow.
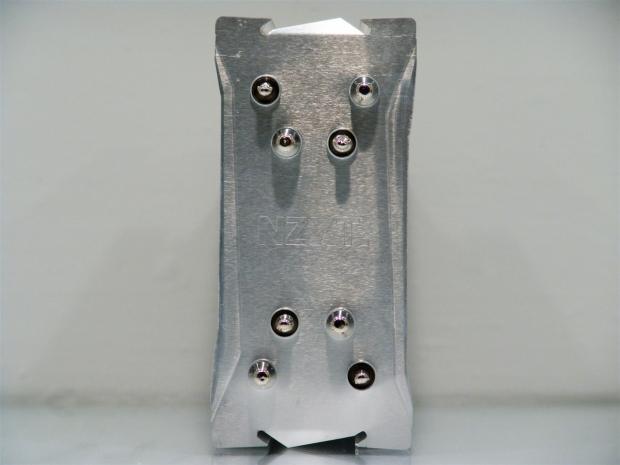
The top of the HAVIK 120 has NZXT pressed into this fin and all others below it with the four pipe ends protruding on both sides of this tower. The fins are actually shaped like knife edges to allow smother flow into the body, but the ridges will disturb flow to take better advantage of said airflow.
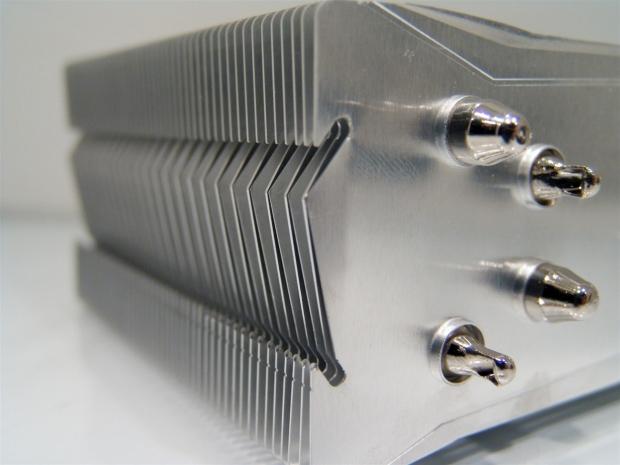
The notches cut on the sides of the fins allow you to easily strap on the fans. Stretching the rubber straps, sliding it between the top two and bottom two fins, rests and locks onto the cooler in these angled grooves.
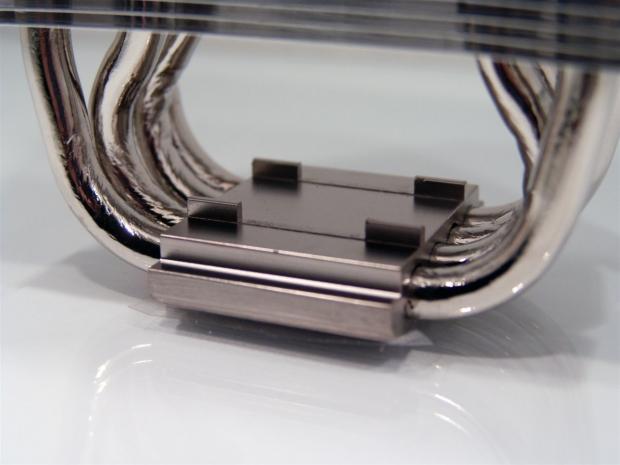
The top of the base is mostly flat but has these four tabs protruding from it. These will keep the cross bar in the hardware kit in place when attempting to mount the cooler.
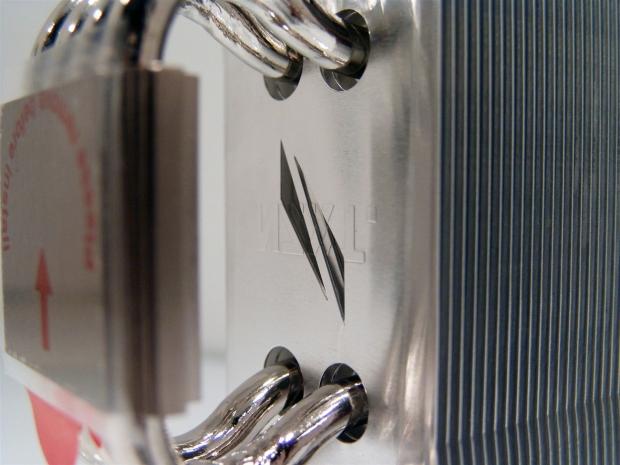
Flipping the cooler over I noticed that all of the fins except the top one have these triangles cut out. This must aid in disturbing the air flow stimulating better transfer of heat from the fins. You can also see the inner pair of pipes is bent very tight, and this necessitates the need to increase the holes in the bottom two fins to allow them to fit properly.
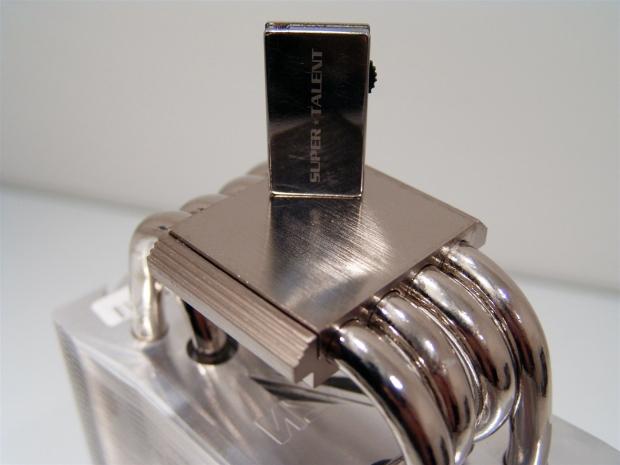
The base is flat from all angles, but as you can see, polishing the base wasn't a major concern for NZXT. Personally i don't care if there are fine marks or it's polished, as long as it works!
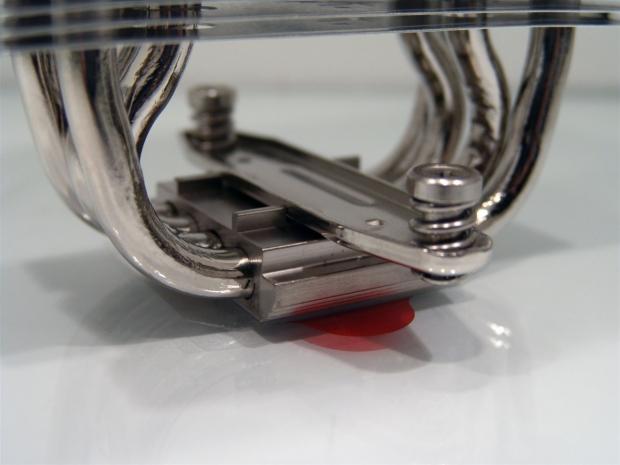
Skipping ahead a little i grabbed that cross bar and set it in the base so you can see how the tabs on the base centre the bar right to left, while the tabs on the bar centre it front to back.
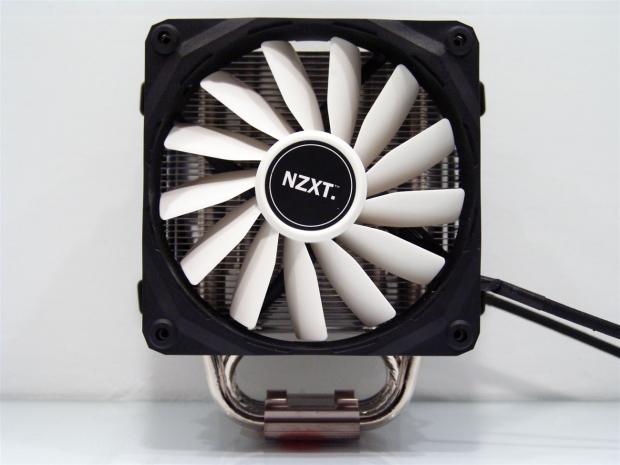
Adding the fans is pretty simple to do. Just stretch the tabs into the pair of fans, and then strap the fans to the cooler. The 120mm fan choice fits this tower well as it covers quite a bit of the fins surface area.
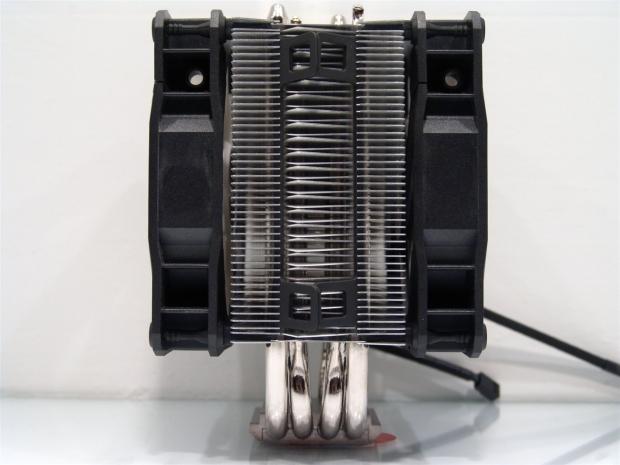
From the side it may look deceptively large, but this cooler is only 4.5" in width with both fans installed. NZXT was right; they definitely made a smaller, more versatile cooler to the HAVIK line with this entry.
Accessories and Documentation
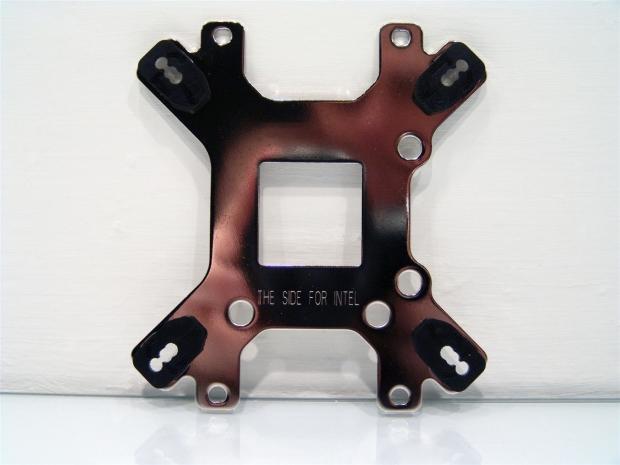
The universal back plate is for both AMD and Intel mounting. It has holes to allow for socket screws and to make room to clear surface mounted components on the motherboard. This side, the Intel side, already has plastic spacers attached to the plate. For AMD users, you want the reverse side of this plate, and you isolate from the motherboard with a pair of stickers you will see in a bit.
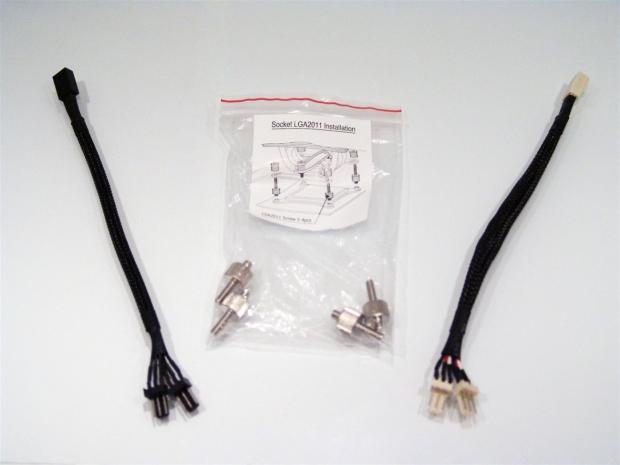
The first things to fall out of the hardware box were the socket LGA2011 screws with a mounting instruction sticker on the bag, and the options for powering the fans. The Y-splitter on the left with black ends is just a power splitter. The one with the beige connections has a resistor built into the splitter to reduce fan speed and noise if you want a silent solution in your build.
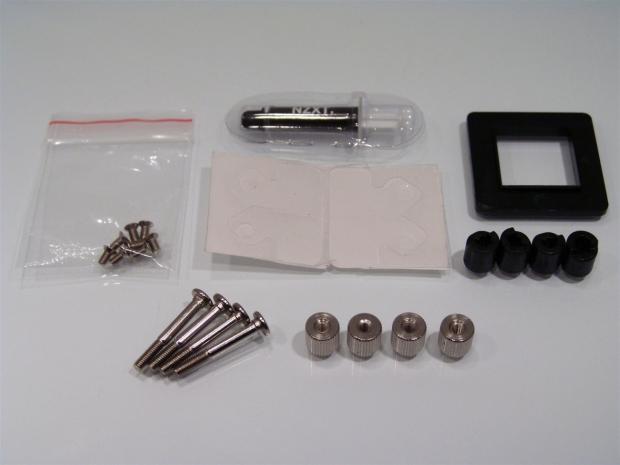
In another bag you will find this assortment. There are screws used with AMD mounting, a tube of thermal paste, the AMD isolation stickers, the LGA775 adapter, four black spacers, four screws, and the nuts to secure the mounting hardware to the motherboard.
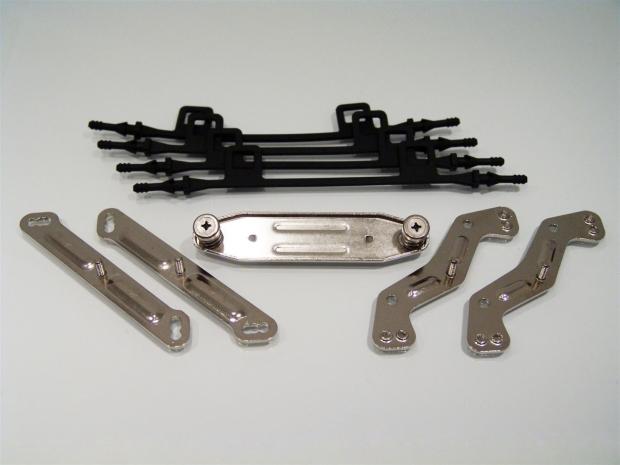
Here we have four black rubber fan mounting straps at the top with the Intel top mounting legs on the left, and AMD legs on the right of the cross bar I showed you earlier.
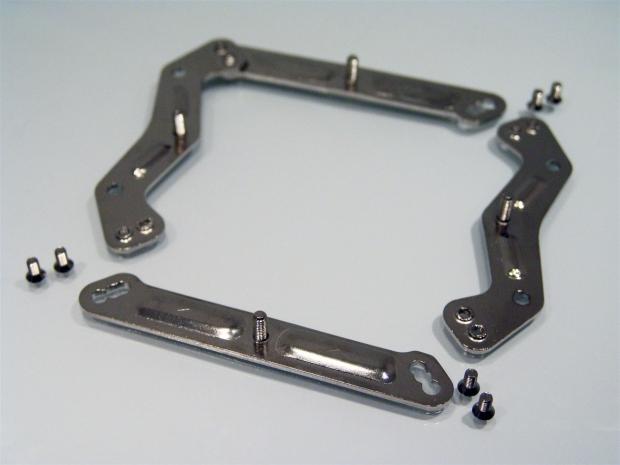
For AMD users, socket orientation is of no concern. Simply use those small screws and secure all four of the AMD and Intel legs together, then mount it to the motherboard. This way you now have screws on all four sides and can mount the cooler blowing out the back of the chassis even if the socket didn't allow for that before.
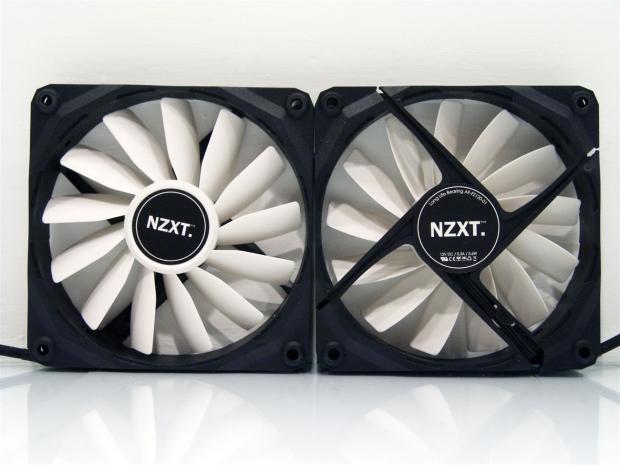
The included FZ fans got a revamp and you are looking at the pair included in the box. They are built with sturdy black frames surrounding thirteen white fan blades. As will the HAVIK140, there are no LEDs; just the white on black on nickel color theme is what you get with the HAVIK 120.
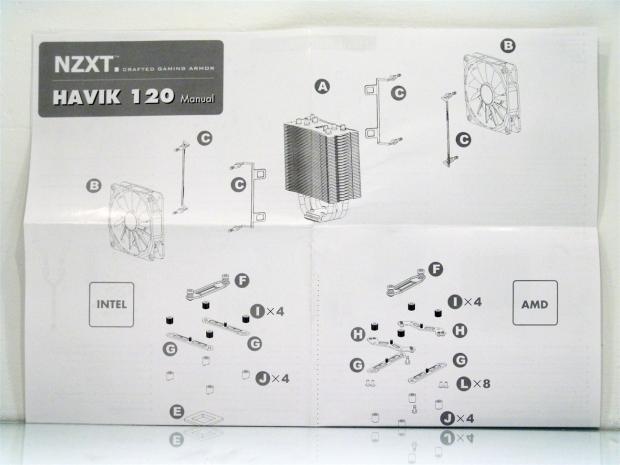
The instructions come all folded up and open to eight sections, front and back. Everything you need to know about the installation can be found in here for both AMD and Intel. Along with the included parts list there are large detailed drawings to take you through step by step on mounting the HAVIK 120.
Installation and Finished Product
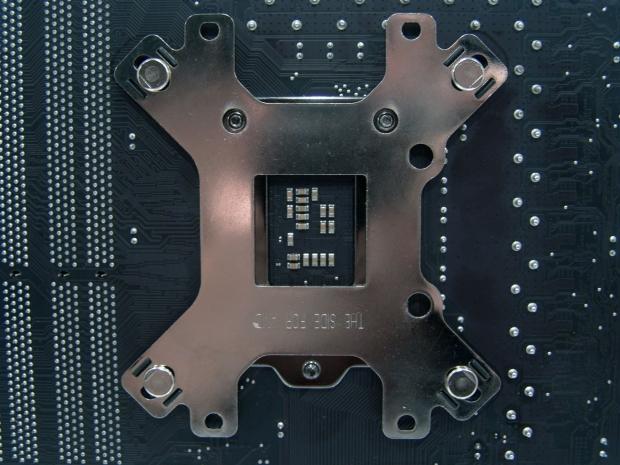
The back plate accepts the long screws via notches ground into the screws that lock into the oval holes. The holes removed from the plate allows for the socket screws on my X68 to poke through as well as clearing my surface mounted components on the back of the board.
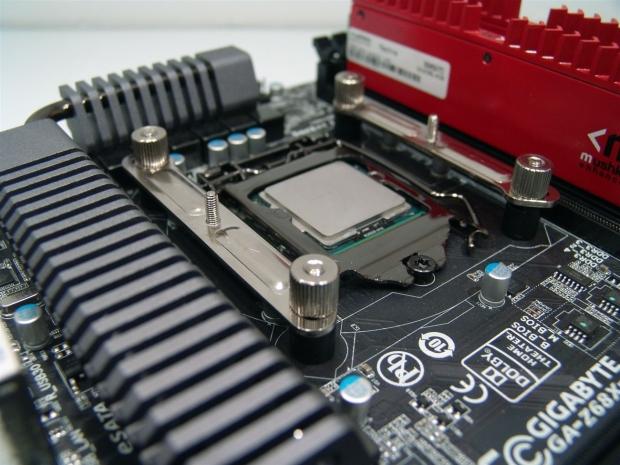
With the Intel kit, you add the black spacers, and then the Intel legs, securing it all to the board with the ribbed nuts. The hardware sits well above the capacitors and caused no issues on either my 990FX or this board around the socket.
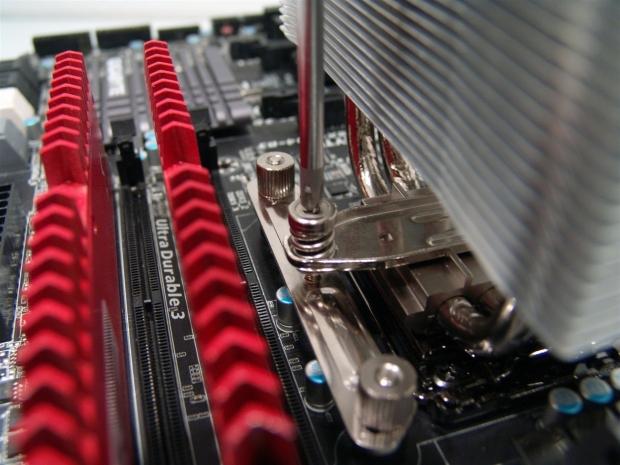
Spread you favorite thermal compound on the CPU, set the cooler on it, and grab the cross bar. To mount the cooler to the board, you just use the screw and spring system on the bar to secure the HAVIK 120. You will know when they are in all the way tight, NZXT designed then to run out of threads where the pressure is most beneficial.
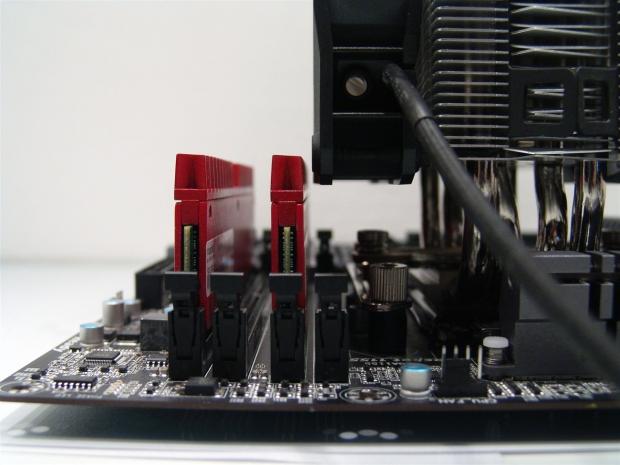
As with most tower coolers, the HAVIK 120 does block one of the memory slots on my motherboard. It does however leave plenty of room for even really tall memory to sit in front of it. Getting the fan on and off is a bit tricky, but at least we can still get to the memory to remove it if we need to. If you have low profile memory, there will be no issues with clearance, but accessing that fourth stick will be a challenge.
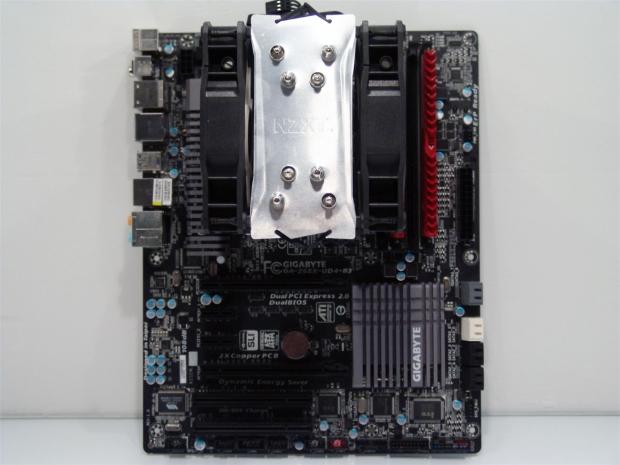
The cooler is still the normal size for a 120mm tower cooler, but it does seem to appear thinner than even the HAVIK140. Installed on the board you also still have access to plug in the 8-pin EPS cable.
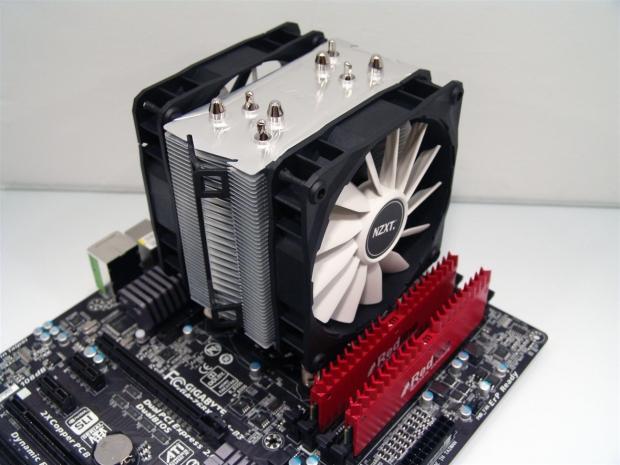
This image is just to end on a good note and supply an image to ponder as you see how well it performs and while reading my thoughts on the HAVIK 120 from NZXT.
Test System & Thermal Results
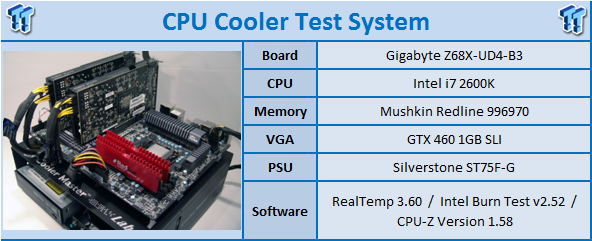
With the system listed above, I apply Arctic Cooling MX-2 to all the coolers I have tested on the GIGABYTE motherboard to even things out with all the cooler manufacturers. To gauge the idle temperatures, I allow the PC to run for a few minutes from the fresh reboot. I then open RealTemp and let things again settle as the reading spikes until the processor is again fully idle. At this point I get the reading and report it to the charts.
For the load testing, both stock and overclocked, we use Intel Burn Test to supply the system load. In this application I set it to work eight threads for 50 passes and maximize the memory tested to over 3000MB to generate as much load as possible to the coolers. With RealTemp open for the entire run, I report the highest temperature seen during the test run. All cooler testing is done open air on a test bench with an ambient temperature of 25°C.
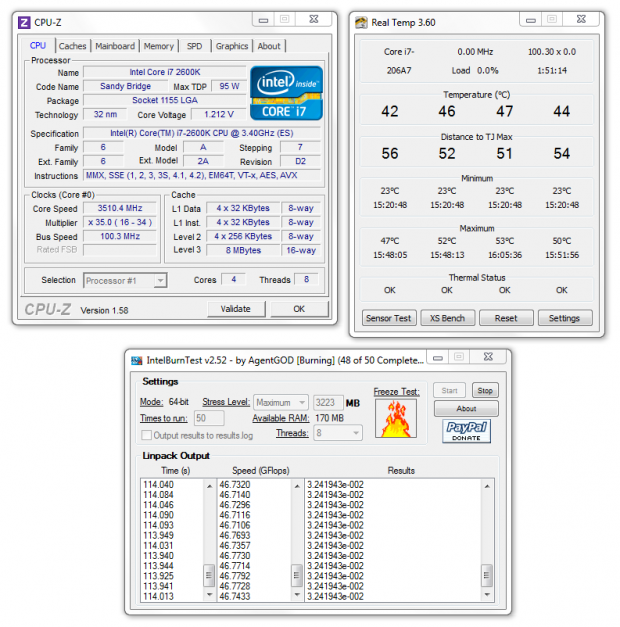
As I usually do with the new reviews, here is my testing image of the HAVIK 120 under load with GIGABYTE's stock BIOS setting employed as I do with all the cooler testing.
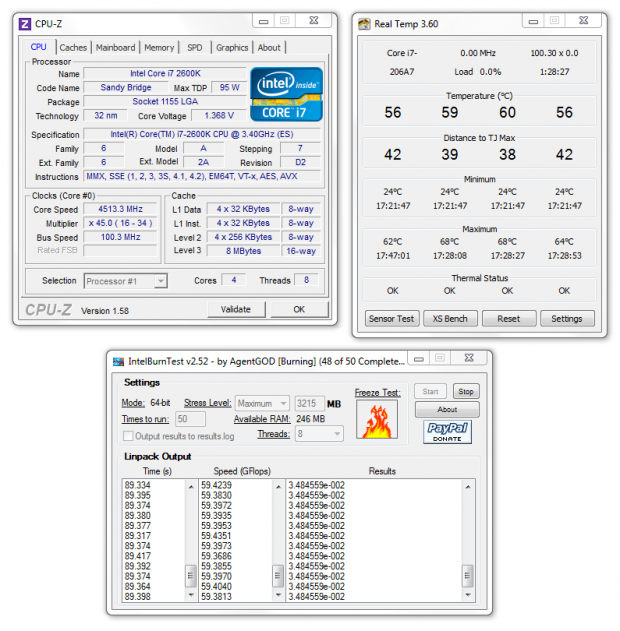
Here is the overclocked testing image. Even with the reduction in the size, NZXT puts up respectable results. Now, off to the charts to compare!
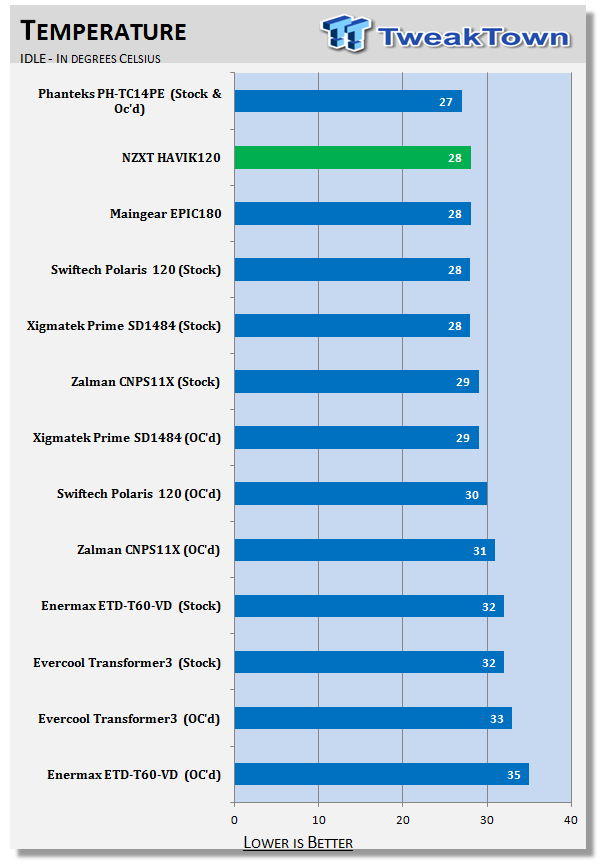
For those who plan to surf through the forums or troll their friends on Facebook, this is the sort of temperatures you should expect. Twenty-eight degrees is respectable considering what other coolers are on this chart.
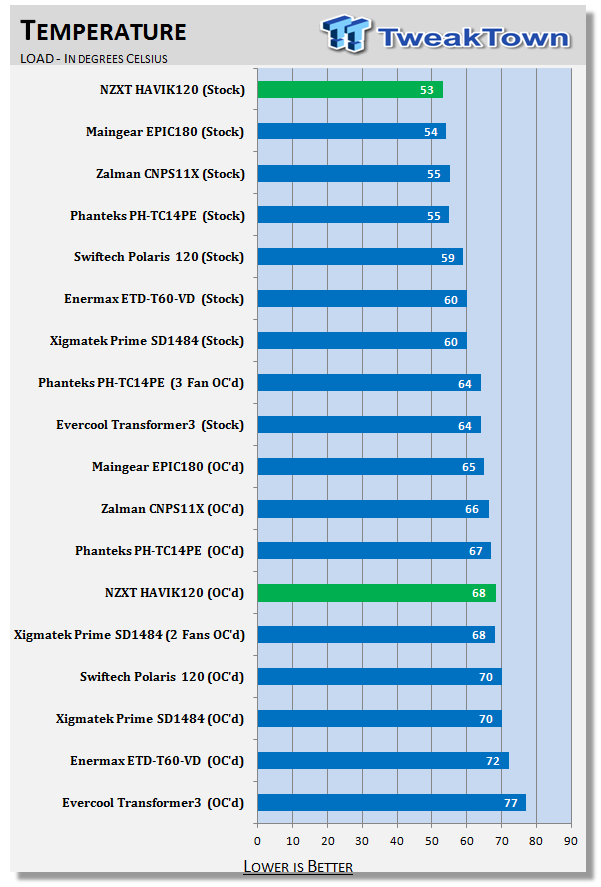
What really shocked me was the stock loaded temperature. I ran this test three different times and even reinstalled some software to be sure I was seeing correctly. Congratulations go to NZXT for this feat against some much larger competition. When the system was overclocked things got back to normal where the sixty-eight degree result is. The only cooler in the same 120mm segment to beat it was the Zalman, and that cooler can get quite loud for a single fan design.
Noise Level Results
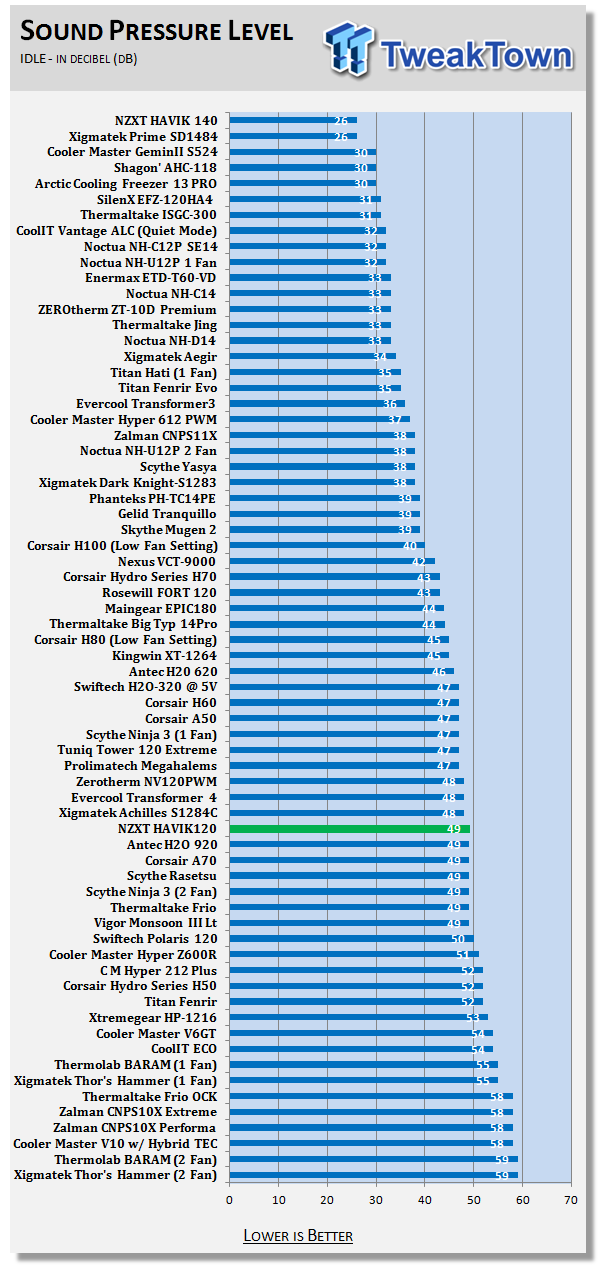
I'm not really sure where NZXT got their sound testing done, but I have to say this cooler is much more audible than the HAVIK140, or a lot of other fans, as this chart shows.
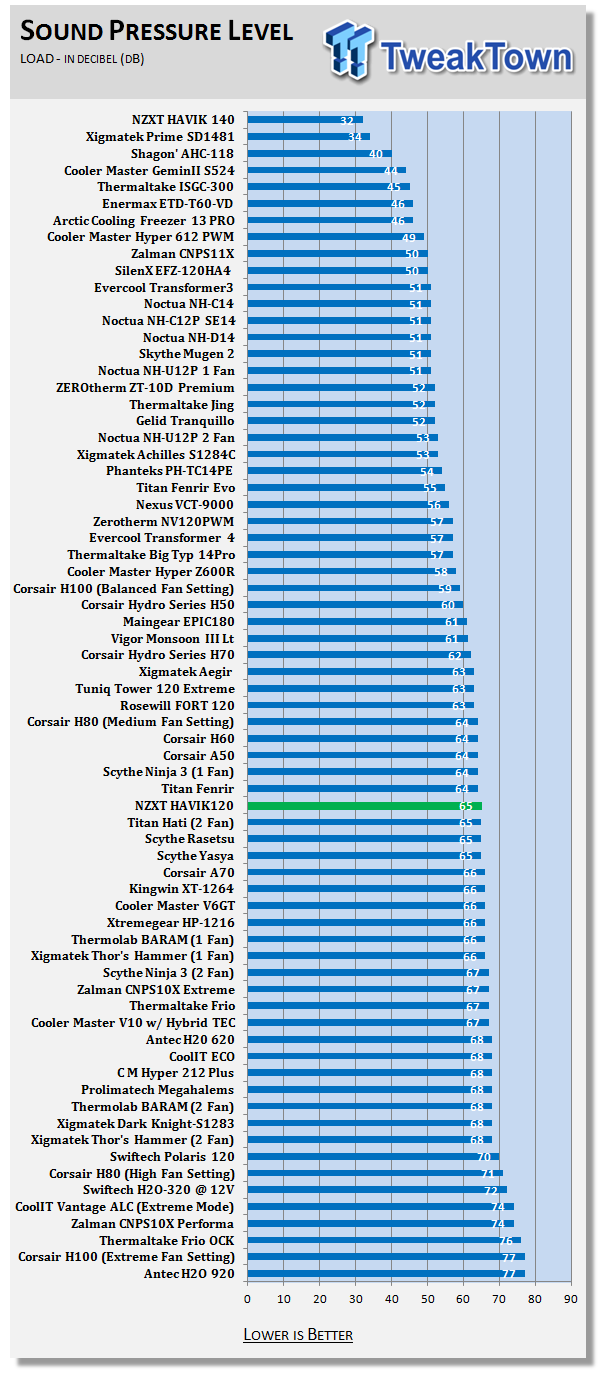
With 12V running through the fans I found something odd here. Via software and in the BIOS I was reading a 12V speed of 1731 RPM, over 200 RPM more than what the fans are specified to do. This might be the cause of the vibration I will address in the conclusion. Either way, it allowed my sample to deliver some good results.
Final Thoughts
I was and still am a huge fan of the HAVIK 140, but there comes a point to where it is just too much cooler for certain installations. That need drove NZXT to deliver a solidly performing little brother into the mix with this release of the HAVIK 120 CPU cooler. The cooler is easy to mount as it said on the box; increasing the pipe diameter to help make up for the reduction in total count, and the push/pull configuration all lend to delivering what we just saw in both the images of the charts. I knew it wasn't going to outperform the Phanteks, but I didn't realize it could keep within one degree of it! Now either I got the worst Phanteks cooler on the planet, or I got the best HAVIK 120 ever made.
The results showed me that there might be something fishy going on with this cooler and as always we welcome any and all explanations from the manufacturer with any findings we have. I sent off an email addressing my issues that fell on deaf ears, or in this case of digital media, blind eyes. I have to go on the assumption that my BIOS, AIDA64 (which has been spot on up to this cooler at reading RPM), and my multi-meter showing 11.97 volts gong to the fans can result in over 200 RPM difference from the specs to the actual fan. I have to believe that the fans were in fact running over 1700 RPM to drive the nasty vibration I felt only with this cooler installed. The test bench vibrated and carried it right into the table I use for testing, and I have to say it wouldn't have been very pleasurable to game with this cooler in a PC on my desk. Going off of my sound meter was yet another indication that something wasn't completely right. NZXT advertises a 22 dB rating, and these fans went well over that mark.
I really had high expectations from this cooler and there is always the chance that I got a bad unit. If NZXT wants to supply another cooler for testing once the retail samples are available, I will be more than happy to give it another run on the test bench. As it stands, the cooler I received is not something that I can base any recommendations on. At this moment take this as more of a preview of what might be available when this cooler hits the shelves. From what I have seen, if there isn't a typo on the maximum fan speed, I got fans that are way over spec, and that will lower the temperatures. If things are on spec, both the noise level and the RPM ratings are way off.
As of right now, take this with a grain of salt as we wait for NZXT to come up with some sort of response to my findings. For now I will just say that the HAVIK 120 is a sleek looking cooler that is more versatile than its larger companion in the HAVIK 140, but that is where I have to stop. I just can't make myself say much more until we get to the bottom of the fan issue and see if the retail samples are fixed. The scoring, as you are about to see It, is going to be harsh, but in things such as performance and value for your money, I'm currently stuck with the fact that you have a 50/50 chance of it doing well. These also carry over to the quality of the unit, and until I get some sort of reply, I am going to pass on the HAVIK 120 for now!


 United
States: Find other tech and computer products like this
over at
  United
Kingdom: Find other tech and computer products like this
over at
  Australia:
Find other tech and computer products like this over at
  Canada:
Find other tech and computer products like this over at
  Deutschland:
Finde andere Technik- und Computerprodukte wie dieses auf