Introduction
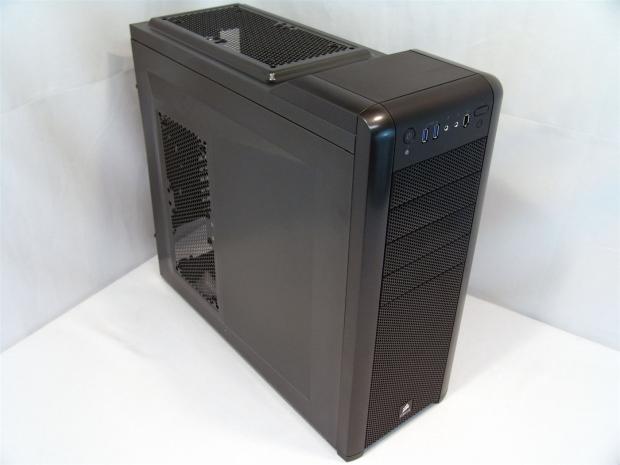
Corsair now brings forth the latest series of cases with the newly released Carbide Series to follow the Graphite and Obsidian series cases before this. Looking to Corsair to get a little background information on this new series, I gathered a couple of things that stood out to me. In their videos of the new Carbide cases from Computex 2011, George made two points very clear.
First of course are the looks, aesthetic appeal both inside and out and functionality, but then he goes on to discuss how wallet friendly cases these are to obtain. The lesser of the two chassis' in this series are intended to sell for $100 or less with the more equipped version of the chassis demanding $30 more over the basic model. Pricing seems really on point for the masses of case buyers out there, and from what I saw in the video, they are pretty cool looking cases.
Corsair says the Carbide series cases offer "everything you need, nothing you don't" and also have a secondary tag line of "built for builders" that we need to address. The Carbide series covers both the 400R and the 500R chassis. The 500R has a white and black exterior with sharp body lines and corners, while the 400R is a metallic dark grey color with rounded lines and corners. The 500R also offers a 200mm fan in the door, a multi-channel fan controller and removable and relocateable hard drive bays which the 400R doesn't have. So to some extent, the series may offer "everything you need and nothing you don't", but the 400R may not where the 500R does. As far as the "built for builders" tag line, I completely agree that both of these are exactly that with what I have seen up to this point.
I was shipped the Carbide Series 400R from Corsair to give it my once over and bring it to you as I saw it. I pretty much covered what this version lacks against its larger numbered brother, but don't let that shake you or pass judgment so fast on this chassis. The 400R is fully capable of offering you a good solution to work with as-is, and offers a fair bit of options for additional cooling, including the ability to house the Hydro Series H100 in the top. That isn't it either. I don't want to give too much away before I spell it all out in the specifications section that is just a click away. Hang around and keep reading, I think even for the current low man on Corsair's totem pole of cases, it is still very much worth your time to have a closer look.
Specifications, Availability and Pricing
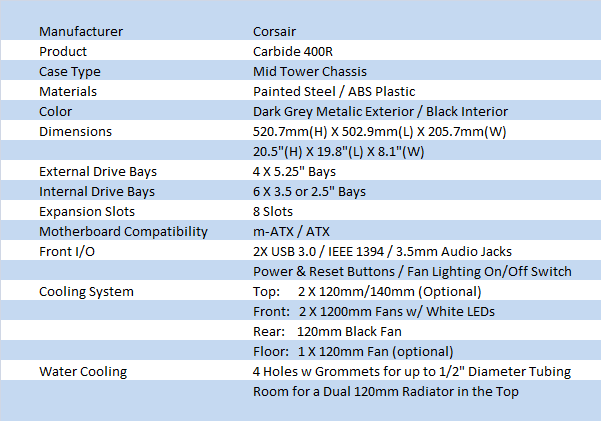
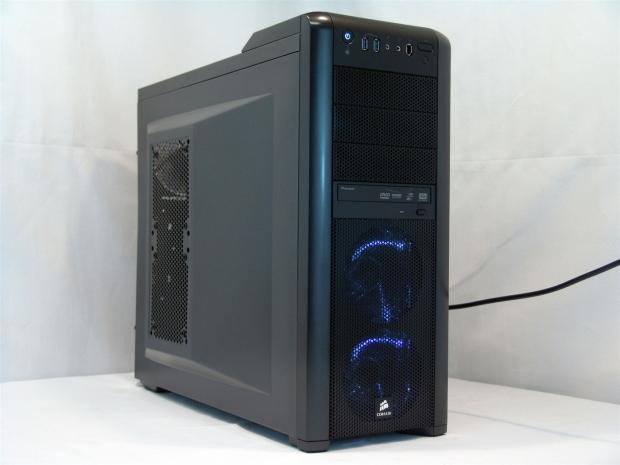
The Carbide Series 400R is an attractive case to look at. With a mix of black on the inside and a dark grey metallic paint applied with a textured finish to the outside (both the steel and plastic components), is something I haven't seen done like this before. The front Bezel is made of ABS plastic and offers room for up to four 5.25" devices with plenty of room left over for the Front I/O panel and the stacked pair of 120mm fans gulping air into the chassis through a steel mesh panel. The plastic continues over the top and terminates in a large handle to help move the 400R around. The sides of the 400R are very reminiscent of the CM HAF 922 with the large bump outs to allow room for fans on the left and hidden wires on the right. In the rear of the chassis you will see a bottom mounted power supply with eight expansion slots and four holes with grommets in them for water cooling tubes along their side. There is the third installed fan here, a 120mm exhaust fan for the 400R.
Speaking of the fans, here is where it gets a little interesting. The 400R comes with three total fans installed. Two 120mm fans with white LEDs are used as the intake in the front with a plain black 120mm in the rear as the exhaust. Now here is the thing. Corsair made room in this case for up to ten fans of various sizes. The door panel pair, the rear, the floor and the top two fans can all be 140mm if you want to change them. That covers six of the ten possible fans in the 400R. The other four fans can be hung in 120mm pairs both on the front of the hard drive rack and the inside of them, making for a bit of push/pull cooling on the hard drives and supplying the expansion cards with a bit more force than the single pair is capable of. This is all for the 400R specifically; the 500R gets a 200mm fan installed in the door, where in the 400R this is not an option.
All this explanation and I haven't even gotten to what the interior of the case has to offer. The interior receives a black coat of paint on everything. The motherboard tray offers compatibility for both Micro-ATX and ATX motherboards with five wire management holes, four of which have those nice Corsair grommets we all like, and the fifth is a cut out for the 8-pin EPS cable and fan wires if needed. The risers come pre-installed and the cabling containing the USB 3.0, firewire, power, reset and all that jazz is not only all black, but sort of pre-wired in the top of the chassis. Both the four 5.25" bays and the six 3.5"/2.5" bays are all tool-less to make things easier for the build. Underneath the chassis you will find four large rubber feet supporting the chassis surrounding the long dust filter that covers the power supply and additional (optional) fan intakes.
I mentioned the MSRP of the Carbide Series 400R was supposed to be sub-100 dollar pricing, and looking at Google shopping I am pleased to say that is true in some places. Out of the fifty-three hits for sales of this chassis only four of them are sticking to the MSRP with or without shipping. The others work their way on up to near $150, and I know you don't want to pay that much. Venturing to the place I spend all of my extra money with, Newegg.com is listing for $99.99 shipped. As if that wasn't enough, if you are really thrifty, there is also a $10 mail-in-rebate taking the price below $90! With it widely available I don't see an issue getting one, but be warned, there are many places stabbing your wallet pretty hard out there!
Packaging
The Packaging

On a plain brown cardboard Corsair lays an image of the chassis next to a brief statement on why this might be one of the beat gaming cases and in six languages too. Of course the bottom of this panel addresses the full name of the Carbide Series 400R, and the "brilliant design, inside and out" tag line at the bottom.

Spinning the box to the right, you get the name at the top, three languages of specifications charts, and images of the inside of the 400R as well as the front.

The back of the box is mainly used for the exploded diagram of the chassis and all its components. This information is covered in the manual, but if you are at the store reading up on the features each key feature is denoted with a letter that you can match to the corresponding description at the bottom.

With six languages covered on the front and back, and the other side only listing three of them, the last side of the packaging covers the remaining three with their own specifications charts, as well as the inside and frontal renderings of the 400R.

Looking at the box, I sort of expected to see the foam in worse shape than it is. The foam on both ends did a good job protecting the top and bottom from damage, but as packaged, it seems the courier dropped it in between them at this images left side. The liner kept the paint from taking any abrasions. From what I can tell so far, the packaging has done a good job.
The Corsair Carbide Series 400R Mid Tower Case
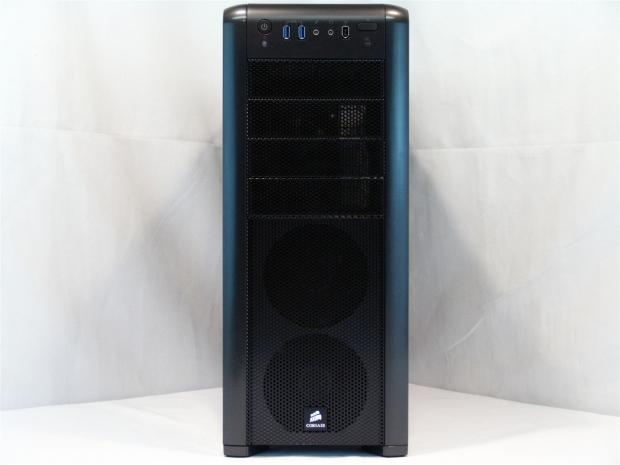
The front of the 400R is rather sleek with the round edges off the sides and top, as the front plastic bezel meets the shape of the steel case behind it. There are four mesh covers for the 5.25" external bays with two circles showing through the mesh at the bottom with the Corsair name plate that allows for the fans behind it to breathe.

The Front I/O panel is flush with the plastic bezel offering the backlit power button with the HDD activity light below it. You move on to a pair of USB 3.0 ports, the 3.5mm headphone and MIC jacks, and a IEEE-1394 connection before you see the oblong On/Off switch for the LED lighting, and the little reset button below it.

The left side of the case has the "hood scoop" shaped bump that allows more room internally for the optional fans to hang on the door without actually having to make the whole side of the case that deep dimensionally. You have the option to hang one or two, either 120mm or 140mm fans here.

There is a lot going on in the back, as I noticed where the case took the damage on the right side here. That aside the 400R still offers eight expansion slots, a bottom mounted PSU, and four holes for water cooling tubing to exit the rear of the case.
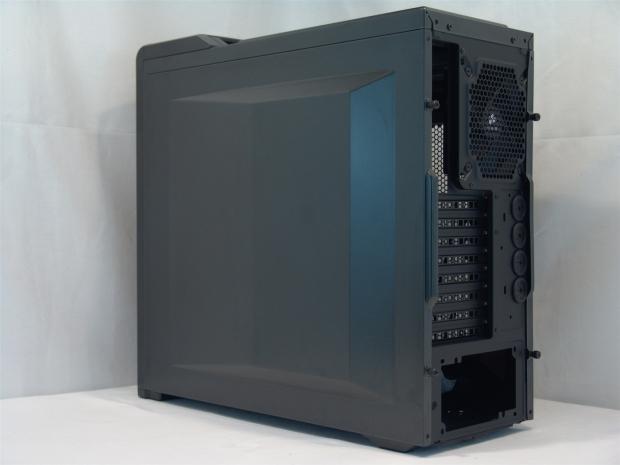
The right side of the case shares the same "bump" as the left side offered, this time with no added ventilation. The reasoning here is to allow much more room than a flat panel offers to hide wiring and still be easy to close with a ton of it in here.

The top of the chassis offers the placement of two 120mm fan, or offers 15mm spacing for dual 120mm radiators, specifically to match the Hydro Series H100 cooler. Again the mounting is there for 140mm fans as well so there are other options to look at. Up near the top you can see the recess that makes for a pretty sturdy handle at the top.

Under the chassis there is a large dust filter to keep the PSU intake and optional 120mm or 140mm fan in front of it from dumping dust into the chassis. The four large plastic feet are padded with rubber to keep the chassis in place, and I found them to be very sturdy.
Inside the Corsair Carbide Series 400R Mid Tower Case

Opening the side panels, I ran into a neat feature where Corsair has "secured" the thumbscrews to the panel. This way when they are out of the case, they don't ever leave the panel so you will always know where it is when you go to replace the doors.

With the panels off the 400R we get our first peek inside of it. The paper work is all sealed in the baggies at the bottom while the hardware is in the white box in the hard drive tray. Just taking that extra bit of care, Corsair also wrapped the USB 3.0 connection, FP Audio connection and the IEEE-1394 all get wrapped in some extra padding.

With all the extras out of the way and the wiring tucked behind the motherboard tray you can now get a much better look at things before I get to specifics on each section.

The four 5.25" bays offer these springy clips to hold the drives in pretty well on their own. Once the cover is removed you just slide the drive in and it will lock into place. To release it, you just slide the "push" button to the front of the chassis and the clip rises to release the drive.

The six trays for the 3.5" drives also have holes in the bottom of the tray to accommodate any 2.5" hard drive as well. The trays are made of thin plastic that allows you to flex them over a drive easily, but leaves them "limp" installed in the case empty. You can also add two 120mm fans to the inside of the drive rack to blow at the expansion cards.

The floor of the chassis offers four rubber pads to support the PSU over the left fan hole. The right hole is for any optional fan you choose in 120mm or 140mm sizes.

The motherboard tray offers a large access hole for coolers, five wire management holes, and the risers are pre-installed for an ATX motherboard with extra holes to support Micro-ATX boards too.

The back of the chassis has the third installed fan at the top above the eight expansion slots. To remove the covers there is a cut out in the back edge of the case to get a straight angle of attack on those thumbscrews.

Behind the tray there doesn't seem to be a lot of room for the wiring, but don't forget, the panel gives you all the room you need. Already connected, to the left are the front fans that are wired to the front I/O for the lighting switch and get powered with a 4-pin Molex connection. The other 3-pin wire hanging on the right is for the rear fan.

I really like that all the wiring remained black and this wasn't a cost cutting measure lost with Corsair. The IEEE-1394, HD Audio, USB 3.0 and all the motherboard connections are as black as they can be for a good looking finished result.
Accessories and Documentation

Opening the plastic bag with the paper work inside I found the 400R quick star guide and the red STOP pamphlet reminding you not to return this product to the point of purchase.

As I mentioned, as the back panel displayed, that is covered in the guide. Really that is all that is covered! The twelve key points have a basic multi-lingual description of each.

Folding it back up to look at the back of the guide, I see Corsair displays a pats check list for the hardware that should be in the white box.

Opening the box to have a look at what I got, I found everything to be packaged separately for easier finding of the hardware when you need it. More specifically, the four risers are kept separated from the four PSU mounting screws below it. At the same time another bag contains a few wire ties and a pair of nylon clips, the motherboard screws, the optical drive screws, and the extended fan mounting screws are all in different bags. Lying across the top is the USB 3.0 adapter to allow those with only USB 2.0 ports on their motherboards to still get functionality from the front I/O USB ports.

I mentioned that 2.5" drives do in fact install into the trays. What I found out was in order to do so you also need to remove the pin system from one side of the tray to allow the drive tray to slide back into the chassis. It's pretty simple to release the four tiny clips with a screwdriver and remove the side piece.

Looking at it a little closer, you can see the tray on the left is flat on the edge, no obstructions. The tray on the right has the clip poking out and will not slide into the drive cage in this state.
The Build and Finished Product

Removing the front bezel just requires a tug at the bottom and it pops right off, with not wires attached so you can get it right out of the way. To install the optical drive, I had to remove the cover from the inside of the bezel and basically I snapped it back on and slid the drive in. You know it's in there right when you hear the click of the tool-less latch.

To simplify the wiring inside I dropped the optical drive to the middle of the chassis, and it sticks out like a sore thumb to me, as it really breaks the flow of the mesh down the front. Next time the drive goes in the top slot at least.

Inside of the chassis I was able to easily install the AXT Gigabyte and the SLI setup in the 400R. With most of the wiring fitting so nicely out of the way behind the motherboard tray, I figured I would just use the short cables to power the GPU's. The limitation here is 316mm, and longer expansion cards need to have power plugs on the side or issues plugging them in will pop up in the 400R.

The back of the case gets a touch of color from the rear I/o dust cover and we now have four DVI ports staring back at us, but I got to say, even the back of this case looks good!

Behind the motherboard tray I put in very little effort to hide or really route anything in a particular manner. I took the necessary cables and ran them where they had to go to power the device, but I just sort of bunched things together and maybe out of the way, but I know there is a big cover yet to be applied with the door panel, so I am testing its abilities.

Without any fans in the left side panel you do get a bit of a look inside the case through the mesh, although a pair of clear, white LED fans would be a huge help to illuminating the view.
This is why I mentioned the white LED fans for the door; they would do really well as a match to the pair that are illuminated when the case is powered on. You do have the option to shut these fans lights off with a push of a button, so if the case is in your room, you will need only to contend with the backlit power button and the occasional flicker of the activity LED.
Final Thoughts
So let's readdress the earlier claims, shall we? - Is the 400R "everything you need, nothing you don't"? - In my mind I still think the 500R fits that bill a bit better than the 400R does, but on the flip side, it's less than $100 to get one to my door, where the 500R is going to cost more. To those with ideas of customizing in a solid chassis, with plenty of options and room to make the finished product look very appealing to anyone who happens to see it with the side off, this is a case to seriously consider. Even with the pretty serious hit my sample took, I can't really say it did anything bad to the case. The cards lined up fine and the door panels didn't give me any issues. As I see it really, there isn't anything I can really fault this case for.
Around the chassis there is room for up to ten fans cooling this chassis. The top of the 400R offers room for a dual radiator with 15mm spacing like the Hydro Series H100. I mean any way you look at it, you can have air either coming or going out of every panel in the 400R if you choose to. The pair of fans in the front of the case and the one installed in the back didn't offer the best results in case cooling, but do offer enough flow for me to say it was sufficient to keep my system within temperatures I was comfortable with. Wiring it all couldn't be simpler. All of the stock wiring to the case is black and something I like personally for a more professional looking end product. I had plenty of length to the wiring and I liked the bump out in the rear panel that allowed me to make a mess and still close with no effort. On top of that, I like that the panels open to the front like a car door, and the fact that I can't lose the thumbscrews is a great addition to any case.
So let's get down to it, should you buy this case? - I can see this being the choice for a lot of users, as it is darker on the exterior with the metallic grey coating and the interior being all black, it keeps things simple. My gut says that while there is a really good deal at Newegg.com for $99.99 shipped before the $10 MIR, I still feel like I would opt for the 500R for what she offers for the small amount of difference in pricing. With trends leaning toward white cases, modular internal components and a built in fan controller, I feel the 400R is more the appetizer to the entree that has yet to be served. I will give the 400R credit where it is due. It is widely available, affordable, has a good feature set for the price and looks good doing it. If you are the frugal ones who shop hard and get the MIR and the Carbide 400R for $89, by all means, do so! For me, I want to see the 500R!



 United
States: Find other tech and computer products like this
over at
  United
Kingdom: Find other tech and computer products like this
over at
  Australia:
Find other tech and computer products like this over at
  Canada:
Find other tech and computer products like this over at
  Deutschland:
Finde andere Technik- und Computerprodukte wie dieses auf