


Introduction
When I think "budget friendly" in chassis design, I think of most of the cases offered currently under $60. What I do tend to find are cases that may look good, but then they lack installed fans, tool-lees features, or both. Of course, the other option is to get an ugly "box" that has more fans, but lacks in appeal and likely will end up under the desk or buried behind other things over time. It is a rare occasion that you can get good looks, loads of cooling, tool-less features, and a few other options to coincide with the term "budget friendly".
Sentey is here to dispel that myth, that you really can have your cake and eat it too! - Back in October I took a look at their full tower chassis, the Arvina GS-6400. Now, this chassis had more room than what we are about to look at, but I can definitely see where Sentey used this basic concept of the Arvina and down scaled it into a mid tower variant. They look to be keeping most of the feature set of the Arvina, along with the external appeal, but this time dropping the price way below the $130 the Arvina demanded at launch.
Today we are going to look at the Optimus GS-6000 mid tower chassis from Sentey. I don't want to give away too much too soon, but this chassis offers one of the fullest feature sets I have seen in a chassis at this price point. This fact alone is a great reason to show the rest of the buying public that they need to take a look in Sentey's direction the next time they buy a chassis, but that isn't all this offers. I say we get right into the specifications so you can see what is on the inside, and see why I really like the Sentey Optimus. The fact that this chassis is only going to leave a dent the size of most tower coolers these days in your wallet, just gives me that much more to praise this chassis for!
Specifications, Availability and Pricing
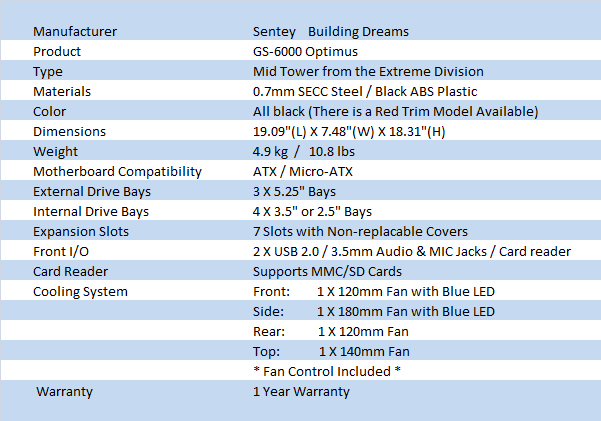
This mid tower chassis from Sentey's Extreme Division of cases is made from 0.7mm SECC steel. The door panels, the body, along with the drive bays and motherboard tray all are, but let's go back to the outside for a moment. If you don't remember the Arvina, it had a very shiny outer paint scheme that went along nicely with the ABS plastic of the top and front. The Optimus is no exception. The front is made of ABS plastic and houses the power and reset buttons along with the front I/O connectivity at the top. This consists of a MMC/SD reader, two USB 2.0 ports, the 3.5mm audio and MIC jacks, and a fan controller. Moving down the face, you will find a stealth drive cover for an optical drive followed by two other panels that can be removed to install more devices. The lower half is vented on the sides and has a large mesh panel backed with a 120mm blue LED fan. The top is also well ventilated and has one 140mm fan installed with room to add another one later if you should choose to do so.
Back to the interior. In the front you will find that the Optimus keeps the tool-less clip system for housing the three 5.25" devices at the top. There is room for up to four hard drives in the bottom, and the tool-less trays that fit 3.5" drives has holes in the tray to screw in a 2.5" drive if you have an SSD to throw in the mix. The motherboard tray does have compatibility for both m-ATX and ATX motherboards above the bottom mounted power supply. You will even find wire management holes and a back plate access hole for swapping cooler a little easier. There is a dust cover that covers the ventilation in the floor and will allow the fan of the power supply to draw clean air in from the bottom. In front of this there is room to add an additional 120mm fan as well. The rear of the chassis holds the 120mm exhaust fan and a row of seven expansion slots. These slots come with breakaway covers so once removed they don't go back in, and once removed you can hold your cards in place with the red tool-less locks found here.
Availabilty of the Sentey Optimus is very limited at this time. As I write this I am looking around and it seems only four locations are currently holding stock of the GS-6000. While tough to find, this case won't kill your budget. Through the usual shopping I found that pricing matters depending on where you decide to buy it. Playing on the averages, the price tag of $59.99 at Newegg.com isn't unreasonable at all. For those a bit more frugal, you can find this chassis some $10 cheaper at Directron as they are currently running a promotional sale. Now that we know where to get the Optimus, we should take a look and see what you get.
Packaging
The Packaging
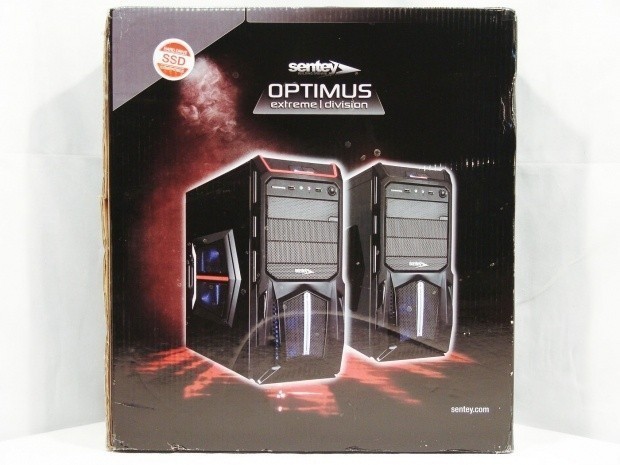
The front of the Sentey Optimus packaging shows both models; the red trimmed version in the front, and the all black version in the back, which we are going to be looking at today.
Dimensions of the chassis are listed under two images of the red trimmed Optimus. This gets followed up with eight images covering the features included with the chassis. At the bottom there is a list of features again but this time in text only.
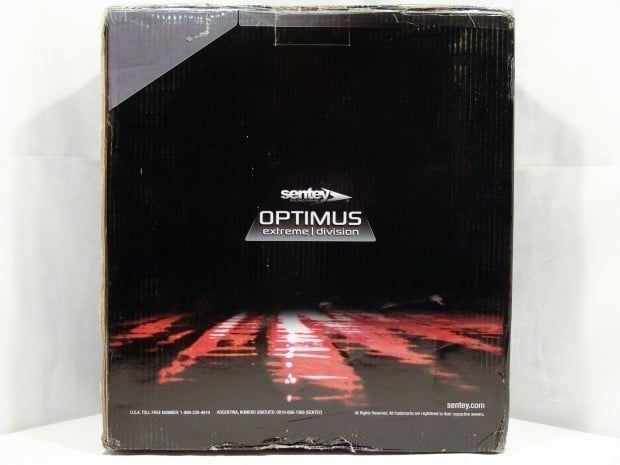
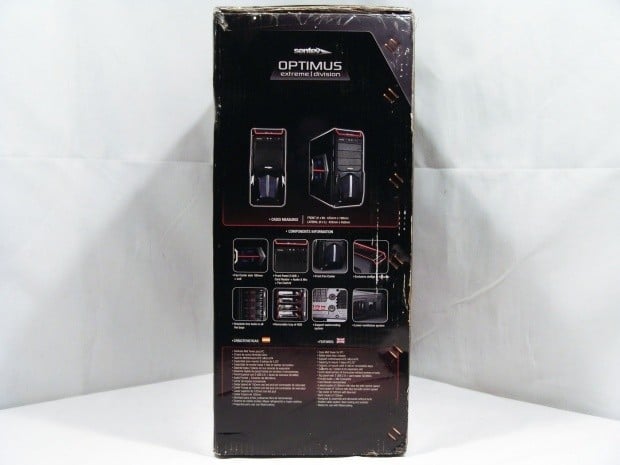
This side of the box is kept very simple and displays the Optimus name and the Extreme Division it comes from above what looks like LED lighting coming through some mesh. At the bottom in white print you will find contact information if you were to have any issues with your chassis.
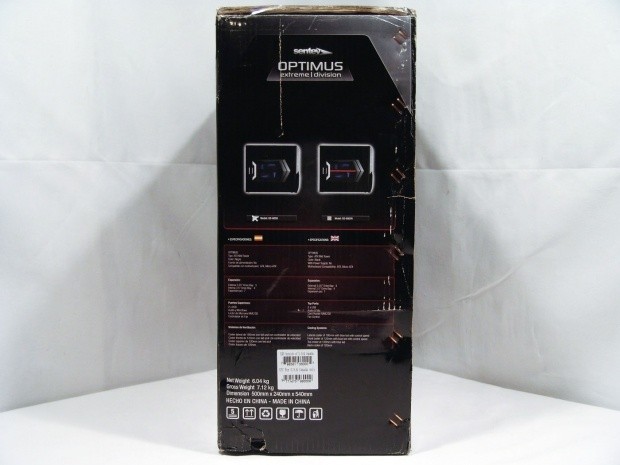
This panel shows the top of both the GS-6000 we are testing along with the GS-6000R. These images get followed with a German and English rendition of the specifications for the Optimus.
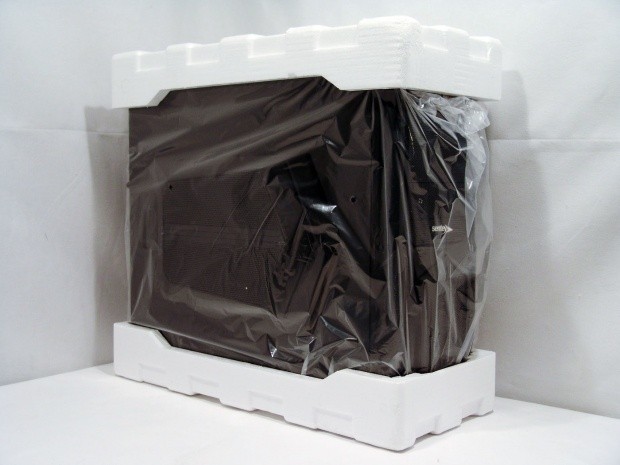
Once out of the box you will find the Optimus wrapped in a plastic bag to protect the finish with Stryofoam caps on both ends to secure the chassis. Considering the condition of the sample I received, which was excellent, I have to say this tried and true method of shipping a chassis does its job once again.
The Sentey Optimus GS-6000 Mid Tower Chassis
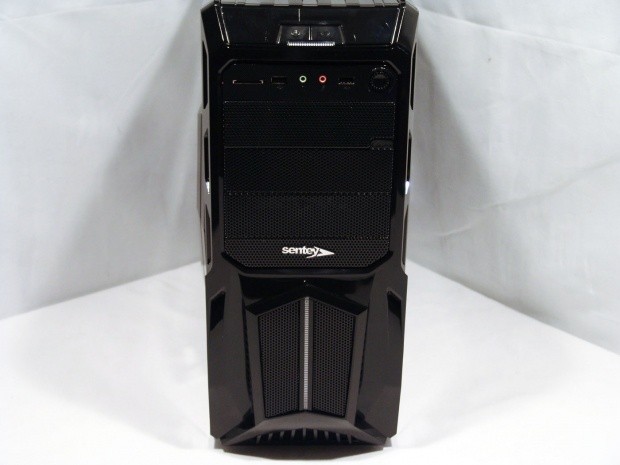
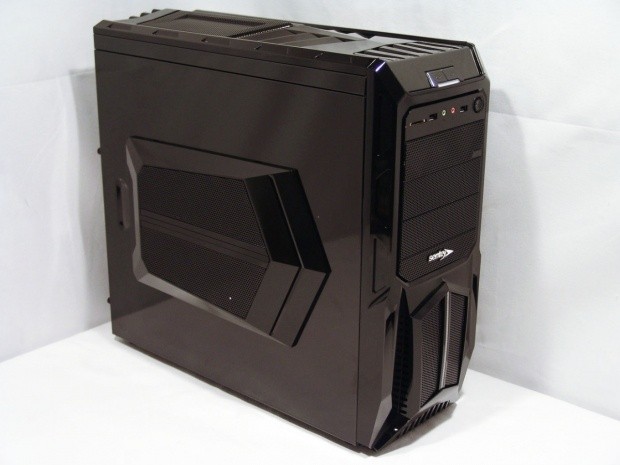
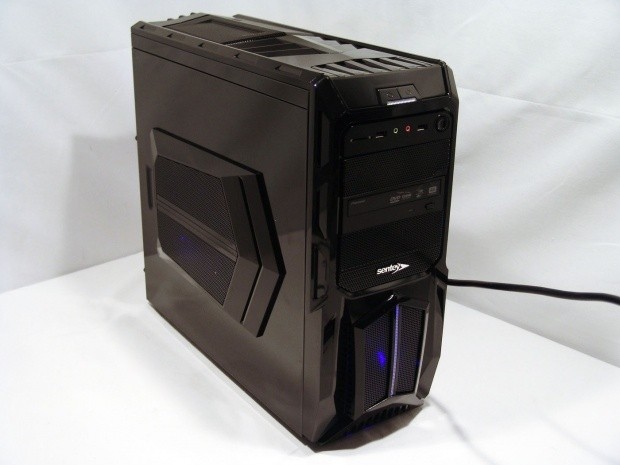
As I said, the Optimus takes that same shiny outer appearance from its larger brother, the Arvina. While there isn't a mix of colors on the Optimus, the ABS front plastic has a piano black finish surrounding the optical bay covers and the mesh at the bottom. The Sentey logo is placed in the middle just above an LED lit bar that travels don the center of the intake fan/
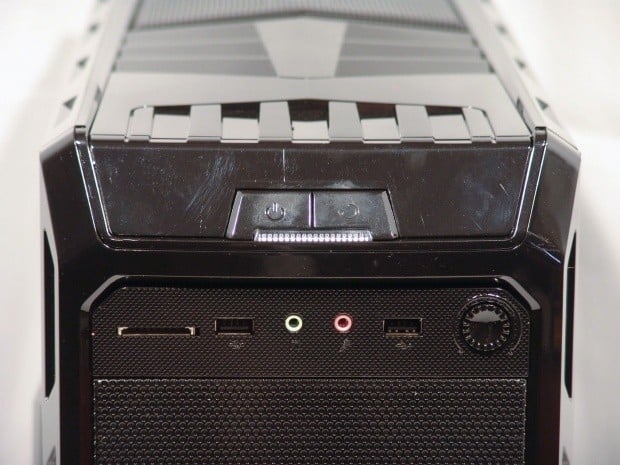
The front IO is held on both the slightly set back angle of the top,a nd just above the optical drive in the front. The top half houses the chromed power and reset buttons along with the hard drive activity light. On the front of the Optimus you will find a MMC/SD card reader, two USB 2.0 ports, front panelo audio and MIC, and a dial fan controller.
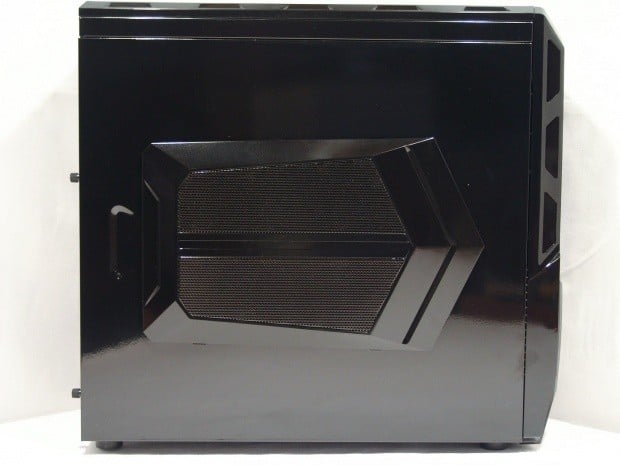
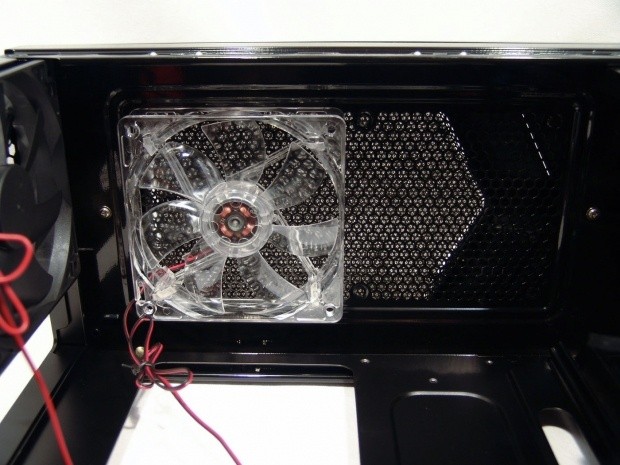
As you can see by the reflection of the white table in the paint, the outside of the whole chassis is very shiny. This left panel has a spot at the rear to grab the tight fitting door and slide it off. Just in front of that is a rather large "hood scoop" looking cover mounted to the panel. This venting is backed by a 180mm blue LED fan.
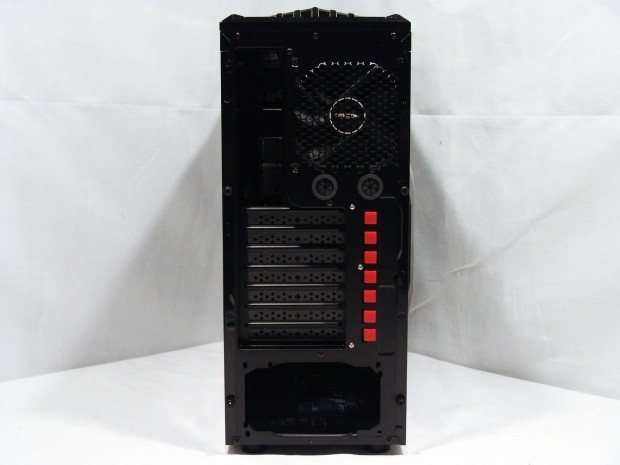
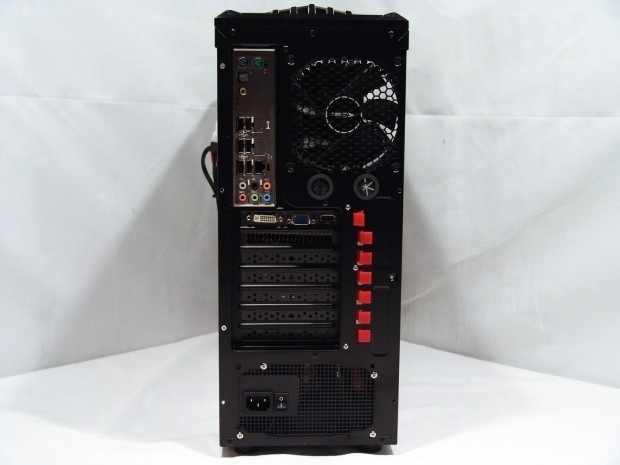
The rear of the chassis uses a flat black to match the interior, and it makes it a bit tough to see what all is going on back here. What you have it the rear I/o next to a 120mm exhaust fan. Just below the fan is a pair of grommets in holes to allow for water cooling tubes to pass through. Further down you see bright red squares that are the back of the tool-lees locks for the seven expansion slots. That leaves us with the large hole at the bottom to accept a power supply.
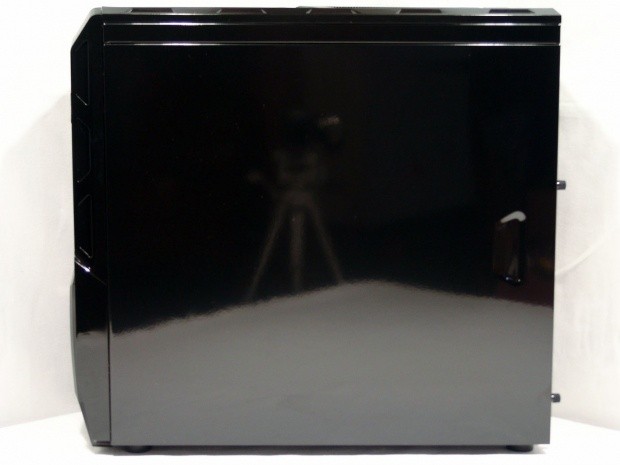
The right side panel again has that very shiny finish to the black paint to match the other side along with the ABS components of the Optimus. Only thing to note with this panel is the dimple in the back of the panel to make removal a bit easier.
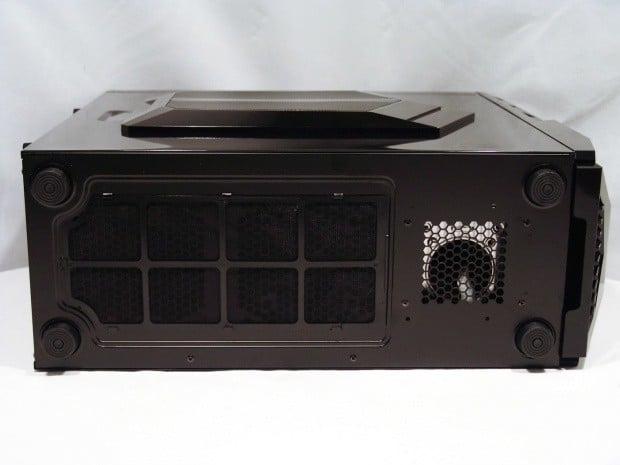
Under the chassis you will see it gets supported by four large feet. This leaves room to add the dust filter under the power supply and the 120mm fan hole just in front of it. Sentey also added a bit of ventilation under the hard drive rack to aid in cooling them.
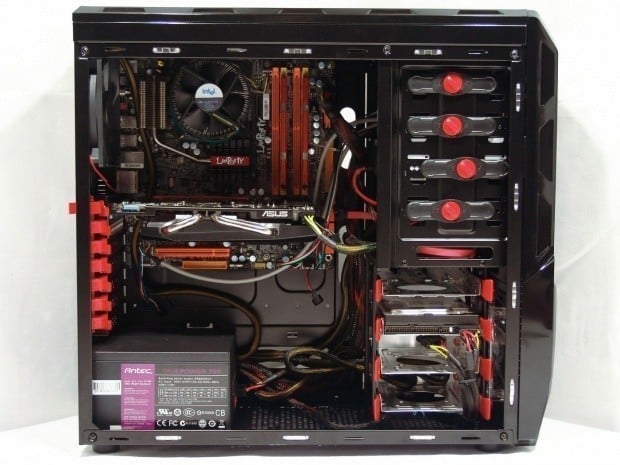
Inside The Sentey Optimus GS-6000 Mid Tower Chassis
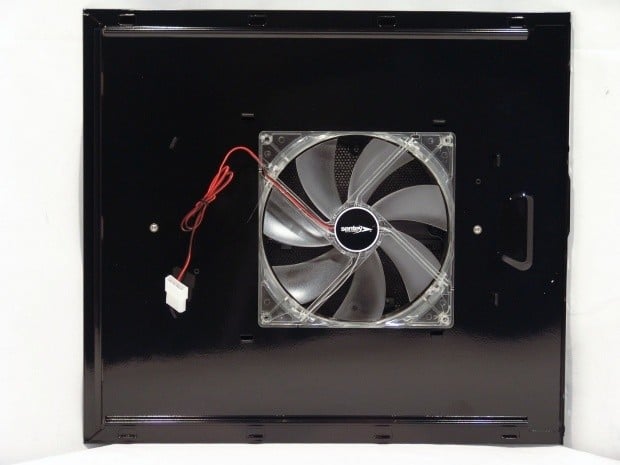
I removed the side panel by removing a pair of thumbscrews and sliding the panel to the rear of the case allowed me to get the image of the fan behind the "hood scoop". Mounted to the inside of the door you will find this clear framed, six blade, 180mm fan that when powered glows with blue LEDs. This fan gets its power via a 4-pin Molex connector.
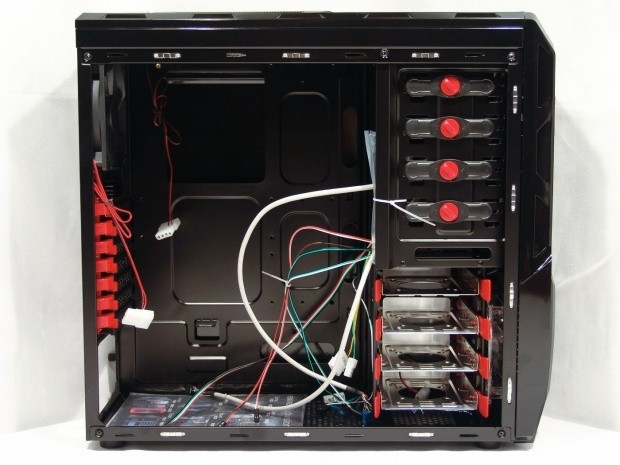
Inside you are greeted with a black background dotted with bright red tool-lees features. The hardware can be found twist tied to the lower optical bays, and the instruction manual is in a plastic bag floating freely inside the chassis.
To mount one of the four 5.25" devices, simply twist the large red knob to unlock the tool-less clips, slide the drive in, and then replace the lock. For added security, you can add screws to the opposite side of these drives if you plan to travel with this chassis. For desktop use, these clips are sufficient to keep the devices locked into place.
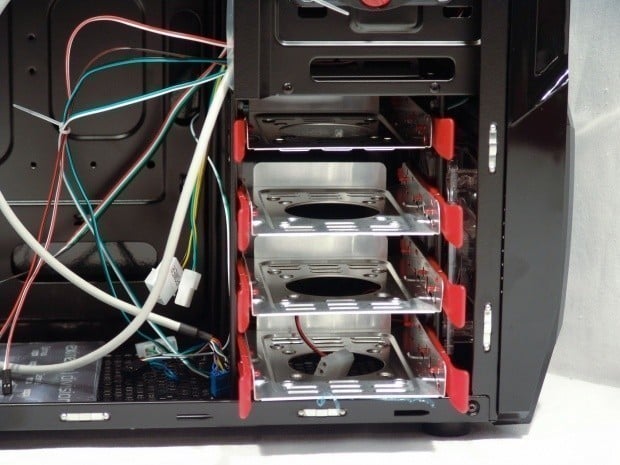
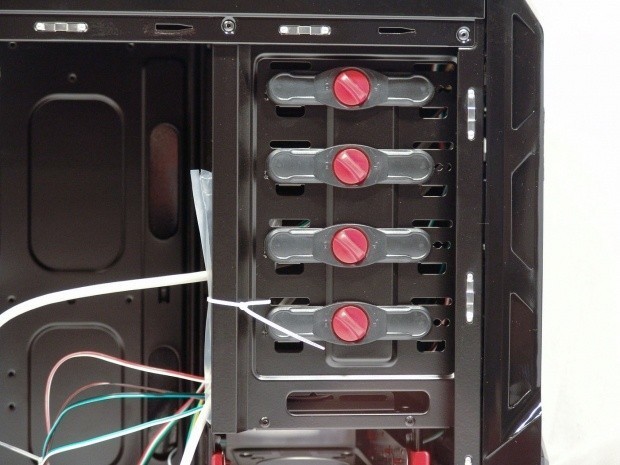
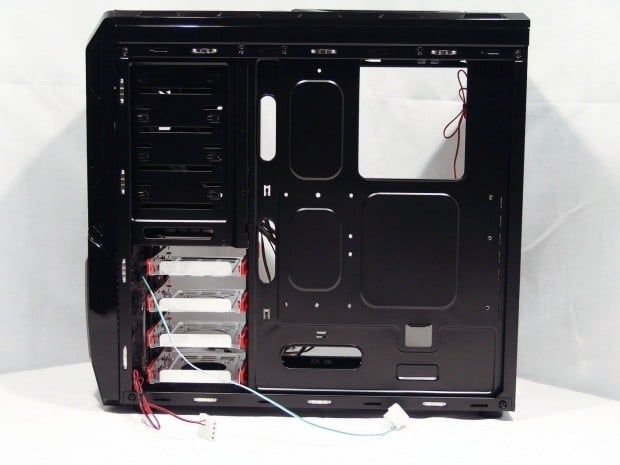
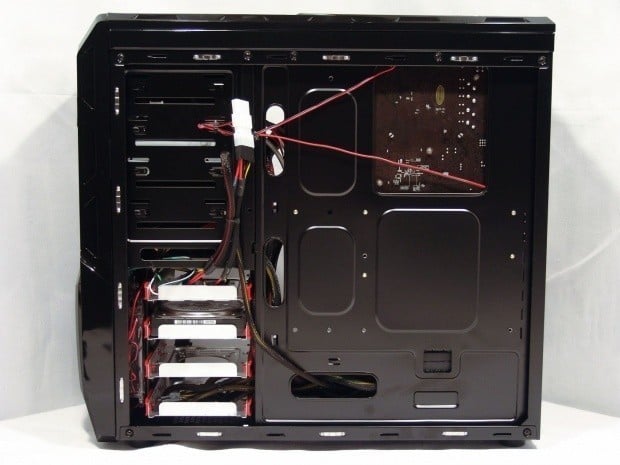
Behind the blue LED intake fan you will find four trays to accept hard drives. Pushing the red tabs inward release the trays and they can either simply lock onto a 3.5" hard drive, or by using the holes in the bottom of the tray along with some included hardware, you can also use these trays to secure 2.5" drives in as well.
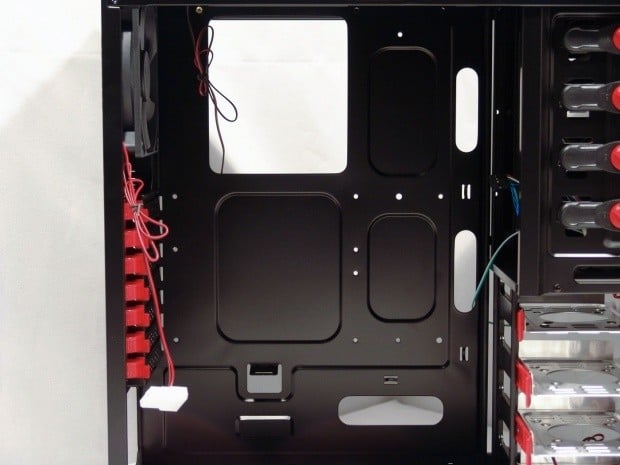
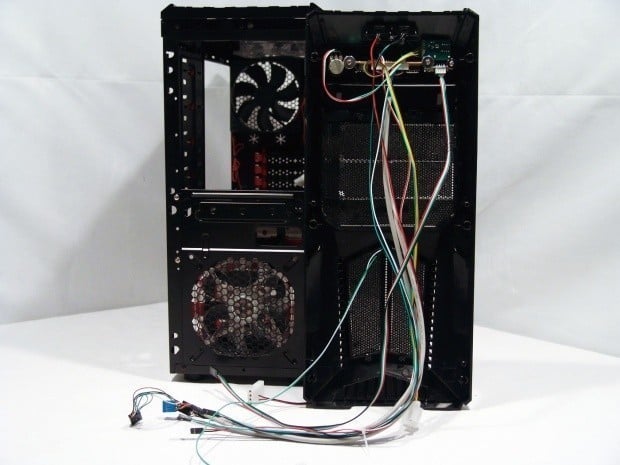
Getting the wiring out of the way, you can see there are holes for risers for both m-ATX and ATX. Along with this compatibility, the Optimus also offers three wire management holes and a few places to tie wiring down. Keeping with current trends in cases, Sentey also offers a large CPU access hole for replacing back plates without having to remove the board.
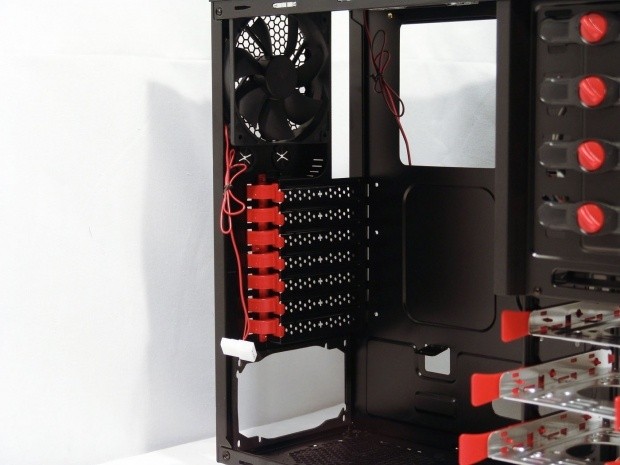
The plain black 120mm exhaust fan gets powered with a 4-pin Molex connection is installed in the rear of the chassis just above the business end of the tool-less expansion card locks.
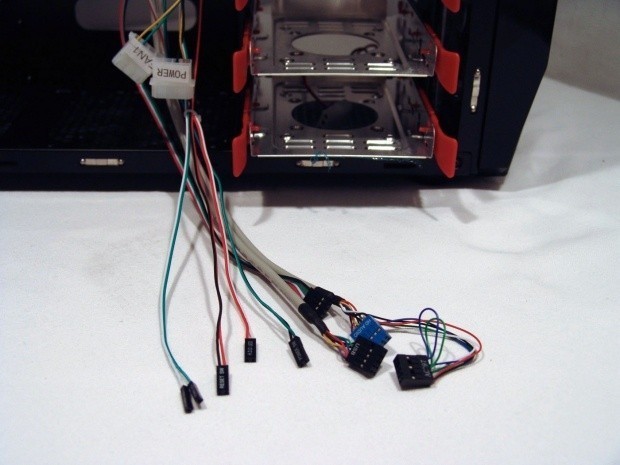
The included wiring consists of labeled Molex connectors for use with the front LEDs and fan controller. From the front I/O panel, you get the HDD activity, power, reset, and power LED connections, You will also find a connection for the card reader, a USB 2.0 connection, and the front panel audio connector.
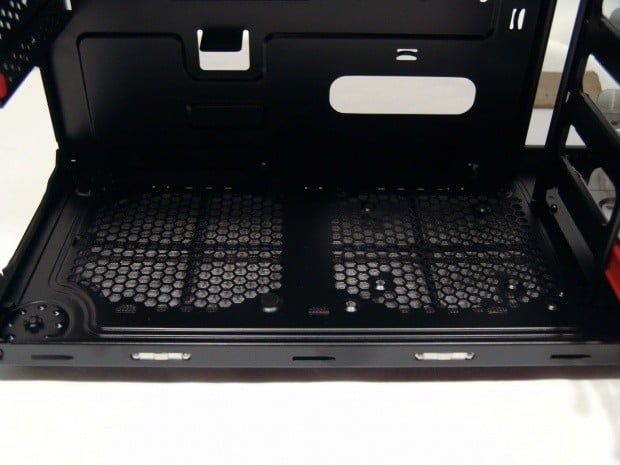
Looking at the floor inside of the Optimus you can see that the floor has little pads to support the power supply, and they even placed a foam washer where the PSU screws into the chassis to work together to keep out any vibrations it may cause. In front of the PSU, there is not only holes to mount a 120mm fan, but if the power supply is a bit longer, they also offer 80mm fan holes so you can still have options.
Under the top of the chassis Sentey has sent this case with a 140mm, seven blade fan. The top of the chassis is removable, and this allows you to be able to move this fan if it blocks your cooler from fitting, or to add a second fan for better ventilation out the top of the chassis.
Around the back I found the 4-pin Molex that powers the intake fan along with another power cable for the front bezel lighting. While there are holes for wiring, there isn't enough room for the 24-pin wiring to be placed back here without a huge hassle replacing the side panel when the build is complete.
Accessories and Documentation
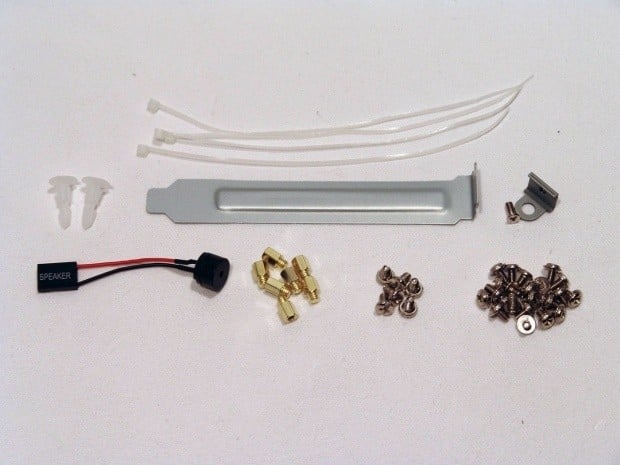
In the bag that was tied to the optical bays you will locate all the included hardware. A set of four wire ties tops the image. This is followed by what I assume are fan mounting pins (the instructions don't show them), an expansion slot cover, and a security loop for the door of the chassis with the accompanying screw. The bottom row consists of a motherboard speaker, seven risers (nine would have been nice), six larger thread screws for the power supply, and twenty smaller screws for mounting the motherboard and drives.
When installing a 3.5" drive, you need to pull the tray s out fully and remove the red slides on the side. Once the drive is in the tray, you can reinstall the red slides and they lock the drive into place. You are now ready to slide it back in the chassis. To place in a 2.5" drive, simply turn this tray over and use the supplied screws to mount the drive directly to the floor of the tray.
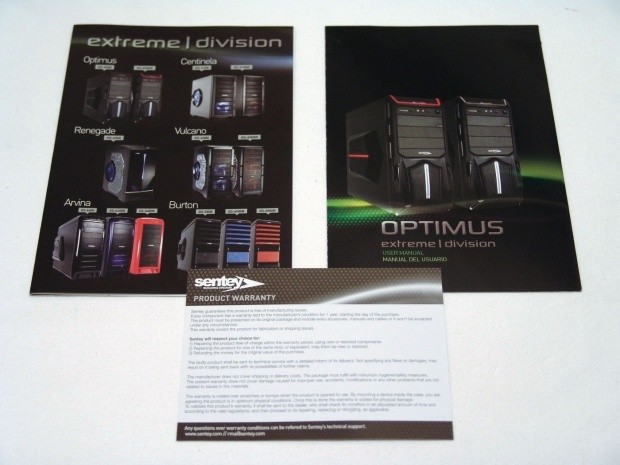
As far as reading materials go, Sentey ships a product catalog, the instruction booklet, and a card pertaining to the one year warranty. The instructions are very simply written and do leave a bit to be desired. For instance, telling me for sure what to use the plastic push pins for. Other than that they do offer some nice renderings of an exploded view of the Optimus along with smaller illustrations pertaining to each group of text.
The Build and Finished Product
Getting things underway I had to remove the front bezel to install the optical drive. All of the front I/o wiring is attached to the bezel so make sure to take care of this early in the build. After you get the wiring clean and tidy, it makes removal of this panel much tougher. The inside of the bezel does offer thin foam dust covers to back the optical bay covers as well as to line the back of the intake. These can be removed and washed as needed.
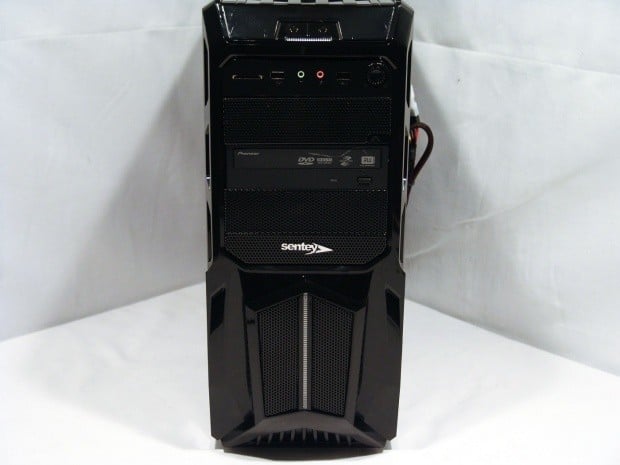
With everything installed and ready to run, you can see the front of the chassis doesn't take on any drastic change in appearance. While they do offer a stealth cover for the top slot, had I used it there would be no point to showing off the front of the Optimus at this stage. What I will point out is that even with a DVD drive with a ton of writing on it, it doesn't detract from the sleek and shiny design.
With everything in place inside the Optimus, I ran into just one small issue. Due to the card I chose to install, the top lock won't go into the locked position due to the plate that runs along the PCB interfering with the lock itself. Due to some personal hard drive issues I had to use a IDE drive for this build. At this point I left the cable off not to detract from the finished product. The rest of the wiring gets where it needs to be, and still offers enough length to clean them up and not leave a mess inside.
The hole for the rear I/O plate is a perfect fit, and I really liked the foam padding in the PSU installation area. What I wasn't too fond of, is that my VGA has to left hanging a little loose, and as you can see it allows the card to lean heavily to the right side. I know this is a card specific issue, and many standard cards will fit, but it is something to keep in mind.
Since powering the test system is pretty straight forward I ran most of the power wiring on the other side. While the 8-pin CPU power line may have fit here versus across the motherboard, there is not a hole at the top to get it to the motherboard, so that was out. The 24-pin wouldn't fit, so that left me just needing to power a couple of fans and make sure the front panel has its power as well. I would have liked it more if the trays weren't blocked at this end for the hard drives. It would make for a cleaner install if the SATA cables and power leads were in the back of the chassis.
At this point I plugged in the hard drive and powered the unit on. To my dismay I had yet to install an OS on the drive, so I didn't get the activity light at boot. But I did test it later and I assure you the strip just under the power and reset does coincide with the activity of the hard drive. The rest of the chassis will either glow blue LEDs through the door panel or through the front ventilation. Accenting both of the LED fans the white strip that runs down the center of the intake is now glowing with blue LEDs as well.
Final Thoughts
During my time with the Sentey Optimus GS-6000, I have to say I am left very pleased. While there are a few things that I would personally change, I feel that for the price point, this offers almost everything you could want. Not only is the case stylish and has a very attractive shiny look to it, it offers a ton of features and includes four fans in the purchase. To take this chassis where other cases don't cut it, the Optimus not only covers tool-less components and dust filters, but adds a card reader and a fan controller to take things just one step further and offer benefits to buyers long time use. While the fan controller is nice to have to be able to tone down the fan speeds, there is really little need for it in my opinion. Sentey did a fine job of mixing good air flow with very little noise with all the fans at full power. Compared to some of the vacuum cleaners I have tested before this, I found the noise level is very acceptable out of the box.
So what would I change? Well, I would work on a slightly better locking system for the expansion cards. Reason being is that not all cards are built to an exact specification. Various coolers and covers that come on not only VGAs, but also sound cards, can potentially have issues with this locking system. I would have liked to see more room behind the motherboard tray. I mean unless you have a PSU with flat wires, you are going to have a tough time wiring things behind the tray. The last thing isn't a change really, more of an addition to the package I would have really appreciated. Due to the super shiny finish of the plastic as well as the paint, finger prints are a huge issue. I would have liked to see a swatch of the cloth that accompanied the Arvina.
Even with two small issues, I am left with a feeling that this chassis has everything that a case buyer would want. It has great looks and flask with the finishing. It also has LEDs which a lot of buyers like. On top of this, it has a full on set of easy to use features inside and out. What really takes this chassis over the top for me is that is can offer you all of this for slightly less than $60 prior to shipping. I know supplies are somewhat limited, but for the $59.99 at Newegg.com the Sentey Optimus is a steal. Don't forget, a bit of digging can lead you to an additional $10 off as long as the sale continues.

 PCCooler CPS RZ820 Display Review: a flagship-level CPU air cooler with an LCD screen
 MOAIPLAY ORA PRO G1 850W ATX 3.1 PSU Review: high efficiency and 10-year warranty for $119.99
 NZXT H6 RGB+ Compact Dual-Chamber Chassis Review
 Lian Li HYDROSHIFT II 360P OLED Curved Liquid CPU Cooler Review
 ID-Cooling FROZN A620 SLK CPU Cooler Review
 Intel is bringing Raptor Lake Next to gaming laptops with DDR4 support and up to 24 cores
 FSR 4.1 support for RX 7000 GPUs arrives ahead of schedule with new Adrenalin driver update
 Game dev with close ties to Xbox gives brutal review of Game Pass, says 'mediocre content' was 'slopped out'
 Steam Machine priced at $1049, Valve officially confirms
 Ubisoft co-founder Claude Guillemot killed in tragic plane crash
 The Legend of Zelda: Ocarina of Time fan remake for PC no longer in development
 Epic Games Store is being rebuilt to deliver up to 6.5X faster performance
 Anthropic says blocking China from Claude cost it hundreds of millions
 Microsoft adds 'Xbox Handheld' as new platform for Xbox, joining consoles and PC
 Diablo IV and Lord of Hatred DLC soft confirmed for the Nintendo Switch 2
 Speed Racer (2008) 4K Ultra HD Blu-ray Review: a stunning remaster of the cult classic
 Navman MiVue Smart True 4K Surround Dashcam Review - Seeing In All Directions At Once
 IQUNIX Magi96 Pro Aluminum Low Profile Mechanical Keyboard Review - Premium Build, Satisfying Sound
 Asetek Forte S-Series Racing Simulator Bundle Review
 Razer Pro Type Ergo Wireless Split Ergonomic Keyboard Review - Built for Comfort and Support
 ASUS ROG Strix Morph 96 Wireless Gaming Keyboard Review - Great Performance, More Affordable
 SAPPHIRE Radeon RX 9070 GRE PULSE OC Review - A New 1440p Challenger Has Arrived
 I stopped Windows 11 notifications from interrupting me with Do Not Disturb, Focus, and a priority list
 I read the Windows Backup app screen carefully, and it does not back up what most people think
 Low Sound Volume on Windows 11? How to fix audio issues and restore normal volume
 8 Critical Warning Signs You Should Never Ignore in Windows 11
 This Windows security feature protects Documents from ransomware, but it is off by default
 Windows 11 already has a voice typing tool, and it is the one most people are not using
 Quick Assist is the only remote-support tool I open when a relative calls about their PC
 The PowerToys utilities I keep enabled on every Windows 11 PC, and the ones I turned off within a week
 TweakTown's Best of Computex 2026 Awards - The Best Hardware, Gaming Gear, and AI