Introduction to Overclocking and The Flow Chart
Overclocking Coffee Lake
Overclocking is a way to get more performance out of your computer's hardware components. There are three major hardware components that can be overclocked; the CPU, DRAM, and GPU. Today you will get a quick guide on how to get started tuning your CPU to its maximum, and the good news is that the new Coffee Lake 8th Generation CPUs are actually very similar to Intel's 6th Generation CPUs. While Kaby Lake (7th Generation) CPUs were basically Skylake (6th Generation) CPUs, but with a better process (14nm+) and higher clocks, Coffee Lake (8th Generation) adds more cores and minor process improvements (14nm++).
When you add cores you also increase the chance of one core not overclocking to higher levels, and it only takes one core to decrease highest all-core overclock, and that is where the process improvements help. The process improvements allow the new 8th Generation chips overclock as high as their 7th Generation counterparts. You can expect a 4.9GHz overclock for pretty much all chips with an all-in-one watercooling cooler, and higher if you de-lid your CPU. The good news is that if you have overclocked Skylake or Kaby Lake CPUs, then overclocking Coffee Lake is going to be very familiar.
The Flow Chart
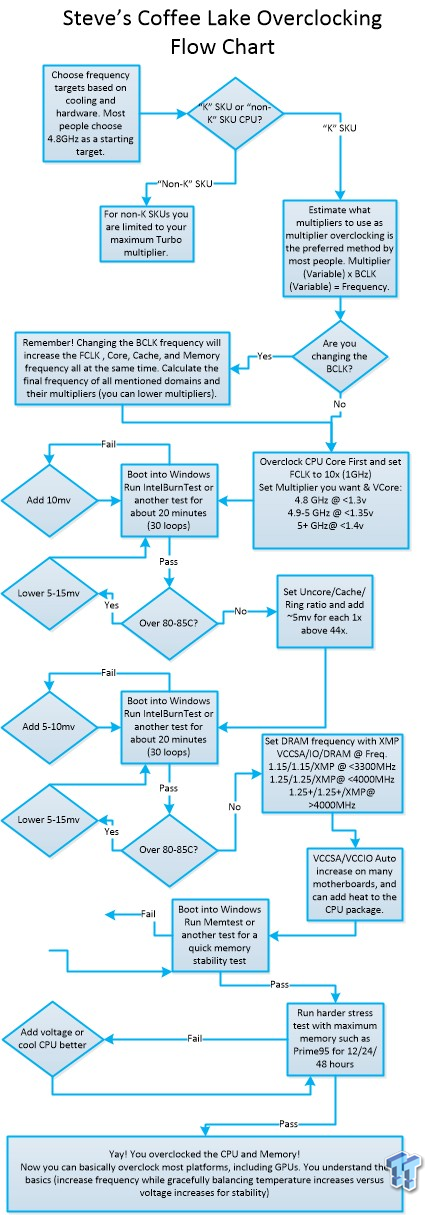
There are differences between the chart here and the one designed in our Skylake Overclocking Guide. For starters, the new CPUs do consume a bit more power, but they also can take a few more millivolts and maintain the same temperatures. Our starting voltages have increased a bit. No vendor has found a way to overclock non-K SKUs with BCLK. So, we are focusing much more on multiplier overclocking since it's more straightforward and there is basically no need for BCLK overclocking for the majority of people.
The basics of overclocking have not changed, you increase multipliers, and then increase voltages to help maintain stability. You hit a wall when your temperatures go over 80C under stress testing, which means you cannot add more voltage unless you increase cooling, so you can't add another multiplier and remain stable.
Our starting points have changed as well; you should start at 4.8-4.9GHz, as most CPUs can do that with ease at 1.3v or less. Our CPU was only able to hit 4.9GHz stable in most cases, but six cores at 4.9GHz with a reasonable VCore is better for our CPU than pumping it up with 0.5v more and pushing temperatures past our comfort zone.
Disclaimer and Before You Begin Overclocking
Disclaimer Overclocking your CPU technically voids your warranty. However, if you want to overclock and still be covered, Intel does provide an aftermarket overclocking warranty for about $50 located here: (PTPP).
Overclocking can also damage your CPU, especially if done incorrectly. This guide is about how to overclock, but doesn't take responsibility for damages that could occur; you bare sole responsibility for any damages that may arise. The price of the PTPP has also increased from $30 for the 6700K and 7700K to $50 for the 8700K. The price has also increased $15 for the 8600K, and will cost you $40 if you want to warranty that CPU with a onetime no-questions replacement of the CPU.
Have you Overclocked Before?
If you have overclocked before and understand hardware selection and the basics of overclocking, you should skip to the next page. The first part of this guide is for those who want to know what to do before overclocking.
Where do I start?
Coffee Lake Overclocking Guide Systems
CPU: You will need a "K-SKU" CPU such as the 8700K, 8600K, or 8350K.
Motherboard: You need a Z370 chipset motherboard, preferably with a decent VRM. Each of our Z370 motherboard reviews details the VRM to the component level and offers thermal imaging of VRM performance. If a motherboard has a great VRM, it will be mentioned on the conclusion page. As the backbone of the system, the motherboard is the component that sets overclocking settings for the CPU and DRAM; it's also what powers both.
Motherboards also offer overclocking features and determine how well the connection between the CPU and DRAM operates. Power delivery is one reason Intel is requiring the new Z370 chipset, but not all Z370 motherboards have VRMs capable of providing a solid overclock. Don't cheap out on the motherboard if you want to reach maximum CPU and DRAM overclocking potential.
DRAM: Intel and motherboard vendors have greatly improved DDR4 compatibility and speed potential, at least compared to Skylake. While we still recommend buying a kit off your motherboard's Qualified Vendors List (QVL), up to 3600MHz is a good target for easy stability.
You don't need RAM that fast, but if you can afford it, you shouldn't have a problem getting it to run at full speed. Four sticks are harder to overclock than two, and if you get a four stick kit, you can't expect more than 3200MHz with ease (especially if it's a 64GB kit). You can find your QVL in the support section of your motherboard vendor's website or inside the manual (if differs by brand).
Cooler: High-end aircoolers are recommended, but most people get all-in-one watercooling coolers since they offer the best of all worlds. They are easy to install, safe, and perform well. Your cooling is your ultimate limitation on your overclock when you are at above-ambient temperatures, so don't cheap out on a cooler.
PSU: I would leave about 200-250W aside for a nice overclock on an 8700K.
You enter the BIOS/UEFI by hitting delete or F2 (on most boards) during boot up. For most boards you have basic and advanced modes, I always skip to the advanced mode and tend to navigate with the keyboard. To enter a setting you either type (or delete and then type), use +/- keys, or you click and scroll. Then you have to "Save & Exit" the BIOS/UEFI for the settings to apply (typically F10 key).
CPU Multipliers and Voltages
CPU Multipliers
There are a few multipliers you need to set when you overclock the CPU. You have multiple settings including CPU core, AVX offset, FCLK, and Cache/Uncore multipliers. While many vendors deviate from Intel's official setting names, we have gone ahead and provided what each setting is called in different UEFIs. All multipliers are multiplied by the base clock (BCLK) to attain a final operating frequency. By default the BCLK is 100MHz, but you can also increase BCLK to overclock the CPU, but you should recognize that increasing the BCLK will increase CPU, cache, FCLK, and memory speeds at the same time.

However, before we begin a few vendors have a setting that allows you to overclock all cores to maximum Turbo frequency (4.4Ghz on 8700K) instead of Intel's specification where cores are staggered between base and maximum frequency. The feature is called MultiCore Enhancement, and is a simple and easy way to overclock without having to mess with many settings. It is an easy way out, but you don't need to mess with it when you are overclocking manually.

Some vendors allow you to choose the core setting mode, such as the ability to sync all cores or set the cores individually. Start with 48x or 49x; I prefer using the sync all cores setting if there is one. On the SuperMicro motherboard, you can set core six setting to what you want the rest of the cores to be at if you don't want to set each core individually. On ASUS, the board will auto-change to sync all cores if you set XMP to enable as it's enabling multi-core enhancement all the way.

While most games and other software don't use Intel's AVX instruction set, many stability testing programs and some software programs do. AVX uses parts of the CPU typically not used and as such will greatly increase power consumption, temperatures, and it could require more voltage to remain stable.
Intel has added in an AVX Offset setting, which allows you to set a number of multipliers for the CPU core to drop down to if AVX is engaged. For example, if you set 50x for the Core ratio and -2 or 2 for the AVX offset, you will get a 5GHz overclock while playing games (no AVX) and 4.8GHz when running HandBrake (AVX). MSI lets you set a frequency for the CPU to shift to instead of a number of multipliers to go down when AVX is enabled.

The CPU cache, ring, and uncore all change the same setting in the CPU. The ratio mainly changes the cache speed, and some vendors have this turned up to 4.4GHz by default. While you won't be able to match the CPU core multiplier most of the time, you should be able to stay 4-6 multipliers below the CPU core multiplier without requiring too much extra voltage.
I would start with 4.2-4.4GHz cache ratio, overclock the CPU up to it's maximum and then go back and find a cache multiplier that doesn't require more VCore to stay stable. I should mention that VCore also provides power to the cache region and isn't a separate voltage rail like it was in the past. Some vendors allow you to set a minimum and maximum ratio for the cache, I typically just set them the same, but you can set a range if you like.
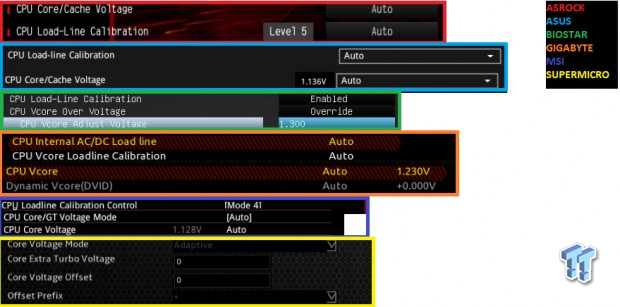
VCore is your main voltage for stabilizing the CPU core and cache overclocks. Every vendor offers the ability to set the VCore to override mode, and it's the default on a few brands (like GIGABYTE)., otherwise you have to choose. There are two other modes on most motherboards; adaptive and offset.
If you run your CPU at maximum speed all the time, then override is what you want, but if you are going to let the CPU multiplier go up and down according to load, then you will want to set adaptive or offset mode. I will go over CPU multiplier dropping on the next page. The adaptive mode allows you to set a VCore you want as maximum and will drop down the VCore if the multiplier drops.
The offset mode allows you to set some millivolts to be added or subtracted to the CPU's default VCore for each multiplier. The new CPUs have different VCore levels for each multiplier (called VID), and every CPU has its individual default voltage levels. By default, Intel specification requires the VCore to drop by a certain amount when load and multiplier are increased.
Load Line Calibration (LLC) reduces or reverses this default voltage drop, and it helps a lot when you are trying to stabilize the CPU. If you want to set offset on a GIGABYTE motherboard, you need to type "normal" to unlock offset mode (offset is called DVID in their UEFI). Many motherboards will auto increase VCore beyond Intel specifications based on "auto-rules", so it's best to always set VCore, try 1.28-1.3v when at around 4.9GHz.

By default, motherboards should set FCLK to a multiplier of x8 (800MHz), but many vendors have set 1GHz by default. If your motherboard has it set at x8/800MHz, you should go and increase it to 1x or 1GHz, as it could help GPU performance slightly. FCLK typically doesn't produce instability when increased.
Power Settings and DRAM Overclocking
Power Saving Settings
Intel has two power saving mechanisms; Enhanced Intel Speed Step (EIST or Speed Step) and Intel C-States. If you want your CPU to drop its multiplier down when it's not being loaded to save power, don't disable any of these settings and leave your Windows Power Plan to balanced.
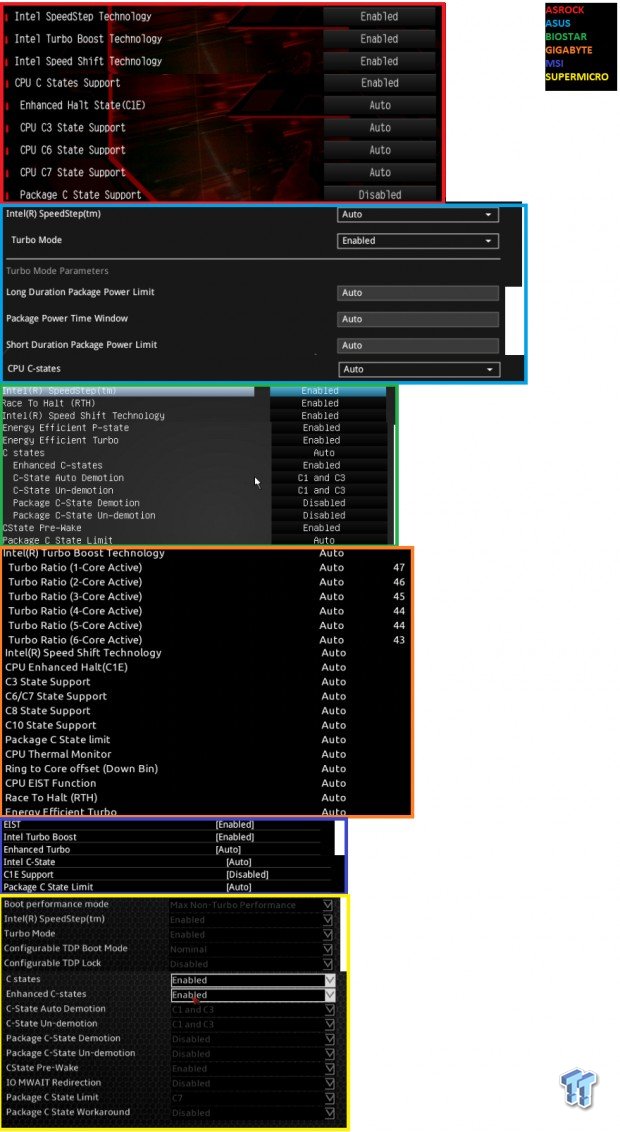
If you do want it to drop, you should also set your VCore to Adaptive or Offset mode, so it drops as well. MSI has an option (CPU Mode: Fixed or Dynamic) that will change the settings for you, but it's not hard to do on your own. If you want your CPU multiplier to stay at maximum at all times, on some boards all you have to do is set Windows Power Plan to High Performance, on others you also need to disable C-States.
EIST is part of how Turbo Mode works, which is how we are able to overclock, so on some boards if you disable it, you can't overclock the CPU. Window's High-Performance power plan and disabling C-States should allow you to run full speed all the time, but if it doesn't, you can also try disabling EIST (it depends on how the vendor has implemented the setting).
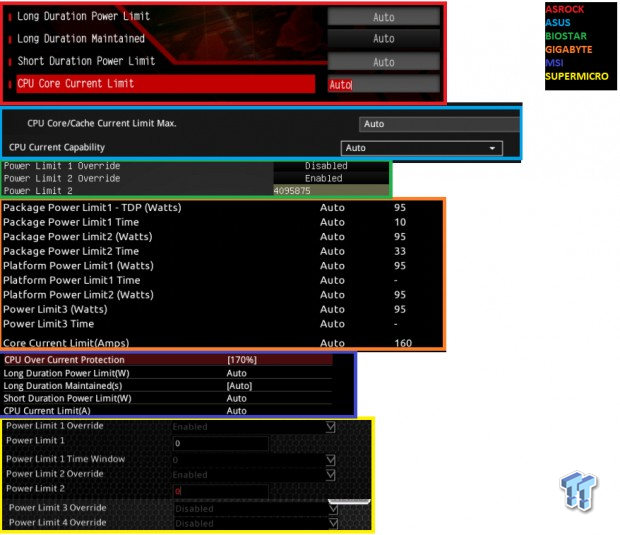
While we have power saving settings that we can manipulate, we also have power limitation settings that we might also need to increase. If performance isn't scaling (try running CINEBENCH every multiplier step to see if performance increases), power restrictions are probably to blame.
These power limits are set in place by default, and on some motherboards, these settings are automatically changed behind the scenes when you overclock, but not all. It is best to increase these limits. On SuperMicro motherboards, setting "0" will maximize the power limit. These settings are found in multiple places in most UEFIs (I mashed them up in the image above); check advanced PWM features, CPU configuration (sometimes not on the OC page), voltage, and CPU overclocking menus.
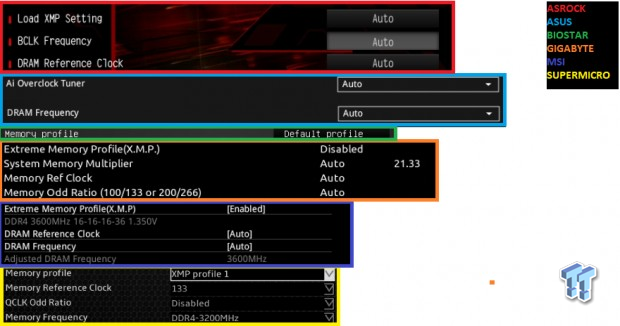
The easiest way to overclock memory is by enabling Intel's Extreme Memory Profile (XMP). It will take your kit to the level it's designed for and is pretty easy to stabilize. You can also manually set the DRAM multiplier and change between 1.00x and 1.33x reference clock multipliers to expand the granularity of memory speed settings (so memory speed can be set in 100MHZ and 133MHz increments; i.e. 2600MHz, 2666MHz, 2800MHz, 2933MHz).
If you manually set the multiplier, you must also manually set DRAM timings and voltage, as XMP sets those for you. Memory timings are a bit more difficult to conquer as there are so many of them, but you can mess around with the primary timings (like CAS latency). Some motherboards like ASUS's ROG boards also have built-in memory overclocking profiles made by their extreme overclockers.
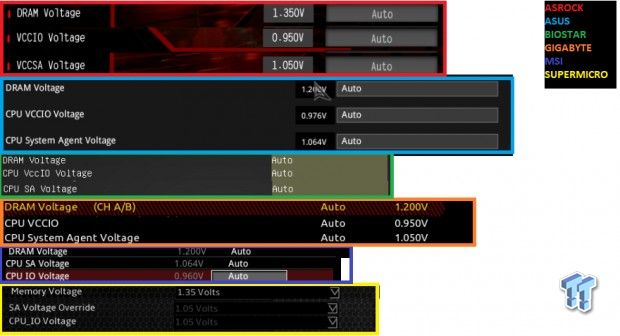
There are three main voltages for overclocking DRAM. DRAM voltage is the voltage that the DRAM is fed, and on most motherboards when you set XMP, the motherboard will automatically increase DRAM voltage. Some motherboards also have auto-rules for two other voltages, System Agent (VCCSA) and System IO (VCCIO).
These two voltages can be set up to 1.3-1.35v, but I would start with around 1.2v on both of these if default voltage levels don't work for your memory overclock or if they work and the auto rules took them too high. Be careful; some motherboards have auto-rules that will increase both VCCIO and VCCSA to 1.3-1.35v by default, essentially maximizing them but also increasing temperatures and power consumption. On those motherboards you can try setting them a bit lower.
Intel Max Voltages and Stability Testing
Apart from disabling parts/features of the CPU that are unneeded to help stabilize your overclock (VT-d, iGPU, etc.), there are only two things you can do to help stabilize higher clocks. The first is to raise voltages, and the second is to improve cooling. Improving cooling is always good, the lower you go, the more headroom you have to add voltage, and you might even find you can reduce voltages to maintain the same overclock if the CPU is made colder.
Improving cooling is difficult and costs money, but increasing voltages is free. You can delid your CPU, use a custom water cooling loop, change thermal interface material, and even go sub-zero. While increasing voltages is free, it's also a double-edged sword. Increasing voltages increases temperatures. You might find that reducing voltages lowers CPU temperature enough, so something like 1.3v could be stable while 1.4v would cause instability at the same frequency because of the added heat. Below we have a list of Intel's recommended maximum operating voltages per their 8th Generation Core Datasheet.
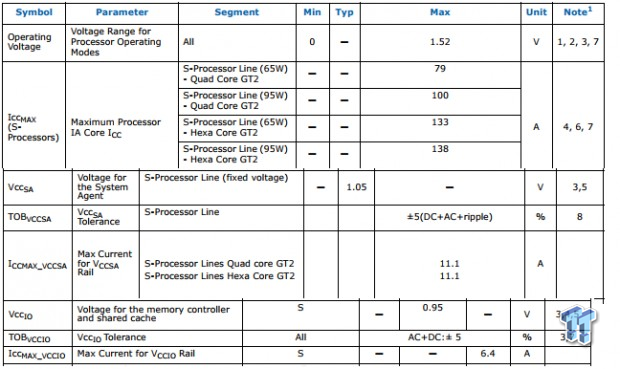
Intel recommends a maximum operating voltage of 1.52v VCore, but that's just way too high. I don't know of any watercooler that could cool down a CPU being fed 1.52v, but of course, that figure from Intel doesn't account for LLC since it's not part of Intel default specifications. I recommend 1.45v as maximum VCore with non-subzero cooling, but that doesn't matter since you will probably hit a thermal limit before you hit that voltage limit.
The VCCSA (System Agent) is 1.05v stock, and the VCCIO (System IO) is rated 0.95v stock. I recommend no more than 1.35v on either of these. I honestly wouldn't run much more than 1.25v for 24/7 use. If you hit an issue with DRAM overclocking, try many different levels from 1.1 to 1.35v. I have seen memory controllers that don't like anything over 1.25v, so try increasing VCCSA first and then VCCIO, and it's fine if they are different levels.
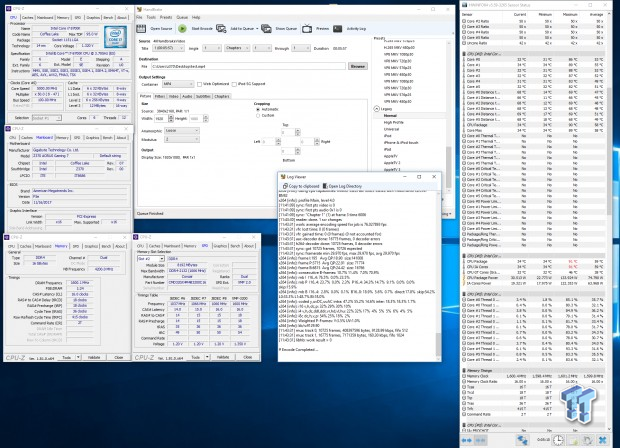
Now, if you remember the flow chart from the first page, I have intermediate stress tests placed after each stage and then a hefty test at the end. That is because stress testing can take days at a time, some people will not call a system "stable" unless it can withstand two days of Prime95 with AVX. I recommend finding a stress testing program that can be run in minutes to an hour, and then when you have tuned all your knobs, then run something like Prime95 for a day or two.
I mainly use three stability testing programs; HandBrake encoding of a 4K video (very quick but shows performance and uses AVX), Intel Burn Test with a decent chunk of memory usage (has AVX and can be run however long you like), and Prime95 blend one day and small FFTs for another (latest version with AVX). Now, there are many out there who still use older versions of Prime95, mainly because older versions didn't utilize the AVX. If AVX is crashing your system because it is overly intensive, you should use an AVX offset, that is what it is there for. However, if you do that you should also use an older version of Prime95 or another stress test without AVX so that you can also test out your maximum multiplier.
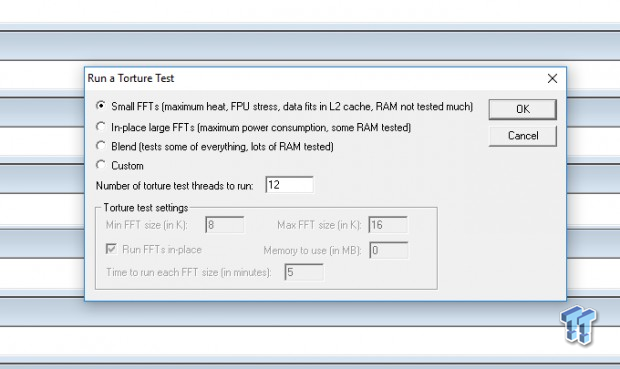
Prime95 has a few different tests you can run. The default test is a blend test, which tests most everything, but isn't going to demolish CPU core instabilities as Small FFTs would. There is some documentation on how to disable AVX use within Prime95 by adding in a string in the local.text file created when the program runs, but from my testing, that method didn't work. Many people also use RealBench for hardcore testing. AIDA64 also has a built-in test, and you can choose what you test (core, FPU, etc.) but I would increase the amount of RAM used in that test as the default value is a bit low. AIDA64 is considered a "safe" test by many, as it's not designed to beat your CPU up, but many believe you can't become a man until you get a really good beating.
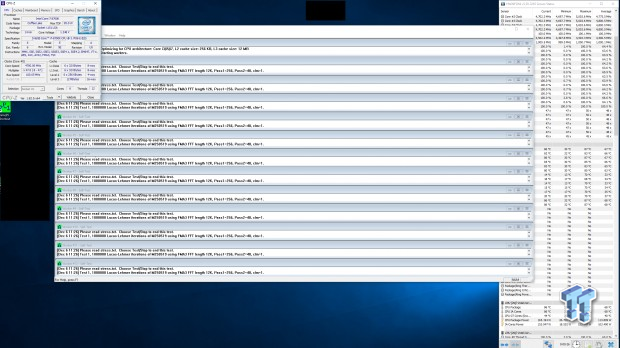
When you run Prime95 keep an eye on temperatures, as you can see I am in the danger zone (80-90C) already with only 1.25v and 4.7GHz (5GHz with -3 AVX offset). You can also see my frequency numbers in the upper right corner, showing that maximum was 5GHz, but current is 4.7GHz. All in all, overclocking is part art and part science. There are rules to follow, guidelines to abide by, and mechanisms with fixed results. However, there is also a lot of uncertainty, as you hear stories of people who pass a day or two of Prime95 but crash after 5 minutes in a game.
Stability testing does help a lot, but there is a reason enterprise-class hardware is usually overclocking locked. Intel and AMD spend a lot of money on making sure their products are rock solid at default, and the truth is if they could get an extra 500MHz out of it, they would and charge more for it as well. Overclocking, when done right, provides immense benefits and is a lot of fun, but in the end don't get your hopes up if you can't hit that 5GHz mark. It's very difficult, and 4.9GHz won't be much worse. Overall, overclocking Coffee Lake CPUs is strightforward and pretty easy. If you have any questions or comments please contact us or post in the comments.

 United
States: Find other tech and computer products like this
over at
  United
Kingdom: Find other tech and computer products like this
over at
  Australia:
Find other tech and computer products like this over at
  Canada:
Find other tech and computer products like this over at
  Deutschland:
Finde andere Technik- und Computerprodukte wie dieses auf