Introduction
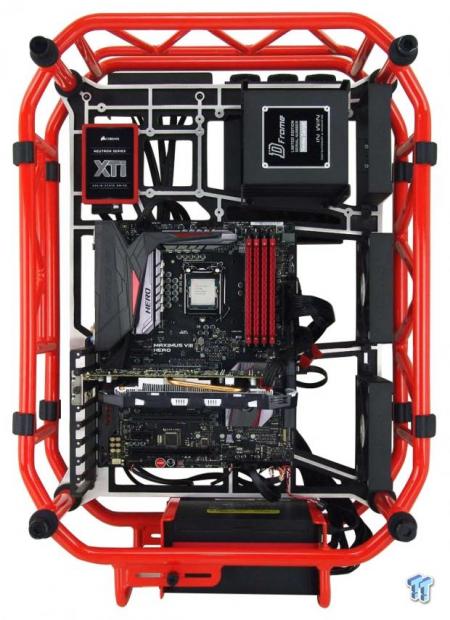
The time has come for yet another system upgrade in which we will bench CPU coolers for the next couple of years. With Intel Kaby Lake just around the corner, we would have loved to wait it out and get the latest and greatest of processors to run with this system, but due to degradation to our older system, we are no longer able to keep the system stable with the voltages we had used in the past. The ASUS Z97 Sabertooth and the Intel Core i7 4770K have been troopers for us.
They allowed us to bring you over ninety coolers and rate them according to thermal characteristics as well as delivering audio results. This way consumers are well informed in purchasing one of the multitudes of options out there to cool your CPU of choice.
You will soon see that not only has our system changed but so has our methodology. Where we feel we have failed the customers in the past was in our control of the fan voltage. Where most users buy a cooler, plug it into the fan header, and tend to use the PWM fan curve of the fan included with the cooler, we feel we were taking the effort of the cooler manufacturers out of the equation. This has led us to not only change our testing methodology, but it also means we will be delivering six charts now rather than four, to compare all CPU coolers as they are intended to run.
The concept of this article is to offer our readers a comprehensive version of all factors that went into our CPU cooler test rig, the software we choose to use, and a step-by-step of how to repeat our results, should you have access to the same components. With minimal help from vendors, and a ton of support from TweakTown's owner, we can not only update our test system into more appropriate gear, but at the same time, we feel that we are covering all the angles now.
We can now deliver more accurate results, in a real-world fashion, not mucking about imposing our settings on them.
Test System Components
The Components
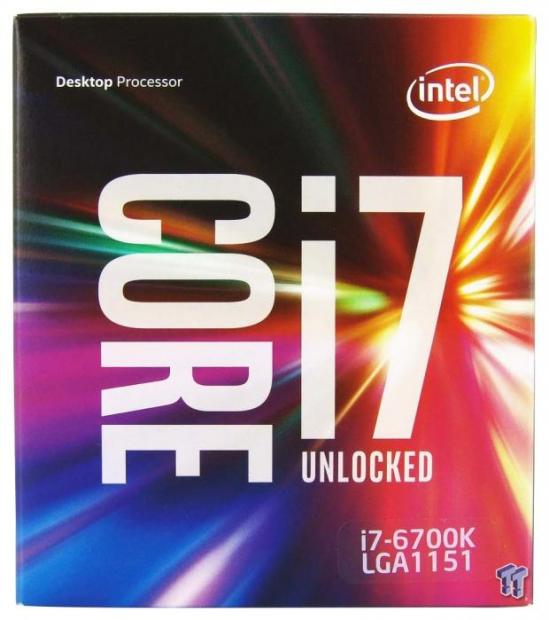
The most important component of a CPU cooler test rig has to be the CPU. In this system, we have opted for the mainstream CPU of choice these days and went with the Intel i7 6700K LGA-1151 processor. This CPU was obtained through standard retail channels, and we are playing the same silicon lottery everyone else is. This CPU is not a cherry-picked product, nor was it binned to get something special, it is an average CPU that anyone would get.
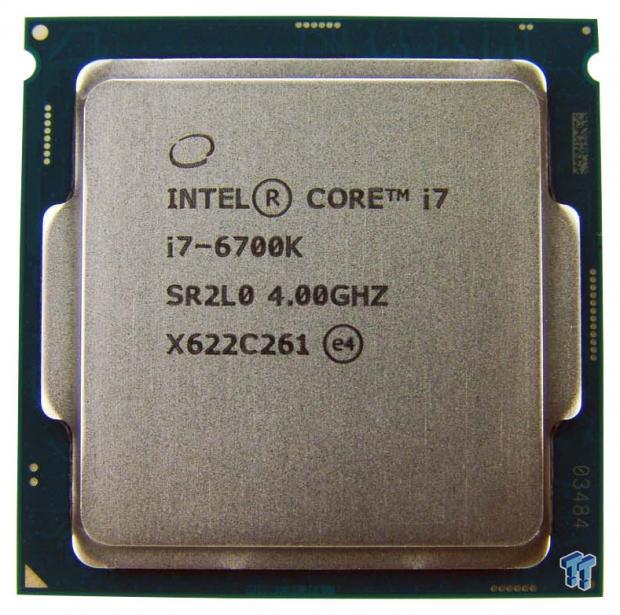
In case you wanted to see the HIS and marking associated with it, we provide you with this image as well. You can see the bin if you feel it still has some bearing on a good clocking chip or not, but the point here is to show we have a regular CPU; no lapping was done, nor have we de-lidded it. We use it as it arrived, as Intel intends.
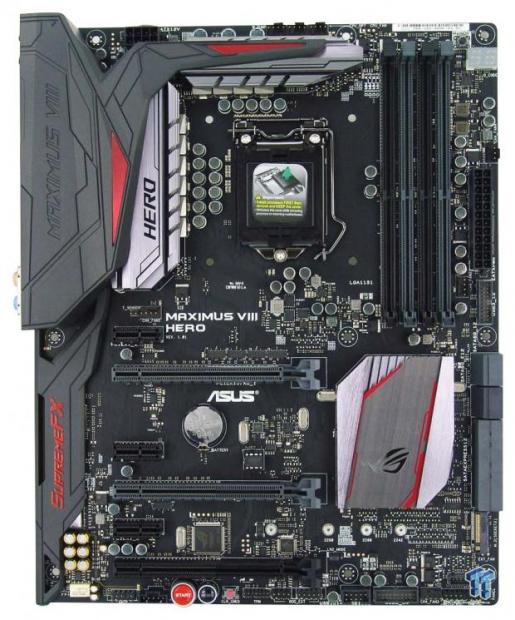
While we would have loved to use the ASUS Maximus VIII Extreme, the cost is prohibitive for it to be considered mainstream. We opted to use the ASUS Maximus VIII Hero instead. With a much better price point and a comprehensive BIOS layout with plenty of options for our needs, this Intel Z170 motherboard will do just fine for our needs.
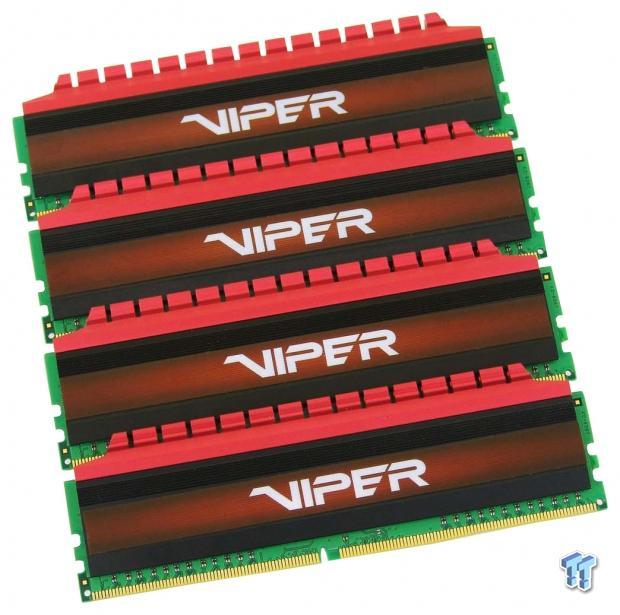
Rather than opting for just two RAM sticks as we have in the past, we realize many are populating all of the DIMM slots these days, so we figured it best to follow suit. We have chosen the Patriot Viper 4, the PV416G300C16QK sticks to be exact, for a couple of reasons. First off, 3000MHz is easily attained on most 6700K CPUs but is not so extreme that we have too much stress on the IMC, skewing CPU temperatures.
The second reason we chose this kit is that they match the motherboard well and have removable tops. This way, if needed, we can still populate the slot nearest the CPU cooler, but stay under the cooler, as long as the coolers are designed to allow it.
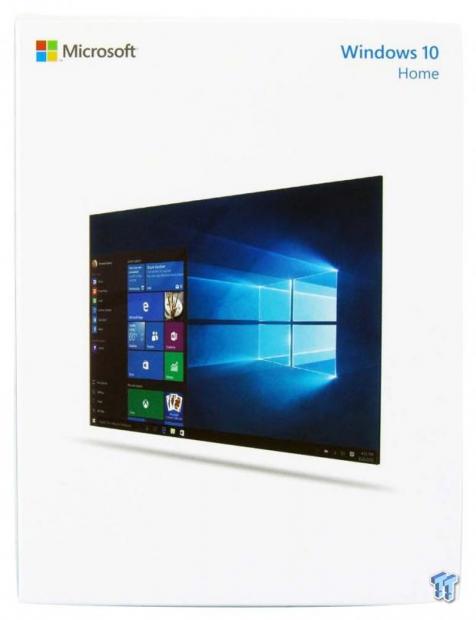
We also move from Windows 7 of our last system to Windows 10 this time around. For our needs, Windows 10 Home has everything we need in an OS, and we will be using this in 64-bit, not 32-bit. As for the install itself, no changes are made to the way it works, but we have disabled a few things like Cortana and other "features" along these lines which Microsoft thinks we cannot live without.
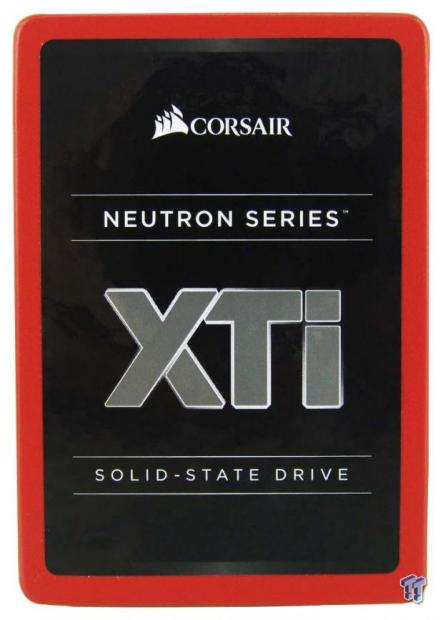
To house the OS, we opted for the 480GB Corsair Neutron XTi. If for nothing else, it matches the red and black theme of both the motherboard and the open air chassis we use with our system.
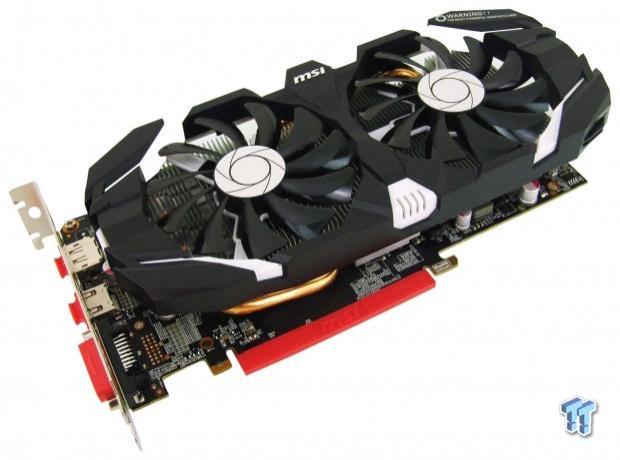
Even though we do not need much as far as GPU power is concerned, we were pleased to accept this gift from MSI. What you are looking at is the MSI GeForce GTX 1060 6GB OC video card. Again, we chose this sample due to the dual fan layout and its silence in operation when the fan curve is adjusted slightly. This way we can take audio readings and not have the video card causing issues with "silent" CPU coolers.
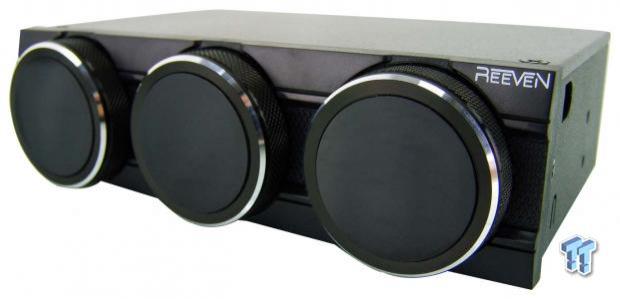
Just in case we find a need for one, we were sure to keep a fan controller in the rig. There may come something that requires supplemental power, but with the ASUS Maximus VIII Hero's fan header layout, we likely will never have the need for the Reeven Polariz RFC-04, but with its easy to adjust voltage and digital readout, it seemed the perfect candidate.
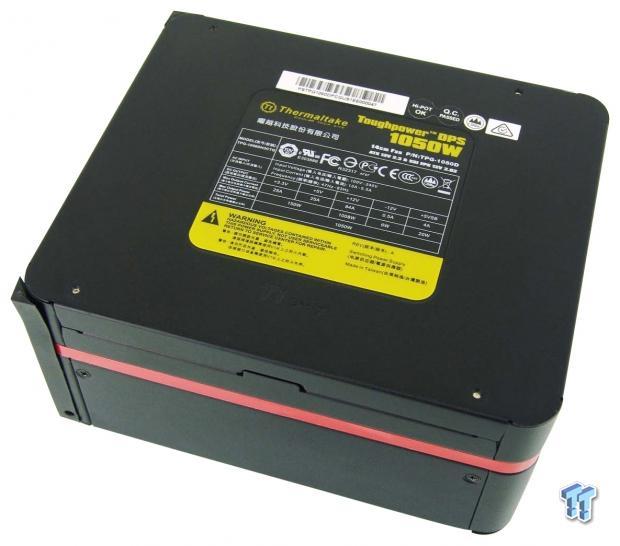
We also need a stable supply of power to this system, and while this PSU is overkill for our needs, we still chose this Thermaltake unit. The Toughpower DPS 1050W is nearly silent when drawing our load of power from it. The main reason we chose this unit is that it is silent as we draw load from it, and of course, the red accents play well into the build.
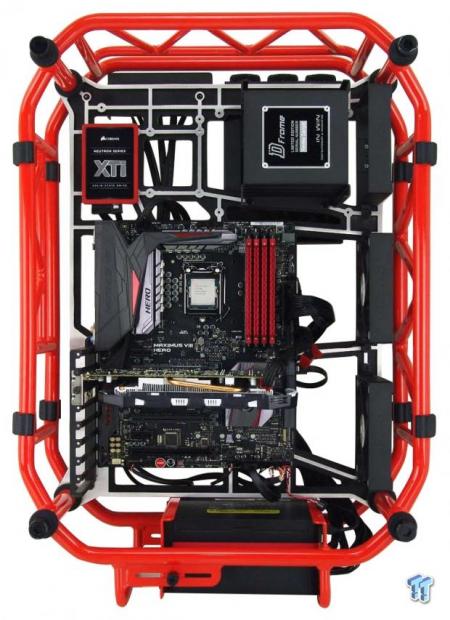
With everything in place inside of the INWIN D-Frame we used previously, you can now see why we stuck with all of that red. We like the open air chassis as it does not impose restrictions to the intake or the exhaust of the cooler, and we do not get heat buildup either. We do use a pair of Corsair CO-9050002-WW (AF120 Quiet Edition) fans to introduce some airflow toward the coolers. We continue using these from the old system as their 21dB noise rating makes sure they do not affect our audio results.
Software and Settings
The first bit of software we were sure to use was CPU-Z. As this is the most widely used software for gauging the CPU and memory parameters, we chose to stick with what works. We will be using version 1.77.0 64-bit for the duration of this system, as we do not believe in updating software when we have such a long time planned to keep the playing field as equal as possible. This way, a cooler tested today, and one a year or so from now, will all display the same voltages and settings. We also verified this works well with our system, and updates can also bring bugs which would skew results provided by this software.
The next bit of software we will be using is AIDA64. More specifically, we are using AIDA64 Engineer version 5.75.3900. We have tried using PRIME95, as well as OCCT, and we feel that AIDA64 is good for a few reasons. First of all, PRIME needs another software suite to produce any readings other than the test being ran. As for OCCT, it took the CPU thermally past reality at times and is not always repeatable in its results. Therefore, we opted for AIDA64, and due to the free versions of its suites, anyone can run the stress testing we use, as well as the settings used within the software.
The last suite we use for our testing is REALTEMP. We grabbed the latest build for our needs, and after calibrations runs, found it not only to match what we see in AIDA64, but it also keeps a lowest and highest temperature right there in plain view. When it comes to delivering our thermal results, we will be taking an average of the four cores highest temperatures during stress testing.
For audio results in our charts, we will be using a handheld sound level meter. Our meter is held a foot away from the rear of the CPU cooler, and whatever the reading on the meter, this is what we will be reporting in the charts. We also will be using the "dB" scale, which is standard decibels, versus the dB(A) scale cooler manufacturers use, which is an adjusted level, and for some is harder to associate with real-world sounds around them.
When it comes time to run our testing, we only open up a pair of CPU-Z windows, one of them on the CPU tab, and the other on the memory tab, just to ensure our CPU and memory are running as they should be, and to verify the CPU voltage applied in each test. We run one instance of REALTEMP, as it displays everything we need, right there in one window. As for AIDA64, we open the suite, click on the Computer icon, and click on the Sensor icon after that. This gives us a full display of temperatures from all readable sensors on the motherboard. This software also allows us to watch the fan speeds of all fans connected to the Maximus VII Hero. Lastly, we can also see all of our voltages in real-time, and even keep an eye on power draw all on one window.
When it comes time to stress the processor, we click on Tools along the top of the AIDA64 window and select the System Stability Test. This opens an additional window, and in this window we keep the Stress CPU, Stress FPU, Stress cache, and the Stress system memory boxes all checked. For our usage, we also remove the motherboard, CPU, and SSD temperatures from the graph, so that what we do see displayed is the four individual core results through the thirty-minute durations of our testing.
The last bits you will need to know about our testing environment, is that no matter the season or the time of day, we control both the ambient temperature as well as the humidity. Thermally, the testing room is kept between 23 and 24 degrees Celsius at all times, which stabilizes our results. As for our humidity levels, we are raising it to 50 percent this time around, as this is more common and healthier than keeping it at lower values as we did previously.
Stock Fan and Thermal Testing
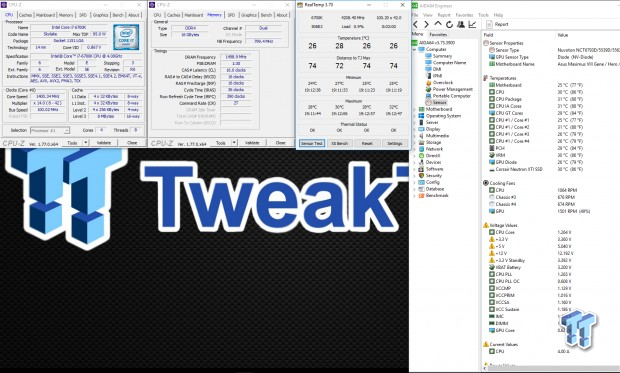
The charts in our reviews that say "Stock" in the header will be using the following parameters. For this testing, we use the system as many building a new system would. By this, we mean that we leave almost everything in the BIOS at default values. What we have done is gone into the BIOS, first applying optimized defaults, then rebooting and returning to the BIOS. The second stop in the BIOS is so we can set the XMP profile active on our memory, and at the same time, we verified that the fan profiles are all set to PWM control. We then made sure after another reboot, to return to the BIOS and save this profile to be certain things remain the same for every cooler we test, and it also makes our job a bit easier, swapping between profiles when the time comes to adjust settings for various tests.
As to the image you see above, this is what we start with. You see the processor is downclocking as it should at idle, as we used a balanced profile in Windows power management. While using the stock LGA1150 cooler for reference and basic stability testing, we can see that the CPU is only utilizing 0.867V at this time. The idle temperatures are slightly above our ambient room temperature, and AIDA64 on the right is displaying a ton of information, but more poignantly, we can see the CPU fan is spinning at 1064 RPM.
The thermal charts for "Stock" settings will display a loaded temperature, which is the average of all four cores of our 6700K, after 30 minutes of AIDA64 stress testing. During this 30 minute run, we keep an eye on the fan speeds, and once the speed has reached its maximum point of the testing, it is then that we grab the sound level meter and get our results for the audio results as well. Again, this is with PWM control enabled, allowing the manufacturers work to shine, and not crippling the fans and cooler performance with the 7.5V we used for this metric in the past.
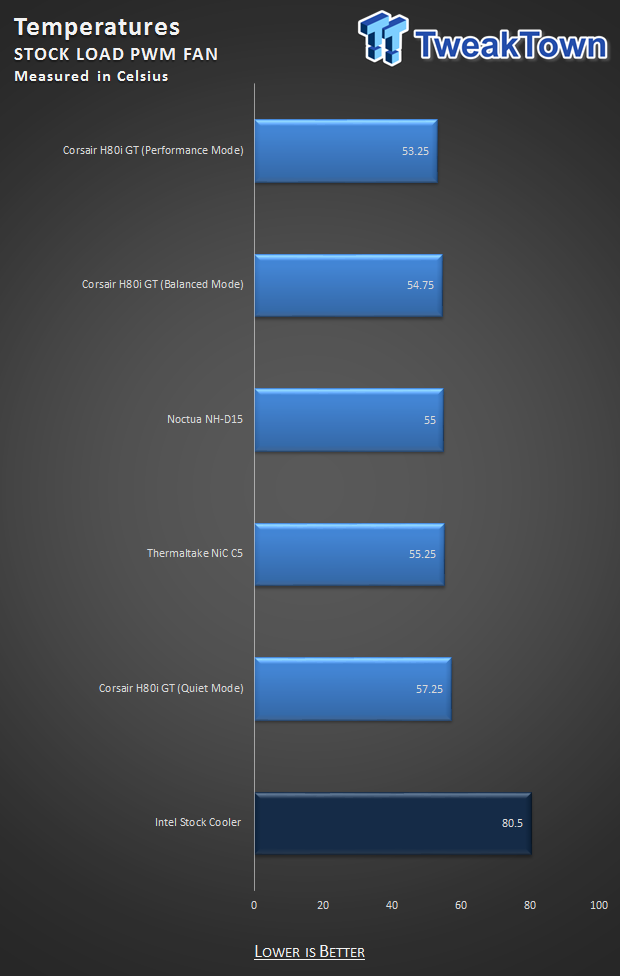
This chart shows the results obtained with our "Stock" testing methodology, and we were sure to add "PWM" into the header as well, to make it obvious what we are showing. Along with the stock Intel LGA1105 cooler, we went back to the Thermaltake NiC C5 for our single tower cooler of choice. The reasoning behind this is that it was one of the most affordable, no interference single tower coolers on the market, and it also affords excellent performance as it ships with two fans on it.
We then used the Noctua NH-D15 as it is one of the best, and most well-known of the dual tower coolers on the market. We also chose this cooler for its limited sound levels. The last cooler we wanted to bring forward from the older options is the Corsair H80i GT. This is to show what a single 120mm radiator based AIO is capable of, and it also allowed us to showcase how we will be using the software, when available, for control of such coolers.
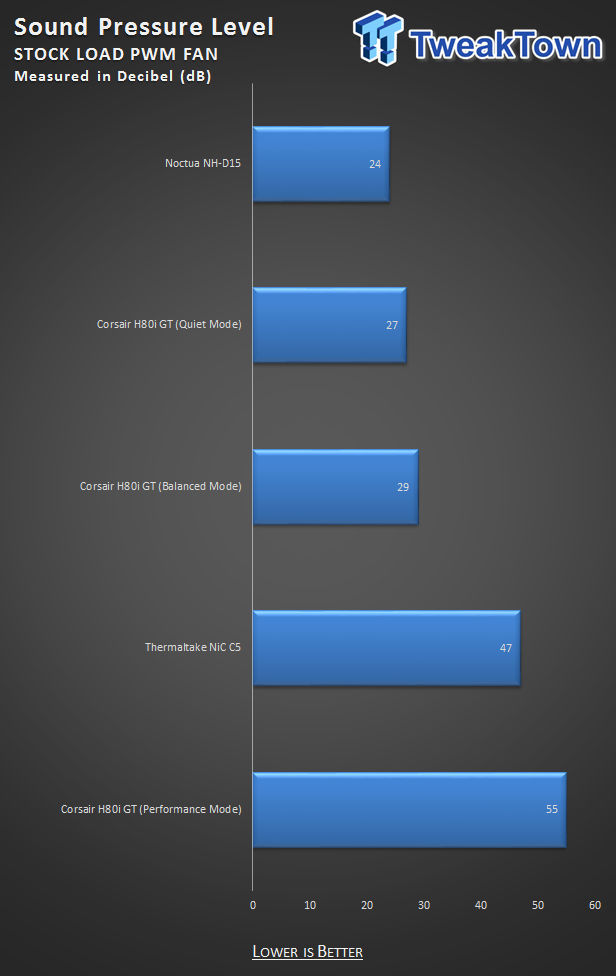
We explained when it is that we grab the audio results from our stress test, which usually happens fifteen to twenty minutes into the stress test. At that point, making sure to be a foot away from the back of the cooler, or away from the second fan if applicable, we obtain the results you can see in this chart. For reference, the Noctua fans were spinning at 732 RPM; the Corsair fans were spinning at 989 RPM in Quiet Mode, 1187 RPM in Balanced Mode, and 2200 RPM in Performance Mode. As for the Thermaltake cooler, its fans topped out at 1624 RPM, and the fan on the Intel stock cooler was turning at 1741 RPM.
Thermal Paste and Overclocked Testing
Thermal Paste
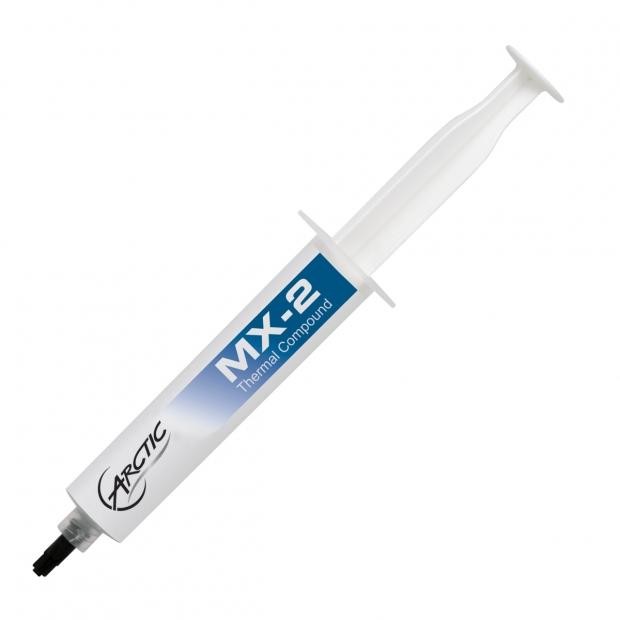
As far as thermal paste is concerned, no matter the paste that may ship with the cooler, we default to using ARCTIC MX-2. We choose this paste for a few reasons. First, it is affordable and widely available across all markets. Secondly, it is easy to clean from the coolers and more importantly, the IHS between tests. Lastly, we like the way this paste spreads across the IHS, where many other pastes can be thicker or require a specialized application method.
We apply the paste in the same fashion for every cooler. After a good cleaning of the processor, we apply a dob to the center of the IHS, about half the size of a pea. We also apply four more dobs, nearer the corners of the IHS, slightly smaller than the one placed in the center. In our many years of testing, we do not get air trapped between the cooler and the IHS, and coverage is excellent. In fact, when we remove the cooler, the entire CPU IHS is covered, and we get just the slightest ridge of paste around the IHS where it has squeezed out any excess.
Overclocked Testing
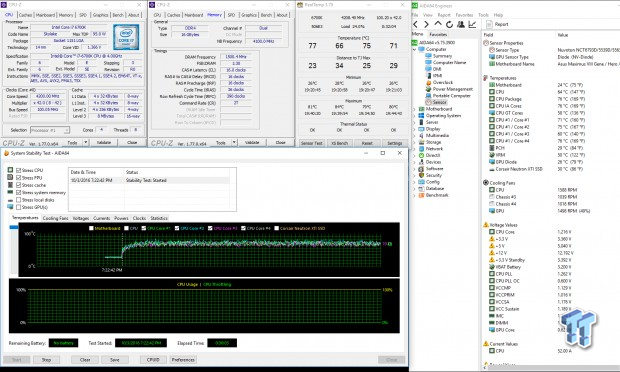
To obtain our overclocked settings, we made sure that this 6700K will pass 24 hours of AIDA64 and PRIME95 testing, which it does, and due to the increased temperatures with OCCT, we did not bother checking that test. At this point, we are still using the PWM control for the fans, but we have gone ahead and overclocked the processor. To get this chip stable at 4.6GHz as you see in the CPU-Z window, it requires us to set 1.325V to the CPU in BIOS, but in Windows, the reading is 1.335V at maximum. At this point, we left the XMP profile active, and while verifying all other voltages were in check, we did leave them on AUTO. For those who are curious, the System Agent is set to 1.168V, and the VCCIO is configured to 1.168V by default AUTO settings. Using AIDA64 voltage readings as well as the Monitor page in the BIOS, our ASUS Maximus VIII Hero does over volt slightly in all facets.
To obtain thermal results, we are running two tests this time, but both are running for 30 minutes of stress, and again the core temperatures are averaged to get the result we display in the charts. Audio results are captured in the same manner as they are for our Stock testing in our Overclocked PWM charts, but we will also offer another chart pair. For the last chart in both thermal and audio testing, we take one more trip to the BIOS, and in the Q-Fan controls, we change the profile to DC and set 100 percent to the headers. This way we can also see the maximum cooling potential of each submission as well.
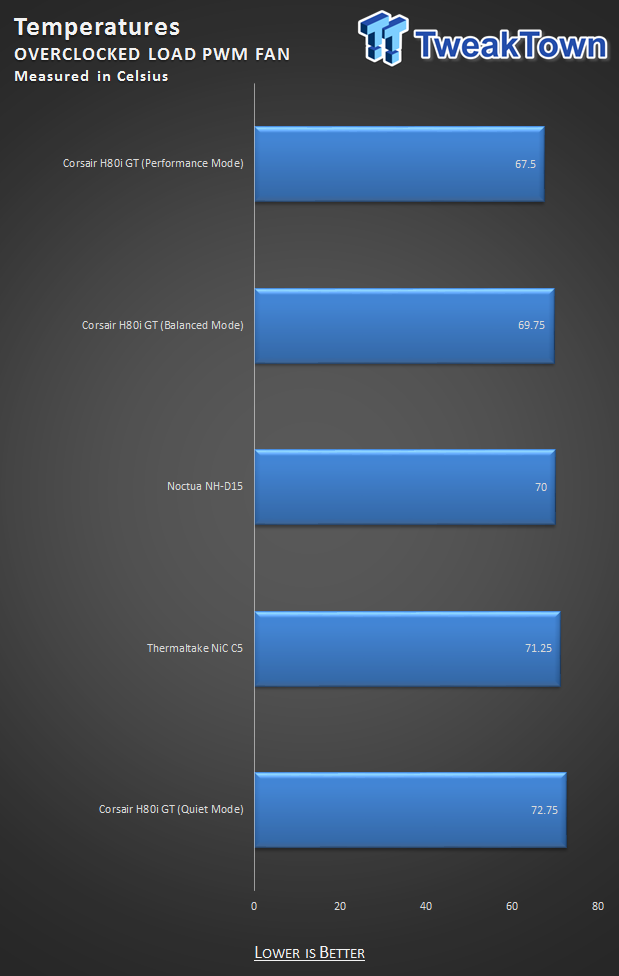
What you see here is the first of two results we obtained. Looking at the header of this chart, we have added "PWM" after the Overclocked Load heading, so that it is easy to see what exactly we were doing in this chart. This allows the coolers to do what they do, in a real-world scenario; as most consumers of aftermarket CPU coolers will be running their cooler in this fashion.
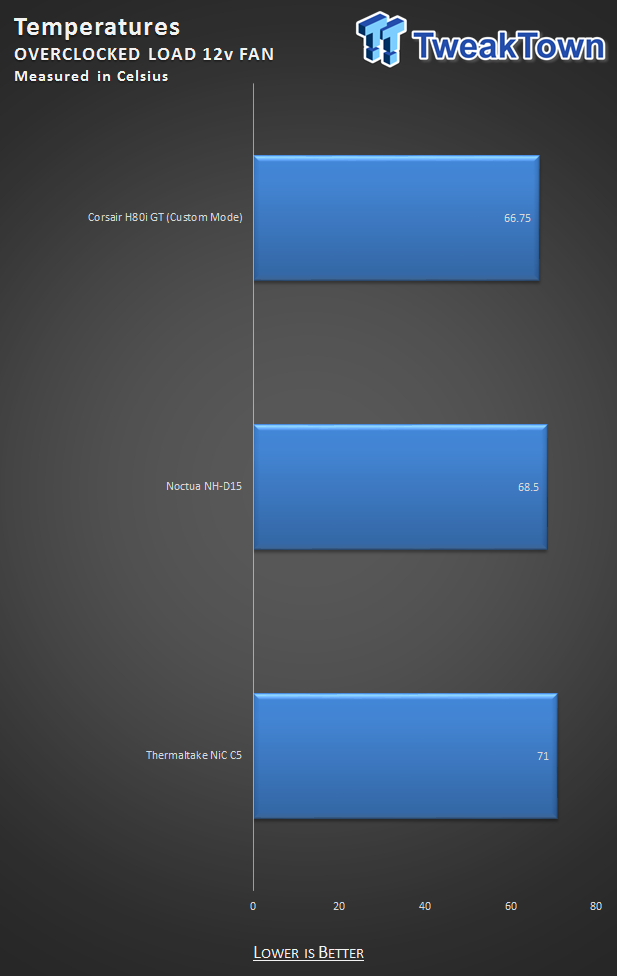
Our second thermal chart for overclocked testing is what we offer with this chart. We made sure to add "12V" to the header, which means we are now running the fan or fans at full speed. While results on the last chart were a bit closer to each other, we hope the group widens in this chart, as it depends on both the fan and the cooler design, not the way in which the fans are programmed with their PWM fan curves.
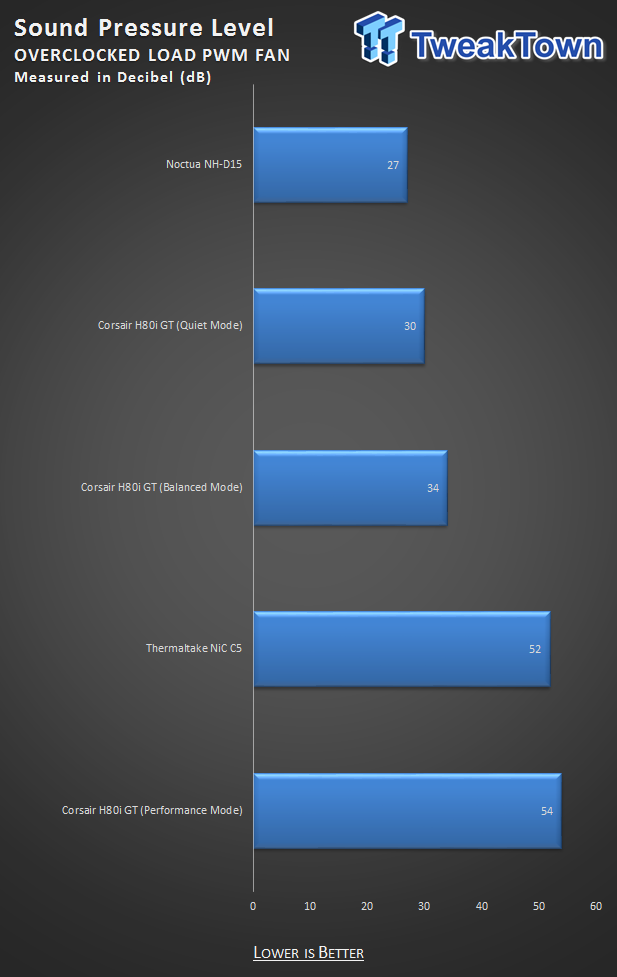
When it comes to noise levels when overclocked, we again will deliver two charts. This one is the "PWM" version in which we allow the fans curve to control the destiny of each cooler. For reference, the NH-D15 fans are spinning at 919 RPM, the NiC C5 fans are spinning at 1875 RPM, and the H80i GT fans are spinning at 1300 RPM in Quiet Mode, 1515 RPM in Balanced Mode, and 2246 RPM in Performance Mode
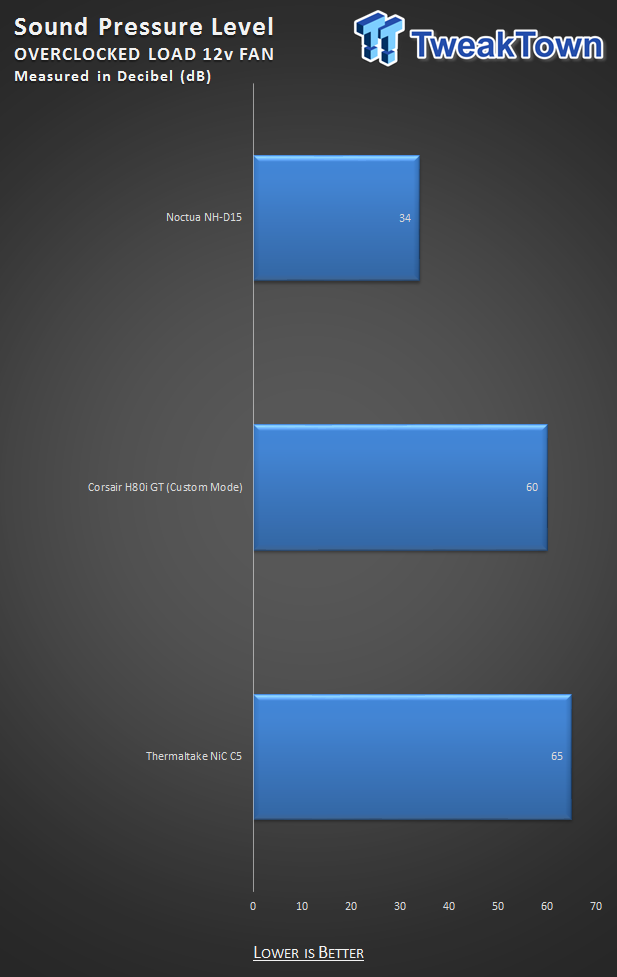
In this "Overclocked 12V" chart, we are gauging the utmost in noise levels each cooler can produce. These results were obtained in the same manner in which we obtained all other sound measurements, but at this time, the Noctua fans were spinning at 1525 RPM, the Corsair in Custom Mode where we could set 100 percent to the fans were spinning at 2400RPM, and the Thermaltake fans were turning at 2073 RPM.
Final thoughts
We hope that we have covered every facet of how we test, and presented it in an easy to follow way, in which you could try to replicate our results. Of course, not every i7 6700K will run this fast, and if you are lucky enough to get 4.6GHz stable, it may not take the same voltage as we need. What we do get out of this 6700K is a solid, stable, near foolproof way of making sure every CPU cooler that hits the lab for testing gets a fair and equal shake when it comes to testing.
While it is near impossible to set up a thermal chamber and a sound proof audio cabinet, we feel that controlling everything we can, down to ambient temperatures and humidity levels, all coolers will have to play in the same environment. Also, changing a few things in our methodology should make our results comparable to the rest of the world, as many users will not go messing around with changing fan voltages, unless they force them to 12V constant power, and even here we have you covered.
We hope you can understand that sometimes we need to leave the past in the past, and move on to bigger and brighter ideas. This is why we did not look to add a massive number of older coolers to our charts. We feel our older system results are still relevant and are an easy place to reference older designs, and how well they performed against each other. We chose what we did for our chart carryovers, as they were well-known designs which everyone loved, or they were class leading in their perspective segments, and in this instance, both reasons apply to what we brought forward. This will give us a great benchmark for all styles of coolers except for the SFF/Low-Profile designs.
The reason we did not add any of them to the list is that very few can pass the overclocked testing, let alone show well against what these much larger coolers can accomplish. With a stockpile of coolers building up while we sourced and fine-tuned this new system, it won't be long until these charts fill up, and give our readers a wider perspective of what today's CPU coolers offer.
We thank you for taking the time to read this article, as it delivers our mindset, and just how we go about obtaining our results which we publish to you; the readers. If you feel we have left anything out of this article, or there is something you cannot wrap your head around in our choice of software or the way we test, feel free to comment below. We will take users opinions into account, and have no issue divulging information or screen captured images in which you can see for yourself where we get our results.
We are as transparent as possible with our reviews at TweakTown and hope this little article help you understand that we are here for you. We are not afraid to change our ways to provide you with the best way of delivering all the information our readers need, especially when it comes to your next CPU cooler purchase.


 United
States: Find other tech and computer products like this
over at
  United
Kingdom: Find other tech and computer products like this
over at
  Australia:
Find other tech and computer products like this over at
  Canada:
Find other tech and computer products like this over at
  Deutschland:
Finde andere Technik- und Computerprodukte wie dieses auf